Installation and configuration guide
- Basic concepts and requirements
- WHMCS setup(install/update)
- Mikrotik preparation and configuration
- Add server (router Mikrotik) in WHMCS
- Product Configuration
Basic concepts and requirements
Business-VPN module WHMCS
Order now | Download | FAQ
Requirements for the successful operation of the module
- Minimal WHMCS version 8+
- Mikrotik/CHR router OS 7+
- Public network for the needs of NAT implementation
An IP address class must be reserved for the solution. Each end customer receives one IP address after activating the service.
Please refer to the basic mode of operation of the module to better understand its operation and functionality.
The basic logic of the module
During the creation of a service for the end client, the module does the following actions:
- Automatically selects a free public IP address from the server available in the settings. When choosing an available IP address, services in the terminated state are not taken into account, i.e. previously used IP. (Previously used IP addresses for services that have not been extended and have expired will be used to activate the service for the new client.)
- The module configures the selected public IP address on the network interface of the router.
- The module creates firewall rules such as:
- NAT rules for accessing the Internet private network
- Allowing firewall rules for communication between IP's of a private network
- Block rules that block traffic between all other private networks.
Mikrotik management schema
- When a user creates a VPN account, the module creates a VPN user Mikrotik on the router, adds queues with a bandwidth limit.
- When a user deletes a VPN Account, the module deletes the VPN user on Mikrotik and deletes the bandwidth-limiting queue.
- When a user creates port forwarding, the module creates rules on the Mikrotik router in the firewall that implement port forwarding from a public address to a private one.
- During service suspension, the module disables all VPN client accounts and resets all active connections.
- During service unsuspension, the module enables all VPN client accounts.
- During service termination, the module deletes all VPN client accounts, deletes all firewall rules associated with the service, and also deletes the public IP from the router's network interface.
WHMCS setup(install/update)
Business-VPN module WHMCS
Order now | Download | FAQ
Module is coded ionCube v13
Supported php version:
- php 7.4 WHMCS 8.11.0 -
- php 8.1 WHMCS 8.11.0 +
- php 8.2 WHMCS 8.11.0 +
To install and update a module, you must perform one and the same action.
1. Download the latest version of the module.
PHP 8.2
wget http://download.puqcloud.com/WHMCS/servers/PUQ_WHMCS-Business-VPN/php82/PUQ_WHMCS-Business-VPN-latest.zipPHP 8.1
wget http://download.puqcloud.com/WHMCS/servers/PUQ_WHMCS-Business-VPN/php81/PUQ_WHMCS-Business-VPN-latest.zipPHP 7.4
wget http://download.puqcloud.com/WHMCS/servers/PUQ_WHMCS-Business-VPN/php74/PUQ_WHMCS-Business-VPN-latest.zipAll versions are available via link: https://download.puqcloud.com/WHMCS/servers/PUQ_WHMCS-Business-VPN/
2. Unzip the archive with the module.
unzip PUQ_WHMCS-Business-VPN-latest.zip3. Copy and Replace "puqBusinessVPN" from "PUQ_WHMCS-Business-VPN" to "WHMCS_WEB_DIR/modules/servers/"
Mikrotik preparation and configuration
Business-VPN module WHMCS
Order now | Download | FAQ
Note: Enter the following commands one by one and wait for the command to complete.
I. Check RouterOS version
Make sure that the version of RouterOS is 7+
system/package/print II. Enabling HTTPS Create your own root CA on your router
/certificate
add name=LocalCA common-name=LocalCA key-usage=key-cert-sign,crl-sign
III. Sign the newly created CA certificate
/certificate
sign LocalCA
IV. Create a new certificate for Webfig (non-root certificate)
Note: as common-name=XXX.XXX.XXX.XXX You enter public IP adddress of the router.
/certificate
add name=Webfig common-name=XXX.XXX.XXX.XXX
V. Sign the newly created certificate for Webfig
/certificate
sign Webfig ca=LocalCA
VI. Enable SSL (www-ssl) and specify to use the newly created certificate for Webfig
/ip service
set www-ssl certificate=Webfig disabled=no
VII. Enable api-ssl and specify to use the newly created certificate for Webfig
/ip service
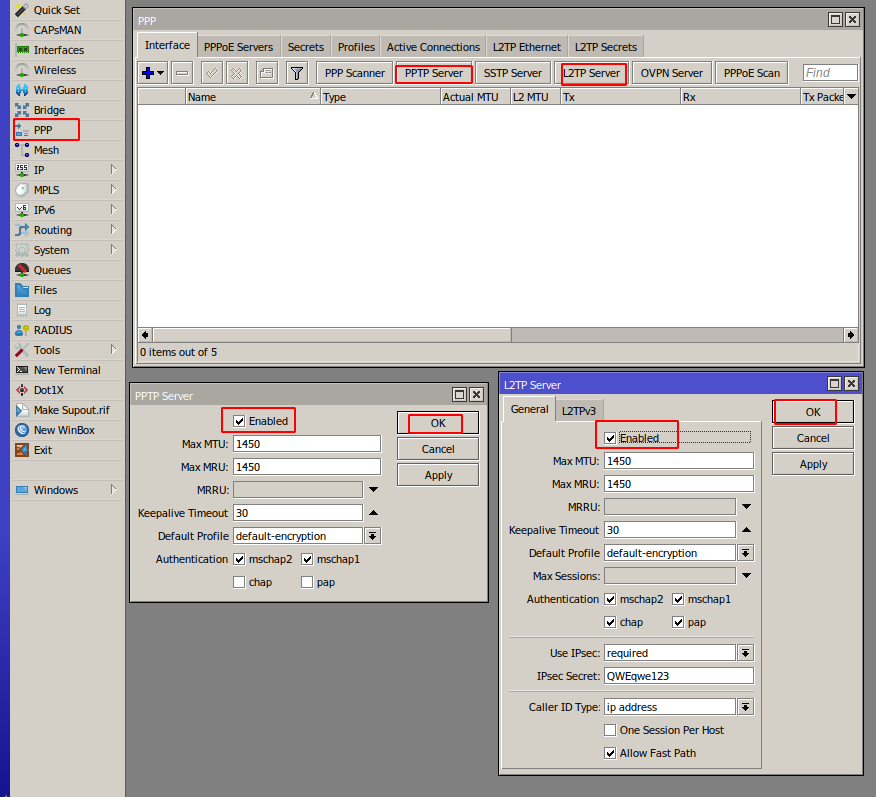
set api-ssl certificate=Webfig disabled=no VIII. Enable VPN server
To enable the VPN server
Add server (router Mikrotik) in WHMCS
Business-VPN module WHMCS
Order now | Download | FAQ
Add a new server to the system WHMCS.
Login to Your WHMCS panel and create new server in WHMCS (System Settings->Products/Services->Servers)

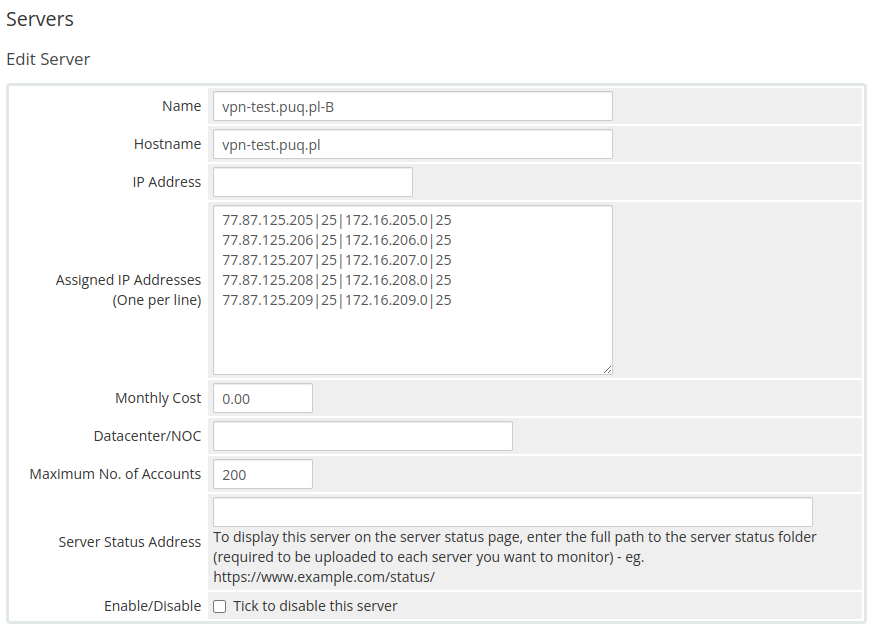
System Settings->Servers->Add New Server- Enter the correct Name and Hostname
Name is just for Your convenience and You can put there anything You like ie: Mygreat mikrotik routr
You can choose whatever hostname You want. Valid entries look similar to: vpn.mydomain.com, ourgreatvpn.mydomain.net. You can also dedicate whole domain ie: myVPNservices.com if You like. The important thing is to resolve the choosen IP address of the Mikrotik router in DNS server for Your domain.
- In the "Assigned IP Addresses field", enter a list of IP addresses that will be issued to users.
The format in which you need to enter a list of public IP addresses and private subnets is as follows.
To define the available pool of IP addresses, for each available IP number you should enter another line where the data is separated by the "|" separator. Each line with an IP number definition has the following structure:
<PUBLIC_IP>|<MASK_OF_ PUBLIC_NETWORK>|<PRIVATE_NETWORK>|<MASK_OF_PRIVATE_NETWORK>
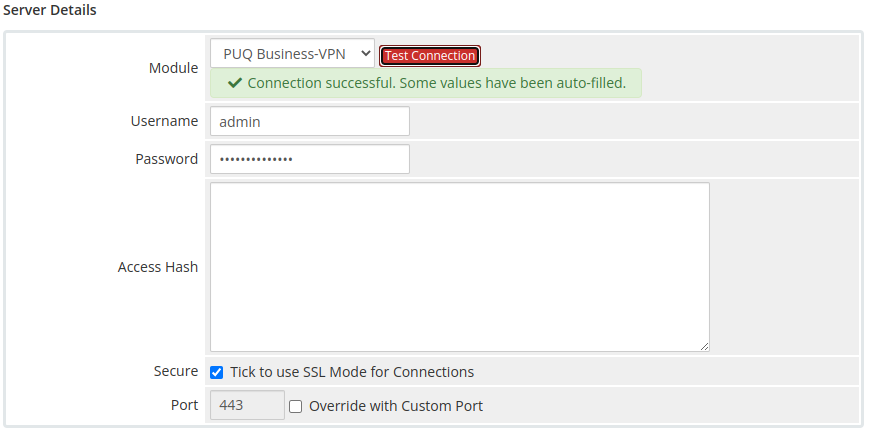
Enter the correct data in the username and password field
- In the Server Details section, select the "PUQ Business-VPN" module and enter the correct username and password for the Mikrotik.
- To check, click the "Test connection" button
Product Configuration
Business-VPN module WHMCS
Order now | Download | FAQ
Add new product to WHMCS
System Settings->Products/Services->Create a New ProductIn the Module settings section, select the "PUQ Business-VPN" module
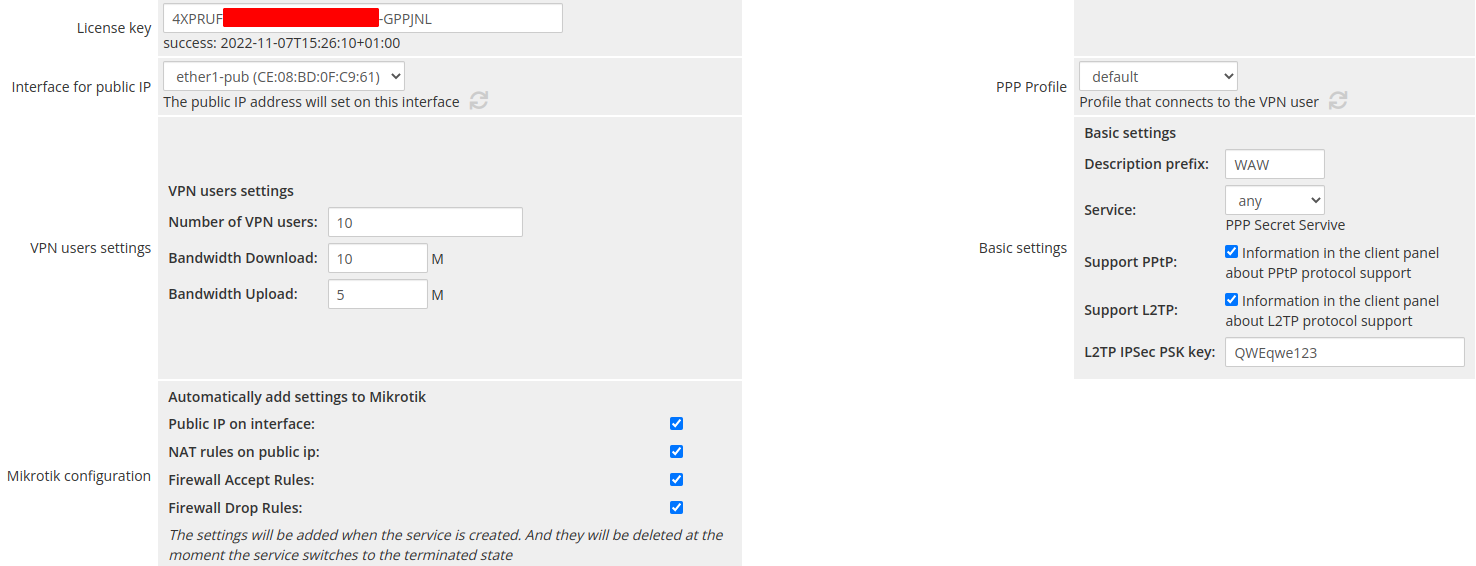
- License key: A pre-purchased license key for the "PUQ Business-VPN" module. For the module to work correctly, the key must be active
- Interface for public IP: Interface on the router on which the public IP address will be set
- PPP Profile: PPP secret profile on Mikrotik router
VPN users settings
- Number of VPN users: The number of VPN accounts that a client can create
- Bandwidth Download: Download bandwidth that will apply per VPN connection
- Bandwidth Upload: Upload bandwidth that will apply per VPN connection
Mikrotik configuration
- Public IP on interface: If checked, the module will automatically set the IP address on the interface in the Mikrotik router
- NAT rules on public ip: If checked, then the module will automatically make firewall rules that will make NAT, for Internet access of all connected VPN accounts of the client in the Mikrotik router
- Firewall Accept Rules: If checked, then the module automatically creates firewall rules that will allow traffic between VPN client accounts
- Firewall Drop Rules: If checked, then the module automatically creates firewall rules that will drop traffic between VPN client accounts and other private networks on the router
Basic settings
- Description prefix: The prefix that will appear in all descriptions that will be on the Mikrotik router
- Service: A service that will be available to a VPN user on a Mikrotik router
- Support PPtP/Support L2TP: If checked, it will be reflected in the client zone
- L2TP IPSec PSK key: it will be reflected in the client zone