Docker modules
This section contains instructions related to Docker modules, including setup, configuration, and integration with various services.
- Technical Disclaimer & Limitation of Liability
- Installing Docker for PUQcloud modules
- Client Container Concept and Structure
- Why Does a Timeout Error Occur on the First SERVICE in WHMCS/WISECP?
Technical Disclaimer & Limitation of Liability
By using any PUQ Docker modules, you acknowledge and agree that you are solely responsible for the deployment, administration, maintenance, and security of your infrastructure. PUQcloud assumes no liability for any issues arising from the use, misconfiguration, or failure of any PUQ Docker module.
Required Knowledge & Responsibilities
To use PUQ Docker modules, you must have the necessary expertise in system administration, troubleshooting, and configuration, including but not limited to:
-
Linux Server Administration
- You must have experience managing servers running Linux-based operating systems.
-
Web Protocols & Proxy Management
- Understanding web proxies, specifically Nginx proxy.
- Knowledge of SSL certificate management and HTTP/HTTPS protocols.
-
Networking & Security
- A solid understanding of networking protocols: TCP, UDP, DNS, HTTPS, and any others relevant to your infrastructure.
- You are responsible for implementing firewall rules, DDoS protection, access control, and security hardening for all components of your system.
-
Containerization & Docker Management
- Proficiency in Docker, including networking, container communication, and orchestration.
- You are responsible for securing your containers, including protection from unauthorized access, vulnerabilities, and data leaks.
-
Bash Scripting & Automation
- Experience with Bash scripting and Linux automation is required.
- You must know how to create, mount, and unmount virtual disks.
-
Server & Infrastructure Management
- You are fully responsible for managing your Docker server, including:
- Performing regular backups and disaster recovery planning.
- Monitoring server load and performance.
- Troubleshooting and resolving any infrastructure-related issues.
- You must develop your own automation scripts for migrations, system recovery, and other administrative tasks.
- You are fully responsible for managing your Docker server, including:
-
Software Maintenance & Updates
- You are responsible for administering, restoring, and updating software running within your Docker containers.
- You must understand the responsibility boundaries between you, PUQcloud, and third-party container providers.
- If an update to our module or a third-party software breaks your configuration, you are responsible for troubleshooting and resolving the issue.
Scope of PUQcloud's Responsibility
PUQcloud only provides:
- A billing system module for WHMCS or WISECP, with a pre-configured backend automation set up in n8n.
- Pre-configured template files for certain containers.
PUQcloud does NOT provide:
- Any actual container images.
- Any third-party software related to containers.
- Any SaaS services—our solution only enables you to create SaaS services using third-party containerized applications from public repositories.
- Technical support for infrastructure, container management, or software troubleshooting.
n8n Server Requirement
- You must have a properly configured n8n server to import and manage workflows for Docker and container automation.
- You must understand how n8n works, and be able to configure and maintain workflows independently.
Limitation of Liability
-
No Guarantees or Warranties
- PUQcloud provides its software "as is", with no guarantees of functionality, security, compatibility, or performance in your specific infrastructure.
- PUQcloud is not responsible for any data loss, downtime, financial loss, business interruption, or security breaches resulting from the use or misconfiguration of PUQ Docker modules.
- We do not guarantee that updates to our software, third-party dependencies, or operating systems will not cause disruptions or require manual intervention.
-
No Support for Customization or Debugging
- PUQcloud does not provide free technical support for integration, troubleshooting, or customization.
- We are not responsible for any incompatibility or failure caused by modifications made to our modules, configurations, or workflows.
-
Full Responsibility for Your Infrastructure
- You are responsible for maintaining system security, backups, data integrity, and service uptime.
- You assume all risks related to:
- Misconfiguration of services.
- Software bugs or vulnerabilities.
- Performance issues or failures.
- Security breaches or unauthorized access.
-
Indemnification
- By using PUQ Docker modules, you agree to fully indemnify PUQcloud and its affiliates against any claims, damages, or liabilities arising from:
- Your use or misuse of the software.
- Any data loss, financial loss, or business impact.
- Any third-party legal actions resulting from your service.
- By using PUQ Docker modules, you agree to fully indemnify PUQcloud and its affiliates against any claims, damages, or liabilities arising from:
Final Acknowledgment
By using PUQ Docker modules, you confirm that:
- You understand and accept full responsibility for the operation, maintenance, and security of your infrastructure.
- You have the necessary technical knowledge to manage Linux, networking, Docker, and automation.
- You will not hold PUQcloud liable for any technical failures, security breaches, data loss, or business disruptions.
Installing Docker for PUQcloud modules
Installing Docker on Debian 12
The WHMCS Docker n8n module requires a Debian 12 server with Docker installed to function properly. This guide provides step-by-step instructions for setting up Docker and configuring the necessary environment.
📌 Prerequisites
✔️ A physical or virtual machine running Debian 12
✔️ A public IP address for the server
✔️ A domain for web applications managed by the module
✔️ DNS Configuration: Create an A record pointing all subdomains to the server's IP:
*.your_domain A server_ip🚀 Installation Steps
1️⃣ Install Required Utilities
Before installing Docker, update the system and install essential tools:
sudo apt-get update
sudo apt-get install sudo sqlite3 apache2-utils jq -y
2️⃣ Configure Sudo Access
Allow passwordless sudo access for the user connecting to the Docker server:
Edit the sudoers file:
sudo nano /etc/sudoersAdd the following line (replace your_username with your actual username):
your_username ALL=(ALL:ALL) NOPASSWD: ALL3️⃣ Install Docker
# Update package index
sudo apt update

# Install dependencies
sudo apt install apt-transport-https ca-certificates curl software-properties-common

# Add Docker’s official GPG key
curl -fsSL https://download.docker.com/linux/debian/gpg | sudo gpg --dearmor -o /usr/share/keyrings/docker-archive-keyring.gpg

# Add Docker repository
echo "deb [arch=amd64 signed-by=/usr/share/keyrings/docker-archive-keyring.gpg] https://download.docker.com/linux/debian $(lsb_release -cs) stable" | sudo tee /etc/apt/sources.list.d/docker.list > /dev/null

# Update package list
sudo apt update

# Install Docker
sudo apt install docker-ce

# Verify Docker status
sudo systemctl status docker

# Install Docker compose
sudo apt install docker-compose-plugin
4️⃣ Deploy Required Containers
Create a Docker Compose file for nginx-proxy and Let's Encrypt companion:
sudo mkdir -p /opt/docker/nginx-proxy
sudo mkdir -p /opt/docker/nginx-proxy/certs
sudo mkdir -p /opt/docker/nginx-proxy/nginx
sudo mkdir -p /opt/docker/nginx-proxy/html
sudo mkdir -p /opt/docker/nginx-proxy/vhost.d
cd /opt/docker/nginx-proxy
nano docker-compose.yml
Paste the following content:
version: "3"

services:
  nginx-proxy:
    image: jwilder/nginx-proxy
    container_name: nginx-proxy
    restart: always
    ports:
      - "80:80"
      - "443:443"
    volumes:
      - /opt/docker/nginx-proxy/certs:/etc/nginx/certs:ro
      - /opt/docker/nginx-proxy/nginx/vhost.d:/etc/nginx/vhost.d
      - /opt/docker/nginx-proxy/nginx/html:/usr/share/nginx/html
      - /var/run/docker.sock:/tmp/docker.sock:ro
    networks:
      - web

  letsencrypt:
    image: jrcs/letsencrypt-nginx-proxy-companion
    restart: always
    container_name: letsencrypt-nginx-proxy-companion
    volumes:
      - /opt/docker/nginx-proxy/certs:/etc/nginx/certs:rw
      - /var/run/docker.sock:/var/run/docker.sock:ro
    volumes_from:
      - nginx-proxy
    networks:
      - web

networks:
  web:
    driver: bridge
Save and exit (CTRL + X, then Y, then ENTER).
Run the containers:
docker-compose up -dThis setup provides:
✔️ nginx-proxy – Automatic HTTP/HTTPS proxy for container web interfaces
✔️ Let's Encrypt Companion – Automatic SSL certificate generation for subdomains
✅ Final Checks
- Confirm Docker is running:
docker ps - Verify nginx-proxy logs:
docker logs nginx-proxy - Ensure Let's Encrypt certificates are being generated correctly:
docker logs letsencrypt-nginx-proxy-companion
Client Container Concept and Structure
Container Deployment
In our deployment scenarios, we use Docker Compose for managing client containers.
Important Directories
The nginx-proxy directory must remain unchanged. Its path is:/opt/docker/nginx-proxy
This directory contains essential components:
docker-compose.yml– Docker Compose configurationcerts/– SSL certificates for domainsnginx/– Nginx configuration files mounted into the containerhtml/– Web root directoryvhost.d/– Virtual host configurations
List of required directories:
/opt/docker/nginx-proxy
/opt/docker/nginx-proxy/certs
/opt/docker/nginx-proxy/nginx
/opt/docker/nginx-proxy/html
/opt/docker/nginx-proxy/vhost.d
Client Container Data Directories
Each client container has its own data directory. The base path for storing user-related Docker files and disk images can be set individually for each n8n workflow involved in service management.
- The clients_dir option defines the storage directory for user data.
- Default path:
/opt/docker/clients
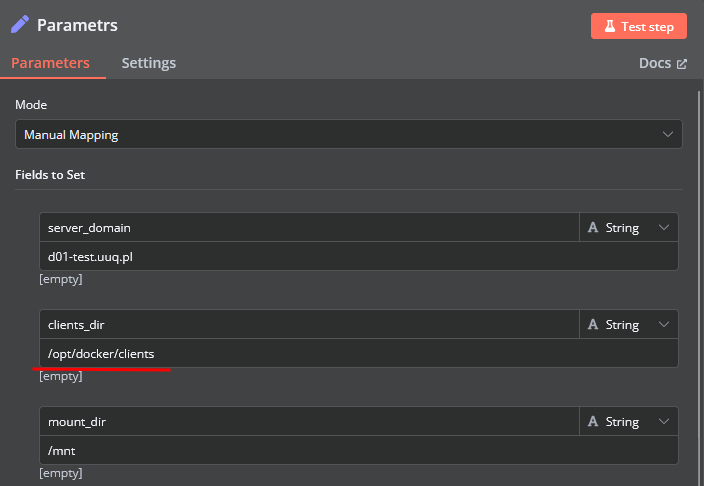
Within this directory, subdirectories are created based on the primary domain name of the service. The domain acts as a reference point for the entire service.
Each service directory contains:
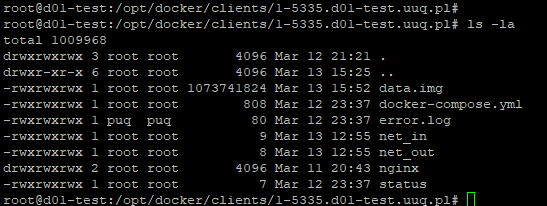
docker-compose.yml– Service-specific Docker Compose configurationstatus– A file storing the container status, which reflects the billing system state (e.g., active, suspended, etc.)nginx/– Nginx proxy configuration for the domain and containerdata.img– Disk image for container data
Before a container starts, the data.img file is mounted into the system using n8n automation. The necessary entries are added to /etc/fstab, ensuring that containers automatically restart after a server reboot.
Why Does a Timeout Error Occur on the First SERVICE in WHMCS/WISECP?
Instructions for Preparing Docker Images Before First Service Deployment
Background
When ordering a service for the first time, Docker needs to download all the necessary containers for the service to run. This process may cause timeout issues with WHMCS or WISECP modules.
Recommended Action
To avoid potential timeout problems, we recommend downloading all required container images before the first service deployment through the WHMCS or WISECP billing systems.
Steps to Follow:
-
Identify all container images needed for the service.
-
Open a terminal or command prompt on the server where Docker is installed.
-
For each required image, run the following command:
docker pull [image_name]:[tag] -
Verify that all images have been successfully downloaded by running:
docker images -
Once all images are downloaded, proceed with the service deployment through WHMCS or WISECP.
Benefits
-
Reduces the risk of timeout errors during service deployment
-
Ensures a smoother first-time setup experience
-
Allows for faster service initialization
By following these instructions, you can preemptively address potential issues and ensure a more reliable service deployment process.