All versions are available via link: [http://download.puqcloud.com/WHMCS/servers/PUQ\_WHMCS-HestiaCP/](http://download.puqcloud.com/WHMCS/servers/PUQ_WHMCS-HestiaCP/)
##### 2. Unzip the archive with the module ``` unzip PUQ_WHMCS-HestiaCP-latest.zip ``` ##### 3. Copy "puqHestiaCP" to "WHMCS\_WEB\_DIR/modules/servers/" ##### 4. Create new server HestiaCP in WHMCS (System Settings->Products/Services->Servers) ``` System Settings->Servers->Add New Server ``` - Enter the correct **Name** and **Hostname** and **IP Addres** [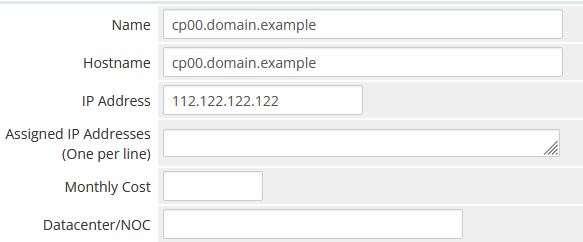](https://doc.puq.info/uploads/images/gallery/2022-10/image-1666496386936.png) - In the **Server Details** section, select the "**PUQ HestiaCP**" module and enter the correct **username** and **password** for the **HestoaCP** server. - To check, click the **"Test connection"** button [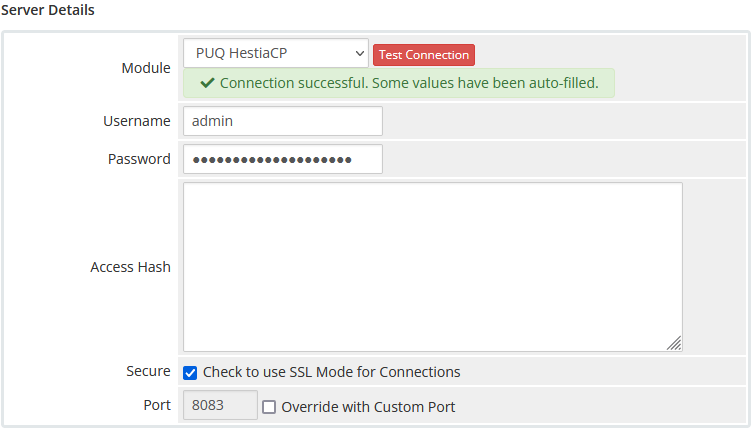](https://doc.puq.info/uploads/images/gallery/2022-10/image-1666496559639.png) ##### 5. Create a new Products/Services ``` System Settings->Products/Services->Create a New Product ``` In the **Module settings** section, select the **"PUQ HestiaCP"** module [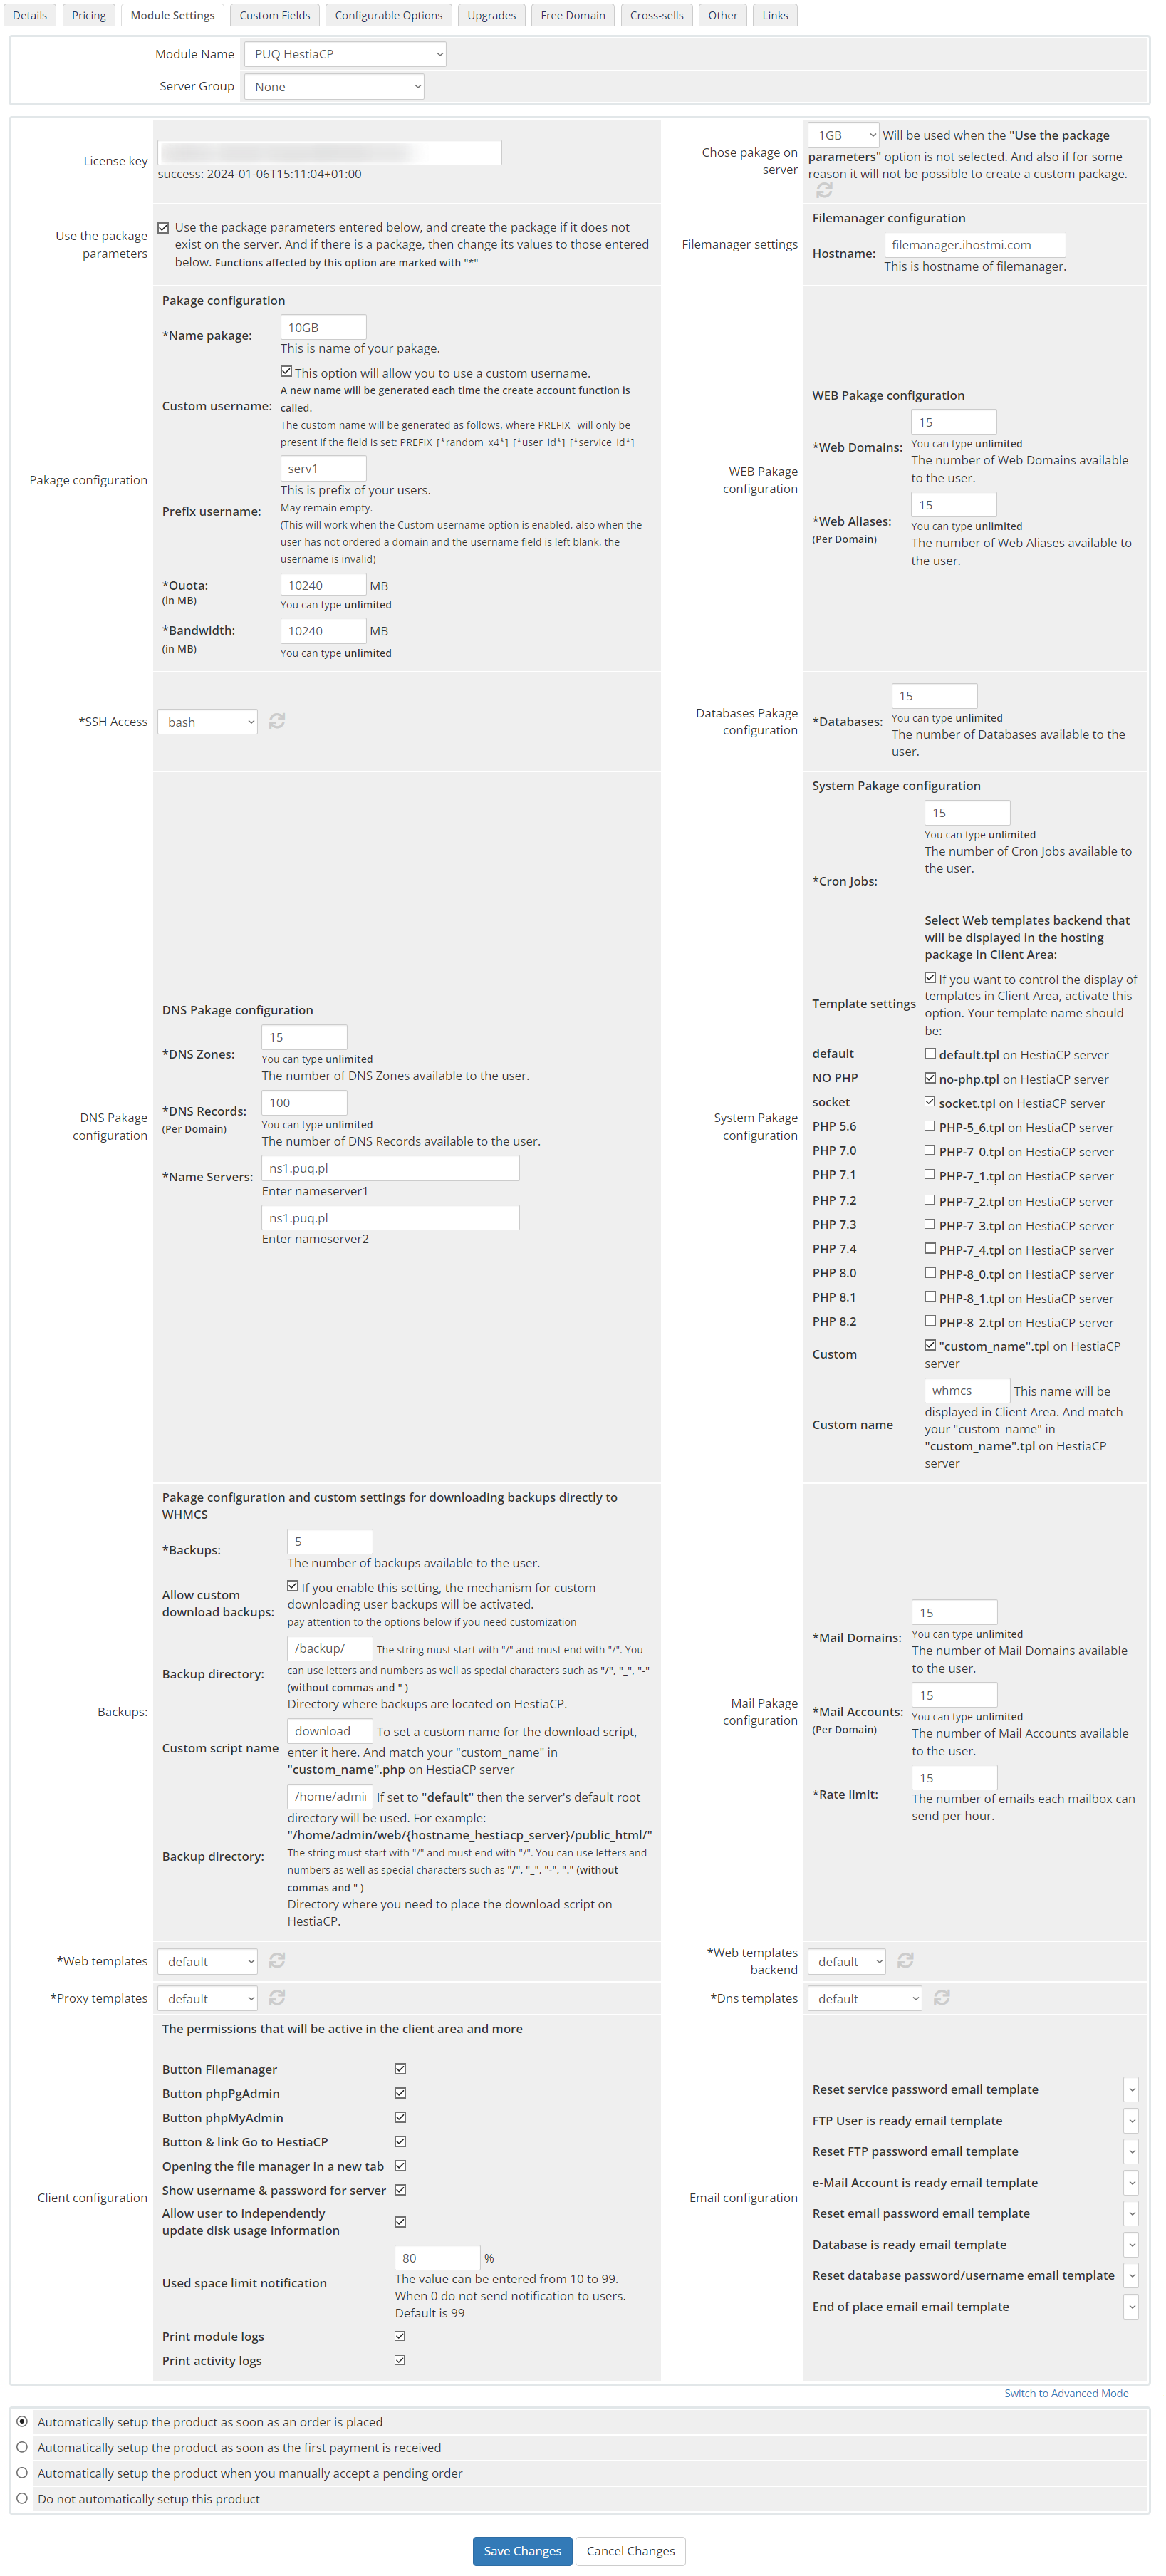](https://doc.puq.info/uploads/images/gallery/2023-04/image-1682430242943.png) - **License key:** A pre-purchased license key for the **"PUQ HestiaCP"** module. For the module to work correctly, the key must be active - **Chose pakage on server:** The list of packages is pulled from the server. Will be used when the **"Use the package parameters"** option is not selected. And also if for some reason it will not be possible to create a custom package.**Attention!** To deploy a custom package, you must set the interface language for the account administrator to English.
- **Use the package parameters:** The option allows you to make a choice of settings. Whether you want to use the packages already configured on the server or upload a customized custom package. Use the package parameters entered below, and create the package if it does not exist on the server. And if there is a package, then change its values to those entered below. - **Filemanager settings:** File manager settings - **Hostname:** The hostname of the file manager - **Pakage configuration:** Setting up a custom package - **Name pakage:** The package name entered will be used to configure the custom package if the option is selected **"Use the package parameters"** - **Custom username:** A new name will be generated each time the create account function is called. The custom name will be generated as follows, where PREFIX\_ will only be present if the field is set: *PREFIX\_\[\*random\_x4\*\]\_\[\*user\_id\*\]\_\[\*service\_id\*\]* - **Prefix username:** This is prefix of your users. May remain empty. This will work when the Custom username option is enabled, also when the user has not ordered a domain and the username field is left blank, the username is invalid - **Quota:** The disk quota that is given to the user in the system. Set in megabytes - **Bandwidth:** Bandwidth Limit that is given to the user in the system. Set in megabytes - **WEB Pakage configuration:** Setting up a web section for a custom package - **Web Domains:** The number of web domains allowed per user in the package - **Web Aliases:** The number of web aliases allowed for each domain in the package - **SSH Access:** Selecting a user access template for SSH Access. The list is loaded from the connected server - **Databases Pakage configuration:** Section for database configuration in a custom package - **Databases:** The number of databases allowed for the user - **DNS Pakage configuration:** DNS section configuration for custom package - **DNS Zones:** The number of DNS zones allowed in the package for the user - **DNS Records:** The number of DNS records in each domain zone allowed in the package for the user - **Name Servers:** Nameservers configuration in custom package - **System Pakage configuration:** System settings section, custom package - **Cron Jobs:** The number of cron jobs that are allowed for the user - **Template settings**: If you want to control the display of templates in Client Area, activate this option. Your template name should be **default.tpl**, **no-php.tpl**, **socket.tpl**, **PHP-5\_6.tpl, PHP-7\_0.tpl, PHP-7\_1.tpl, PHP-7\_2.tpl, PHP-7\_3.tpl, PHP-7\_4.tpl, PHP-8\_0.tpl, PHP-8\_1.tpl, PHP-8\_2.tpl, "custom\_name".tpl** this name will be displayed in Client Area. And match your "custom\_name" in "custom\_name".tpl on HestiaCP server. Each of the templates is activated separately.**Attention!** If the specified heatplate name is not found on the server, then the heatplate will not be available to Client Area. If the option is disabled, all templates available on the server will be available for selection by the client!
- **Backups:** Backup configuration in custom package - **Backups:** The number of backup copies that are allowed for the user - **Allow custom download backups:** this setting activates a mechanism that will allow you to download backups directly from your WHMCS account, using the "Download" buttonIn order for the user to be able to download a backup using this method, it is necessary to add the folder where the backups are stored to the open\_basedir in the configuration of your PHP template. By default, the folder where backups are stored is not included, and you are likely to receive an error: Got error 'PHP message: PHP Warning: finfo\_file(): open\_basedir restriction in effect. File(/backup/\*\*\*\*\*\*\*.tar) is not within the allowed path(s)... To give PHP access to the backup folder, you need to create a custom template by copying your preferred one, and then add the desired directory to the php\_admin\_value\[open\_basedir\] variable.
- **Backup directory: i**n this setting, you must write the absolute path of the folder in which backups are stored on the server - **Custom script name:** if you want to change the name of the script, you can enter the name here - **Path for deploying the download script:** path to deploy the download script to the server - **Mail Package configuration:** Mail settings section, custom package - **Mail Domains:** Number of email domains allowed for a user - **Mail Accounts:** Number of email accounts per email domain allowed for a user - **Rate limit:** Email limit per hour - **Web templates:** Choosing a template Web Template APACHE2. The list of templates is loaded from the server - **Web templates backend:** Choosing a Backend Template PHP-FPM. The list of templates is loaded from the server - **Proxy templates:** Choosing a Proxy Template NGINX. The list of templates is loaded from the server - **Dns templates:** Choosing a DNS Template BIND9. The list of templates is loaded from the server - **Client configuration:** The permissions that will be active in the client area and more - **Button Filemanager:** Show/hide file manager button in client area - **Button phpPgAdmin:** Show/hide phpPgAdmin button in client area - **Button phpMyAdmin:** Show/hide phpMyAdmin button in client area - **Button & link Go to HestiaCP:** Show/hide "Go to HestiaCP" button and full link in client area - **Opening the file manager in a new tab: **If this is enabled, the file manager will open in a new window - **Show username & password for server:** If this is enabled, the user will see information about his password and username - **Allow user to independently update disk usage information:** If this feature is enabled, it will allow the user to update the free space of the server upon request - **Used space limit notification:** Setting the limit, when exceeded, a notification will be sent to the user that the place is running out. The value can be entered from 10 to 99. When 0 do not send notification to users. Default is 99 - **Print module logs:** Enable or disable printing of module logs - **Print activity logs**: Enable or disable printing activity logs of module - **Email configuration:** Setting up email templates. Selection of pre-prepared templates to inform the user about some actions - **Reset service password email template:** When resetting the service password - **FTP User is ready email template:** When a new FTP user was created - **Reset FTP password email template:** When the FTP user password was changed - **e-Mail Account is ready email template:** When a new mail account was created - **Reset email password email template:** When the password is changed in the mail account - **Database is ready email template:** When the new database is created - **Reset database password/username email template:** When the database password or username has been changed - **End of place email email template:** When the space in the account is already running out ##### 5. WHMCS configurationAttention! Let's Encrypt certificate generation takes longer than any other request. In order to avoid the "Troubleshooting an Argument 1 passed ... must be an instance of PDOStatement Error" error, some configuration changes must be made.
Let's go to: ``` nano /etc/mysql/my.cnf ``` The changes are by 30 sec or more: ``` wait_timeout=30 long_query_time=30 ``` After changing the configuration, you need to restart the service: ``` service mysql restart ```