Client Area
- Home screen
- Charts Section Description
- Reinstall Section Description
- Snapshots Section Description
- Backups Section Description
- ISO Mount Section Description
- Reset Password Section Description
- Upgrade/Downgrade Options Section Description
Home screen
Hetzner Datacenter module WHMCS
Order now | Download | FAQ
The end customer, after logging in to his own customer panel, has access to the following information and options:
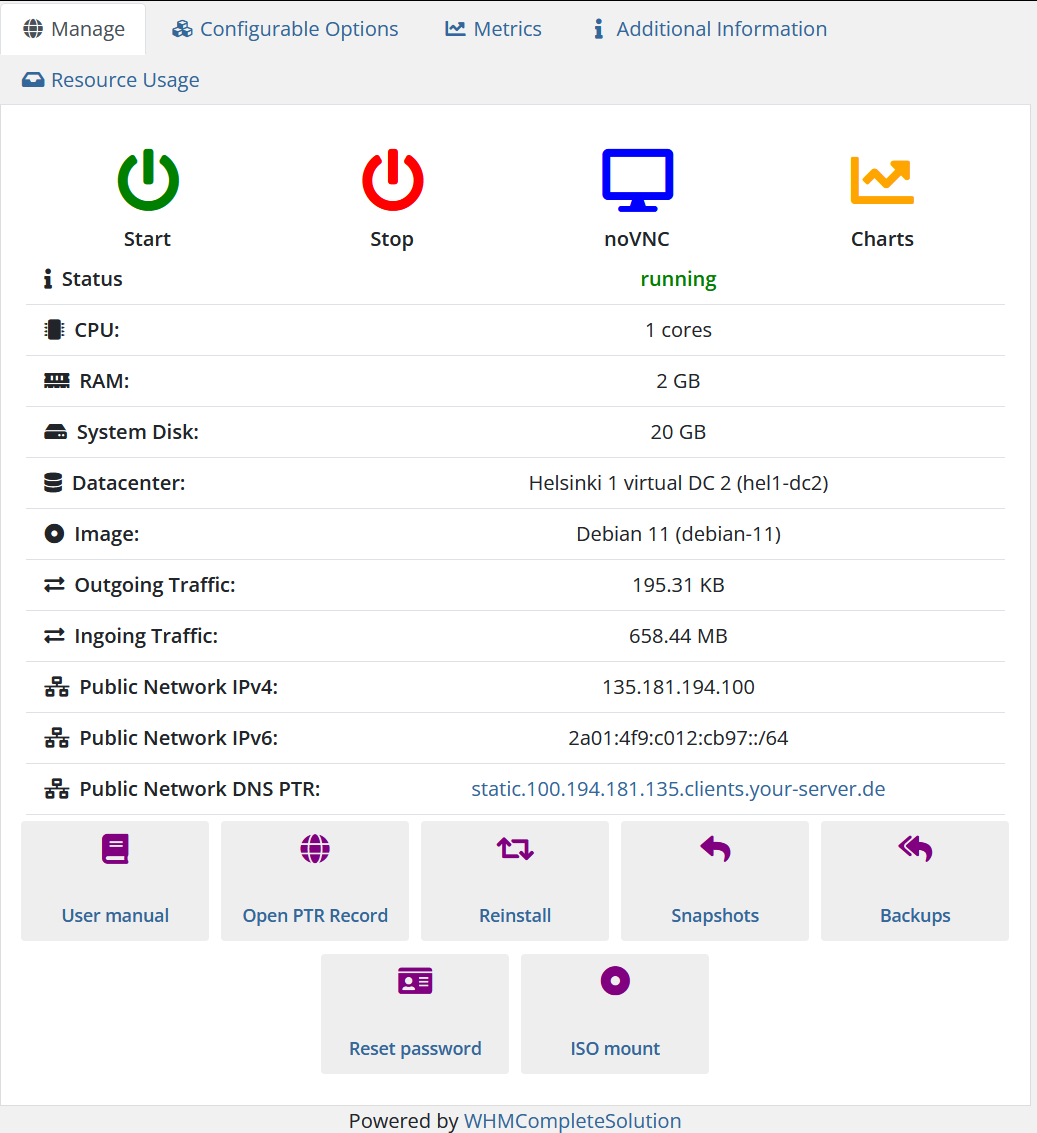
1. The Manage tab
2. Configurable Options tab
- Here the client will see a list of Configurable Options and their values.

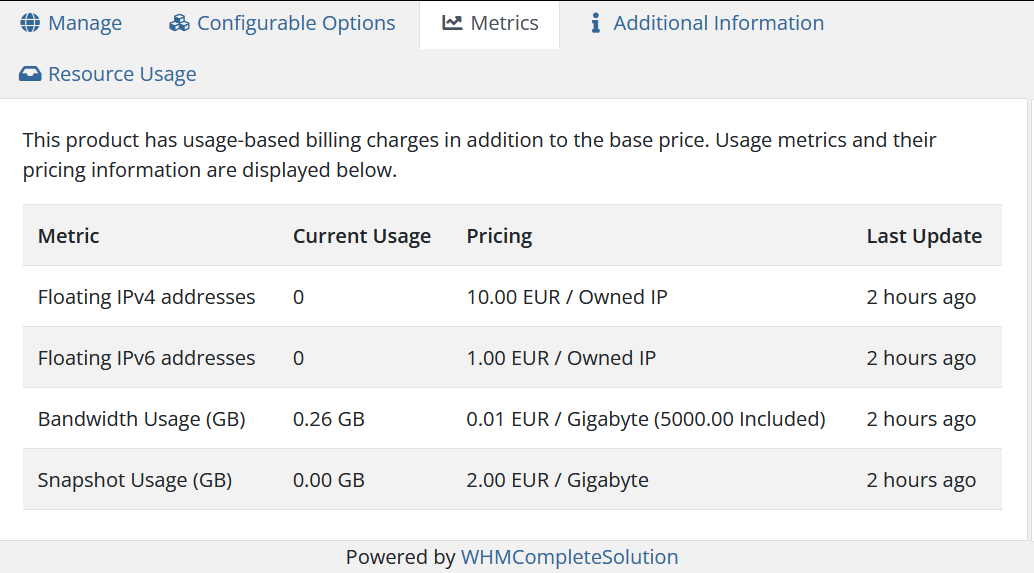
3. Metrics tab
The "Metrics" tab provides detailed information about usage-based billing for your server in addition to the base price. This section displays various usage metrics, the current usage levels, associated pricing, and the last time the data was updated.
Detailed Breakdown of Metrics:
-
Floating IPv4 addresses:
- Current Usage: The number of floating IPv4 addresses currently being used. (In this case, 0)
- Pricing: The cost associated with each owned floating IPv4 address. (In this case, 10.00 EUR per owned IP)
- Last Update: The timestamp showing when this data was last refreshed. (In this case, 4 hours ago)
-
Floating IPv6 addresses:
- Current Usage: The number of floating IPv6 addresses currently being used. (In this case, 0)
- Pricing: The cost associated with each owned floating IPv6 address. (In this case, 1.00 EUR per owned IP)
- Last Update: The timestamp showing when this data was last refreshed. (In this case, 4 hours ago)
-
Bandwidth Usage (GB):
- Current Usage: The amount of bandwidth used by the server. (In this case, 0.26 GB)
- Pricing: The cost per gigabyte of bandwidth used beyond the included allowance. (In this case, 0.01 EUR per GB, with 5000.00 GB included)
- Last Update: The timestamp showing when this data was last refreshed. (In this case, 4 hours ago)
-
Snapshot Usage (GB):
- Current Usage: The amount of storage used for server snapshots. (In this case, 0.00 GB)
- Pricing: The cost per gigabyte of snapshot storage used. (In this case, 2.00 EUR per GB)
- Last Update: The timestamp showing when this data was last refreshed. (In this case, 4 hours ago)
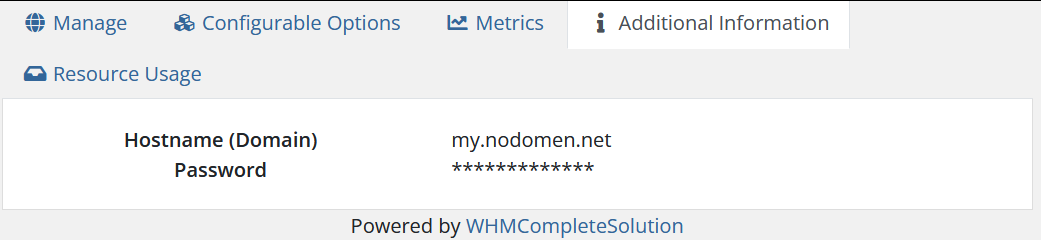
3. Additional Information tab
- Here the client will see a list of Custom Fields and their values.
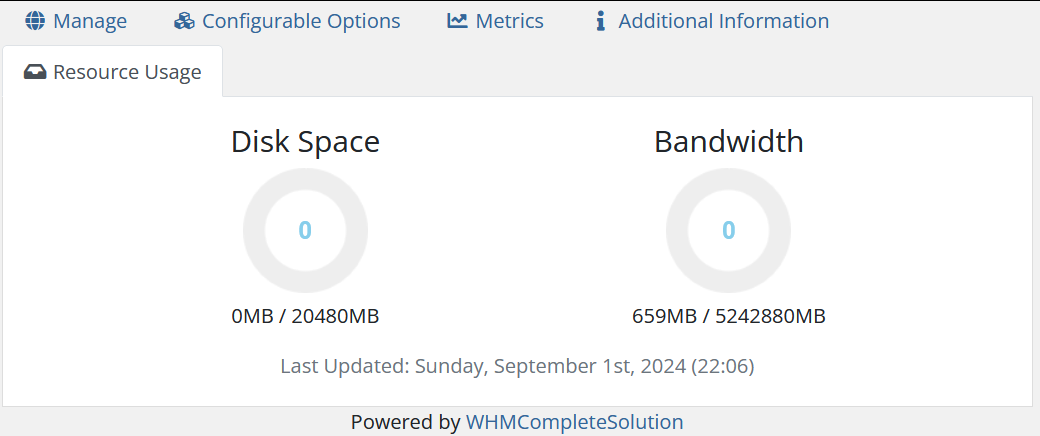
2. The Resource Usage tab
- Displays service usage statistics
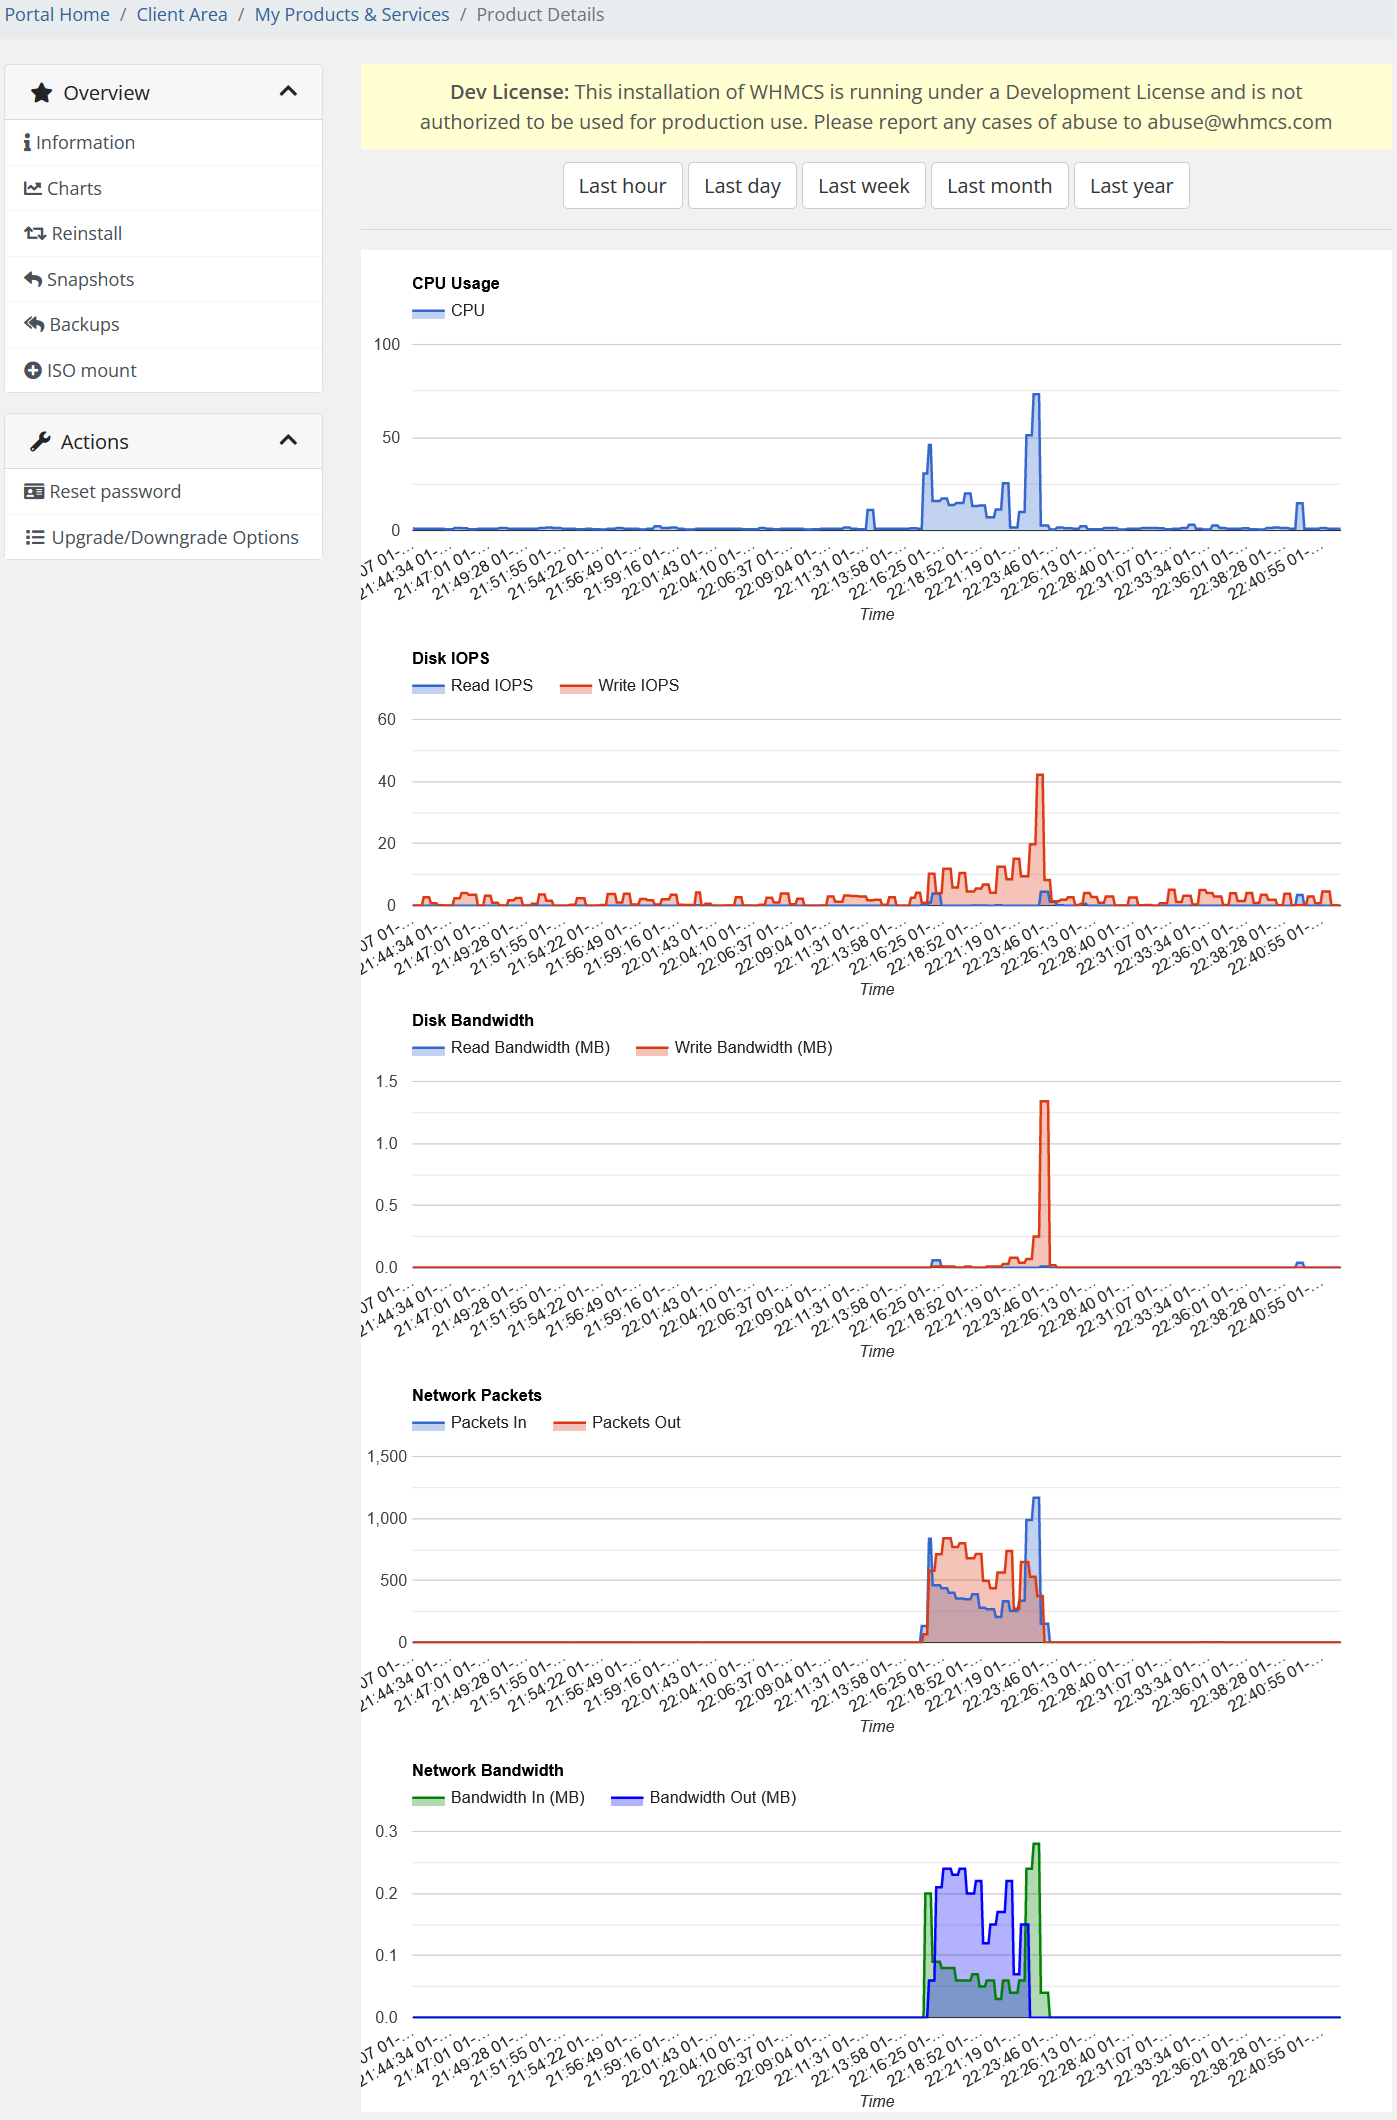
Charts Section Description
Hetzner Datacenter module WHMCS
Order now | Download | FAQ
The "Charts" section provides visual representations of various performance metrics of your server over different time periods. This section is useful for monitoring and analyzing the server's resource usage and performance trends.
Available Time Frames:
At the top of the section, there are buttons that allow you to select the time frame for the displayed metrics:
- Last hour
- Last day
- Last week
- Last month
- Last year
Performance Metrics:
-
CPU Usage:
- Description: This chart shows the CPU usage over time, represented by a blue line. The vertical axis indicates the percentage of CPU usage, while the horizontal axis represents time.
- Purpose: Monitoring CPU usage helps to understand the server's processing load and identify periods of high or low activity.
-
Disk IOPS (Input/Output Operations Per Second):
- Description: This chart displays the disk IOPS, split into Read IOPS (blue) and Write IOPS (red). The vertical axis indicates the number of IOPS, and the horizontal axis represents time.
- Purpose: Tracking disk IOPS is important for understanding how frequently the disk is being accessed, which can affect the overall performance of the server, especially under high read/write operations.
-
Disk Bandwidth:
- Description: This chart shows the disk bandwidth usage, differentiated into Read Bandwidth (MB) (blue) and Write Bandwidth (MB) (red). The vertical axis shows the bandwidth in megabytes, and the horizontal axis represents time.
- Purpose: This metric helps to monitor the amount of data being read from or written to the disk, which is crucial for assessing the impact of disk operations on the server's performance.
-
Network Packets:
- Description: This chart displays the number of network packets processed by the server, with Packets In (blue) and Packets Out (red). The vertical axis shows the number of packets, and the horizontal axis represents time.
- Purpose: Tracking network packets allows you to monitor the volume of incoming and outgoing network traffic, which is essential for understanding network load and identifying any potential issues with connectivity or bandwidth.
-
Network Bandwidth:
- Description: This chart shows the network bandwidth usage, with Bandwidth In (MB) (green) and Bandwidth Out (MB) (blue). The vertical axis indicates the bandwidth in megabytes, while the horizontal axis represents time.
- Purpose: Monitoring network bandwidth usage helps to evaluate the server's network performance and ensure that it can handle the necessary data throughput without bottlenecks.
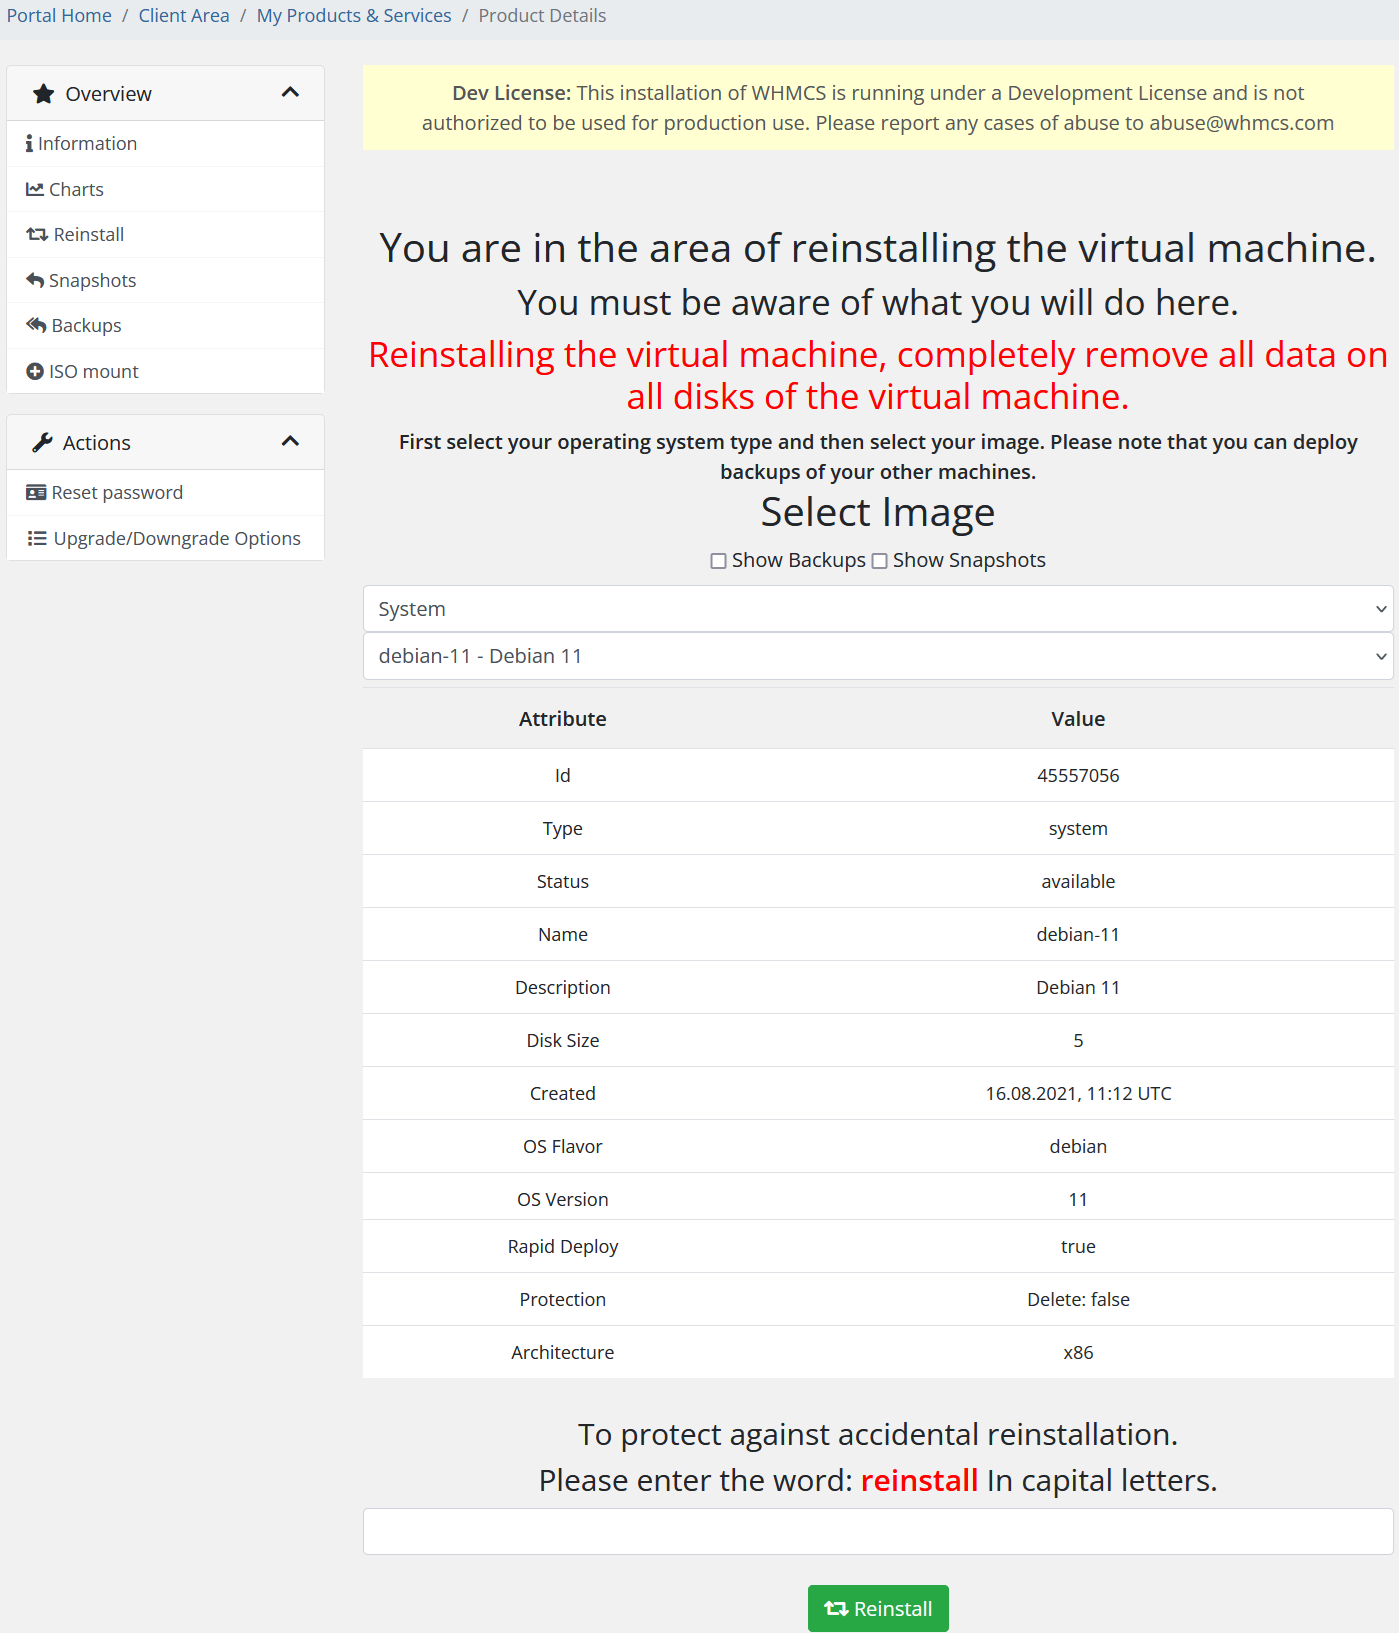
Reinstall Section Description
Hetzner Datacenter module WHMCS
Order now | Download | FAQ
The "Reinstall" section is a critical area where you can perform a complete reinstallation of your virtual machine. This section includes several important warnings and steps to ensure that users understand the consequences of reinstalling the server.
Key Warnings:
- Reinstallation Warning: The section begins with a strong warning in red text stating that reinstalling the virtual machine will completely remove all data on all disks of the virtual machine. This is emphasized to prevent accidental data loss.
- Awareness Notice: There is a general reminder that you must be fully aware of what you are about to do before proceeding with the reinstallation.
Steps to Reinstall:
-
Select Image:
- Image Type: First, you need to select the type of operating system image you want to reinstall. This is done through a dropdown menu where you can select from available images.
- Available Options: There are options to show backups and snapshots by checking the corresponding boxes, allowing you to restore from a previous state if necessary.
-
Image Details:
-
Below the selection area, detailed information about the selected image is provided in a table format. The attributes include:
- Id: The unique identifier for the image.
- Type: The type of image (in this case, 'system').
- Status: The current availability status of the image.
- Name: The name of the selected image.
- Description: A brief description of the image.
- Disk Size: The size of the disk associated with the image.
- Created: The creation date and time of the image.
- OS Flavor: The flavor of the operating system (e.g., Debian).
- OS Version: The version of the operating system.
- Rapid Deploy: Indicates whether rapid deployment is enabled.
- Protection: Indicates whether delete protection is enabled.
- Architecture: The architecture of the image (e.g., x86).
-
Note: The attributes listed here are dynamic and may vary depending on the selected image or the server configuration. Users should carefully review these details before proceeding.
-
-
Confirmation:
- Protection Mechanism: To protect against accidental reinstallation, the user is required to type the word "REINSTALL" in capital letters in a provided text box. This step is mandatory and acts as a final confirmation that the user intends to proceed with the reinstallation.
-
Execute Reinstallation:
- Once the word is correctly entered, the green Reinstall button at the bottom can be clicked to initiate the reinstallation process. This action will completely wipe the server and install the selected operating system image.
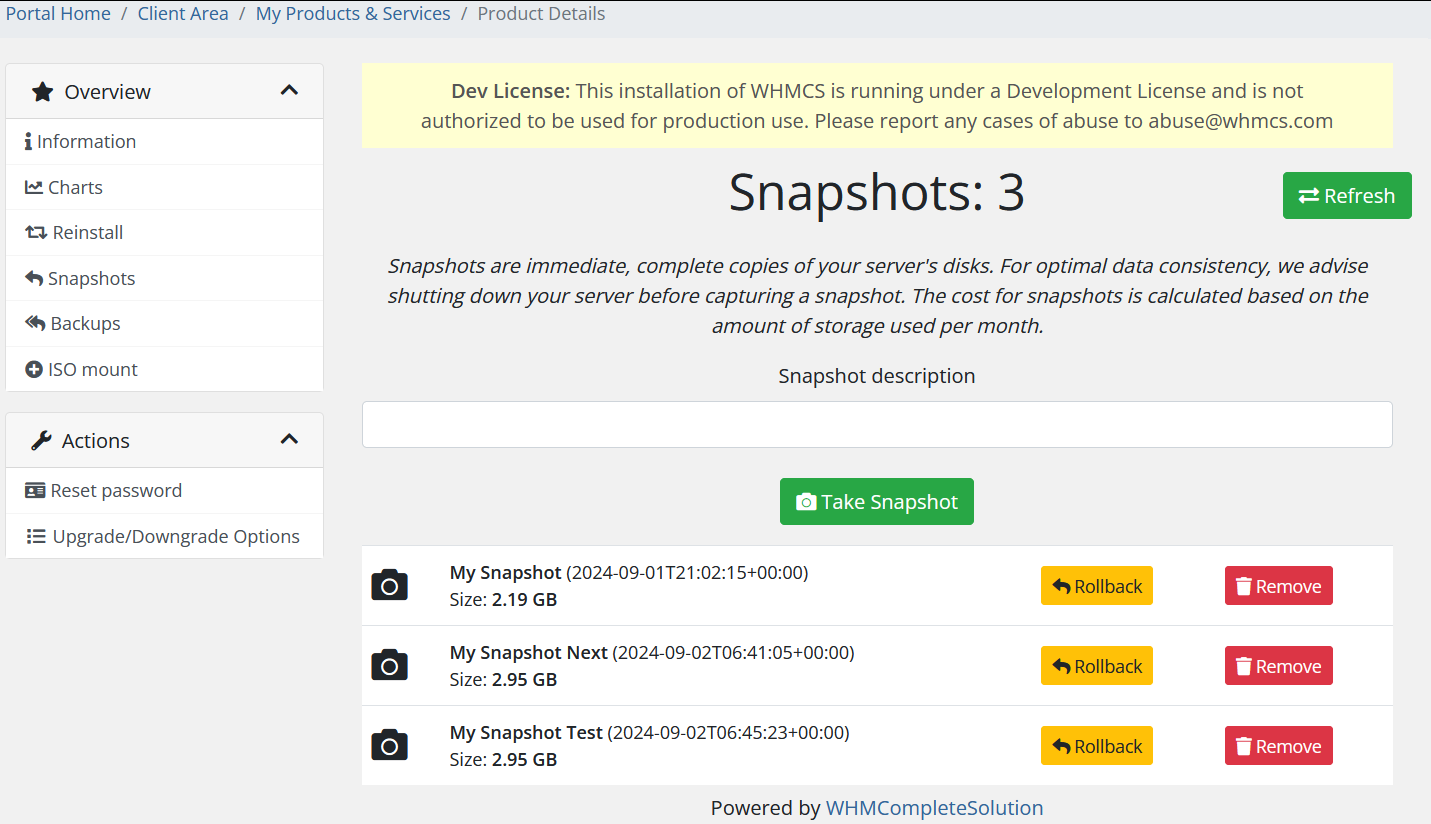
Snapshots Section Description
Hetzner Datacenter module WHMCS
Order now | Download | FAQ
The "Snapshots" section allows you to manage snapshots of your server. Snapshots are immediate, complete copies of your server's disks, capturing the current state of the server. This is useful for backing up data or creating restore points before making significant changes to the system.
Key Features and Actions:
-
Snapshot Creation:
- Snapshot Description: There is a text box where you can enter a descriptive name for the snapshot you are about to create.
- Take Snapshot: The green Take Snapshot button allows you to create a new snapshot of the server. It’s recommended to shut down your server before capturing a snapshot to ensure data consistency.
-
Snapshot Management:
- The section lists all existing snapshots, showing the following details for each:
- Snapshot Name: The user-defined name of the snapshot (e.g., "My Snapshot").
- Timestamp: The date and time when the snapshot was created (e.g., 2024-09-01T21:02:15+00:00).
- Size: The amount of storage space used by the snapshot (e.g., 2.19 GB).
- The section lists all existing snapshots, showing the following details for each:
-
Actions for Each Snapshot:
- Rollback: The yellow Rollback button allows you to restore the server to the state it was in at the time the snapshot was taken. This is particularly useful if you encounter issues and need to revert to a previous stable state.
- Remove: The red Remove button allows you to delete the snapshot, freeing up the space it occupies. This action is irreversible, so it should be done with caution.
-
Refresh Button:
- Refresh: A green Refresh button at the top of the section allows you to update the list of snapshots, ensuring that the latest snapshots and any changes are displayed.
Important Notes:
- Cost Consideration: The cost for snapshots is calculated based on the amount of storage used per month. Therefore, it’s advisable to manage snapshots carefully to avoid unnecessary charges.
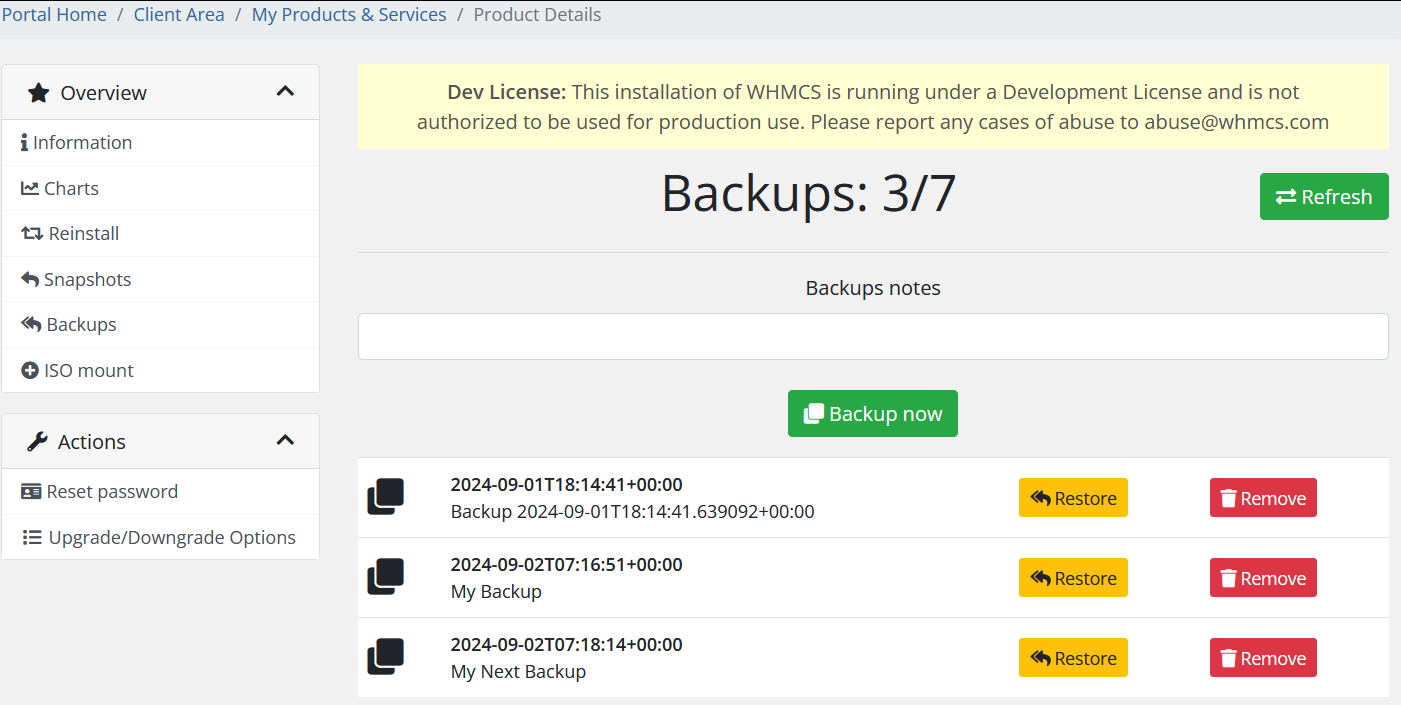
Backups Section Description
Hetzner Datacenter module WHMCS
Order now | Download | FAQ
The "Backups" section is where you can manage and restore backups of your virtual machine. This section is crucial for maintaining data integrity and providing recovery options in case of system failure or other critical issues.
Key Features and Actions:
-
Backup Creation:
- Backup Notes: There is a text box labeled "Backups notes" where you can enter a description or notes for the backup you are about to create. This allows you to easily identify the purpose or specific details of the backup later on.
- Backup Now: The green Backup now button allows you to initiate a new backup of the current state of your virtual machine. This backup will include all data and settings at the time of creation.
-
Backup Management:
- The section lists all existing backups, providing the following details for each:
- Timestamp: The date and time when the backup was created (e.g., 2024-09-01T18:14:41+00:00).
- Backup Name: The user-defined name or automatically generated name for the backup (e.g., "Backup 2024-09-01T18:14:41.639092+00:00" or "My Backup").
- The section lists all existing backups, providing the following details for each:
-
Actions for Each Backup:
- Restore: The yellow Restore button allows you to restore the virtual machine to the state it was in when the backup was created. This will overwrite the current state of the machine with the backup, reverting any changes made since the backup was created.
- Remove: The red Remove button allows you to delete the backup. Deleting a backup will free up storage space, but this action is irreversible, so it should be done carefully.
-
Refresh Button:
- Refresh: A green Refresh button at the top of the section allows you to update the list of backups, ensuring that the most current backups and any recent changes are displayed.
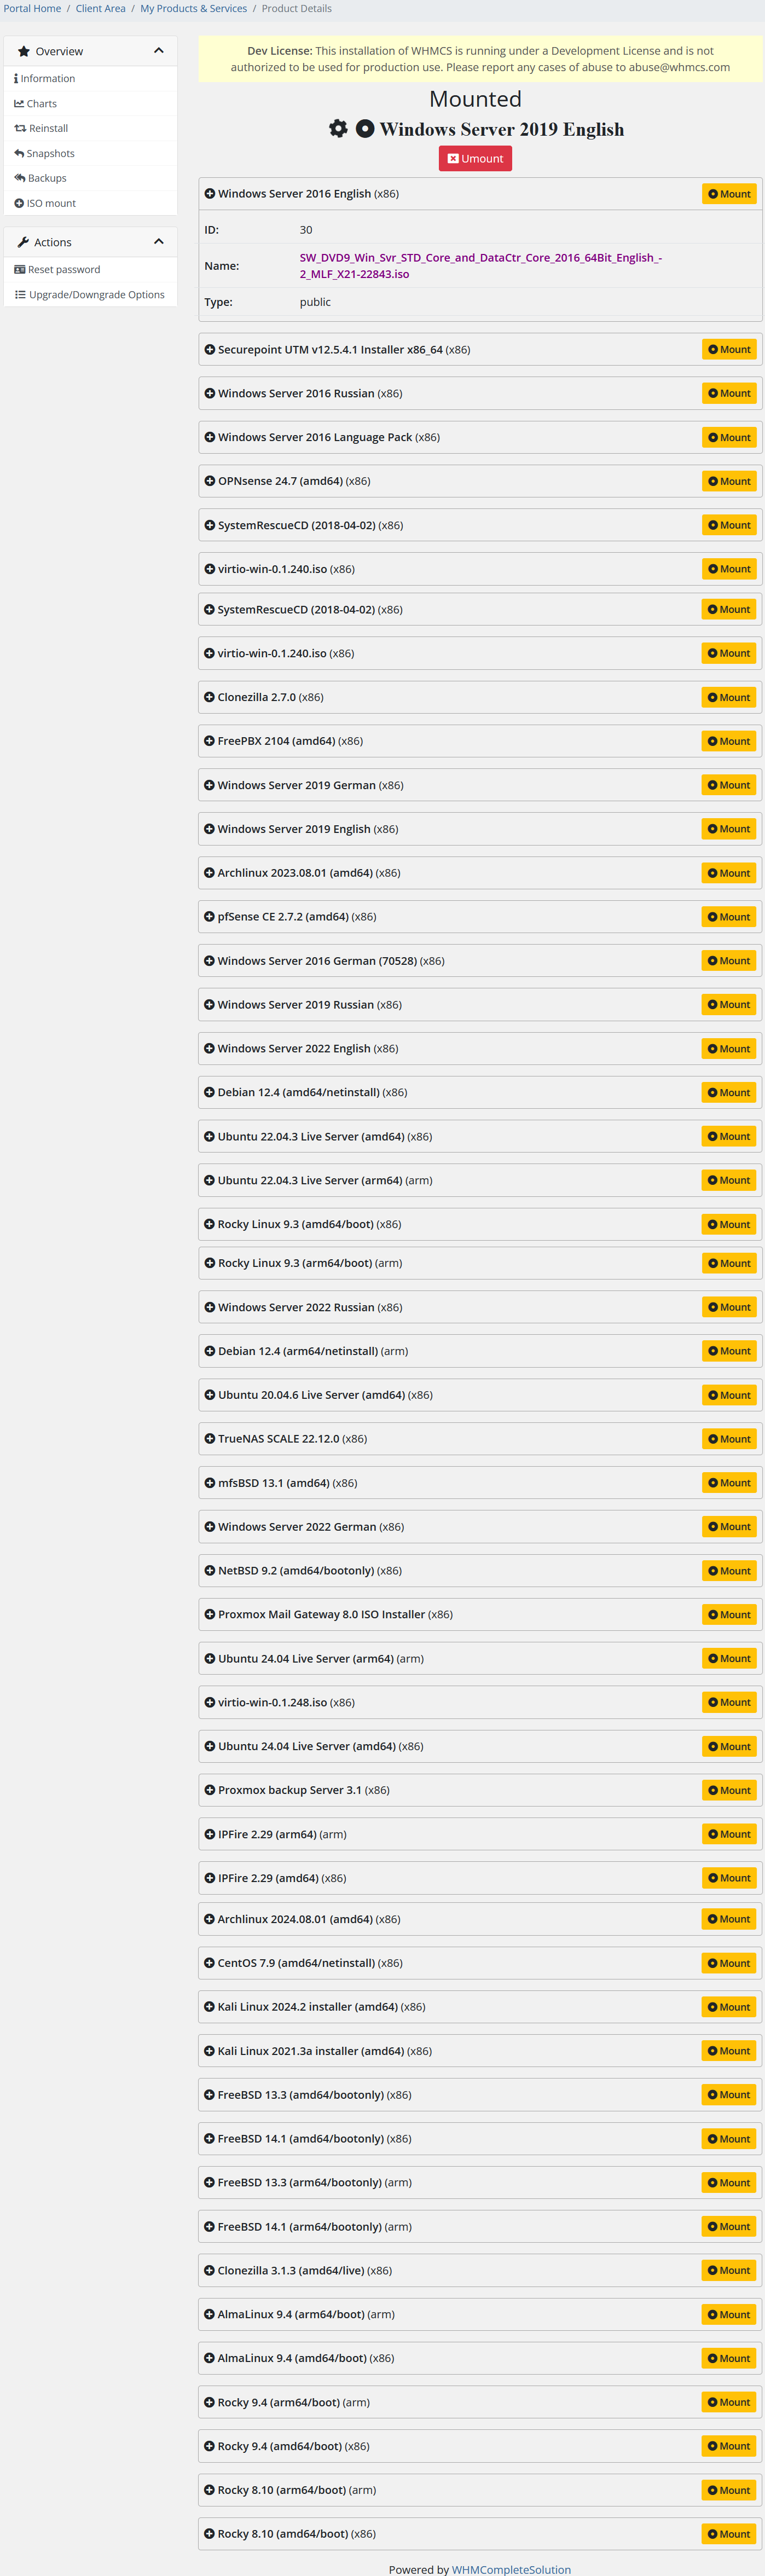
ISO Mount Section Description
Hetzner Datacenter module WHMCS
Order now | Download | FAQ
The "ISO Mount" section allows users to manage and mount ISO images to their virtual machine. These ISO images are used for installing operating systems, recovery tools, and various software packages on the server. The interface is designed to provide a list of available ISO images, along with the option to view additional details and mount or unmount these images.
Key Features and Actions:
-
Mounted ISO:
- At the top of the section, the currently mounted ISO image is displayed. In this example, Windows Server 2019 English is shown as the mounted image.
- Unmount Button: A red Unmount button is provided next to the mounted image, allowing users to unmount the ISO if they wish to detach it from the virtual machine.
-
Available ISO Images:
- Below the mounted ISO, a list of all available ISO images is displayed. Each ISO image is presented with the following information:
- Name: The name of the ISO image, such as "Windows Server 2016 English (x86)" or "Debian 12.4 (arm64/netinstall)".
- Mount Button: Each ISO has a yellow Mount button next to it, allowing users to mount the selected ISO image to the virtual machine.
- Expandable Details: Some ISO images have additional details that can be expanded by clicking on the image name. These details include:
- Id: A unique identifier for the ISO image.
- Name: The full name of the ISO file, including its path.
- Type: The type of the ISO image (e.g., public or private).
- Size: The size of the ISO image in gigabytes.
- Below the mounted ISO, a list of all available ISO images is displayed. Each ISO image is presented with the following information:
-
Managing ISO Images:
- Users can click the Mount button next to any ISO image to mount it to the virtual machine. Once mounted, the ISO can be used to boot the server or perform installations.
- If an ISO image is already mounted, mounting a new ISO will typically require unmounting the current image first.
-
Search and Navigation:
- The list of ISO images is scrollable, allowing users to navigate through all available options. This includes a variety of operating systems, recovery tools, and other software distributions.
Reset Password Section Description
Hetzner Datacenter module WHMCS
Order now | Download | FAQ
The "Reset Password" section allows users to reset the password of their virtual machine through an automated process. This section is designed to be a quick and convenient way to regain access to the server if the password has been lost or needs to be changed.
Key Information:
-
Important Warning:
- The section prominently displays a warning in red text, stating that the password reset procedure will only work if the packages responsible for the operation of
cloud-inithave not been removed from the virtual machine.cloud-initis a tool used to initialize cloud instances, and it must be present for the automated password reset to function correctly.
- The section prominently displays a warning in red text, stating that the password reset procedure will only work if the packages responsible for the operation of
-
Additional Instruction:
- Below the warning, there is an additional note in smaller text indicating that if the reset procedure was successful but the password was not changed, the user will need to manually connect to the virtual machine using the noVNC console, boot into safe mode, and change the password manually.
-
Reset Password Button:
- A green Reset password button is provided for users to initiate the password reset process. This button triggers the automated procedure that attempts to reset the virtual machine's password.

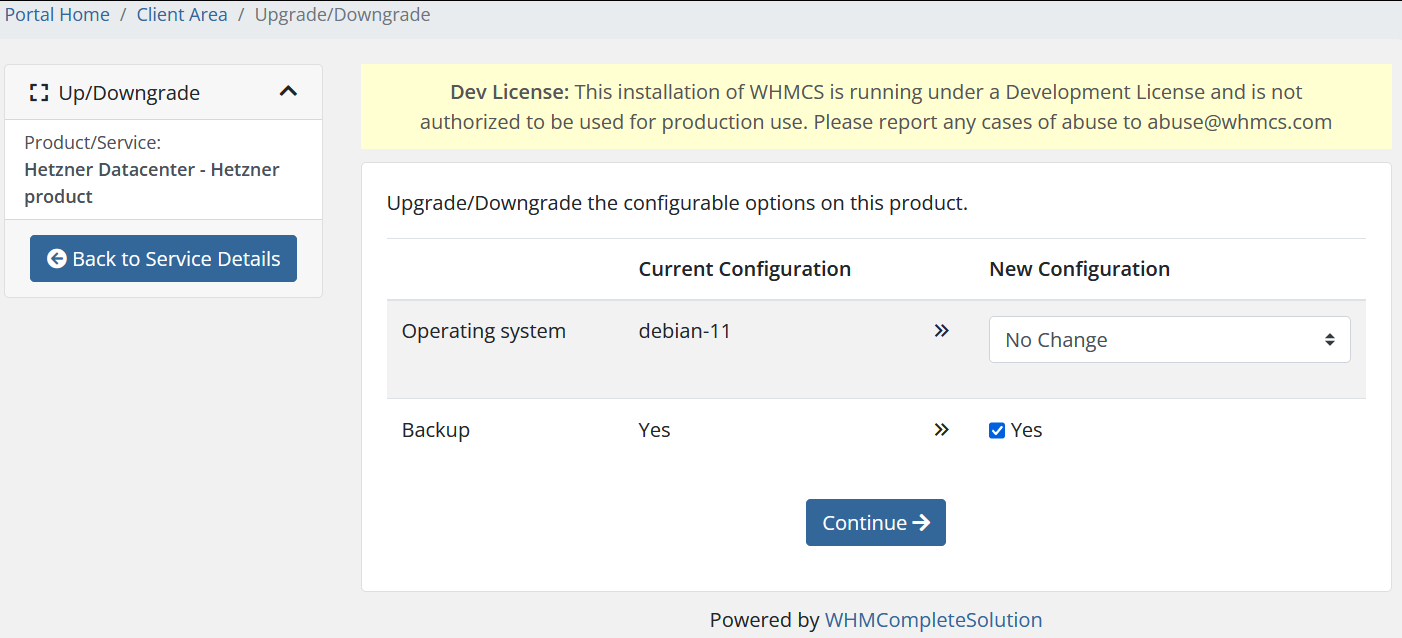
Upgrade/Downgrade Options Section Description
Hetzner Datacenter module WHMCS
Order now | Download | FAQ
The "Upgrade/Downgrade Options" section allows users to modify the configurable options associated with their product or service. This interface is particularly useful for adjusting features like backup settings, among other configurable options.
Key Features and Actions:
-
Current Configuration:
- The section displays the current configuration of the product or service. This includes any active options or features that have been enabled or disabled. For example, the current status of the Backup option is shown here as "Yes" if it is enabled.
-
New Configuration:
- On the right side, the new configuration can be selected. Users can enable or disable options such as Backup by checking or unchecking the corresponding box. In this example, the Backup option is checked, indicating that backups will remain enabled or will be enabled if they were previously disabled.
-
Backup Option:
- Backup Toggle: This section specifically highlights the ability to toggle the backup feature on or off. By using this option, users can easily include or exclude backups as part of their service, directly influencing how their data is managed and protected.
- Enabling backups can provide crucial data recovery options, while disabling it can save costs if the user decides backups are no longer necessary.
-
Continue Button:
- Once the desired configuration changes have been made, users can click the Continue button to proceed with applying the changes. This action will update the service with the new settings.