**Module is coded ionCube v13**
Supported php version: - php 7.4 WHMCS 8.11.0 - - php 8.1 WHMCS 8.11.0 + - php 8.2 WHMCS 8.11.0 +To install and update a module, you must perform one and the same action.
##### 1. Download the latest version of the module. PHP 8.2 ```Powershell wget http://download.puqcloud.com/WHMCS/servers/PUQ_WHMCS-Jellyfin/php82/PUQ_WHMCS-Jellyfin-latest.zip ``` PHP 8.1 ```Powershell wget http://download.puqcloud.com/WHMCS/servers/PUQ_WHMCS-Jellyfin/php81/PUQ_WHMCS-Jellyfin-latest.zip ``` PHP 7.4 ```Powershell wget http://download.puqcloud.com/WHMCS/servers/PUQ_WHMCS-Jellyfin/php74/PUQ_WHMCS-Jellyfin-latest.zip ```All versions are available via link: [http://download.puqcloud.com/WHMCS/servers/PUQ\_WHMCS-Jellyfin/](http://download.puqcloud.com/WHMCS/servers/PUQ_WHMCS-Jellyfin/)
##### 2. Unzip the archive with the module. ```Powershell unzip PUQ_WHMCS-Jellyfin-latest.zip ``` ##### 3. Copy and Replace "puqJellyfin" to "WHMCS\_WEB\_DIR/modules/servers/" # Setup guide: Jellyfin setup ### Jellyfin module **[WHMCS](https://puqcloud.com/link.php?id=77)** ##### [Order now](https://puqcloud.com/whmcs-module-jellyfin.php) | [Download](https://download.puqcloud.com/WHMCS/servers/PUQ_WHMCS-Jellyfin/) | [FAQ](https://faq.puqcloud.com/) #### 1. Install Jellyfin on your server To simplify deployment and help automate this for as many users as possible, we provide a BASH script to handle repo installation as well as installing Jellyfin. All you need to do is run this command on your system ``` wget -O- https://repo.jellyfin.org/install-debuntu.sh | sudo bash ``` #### 2. SSL certificate generation: ``` sudo apt install nginx certbot python3-certbot-nginx ``` ``` sudo certbot --nginx --agree-tos --redirect --hsts --staple-ocsp --email YOUR_EMAIL -d DOMAIN_NAME ``` ``` echo "0 0 * * * root certbot renew --quiet --no-self-upgrade --post-hook 'systemctl reload nginx'" | sudo tee -a /etc/cron.d/renew_certbot ``` #### 3. Configure nginx from a subdomain Create a file named jellyfin.conf. ``` cd /etc/nginx/conf.d/ nano jellyfin.conf ``` Then, insert the following text, replacing DOMAIN\_NAME with your domain. ```Nginx # Uncomment the commented sections after you have acquired a SSL Certificate server { listen 80; listen [::]:80; server_name DOMAIN_NAME; # Uncomment to redirect HTTP to HTTPS return 301 https://$host$request_uri; } server { listen 443 ssl http2; listen [::]:443 ssl http2; server_name DOMAIN_NAME; ## The default `client_max_body_size` is 1M, this might not be enough for some posters, etc. client_max_body_size 20M; # use a variable to store the upstream proxy # in this example we are using a hostname which is resolved via DNS # (if you aren't using DNS remove the resolver line and change the variable to point to an IP address e.g `set $jellyfin 127.0.0.1`) set $jellyfin 127.0.0.1; resolver 127.0.0.1 valid=30; ssl_certificate /etc/letsencrypt/live/DOMAIN_NAME/fullchain.pem; ssl_certificate_key /etc/letsencrypt/live/DOMAIN_NAME/privkey.pem; include /etc/letsencrypt/options-ssl-nginx.conf; ssl_dhparam /etc/letsencrypt/ssl-dhparams.pem; add_header Strict-Transport-Security "max-age=31536000" always; ssl_trusted_certificate /etc/letsencrypt/live/DOMAIN_NAME/chain.pem; ssl_stapling on; ssl_stapling_verify on; # Security / XSS Mitigation Headers # NOTE: X-Frame-Options may cause issues with the webOS app add_header X-Frame-Options "SAMEORIGIN"; add_header X-XSS-Protection "0"; # Do NOT enable. This is obsolete/dangerous add_header X-Content-Type-Options "nosniff"; # COOP/COEP. Disable if you use external plugins/images/assets add_header Cross-Origin-Opener-Policy "same-origin" always; add_header Cross-Origin-Embedder-Policy "require-corp" always; add_header Cross-Origin-Resource-Policy "same-origin" always; # Permissions policy. May cause issues on some clients add_header Permissions-Policy "accelerometer=(), ambient-light-sensor=(), battery=(), bluetooth=(), camera=(), clipboard-read=(), display-capture=(), document-domain=(), encrypted-media=(), gamepad=(), geolocation=(), gyroscope=(), hid=(), idle-detection=(), interest-cohort=(), keyboard-map=(), local-fonts=(), magnetometer=(), microphone=(), payment=(), publickey-credentials-get=(), serial=(), sync-xhr=(), usb=(), xr-spatial-tracking=()" always; # Tell browsers to use per-origin process isolation add_header Origin-Agent-Cluster "?1" always; # Content Security Policy # See: https://developer.mozilla.org/en-US/docs/Web/HTTP/CSP # Enforces https content and restricts JS/CSS to origin # External Javascript (such as cast_sender.js for Chromecast) must be whitelisted. # NOTE: The default CSP headers may cause issues with the webOS app #add_header Content-Security-Policy "default-src https: data: blob: http://image.tmdb.org; style-src 'self' 'unsafe-inline'; script-src 'self' 'unsafe-inline' https://www.gstatic.com https://www.youtube.com blob:; worker-src 'self' blob:; connect-src 'self'; object-src 'none'; frame-ancestors 'self'"; location = / { return 302 http://$host/web/; #return 302 https://$host/web/; } location / { # Proxy main Jellyfin traffic proxy_pass http://$jellyfin:8096; proxy_set_header Host $host; proxy_set_header X-Real-IP $remote_addr; proxy_set_header X-Forwarded-For $proxy_add_x_forwarded_for; proxy_set_header X-Forwarded-Proto $scheme; proxy_set_header X-Forwarded-Protocol $scheme; proxy_set_header X-Forwarded-Host $http_host; # Disable buffering when the nginx proxy gets very resource heavy upon streaming proxy_buffering off; } # location block for /web - This is purely for aesthetics so /web/#!/ works instead of having to go to /web/index.html/#!/ location = /web/ { # Proxy main Jellyfin traffic proxy_pass http://$jellyfin:8096/web/index.html; proxy_set_header Host $host; proxy_set_header X-Real-IP $remote_addr; proxy_set_header X-Forwarded-For $proxy_add_x_forwarded_for; proxy_set_header X-Forwarded-Proto $scheme; proxy_set_header X-Forwarded-Protocol $scheme; proxy_set_header X-Forwarded-Host $http_host; } location /socket { # Proxy Jellyfin Websockets traffic proxy_pass http://$jellyfin:8096; proxy_http_version 1.1; proxy_set_header Upgrade $http_upgrade; proxy_set_header Connection "upgrade"; proxy_set_header Host $host; proxy_set_header X-Real-IP $remote_addr; proxy_set_header X-Forwarded-For $proxy_add_x_forwarded_for; proxy_set_header X-Forwarded-Proto $scheme; proxy_set_header X-Forwarded-Protocol $scheme; proxy_set_header X-Forwarded-Host $http_host; } } ``` #### Restarting nginx ``` sudo service nginx restart ``` # Setup guide: WHMCS setup ### Jellyfin module **[WHMCS](https://puqcloud.com/link.php?id=77)** ##### [Order now](https://puqcloud.com/whmcs-module-jellyfin.php) | [Download](https://download.puqcloud.com/WHMCS/servers/PUQ_WHMCS-Jellyfin/) | [FAQ](https://faq.puqcloud.com/) ##### 1. Download the latest version of the module. PHP 8.1 ```Powershell wget http://download.puqcloud.com/WHMCS/servers/PUQ_WHMCS-Jellyfin/PUQ_WHMCS-Jellyfin-latest.zip ``` PHP 7.4 ```Powershell wget http://download.puqcloud.com/WHMCS/servers/PUQ_WHMCS-Jellyfin/php74/PUQ_WHMCS-Jellyfin-latest.zip ```All versions are available via link: [http://download.puqcloud.com/WHMCS/servers/PUQ\_WHMCS-Jellyfin/](http://download.puqcloud.com/WHMCS/servers/PUQ_WHMCS-Jellyfin/)
##### 2. Unzip the archive with the module. ```Powershell unzip PUQ_WHMCS-Jellyfin-latest.zip ``` ##### 3. Copy "puqJellyfin" to "WHMCS\_WEB\_DIR/modules/servers/" ##### 4. Create new server Jellyfin in WHMCS (System Settings->Products/Services->Servers) ``` System Settings->Servers->Add New Server ``` - Enter the correct **Name** and **Hostname** [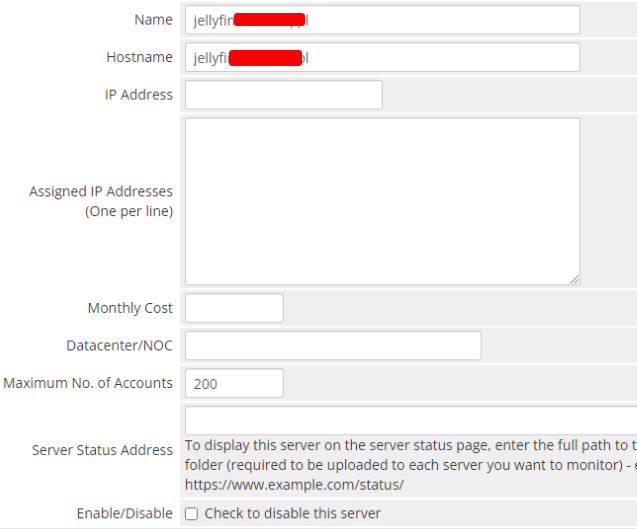](https://doc.puq.info/uploads/images/gallery/2023-11/2023-11-02-14-40.png) - In the **Server Details** section, select the "**PUQ Jellyfin**" module and enter the correct **username**, **password** and **access hash (API key)** for the **Jellyfin web interface**. - To check, click the **"Test connection"** button [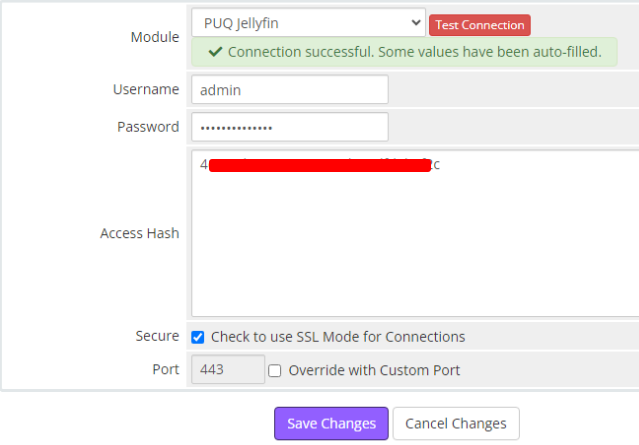](https://doc.puq.info/uploads/images/gallery/2023-11/2023-11-02-14-40-1.png) ##### 5. Create a new Products/Services ``` System Settings->Products/Services->Create a New Product ``` In the **Module settings** section, select the **"PUQ Jellyfin"** module [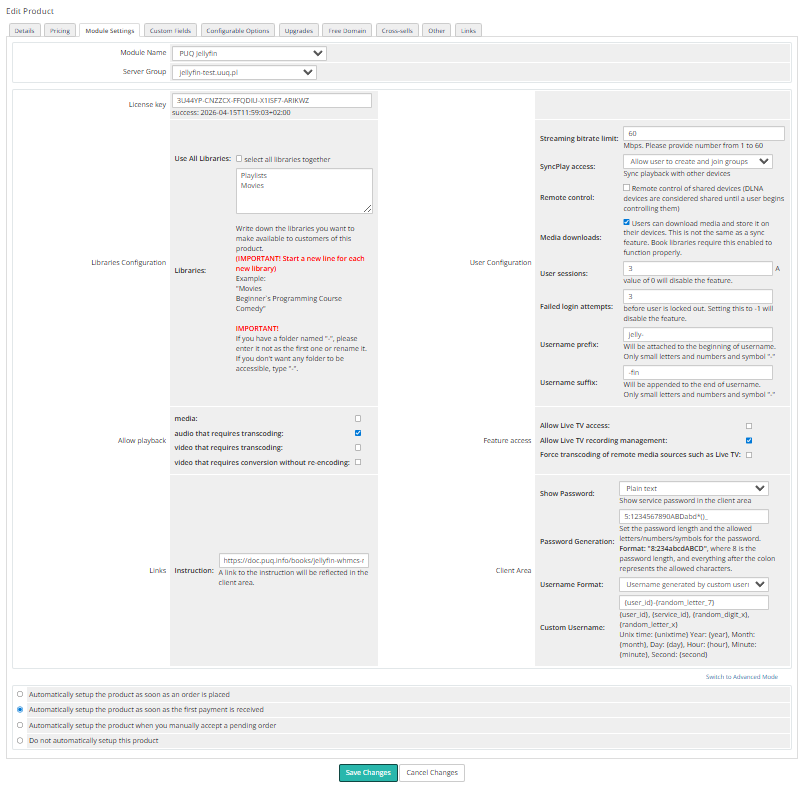](https://doc.puq.info/uploads/images/gallery/2025-10/Zeh2.png) - **License key:** A pre-purchased license key for the **"PUQ Jellyfin"** module. For the module to work correctly, the key must be active ##### Libraries: - **Use All Libraries**: Choosing all of libraries from your Jellyfin server - **Libraries**: The libraries you want to make available to customers of this product. **(IMPORTANT! Start a new line for each new library)** Example: "Movies Beginner`s Programming Course Comedy" **IMPORTANT!** If you have a folder named "-", please enter it not as the first one or rename it. If you don't want any folder to be accessible, type "-". ##### User Configuration: - **Streaming bitrate limit:** An optional per-stream bitrate limit for all out of network devices. This is useful to prevent devices from requesting a higher bitrate than your internet connection can handle. This may result in increased CPU load on your server in order to transcode videos on the fly to a lower bitrate. - **SyncPlay access:** The SyncPlay feature enables to sync playback with other devices. Select the level of access this user has to the SyncPlay - **Remote control:** Remote control of shared devices (DLNA devices are considered shared until a user begins controlling them) - **Media downloads:** Users can download media and store it on their devices. This is not the same as a sync feature. Book libraries require this enabled to function properly. - **User sessions:** Set the maximum number of simultaneous user sessions.