# Jellyfin WHMCS module
# Description
### Jellyfin module **[WHMCS](https://puqcloud.com/link.php?id=77)**
##### [Order now](https://puqcloud.com/whmcs-module-jellyfin.php) | [Download](https://download.puqcloud.com/WHMCS/servers/PUQ_WHMCS-Jellyfin/) | [Community](https://community.puqcloud.com/)
## Jellyfin WHMCS module
The **Jellyfin WHMCS module** turns your WHMCS into an automated platform for selling **Jellyfin media-server accounts**. Each WHMCS service is mapped to a Jellyfin user whose access is fully driven by the product configuration: which libraries the user can see, what playback and transcoding is allowed, Live TV access, SyncPlay, streaming bitrate limit, maximum active sessions and failed-login lockout.
Account provisioning is automatic — on **Create** the module generates the username and password, creates the Jellyfin user and applies the configured policy. **Suspend / Unsuspend / Change package / Terminate** keep the Jellyfin user in sync with the WHMCS service lifecycle. Clients manage everything from the WHMCS client area.
- - - - - -
## What's new in v3.0
Version 3.0 is a **complete rewrite** that brings the module up to the modern PUQ standard:
- 🎨 **Redesigned client area** — a beautiful, fully **AJAX** card-based interface: a gradient status hero, account credentials with copy/show, live usage bars (sessions, failed logins), library chips and an active-devices table. No page reloads — every action reports back with a toast.
- 🗂️ **Dynamic library picker** — libraries are now loaded **live from your Jellyfin server** as checkboxes with *Select all* and *Reload*, instead of typing names by hand.
- 🔌 **Jellyfin 10.11.10+ ready** — switched to the modern `Authorization: MediaBrowser` scheme and the current API routes, so the module keeps working on Jellyfin **10.12 / 10.13** where the legacy authorization is removed.
- 🧰 **One-click self-service** — clients can **drop all devices** and **unblock** their account straight from the client area.
- ⚙️ **Streamlined configuration** — all product settings live in a single, injected settings panel; upgrading from v2.x needs **no reconfiguration**.
- 🛡️ **Hardened & diagnosable** — PHP 7.4 / 8.1 / 8.2+ clean, null-safe, with full error logging to the WHMCS Module Log for easy troubleshooting.
- 🌍 **25 languages** — the full interface is translated.
- - - - - -
## Main features
- **Automatic provisioning** — Jellyfin user created on service activation with generated credentials
- **Full lifecycle sync** — suspend, unsuspend, change package, terminate and change password
- **Library access control** — grant all libraries or a selected set per product
- **Playback & transcoding policy** — media playback, audio/video transcoding, remux without re-encoding, force remote-source transcoding
- **Feature access** — Live TV access and recording management
- **Session & security limits** — streaming bitrate limit, maximum active sessions, failed-login lockout
- **SyncPlay & downloads** — SyncPlay access level and media-download control
- **Flexible credentials** — configurable password generation and standard or macro-based custom username templates
- **AJAX client area** — modern card-based UI showing status, credentials, allowed libraries, active devices and sessions
- **Self-service actions** — clients can drop all devices and unblock their account
- **Admin service tab** — user status, libraries, package info and active devices on the WHMCS service page
- **Multi-language** — 25 languages
- **License verification** — built-in online/offline license system with admin homepage alerts
- - - - - -
## System requirements & compatibility
The module supports **PHP 7.4, 8.1 and 8.2+**, shipped as a separate ionCube build per PHP version. Download the build that matches the PHP version your WHMCS runs on.
| WHMCS version | PHP version | Module build |
|---|
| WHMCS 8.x | 7.4 | `php74` |
| WHMCS 8.x | 8.1 | `php81` |
| WHMCS 8.x | 8.2 | `php82` |
| WHMCS 9.x | 8.2 | `php82` |
> Match the build to the **server's PHP version**, not to the WHMCS version. PHP 8.2 and any newer PHP → always use `php82`. Requires ionCube Loader v13+.
A reachable **Jellyfin server, version 10.11.10 or newer**, with an administrator account and API key is required. The module uses the modern `Authorization: MediaBrowser` scheme and the current user/password API routes, so it stays compatible with Jellyfin 10.12/10.13 where the legacy authorization headers are removed.# Changelog
### Jellyfin module **[WHMCS](https://puqcloud.com/link.php?id=77)**
##### [Order now](https://puqcloud.com/whmcs-module-jellyfin.php) | [Download](https://download.puqcloud.com/WHMCS/servers/PUQ_WHMCS-Jellyfin/) | [Community](https://community.puqcloud.com/)
## v3.0 — 2026-06-06
**Added**
- AJAX, card-based client area with a gradient status hero, a two-column account/usage layout, usage progress bars (sessions, failed logins), library chips and an active-devices table — plus toast notifications and confirm dialogs.
- Self-service **Drop all devices** and **Unblock** actions in the client area (no page reload).
- **Dynamic library picker** in the product configuration form: the library list is loaded live from the assigned Jellyfin server as checkboxes, with a *Select all* toggle and a *Reload* button (with a manual text-box fallback when the server is unreachable). The separate *Use all libraries* switch is kept.
- Product configuration form injected on the WHMCS product page via `AdminAreaFooterOutput`.
- Admin homepage license alert listing products with invalid or missing licenses.
- Schema migration runner (`puqJellyfinMigrations`).
- **Diagnostic logging throughout.** Every lifecycle action, hook and AJAX call records its result and any exception to the WHMCS Module Log; all Jellyfin API calls log their request/response on error (and every write call on success), with the HTTP status code and the real Jellyfin message. Passwords are redacted in the log.
**Changed**
- **Jellyfin 10.11.10+ compatibility.** Switched to the modern `Authorization: MediaBrowser` header (with `Version`) as the primary scheme and dropped the deprecated `X-Emby-Token` / `X-MediaBrowser-Token` headers that Jellyfin removes in 10.12/10.13. The password endpoint now uses the current route `Users/Password?userId=` instead of the deprecated `Users/{id}/Password`.
- `CreateAccount` now reads the new user's `Id` directly from the `Users/New` response instead of re-listing all users and matching by name (faster and robust against special characters).
- API error handling now inspects the HTTP status code and extracts the real Jellyfin error message (ProblemDetails / validation errors) instead of occasionally treating a 4xx as success.
- All product settings are now stored as a single JSON document in `configoption24`. Existing v2 installs are read transparently from the legacy `configoption3`–`configoption8` slots, so **no reconfiguration is required** after upgrading.
- License verification moved to a block-based hash with online/offline caching.
- Jellyfin admin API token is cached per instance instead of re-authenticating on every call.
- PHP **7.4 / 8.1 / 8.2+** compatible source; hardened with null-safe reads, `try/catch` around all external calls, and `htmlspecialchars` on every API-sourced string.
**Fixed**
- Web-interface URL no longer mishandled the plain-HTTP/port-80 case (operator-precedence bug in the default-port check).
- Empty text fields (e.g. an intentionally blank username suffix) are now preserved instead of reverting to their default on save.
- - - - - -
## v2.1.1
- Maintenance release (last public v2.x build).
## v2.1 — 2025-10-03
- Added a configurable rule for **custom usernames**.
- Added a configurable rule for **custom passwords**.
- Added support for **PHP 8.2+**.
## v2.0.1 — 2024-12-19
- Added a validation check in the Client Area Primary Sidebar hook.
## v2.0 — 2024-09-24
- Module compiled with **ionCube v13**.
- Supported PHP versions:
- PHP 7.4 — WHMCS 8.11.0 and below
- PHP 8.1 — WHMCS 8.11.0 and above
- PHP 8.2 — WHMCS 8.11.0 and above
## v1.5.1 — 2024-08-13
- Fixed a password bug when **Show password** is set to *no*.
## v1.5 — 2023-07-12
- Client area better adapted for mobile.
- Added buttons to copy the login and password in the client area.
## v1.4 — 2023-12-21
- Client area enhancements:
- Option to hide service passwords by default.
- Added a **Show** button to reveal the service password in the client area.
- Option to display the service password in plain text.
- Note: save the product's *Module Settings* for the module to function correctly.
## v1.3 — 2023-12-18
- Various bug fixes.
- Fixed the session-count display in the client area.
- Support for Jellyfin 10.8.13.
## v1.2 — 2023-11-17
- Fixed incorrect library-selection behaviour (**CRITICAL**).
- Fixed bugs in the change-password feature.
- New **Use All Libraries** checkbox on the Module Settings page.
- Client-area changes and optimizations.
- Note: reconfigure the product's *Module Settings* and run **Change Package** on customer services.
## v1.1 — 2023-11-09
- Reworked library handling: `-` means *no libraries selected*, an empty field means *select all libraries*.
- Bug fixes.
## v1.0 — 2023-11-03
- First version.# Installation and Configuration Guide
Step-by-step instructions for installing and configuring the Jellyfin WHMCS module: WHMCS deployment, connecting your Jellyfin server, creating the product and configuring the access policy.
# WHMCS Module Installation and Update
### Jellyfin module **[WHMCS](https://puqcloud.com/link.php?id=77)**
##### [Order now](https://puqcloud.com/whmcs-module-jellyfin.php) | [Download](https://download.puqcloud.com/WHMCS/servers/PUQ_WHMCS-Jellyfin/) | [Community](https://community.puqcloud.com/)
## Supported PHP & WHMCS versions
The module supports **PHP 7.4, 8.1 and 8.2+** and **WHMCS 8.x / 9.x**, and is shipped as a **separate ionCube build per PHP version**. Download the build that matches the PHP version your WHMCS runs on.
| WHMCS version | PHP version | Module build |
|---------------|-------------|--------------|
| WHMCS 8.x | 7.4 | `php74` |
| WHMCS 8.x | 8.1 | `php81` |
| WHMCS 8.x | 8.2 | `php82` |
| WHMCS 9.x | 8.2 | `php82` |
> Match the build to your **server's PHP version**, not to the WHMCS version. PHP 8.2 and any newer PHP → always use `php82`. Requires **ionCube Loader v13+** (v14/v15 supported).
## Download
The module is distributed as a single ZIP archive. A separate build is published for each supported PHP major version — pick the one that matches the PHP runtime used by your WHMCS installation.
All versions and historical builds are available in the index:
- [https://download.puqcloud.com/WHMCS/servers/PUQ_WHMCS-Jellyfin/](https://download.puqcloud.com/WHMCS/servers/PUQ_WHMCS-Jellyfin/)
### Direct "latest" downloads
#### PHP 8.2
```bash
wget https://download.puqcloud.com/WHMCS/servers/PUQ_WHMCS-Jellyfin/php82/PUQ_WHMCS-Jellyfin-latest.zip
```
#### PHP 8.1
```bash
wget https://download.puqcloud.com/WHMCS/servers/PUQ_WHMCS-Jellyfin/php81/PUQ_WHMCS-Jellyfin-latest.zip
```
#### PHP 7.4
```bash
wget https://download.puqcloud.com/WHMCS/servers/PUQ_WHMCS-Jellyfin/php74/PUQ_WHMCS-Jellyfin-latest.zip
```
> Not sure which PHP version your WHMCS runs on? Check **Utilities > System > PHP Info** in the WHMCS admin area.
## Installation
### Step 1: Unzip the Archive
On your WHMCS server (or locally, before uploading):
```bash
unzip PUQ_WHMCS-Jellyfin-latest.zip
```
The archive extracts into a `PUQ_WHMCS-Jellyfin/` directory containing the server module folder `puqJellyfin`.
### Step 2: Copy the Server Module
Copy and replace `puqJellyfin` from the extracted `PUQ_WHMCS-Jellyfin/` directory to your WHMCS installation:
```
PUQ_WHMCS-Jellyfin/puqJellyfin → WHMCS_WEB_DIR/modules/servers/puqJellyfin/
```
Example:
```bash
cp -r PUQ_WHMCS-Jellyfin/puqJellyfin /var/www/html/whmcs/modules/servers/
```
### Step 3: ionCube Loader
Ensure **ionCube Loader v13+** is installed and enabled for the PHP version your WHMCS runs on. The module source is encoded with ionCube.
### Step 4: License key
Each product that uses this module requires a valid license key in the **License key** field of the product's **Module Settings** tab. Invalid or missing licenses are listed on the WHMCS admin homepage.

> The module self-creates its database tables (`puq_license`, `puq_module_versions`) on first load — there is no SQL to run manually.
## File Structure
After installation, the module files should be located at:
```
whmcs/
├── modules/
│ └── servers/
│ └── puqJellyfin/ # Server module
│ ├── puqJellyfin.php
│ ├── hooks.php
│ ├── whmcs.json
│ ├── lib/
│ ├── lang/
│ └── templates/
```
## Update Procedure
To update the module to a newer version:
1. Back up your WHMCS installation (and the existing `modules/servers/puqJellyfin/` directory).
2. Download the latest build that matches your server's PHP version (see **Download** above).
3. Upload and overwrite the files in `modules/servers/puqJellyfin/`.
4. Open any WHMCS admin page once — the migration runner brings the schema up to date automatically.
> **Upgrading from v2.x:** no reconfiguration is required. The module reads existing product settings from the legacy `configoption3`–`configoption8` slots until you save the product once through the new form, at which point they are consolidated into `configoption24`.
> **Tip:** always back up your WHMCS installation before performing an update.
# Add a Jellyfin server in WHMCS
### Jellyfin module **[WHMCS](https://puqcloud.com/link.php?id=77)**
##### [Order now](https://puqcloud.com/whmcs-module-jellyfin.php) | [Download](https://download.puqcloud.com/WHMCS/servers/PUQ_WHMCS-Jellyfin/) | [Community](https://community.puqcloud.com/)
Configure the connection to your Jellyfin server under **Setup → Products/Services → Servers → Add New Server**.
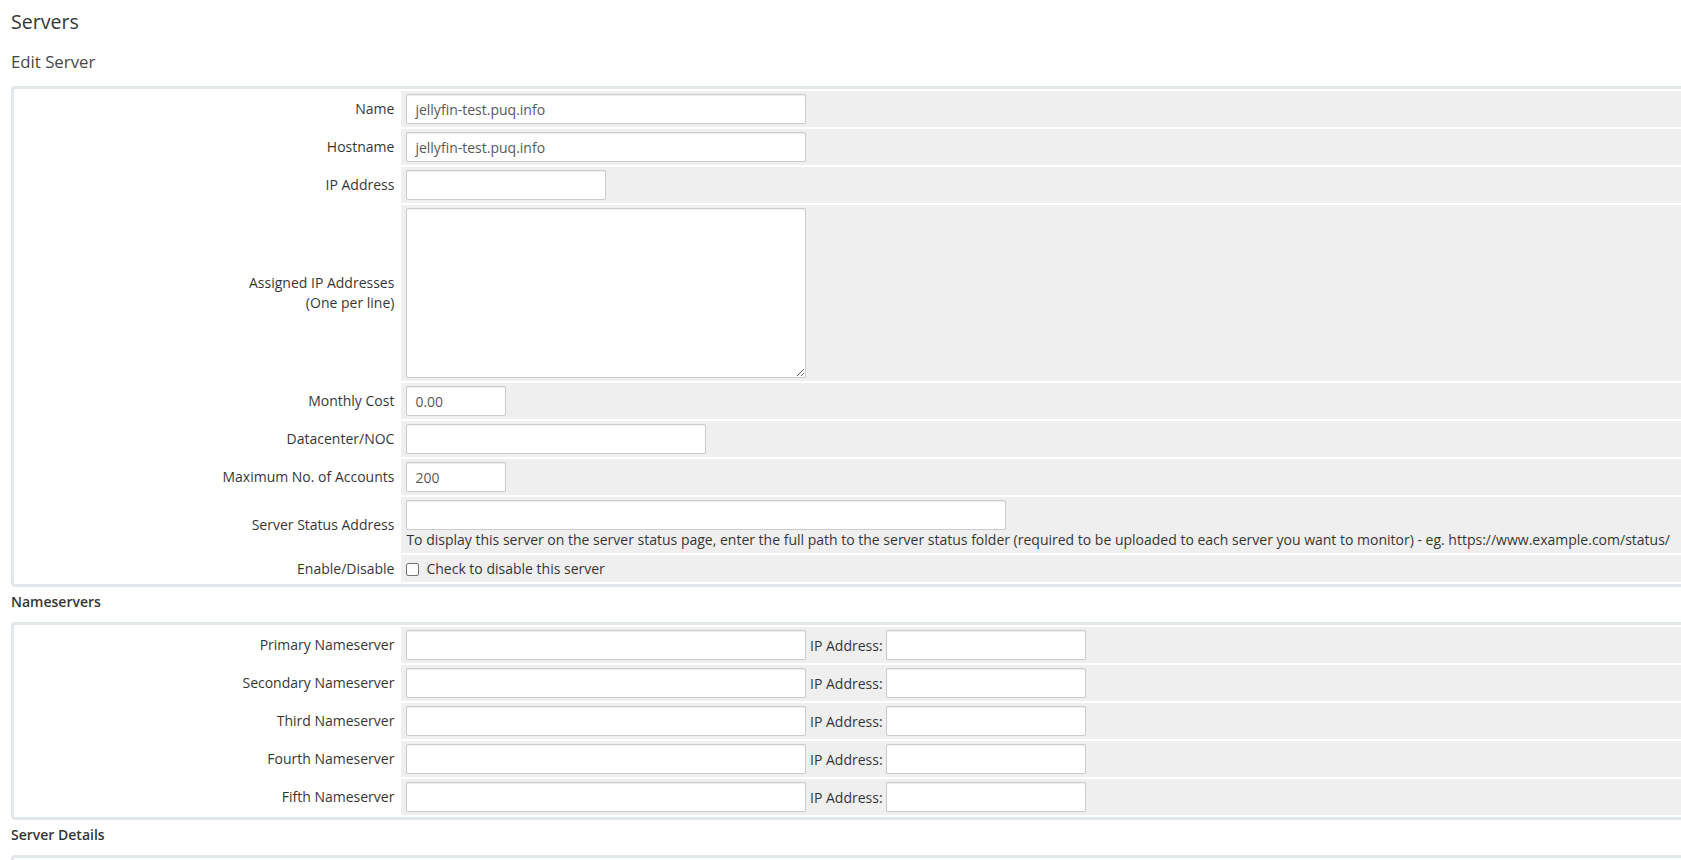
| Field | Value |
|-------|-------|
| **Hostname / IP Address** | The Jellyfin server hostname or IP. |
| **Secure (SSL)** | Enable if Jellyfin is served over HTTPS. |
| **Port** | Jellyfin port (default `8096`, or `443` when SSL is enabled). |
| **Username** | A Jellyfin **administrator** username. |
| **Password** | That administrator's password. |
| **Access Hash** | A Jellyfin **API key** (Dashboard → API Keys). |
| **Type / Module** | `PUQ Jellyfin`. |
In the **Server Details** section select **Module → PUQ Jellyfin** and fill in the **Username**, **Password** and **Access Hash** (API key), tick **Secure** for SSL and set the **Port**.
Use **Test Connection** to confirm WHMCS can reach Jellyfin and authenticate. The module authenticates with the username/password + API key to obtain an access token, then calls `System/Info` to verify connectivity.
Assign the server (or a server group containing it) to your Jellyfin product under the product's **Module Settings**.
# Product configuration
### Jellyfin module **[WHMCS](https://puqcloud.com/link.php?id=77)**
##### [Order now](https://puqcloud.com/whmcs-module-jellyfin.php) | [Download](https://download.puqcloud.com/WHMCS/servers/PUQ_WHMCS-Jellyfin/) | [Community](https://community.puqcloud.com/)
Create a product of type **PUQ Jellyfin** (Setup → Products/Services), assign the Jellyfin server on the **Module Settings** tab, then configure the access policy in the injected configuration panel.
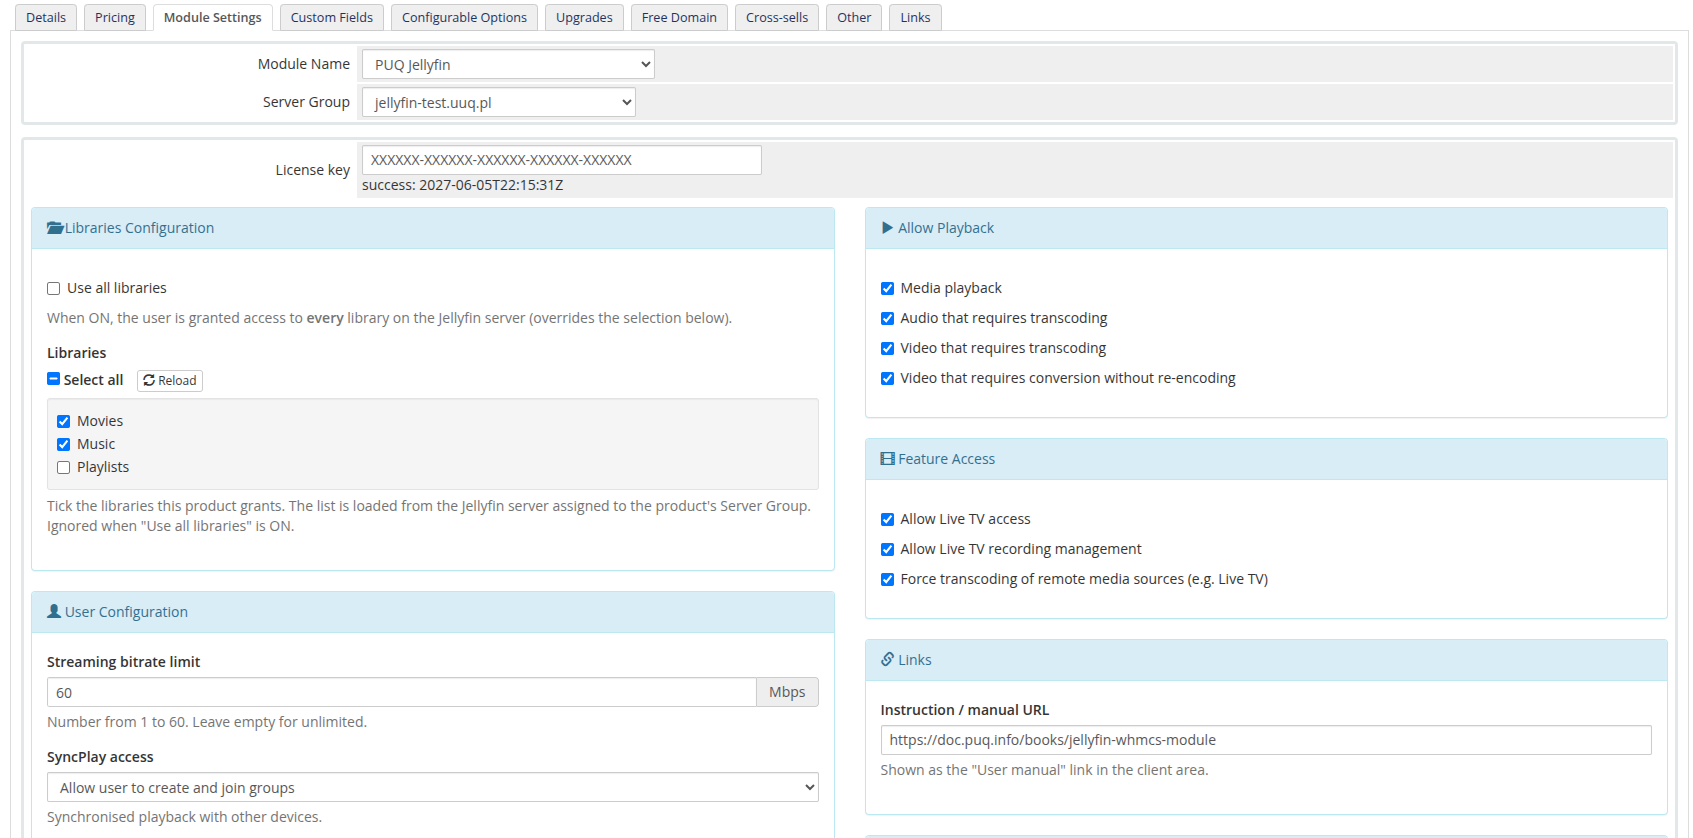
## Libraries Configuration
- **Use all libraries** — grant access to every library on the server (overrides the selection below).
- **Libraries** — the list of libraries is loaded live from the Jellyfin server assigned to the product's Server Group. Tick the libraries this product grants; use **Select all** to toggle everything, or **Reload** to refresh the list. Leaving everything unticked grants no library. If the server cannot be reached, a manual text box appears as a fallback (one library name per line). Ignored when "Use all libraries" is ON.
> The dynamic list requires the product to be saved with a Server Group that contains a reachable Jellyfin server. Until then the panel shows a hint to select and save a Server Group.

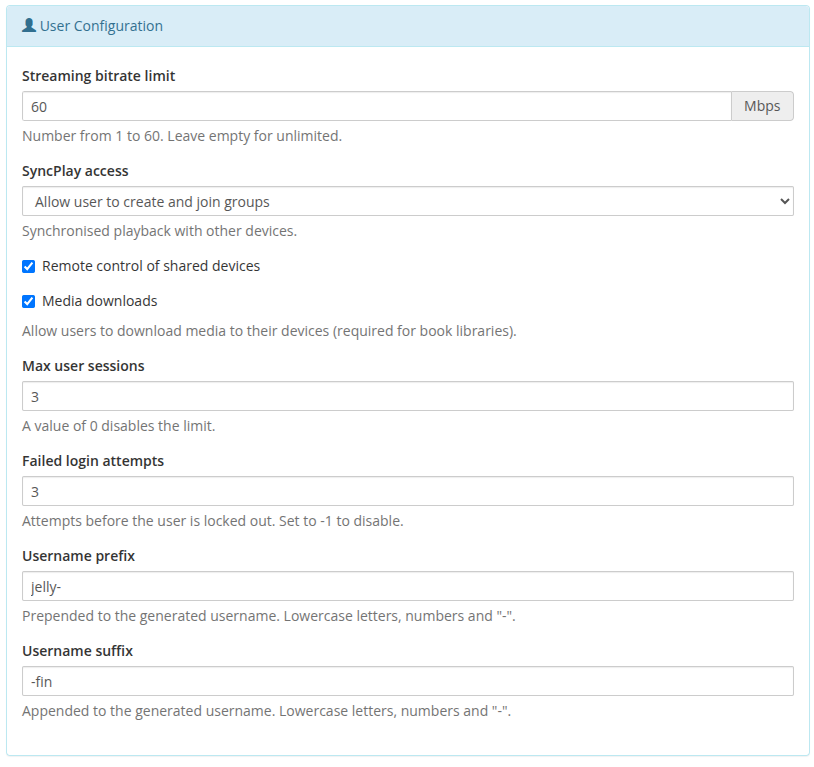
## User Configuration
- **Streaming bitrate limit** — 1–60 Mbps (empty = unlimited).
- **SyncPlay access** — create & join groups / join groups / disabled.
- **Remote control of shared devices**, **Media downloads** — on/off.
- **Max user sessions** — `0` disables the limit.
- **Failed login attempts** — lockout threshold; `-1` disables it.
- **Username prefix / suffix** — wrap the generated username.
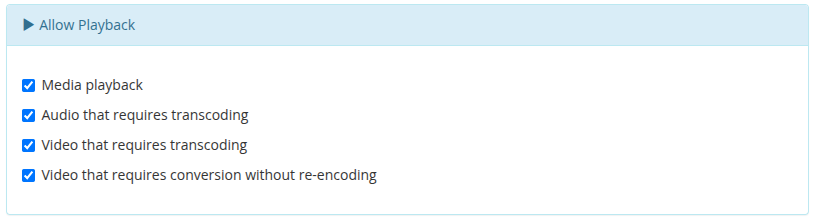
## Allow Playback
Toggle media playback, audio transcoding, video transcoding and video conversion without re-encoding.
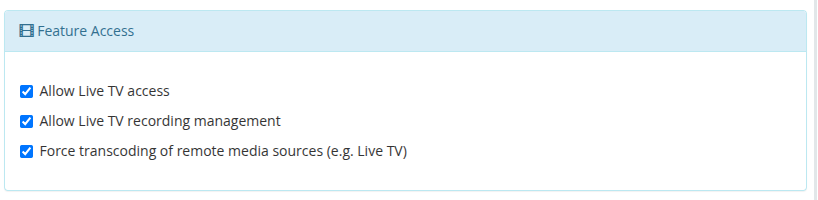
## Feature Access
Live TV access, Live TV recording management, and force transcoding of remote media sources.
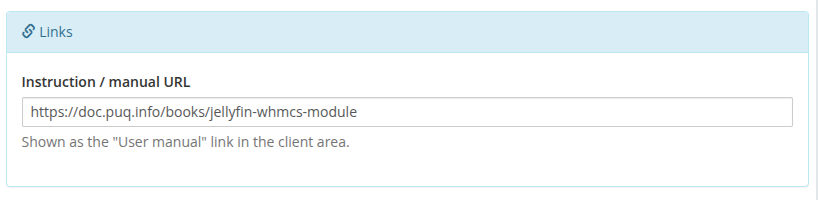
## Links
- **Instruction / manual URL** — shown as the *User manual* link in the client area.
## Client Area
- **Show password** — show button / plain text / hidden.
- **Password generation** — `length:characters`, e.g. `8:23456789abcdABCD`.
- **Username format** — `standard` (`prefix-suffix`) or `custom`.
- **Custom username** — macro template: `{user_id}`, `{service_id}`, `{random_digit_x}`, `{random_letter_x}`, `{unixtime}`, `{year}`, `{month}`, `{day}`, `{hour}`, `{minute}`, `{second}`.
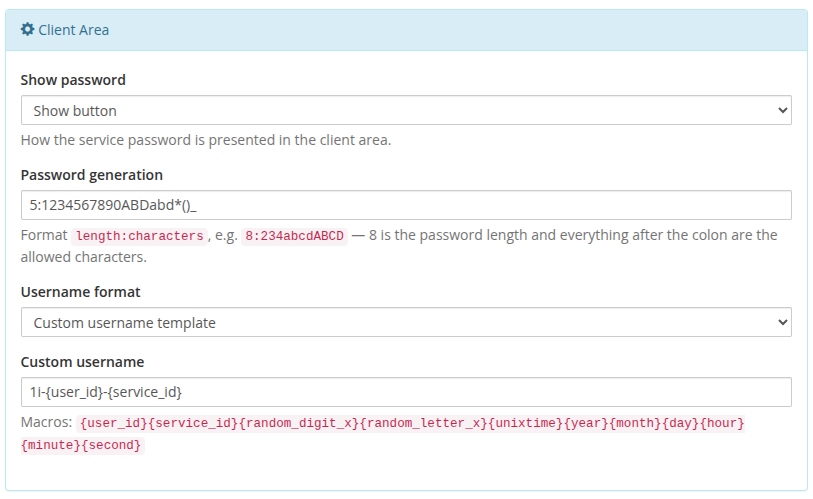
Settings are stored as a single JSON document in `configoption24`. After saving, **Create/Change** actions push the resulting policy to Jellyfin.
# Client Area
What the customer sees and can do on the Jellyfin service page in the WHMCS client area.
# Client area overview
### Jellyfin module **[WHMCS](https://puqcloud.com/link.php?id=77)**
##### [Order now](https://puqcloud.com/whmcs-module-jellyfin.php) | [Download](https://download.puqcloud.com/WHMCS/servers/PUQ_WHMCS-Jellyfin/) | [Community](https://community.puqcloud.com/)
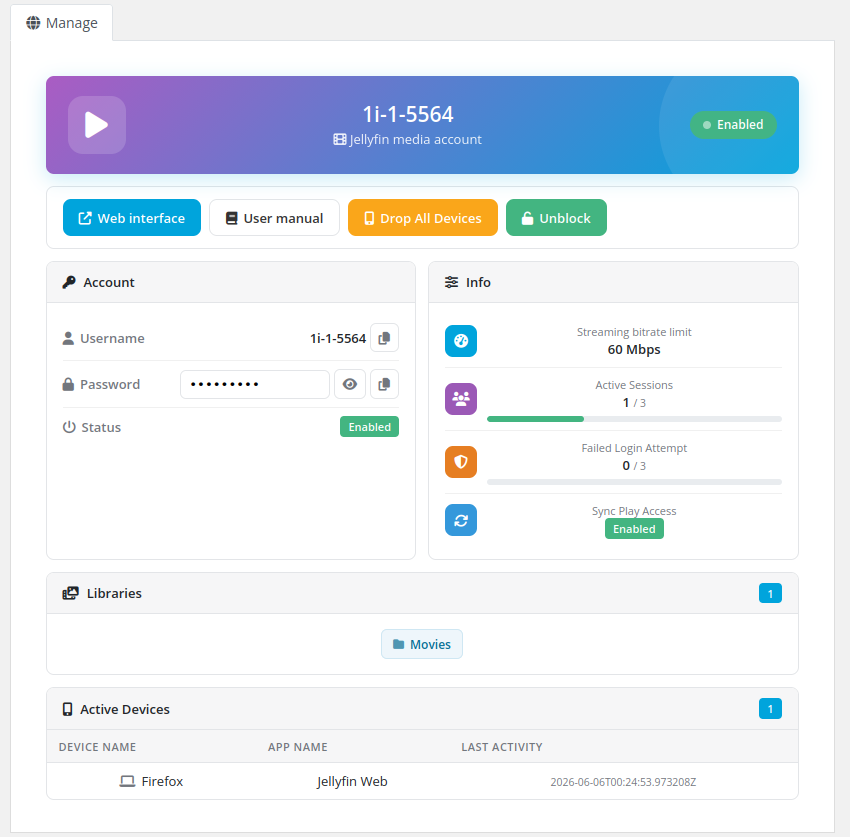
The client opens their Jellyfin service from **clientarea.php → My Services → (service) → Information**. The page loads its data over AJAX and renders a set of cards.

## Actions
- **Web interface** — opens the Jellyfin web UI in a new tab.
- **User manual** — opens the instruction URL configured on the product (if set).
- **Drop All Devices** — signs the account out of every device (confirmation required).
- **Unblock** — re-enables the account when it has been locked/disabled (shown only when disabled).
## Account
- **Username** with a copy button.
- **Password** — shown as a reveal button, plain text, or hidden, depending on the product's *Show password* setting; with a copy button.
- **Status** — Enabled / Disabled badge.
## Info
- Streaming bitrate limit, active sessions (with the max), failed-login attempts (with the lockout threshold), and SyncPlay access.
## Libraries & Devices
- **Libraries** — chips for each library the user can access (with a count badge).
- **Active Devices** — table of device name, app and last activity (with a count badge).
All actions use AJAX and report the result with a toast notification — the page never reloads.
# Admin Area
Managing a Jellyfin service from the WHMCS admin area.
# Service page
### Jellyfin module **[WHMCS](https://puqcloud.com/link.php?id=77)**
##### [Order now](https://puqcloud.com/whmcs-module-jellyfin.php) | [Download](https://download.puqcloud.com/WHMCS/servers/PUQ_WHMCS-Jellyfin/) | [Community](https://community.puqcloud.com/)
On the WHMCS admin service page (**Clients → (client) → Products/Services**) the module adds an information tab and the standard module command buttons.
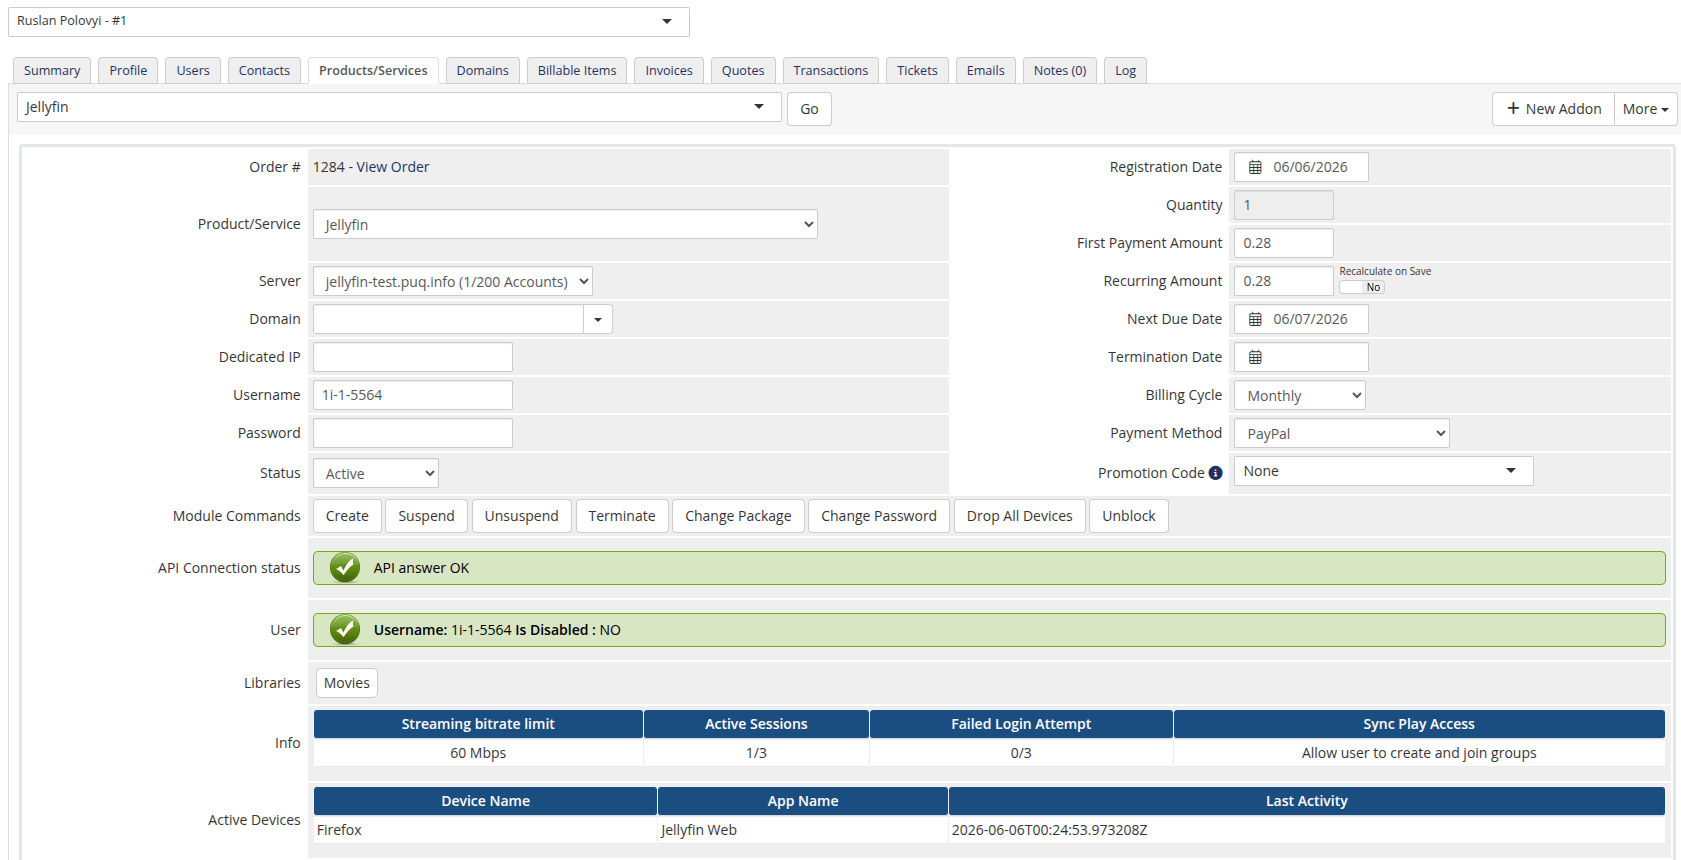
## Module commands
- **Create** — generates credentials, creates the Jellyfin user and applies the policy.
- **Suspend / Unsuspend** — toggles the user's *IsDisabled* flag.
- **Change Package** — re-applies the product policy to the existing user.
- **Change Password** — resets and sets a new password.
- **Terminate** — deletes the Jellyfin user.
## Custom buttons
- **Drop All Devices** — removes all of the user's registered devices.
- **Unblock** — re-enables a disabled account (requires the service to be *Active*).
## Information tab
- **API Connection status** — confirms the module can reach Jellyfin.
- **User** — username and disabled state (with a too-many-failed-logins warning).
- **Libraries** — the libraries the user can access.
- **Info** — streaming bitrate limit, active sessions, failed-login counter and SyncPlay access.
- **Active Devices** — device name, app and last activity.
> All lifecycle actions are license-gated: if the license cache is stale and the license server is unreachable, the action is refused with the license error.