# Mikrotik WireGuard VPN WHMCS module
# Description
### Mikrotik WireGuard VPN module **[WHMCS](https://puqcloud.com/link.php?id=77)**
##### [Order now](https://puqcloud.com/store/whmcs-module-mikrotik-wireguard-vpn) | [Download](https://download.puqcloud.com/WHMCS/servers/PUQ_WHMCS-Mikrotik-WireGuard-VPN/) | [FAQ](https://community.puqcloud.com/)
## PUQ Mikrotik WireGuard VPN — WHMCS Server Module
**PUQ Mikrotik WireGuard VPN** is a WHMCS server provisioning module for automated deployment of WireGuard VPN accounts on Mikrotik routers. The module communicates with Mikrotik via REST API and provides full lifecycle management of VPN services including creation, suspension, unsuspension, termination, and package changes.
- - - - - -
## Key Features
- **Automatic WireGuard VPN provisioning** — create and deploy VPN accounts on Mikrotik routers automatically
- **Full lifecycle management** — suspend, unsuspend, terminate, and change packages
- **Mikrotik REST API only** — communicates via Mikrotik REST API (RouterOS 7+)
- **Bandwidth speed limits** — configurable upload/download speed limits per product using Mikrotik Simple Queues
- **Private and public IP support** — assign IPs from a configurable pool per server
- **Metric billing** — usage-based billing for incoming and outgoing traffic (GB)
- **WireGuard configuration export** — text and QR code formats for easy client setup
- **VPN connection status monitoring** — real-time endpoint, handshake, and transfer info
- **VPN interface reboot** — reset frozen connections from client or admin area
- **Traffic statistics** — daily and monthly traffic charts with Google Charts (can be disabled per product)
- **Multilingual interface** — 25 languages: Arabic, Azerbaijani, Catalan, Chinese, Croatian, Czech, Danish, Dutch, English, Estonian, Farsi, French, German, Hebrew, Hungarian, Italian, Macedonian, Norwegian, Polish, Romanian, Russian, Spanish, Swedish, Turkish, Ukrainian
- **Custom links** — configurable links to setup instructions and VPN client downloads in client area
- - - - - -
## Available Options in the Admin Panel
- Create / Suspend / Unsuspend / Terminate users
- Change package (update bandwidth limits and WireGuard interface)
- VPN connection status and peer information
- VPN interface reboot function
- Text and QR code configuration display
- Metric Billing (Bandwidth Usage Download/Upload in GB)
- - - - - -
## Available Options in the Client Panel
- VPN connection status (endpoint, handshake, RX/TX)
- Text and QR code configuration with download button
- VPN interface reboot function
- Traffic statistics with daily and monthly charts
- Links to user manual and VPN client downloads
- - - - - -
## System Requirements
| Requirement | Minimum |
|---|
| **WHMCS** | 9.x+ |
| **PHP** | 8.2+ |
| **ionCube Loader** | v13 or newer (v14, v15) |
| **Mikrotik RouterOS** | 7+ |
- - - - - -
## Important Notes
- The upload and download speed settings in the WHMCS module register the opposite values on the Mikrotik router (e.g., download speed in WHMCS = upload speed in Mikrotik).
- To ensure proper VPN functionality, the administrator must correctly configure the Mikrotik router: NAT, Firewall, routing, and all required settings for VPN to operate correctly.
- - - - - -
## Links
- **Product page:** [https://puqcloud.com/](https://puqcloud.com/)
- **Documentation:** [https://doc.puq.info/books/mikrotik-wireguard-vpn-whmcs-module](https://doc.puq.info/books/mikrotik-wireguard-vpn-whmcs-module)
- **Support:** [https://puqcloud.com/submitticket.php](https://puqcloud.com/submitticket.php?step=2&deptid=1)
- **Community:** [https://community.puqcloud.com/](https://community.puqcloud.com/)# Changelog
### Mikrotik WireGuard VPN module **[WHMCS](https://puqcloud.com/link.php?id=77)**
##### [Order now](https://puqcloud.com/store/whmcs-module-mikrotik-wireguard-vpn) | [Download](https://download.puqcloud.com/WHMCS/servers/PUQ_WHMCS-Mikrotik-WireGuard-VPN/) | [FAQ](https://community.puqcloud.com/)
## v3.2.1 — 2026-06-02
- **Full compatibility with the latest Mikrotik RouterOS 7.21.4.** The module has been tested and certified against RouterOS 7.21.4, so you can confidently run the newest firmware on your routers without any provisioning hiccups.
- **Rock-solid REST API connections.** Resolved rare cases where requests to the router could stall and time out, leaving operations hanging. Account creation, suspension, statistics collection and status checks now complete instantly and reliably.
- **Snappier, more dependable automation.** With every API call responding without delay, day-to-day provisioning and billing run faster and smoother — fewer retries, no stuck tasks, and a more responsive experience for both your team and your customers.
- **PHP 7.4 support restored.** The module once again runs on PHP 7.4 in addition to PHP 8.x, so hosting environments that have not yet migrated to PHP 8 can keep using the latest version. PHP 7.4 will remain supported for as long as it is technically possible to do so.
- - - - - -
## v3.2 — 2026-04-21
- **Improved stability across the WHMCS admin area.** Rare page-loading errors that could appear on some admin screens (for example when opening a support ticket on installations with non-standard file layouts, symlinks or custom hosting paths) have been eliminated. The admin panel now loads smoothly in every environment.
- **Greater compatibility with complex hosting setups.** The module is now fully resilient to WHMCS installations using symlinked directories, multi-domain hosting and custom include paths.
- **Smoother day-to-day operation for administrators.** Fewer interruptions, no unexpected "Oops!" pages, and a more predictable experience when working with tickets, clients and services — so your team can focus on customers, not on troubleshooting.
- - - - - -
## v3.1 — 2026-02-26
### New Features
- Added option to disable traffic statistics collection per product
- When statistics collection is disabled, traffic data is not collected and the statistics page is hidden from the client area
- - - - - -
## v3.0 — 2026-02-02
### Changes
- Support for WHMCS 9+ with redesigned product module settings
- Updated client area interface design
- New admin settings UI with custom panels (Mikrotik & Bandwidth, WireGuard Configuration, History, Client Area)
- Configuration stored as JSON in configoption24 instead of individual config options
> **Warning:** Product reconfiguration is required after update from v2.x.
- - - - - -
## v2.0 — 2024-09-23
### Changes
- Module is coded with ionCube v13
- Supports PHP 7.4, 8.1, and 8.2 with WHMCS 8.11.0 and later versions
- - - - - -
## v1.3 — 2024-07-29
### New Features
- Added metric pricing for incoming and outgoing traffic (Bandwidth Usage Download/Upload in GB)
- - - - - -
## v1.2 — 2024-06-17
### New Features
- Implemented VPN interface reboot capability for connection resets
### Improvements
- Improved mobile client area adaptation
- Minor translation adjustments
- - - - - -
## v1.1 — 2023-12-15
### New Features
- Package change functionality introduced
### Improvements
- Minor administrative and client interface modifications
- - - - - -
## v1.0 — 2023-10-09
First release.
### Features
- Automatic creation and deployment of WireGuard VPN accounts on Mikrotik routers
- Suspend, unsuspend, and terminate VPN accounts
- Integration with Mikrotik REST API only (RouterOS 7+)
- Configurable bandwidth speed limits (upload/download)
- Support for private and public IP addresses
- IP address pool management per server
- Text and QR code WireGuard configuration formats
- VPN connection status monitoring (endpoint, handshake, RX/TX)
- Traffic statistics with daily and monthly charts
- Client area with configuration download and connection info
- Admin area with peer management and API status
- Multilingual support (25 languages)
- License verification system# Installation and Configuration Guide
Step-by-step instructions for installing the module, preparing the Mikrotik router, and configuring WHMCS products and servers.
# WHMCS Setup (Install / Update)
### Mikrotik WireGuard VPN module **[WHMCS](https://puqcloud.com/link.php?id=77)**
##### [Order now](https://puqcloud.com/store/whmcs-module-mikrotik-wireguard-vpn) | [Download](https://download.puqcloud.com/WHMCS/servers/PUQ_WHMCS-Mikrotik-WireGuard-VPN/) | [FAQ](https://community.puqcloud.com/)
## System Requirements
| Requirement | Minimum |
|-------------|---------|
| **WHMCS** | 9.x+ |
| **PHP** | 8.2+ |
| **ionCube Loader** | v13 or newer (v14, v15) |
---
## Download
Download the latest version of the module:
```bash
wget https://download.puqcloud.com/WHMCS/servers/PUQ_WHMCS-Mikrotik-WireGuard-VPN/php82/PUQ_WHMCS-Mikrotik-WireGuard-VPN-latest.zip
```
Unzip the archive:
```bash
unzip PUQ_WHMCS-Mikrotik-WireGuard-VPN-latest.zip
```
---
## Installation
**Step 1.** Download and unzip the module archive (see above).
**Step 2.** Copy the `puqMikrotikWireGuardVPN` directory to your WHMCS installation:
```
WHMCS_WEB_DIR/modules/servers/puqMikrotikWireGuardVPN
```
The resulting directory structure should look like:
```
modules/
servers/
puqMikrotikWireGuardVPN/
puqMikrotikWireGuardVPN.php
hooks.php
lib/
templates/
lang/
...
```
**Step 3.** The module is ready to use. Proceed to configure a server and product in WHMCS.
---
## Update
The update process is identical to the installation — simply download the latest version and replace the existing `puqMikrotikWireGuardVPN` directory.
> **Note:** When updating from v2.x to v3.x, product reconfiguration is required due to the new settings storage format.
---
## Legacy Versions
For older WHMCS versions (8.x), legacy module builds are available:
- **All versions:** [https://download.puqcloud.com/WHMCS/servers/PUQ_WHMCS-Mikrotik-WireGuard-VPN/](https://download.puqcloud.com/WHMCS/servers/PUQ_WHMCS-Mikrotik-WireGuard-VPN/)
- **PHP 7.4:** [https://download.puqcloud.com/WHMCS/servers/PUQ_WHMCS-Mikrotik-WireGuard-VPN/php74/](https://download.puqcloud.com/WHMCS/servers/PUQ_WHMCS-Mikrotik-WireGuard-VPN/php74/)
- **PHP 8.1:** [https://download.puqcloud.com/WHMCS/servers/PUQ_WHMCS-Mikrotik-WireGuard-VPN/php81/](https://download.puqcloud.com/WHMCS/servers/PUQ_WHMCS-Mikrotik-WireGuard-VPN/php81/)
# Setup Guide: Mikrotik Preparation and Configuration
### Mikrotik WireGuard VPN module **[WHMCS](https://puqcloud.com/link.php?id=77)**
##### [Order now](https://puqcloud.com/store/whmcs-module-mikrotik-wireguard-vpn) | [Download](https://download.puqcloud.com/WHMCS/servers/PUQ_WHMCS-Mikrotik-WireGuard-VPN/) | [FAQ](https://community.puqcloud.com/)
## Prerequisites
- **RouterOS version 7 or higher** is required.
- Access to the Mikrotik router via terminal (SSH, Winbox terminal, or WebFig terminal).
> **Important:** Enter the following commands one by one and wait for each command to complete before proceeding to the next.
---
## Step I. Check RouterOS Version
Verify that your router is running RouterOS 7 or higher:
```
system/package/print
```
---
## Step II. Create Root Certificate Authority
Create a local CA certificate for SSL:
```
/certificate add name=LocalCA common-name=LocalCA key-usage=key-cert-sign,crl-sign
```
---
## Step III. Sign the CA Certificate
```
/certificate sign LocalCA
```
---
## Step IV. Create Webfig Certificate
Replace `XXX.XXX.XXX.XXX` with the router's **public IP address**:
```
/certificate add name=Webfig common-name=XXX.XXX.XXX.XXX
```
---
## Step V. Sign the Webfig Certificate
```
/certificate sign Webfig ca=LocalCA
```
---
## Step VI. Enable SSL for the Web Interface
```
/ip service set www-ssl certificate=Webfig disabled=no
```
---
## Step VII. Enable API-SSL
```
/ip service set api-ssl certificate=Webfig disabled=no
```
---
## Step VIII. WireGuard VPN Server Setup
Create and enable the WireGuard VPN server interface through the RouterOS interface.
You can do this via Winbox or WebFig:
1. Navigate to **WireGuard** section
2. Click **Add New** (+)
3. Set the interface name (e.g., `wireguard1`)
4. Set the **Listen Port** (e.g., `13231`)
5. Enable the interface
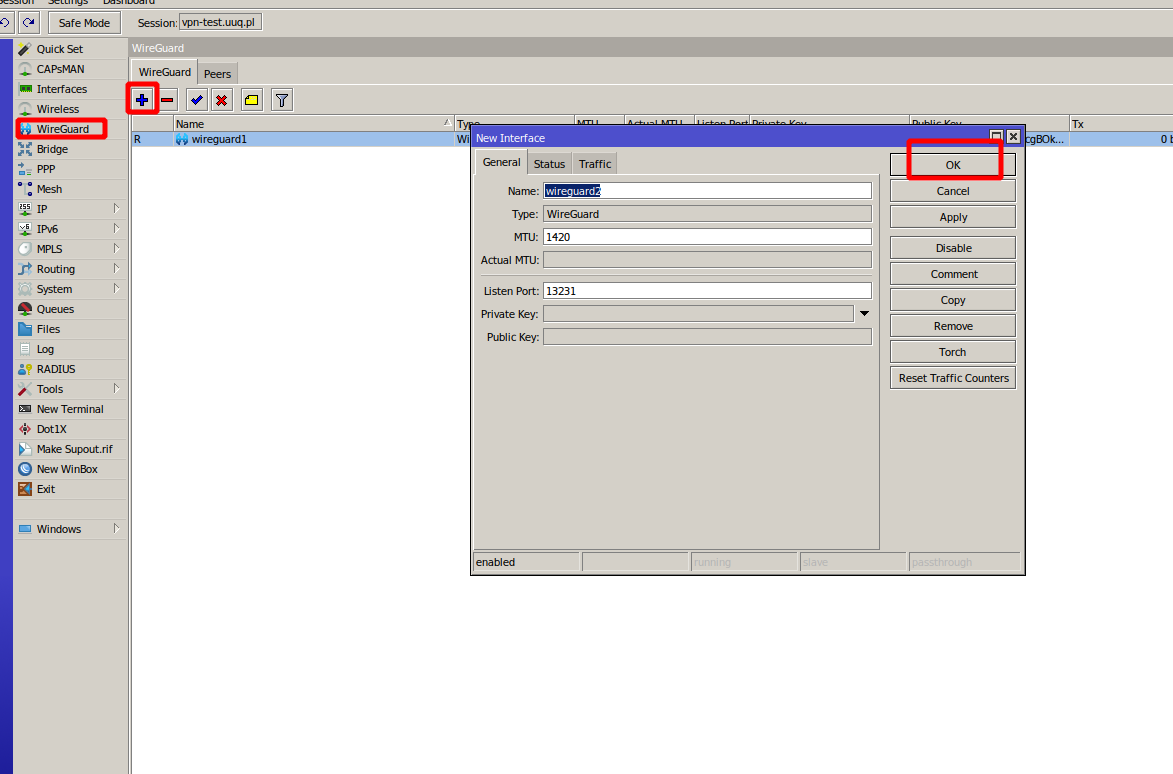
*WireGuard interface configuration in Mikrotik WebFig*
---
## Step IX. Configure Firewall, NAT and Routing
> **Important:** Please be aware that to ensure proper functionality of VPN connections, it is essential for you, as an administrator, to correctly configure the Mikrotik router. This entails configuring **NAT**, **Firewall**, **routing**, and all the required settings for VPN to operate correctly.
Example NAT masquerade rule (adjust to your network):
```
/ip firewall nat add chain=srcnat out-interface=ether1 action=masquerade
```
Example firewall rule to allow WireGuard traffic:
```
/ip firewall filter add chain=input protocol=udp dst-port=13231 action=accept comment="Allow WireGuard"
```
---
## Next Steps
After completing the Mikrotik preparation, proceed to [Add server (router Mikrotik) in WHMCS](../03-installation-and-configuration/03-add-server.md).
# Add Server (Router Mikrotik) in WHMCS
### Mikrotik WireGuard VPN module **[WHMCS](https://puqcloud.com/link.php?id=77)**
##### [Order now](https://puqcloud.com/store/whmcs-module-mikrotik-wireguard-vpn) | [Download](https://download.puqcloud.com/WHMCS/servers/PUQ_WHMCS-Mikrotik-WireGuard-VPN/) | [FAQ](https://community.puqcloud.com/)
Navigate to **System Settings > Servers > Add New Server** in WHMCS admin area.
---
## Step 1: Name and Hostname
- **Name** — a descriptive name for your convenience (e.g., "Mikrotik VPN Router 1")
- **Hostname** — the hostname that resolves to your Mikrotik router's IP address (e.g., `vpn.mydomain.com`). You can also use a dedicated domain. The important thing is that the chosen hostname resolves to the IP address of the Mikrotik router in your DNS.
---
## Step 2: Assigned IP Addresses
In the **Assigned IP Addresses** field, enter a list of IP addresses that will be issued to VPN clients — one IP per line.
These IPs will be assigned to WireGuard peers as their tunnel addresses. The module automatically allocates the first available (unused) IP from this pool for each new service.
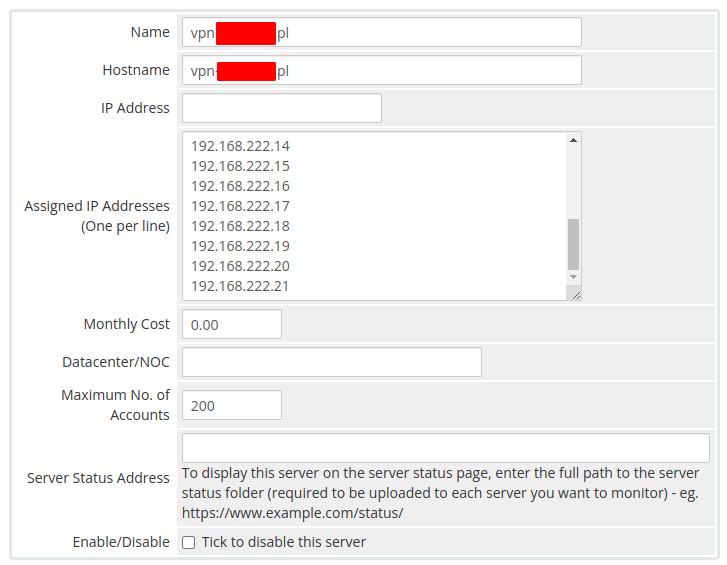
*Enter the list of IP addresses for VPN clients*
---
## Step 3: Server Details
1. Select the **"PUQ Mikrotik WireGuard VPN"** module from the Module dropdown
2. Enter the correct **username** and **password** for the Mikrotik router
3. Set the **port** (default: `443` for HTTPS REST API)
4. Check the **Secure** checkbox if using HTTPS (recommended)
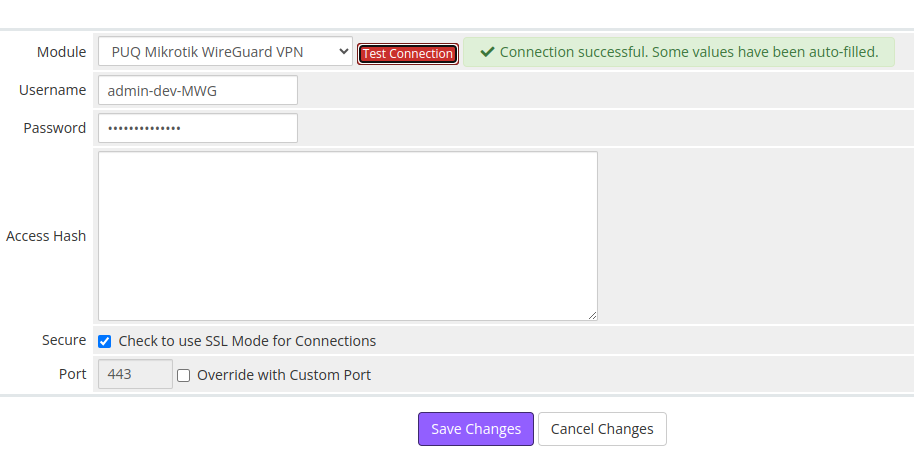
*Server connection settings with module selection*
---
## Step 4: Test Connection
Click the **"Test Connection"** button to verify that WHMCS can communicate with the Mikrotik router via REST API.
A successful connection will confirm that:
- The Mikrotik router is reachable
- The credentials are correct
- The REST API is enabled and responding
---
## Next Steps
After adding the server, proceed to [Product Configuration in WHMCS](../03-installation-and-configuration/04-product-configuration.md).
# Product Configuration in WHMCS
### Mikrotik WireGuard VPN module **[WHMCS](https://puqcloud.com/link.php?id=77)**
##### [Order now](https://puqcloud.com/store/whmcs-module-mikrotik-wireguard-vpn) | [Download](https://download.puqcloud.com/WHMCS/servers/PUQ_WHMCS-Mikrotik-WireGuard-VPN/) | [FAQ](https://community.puqcloud.com/)
Navigate to **System Settings > Products/Services > Create a New Product** in WHMCS admin area.
Select the **"PUQ Mikrotik WireGuard VPN"** module on the **Module Settings** tab.
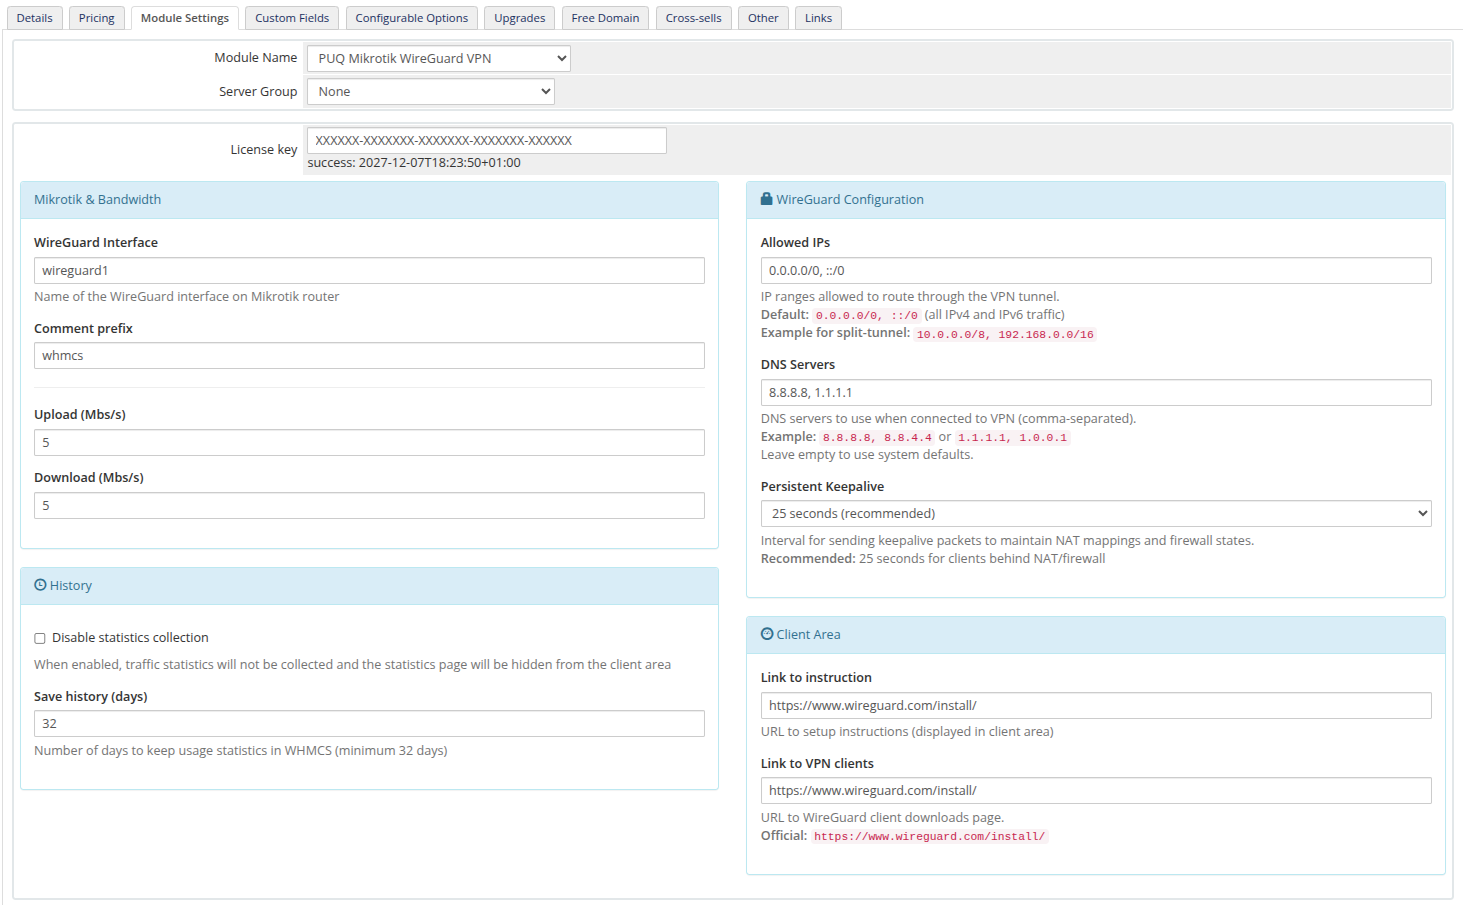
*Product module settings with all configuration panels*
---
## License Key
Enter a valid, pre-purchased license key for the module. The license status is displayed below the key field.
---
## Mikrotik & Bandwidth
| Field | Description | Default |
|-------|-------------|---------|
| **WireGuard Interface** | Name of the WireGuard interface on the Mikrotik router (must be pre-created) | `wireguard1` |
| **Comment prefix** | Prefix added to VPN peer and queue comments on Mikrotik | `whmcs` |
| **Upload (Mbs/s)** | Upload bandwidth speed limit in Mbps | `1` |
| **Download (Mbs/s)** | Download bandwidth speed limit in Mbps | `1` |
---
## WireGuard Configuration
These settings are included in the WireGuard client configuration file provided to customers:
| Field | Description | Default |
|-------|-------------|---------|
| **Allowed IPs** | IP ranges allowed to route through the VPN tunnel | `0.0.0.0/0, ::/0` |
| **DNS Servers** | DNS servers to use when connected to VPN (comma-separated) | `8.8.8.8, 1.1.1.1` |
| **Persistent Keepalive** | Interval for sending keepalive packets (15/25/30/60/120 seconds) | `25 seconds` |
**Allowed IPs examples:**
- `0.0.0.0/0, ::/0` — route all IPv4 and IPv6 traffic through VPN (full tunnel)
- `10.0.0.0/8, 192.168.0.0/16` — route only specific networks (split tunnel)
---
## History
| Field | Description | Default |
|-------|-------------|---------|
| **Disable statistics collection** | When enabled, traffic statistics will not be collected and the statistics page will be hidden from the client area | Unchecked |
| **Save history (days)** | Number of days to keep usage statistics in WHMCS (minimum 32 days) | `32` |
---
## Client Area
| Field | Description | Default |
|-------|-------------|---------|
| **Link to instruction** | URL to setup instructions (displayed in client area as "User manual" button) | Empty |
| **Link to VPN clients** | URL to WireGuard client downloads page (displayed as "VPN client" button) | Empty |
**Recommended:** Set "Link to VPN clients" to `https://www.wireguard.com/install/` — the official WireGuard client downloads page.
---
## Metric Billing
The module supports usage-based billing through WHMCS Metric Billing. Two metrics are available:
- **Bandwidth Usage Download (GB)** — monthly download traffic in gigabytes
- **Bandwidth Usage Upload (GB)** — monthly upload traffic in gigabytes
To enable metric billing, go to the product's **Metric Billing** section and toggle the desired metrics **ON**, then click **Configure Pricing** to set the per-GB price.

*Metric Billing settings with Download and Upload metrics enabled*
# Client Area
The client-facing interface for managing WireGuard VPN services.
# Home Screen
### Mikrotik WireGuard VPN module **[WHMCS](https://puqcloud.com/link.php?id=77)**
##### [Order now](https://puqcloud.com/store/whmcs-module-mikrotik-wireguard-vpn) | [Download](https://download.puqcloud.com/WHMCS/servers/PUQ_WHMCS-Mikrotik-WireGuard-VPN/) | [FAQ](https://community.puqcloud.com/)
Customers accessing their VPN service panel can view and manage their WireGuard VPN connection.
---
## Action Buttons
At the top of the page, the following buttons are displayed:
- **VPN client** — link to WireGuard client downloads (if configured by administrator)
- **User manual** — link to setup instructions (if configured by administrator)
- **Reset VPN Interface** — reboot the VPN interface to reset a frozen connection
---
## Network Configuration
Displays the VPN service status and settings:
- **Enable** — shows whether the VPN peer is enabled or disabled
- **VPN Protocol** — always "WireGuard"
- **Bandwidth download/upload** — the configured speed limits in Mb/s
---
## Connection Status
Real-time information about the VPN connection:
- **Endpoint** — the client's current IP address and port (shown when connected)
- **Latest handshake** — timestamp of the last successful WireGuard handshake
- **Transfer RX** — data received by the peer
- **Transfer TX** — data sent by the peer
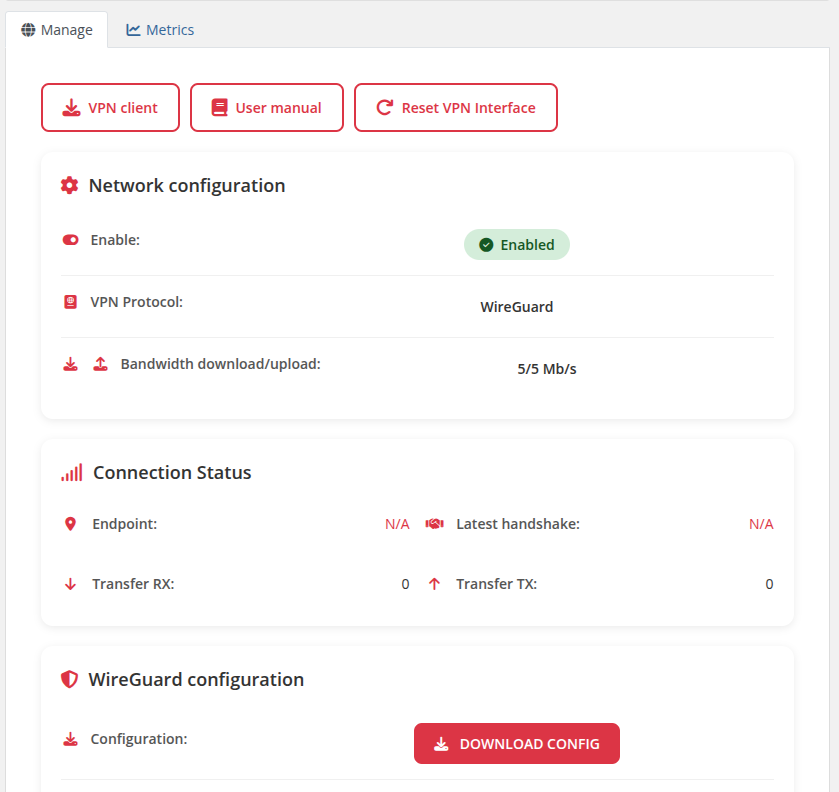
*Client area overview showing action buttons, network configuration, and connection status*
---
## WireGuard Configuration
Provides the client with everything needed to configure their WireGuard client:
- **DOWNLOAD CONFIG** button — downloads the `wg0.conf` configuration file
- **QR Code** — scannable QR code for mobile WireGuard apps
- **Configuration text** — the full WireGuard configuration in text format
The configuration includes:
```
[Interface]
Address =
DNS =
PrivateKey =
[Peer]
PersistentKeepalive =
Endpoint = :
PublicKey =
AllowedIPs =
```
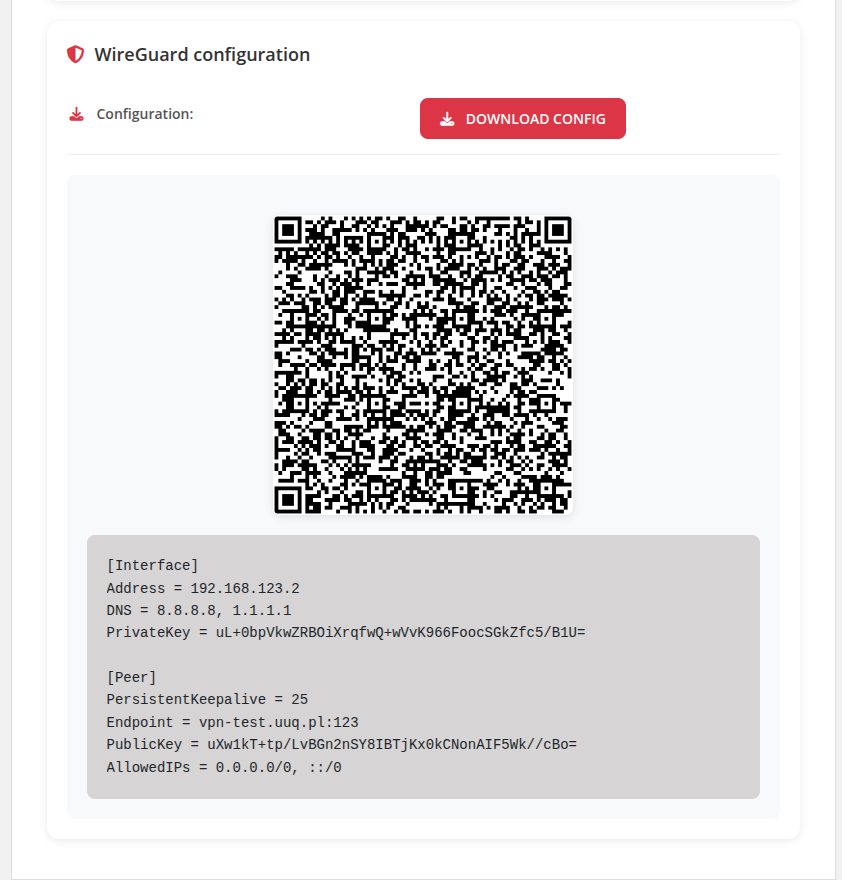
*WireGuard configuration section with QR code and text config*
---
## Traffic Statistics
When traffic statistics collection is enabled (default), a **Traffic statistics** link appears in the sidebar navigation.
The statistics page displays two charts powered by Google Charts:
- **Traffic statistics for the last 30 days** — daily download and upload traffic in GB
- **Total traffic for all time per month** — monthly aggregated download and upload traffic in GB
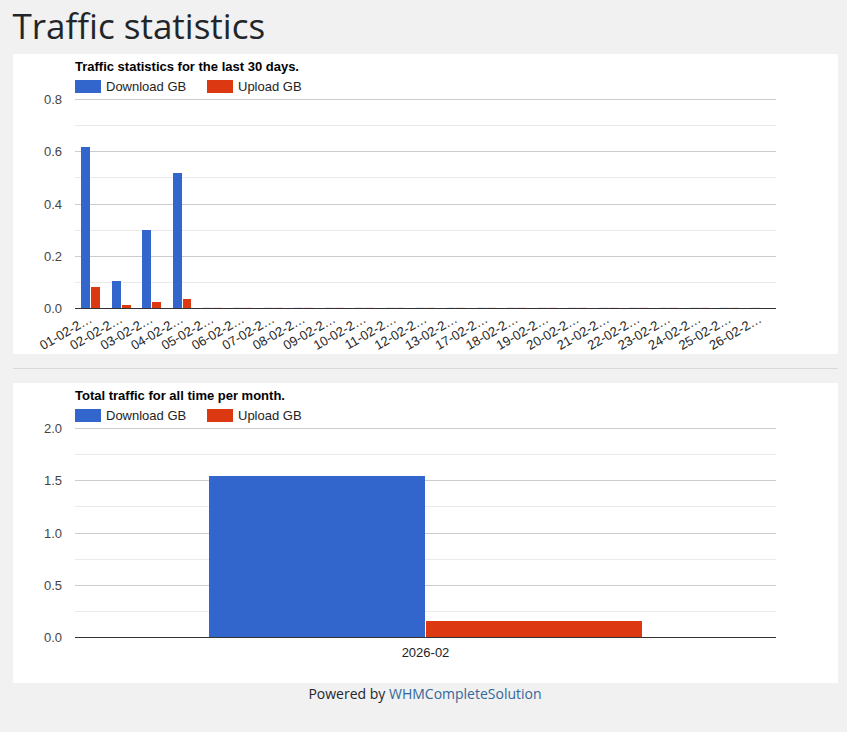
*Traffic statistics page with daily and monthly charts*
> **Note:** Traffic statistics can be disabled per product in the admin settings (History > Disable statistics collection). When disabled, the sidebar link and statistics page are hidden.
# Admin Area
The administrator interface for managing WireGuard VPN service instances.
# Product Information
### Mikrotik WireGuard VPN module **[WHMCS](https://puqcloud.com/link.php?id=77)**
##### [Order now](https://puqcloud.com/store/whmcs-module-mikrotik-wireguard-vpn) | [Download](https://download.puqcloud.com/WHMCS/servers/PUQ_WHMCS-Mikrotik-WireGuard-VPN/) | [FAQ](https://community.puqcloud.com/)
The admin service management page provides a comprehensive view of each VPN service instance.
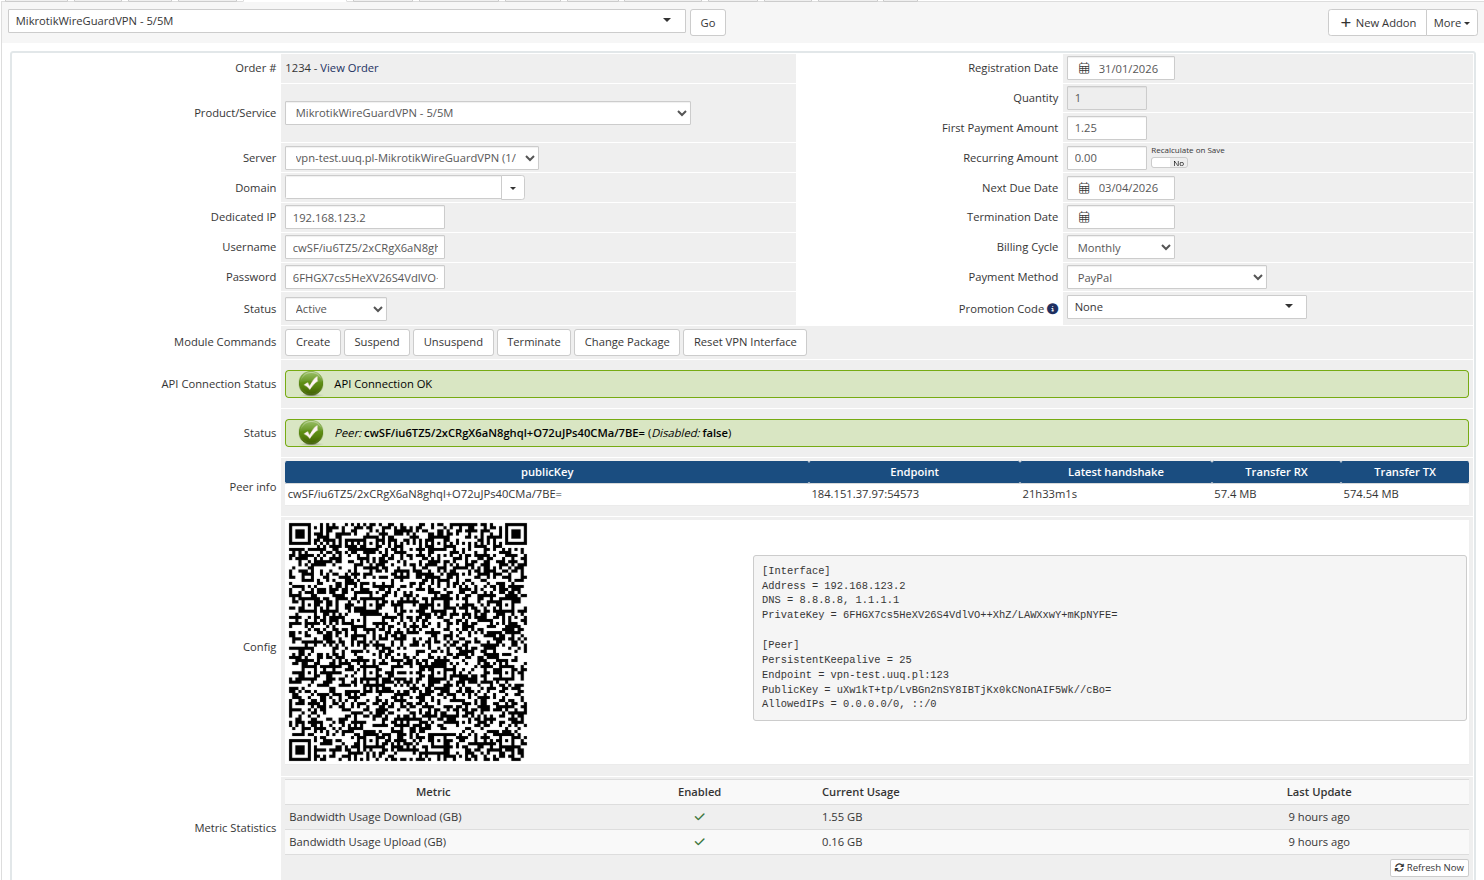
*Admin area product information screen*
---
## License Verification
Displays the license status for the product. If the license is invalid or expired, an error message is shown.
---
## API Connection Status
Shows whether WHMCS can successfully communicate with the Mikrotik router:
- **API Connection OK** — the Mikrotik router is reachable and responding
- **API connection problem** — the router is unreachable or credentials are incorrect
---
## Peer Status
Indicates whether the WireGuard peer exists on the Mikrotik router and its current state:
- **Disabled: false** — the peer exists and is active (green indicator)
- **Disabled: true** — the peer exists but is disabled/suspended (red indicator)
- **The peer does not exist on the VPN server** — no peer found for this service
---
## Peer Info
A table displaying detailed peer information:
| Field | Description |
|-------|-------------|
| **publicKey** | The client's WireGuard public key |
| **Endpoint** | The client's current IP address and port (N/A if not connected) |
| **Latest handshake** | Timestamp of the last successful WireGuard handshake (N/A if never connected) |
| **Transfer RX** | Total data received by the peer |
| **Transfer TX** | Total data sent by the peer |
---
## Config
Displays the WireGuard client configuration in two formats:
- **QR Code** — scannable QR code image
- **Text config** — the full WireGuard configuration text
---
## Admin Actions
The following management actions are available:
| Action | Description |
|--------|-------------|
| **Create** | Generate WireGuard keys, allocate IP, create peer and bandwidth queue on Mikrotik |
| **Suspend** | Disable the WireGuard peer on Mikrotik |
| **Unsuspend** | Re-enable the WireGuard peer on Mikrotik |
| **Terminate** | Delete the peer and queue from Mikrotik, clear service data |
| **Change Package** | Update the peer's WireGuard interface and recreate the bandwidth queue with new limits |
| **Reset VPN Interface** | Temporarily disable and re-enable the peer to reset a frozen connection |