Installation and configuration guide
- Setup (install/update)
- License Activation
- Add server (MinIO) in WISECP
- Service/Product configuration
- Setup guide: MinIO S3 setup
Setup (install/update)
MinIO S3 module WISECP
Order now | Download | FAQ
To install and update a module, you must perform one and the same action.
1. Download the latest version of the module.
wget http://download.puqcloud.com/WISECP/Product/PUQ_WISECP-MinIO-S3/PUQ_WISECP-MinIO-S3-latest.zipAll versions are available: https://download.puqcloud.com/WISECP/Product/PUQ_WISECP-MinIO-S3/
2. Unzip the archive with the module.
unzip PUQ_WISECP-MinIO-S3-latest.zip3. Copy and Replace "puqMinIOS3" from "PUQ_WISECP-MinIO-S3" to "WISECP_WEB_DIR/coremio/modules/Product/"
License Activation
MinIO S3 module WISECP
Order now | Download | FAQ
1. Log in to the administrative area of your WISECP.
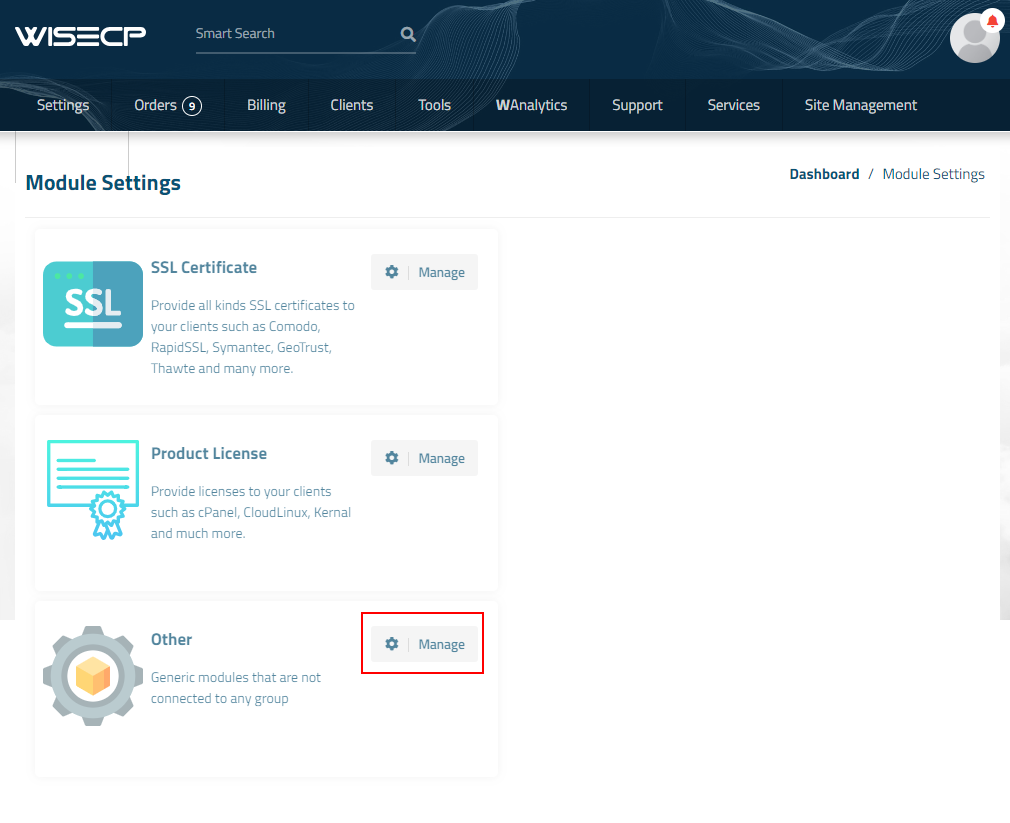
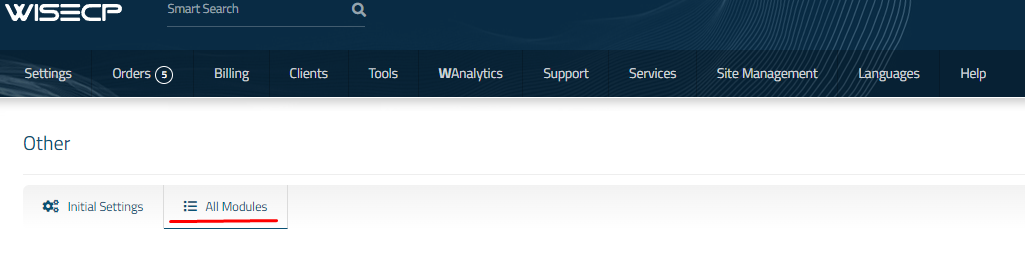
2. Go to module configuration.
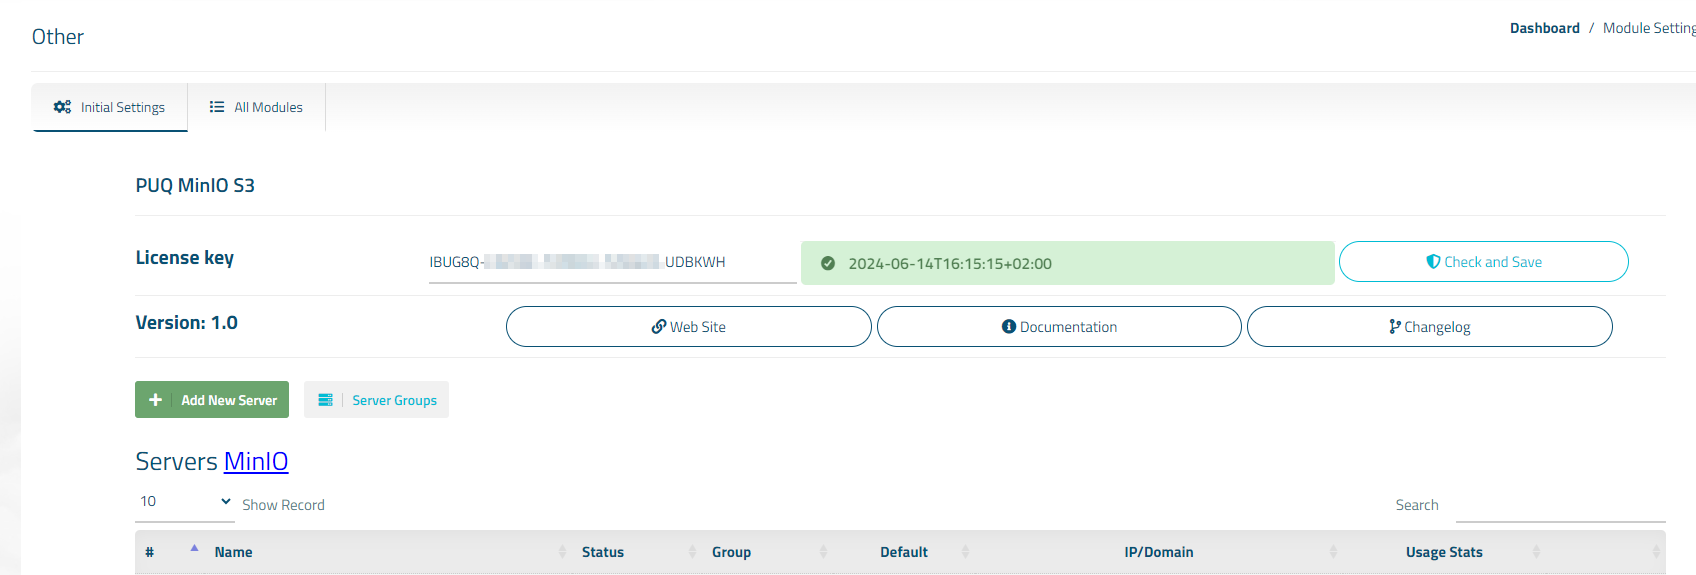
Services -> Service Management -> Module Settings -> Other -> All Modules -> PUQ MinIO S3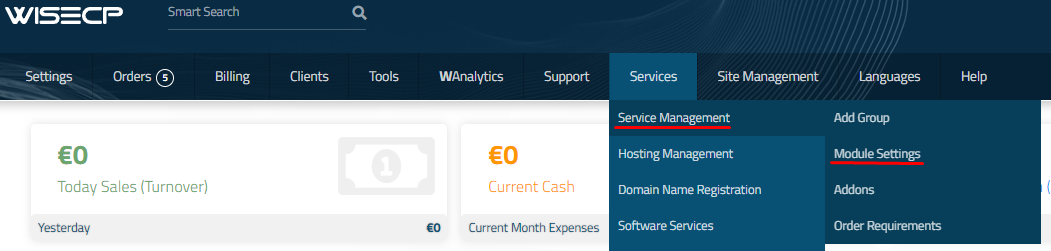

3. On the open page, enter the purchased license key for this product and click the 'Check and Save' button to validate the key and save it.
Add server (MinIO) in WISECP
MinIO S3 module WISECP
Order now | Download | FAQ
1. Log in to the administrative area of your WISECP.
2. Go to module configuration.
Services -> Service Management -> Module Settings -> Other -> All Modules -> PUQ MinIO S3
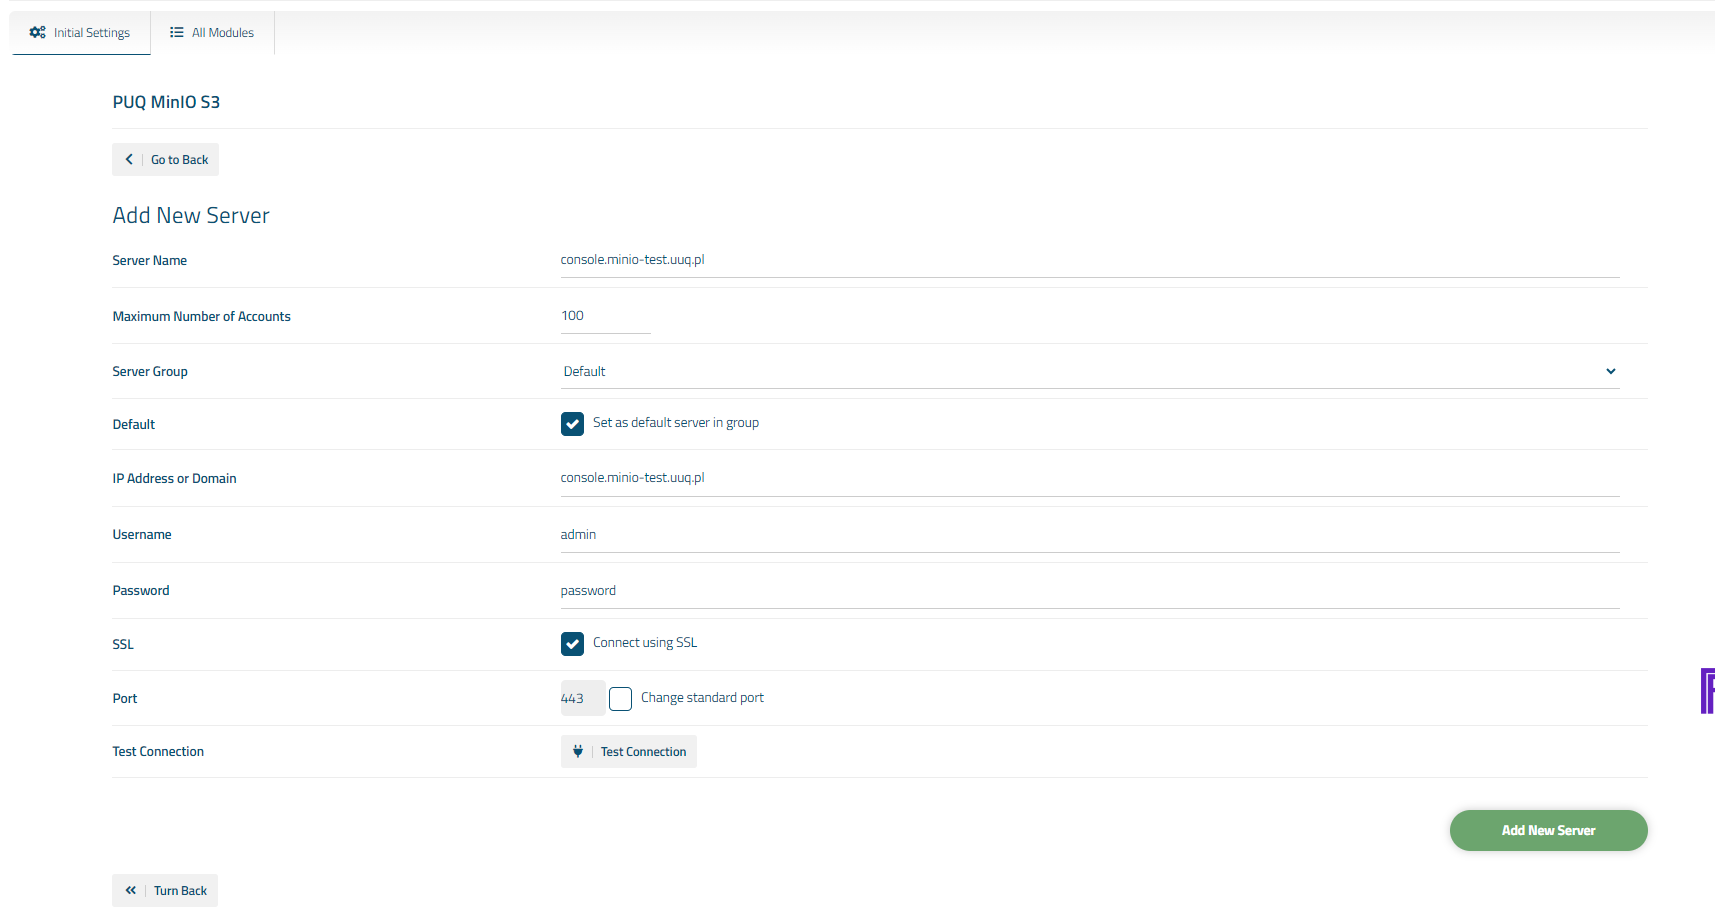
3. In the opened page, click the 'Add Server' button.
4. On the opened page, enter all the necessary information:
- Name: Displayed name of the server.
- Maximum Number of Accounts: The number of services that can be on this server.
- Server Group: Optionally, choose the server group.
- IP Address or Domain: The address of the ownCloud server you are connecting to.
- Username/Password: Username and Password on the ownCloud server.
- Check the SSL box if you want to use SSL-encrypted connection. If necessary, specify the port and perform a connection test.

3. On the open page, enter the purchased license key for this product and click the 'Check and Save' button to validate the key and save it.
Service/Product configuration
MinIO S3 module WISECP
Order now | Download | FAQ
If you do not have a Service Group where you want to place the new service, you need to create a new Service Group
1. Log in to the administrative area of your WISECP.
2. Create New Service Group
Go to
Services -> Service Management -> Add Group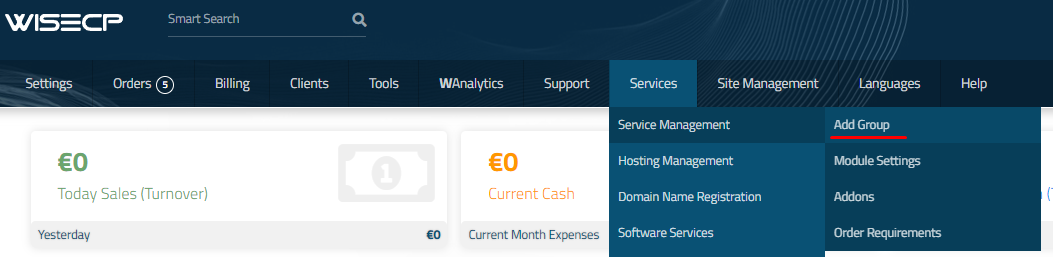
Enter all the necessary data and click the 'Create Group' button.
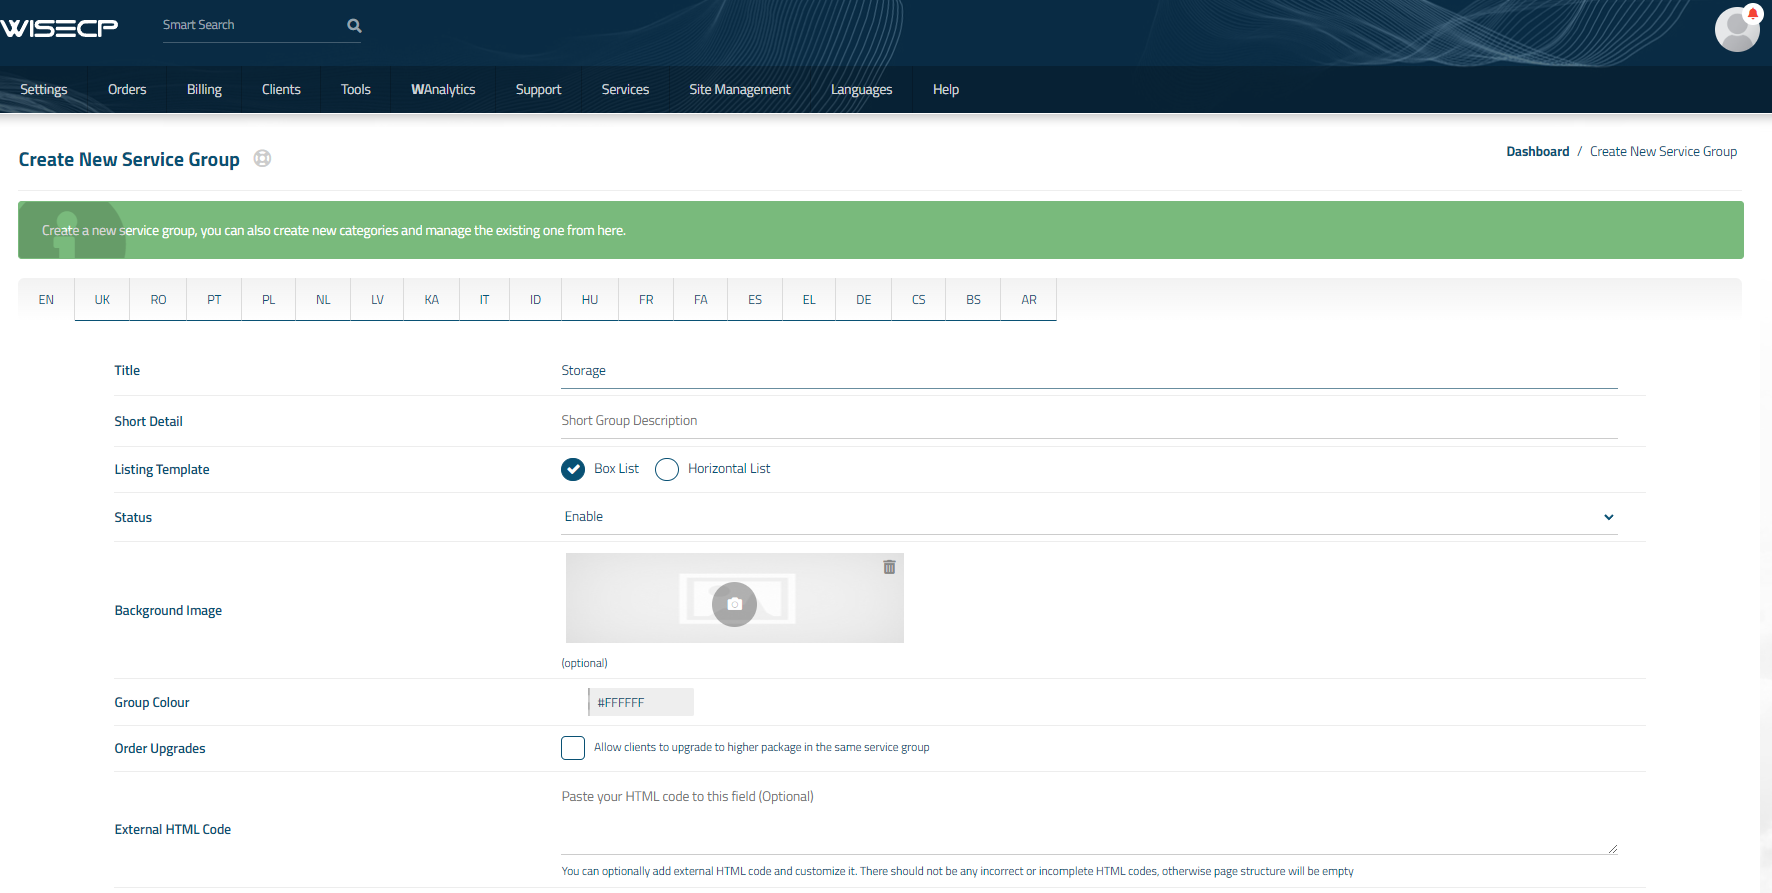
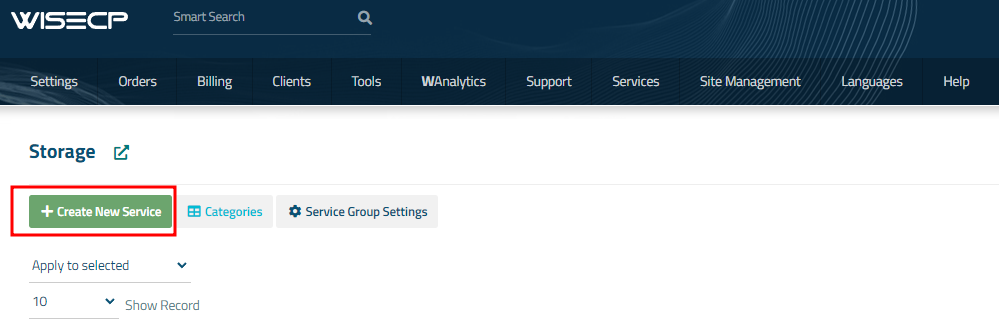
3. Adding a New Service
Go to
Services -> our service group where you need to add the new service.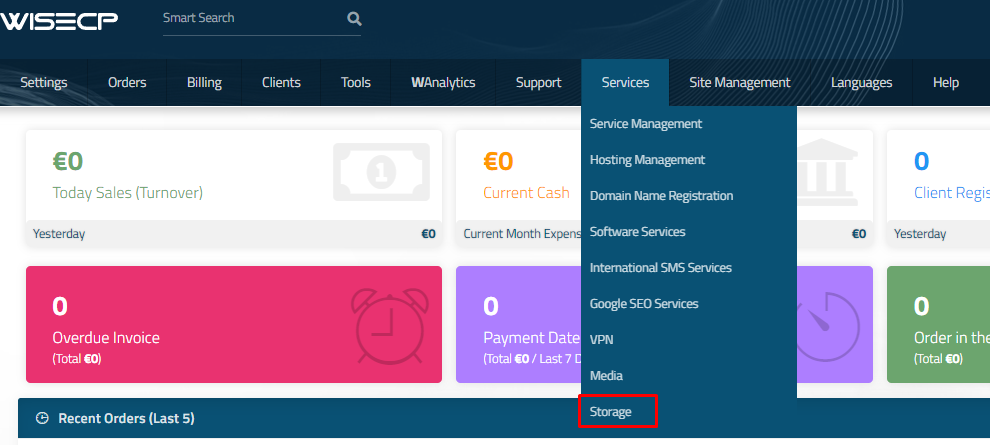
In the opened window, click the 'Create New Service' button.
On the opened page, enter all the necessary details for your new service and navigate to the 'Core' tab.
Select the 'PUQ MinIO S3' module from the drop-down list of modules.
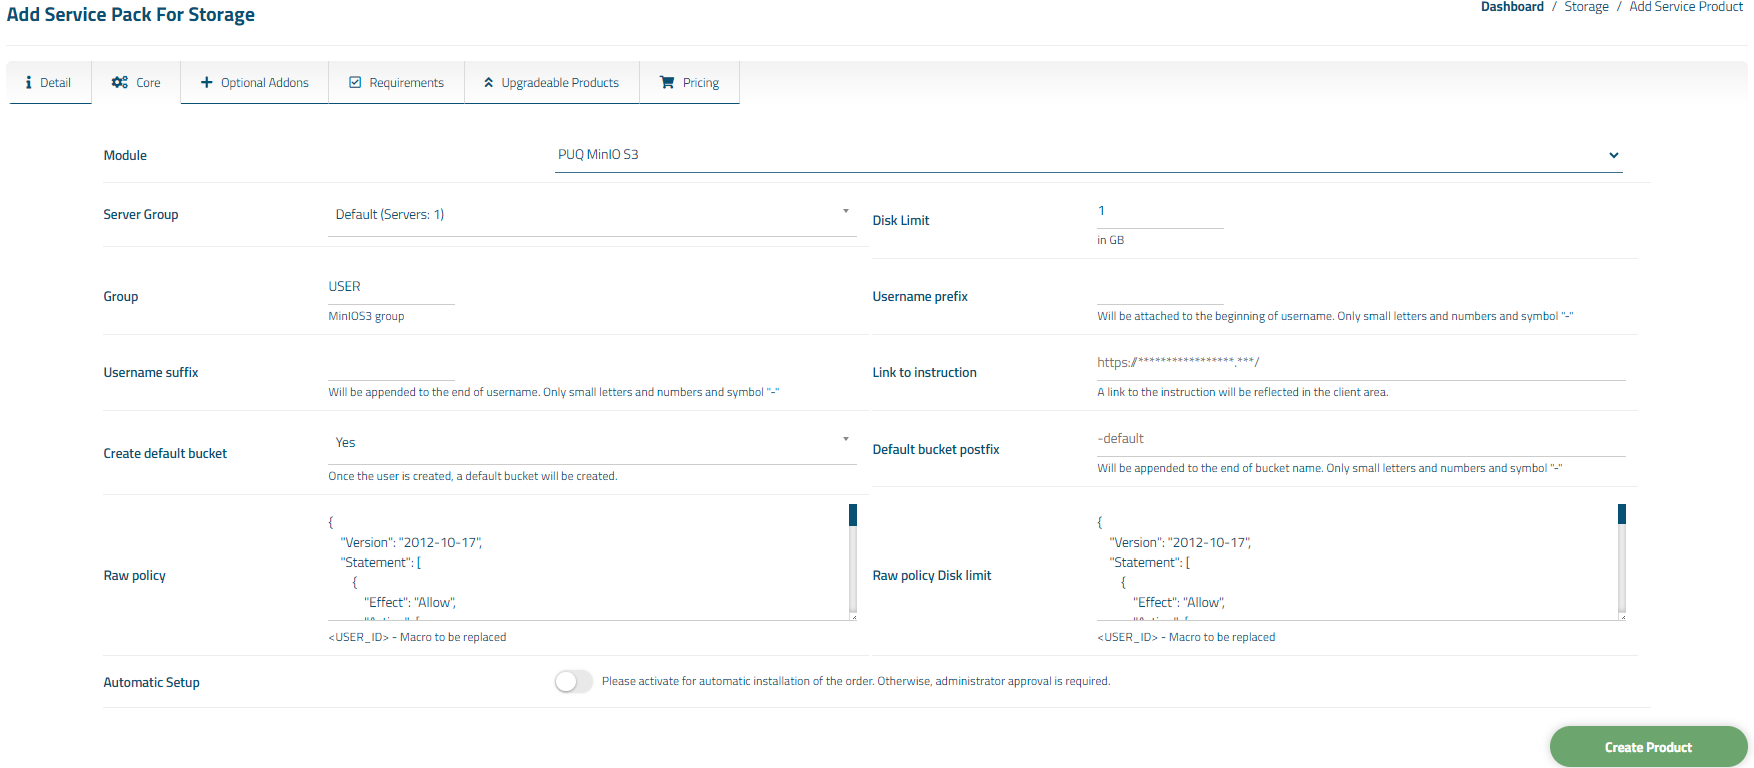
4. Fill in the configuration options according to your preferences.
- Server Group is the group of servers from which a server will be chosen for provisioning the service
- Disk Limit: is the disk space quota that is issued to the user
- Group: is the group that will be assigned to the user
- Username Prefix will be added at the beginning of the username during user creation and is used for uniqueness
- Username Suffix will be added at the end of the username during user creation and is also used for uniqueness
- Create default bucket To create a bucket by default after creating a user
-
Default bucket postfix The default bucket will be created with the user's name, followed by this parameter
- Raw policy The policy that will be applied to the user while the user has not exceeded usage limits
- Raw policy Disk limit The policy that will be applied to the user when the user exceeds usage limits
Setup guide: MinIO S3 setup
MinIO S3 module WISECP
Order now | Download | FAQ
There are many ways to install MinIO. Below we will introduce the installation method from binaries. In the following description, we will provide additional steps beyond the basic installation to set up the service properly. The description will include, among others, setting up the service, nginx proxy and SSL certificates.
In the current example, we will use the Debian 10 operating system.
1 - Installing and configuring the MinIO server
If you haven't updated the package database recently, update it:
sudo apt updateThen download the Minio server binary from the official website:
wget https://dl.min.io/server/minio/release/linux-amd64/minioOutput
# wget https://dl.min.io/server/minio/release/linux-amd64/minio
--2022-08-10 10:01:59-- https://dl.min.io/server/minio/release/linux-amd64/minio
Resolving dl.min.io (dl.min.io)... 178.128.69.202, 138.68.11.125
Connecting to dl.min.io (dl.min.io)|178.128.69.202|:443... connected.
HTTP request sent, awaiting response... 200 OK
Length: 96968704 (92M) [application/octet-stream]
Saving to: ‘minio’minio 100%[======================================================================>] 92,48M 16,7MB/s in 6,8s
2022-08-10 10:02:07 (13,6 MB/s) - ‘minio’ saved [96968704/96968704]
Once the download is complete, a file called minio will be in your working directory. Use the following command to get the executable:
sudo chmod +x minioNow move the file to the /usr/local/bin directory, where the Minio systemd startup script expects to find it:
sudo mv minio /usr/local/binThis will allow us to write a service unit file in the next steps of this tutorial to ensure that Minio starts up automatically on system boot.
For security reasons, it is recommended to avoid running the Minio server as root. This will limit the damage that can be done to the system in the event of a security breach. Because the systemd script you'll use in step 2 is looking for an account and group called minio-user, create a new user with that name:
sudo useradd -r minio-user -s /sbin/nologinIn this command, you used the -s flag to set up /sbin/nologin as the shell for minio-user. This is a shell that does not allow the user to log in, which is not necessary for minio-user.
Next, transfer ownership of the Minio binary to minio-user:
sudo chown minio-user:minio-user /usr/local/bin/minioNext, you need to create a directory where Minio will store the files. This location will be where you store the buckets that you will use later to organize the objects you store on your Minio server. This tutorial will use the minio directory name:
sudo mkdir /usr/local/share/minioGive minio-user ownership of this directory:
sudo chown minio-user:minio-user /usr/local/share/minioMost server configuration files are stored in the /etc directory, so this is where you need to create your configuration file:
sudo mkdir /etc/minioGive minio-user ownership of this directory:
sudo chown minio-user:minio-user /etc/minioUse Nano or your favorite text editor to create the environment file needed to change the default configuration:
sudo nano /etc/default/minioAfter opening the file, add the following lines to set a few important environment variables in the environment file:
MINIO_ACCESS_KEY="minio"
MINIO_VOLUMES="/usr/local/share/minio/"
MINIO_OPTS="-C /etc/minio --address :9000 --console-address :9001"
MINIO_SECRET_KEY="miniostorage"
Let's take a look at these variables and the values you have set:
- MINIO_ACCESS_KEY: This variable specifies the access key you will use to access the Minio browser user interface.
- MINIO_SECRET_KEY: This variable specifies the private key you will use to pass login credentials to the Minio interface. In this tutorial, we'll use the miniostorage value, but we recommend choosing a different, more complex password to keep your server secure.
- MINIO_VOLUMES: This variable specifies the storage directory you have created for your buckets.
- MINIO_OPTS: This variable determines where and how the server serves the data. The -C flag tells Minio the configuration directory to use, and the --address flag specifies the IP address and port to bind to. If no IP address is specified, Minio will bind to whatever address is set on the server, including localhost and any Docker-related IP addresses, so we recommend that you directly specify the IP address here. You can change the default port 9000 if you like.
Save and close the environment file after making changes.
You have installed Minio and set a number of important environment variables. Next, you need to configure the server to run as a system service.
2 - Installing the Systemd MinIO startup script
In this step, you will set up the Minio server to manage it as a systemd service.
Create a file /etc/systemd/system/minio.service
sudo nano /etc/systemd/system/minio.serviceFile contents:
[Unit]
Description=MinIO
Documentation=https://docs.min.io
Wants=network-online.target
After=network-online.target
AssertFileIsExecutable=/usr/local/bin/minio

[Service]
WorkingDirectory=/usr/local/

User=minio-user
Group=minio-user

EnvironmentFile=/etc/default/minio
ExecStartPre=/bin/bash -c "if [ -z \"${MINIO_VOLUMES}\" ]; then echo \"Variable MINIO_VOLUMES not set in /etc/default/minio\"; exit 1; fi"

ExecStart=/usr/local/bin/minio server $MINIO_OPTS $MINIO_VOLUMES

# Let systemd restart this service always
Restart=always

# Specifies the maximum file descriptor number that can be opened by this process
LimitNOFILE=65536

# Disable timeout logic and wait until process is stopped
TimeoutStopSec=infinity
SendSIGKILL=no

[Install]
WantedBy=multi-user.target

# Built for ${project.name}-${project.version} (${project.name})
Then run the following command to reload all systemd units:
sudo systemctl daemon-reload
sudo systemctl enable minio
Now that the systemd script is installed and configured, it's time to start the server.
3 - Starting the MinIO Server
In this step, you will start the server and change the firewall settings to allow access through the browser interface.
Start Minio server:
sudo systemctl start minioThen check the Minio's status, the IP address it's bound to, memory usage, and more with the following command:
sudo systemctl status minioThe result will look like this:
4 - Securing Access to MinIO Server with Let’s Encrypt SSL/TLS Certificate
You need to replace yourdomain.com with your own domain
Certbot is a console based certificate generation tool for Let's Encrypt.
In this recipe, we will generate a Let's Encypt certificate using Certbot. This certificate will then be deployed for use in the MinIO server.
Install Certbot
sudo apt update
sudo apt install certbot nginx python3-certbot-nginx -y
Set up Nginx proxy with MinIO Server
Proxy all requests
rm /etc/nginx/sites-enabled/default
nano /etc/nginx/sites-enabled/minio
server {
listen 80 default_server;
server_name yourdomain.com;
return 301 https://$host$request_uri;
}
server {
listen 443 ssl http2;
server_name yourdomain.com;
ssl_certificate /etc/letsencrypt/live/yourdomain.com/fullchain.pem;
ssl_certificate_key /etc/letsencrypt/live/yourdomain.com/privkey.pem;
ssl_trusted_certificate /etc/letsencrypt/live/yourdomain.com/cert.pem;
ssl_session_timeout 20m;
ssl_ciphers ECDHE-RSA-AES128-GCM-SHA256:ECDHE:ECDH:AES:HIGH:!NULL:!aNULL:!MD5:!ADH:!RC4;
ssl_protocols TLSv1 TLSv1.1 TLSv1.2;
ssl_prefer_server_ciphers on;
ssl_verify_client off;
ignore_invalid_headers off;
client_max_body_size 0;
proxy_buffering off;
location / {
proxy_set_header X-Real-IP $remote_addr;
proxy_set_header X-Forwarded-For $proxy_add_x_forwarded_for;
proxy_set_header X-Forwarded-Proto $scheme;
proxy_set_header Host $http_host;
proxy_connect_timeout 300;
proxy_http_version 1.1;
proxy_set_header Connection "";
chunked_transfer_encoding off;
proxy_pass http://localhost:9001;
}
}
Obtain the SSL/TLS Certificate
sudo certbot --nginx -d yourdomain.comRestart nginx wer server
sudo service nginx restartIn order for the certificate to be updated automatically, you must add to the crontab
crontab -e0 12 * * * /usr/bin/certbot renew --quietThe configuration is now complete.
Login to the server
url: https://yourdomain.com/
Username: minio
Password: miniostorage