Installation and configuration guide
- WHMCS setup(install/update)
- Setup guide: Nextcloud setup
- Setup guide: WHMCS setup
- Email Template (puqNextcloud notification disk limit)
- Add server (Nextcloud server)
- Product Configuration
WHMCS setup(install/update)
Nextcloud module WHMCS
Order now | Download | FAQ
Module is coded ionCube v13
Supported php version:
- php 7.4 WHMCS 8.11.0 -
- php 8.1 WHMCS 8.11.0 +
- php 8.2 WHMCS 8.11.0 +
To install and update a module, you must perform one and the same action.
1. Download the latest version of the module.
PHP 8.2+
wget http://download.puqcloud.com/WHMCS/servers/PUQ_WHMCS-Nextcloud/php82/PUQ_WHMCS-Nextcloud-latest.zipPHP 8.1
wget http://download.puqcloud.com/WHMCS/servers/PUQ_WHMCS-Nextcloud/php81/PUQ_WHMCS-Nextcloud-latest.zipPHP 7.4
wget http://download.puqcloud.com/WHMCS/servers/PUQ_WHMCS-Nextcloud/php74/PUQ_WHMCS-Nextcloud-latest.zipAll versions are available via link: http://download.puqcloud.com/WHMCS/servers/PUQ_WHMCS-Nextcloud/
2. Unzip the archive with the module.
unzip PUQ_WHMCS-Nextcloud-latest.zip3. Copy and Replace "puqNextcloud" to "WHMCS_WEB_DIR/modules/servers/"
Setup guide: Nextcloud setup
Nextcloud module WHMCS
Order now | Download | FAQ
Nextcloud including Nextcloud Office on Debian10 with nginx, MariaDB, PHP 8.1, Let's Encrypt, Redis, Fail2ban and ufw
1. Preparation and installation of the nginx web server
to install the following software packages as a necessary basis for server operation:
apt-get install -y apt-transport-https bash-completion bzip2 ca-certificates cron curl dialog dirmngr ffmpeg ghostscript git gpg gnupg gnupg2 htop jq libfile-fcntllock-perl libfontconfig1 libfuse2 locate lsb-release net-tools rsyslog screen smbclient socat software-properties-common ssl-cert tree unzip wget zipEnter the future server name in both the hosts file and the hostname file
nano /etc/hosts127.0.0.1 localhost
public_IP your.domain.de
The server name must be specified as an FQDN, i.e. fully qualified:
nano /etc/hostnameyour.domain.dereboot nowMake sure the "debian-archive-keyring" package is installed:
Add the nginx key to your server:
apt install -y debian-archive-keyring
curl https://nginx.org/keys/nginx_signing.key | gpg --dearmor | tee /usr/share/keyrings/nginx-archive-keyring.gpg >/dev/null
Add the software sources for nginx and PHP:
echo "deb [signed-by=/usr/share/keyrings/nginx-archive-keyring.gpg] http://nginx.org/packages/mainline/debian `lsb_release -cs` nginx" | tee /etc/apt/sources.list.d/nginx.list
echo "deb [arch=amd64] https://packages.sury.org/php/ $(lsb_release -cs) main" | tee /etc/apt/sources.list.d/php.list
In order to be able to trust the PHP sources as well, we also add this key:
wget -qO - https://packages.sury.org/php/apt.gpg | apt-key add -Preparation of MariaDB – database server:
wget https://downloads.mariadb.com/MariaDB/mariadb_repo_setup
chmod +x mariadb_repo_setup && ./mariadb_repo_setup --mariadb-server-version="mariadb-10.8"
We are now updating the system and generating temporary "self-signed" certificates, which will later be replaced with full-fledged Let's Encrypt certificates.
Server update:
apt update && make-ssl-cert generate-default-snakeoil -yTo ensure that no relics from previous installations are interfering with the operation of the web server, we remove these:
apt remove nginx nginx-extras nginx-common nginx-full -y --allow-change-held-packagesWe also make sure that the counterpart (Apache2) to the nginx web server is neither active nor installed.
systemctl stop apache2.service
systemctl disable apache2.service
Now the preparations for installing the web server are complete and we can install it with the following command
apt install -y nginxand the service to start automatically after a system reboot using set up
systemctl enable nginx.serviceWith a view to future adjustments, the default configuration is saved and a new configuration file opened:
mv /etc/nginx/nginx.conf /etc/nginx/nginx.conf.bak
touch /etc/nginx/nginx.conf && nano /etc/nginx/nginx.conf
Copy all of the following content into the file:
user www-data;
worker_processes auto;
pid /var/run/nginx.pid;
events {
  worker_connections 2048;
  multi_accept on; use epoll;
  }
http {
  log_format criegerde escape=json
  '{'
    '"time_local":"$time_local",'
    '"remote_addr":"$remote_addr",'
    '"remote_user":"$remote_user",'
    '"request":"$request",'
    '"status": "$status",'
    '"body_bytes_sent":"$body_bytes_sent",'
    '"request_time":"$request_time",'
    '"http_referrer":"$http_referer",'
    '"http_user_agent":"$http_user_agent"'
  '}';
  access_log /var/log/nginx/access.log criegerde;
  error_log /var/log/nginx/error.log warn;
  #set_real_ip_from 127.0.0.1;
  real_ip_header X-Forwarded-For;
  real_ip_recursive on;
  include /etc/nginx/mime.types;
  default_type application/octet-stream;
  sendfile on;
  send_timeout 3600;
  tcp_nopush on;
  tcp_nodelay on;
  open_file_cache max=500 inactive=10m;
  open_file_cache_errors on;
  keepalive_timeout 65;
  reset_timedout_connection on;
  server_tokens off;
  resolver 127.0.0.53 valid=30s;
  resolver_timeout 5s;
  include /etc/nginx/conf.d/*.conf;
 }
Save the file and close it to then restart the web server:
systemctl restart nginx.serviceIn preparation for the SSL certificates and the web directories, we create four folders and set the correct permissions:
mkdir -p /var/log/nextcloud /var/nc_data /var/www/letsencrypt/.well-known/acme-challenge /etc/letsencrypt/rsa-certs /etc/letsencrypt/ecc-certs
chown -R www-data:www-data /var/nc_data /var/www /var/log/nextcloud
The installation of the web server is thus already completed and we continue with the installation and the adjustments of PHP.
2. Installation and configuration of PHP 8.1 (fpm)
The PHP repository has already been set up and activated in the previous chapter, so we can start the installation directly.
apt update && apt install -y php-common \
php8.1-{fpm,gd,curl,xml,zip,intl,mbstring,bz2,ldap,apcu,bcmath,gmp,imagick,igbinary,mysql,redis,smbclient,cli,common,opcache,readline} \
imagemagick --allow-change-held-packages
Optional (if you plan to use Samba and/or cifs shares or an LDAP(s) connection):
apt install -y ldap-utils nfs-common cifs-utilsSet the correct date format to enable correct logging as well:
timedatectl set-timezone Europe/WarsawBefore we start optimizing PHP, let's back up the configuration files:
cp /etc/php/8.1/fpm/pool.d/www.conf /etc/php/8.1/fpm/pool.d/www.conf.bak
cp /etc/php/8.1/fpm/php-fpm.conf /etc/php/8.1/fpm/php-fpm.conf.bak
cp /etc/php/8.1/cli/php.ini /etc/php/8.1/cli/php.ini.bak
cp /etc/php/8.1/fpm/php.ini /etc/php/8.1/fpm/php.ini.bak
cp /etc/php/8.1/fpm/php-fpm.conf /etc/php/8.1/fpm/php-fpm.conf.bak
cp /etc/php/8.1/mods-available/apcu.ini /etc/php/8.1/mods-available/apcu.ini.bak
cp /etc/ImageMagick-6/policy.xml /etc/ImageMagick-6/policy.xml.bak
To adapt PHP to your system, some parameters are calculated, just execute the following lines:
AvailableRAM=$(awk '/MemAvailable/ {printf "%d", $2/1024}' /proc/meminfo)
AverageFPM=$(ps --no-headers -o 'rss,cmd' -C php-fpm8.1 | awk '{ sum+=$1 } END { printf ("%d\n", sum/NR/1024,"M") }')
FPMS=$((AvailableRAM/AverageFPM))
PMaxSS=$((FPMS*2/3))
PMinSS=$((PMaxSS/2))
PStartS=$(((PMaxSS+PMinSS)/2))
sed -i "s/;env\[HOSTNAME\] = /env[HOSTNAME] = /" /etc/php/8.1/fpm/pool.d/www.conf
sed -i "s/;env\[TMP\] = /env[TMP] = /" /etc/php/8.1/fpm/pool.d/www.conf
sed -i "s/;env\[TMPDIR\] = /env[TMPDIR] = /" /etc/php/8.1/fpm/pool.d/www.conf
sed -i "s/;env\[TEMP\] = /env[TEMP] = /" /etc/php/8.1/fpm/pool.d/www.conf
sed -i "s/;env\[PATH\] = /env[PATH] = /" /etc/php/8.1/fpm/pool.d/www.conf
sed -i 's/pm = dynamic/pm = static/' /etc/php/8.1/fpm/pool.d/www.conf
sed -i 's/pm.max_children =.*/pm.max_children = '$FPMS'/' /etc/php/8.1/fpm/pool.d/www.conf
sed -i 's/pm.start_servers =.*/pm.start_servers = '$PStartS'/' /etc/php/8.1/fpm/pool.d/www.conf
sed -i 's/pm.min_spare_servers =.*/pm.min_spare_servers = '$PMinSS'/' /etc/php/8.1/fpm/pool.d/www.conf
sed -i 's/pm.max_spare_servers =.*/pm.max_spare_servers = '$PMaxSS'/' /etc/php/8.1/fpm/pool.d/www.conf
sed -i "s/;pm.max_requests =.*/pm.max_requests = 1000/" /etc/php/8.1/fpm/pool.d/www.conf
sed -i "s/allow_url_fopen =.*/allow_url_fopen = 1/" /etc/php/8.1/fpm/php.ini

sed -i "s/output_buffering =.*/output_buffering = 'Off'/" /etc/php/8.1/cli/php.ini
sed -i "s/max_execution_time =.*/max_execution_time = 3600/" /etc/php/8.1/cli/php.ini
sed -i "s/max_input_time =.*/max_input_time = 3600/" /etc/php/8.1/cli/php.ini
sed -i "s/post_max_size =.*/post_max_size = 10240M/" /etc/php/8.1/cli/php.ini
sed -i "s/upload_max_filesize =.*/upload_max_filesize = 10240M/" /etc/php/8.1/cli/php.ini
sed -i "s/;date.timezone.*/date.timezone = Europe\/\Berlin/" /etc/php/8.1/cli/php.ini
sed -i "s/;cgi.fix_pathinfo.*/cgi.fix_pathinfo=0/" /etc/php/8.1/cli/php.ini

sed -i "s/memory_limit = 128M/memory_limit = 1G/" /etc/php/8.1/fpm/php.ini
sed -i "s/output_buffering =.*/output_buffering = 'Off'/" /etc/php/8.1/fpm/php.ini
sed -i "s/max_execution_time =.*/max_execution_time = 3600/" /etc/php/8.1/fpm/php.ini
sed -i "s/max_input_time =.*/max_input_time = 3600/" /etc/php/8.1/fpm/php.ini
sed -i "s/post_max_size =.*/post_max_size = 10G/" /etc/php/8.1/fpm/php.ini
sed -i "s/upload_max_filesize =.*/upload_max_filesize = 10G/" /etc/php/8.1/fpm/php.ini
sed -i "s/;date.timezone.*/date.timezone = Europe\/\Berlin/" /etc/php/8.1/fpm/php.ini
sed -i "s/;cgi.fix_pathinfo.*/cgi.fix_pathinfo=0/" /etc/php/8.1/fpm/php.ini
sed -i "s/;session.cookie_secure.*/session.cookie_secure = True/" /etc/php/8.1/fpm/php.ini
sed -i "s/;opcache.enable=.*/opcache.enable=1/" /etc/php/8.1/fpm/php.ini
sed -i "s/;opcache.validate_timestamps=.*/opcache.validate_timestamps=0/" /etc/php/8.1/fpm/php.ini
sed -i "s/;opcache.enable_cli=.*/opcache.enable_cli=1/" /etc/php/8.1/fpm/php.ini
sed -i "s/;opcache.memory_consumption=.*/opcache.memory_consumption=256/" /etc/php/8.1/fpm/php.ini
sed -i "s/;opcache.interned_strings_buffer=.*/opcache.interned_strings_buffer=32/" /etc/php/8.1/fpm/php.ini
sed -i "s/;opcache.max_accelerated_files=.*/opcache.max_accelerated_files=100000/" /etc/php/8.1/fpm/php.ini
sed -i "s/;opcache.revalidate_freq=.*/opcache.revalidate_freq=60/" /etc/php/8.1/fpm/php.ini
sed -i "s/;opcache.save_comments=.*/opcache.save_comments=1/" /etc/php/8.1/fpm/php.ini

sed -i "s|;emergency_restart_threshold.*|emergency_restart_threshold = 10|g" /etc/php/8.1/fpm/php-fpm.conf
sed -i "s|;emergency_restart_interval.*|emergency_restart_interval = 1m|g" /etc/php/8.1/fpm/php-fpm.conf
sed -i "s|;process_control_timeout.*|process_control_timeout = 10|g" /etc/php/8.1/fpm/php-fpm.conf

sed -i '$aapc.enable_cli=1' /etc/php/8.1/mods-available/apcu.ini

sed -i "s/rights=\"none\" pattern=\"PS\"/rights=\"read|write\" pattern=\"PS\"/" /etc/ImageMagick-6/policy.xml
sed -i "s/rights=\"none\" pattern=\"EPS\"/rights=\"read|write\" pattern=\"EPS\"/" /etc/ImageMagick-6/policy.xml
sed -i "s/rights=\"none\" pattern=\"PDF\"/rights=\"read|write\" pattern=\"PDF\"/" /etc/ImageMagick-6/policy.xml
sed -i "s/rights=\"none\" pattern=\"XPS\"/rights=\"read|write\" pattern=\"XPS\"/" /etc/ImageMagick-6/policy.xml
Now restart both services, nginx and PHP:
systemctl restart php8.1-fpm.service nginx.servicePHP is now already installed and optimized for Nextcloud. For more PHP optimizations. Let's start with the installation and configuration of the database server MariaDB.
3. Installation and configuration of MariaDB 10.8
MariaDB is installed with this command:
apt update && apt install -y mariadb-serverNow let's harden the database server using the supplied tool "mysql_secure_installation". With an initial installation, there is no root password, so you can confirm the query with ENTER. It is recommended to set a password directly, the corresponding dialog will appear automatically:
mysql_secure_installation
Enter current password for root (enter for none): <ENTER> or type the password
Switch to unix_socket authentication [Y/n] Y
Set root password? [Y/n] Y
Remove anonymous users? [Y/n] Y
Disallow root login remotely? [Y/n] Y
Remove test database and access to it? [Y/n] Y
Reload privilege tables now? [Y/n] Y
Now stop the database server and then save the default configuration so that you can make adjustments immediately afterwards:
systemctl stop mysql
mv /etc/mysql/my.cnf /etc/mysql/my.cnf.bak
nano /etc/mysql/my.cnf
Copy all of the following lines into the empty file:
[client]
default-character-set = utf8mb4
port = 3306
socket = /var/run/mysqld/mysqld.sock
[mysqld_safe]
log_error=/var/log/mysql/mysql_error.log
nice = 0
socket = /var/run/mysqld/mysqld.sock
[mysqld]
basedir = /usr
bind-address = 127.0.0.1
binlog_format = ROW
bulk_insert_buffer_size = 16M
character-set-server = utf8mb4
collation-server = utf8mb4_general_ci
concurrent_insert = 2
connect_timeout = 5
datadir = /var/lib/mysql
default_storage_engine = InnoDB
expire_logs_days = 2
general_log_file = /var/log/mysql/mysql.log
general_log = 0
max_connections = 200
max_heap_table_size = 64M
myisam_sort_buffer_size = 512M
port = 3306
pid-file = /var/run/mysqld/mysqld.pid
query_cache_limit = 2M
query_cache_size = 64M
query_cache_type = 1
query_cache_min_res_unit = 2k
read_buffer_size = 2M
read_rnd_buffer_size = 1M
skip-external-locking
skip-name-resolve
slow_query_log_file = /var/log/mysql/mariadb-slow.log
slow-query-log = 1
socket = /var/run/mysqld/mysqld.sock
sort_buffer_size = 4M
table_open_cache = 400
thread_cache_size = 128
tmp_table_size = 64M
tmpdir = /tmp
transaction_isolation = READ-COMMITTED
[isamchk]
key_buffer = 16M
Save and close the file and then restart the database server to set up the Nextcloud database, the Nextcloud user and its password:
systemctl restart mysql.service
mysql -uroot -p
CREATE DATABASE nextclouddb CHARACTER SET utf8mb4 COLLATE utf8mb4_general_ci; CREATE USER nextclouddbuser@localhost identified by 'nextclouddbpassword'; GRANT ALL PRIVILEGES on nextclouddb.* to nextclouddbuser@localhost; FLUSH privileges; quit;
Explanation :
Database name: nextclouddb
Database user: nextclouddbuser
Database user password: nextclouddbpassword
mysql -h localhost -uroot -p -e "SELECT @@TX_ISOLATION; SELECT SCHEMA_NAME 'database', default_character_set_name 'charset', DEFAULT_COLLATION_NAME 'collation' FROM information_schema.SCHEMATA WHERE SCHEMA_NAME='nextclouddb'"
4. Installing and configuring Redis
We install the Redis server to increase Nextcloud performance, as Redis reduces the load on the MariaDB Nextcloud database:
apt update && apt install -y redis-serverCustomize the Redis configuration by backing up and customizing the configuration by running the following commands:
cp /etc/redis/redis.conf /etc/redis/redis.conf.bak
sed -i "s/port 6379/port 0/" /etc/redis/redis.conf
sed -i s/\#\ unixsocket/\unixsocket/g /etc/redis/redis.conf
sed -i "s/unixsocketperm 700/unixsocketperm 770/" /etc/redis/redis.conf
sed -i "s/# maxclients 10000/maxclients 10240/" /etc/redis/redis.conf
usermod -aG redis www-data
cp /etc/sysctl.conf /etc/sysctl.conf.bak
sed -i '$avm.overcommit_memory = 1' /etc/sysctl.conf
Based on sufficient installation experience, I recommend that you restart the entire server once:
reboot nowCongratulations, the server is already installed and set up, so you can start setting up the Nextcloud.
5. Installation and optimization of Nextcloud (incl. SSL)
You need to replace yourdomain.com with your own domain
Certbot is a console based certificate generation tool for Let's Encrypt.
In this recipe, we will generate a Let's Encypt certificate using Certbot. This certificate will then be deployed for use in the Nextcloud server.
Install Certbot
sudo apt update
sudo apt-get install certbot python3-certbot-nginx
We will now set up various vhost, i.e. Swegterver configuration files, and modify the standard vhost file persistently. Since the system was previously restarted, we switch back to privileged user mode, save the default vhost file called default.conf and create empty vhost files for configuration.
sudo -s
[ -f /etc/nginx/conf.d/default.conf ] && mv /etc/nginx/conf.d/default.conf /etc/nginx/conf.d/default.conf.bak
touch /etc/nginx/conf.d/nextcloud.conf
nano /etc/nginx/conf.d/nextcloud.confCopy all the following lines into the nextcloud.conf
upstream php-handler {
  server unix:/run/php/php8.1-fpm.sock;
}

map $arg_v $asset_immutable {
  "" "";
  default "immutable";
}

server {
  listen 80 default_server;
  server_name nextcloud-test.uuq.pl;
  return 301 https://$host$request_uri;
}


server {
  listen 443      ssl http2;
  listen [::]:443 ssl http2;
  server_name yourdomain.com;

  ssl_certificate /etc/letsencrypt/live/yourdomain.com/fullchain.pem;
  ssl_certificate_key /etc/letsencrypt/live/yourdomain.com/privkey.pem;
  ssl_trusted_certificate /etc/letsencrypt/live/yourdomain.com/cert.pem;

  ssl_session_timeout 1d;
  ssl_session_cache shared:SSL:50m;
  ssl_session_tickets off;
  ssl_protocols TLSv1.3 TLSv1.2;
  ssl_ciphers 'TLS-CHACHA20-POLY1305-SHA256:TLS-AES-256-GCM-SHA384:ECDHE-RSA-AES256-GCM-SHA512:DHE-RSA-AES256-GCM-SHA512:ECDHE-RSA-AES256-GCM-SHA384:DHE-RSA-AES256-GCM-SHA384';
  ssl_ecdh_curve X448:secp521r1:secp384r1;
  ssl_prefer_server_ciphers on;
  ssl_stapling on;
  ssl_stapling_verify on;
  client_max_body_size 10G;
  client_body_timeout 3600s;
  fastcgi_buffers 64 4K;
  gzip on;
  gzip_vary on;
  gzip_comp_level 4;
  gzip_min_length 256;
  gzip_proxied expired no-cache no-store private no_last_modified no_etag auth;
  gzip_types application/atom+xml application/javascript application/json application/ld+json application/manifest+json application/rss+xml application/vnd.geo+json application/vnd.ms-fontobject application/wasm application/x-font-ttf application/x-web-app-manifest+json application/xhtml+xml application/xml font/opentype image/bmp image/svg+xml image/x-icon text/cache-manifest text/css text/plain text/vcard text/vnd.rim.location.xloc text/vtt text/x-component text/x-cross-domain-policy;
  add_header Strict-Transport-Security            "max-age=15768000; includeSubDomains; preload;" always;
  add_header Permissions-Policy                   "interest-cohort=()";
  add_header Referrer-Policy                      "no-referrer"   always;
  add_header X-Content-Type-Options               "nosniff"       always;
  add_header X-Download-Options                   "noopen"        always;
  add_header X-Frame-Options                      "SAMEORIGIN"    always;
  add_header X-Permitted-Cross-Domain-Policies    "none"          always;
  add_header X-Robots-Tag                         "none"          always;
  add_header X-XSS-Protection                     "1; mode=block" always;
  fastcgi_hide_header X-Powered-By;
  root /var/www/nextcloud;
  index index.php index.html /index.php$request_uri;
  location = / {
    if ( $http_user_agent ~ ^DavClnt ) {
      return 302 /remote.php/webdav/$is_args$args;
    }
  }
  location = /robots.txt {
    allow all;
    log_not_found off;
    access_log off;
  }
  location ^~ /apps/rainloop/app/data {
    deny all;
  }
  location ^~ /.well-known {
  location = /.well-known/carddav { return 301 /remote.php/dav/; }
  location = /.well-known/caldav  { return 301 /remote.php/dav/; }
  location /.well-known/acme-challenge { try_files $uri $uri/ =404; }
  location /.well-known/pki-validation { try_files $uri $uri/ =404; }
    return 301 /index.php$request_uri;
  }
  location ~ ^/(?:build|tests|config|lib|3rdparty|templates|data)(?:$|/)  { return 404; }
  location ~ ^/(?:\.|autotest|occ|issue|indie|db_|console)                { return 404; }
  location ~ \.php(?:$|/) {
    rewrite ^/(?!index|remote|public|cron|core\/ajax\/update|status|ocs\/v[12]|updater\/.+|oc[ms]-provider\/.+|.+\/richdocumentscode\/proxy) /index.php$request_uri;
    fastcgi_split_path_info ^(.+?\.php)(/.*)$;
    set $path_info $fastcgi_path_info;
    try_files $fastcgi_script_name =404;
    include fastcgi_params;
    fastcgi_param SCRIPT_FILENAME $document_root$fastcgi_script_name;
    fastcgi_param PATH_INFO $path_info;
    fastcgi_param HTTPS on;
    fastcgi_param modHeadersAvailable true;
    fastcgi_param front_controller_active true;
    fastcgi_pass php-handler;
    fastcgi_intercept_errors on;
    fastcgi_request_buffering off;
    fastcgi_read_timeout 3600;
    fastcgi_send_timeout 3600;
    fastcgi_connect_timeout 3600;
    fastcgi_max_temp_file_size 0;
  }
  location ~ \.(?:css|js|svg|gif|png|jpg|ico|wasm|tflite|map)$ {
    try_files $uri /index.php$request_uri;
    add_header Cache-Control "public, max-age=15778463, $asset_immutable";
    expires 6M;
    access_log off;
    location ~ \.wasm$ {
      default_type application/wasm;
    }
  }
  location ~ \.woff2?$ {
    try_files $uri /index.php$request_uri;
    expires 7d;
    access_log off;
  }
  location /remote {
    return 301 /remote.php$request_uri;
  }
  location / {
    try_files $uri $uri/ /index.php$request_uri;
  }
}
Generate Let's Encrypt cert
sudo certbot --nginx -d yourdomain.comRestart nginx wer server
sudo service nginx restartIn order for the certificate to be updated automatically, you must add to the crontab
crontab -e0 12 * * * /usr/bin/certbot renew --quietWe now start the 'actual' installation of the Nextcloud software and set up the SSL certificates from Let's Encrypt using acme . To do this, switch to the working directory
cd /usr/local/srcand download the current Nextcloud release:
wget https://download.nextcloud.com/server/releases/latest.tar.bz2
wget https://download.nextcloud.com/server/releases/latest.tar.bz2.md5
Check the files:
md5sum -c latest.tar.bz2.md5 < latest.tar.bz2Unpack the Nextcloud software into the web directory (var/www), then set the permissions appropriately and delete the download file:
tar -xjf latest.tar.bz2 -C /var/www && chown -R www-data:www-data /var/www/ && rm -f latest.tar.bz2We can now proceed with setting up the Nextcloud. To do this, use the following "silent" installation command:
sudo -u www-data php /var/www/nextcloud/occ maintenance:install --database "mysql" --database-name "nextclouddb" --database-user "nextclouddbuser" --database-pass "nextclouddbpassword" --admin-user "YourNextcloudAdmin" --admin-pass "YourNextcloudAdminPasssword" --data-dir "/var/nc_data"Explanations:
database-name " nextclouddb " : database name from
database-user “ nextclouddbuser ” : Database user from
database-pass “ nextclouddbpassword ” : Database user password from
admin-user “ YourNextcloudAdmin ” : freely selectable by you
admin-pass “ YourNextcloudAdminPasssword ” : freely selectable by you
Wait until the installation of the Nextcloud has been completed and then adjust the central configuration file of the Nextcloud "config.php" as the web user www-data :
1. Add your domain as a trusted domain, adding your dedicated domain to your.domain.de :
sudo -u www-data php /var/www/nextcloud/occ config:system:set trusted_domains 0 --value=ihre.domain.de2. Set your domain as overwrite.cli.url, adding your.domain.de with your dedicated domain:
sudo -u www-data php /var/www/nextcloud/occ config:system:set overwrite.cli.url --value=https://ihre.domain.deNow we finally expand the Nextcloud configuration. To do this, first save the existing config.php and then execute the following lines in one block:
sudo -u www-data cp /var/www/nextcloud/config/config.php /var/www/nextcloud/config/config.php.bak
sudo -u www-data touch /var/www/nextcloud/config/tweaks.config.php
nano /var/www/nextcloud/config/tweaks.config.php<?php
$CONFIG = array (
'activity_expire_days' => 14,
'allow_local_remote_servers' => true,
'auth.bruteforce.protection.enabled' => true,
'blacklisted_files' =>
array (
0 => '.htaccess',
1 => 'Thumbs.db',
2 => 'thumbs.db',
),
'cron_log' => true,
'default_phone_region' => 'DE',
'defaultapp' => 'files,dashboard',
'enable_previews' => true,
'enabledPreviewProviders' =>
array (
0 => 'OC\Preview\PNG',
1 => 'OC\Preview\JPEG',
2 => 'OC\Preview\GIF',
3 => 'OC\Preview\BMP',
6 => 'OC\Preview\PDF',
7 => 'OC\Preview\MP3',
8 => 'OC\Preview\TXT',
9 => 'OC\Preview\MarkDown',
),
'filesystem_check_changes' => 0,
'filelocking.enabled' => 'true',
'htaccess.RewriteBase' => '/',
'integrity.check.disabled' => false,
'knowledgebaseenabled' => false,
'logfile' => '/var/log/nextcloud/nextcloud.log',
'loglevel' => 2,
'logtimezone' => 'Europe/Berlin',
'log_rotate_size' => '104857600',
'maintenance' => false,
'maintenance_window_start' => 1,
'overwriteprotocol' => 'https',
'preview_max_x' => 1024,
'preview_max_y' => 768,
'preview_max_scale_factor' => 1,
'profile.enabled' => false,
'redis' =>
array (
'host' => '/var/run/redis/redis-server.sock',
'port' => 0,
'timeout' => 0.5,
'dbindex' => 1,
),
'quota_include_external_storage' => false,
'share_folder' => '/Freigaben',
'skeletondirectory' => '',
'theme' => '',
'trashbin_retention_obligation' => 'auto, 7',
'updater.release.channel' => 'stable',
);Modify the ".user.ini"
sudo -u www-data sed -i "s/output_buffering=.*/output_buffering=0/" /var/www/nextcloud/.user.iniand adjust the Nextcloud apps as user www-data
sudo -u www-data php /var/www/nextcloud/occ app:disable survey_client
sudo -u www-data php /var/www/nextcloud/occ app:disable firstrunwizard
sudo -u www-data php /var/www/nextcloud/occ app:enable admin_audit
sudo -u www-data php /var/www/nextcloud/occ app:enable files_pdfviewer
Optional Nextcloud Office:
sudo -u www-data /usr/bin/php /var/www/nextcloud/occ app:install richdocuments
sudo -u www-data /usr/bin/php /var/www/nextcloud/occ app:install richdocumentscode
Nextcloud is now fully operational, optimized and secured. Restart all relevant services:
systemctl stop nginx.service
systemctl stop php8.1-fpm.service
systemctl restart mysql.service
systemctl restart php8.1-fpm.service
systemctl restart redis-server.service
systemctl restart nginx.service
Set up a cronjob for Nextcloud as a “www-data” user:
crontab -u www-data -ePaste this line
*/5 * * * * php -f /var/www/nextcloud/cron.php > /dev/null 2>&1Then save and close the file and reconfigure the Nextcloud job from "Ajax" to "Cron" using the Nextclouds CLI:
sudo -u www-data php /var/www/nextcloud/occ background:cronPlease take some time and check the security status of your server.
To avoid difficulties that can result from updating the components used, the relevant packages can be excluded from updating using "apt-mark hold":
apt-mark hold nginx*
apt-mark hold redis*
apt-mark hold mysql*
apt-mark hold galera*
apt-mark hold mariadb*
apt-mark hold php*
In order to include these packages again in the context of updates, only the "hold" has to be lifted:
apt-mark unhold nginx*
apt-mark unhold redis*
apt-mark unhold mysql*
apt-mark unhold galera*
apt-mark unhold mariadb*
apt-mark unhold php*
After updating, we recommend setting it to 'hold' again.
6. System hardening fail2banand ufw
apt update && apt install -y fail2bantouch /etc/fail2ban/filter.d/nextcloud.confCopy everything from "cat..." to "...EOF" to your clipboard, then paste it into the shell:
cat <<EOF >/etc/fail2ban/filter.d/nextcloud.conf
[Definition]
_groupsre = (?:(?:,?\s*"\w+":(?:"[^"]+"|\w+))*)
failregex = ^\{%(_groupsre)s,?\s*"remoteAddr":"<HOST>"%(_groupsre)s,?\s*"message":"Login failed:
            ^\{%(_groupsre)s,?\s*"remoteAddr":"<HOST>"%(_groupsre)s,?\s*"message":"Trusted domain error.
datepattern = ,?\s*"time"\s*:\s*"%%Y-%%m-%%d[T ]%%H:%%M:%%S(%%z)?"
EOF
Confirm with <ENTER> to fill the file. The result then looks like this:
cat /etc/fail2ban/filter.d/nextcloud.conf
Now create a new jail file
nano /etc/fail2ban/jail.d/nextcloud.localCopy all of the following lines into it:
[nextcloud]
backend = auto
enabled = true
port = 80,443
protocol = tcp
filter = nextcloud
maxretry = 5
bantime = 3600
findtime = 36000
logpath = /var/log/nextcloud/nextcloud.log
Restart fail2ban and check the fail2ban status:
systemctl restart fail2ban.service
fail2ban-client status nextcloud
If you have previously changed the SSH port from 22 to another port, you must replace 22 accordingly!
apt install -y ufw
ufw allow 80/tcp comment "LetsEncrypt(http)"
ufw allow 443/tcp comment "LetsEncrypt(https)"
ufw allow 22/tcp comment "SSH"
ufw enable
systemctl restart ufw.service
Setup guide: WHMCS setup
Nextcloud module WHMCS
Order now | Download | FAQ
Module is coded ionCube v13
Supported php version:
- php 7.4 WHMCS 8.11.0 -
- php 8.1 WHMCS 8.11.0 +
- php 8.2 WHMCS 8.11.0 +
To install and update a module, you must perform one and the same action.
1. Download the latest version of the module.
PHP 8.2
wget http://download.puqcloud.com/WHMCS/servers/PUQ_WHMCS-Nextcloud/php82/PUQ_WHMCS-Nextcloud-latest.zipPHP 8.1
wget http://download.puqcloud.com/WHMCS/servers/PUQ_WHMCS-Nextcloud/php81/PUQ_WHMCS-Nextcloud-latest.zipPHP 7.4
wget http://download.puqcloud.com/WHMCS/servers/PUQ_WHMCS-Nextcloud/php74/PUQ_WHMCS-Nextcloud-latest.zipAll versions are available via link: http://download.puqcloud.com/WHMCS/servers/PUQ_WHMCS-Nextcloud/
2. Unzip the archive with the module.
unzip PUQ_WHMCS-Nextcloud-latest.zip3. Copy and Replace "puqNextcloud" to "WHMCS_WEB_DIR/modules/servers/"
4. Create new server Nextcloud in WHMCS (System Settings->Products/Services->Servers)
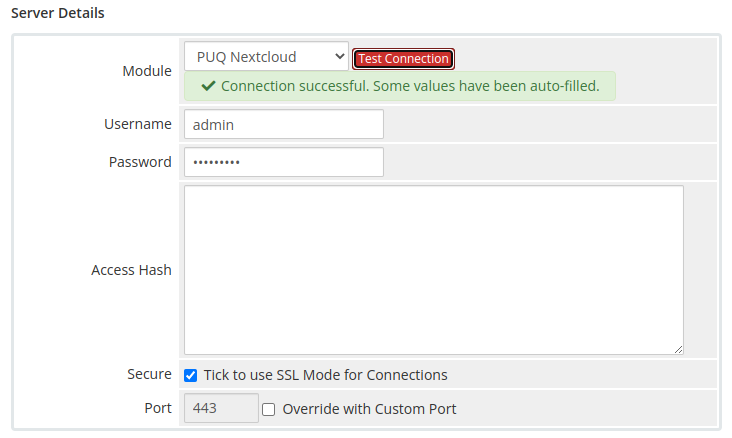
System Settings->Servers->Add New Server- Enter the correct Name and Hostname

- In the Server Details section, select the "PUQ Nextcloud" module and enter the correct username and password for the Nextcloud web interface.
- To check, click the "Test connection" button
5. Create a new Products/Services
System Settings->Products/Services->Create a New ProductIn the Module settings section, select the "PUQ Nextcloud" module
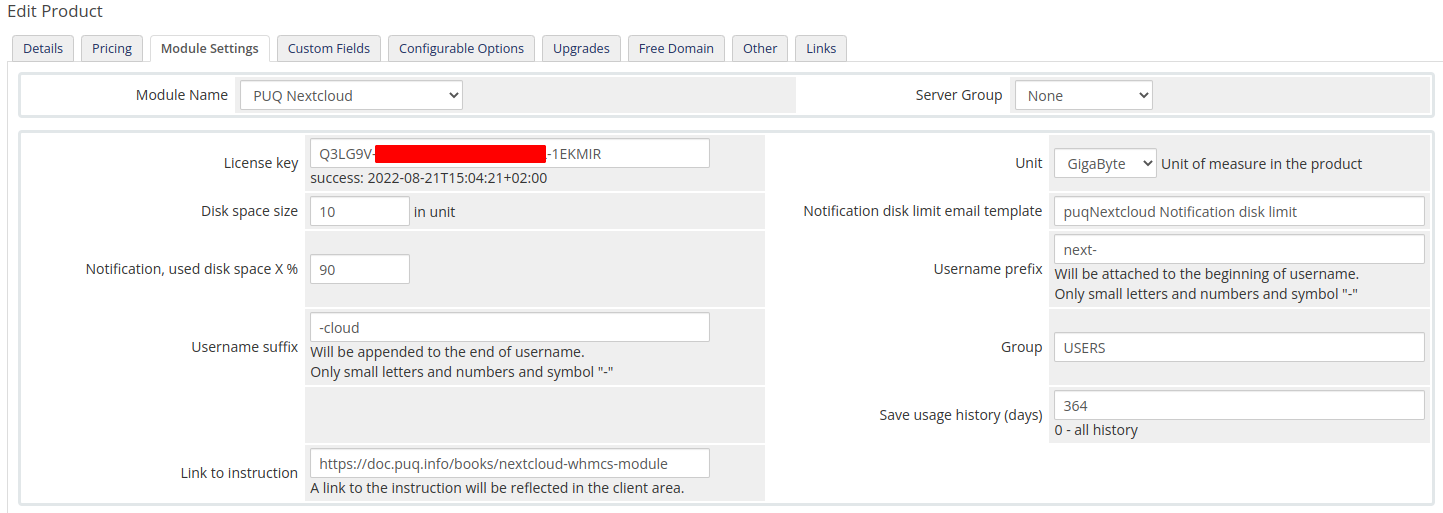
- License key: A pre-purchased license key for the "PUQ Nextcloud" module. For the module to work correctly, the key must be active
- Unit: Packet disk space units
- Disk space size: Disk size in this product
- Notification disk limit email template: Email template that will be sent when the disk quota is exceeded in %
- Notification, used disk space X %: Sets a percentage parameter, after exceeding this parameter a notification will be sent to the user
- Username prefix/Username suffix: Necessary in order to generate a username for the service, in the format: prefix<cliet_id>-<service_id>suffix
- Group: The group that will be assigned to the user on the server side of the Nextcloud
- Save usage history (days): The number of days it takes to save user disk usage statistics
- Link to instruction: Link to the instruction, if filled out, it will be reflected in the client area
Email Template (puqNextcloud notification disk limit)
Nextcloud module WHMCS
Order now | Download | FAQ
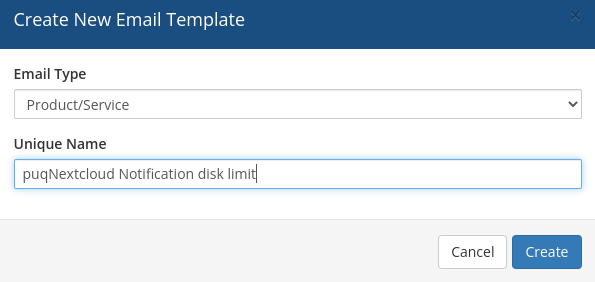
Create an email template for customer notifications.
System Settings->Email Templates->Create New Email Template- Email Type: Product/service
- Unique Name: puqNextcloud Notification disk limit
Subject:
Disk space usage {$disk_used_percentage} % - {$username}Body:
Dear {$client_name},

This letter informs you that the disk space usage limit is coming to an end.

Product/Service: {$service_product_name}
Due Date: {$service_next_due_date}

Username: {$username}

Disk limit: {$disk_limit_bytes*$unit_coefficient} {$unit}
Disk used: {$disk_used_unit} {$unit} ({$disk_used_percentage} %)
Disk free: {$disk_free_unit} {$unit} ({$disk_free_percentage} %)


{$signature}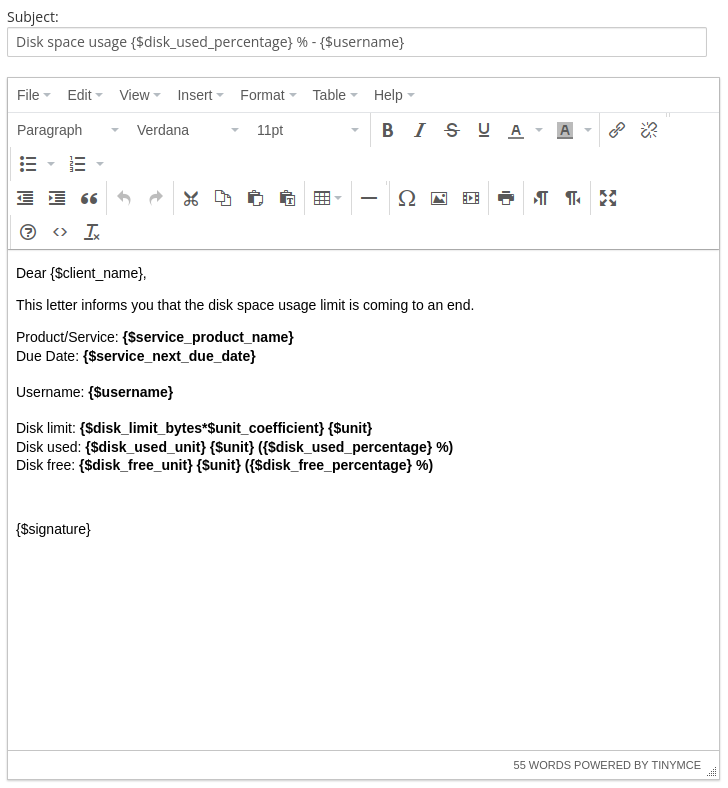
Add server (Nextcloud server)
Nextcloud module WHMCS
Order now | Download | FAQ
Add a new server to the system WHMCS.
System Settings->Servers->Add New Server- Enter the correct Name and Hostname
- In the Server Details section, select the "PUQ Nextcloud" module and enter the correct username and password for the Nextcloud web interface.
- To check, click the "Test connection" button
Product Configuration
Nextcloud module WHMCS
Order now | Download | FAQ
Add new product to WHMCS
System Settings->Products/Services->Create a New ProductIn the Module settings section, select the "PUQ Nextcloud" module
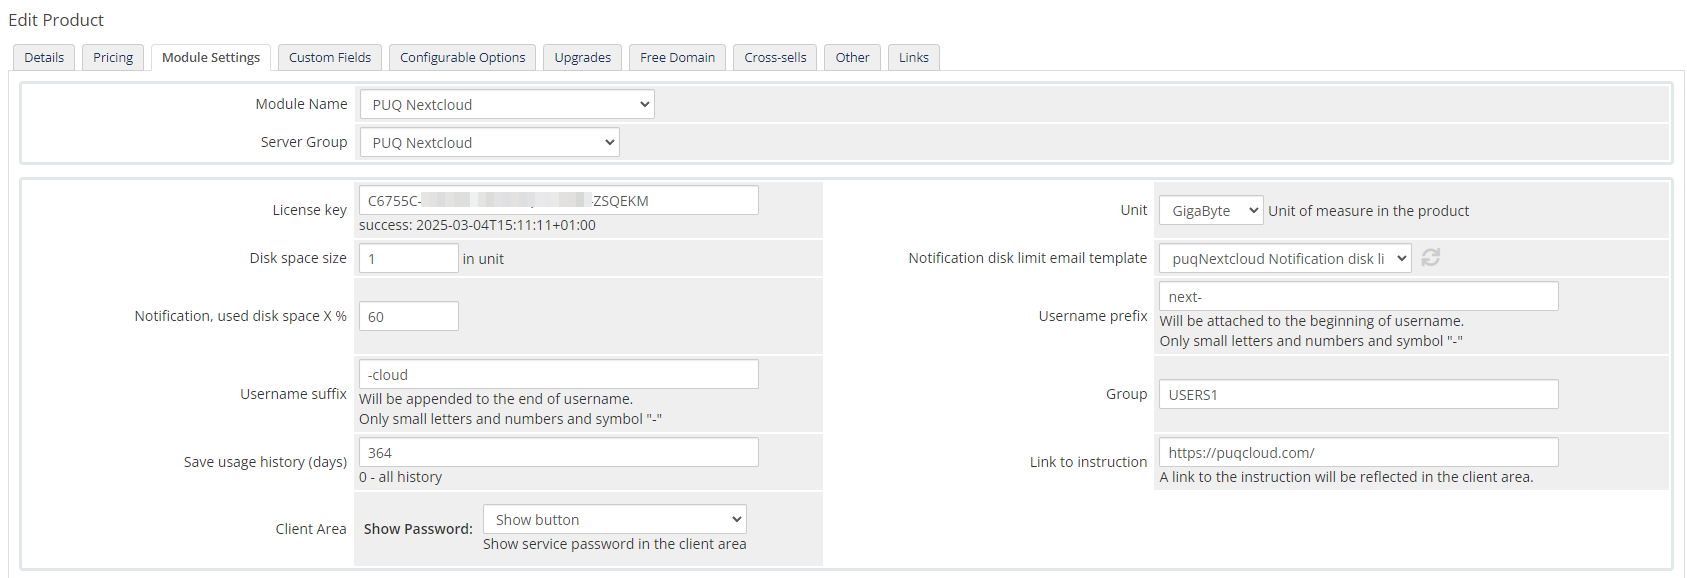
- License key: A pre-purchased license key for the "PUQ Nextcloud" module. For the module to work correctly, the key must be active
- Unit: Packet disk space units
- Disk space size: Disk size in this product
- Notification disk limit email template: Email template that will be sent when the disk quota is exceeded in %
- Notification, used disk space X %: Sets a percentage parameter, after exceeding this parameter a notification will be sent to the user
- Username prefix/Username suffix: Necessary in order to generate a username for the service, in the format: prefix<client_id>-<service_id>suffix
- Group: The group that will be assigned to the user on the server side of the Nextcloud
- Save usage history (days): The number of days it takes to save user disk usage statistics
- Link to instruction: Link to the instruction, if filled out, it will be reflected in the client area
- Client Area: Client zone settings, show or not show the password in the client zone, type how to show the password.