PowerDNS WHMCS Module
The module allows to provide management of DNS records of zones as a separate product. Uses PoqweDNS.
- Description
- Changelog
- Installation and configuration guide
- WHMCS setup(install/update)
- Setup guide: PowerDNS setup
- Add server (PowerDNS server)
- Product Configuration
- Client Area
- Admin Area
Description
PowerDNS module WHMCS
Order now | Download | FAQ
The PUQ PowerDNS module allows you to create products that enable clients to manage DNS records within their DNS zone. The module uses the standard connection to the PowerDNS API and does not require additional configuration on the PowerDNS side.
Module features:
- Configuration of restrictions such as the number of zones and zone name filters.
- The module automatically blocks the zone if payment is not made.
- Automatic zone unblocking.
- Automatic zone deletion during service termination.
WHMCS minimal version: 8 +
PowerDNS minimal version: 4.9
Changelog
PowerDNS module WHMCS
Order now | Download | FAQ
v2.3 Released 02-04-2025
- Added critical security fixes
v2.2 Released 07-02-2025
- Add automatic creation of zones if a domain was entered for services
- Fix conflict of technical fields with the name "content" in some cases interfere with deleting and editing TXT, SRV records
v2.1 Released 16-11-2024
1. Add zone templates configuration to product configuration (https://doc.puq.info/books/powerdns-whmcs-module/page/product-configuration)
2. Some bug fix
v2.0 Released 23-09-2024
Module is coded ionCube v13
Supported php version:
- php 7.4 WHMCS 8.11.0 -
- php 8.1 WHMCS 8.11.0 +
- php 8.2 WHMCS 8.11.0 +
- Translations added/updated (Arabic, Azerbaijani, Catalan, Chinese, Croatian, Czech, Danish, Dutch, English, Estonian, Farsi, French, German, Hebrew, Hungarian, Italian, Macedonian, Norwegian, Polish, Romanian, Russian, Spanish, Swedish, Turkish, Ukrainian)
v1.0 Released 01-09-2024
First version
Installation and configuration guide
WHMCS setup(install/update)
PowerDNS module WHMCS
Order now | Download | FAQ
Module is coded ionCube v13
Supported php version:
- php 7.4 WHMCS 8.11.0 -
- php 8.1 WHMCS 8.11.0 +
- php 8.2 WHMCS 8.11.0 +
To install and update a module, you must perform one and the same action.
1. Download the latest version of the module.
PHP 8.2
wget http://download.puqcloud.com/WHMCS/servers/PUQ_WHMCS-PowerDNS/php82/PUQ_WHMCS-PowerDNS-latest.zipPHP 8.1
wget http://download.puqcloud.com/WHMCS/servers/PUQ_WHMCS-PowerDNS/php81/PUQ_WHMCS-PowerDNS-latest.zipPHP 7.4
wget http://download.puqcloud.com/WHMCS/servers/PUQ_WHMCS-PowerDNS/php74/PUQ_WHMCS-PowerDNS-latest.zipAll versions are available via link: https://download.puqcloud.com/WHMCS/servers/PUQ_WHMCS-PowerDNS/
2. Unzip the archive with the module.
unzip PUQ_WHMCS-PowerDNS-latest.zip3. Copy and Replace "puqPowerDNS" to "WHMCS_WEB_DIR/modules/servers/"
Setup guide: PowerDNS setup
PowerDNS module WHMCS
Order now | Download | FAQ
Disclaimer: This guide is intended for informational purposes only and provides a basic example of how to enable the API in PowerDNS. It is strongly recommended to refer to the official PowerDNS documentation for comprehensive and accurate instructions. Following official guidelines ensures that your setup is secure, reliable, and fully supported. This example may not cover all security considerations or configurations required for your specific environment. Use this guide at your own risk.
Install PowerDNS
Update the System
It is always safe to work with a system that is up-to-date. Updating your Debian system can be done using the simple command:
sudo apt update && sudo apt upgradeInstall the required tools:
sudo apt install curl vim git libpq-dev -yOnce all the packages have been updated to their latest stable versions, proceed with the below steps.
1 – Install PowerDNS Relational Database
PowerDNS supports innumerable database backends such as MySQL, PostgreSQL, Oracle e.t.c. Here, we will use the MariaDB as backend storage for PowerDNS zone files.
Install MariaDB on Debian using the below steps:
First, install the required tools:
sudo apt install software-properties-common gnupg2 -yThen proceed and the MariaDB 10.6 repository on the system.
curl -LsS -O https://downloads.mariadb.com/MariaDB/mariadb_repo_setup
sudo bash mariadb_repo_setup
Update your package index and install MariaDB.
sudo apt update
sudo apt install mariadb-server mariadb-client
Once the installation is complete, start and enable MariaDB.
sudo systemctl start mariadb
sudo systemctl enable mariadb
Login to the shell using the root user
sudo mysql -u rootNow create a PowerDNS database.
CREATE DATABASE powerdns;
GRANT ALL ON powerdns.* TO 'powerdns_user'@'%' IDENTIFIED BY 'Strongpassword';
FLUSH PRIVILEGES;
EXIT
Remember the password set for the user should not contain special characters since PowerDNS doesn’t like this and will cause the error “Access denied for user ‘powerdns_user’@’localhost’ (using password: YES)“
2 – Install PowerDNS on Debian
We will begin by disabling the systemd-resolved service. This service runs on port 53 providing network name resolution used to load applications but now we want to use PowerDNS.
Stop and disable systemd-resolved using the commands:
sudo systemctl stop systemd-resolved
sudo systemctl disable systemd-resolved
Proceed and remove the symbolic link for the file.
$ ls -lh /etc/resolv.conf
-rw-r--r-- 1 root root 49 Feb 23 04:53 /etc/resolv.conf
$ sudo unlink /etc/resolv.conf
Update the resolv.conf file.
$ sudo vim /etc/resolv.conf
nameserver 8.8.8.8
After the above adjustments, you can install PowerDNS from the default APT repositories using the command:
sudo apt install pdns-server pdns-backend-mysqlInstall the latest release of PowerDNS available on the official PowerDNS release page. As of this guide, the stable release was at 4.6. The repository for this release can be added to the system as below.
sudo vim /etc/apt/sources.list.d/pdns.listFor Debian 12
deb [arch=amd64] http://repo.powerdns.com/debian bookworm-auth-46 mainFor Debian 11
deb [arch=amd64] http://repo.powerdns.com/debian bullseye-auth-46 mainFor Debian 10
deb [arch=amd64] http://repo.powerdns.com/debian buster-auth-46 mainImport the GPG key signing for the repository.
curl -fsSL https://repo.powerdns.com/FD380FBB-pub.asc | sudo gpg --dearmor -o /etc/apt/trusted.gpg.d/pdns.gpgSet the APT preferences.
$ sudo vim /etc/apt/preferences.d/pdns
Package: pdns-*
Pin: origin repo.powerdns.com
Pin-Priority: 600
Update your APT package index.
sudo apt updateNow install the PowerDNS server and the MySQL backend as below.
sudo apt install pdns-server pdns-backend-mysql3 – Configure the PowerDNS Database
Now that we have the PowerDNS database already created on MariaDB, we will proceed and import the database schemas to it. This normally saved under the /usr/share/pdns-backend-mysql/schema/ as a schema.mysql.sql file.
Now import this schema to the created database(powerdns) in step 1.
mysql -u powerdns_user -p powerdns < /usr/share/pdns-backend-mysql/schema/schema.mysql.sqlYou can then verify schema import as below.
sudo mysql -u root
use powerdns;
show tables;
After the schema has been imported, we will now configure the PowerDNS connection details to the database.
This can be done by creating the file below.
sudo vim /etc/powerdns/pdns.d/pdns.local.gmysql.conf In the opened file, edit the lines:
# MySQL Configuration
# Launch gmysql backend
launch+=gmysql
# gmysql parameters
gmysql-host=127.0.0.1
gmysql-port=3306
gmysql-dbname=powerdns
gmysql-user=powerdns_user
gmysql-password=Strongpassword
gmysql-dnssec=yes
# gmysql-socket=
Set the appropriate permissions for the file.
sudo chown pdns: /etc/powerdns/pdns.d/pdns.local.gmysql.conf
sudo chmod 640 /etc/powerdns/pdns.d/pdns.local.gmysql.conf
You can now verify the database connection.
sudo systemctl stop pdns.service
sudo pdns_server --daemon=no --guardian=no --loglevel=9
With the above output, the database connection is successful. Restart and enable the PowerDNS service.
sudo systemctl restart pdns
sudo systemctl enable pdns
Verify the port 53 is open for DNS.
sudo ss -alnp4 | grep pdnsOutput:
udp   UNCONN 0      0            0.0.0.0:53         0.0.0.0:*    users:(("pdns_server",pid=18530,fd=5))
tcp   LISTEN 0      128          0.0.0.0:53         0.0.0.0:*    users:(("pdns_server",pid=18530,fd=7))
You can also check if PowerDNS is responding to requests.
$ dig @127.0.0.1

; <<>> DiG 9.16.22-Debian <<>> @127.0.0.1
; (1 server found)
;; global options: +cmd
;; Got answer:
;; ->>HEADER<<- opcode: QUERY, status: REFUSED, id: 4882
;; flags: qr rd; QUERY: 1, ANSWER: 0, AUTHORITY: 0, ADDITIONAL: 1
;; WARNING: recursion requested but not available

;; OPT PSEUDOSECTION:
; EDNS: version: 0, flags:; udp: 1232
;; QUESTION SECTION:
;.				IN	NS

;; Query time: 4 msec
;; SERVER: 127.0.0.1#53(127.0.0.1)
;; WHEN: Wed Feb 23 06:03:49 EST 2022
;; MSG SIZE  rcvd: 28
To enable the API in PowerDNS
1 – Edit the PowerDNS Configuration File
The configuration file for PowerDNS is usually located at /etc/powerdns/pdns.conf. Open it for editing:
sudo nano /etc/powerdns/pdns.conf
2 – Enable the API
Find and modify the following lines, or add them if they are not present:
api=yes
webserver=yes
webserver-address=0.0.0.0
webserver-port=8081api=yes: Enables the API.webserver=yes: Enables the web server for accessing the API.webserver-address=0.0.0.0: Configures the server to listen on all IP addresses. If you want to restrict access to a specific IP, specify that IP address here.webserver-port=8081: Specifies the port on which the API web server will be available (default is 8081).
3 – Configure Access from Another Server
To allow access to the API from another server, set up authentication by adding the following line in pdns.conf:
api-key=your_api_key_hereapi-key=your_api_key_here: Set the API key that will be used to authenticate requests to the API. Replaceyour_api_key_herewith a strong, secure key.
4 – Restart PowerDNS
After making these changes, restart PowerDNS to apply them:
sudo systemctl restart pdns5 – Test the API
From another server, test the API by making a request using the API key, for example:
curl -X GET -H 'X-API-Key: your_api_key_here' http://ip_address_of_pdns_server:8081/api/v1/serversReplace your_api_key_here with your API key and ip_address_of_pdns_server with the IP address of the server where PowerDNS is installed.
Add server (PowerDNS server)
PowerDNS module WHMCS
Order now | Download | FAQ
Add a new server to the system WHMCS.
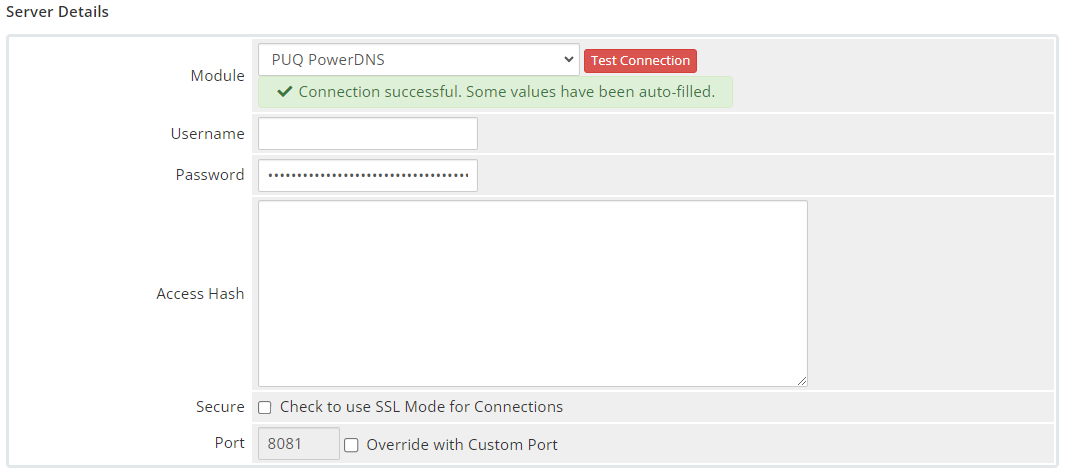
System Settings->Servers->Add New Server- Enter the correct Name and Hostname
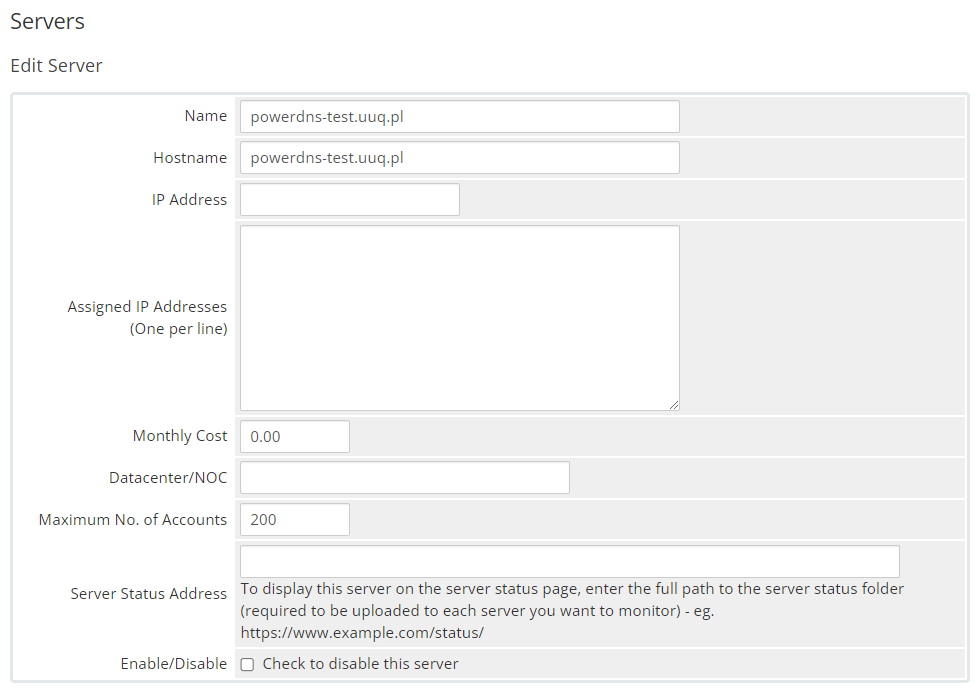
- In the Server Details section, select the "PUQ PowerDNS" module and enter the correct PowerDNS API key in the password field.
- To check, click the "Test connection" button
Product Configuration
PowerDNS module WHMCS
Order now | Download | FAQ
Add new product to WHMCS
System Settings->Products/Services->Create a New ProductIn the Module settings section, select the "PUQ PowerDNS" module
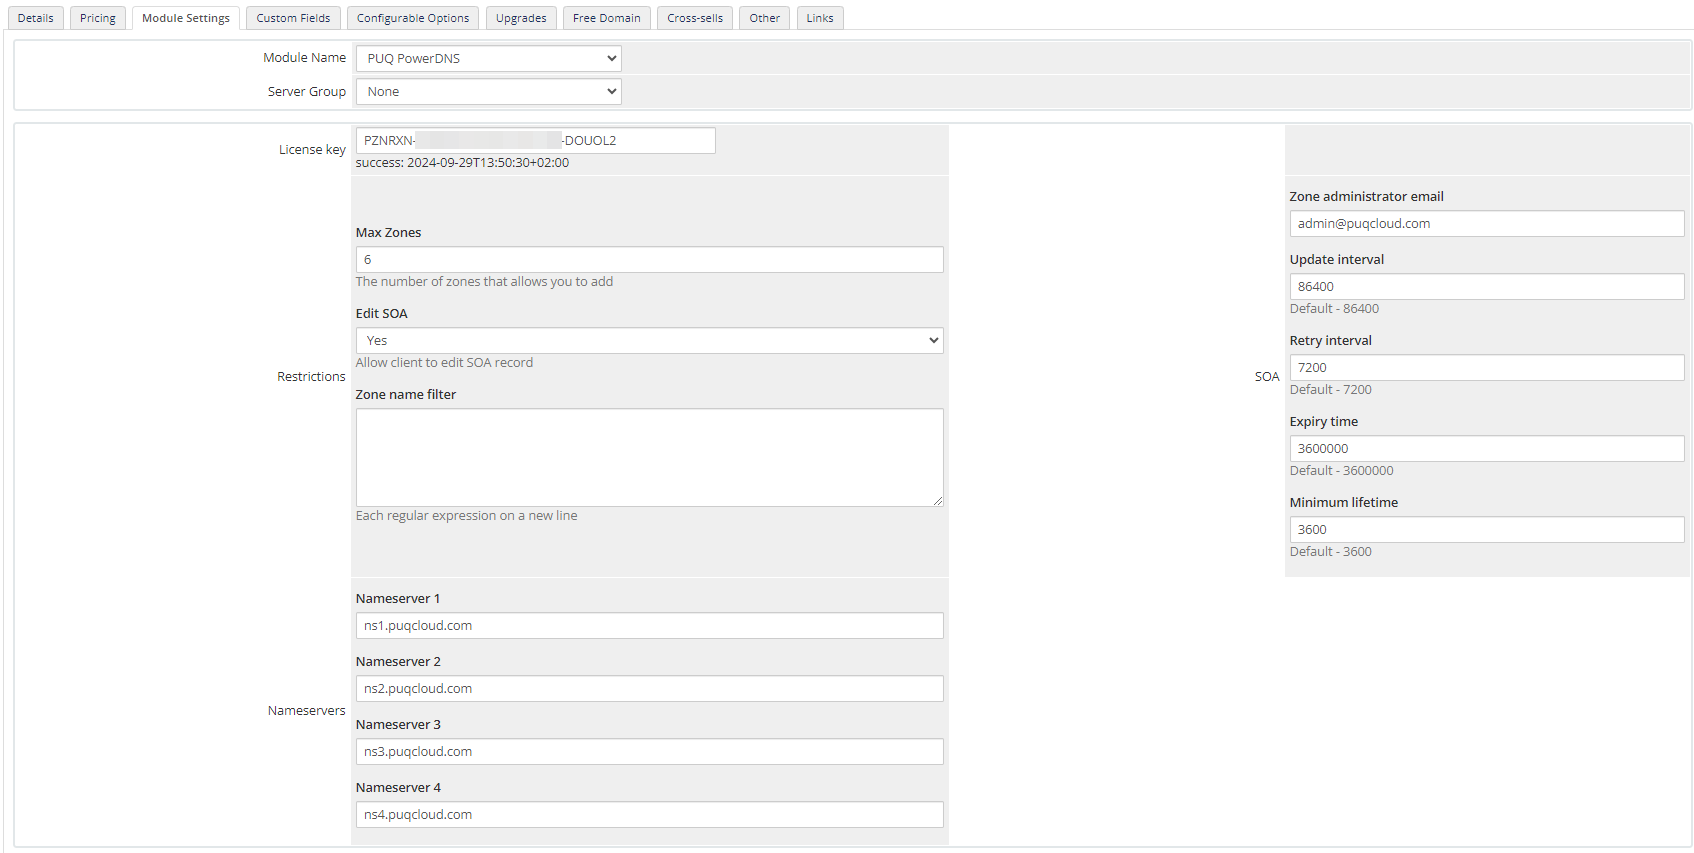
- License key: A pre-purchased license key for the "PUQ PowerDNS" module. For the module to work correctly, the key must be active
- Max Zones: The number of zones that will be available for the client to manage.
- Edit SOA: Whether to allow the client to manage the SOA record.
- Zone name filter: In this field, you can enter regular expressions to filter zone names that the client can add. Each filter should be on a separate line, and each filter is checked in sequence, meaning the zone will not be added if even one filter matches.
- Nameservers: In this section, enter the name servers that will be added to the zone (Your DNS cluster).
- SOA: In this section, enter all the SOA record parameters that will be used by default.
Zone template

Here are the rules for creating DNS records. These records will be automatically generated when a zone is created. Placeholders like {zone} will be replaced with the actual zone name. The format for defining records is as follows:
Format:name type ttl content
Explanation:
-
name:
- This specifies the name of the subdomain or record.
- For example,
ftpwill expand toftp.<zone.name>. - Use
@to refer to the main zone (root domain).
-
type:
- The type of DNS record.
- Examples include:
A,AAAA,MX,CNAME,TXT,SRV,CAA,DNSKEY,DS,NAPTR,TLSA.
-
ttl (Time To Live):
- The duration (in seconds) for which the record is cached by DNS resolvers.
- Recommended default is
3600seconds (1 hour).
-
content:
- The value or data for the record, provided without abbreviations or placeholders.
- For example, for an
Arecord, this would be the IPv4 address.
These rules ensure consistency and accuracy when defining DNS records for your zones.
Example Zone Records Template
A Records (IPv4):
@           A       3600    192.168.1.1
@           A       3600    192.168.1.3
www         A       3600    192.168.1.2
www2        A       3600    192.168.1.3
AAAA Records (IPv6):
@           AAAA    3600    2001:0db8:85a3:0000:0000:8a2e:0370:7334
@           AAAA    3600    2001:0db8:85a3:0000:0000:8a2e:0370:7336
www         AAAA    3600    2001:0db8:85a3:0000:0000:8a2e:0370:7335
www2        AAAA    3600    2001:0db8:85a3:0000:0000:8a2e:0370:7335
CNAME Records (Aliases):
ftp         CNAME   3600    {zone}
ftp2        CNAME   3600    example.com
MX Records (Mail Exchange):
@           MX      3600    10 mail.{zone}
@           MX      3600    20 backupmail.{zone}
TXT Records (Text Data):
@           TXT     3600    v=spf1 ip4:192.168.1.1 -all
@           TXT     3600    SOME TXT TEXT
_dmarc      TXT     3600    v=DMARC1; p=none; rua=mailto:dmarc@{zone}
CAA Records (Certification Authority Authorization):
@           CAA     3600    0 issue      letsencrypt.org
@           CAA     3600    0 issuewild  comodoca.com
@           CAA     3600    0 iodef      mailto:admin@{zone}
NAPTR Record (Naming Authority Pointer):
_sip._udp NAPTR 3600 100 10 S SIP+D2U * sip.{zone}.SRV Records (Service Locator):
_sip._tcp SRV 3600 10 5 5060 sipserver.{zone}Key Notes:
@: Represents the main zone (e.g., the root domain).- Placeholders like
{zone}: Will be replaced by the actual zone name during execution. - TTL (Time to Live): Use 3600 seconds by default, which is standard for DNS records.
- Adjust records based on your specific zone requirements. These templates cover common DNS record types for a functional zone configuration.
Client Area
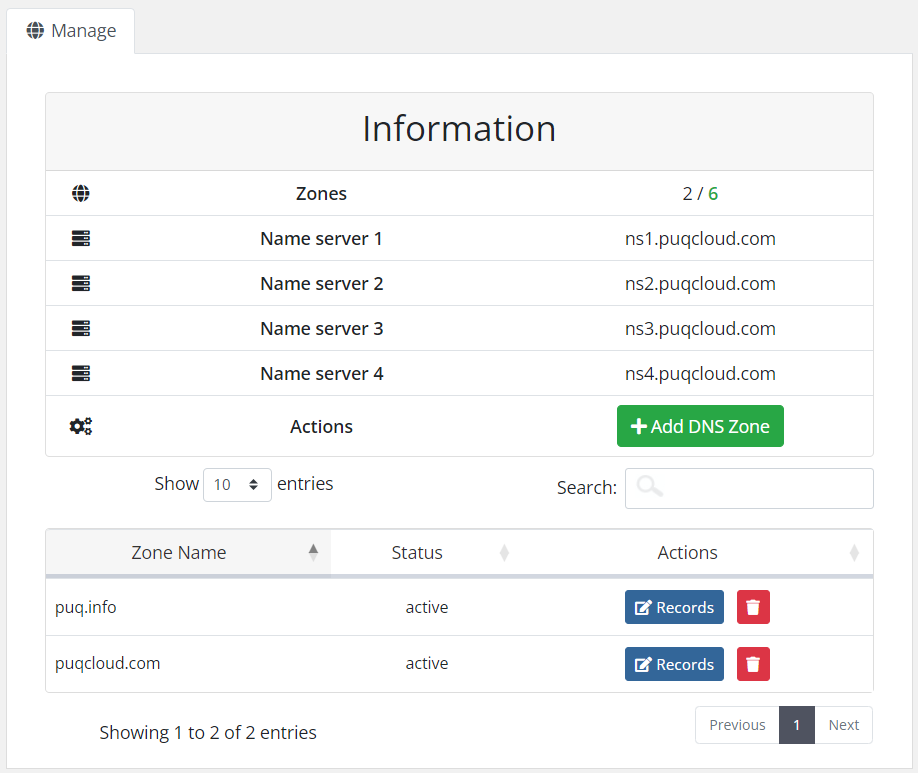
Home screen
PowerDNS module WHMCS
Order now | Download | FAQ
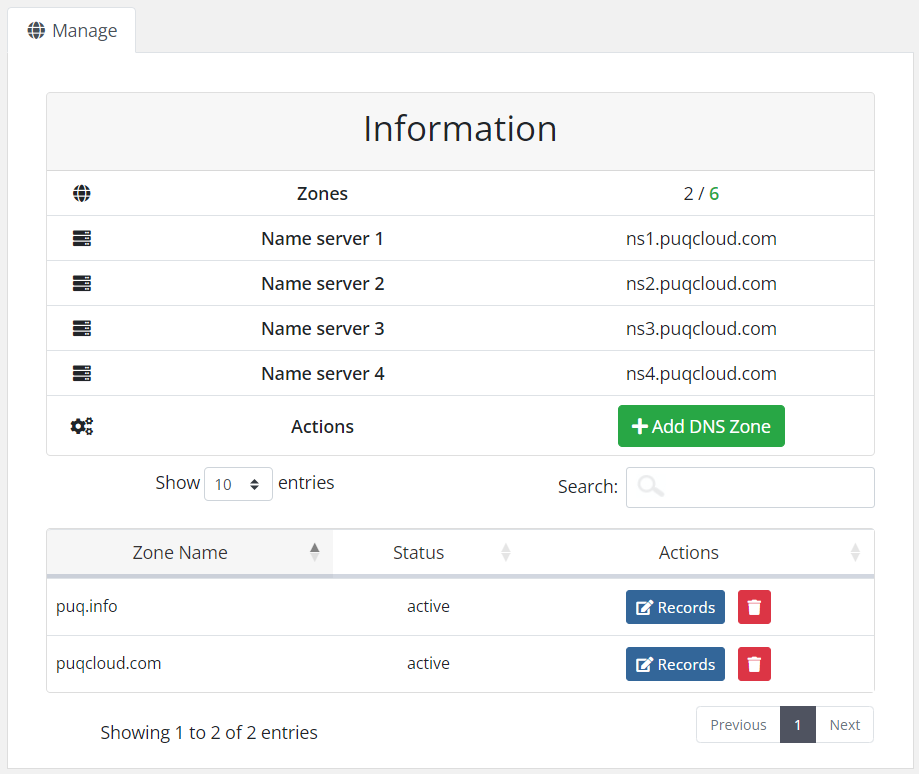
On the product's home page in the client area, there is a list of NS servers that the client needs to set up on their domain in the registrar's settings. There is also a list of zones with the ability to manage them.
Add DNS Zone
PowerDNS module WHMCS
Order now | Download | FAQ
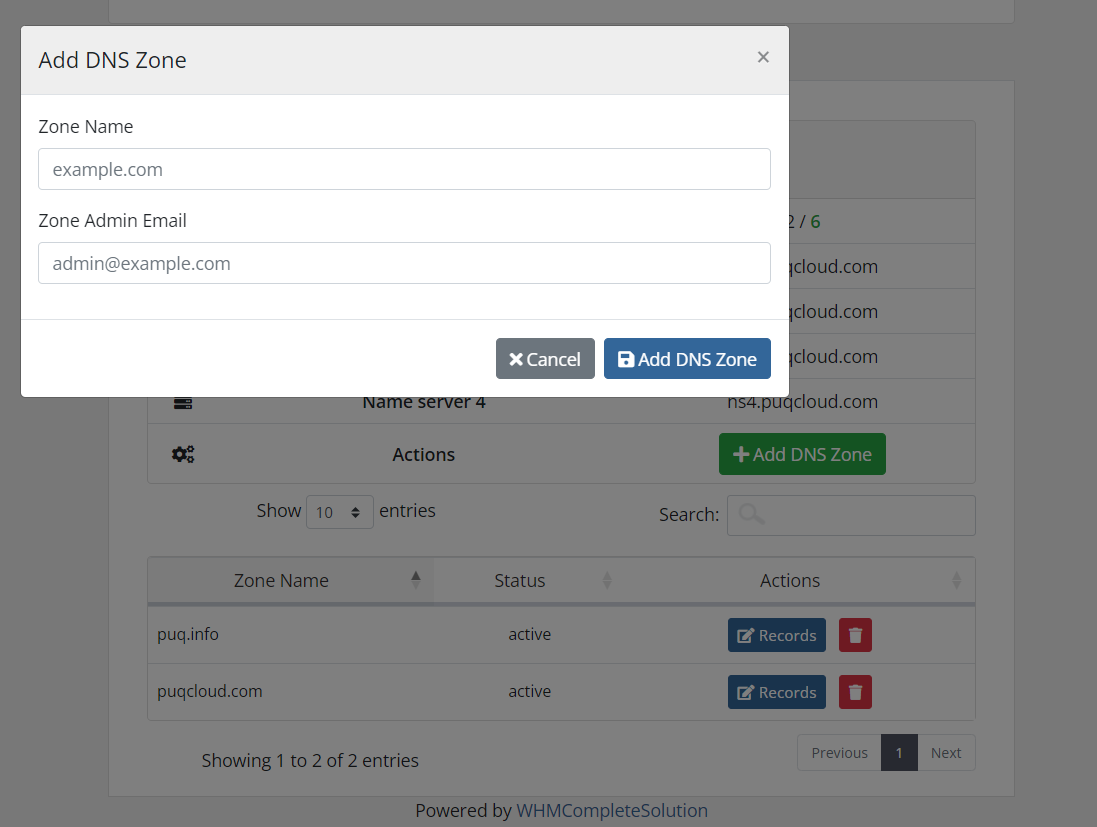
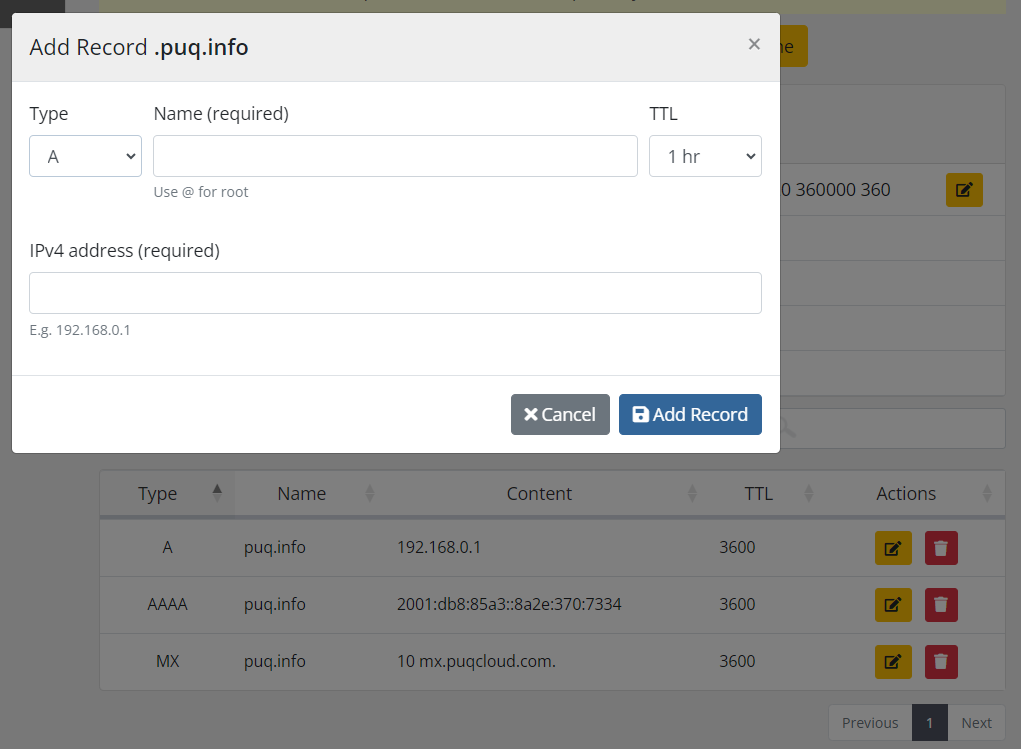
When the "Add DNS Zone" button is clicked, a wizard for adding a new zone will open in a pop-up window.
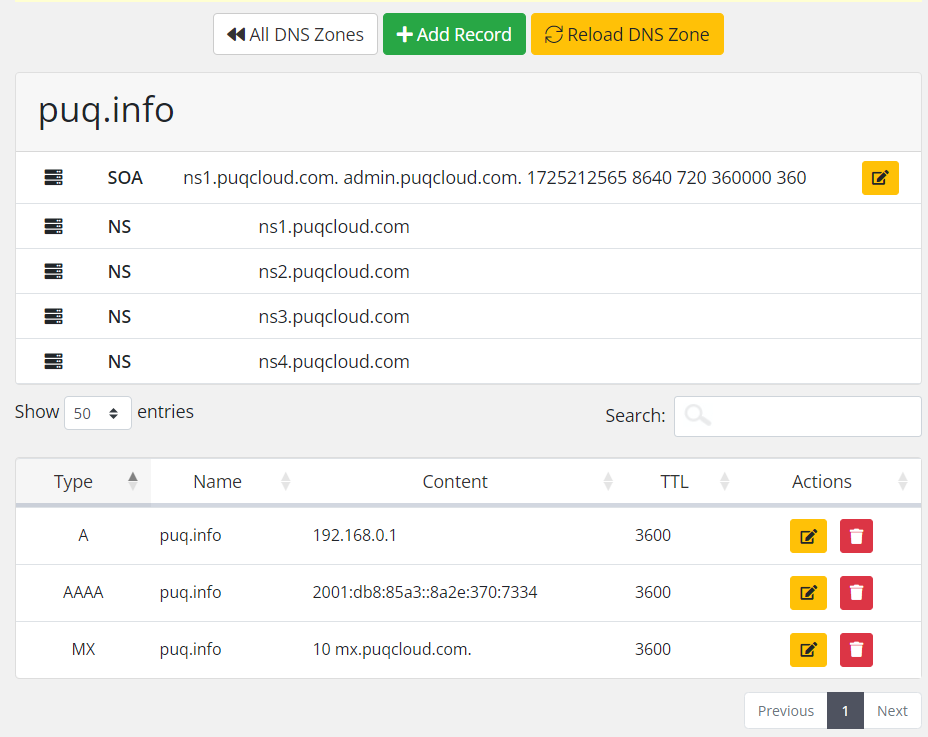
Managing DNS Records
PowerDNS module WHMCS
Order now | Download | FAQ
To manage records, you need to click the "Records" button on the selected zone, and on the page that opens, you will be able to manage the records.
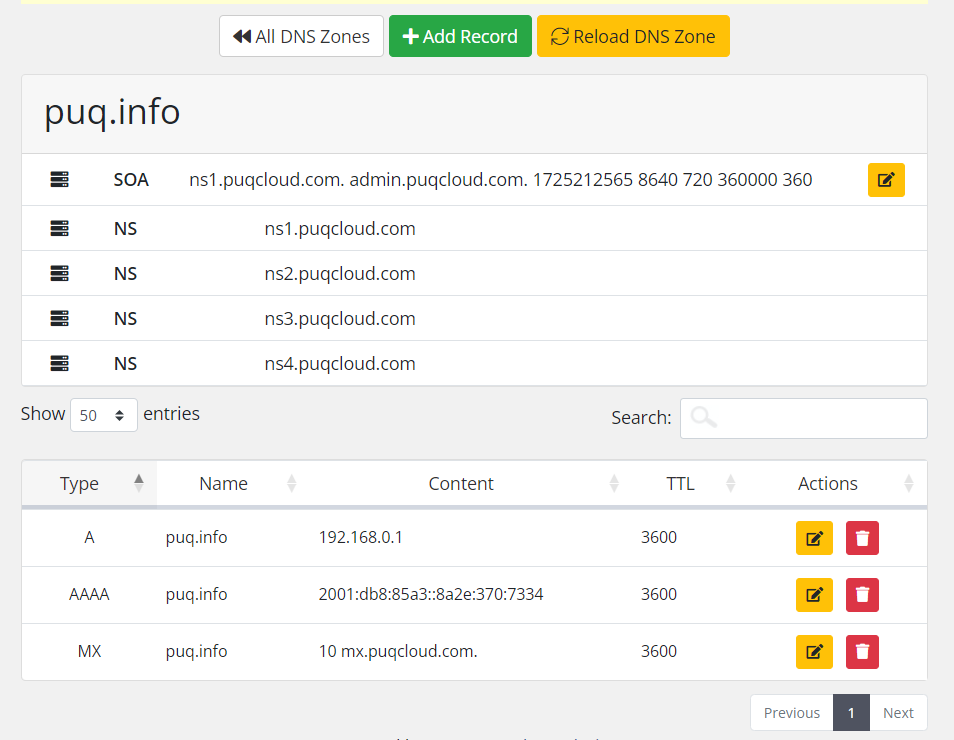
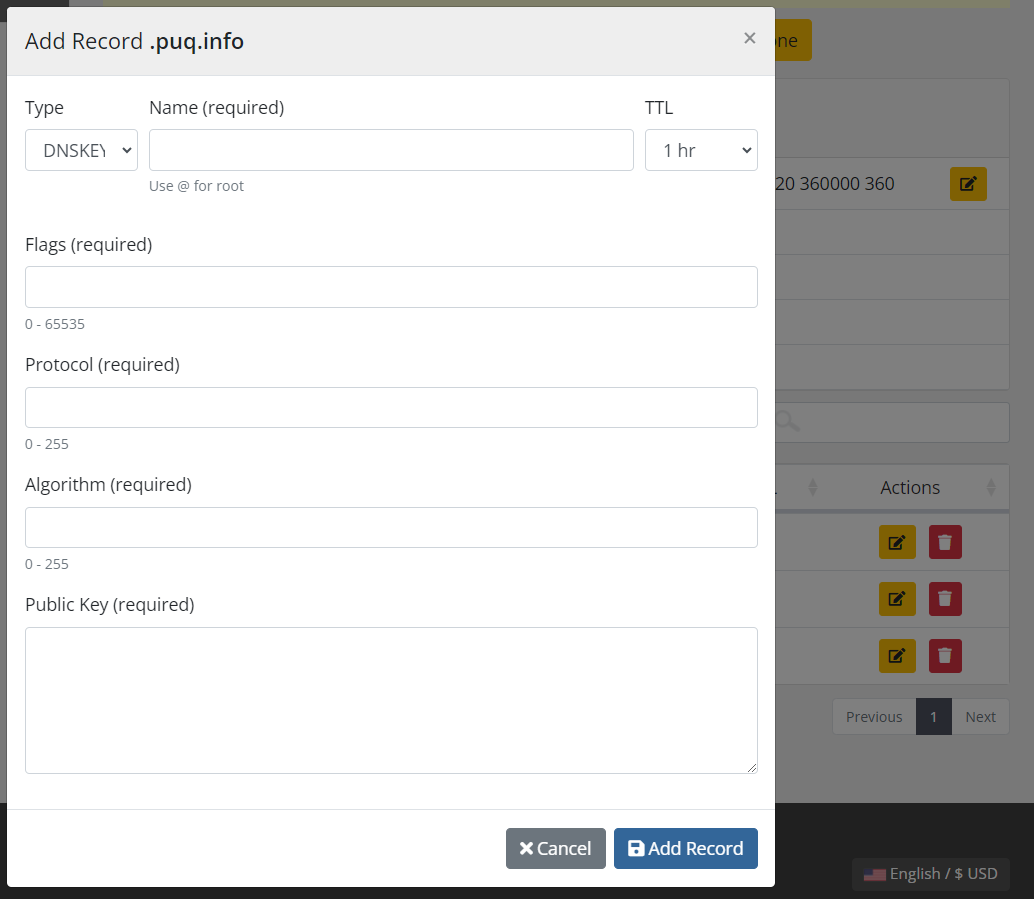
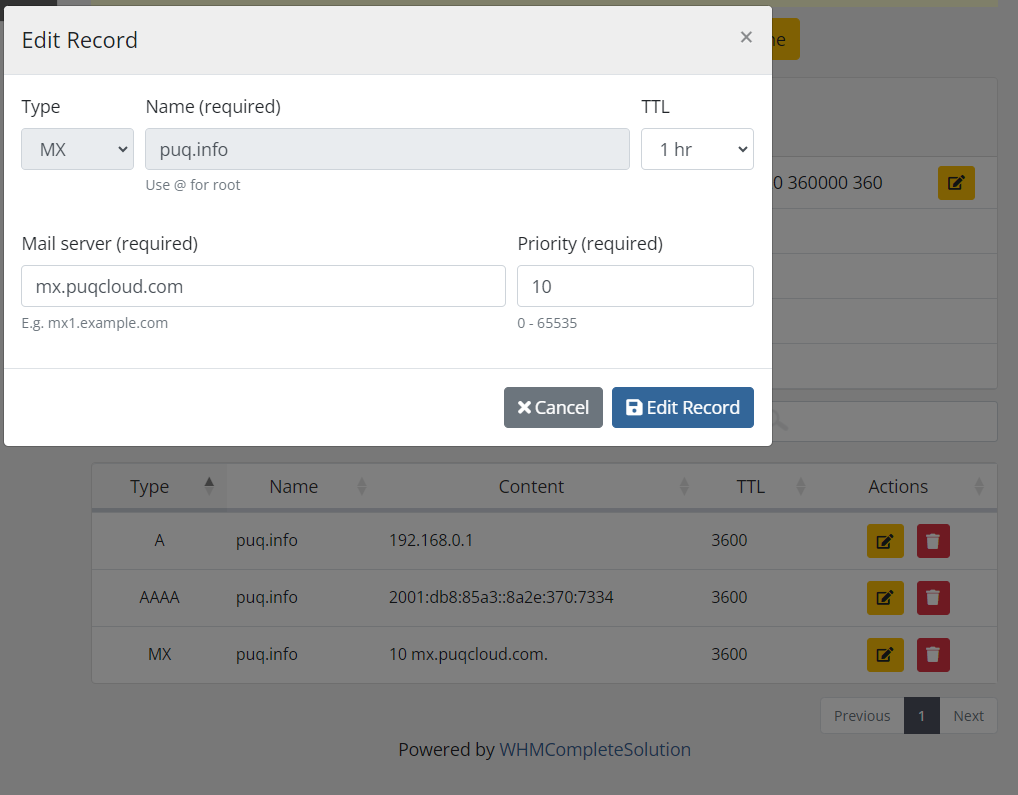
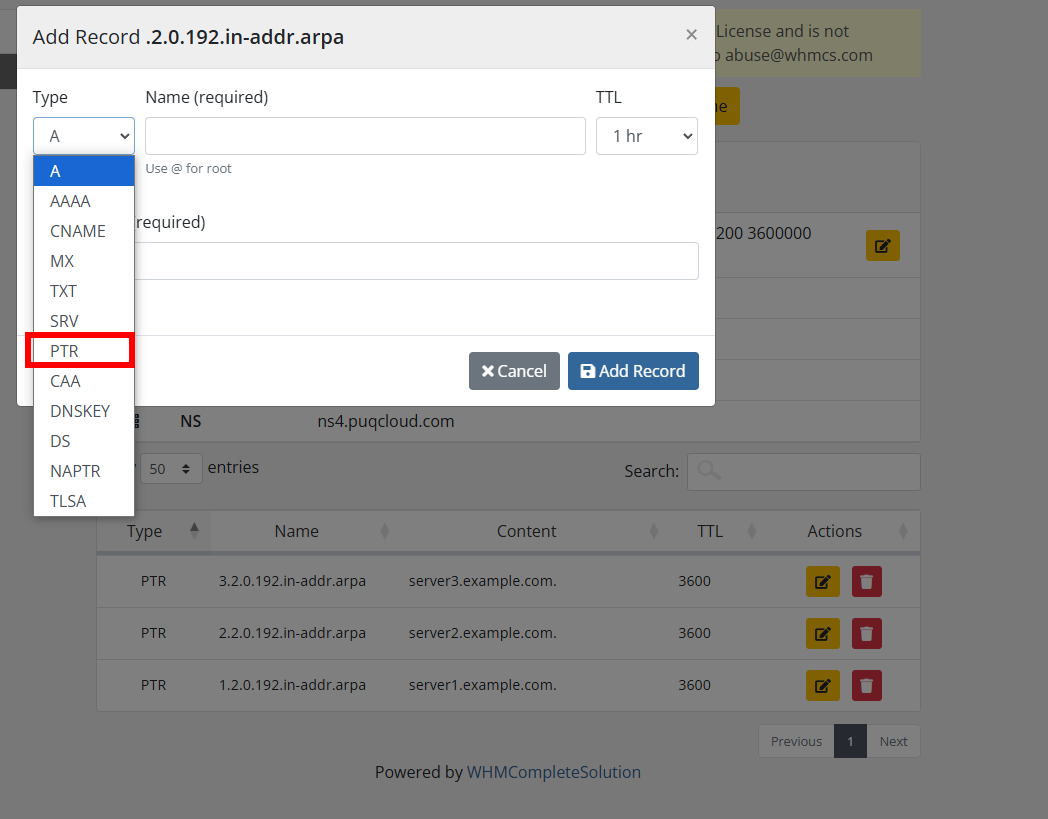
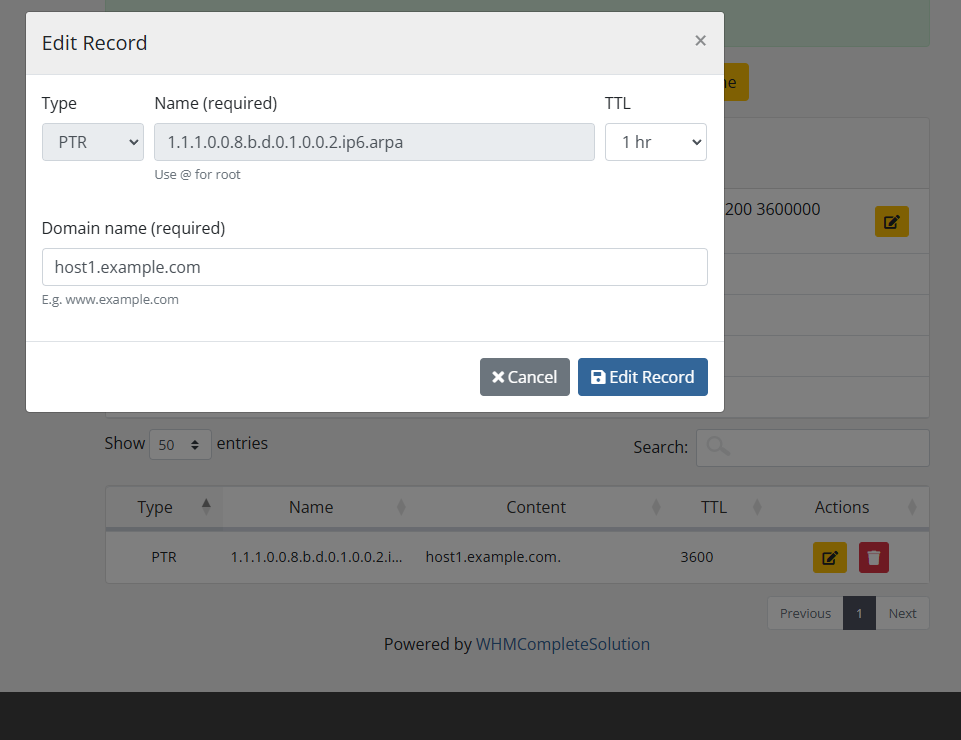
Edit records
PTR IPv4 and IPv6
PowerDNS module WHMCS
Order now | Download | FAQ
Module support PTR IPv4 and IPv6

Admin Area
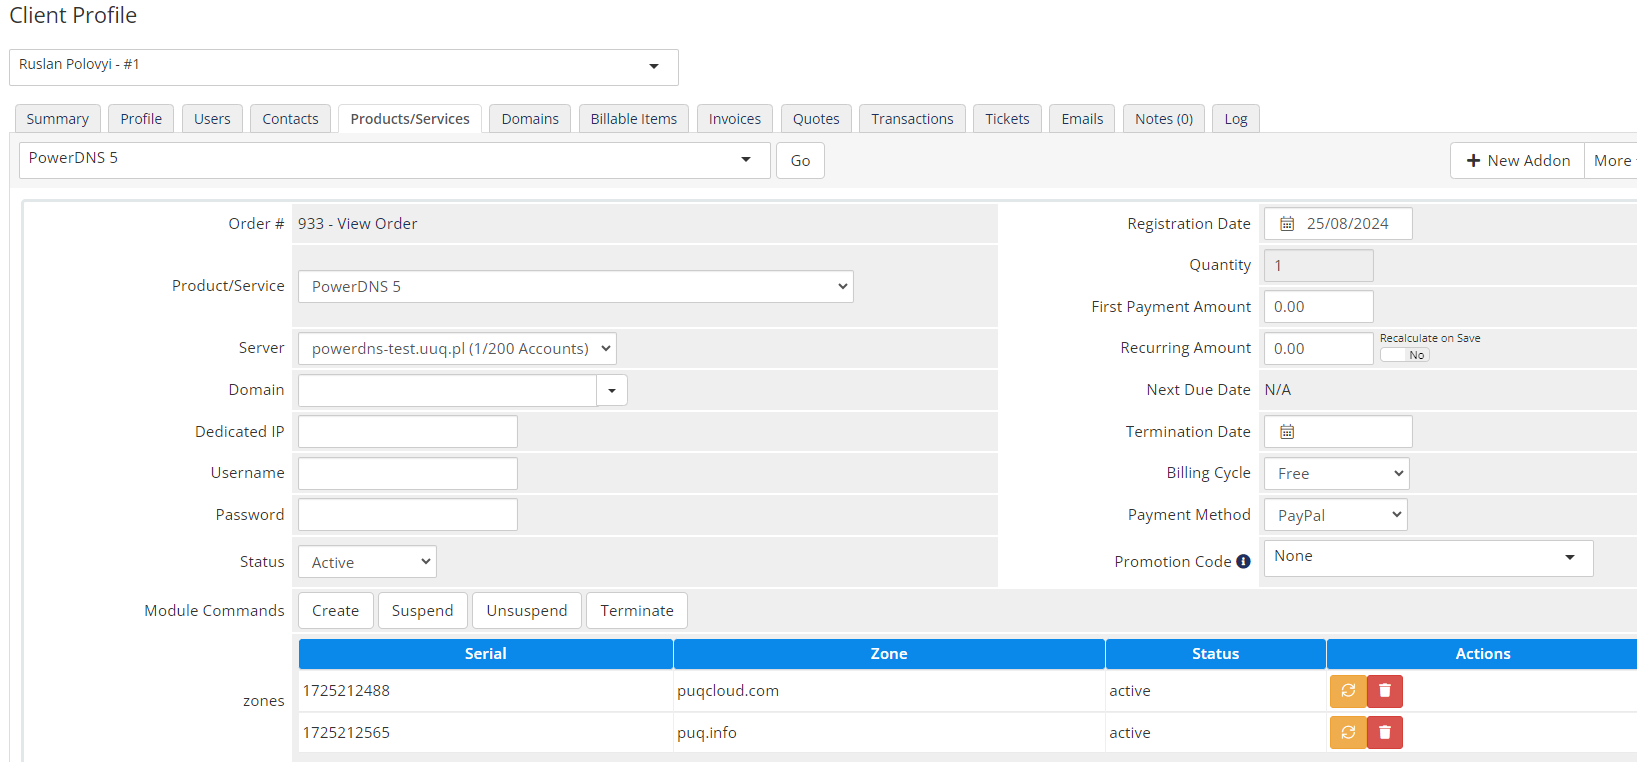
Product Information
PowerDNS module WHMCS
Order now | Download | FAQ
Here is the data presented for the service admin in WHMCS