Installation and configuration guide
- Basic concepts and requirements
- 1. WHMCS setup(install/update)
- 2. Virtual machine templates
- 3. Install VNCproxy and noVNC
- 4. Create new server for Proxmox in WHMCS
- 5. Synchronization of DNS records
- 6a. Email Template (puqProxmoxVKM Welcome Email)
- 6b. Email Template (puqProxmoxKVM VM is ready)
- 6c. Email Template (puqProxmoxKVM Reset password)
- 6d. Email Template (puqProxmoxKVM Backup restored)
- 6e. Email Template (puqProxmoxKVM Upgrade Email)
- 7. Troubleshooting
Basic concepts and requirements
ProxmoxKVM module WHMCS
Order now | Download | FAQ
Requirements for the successfull operation of the module
- Minimal WHMCS version 8+
- Minimal Proxmox server or cluster version 7+
- Continuous and stable network availability between systems
- In the case of using static IP addresses, it is necessary to have the required number of free IP addresses that will be reserved for use in virtual machine services.
- If you are using a DHCP server in your virtual machine network, you will additional need to configure it properly.
- If you use VLAN in your network, then you need to correctly configure your internal network so that the VLAN is available on all nodes of the cluster.
- In order for the noVNC console to work correctly, it is necessary to configure the VNC Web proxy on a separate installation (for example, a virtual machine) that will have access to the Internet and to the secure network of the Proxmox cluster / server.
- You need to set up a DNS API proxy. To synchronize forward and reverse DNS records.
In order to manage pools of IPv4 and IPv6 IP addresses, DNS zones
you need to install the PUQ Customization addon module (free)
https://doc.puq.info/books/puq-customization-whmcs-addon
https://download.puqcloud.com/WHMCS/addons/PUQ-Customization/
https://puqcloud.com/whmcs-addon-puq-customization.php
If the module is set to use the DHCP server, the module does not manage the allocation of IP addresses and firewall rules, but only the throughput and setting the appropriate bridge and vlan settings on the network card
In the case of using one Proxmox server, a Directory or NFS data store is required.
In the case of using a Proxmox cluster, the cluster must have a shared network storage.
- On one network storage, there should be both templates of virtual machines and disks of virtual machines. A configuration is allowed when the virtual machine template has 2 disks that can be stored on different network storages. For example, the system disk of the virtual machine is stored on the fast storage, and an additional disk is stored on the slow storage, designed for backups inside the virtual machine.
- For ISO images, you can use another network storage
- For backups to work, network storage is also required. You can use Proxmox Backup and Your server must still be available to all nodes in the cluster.
The configuration of datastores intended for backups must be configured in advance so that they do not rotate backup copies. Or the rotation has been configured so that it does not interfere with the number of spare copies in the client's package.
If you want to use firewall rules that will protect against IP address spoofing in virtual machines, You need in advance to properly configure the firewall on your server/cluster. The policy for incoming and outgoing traffic must be "DENY". The module adds permissive firewall rules on a virtual machine with the IP address of this machine.
The logic of the module.
Creating a new Virtual Machine.
- After the client ordered and paid for the virtual machine services
- An available IP address is selected from the list in the server settings. !!! If the service is in the Terminated state, its assigned IP address will be taken into account when creating new machines and can be used for a new machine.!!!
- The available virtual machine ID is selected in such a way that it is unique in the WHMCS system and on the Proxmox server.
- The fields with the domain name and the name of the virtual machine are generated and filled. The procedure uses the data supplied in the virtual machine package.
- Starts the process of cloning a virtual machine from the desired virtual machine template.
- Notifications are sent to the client that the virtual machine is in the process of being created (Welcome email)
- Internal cron process monitors and cares about proper installation procedure.
- Each time cron is executed, the module tries to continue setting up the virtual machine if the cloning process is completed, virtual machine configuration steps in crontab job:
- Write the MAC address of the network card VM in the WHMCS database
-
Set DNS Records
- Set CPU and RAM
- Set system disk size
- Set system disk bandwidth
- Created additional disk if needed
- Set additional disk size if needed
- Set additional disk bandwidth if needed
- Set network bridge and VLAN and bandwidth
- Set Firewall rules
- Configure cloud-nit (user, password, network configuration)
- Start VM
- Notify the client by e-mail that the virtual machine has been created, and the access parameters IP, user, password
An example of output from crontab log upon successful creation of a virtual machine
===========================================
VM_id: 2001
Service_id: 4785
User_id: 1
VMSetDedicatedIp: The local status should be creation
VMClone: The local status should be set_ip
VMSetCpuRam: success
VMSetSystemDiskSize: success
VMSetSystemDiskBandwidth: success
VMSetCreatedAdditionalDisk: success
VMSetAdditionalDiskSize: success
VMSetAdditionalDiskBandwidth: success
VMSetNetwork: success
VMSetFirewall: success
VMSetCloudinit: success
VMStart: success
Remote_status: running
Local_status: ready
ServiceSendEmailVMReady: OK
Reinstalling the Virtual Machine.
It is possible to reinstall VM from WHMCS panel.
The reinstallation process removes the virtual machine and recreate it using the parameters and characteristics and the actual data of the package.
- After the reinstallation option has been chosen and run the virtual machine is removed. Backups are not deleted. After removal, the process of cloning the virtual machine from the selected virtual machine template is started.
- Each time cron is executed, the module tries to continue setting up the virtual machine if the cloning process is completed, virtual machine configuration steps in crontab job:
-
- Set CPU and RAM
- Delete DNS Records
-
Set DNS Records
- Set system disk size
- Set system disk bandwidth
- Created additional disk if needed
- Set additional disk size if needed
- Set additional disk bandwidth if needed
- Set network Bridge and VLAN and bandwidth and MAC address
- Set Firewall rules
- Configure cloud-nit (user, password, network configuration)
- Start VM
- Notify the client by e-mail that the virtual machine has been ready, and provide access parameters IP, user, password
Snapshots
- The client has the ability to create/delete/restore snapshots of his virtual machine.
- The number of snapshots is limited in the package configuration.
- Snapshot lifetime is configured in the package configuration (is it in the range of 1-10 days maximum)
- Snapshots are automatically deleted when their lifetime expires (using crontab jobs)
Backups
- The client has direct ability to create/delete/restore backups of his virtual machine.
- The number of backups is limited in the package configuration.
- In the case of a schedule configuration for creating automatic backups, the client has the opportunity to select only the day on which the backup should be created. Backup times are generated automatically and randomly each time an automatic backup task is saved.
- How automatic backups work.
- during cron execution, it checks which virtual machine has a schedule for today, and if the execution time of the scheduled copy is younger than the moment at which the crona job is running
- checks if there is no today's backup then
- checks if there is a free slot for a backup and if not, it deletes the oldest backup
- creates a backup
Backup recovery
- Before restoring a backup, the virtual machine must be in a powered off state.
- After a successful backup restore, the module does the following processes with the virtual machine.
- Set CPU and RAM if needed
- Set system disk size if needed
- Set system disk bandwidth if needed
- Created additional disk if needed
- Set additional disk size if needed
- Set additional disk bandwidth if needed
- Set network bridge and VLAN and bandwidth and MAC address if needed
- Start VM
- Notify the client by e-mail that the virtual machine restoring the backup ready
- If for some reason it was not possible to restore the virtual machine from the backup, then the client is given the opportunity to try to restore the backup again or reinstall the virtual machine
During the creation and restoration of a backup, all operations for managing the virtual machine are suspended
Reset password
The password reset procedure will work if the packages that are responsible for the operation of cloud-init have not been removed from the virtual machine
- Before reset password, the virtual machine must be in a powered off state.
- Processes that occur during the password change procedure
- a new random password is generated and recorded in the client's service settings
- Configure cloud-nit (user, password, network configuration)
- Start VM
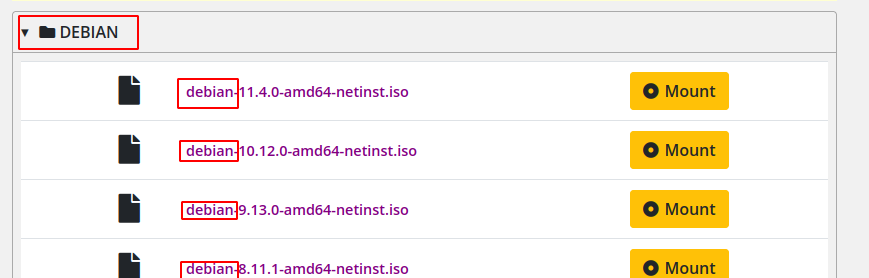
Mounting ISO image
ISO images are configured and stored in standard Proxmox way. You need to prepare storage (shared storage in case of Proxmox cluster) and upload ISO images to it in advance.
To organize and facilitate image selection, the module uses a display method that follows the file name formatting convention. Module displays ISO images names taken from Proxmox in WHMCS panel. One should pay attention to the correct naming of the image files.
ISO images are cataloged and sorted by the symbol "-" in the name of the ISO image.
For the name of the directory, the first occurrence is matched up to the symbol "-"
If the name of the ISO image does not have a symbol "-" then such an image will be cataloged in the OTHER directory.
1. WHMCS setup(install/update)
Order now | Dowload | FAQ
Module is coded ionCube v13
Supported php version:
- php 7.4 WHMCS 8.11.0 -
- php 8.1 WHMCS 8.11.0 +
- php 8.2 WHMCS 8.11.0 +
To install and update a module, you must perform one and the same action.
1. Download the latest version of the module.
PHP 8.2
wget http://download.puqcloud.com/WHMCS/servers/PUQ_WHMCS-Proxmox-KVM/php82/PUQ_WHMCS-Proxmox-KVM-latest.zipPHP 8.1
wget http://download.puqcloud.com/WHMCS/servers/PUQ_WHMCS-Proxmox-KVM/php81/PUQ_WHMCS-Proxmox-KVM-latest.zipPHP 7.4
wget http://download.puqcloud.com/WHMCS/servers/PUQ_WHMCS-Proxmox-KVM/php74/PUQ_WHMCS-Proxmox-KVM-latest.zipAll versions are available via link: http://download.puqcloud.com/WHMCS/servers/PUQ_WHMCS-Proxmox-KVM/
2. Unzip the archive with the module.
unzip PUQ_WHMCS-Proxmox-KVM-latest.zip3. Copy and Replace "puqProxmoxKVM" from "PUQ_WHMCS-Proxmox-KVM" to "WHMCS_WEB_DIR/modules/servers/"
2. Virtual machine templates
ProxmoxKVM module WHMCS
Order now | Download | FAQ
Preface
Since the primary purpose of the module is to create and manage virtual KVM machines, the machine templates must be properly prepared and available in the Proxmox panel (standalone server or cluster).
You can try to use available templates from the Internet (which support clud-init standard) and they should work fine, but we suggest initially using templates that are created according to our standards. We offer a basic set of images for download.
In order for the automatic installation of the virtual machine to work correctly, You need to prepare virtual machine templates for all operating systems that you want to provide for your customers to choose from.
The physical state of the virtual machine template
- All parameters of the virtual machine must be less than the smallest package you offer to clients. (cpu, RAM, disk size)
- If you provide a virtual machine with two disks and host these disks on different storages, you need to create these boards in the template of the virtual machine on the necessary data storage, otherwise the additional disk will be created automatically on the same storage as the main disk.
- You need to add a cloud-init disk in order to automatically configure the virtual machine after cloning, your client parameters (network settings, authorization data)
Virtual machine template software
- Install the desired operating system on the template virtual machine
- During installation, partitions of the virtual machine disk must be divided so that the root partition is the last in the lists. This is necessary in order for the automatic change of the system partition to work at the moment when the disk of the virtual machine is enlarged.
- After installing the operating system, you need to install the cloud-init software suite
enable root ssh
nano /etc/ssh/sshd_config
PermitRootLogin yes
/etc/init.d/ssh restart
apt-get update
apt-get install network-manager resolvconf -y
apt-get install cloud-initramfs-growroot cloud-init cloud-utils -y
systemctl enable cloud-init-local.service
systemctl enable cloud-init.service
systemctl enable cloud-config.service
systemctl enable cloud-final.service
dpkg -l | grep cloud-*


Delete all from /etc/NetworkManager/dispatcher.d except cloud-init-hook-network-manager

deluser --remove-home debian
rm -R /home/debian/
cat /dev/null > ~/.bash_history && history -c && exit
We have prepared templates for popular operating systems.
Templates are in the form of a virtual machine backup.
In order to use it, you need to download the archive. Then copy it to the Proxmox server and restore the backup.
Operating system configuration:
- hdd 5 GB (virtio)
- disabled swap
- minimal server installation
- allow the root user to connect via ssh
- root password: puqcloud
- installed cloud-initramfs-growroot cloud-init cloud-utils
- localization and time zone Europe/Warsaw
- language English
FAQ
If you need any other operating system or certain parameters, you can discuss it on our faq
Please note that we provide operating system templates only to demonstrate the functionality of our module.
YOUR USE OF THESE OPERATING SYSTEMS IS AT YOUR OWN RISK. WE DO NOT GUARANTEE CORRECT OPERATION AND SAFETY. WE DO NOT RECOMMEND TO USE THEM AS OPERATING SYSTEM TEMPLATES FOR YOUR CLIENTS.
Download prebuild Proxmox OS templates
You can download the templates from the links below.
Debian
Ubuntu
CentOS
Proxmox
Official cloud images with root access.

Debian

Ubuntu

CentOS
3. Install VNCproxy and noVNC
ProxmoxKVM module WHMCS
Order now | Download | FAQ
Preface
The module supports the ability to connect and use the console to manage a specific KVM virtual machine.
To connect to the virtual machine console, we will use third-party software.
noVNC - the open source VNC client - noVNC is both a VNC client JavaScript library as well as an application built on top of that library. noVNC runs well in any modern browser including mobile browsers (iOS and Android).
-
- Project site: https://novnc.com
- Project github: https://github.com/novnc/noVNC
As we only use external project we dont take any responsibility for data leak, hacks etc.
We use golang to build our products.
We have used the following libraries
- https://github.com/evangwt/go-vncproxy (MIT License)
- https://github.com/gin-gonic/gin (MIT License)
- https://pkg.go.dev/golang.org/x/net/websocket (BSD License)
If you have any difficulties, you can use our public vncproxy server. We strongly recommend setting up and using your own vncproxy server. You will retain control over server performance and security
noVNC WEB proxy server: vncproxy.puqcloud.com
noVNC WEB proxy key:puqcloud
WEB ports: 80/443
VNC ports: 5900-5999
With vncproxy you make a proxy between the client and your PROXMOX server.
vncproxy must have an unequal stable network with the proxmox server, ports 5900-5999 are enough
Also, if you use a domain name in connecting the PROXMOX seraer to the WHMCS system, this domain name must be correctly resolved from the vncproxy server
Let's start with installation.
Installation process
Domain definition
First, define a domain name for the vncproxy server, in our case it will be vncproxy.puqcloud.com
Further in the example, we will use the domain name vncproxy.puqcloud.com, but in all your configurations you must use your own domain name.
NGINX installation and configuration
Secondly, you need to install a server with your favorite operating system. In our case, this is the Debian 11 operating system. You also need to set up a DNS entry on your domain so that it returns the IP address of the server.
At first, if you haven't updated the package database recently, update it:
sudo apt updateInstall nginx WEB server and Certbot
sudo apt install certbot nginx python3-certbot-nginx zip -yDownload noVNC client
cd /root/
wget https://github.com/novnc/noVNC/archive/refs/tags/v1.3.0.zip
unzip v1.3.0.zip
cp -R noVNC-1.3.0/* /var/www/html/
rm v1.3.0.zip
rm -r noVNC-1.3.0/
Now, going to http://vncproxy.puqcloud.com/vnc.html will open the noVNC client.
Generate SSL certificate and install it in WEB server using certbot
certbot --nginx -d vncproxy.puqcloud.comIn order for the certificate to be updated automatically, you must add to the crontab
crontab -e0 12 * * * /usr/bin/certbot renew --quietNGINX virtual host configuration
Make the necessary settings in your domain configuration file in the nginx server
nano /etc/nginx/sites-available/defaultserver {
listen 80 default_server;
listen [::]:80 default_server;
root /var/www/html;
index index.html index.htm index.nginx-debian.html;
server_name _;
location / {
try_files $uri $uri/ =404;
}
}
server {
root /var/www/html;
index index.html index.htm index.nginx-debian.html;
server_name vncproxy.puqcloud.com; # managed by Certbot
location / {
try_files $uri $uri/ =404;
}
listen [::]:443 ssl ipv6only=on; # managed by Certbot
listen 443 ssl; # managed by Certbot
ssl_certificate /etc/letsencrypt/live/vncproxy.puqcloud.com/fullchain.pem; # managed by Certbot
ssl_certificate_key /etc/letsencrypt/live/vncproxy.puqcloud.com/privkey.pem; # managed by Certbot
include /etc/letsencrypt/options-ssl-nginx.conf; # managed by Certbot
ssl_dhparam /etc/letsencrypt/ssl-dhparams.pem; # managed by Certbot
location /vncproxy {
proxy_pass http://127.0.0.1:8080/vncproxy;
proxy_http_version 1.1;
proxy_set_header Upgrade $http_upgrade;
proxy_set_header Connection "Upgrade";
proxy_set_header Host $host;
proxy_set_header X-Real-IP $remote_addr;
proxy_set_header X-Forwarded-For $proxy_add_x_forwarded_for;
}
}
server {
if ($host = vncproxy.puqcloud.com) {
return 301 https://$host$request_uri;
} # managed by Certbot
listen 80 ;
listen [::]:80 ;
server_name vncproxy.puqcloud.com;
return 404; # managed by Certbot
}service nginx restart
Next step is to install vncproxy
apt-get install screen -y
cd /root/
wget http://download.puqcloud.com/WHMCS/servers/PUQ_WHMCS-Proxmox-KVM/vncproxy/vncwebproxy
chmod +x vncwebproxy
We will run the script in the screen.
The first script parameter is a unique key. noVNC WEB proxy key - in WHMCS module parameter.
screen
./vncwebproxy puqcloud
After a successful launch, you can watch the execution log in the console.
root@vncproxy:~# ./vncwebproxy puqcloud
[./vncwebproxy puqcloud]
proxmox-test.uuq.pl59002022/09/11 19:11:08 [vncproxy][debug] ServeWS
2022/09/11 19:11:08 [vncproxy][debug] request url: /vncproxy/proxmox-test.uuq.pl/5900/d91bac199c2ce79392d8e175076e3780
2022/09/11 19:11:13 [vncproxy][info] close peer
[GIN] 2022/09/11 - 19:11:13 | 200 |  4.740249024s |   79.184.10.217 | GET      "/vncproxy/proxmox-test.uuq.pl/5900/d91bac199c2ce79392d8e175076e3780"
Security
The security setting for the server should meet your standards.
Do not forget that for the correct operation of the server, you must allow connections to 80/443 ports. And outgoing connections to the PROXMOX server.
4. Create new server for Proxmox in WHMCS
ProxmoxKVM module WHMCS
Order now | Download | FAQ
Preface
For the module to work properly, you must configure the server settings in Your main WHMCS panel. This is the place to set up a proxmox server or proxmox cluster, which will then be used to build KVM machines. Here we define the access data IP ranges and additional settings.
Attention.
If you have one server, or you do not use server groups. Van needs to make this server the default. By clicking on it with the mouse.
Make this server the active default for new signups
Server creation
Login to Your WHMCS panel and create new server Proxmox in WHMCS (System Settings->Products/Services->Servers)

System Settings->Servers->Add New Server- Enter the correct Name and Hostname
- In field Assigned IP Addresses you must enter a list of IP addresses of virtual machines that will be reserved for this server.
Starting with version 1.3, the module started supporting IPv4/IPv6 pools.
In order to manage pools of IPv4 and IPv6 IP addresses, you need to install the PUQ Customization addon module (free)
https://doc.puq.info/books/puq-customization-whmcs-addon/page/ip-pools
https://doc.puq.info/books/puq-customization-whmcs-addon/chapter/module-puqproxmoxkvm
https://doc.puq.info/books/puq-customization-whmcs-addon
https://download.puqcloud.com/WHMCS/addons/PUQ-Customization/
Format to follow in the Assigned IP Addresses field.
To define the available pool of IP addresses, for each available IP number you should enter another line where the data is separated by the "|" separator. Each line with an IP number definition has the following structure:
<bridge>|<vlan_tag>|<IP_address>|<net_mask>|<Gateway>|<DNS1>,<DNS2>
<bridge> - the bridge to which the machine is connected is virtual.
<vlan_tag> - vlan which will be installed on the map of the network machine. In case of not using vlan, you need to set 0
Example:
vmbr0|10|192.168.10.2|24|192.168.10.1|8.8.8.8,1.1.1.1
vmbr0|10|192.168.10.3|24|192.168.10.1|8.8.8.8,1.1.1.1
vmbr0|10|192.168.10.4|24|192.168.10.1|8.8.8.8,1.1.1.1
vmbr0|30|192.168.20.2|24|192.168.20.1|8.8.8.8,1.1.1.1
vmbr0|30|192.168.20.3|24|192.168.20.1|8.8.8.8,1.1.1.1
vmbr0|30|192.168.20.4|24|192.168.20.1|8.8.8.8,1.1.1.1
vmbr1|333|172.16.5.2|24|172.16.5.1|8.8.8.8,1.1.1.1
vmbr1|333|172.16.5.3|24|172.16.5.1|8.8.8.8,1.1.1.1
vmbr1|333|172.16.5.4|24|172.16.5.1|8.8.8.8,1.1.1.1
vmbr3|0|10.0.25.2|24|10.0.25.1|10.0.10.10,10.0.10.20
vmbr3|0|10.0.25.3|24|10.0.25.1|10.0.10.10,10.0.10.20
vmbr3|0|10.0.25.4|24|10.0.25.1|10.0.10.10,10.0.10.20
vmbr3|0|10.0.25.5|24|10.0.25.1|10.0.10.10,10.0.10.20
vmbr3|0|10.0.25.6|24|10.0.25.1|10.0.10.10,10.0.10.20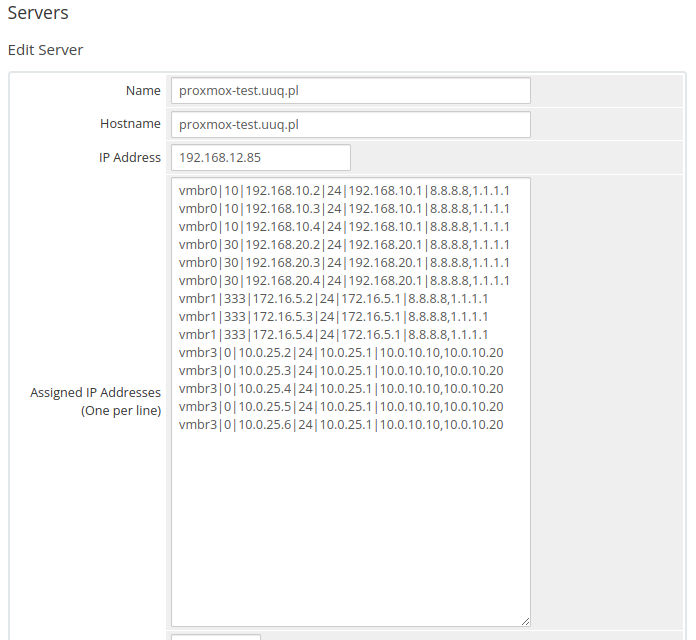
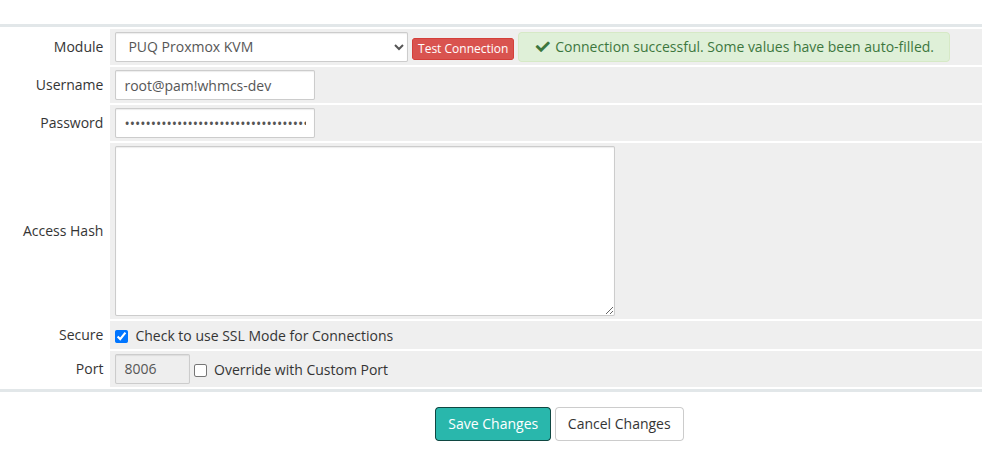
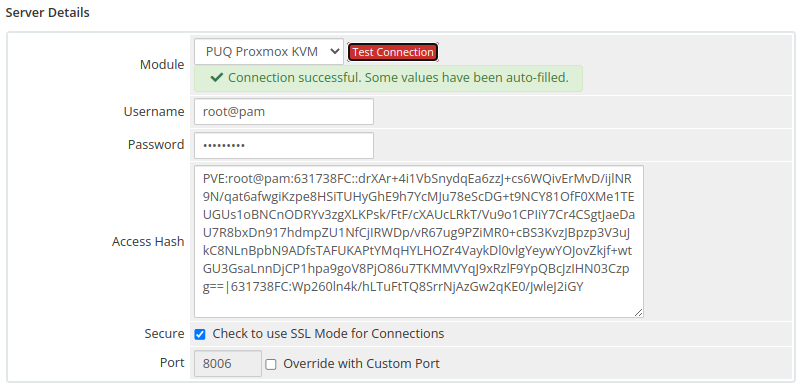
Enter the correct data in the username and password field
- In the Server Details section, select the "PUQ Proxmox KVM" module and enter the correct username and password for the Proxmox web interface.
- To check, click the "Test connection" button
Attention: Starting from module version 2.3, authentication has been changed to token-based.
In the username field, you must enter the Proxmox token ID in the format root@pam!whmcs-dev, and in the password field, enter the token value.
If you are using a version earlier than 2.3, you must enter the Proxmox username in the format root@pam in the username field, and the corresponding password in the password field.
During operation, the module will automatically fill in the Access Hash field. This field does not need to be completed.
VERSION 2.3+
VERSION 2.2-
Attention
If you have one server, or you do not use server groups. Van needs to make this server the default. By clicking on it with the mouse.
Make this server the active default for new signups

5. Synchronization of DNS records
ProxmoxKVM module WHMCS
Order now | Download | FAQ
Starting with version 1.4, the module started supporting DNS Synchronization
(cloudflare.com, HestiaCP)
In order to manage DNS zones to synchronization , you need to install the PUQ Customization addon module (free)
https://doc.puq.info/books/puq-customization-whmcs-addon/page/dns-zones
https://doc.puq.info/books/puq-customization-whmcs-addon/chapter/module-puqproxmoxkvm
https://doc.puq.info/books/puq-customization-whmcs-addon
https://download.puqcloud.com/WHMCS/addons/PUQ-Customization/
For your convenience, we have prepared a mechanism that generates basic domain entries for newly created servers.
Setting these entries is not necessary for the correct operation and use of the service.
In this version of the module, we do not have integration of procedures and mechanisms for synchronizing DNS records with various DNS servers. The module returns all IP addresses and DNS records as json using an http request. You need to do the integration with your DNS server yourself.
We want to introduce automatic integration of DNS records into popular services and DNS servers. But we don't know where to start. You can help us with this. Please visit our forum and post your needs. We will definitely try to implement them in future versions.
https://faq.puqcloud.com/
How it works
In order to get all IP addresses and DNS records, you need to send a GET request.
https://<WHMCS-SERVER>/modules/servers/puqProxmoxKVM/lib/dns/dns.phpAnswer:
[
   {
      "forward" : "vlan-1-4779.vps.uuq.pl",
      "ip" : "192.168.0.2",
      "reverse" : "mail.uuq.pl"
   },
   {
      "forward" : "vps-1-4780.vps.uuq.pl",
      "ip" : "192.168.0.3",
      "reverse" : "test.vps.uuq.pl"
   },
   {
      "forward" : "vlan-1-4781.vps.uuq.pl",
      "ip" : "192.168.0.4",
      "reverse" : "blabla.vps.uuq.pl"
   }
]
The script does not return entries that contain errors or are empty.
With this information, you can import DNS records into your DNS server.
Security
.htaccess file example
order deny,allow
deny from all
allow from <allowed_IP_address>
6a. Email Template (puqProxmoxVKM Welcome Email)
ProxmoxKVM module WHMCS
Order now | Download | FAQ
Create an email template for customer notifications.
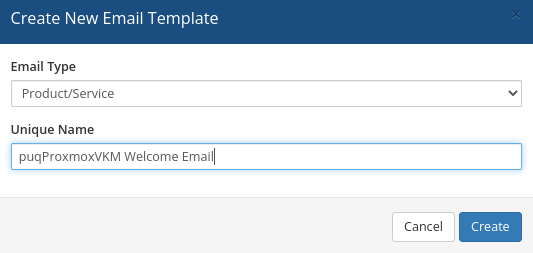
System Settings->Email Templates->Create New Email Template- Email Type: Product/service
- Unique Name: puqProxmoxVKM Welcome Email
Subject:
Virtual Machine Order InformationBody:
Dear {$client_name},

Your order has been accepted for implementation.
Installing and pre-configuring the virtual machine will take some time.
Please wait for an e-mail with information that the virtual machine is ready for use, also with access parameters.

Product/Service: {$service_product_name}
Payment Method: {$service_payment_method}
Amount: {$service_recurring_amount}
Billing Cycle: {$service_billing_cycle}
Next Due Date: {$service_next_due_date}

Important note - if you have also purchased the backup options, do not forget to configure the schedule in the service's subpage.


Thank you for choosing us.

{$signature}
6b. Email Template (puqProxmoxKVM VM is ready)
ProxmoxKVM module WHMCS
Order now | Download | FAQ
Create an email template for customer notifications.
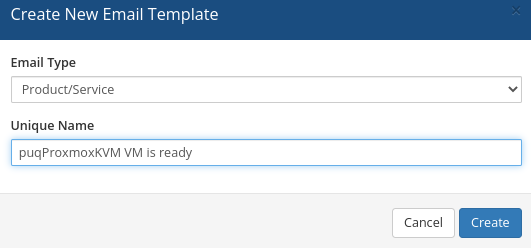
System Settings->Email Templates->Create New Email Template- Email Type: Product/service
- Unique Name: puqProxmoxKVM VM is ready
Subject:
Virtual Machine is readyBody:
Dear {$client_name},

Your virtual machine is already ready.
You can connect to it using data.


Product/Service: {$service_product_name}
Payment Method: {$service_payment_method}
Amount: {$service_recurring_amount}
Billing Cycle: {$service_billing_cycle}
Next Due Date: {$service_next_due_date}


IP address: {$service_dedicated_ip} or {$service_domain}
Username: {$service_username}
Password: {$service_password}


Thank you for choosing us.

{$signature}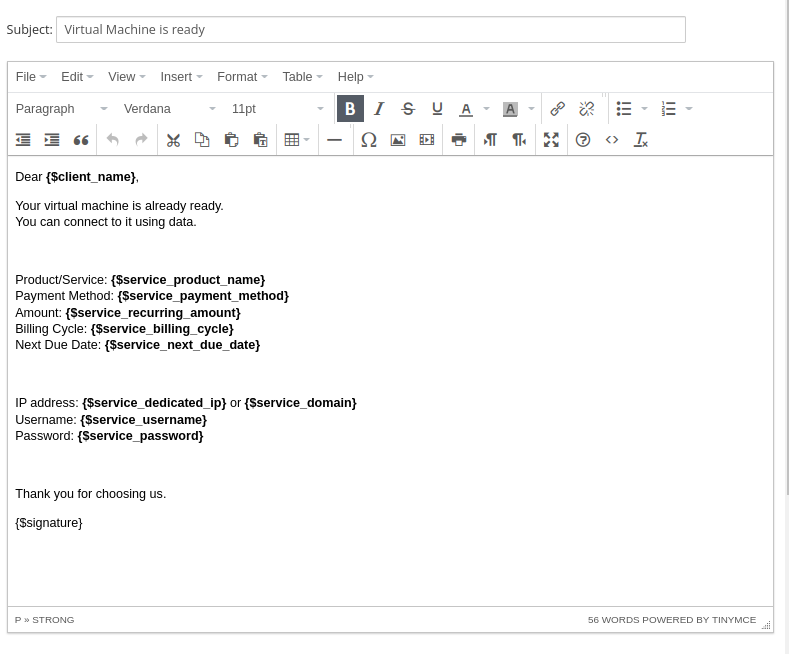
6c. Email Template (puqProxmoxKVM Reset password)
ProxmoxKVM module WHMCS
Order now | Download | FAQ
Create an email template for customer notifications.
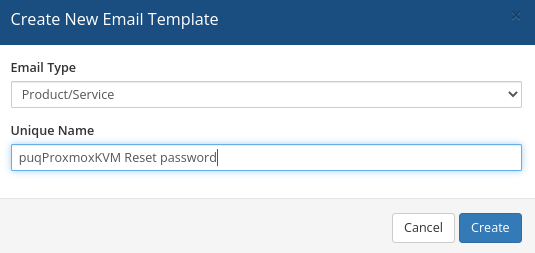
System Settings->Email Templates->Create New Email Template- Email Type: Product/service
- Unique Name: puqProxmoxKVM Reset password
Subject:
Reset password is readyBody:
Dear {$client_name},

Password reset successful.

IP address: {$service_dedicated_ip} or {$service_domain}
Username: {$service_username}
Password: {$service_password}


Thank you for choosing us.

{$signature}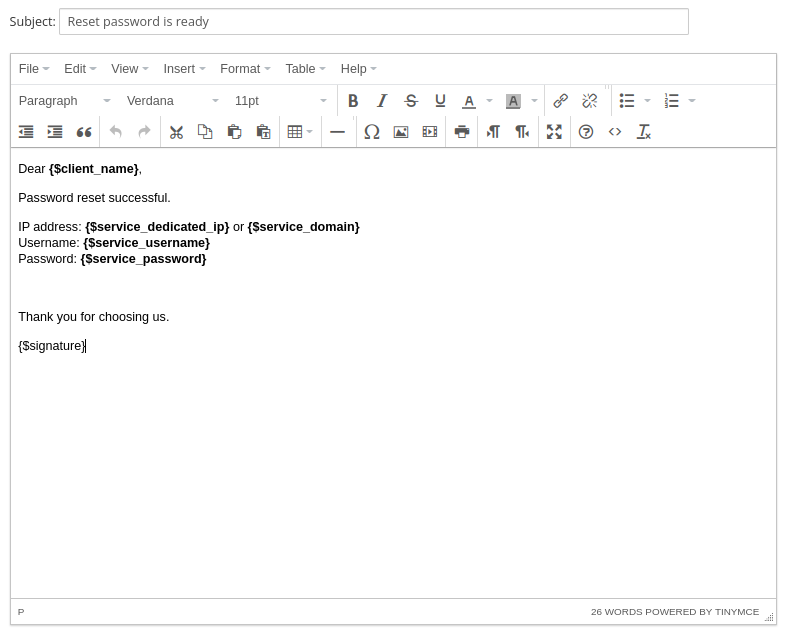
6d. Email Template (puqProxmoxKVM Backup restored)
ProxmoxKVM module WHMCS
Order now | Download | FAQ
Create an email template for customer notifications.
System Settings->Email Templates->Create New Email Template- Email Type: Product/service
- Unique Name: puqProxmoxKVM Backup restored

Subject:
Backup restored successfulBody:
Dear {$client_name},

Backup restored successful.

Product/Service: {$service_product_name}
Payment Method: {$service_payment_method}
Amount: {$service_recurring_amount}
Billing Cycle: {$service_billing_cycle}
Next Due Date: {$service_next_due_date}

IP address: {$service_dedicated_ip} or {$service_domain}

Thank you for choosing us.

{$signature}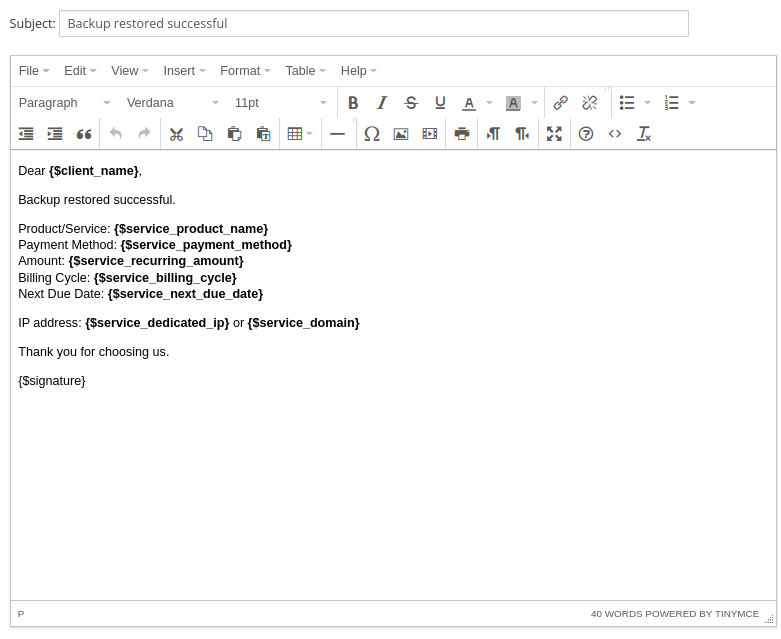
6e. Email Template (puqProxmoxKVM Upgrade Email)
ProxmoxKVM module WHMCS
Order now | Download | FAQ
Create an email template for customer notifications.
System Settings->Email Templates->Create New Email Template- Email Type: Product/service
- Unique Name: puqProxmoxKVM Upgrade Email
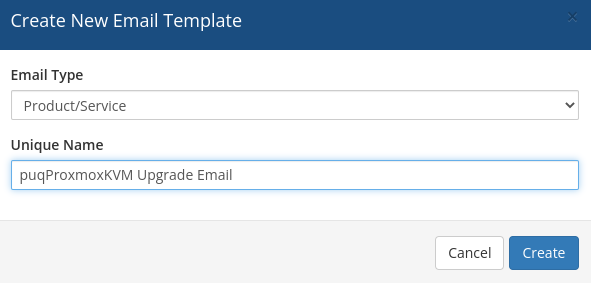
Subject:
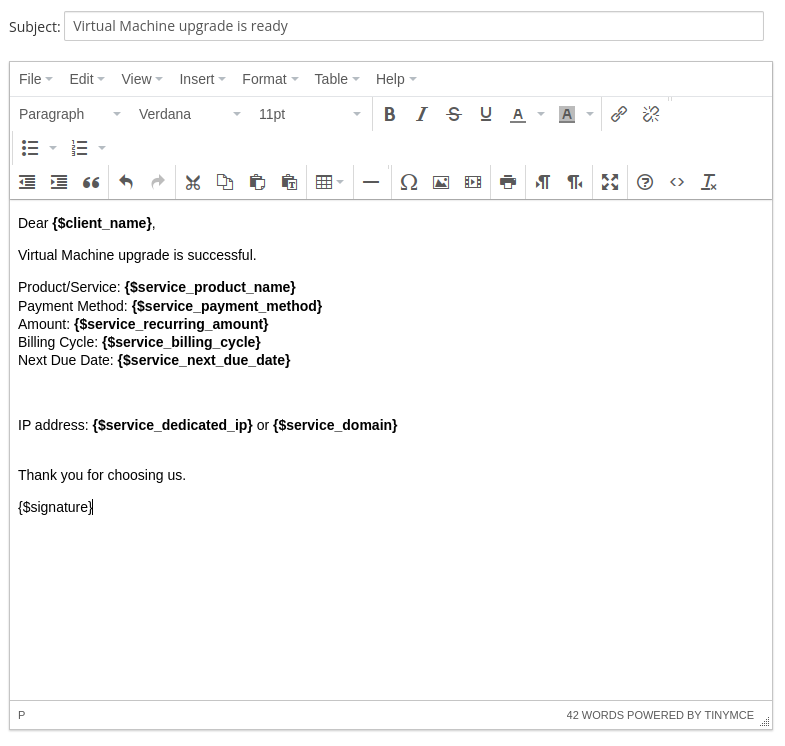
Virtual Machine upgrade is readyBody:
Dear {$client_name},

Virtual Machine upgrade is successful.

Product/Service: {$service_product_name}
Payment Method: {$service_payment_method}
Amount: {$service_recurring_amount}
Billing Cycle: {$service_billing_cycle}
Next Due Date: {$service_next_due_date}


IP address: {$service_dedicated_ip} or {$service_domain}


Thank you for choosing us.

{$signature}
7. Troubleshooting
ProxmoxKVM module WHMCS
Order now | Download | FAQ
CRON
In the event that the module does not work properly and activities are not performed, please check the operation of the CRON service in the first place.
Here you can read how the process of provisioning virtual machines works.
https://doc.puq.info/books/proxmoxkvm-whmcs-module/page/basic-concepts-and-requirements
If your problem is still not resolved, then please run the cron job manually and look at the output in the console.
/usr/bin/php7.4 -q /WHMCS_DIR/crons/cron.phpThere must be something like that.
===========================================
VM_id: 2001
Service_id: 4785
User_id: 1
VMSetDedicatedIp: The local status should be creation
VMClone: The local status should be set_ip
VMSetCpuRam: success
VMSetSystemDiskSize: success
VMSetSystemDiskBandwidth: success
VMSetCreatedAdditionalDisk: success
VMSetAdditionalDiskSize: success
VMSetAdditionalDiskBandwidth: success
VMSetNetwork: success
VMSetFirewall: success
VMSetCloudinit: success
VMStart: success
Remote_status: running
Local_status: ready
ServiceSendEmailVMReady: OK