Head/Footer Output
Return HTML to be output within the HEAD/before the closing BODY tags of the page output.
Description
PUQ Customization module WHMCS
Order now | Download | FAQ
Head/Footer Output
The extension offers several configuration options to cater to different needs:
-
Return HTML to be output within the HEAD tags of the page output: This allows you to include specific HTML code or scripts in the head section of the page. For example, you can insert custom meta tags for SEO purposes or add tracking codes for analytics tools.
-
Return HTML to be output before the closing BODY tag of the page output: This enables you to add custom content or scripts just before the closing body tag of the page. You can utilize this functionality to insert JavaScript code for certain functionality, such as live chat widgets or social media integration.
-
Return HTML to be output within the HEAD tags of the admin area: This feature allows you to include custom HTML or scripts specifically in the head section of the admin area. It can be useful for adding admin-specific stylesheets or custom JavaScript code for enhancing the admin interface.
-
Return HTML to be output before the closing BODY tag of the admin area: With this option, you can insert custom content or scripts before the closing body tag of the admin area. It provides flexibility to add custom functionalities or enhancements specific to the admin area.
Examples of how this functionality can be applied:
-
Custom Tracking Codes: You can use the "Return HTML to be output within the HEAD tags" option to insert tracking codes from services like Google Analytics or Facebook Pixel to track user activities on your client area or admin area.
-
Custom CSS Styling: By utilizing the "Return HTML to be output within the HEAD tags" option, you can add custom CSS stylesheets to modify the appearance and layout of specific pages in the client area or admin area.
-
Integration with Third-Party Tools: The "Return HTML to be output before the closing BODY tag" option allows you to integrate external tools or widgets into the client area or admin area. For example, you can add live chat functionality or embed social media feeds using custom JavaScript code.
-
Custom Messages or Announcements: With the "Return HTML to be output before the closing BODY tag" option, you can display custom messages or announcements on specific pages of the client area or admin area, providing important information or updates to users.
Remember, the possibilities are vast, and this functionality allows you to tailor the head and footer sections of your WHMCS environment according to your specific requirements.
Configuration
PUQ Customization module WHMCS
Order now | Download | FAQ
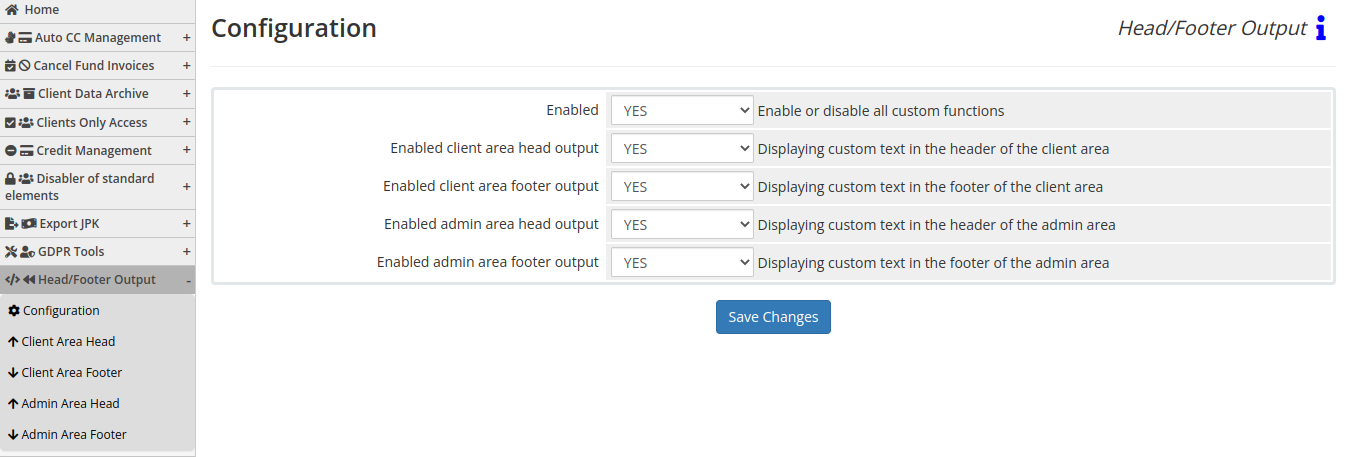
On the configuration page, you have the following options:
-
Enabled client area head output: When set to "YES," it enables the display of custom text in the header of the client area. This allows you to insert your own text or HTML code at the top of the client area pages.
-
Enabled client area footer output: When set to "YES," it enables the display of custom text in the footer of the client area. This allows you to insert your own text or HTML code at the bottom of the client area pages.
-
Enabled admin area head output: When set to "YES," it enables the display of custom text in the header of the admin area. This allows you to insert your own text or HTML code at the top of the admin area pages.
-
Enabled admin area footer output: When set to "YES," it enables the display of custom text in the footer of the admin area. This allows you to insert your own text or HTML code at the bottom of the admin area pages.
By enabling these options, you can customize the header and footer sections of both the client area and admin area by adding your own text or HTML code. This provides the flexibility to display important information, announcements, branding elements, or any other content you wish to include in those areas.
Data input
PUQ Customization module WHMCS
Order now | Download | FAQ
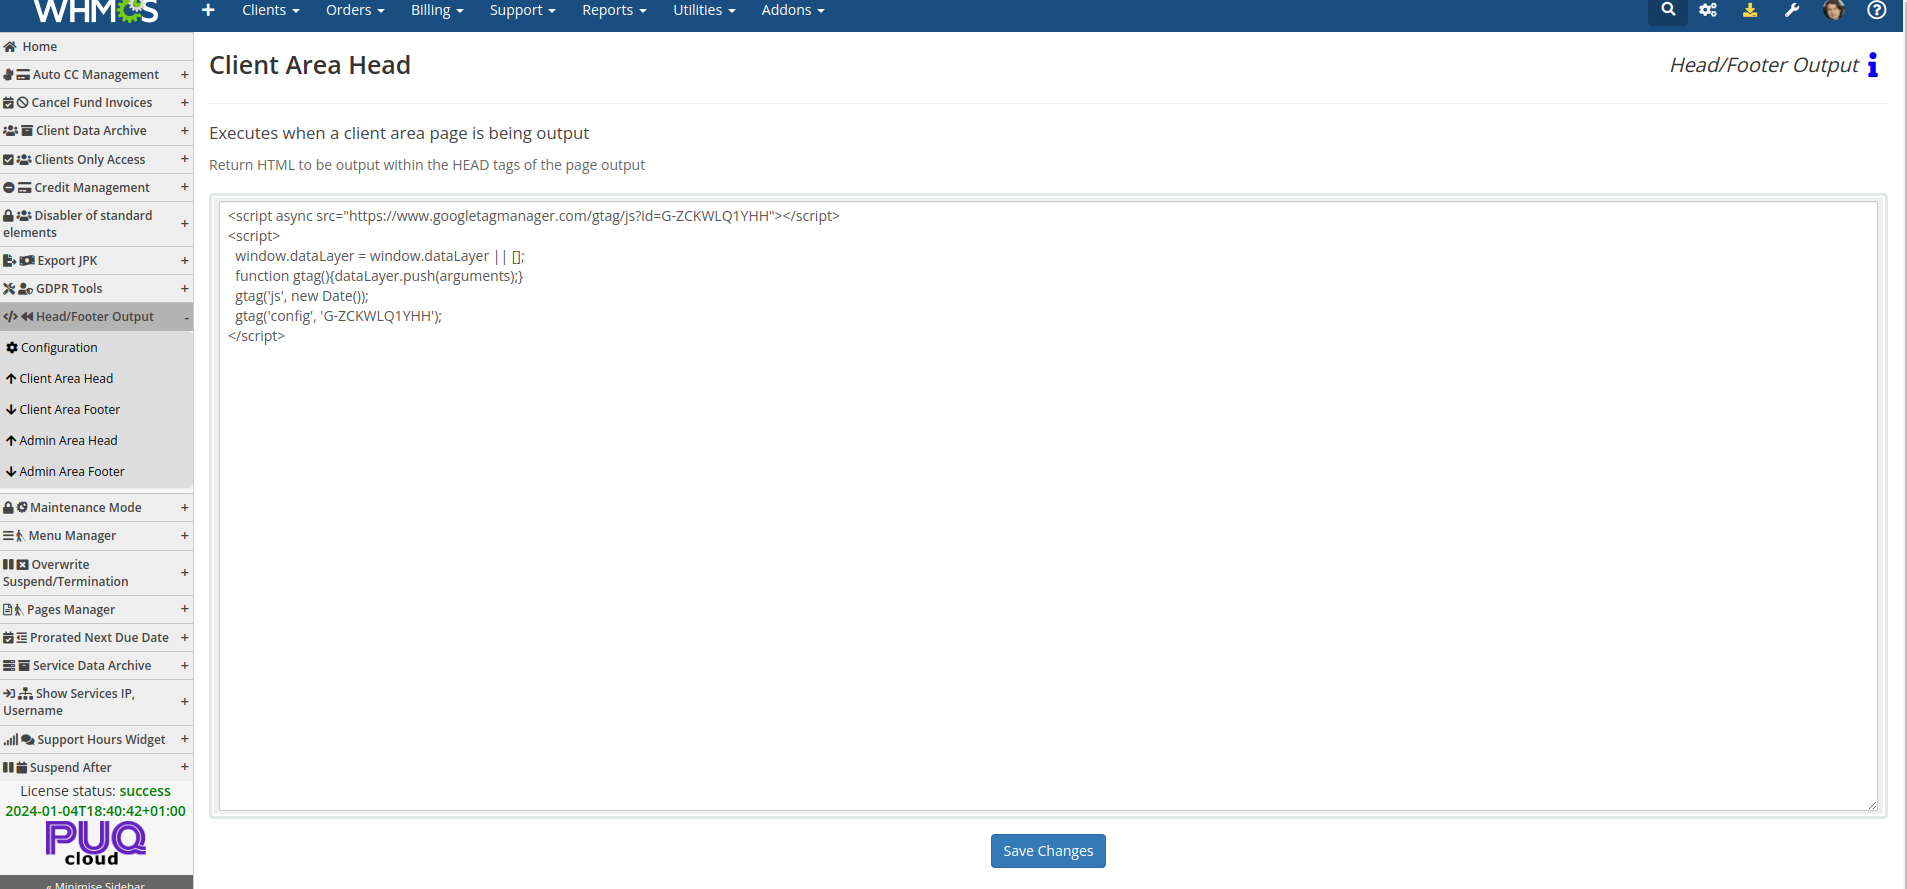
To edit any of the four code fragments, follow these steps:
-
Select the corresponding menu option for the fragment you want to edit. For example, choose "Client Area Head" to edit the code displayed in the header of the client area.
-
Enter the desired text or HTML code that you want to be displayed in the selected section.
-
Click the "Save" button to save your changes.
Repeat these steps for each fragment you wish to edit: "Client Area Footer," "Admin Area Head," and "Admin Area Footer."