Module puqProxmoxKVM
PUQ ProxmoxKVM module management extension
Description
PUQ Customization module WHMCS
Order now | Download | FAQ
The "Module puqProxmoxKVM" extension is designed for managing and configuring additional options for the ProxmoxKVM module within the WHMCS platform.
To learn more about this ProxmoxKVM WHMCS module, please refer to the documentation at
https://doc.puq.info/books/proxmoxkvm-whmcs-module (Order now | Dowload | FAQ)


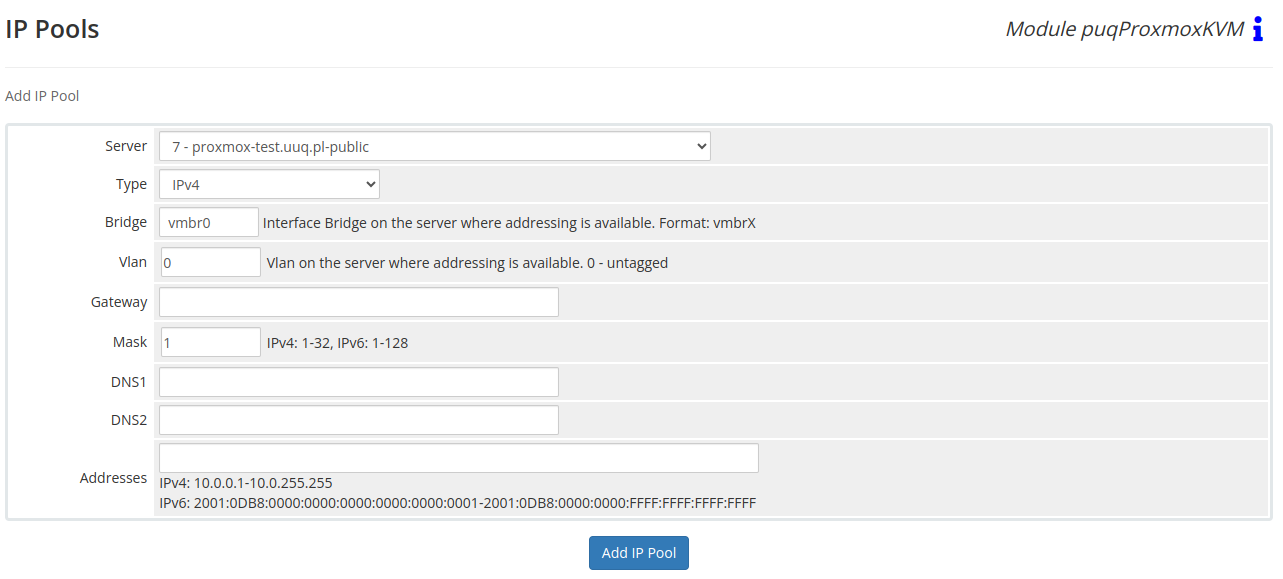

IP Pools
PUQ Customization module WHMCS
Order now | Download | FAQ
To enable the provision of virtual machines with virtual IP addresses, both IPv4 and IPv6, the configuration of an IP Pool is available.
An IP Pool is an abstract object that contains the following information:
- Server: The Proxmox server within the WHMCS system for which this pool will be active.
- Type: The type of the pool, which can be IPv4 or IPv6.
- Bridge and VLAN: Corresponding parameters that will be configured on the virtual machine if it receives an IP from this pool. (Please note that the addressing must be available on this Bridge and VLAN.)
- Gateway: The default gateway that will be configured on the virtual machine.
- Mask: The subnet mask that will be configured on the virtual machine.
- DNS1/DNS2: The DNS servers that will be configured on the virtual machine.
- Addresses: The range of addresses included in this pool. Please note that the Gateway will be excluded from the pool but will be listed as an occupied IP if it is part of the pool.
By configuring an IP Pool, you can streamline the allocation of virtual IP addresses for your virtual machines, ensuring efficient network management and connectivity within the Proxmox environment.

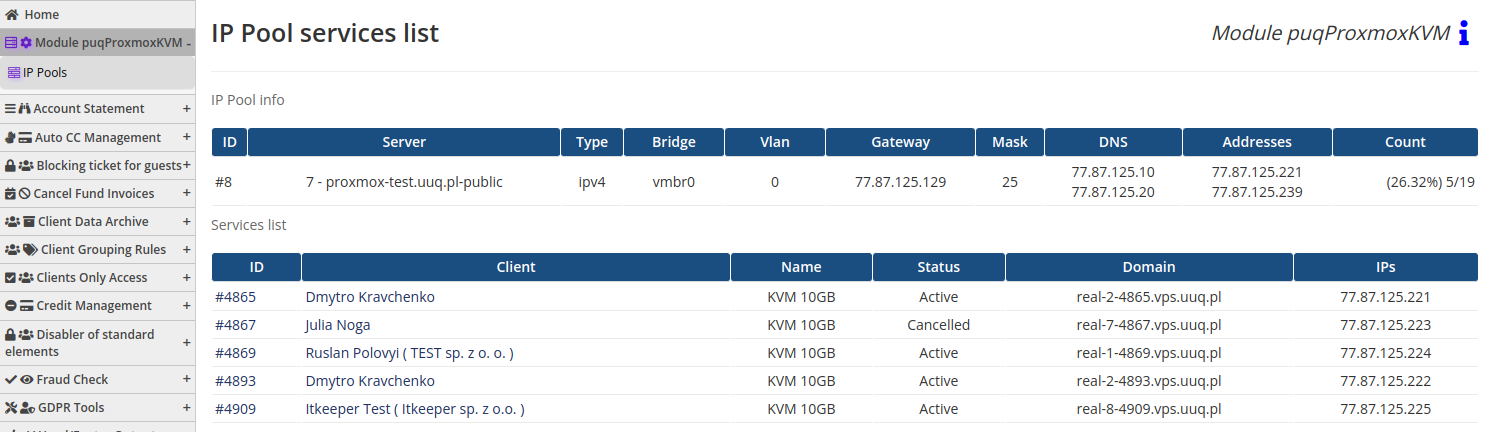
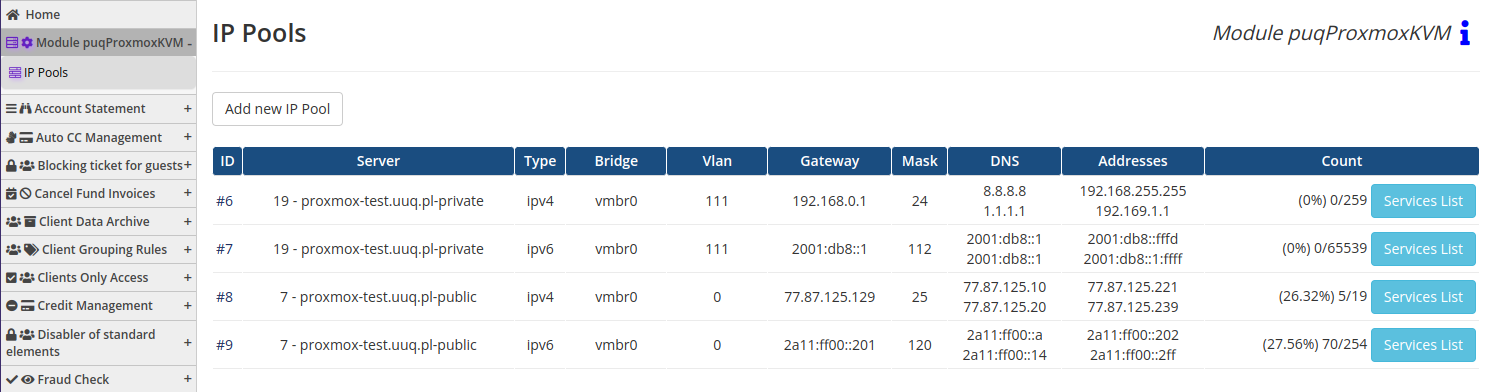
When viewing the list of IP pools, you will find information about the pool's size and its utilization. Additionally, there is a button available to view the services associated with IP addresses from that pool.
The size of the pool indicates the total number of available IP addresses within it, while the utilization provides insights into how many IP addresses have been allocated or are in use.
To gain further visibility into the services utilizing IP addresses from a particular pool, you can click on the designated button. This will provide you with a comprehensive overview of the services and associated virtual machines that currently utilize IP addresses from that specific pool. By accessing this information, you can effectively manage and monitor IP address allocation within your infrastructure.

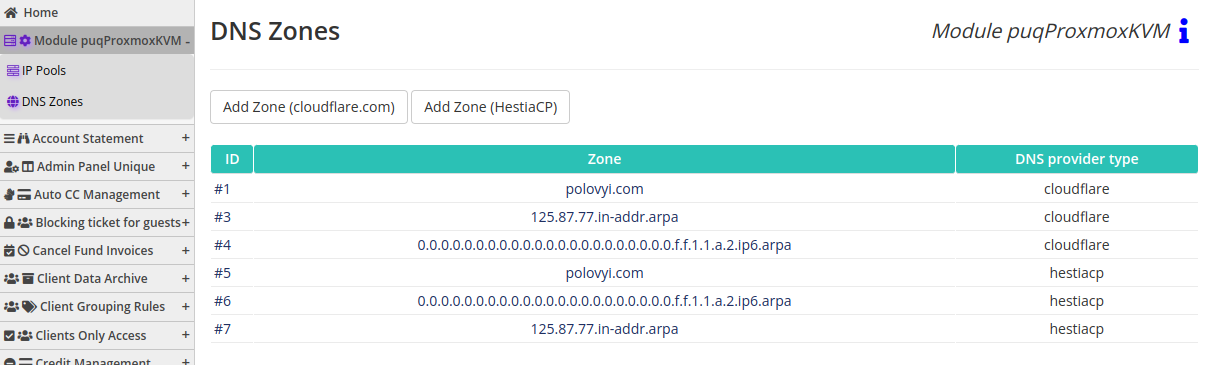
DNS Zones
PUQ Customization module WHMCS
Order now | Download | FAQ
Instructions: Configuring DNS Synchronization for Virtual Machines in puqProxmoxKVM
In order to enable DNS records synchronization for virtual machines managed by the puqProxmoxKVM module, you have the option to create DNS zones. A DNS zone is an object that is part of the API connection configuration to the DNS provider, allowing the puqProxmoxKVM module to synchronize DNS records.
How it Works:
- When creating a new service, modifying an existing one, or when a client requests a change to their virtual machine's revDNS record, the module will attempt to find the corresponding DNS zone for synchronization.
- Forward Zone: The domain and subdomain are taken from the service's Domain field, and the module matches them with the added zones. If there's a match, it performs actions to synchronize the A and AAAA records. The IPv4 address is taken from the Allocated IP field for the service, and for IPv6 synchronization, the first available IPv6 address for that service is used.
- Reverse Zone: All IP addresses are converted into a DNS zone, which is then compared with the list of existing zones. When there's a match, the records are synchronized.
By synchronization, it means that the records will be removed from the remote server and then recreated. Except for service creation, where records are created without deletion. Also, when a service is deleted, the records will be deleted and not recreated.
After adding the zone, you can click the "Test Zone" button to verify the correctness of the added data and perform a test on the DNS provider using the API.
Supported DNS Providers:
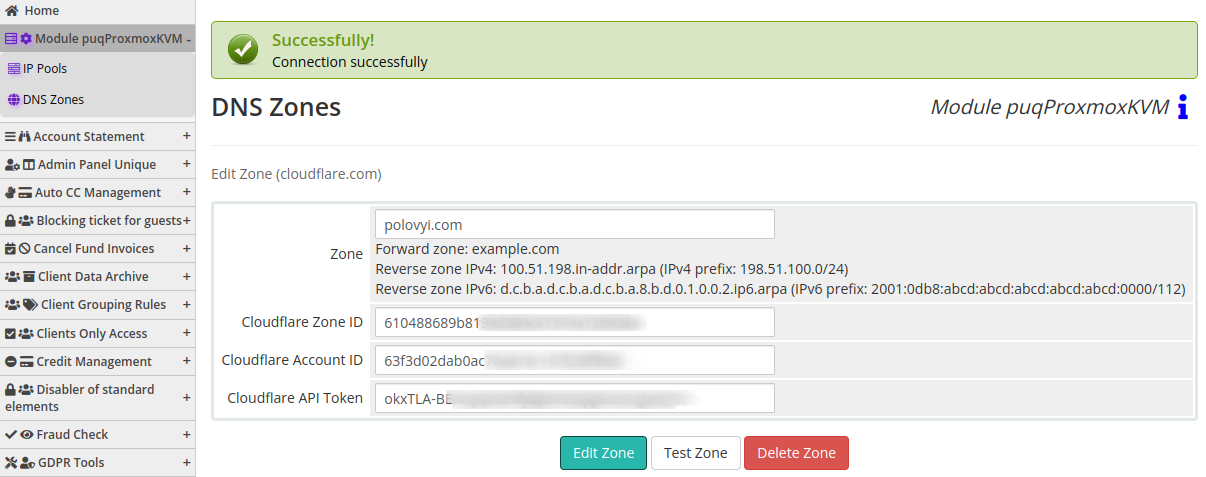
cloudflare.com
-
- Required data for zone creation:
- Zone Name
- Zone ID
- Account ID
- API Token Before adding a zone, you must create the zone on the service and obtain all the necessary data with sufficient access rights.
- Required data for zone creation:
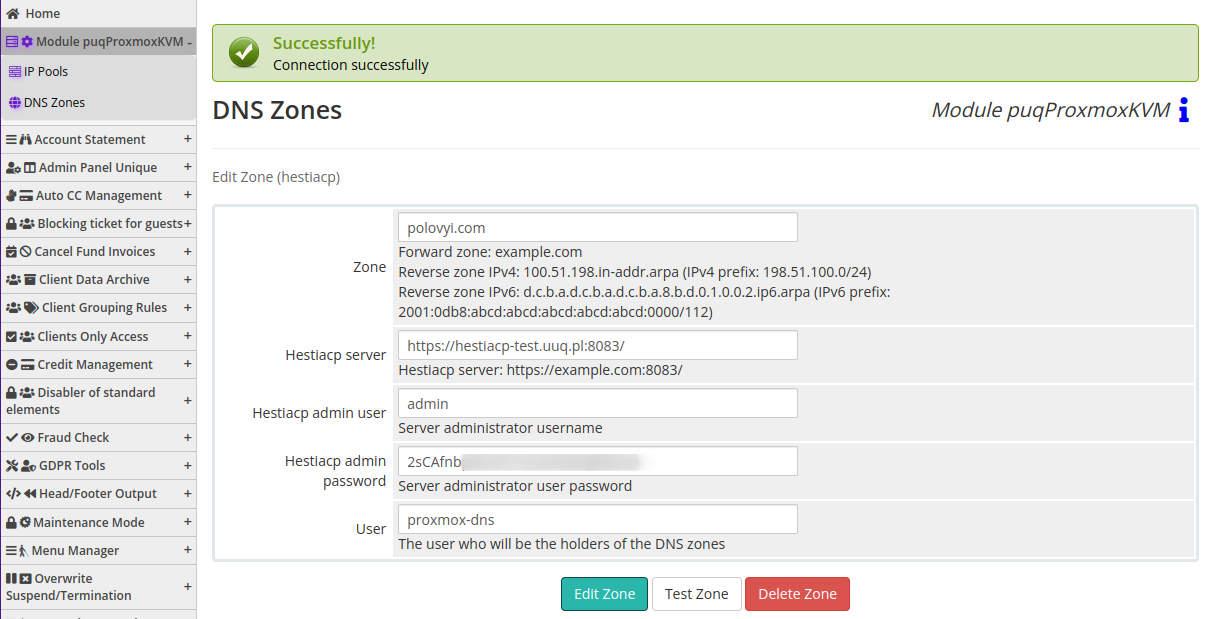
HestiaCP Server
-
- Required data for zone creation:
- Zone
- Hestiacp server
- Hestiacp admin user
- Hestiacp admin password
- User (The user who will be the holder of the DNS zones) When adding a zone, create it on the remote server and allow WHMCS access to the HestiaCP server via API.
- Required data for zone creation:
Note:
- The synchronization will occur for all matching zones. If you add two identical zones on different DNS providers, synchronization will occur for both of these identical zones.
- Synchronization is not instantaneous but occurs at scheduled cron tasks and may take some time.
- If there are any connection errors or other issues during the synchronization process, they will be logged in the module's logs. Synchronization errors will not stop the service or disrupt automation processes.
Forward/Reverse DNS Zones for IPv4 and IPv6
PUQ Customization module WHMCS
Order now | Download | FAQ
Configuring Forward and Reverse DNS Zones for IPv4 and IPv6
DNS zones are used to translate domain names into IP addresses and vice versa. To properly configure forward and reverse DNS zones for IPv4 and IPv6, you need to know the subnets associated with the respective IP addresses. Below are instructions on how to build zones for IPv4 and IPv6.
Forward DNS Zones for IPv4/IPv6:
Forward DNS zones are used to map domain names to IPv4 addresses.
-
Determine the domain name for your server or device. For example: myserver.example.com.
-
Determine the IPv4 address that will correspond to this domain name. For example: 203.0.113.10.
myserver.example.com. IN A 203.0.113.10- Determine the IPv6 address that will correspond to this domain name. For example: 2001:0db8:85a3:0000:0000:8a2e:0370:7334.
myserver.example.com. IN AAAA 2001:0db8:85a3:0000:0000:8a2e:0370:7334Reverse DNS Zones for IPv4 and IPv6:
Reverse DNS zones convert IP addresses back into domain names. Please note that reverse DNS zones for IPv4 and IPv6 have slightly different formats.
Reverse DNS Zones for IPv4:
Reverse DNS zones for IPv4 are based on the four octets of an IPv4 address.
-
Split the IPv4 address into octets and reverse them, adding ".in-addr.arpa" at the end.
For example: 10.113.0.203.in-addr.arpa -
Create a new zone in the DNS configuration file (e.g., reverse.db) with the specified reverse domain name and your server's domain name:
10.113.0.203.in-addr.arpa. IN PTR myserver.example.com.
Reverse DNS Zones for IPv6:
Reverse DNS zones for IPv6 are based on the hexadecimal representation of the IPv6 address.
-
Write the IPv6 address in hexadecimal form, separating each group of digits with colons and adding ".ip6.arpa" at the end.
For example: 4.3.3.7.0.e.3.7.0.2.e.a.8.0.0.0.0.0.0.0.0.0.0.0.3.8.a.5.8.b.d.0.1.0.0.2.ip6.arpa -
Create a new zone in the DNS configuration file (e.g., reverse.db) with the specified reverse domain name and your server's domain name:
4.3.3.7.0.e.3.7.0.2.e.a.8.0.0.0.0.0.0.0.0.0.0.0.3.8.a.5.8.b.d.0.1.0.0.2.ip6.arpa. IN PTR myserver.example.com.