PUQ Customization WHMCS Addon
The module makes it possible to extend the standard functionality of the WHMCS system with custom functions presented in the module.
- Description
- Changelog
- Installation/Update and configuration guide
- License PUQ Customization WHMCS module
- Module Home Page
- Module puqProxmoxKVM
- Menu Manager
- Pages Manager
- Description
- Configuration
- Page list
- Add New Page
- Widget Domain Search
- Widget Domain TLD
- Widget Product Cards
- Widget Slider Logos
- Widget Team Slide
- Widget Question Answer
- Widget Intelligent Domain Search
- Account Statement
- Auto CC Management
- Cancel Fund Invoices
- Client Data Archive
- Description
- Configuration
- Whois Online
- The administrator widget
- Search
- Duplicate Finder
- Intelligent Search
- Clients Only Access
- Credit Management
- Head/Footer Output
- Overwrite Suspend/Termination
- Prorated Next Due Date
- Service Data Archive
- Show Services IP, Username
- Support Hours Widget
- Suspend After
- Blocking Ticket For Guests
- Disabler of standard elements
- Maintenance mode
- GDPR Tools
- Fraud Check
- Overwrite Tax Rules
- Description
- Configuration
- Home companies
- Countries set
- Tax rules
- Client Overview Widget
- Invoice Editing
- Integration Code
- Admin Panel Unique
- Manual Cron Run
- Promo Code API
- Description
- Configuration
- Promo Sets
- Add/Edit/Delete Promo Set
- API requests
- Secure, Unique Generated Links
- Cancellation Request
- Mattermost Export
- Export Tools
- Export VAT_R
- Lang Detect
- Ticket Auto-Reply
- Currency Exchange
- Product Group Order
Description
PUQ Customization module WHMCS
Order now | Download | FAQ
PUQ Customization
Our PUQ Customization module is designed to customize the standard functionality of the WHMCS system. The main feature of our module is that it contains a vast array of extension functions for WHMCS, which sets it apart from similar modules offered by our competitors. Instead of having separate modules for each functional extension, our solution provides a comprehensive set of functional extensions that are regularly updated and added, all in one module. Some of these extensions are also available for free. Additionally, our module offers a convenient and intuitive interface for managing these custom additions.
We value feedback from our clients, and if there is a demand for additional functionality, we strive to release and incorporate it into our module whenever possible. Furthermore, our module serves as an engine for add-ons that can be developed and included by anyone interested, subject to prior agreement and verification. We always credit the authors of each add-on featured in our module.
We believe that our module will serve as a powerful tool for creating a multitude of add-ons, enabling WHMCS clients to comfortably configure their systems to meet their specific business needs.
Please note that our module is not just another theme or hook. It is a collection of logical extensions with customizable options, including the necessary hooks. When it comes to modifying the WHMCS frontend, we strive to develop extensions with a universal graphic design that will be displayed consistently across different themes. Additionally, our module fully supports multilingual capabilities without the need to edit language files. Everything is accessible through the extension's settings, which you can configure and utilize.
Moreover, each extension can be easily enabled or disabled for seamless usage and to prevent any conflicts with other modules from our competitors.
Our module includes a comprehensive set of features, and the following list provides a glimpse of what it offers
please note that this list is not exhaustive
Module puqProxmoxKVM
PUQ ProxmoxKVM module management extension
Overwrite Tax Rules
The extension provides the ability to rewrite tax rules and allows the creation of multiple home companies.
Fraud Check
Allows you to determine the reputation of the client at the angle of fraudulent activities, report fraudulent activities.
Account Statement
Allows administrators and clients to view and download PDF financial statements.
Auto CC Management
Gives customers the ability to enable or disable automatic credit card payments.
Blocking ticket for guests
Prevents non-customers from opening support tickets.
Cancel Fund Invoices
Allows cancellation or deletion of invoices generated for client credit top-ups.
Client Data Archive
Saves client data and IP access information, with a search function and real-time display of online clients.
Clients Only Access
Restricts access to the entire portal for non-logged-in users, redirecting them to the login page.
Credit Management
Enables customers to manage automatic credit application.
Disabler of standard elements
Disables certain standard elements, such as navigation bars, sidebars, and panels in the client area.
GDPR Tools
Assists with achieving GDPR compliance for your website.
Head/Footer Output
Provides HTML output within the HEAD section or before the closing BODY tags of the page.
Maintenance Mode
Restricts user access to the site during maintenance.
Menu Manager
Allows the creation of custom menus.
Overwrite Suspend/Termination
Sets a specific date for service suspension or termination.
Pages Manager
Facilitates the creation of custom pages.
Prorated Next Due Date
Synchronizes the next payment date for all customer services, including from the customer's zone.
Service Data Archive
Saves all changes made to the service configuration.
Show Services IP, Username
Displays the IP address and username of services in invoices and service lists in the client area.
Support Hours Widget
Displays a support hours widget in the top of the sidebar on the submit ticket page.
Suspend After
Allows setting a specific date and time for suspending client services.
Admin Panel Unique
Customization of the admin panel, changing colors, logo and more.
Manual Cron Run
Manual Cron Run extension provides users with the ability to manually execute cron jobs.
Promo Code API
The Promo Code API extension helps with creation of promo codes from the API.
Cancellation Request
The Cancellation Request extension helps manage unpaid and canceled invoices by transitioning them to a "Cancelled" status or removing already canceled invoices, both manually and via cron jobs.
Mattermost Export
Export Tools
The "ExportTool" extension for WHMCS enables seamless JSON or XML export of data from various WHMCS tables, offering customizable, secure, and efficient data management and integration capabilities.
Export VAT_R
Extension specifically designed for the Polish market! The Export VAT_R extension enables generating VAT_R reports for tax settlements from invoices within your WHMCS system.
Lang Detect
This extension automatically detects and applies the browser's preferred language and currency for WHMCS platforms, streamlining localization and improving user experience by presenting content in the visitor's native language.
Ticket Auto-Reply
The extension allows configuring messages to be sent to clients automatically in response to their inquiries.
Currency Exchange
Allows you to synchronize currencies with the selected bank API.
Please note that this is just a glimpse of the extensive range of features and functionality provided by our module.
Changelog
PUQ Customization module WHMCS
Order now | Download | FAQ
v2.2 Released 21-08-2025
- Support for custom admin path of admin panel
- Added extension ProductGroupOrder v1.0
- ManualCronRun v1.1
- Ticket Auto-Reply v1.0
-
unify error logging labels across extensions to reflect the actual module and hook.
-
- BlockingTicketForGuests v1.0.1
- Added
unescapemodifier to render HTML in the template.
- Added
- CurrencyExchange v1.0
- Tech: improved JS handling in Smarty templates; prevents similar compile errors; cleaner structure.
- UI/UX: redesigned to an interactive panel with cards/animations; fully responsive.
- New features: live search & filters; full-column sorting; pagination (20/page); 4 chart types (Line/Area/Column/Scatter); KPI stats; CSV export.
- ExportTool v1.0
- Tech: improved JS handling in Smarty templates; prevents similar compile errors; cleaner structure.
- Lang Detect v1.0
- Fixed redirect loop when
language=/currency=are empty. - Correct parsing of
HTTP_ACCEPT_LANGUAGE(quality values stripped). - Safer GET vs cookie comparison with empty-value checks.
- Refined defaults/fallbacks and config validation.
- Extra guard against redirects on invalid data.
- Fixed redirect loop when
v2.1 Released 11-10-2024
- FraudCheck v1.2
- Fixed a bug that caused a critical error during an empty response
- ManualCronRun v1.1
- Fixed a bug related to the execution of the manual Daily Cron functionality
- LangDetect v1.0.1
v2.0 Released 23-09-2024
Module is coded ionCube v13
Supported php version:
- php 7.4 WHMCS 8.11.0 -
- php 8.1 WHMCS 8.11.0 +
- php 8.2 WHMCS 8.11.0 +
1. Fixed a bug with clearing the database when deactivating a module or extension.
v1.6 Released 02-05-2024
- Overwrite Tax Rules
- display of the tax percentage in the cart during calculation has been corrected
- processing of tax rules on Funds items (no tax is charged)
- fixed a bug displaying the tax percentage on HTML invoices in the client area
- an option has been added that changes the status of Funds proforma invoice to selected and cancels all actions
- during payment (except for loan settlement), Funds proforma invoice does not become an invoice
- Add extension "Lang Detect" (Documentation)
- Add extension "Currency Exchange" (Documentation)
- Add extension "Ticket Auto-Reply" (Documentation)
- Pages Manager
- Fix the pricing bug on PUQProductCards when a user is logged in and on another page.
- Mattermost Export
- Messages in threads have been recoded.
- Messages in threads now appear as quotes rather than code.
v1.4.2 Released 12-03-2024
- Pages Manager (1.4.1)
- Added the ability to redirect from domain search to a custom page.
- Fixed a bug with displaying currency incorrectly in PUQ Domain TLD.
- Menu Manager (1.1)
- Added mega menu functionality.
- Support Hours Widget (1.0.2)
- Fixed a bug with saving translations.
v1.4.1 Released 08-03-2024
- Show Services IP, Username (1.2)
- fixed a bug where the IP was shown in the invoice position with domains
- Pages Manager (1.4)
- Added plugin Smart domain search with search for domains in all available ones in turn
- Added the ability to relabel the footer of all pages
- Mattermost Export (1.0.1)
- Tickets export: fixed bug where client-reply to old tickets (created before extention was enabled) were also exported to Mattermost
- Tickets export: Added the Name/Company Name/Guest Status of the ticket sender and their email when creating a post in Mattermost
- Invoices export: fixed bug with total income
- Invoices export: added client id after client name
- Reports export: fixed bug with Billing Income
v1.4 Released 04-03-2024
- "Manual Cron Run" (1.0.2) : Fixed a bug where manually executing the daily cron job would change the execution time of the daily cron job in the main WHMCS settings.
- Add extension "Cancellation Request" (Documentation)
- Add extension "Export Tool" (Documentation)
- Add extension "Export VAT_R" (Documentation)
- Add extension "Mattermost Export" (Documentation)
- Add extension "Promo Code API" (Documentation)
- Extension "Module puqProxmoxKVM" (1.1.2)
- fixed bug with IPv6 receiving
- added diagnostic information Services Summary
- Extension "Prorated Next Due Date" (1.1)
- The possibility of prorata is disabled if there are unpaid invoices on the service
- The prorate invoice looks like a regular invoice with all the consequences
- Improved BX compatibility
- The prorata mechanism has been changed from the standard method to a custom one
(an invoice is created with a description of the prorata, at the time of payment the nextduedate is changed to the number of days of the prorata)
- Extension "Overwrite Tax Rules" (1.1.2)
- Fixed a bug with ANY rules
- Added the ability to change "Tax name" in frozen invoice data
v1.3.1 Released 16-10-2023
- Supported WHMCS v8.8.0
- Translations added/updated (Arabic, Azerbaijani, Catalan, Chinese, Croatian, Czech, Danish, Dutch, English, Estonian, Farsi, French, German, Hebrew, Hungarian, Italian, Macedonian, Norwegian, Polish, Romanian, Russian, Spanish, Swedish, Turkish, Ukrainian)
- Module "Account Statement" (1.1.1)
- Translations added/updated (Arabic, Azerbaijani, Catalan, Chinese, Croatian, Czech, Danish, Dutch, English, Estonian, Farsi, French, German, Hebrew, Hungarian, Italian, Macedonian, Norwegian, Polish, Romanian, Russian, Spanish, Swedish, Turkish, Ukrainian)
- Module "Admin Panel Unique" (1.0.1)
- Translations added/updated (Arabic, Azerbaijani, Catalan, Chinese, Croatian, Czech, Danish, Dutch, English, Estonian, Farsi, French, German, Hebrew, Hungarian, Italian, Macedonian, Norwegian, Polish, Romanian, Russian, Spanish, Swedish, Turkish, Ukrainian)
- Module "Auto CC Management" (1.0.1)
- Translations added/updated (Arabic, Azerbaijani, Catalan, Chinese, Croatian, Czech, Danish, Dutch, English, Estonian, Farsi, French, German, Hebrew, Hungarian, Italian, Macedonian, Norwegian, Polish, Romanian, Russian, Spanish, Swedish, Turkish, Ukrainian)
- Module "Blocking ticket for guests" (1.0.1)
- Translations added/updated (Arabic, Azerbaijani, Catalan, Chinese, Croatian, Czech, Danish, Dutch, English, Estonian, Farsi, French, German, Hebrew, Hungarian, Italian, Macedonian, Norwegian, Polish, Romanian, Russian, Spanish, Swedish, Turkish, Ukrainian)
- Module "Cancel Fund Invoices" (1.0.1)
- Translations added/updated (Arabic, Azerbaijani, Catalan, Chinese, Croatian, Czech, Danish, Dutch, English, Estonian, Farsi, French, German, Hebrew, Hungarian, Italian, Macedonian, Norwegian, Polish, Romanian, Russian, Spanish, Swedish, Turkish, Ukrainian)
- Module "Client Data Archive" (1.1.1)
- Translations added/updated (Arabic, Azerbaijani, Catalan, Chinese, Croatian, Czech, Danish, Dutch, English, Estonian, Farsi, French, German, Hebrew, Hungarian, Italian, Macedonian, Norwegian, Polish, Romanian, Russian, Spanish, Swedish, Turkish, Ukrainian)
- Module "Clients Only Access" (1.0.1)
- Translations added/updated (Arabic, Azerbaijani, Catalan, Chinese, Croatian, Czech, Danish, Dutch, English, Estonian, Farsi, French, German, Hebrew, Hungarian, Italian, Macedonian, Norwegian, Polish, Romanian, Russian, Spanish, Swedish, Turkish, Ukrainian)
- Module "Credit Management" (1.0.1)
- Translations added/updated (Arabic, Azerbaijani, Catalan, Chinese, Croatian, Czech, Danish, Dutch, English, Estonian, Farsi, French, German, Hebrew, Hungarian, Italian, Macedonian, Norwegian, Polish, Romanian, Russian, Spanish, Swedish, Turkish, Ukrainian)
- Module "Disabler of standard elements" (1.0.1)
- Translations added/updated (Arabic, Azerbaijani, Catalan, Chinese, Croatian, Czech, Danish, Dutch, English, Estonian, Farsi, French, German, Hebrew, Hungarian, Italian, Macedonian, Norwegian, Polish, Romanian, Russian, Spanish, Swedish, Turkish, Ukrainian)
- Module "Fraud Check" (1.0.2)
- Translations added/updated (Arabic, Azerbaijani, Catalan, Chinese, Croatian, Czech, Danish, Dutch, English, Estonian, Farsi, French, German, Hebrew, Hungarian, Italian, Macedonian, Norwegian, Polish, Romanian, Russian, Spanish, Swedish, Turkish, Ukrainian)
- Module "GDPR Tools" (1.0.2)
- Translations added/updated (Arabic, Azerbaijani, Catalan, Chinese, Croatian, Czech, Danish, Dutch, English, Estonian, Farsi, French, German, Hebrew, Hungarian, Italian, Macedonian, Norwegian, Polish, Romanian, Russian, Spanish, Swedish, Turkish, Ukrainian)
- Module "Head/Footer Output" (1.0.2)
- Translations added/updated (Arabic, Azerbaijani, Catalan, Chinese, Croatian, Czech, Danish, Dutch, English, Estonian, Farsi, French, German, Hebrew, Hungarian, Italian, Macedonian, Norwegian, Polish, Romanian, Russian, Spanish, Swedish, Turkish, Ukrainian)
- Module "Maintenance Mode" (1.0.3)
- Translations added/updated (Arabic, Azerbaijani, Catalan, Chinese, Croatian, Czech, Danish, Dutch, English, Estonian, Farsi, French, German, Hebrew, Hungarian, Italian, Macedonian, Norwegian, Polish, Romanian, Russian, Spanish, Swedish, Turkish, Ukrainian)
- Module "Manual Cron Run" (1.0.1)
- Translations added/updated (Arabic, Azerbaijani, Catalan, Chinese, Croatian, Czech, Danish, Dutch, English, Estonian, Farsi, French, German, Hebrew, Hungarian, Italian, Macedonian, Norwegian, Polish, Romanian, Russian, Spanish, Swedish, Turkish, Ukrainian)
- Module "Menu Manager" (1.0.1)
- Translations added/updated (Arabic, Azerbaijani, Catalan, Chinese, Croatian, Czech, Danish, Dutch, English, Estonian, Farsi, French, German, Hebrew, Hungarian, Italian, Macedonian, Norwegian, Polish, Romanian, Russian, Spanish, Swedish, Turkish, Ukrainian)
- Module "puqProxmoxKVM" (1.1.1)
- Translations added/updated (Arabic, Azerbaijani, Catalan, Chinese, Croatian, Czech, Danish, Dutch, English, Estonian, Farsi, French, German, Hebrew, Hungarian, Italian, Macedonian, Norwegian, Polish, Romanian, Russian, Spanish, Swedish, Turkish, Ukrainian)
- Module "Overwrite Suspend/Termination" (1.0.1)
- Translations added/updated (Arabic, Azerbaijani, Catalan, Chinese, Croatian, Czech, Danish, Dutch, English, Estonian, Farsi, French, German, Hebrew, Hungarian, Italian, Macedonian, Norwegian, Polish, Romanian, Russian, Spanish, Swedish, Turkish, Ukrainian)
- Module "Overwrite Tax Rules" (1.1.1)
- Translations added/updated (Arabic, Azerbaijani, Catalan, Chinese, Croatian, Czech, Danish, Dutch, English, Estonian, Farsi, French, German, Hebrew, Hungarian, Italian, Macedonian, Norwegian, Polish, Romanian, Russian, Spanish, Swedish, Turkish, Ukrainian)
- Module "Pages Manager" (1.1.2)
- Translations added/updated (Arabic, Azerbaijani, Catalan, Chinese, Croatian, Czech, Danish, Dutch, English, Estonian, Farsi, French, German, Hebrew, Hungarian, Italian, Macedonian, Norwegian, Polish, Romanian, Russian, Spanish, Swedish, Turkish, Ukrainian)
- Module "Prorated Next Due Date" (1.0.2)
- Translations added/updated (Arabic, Azerbaijani, Catalan, Chinese, Croatian, Czech, Danish, Dutch, English, Estonian, Farsi, French, German, Hebrew, Hungarian, Italian, Macedonian, Norwegian, Polish, Romanian, Russian, Spanish, Swedish, Turkish, Ukrainian)
- Module "Service Data Archive" (1.1.1)
- Translations added/updated (Arabic, Azerbaijani, Catalan, Chinese, Croatian, Czech, Danish, Dutch, English, Estonian, Farsi, French, German, Hebrew, Hungarian, Italian, Macedonian, Norwegian, Polish, Romanian, Russian, Spanish, Swedish, Turkish, Ukrainian)
- Module "Show Services IP, Username" (1.1.1)
- Translations added/updated (Arabic, Azerbaijani, Catalan, Chinese, Croatian, Czech, Danish, Dutch, English, Estonian, Farsi, French, German, Hebrew, Hungarian, Italian, Macedonian, Norwegian, Polish, Romanian, Russian, Spanish, Swedish, Turkish, Ukrainian)
- Module "Support Hours Widget" (1.0.1)
- Translations added/updated (Arabic, Azerbaijani, Catalan, Chinese, Croatian, Czech, Danish, Dutch, English, Estonian, Farsi, French, German, Hebrew, Hungarian, Italian, Macedonian, Norwegian, Polish, Romanian, Russian, Spanish, Swedish, Turkish, Ukrainian)
- Module "Suspend After" (1.0.1)
- Translations added/updated (Arabic, Azerbaijani, Catalan, Chinese, Croatian, Czech, Danish, Dutch, English, Estonian, Farsi, French, German, Hebrew, Hungarian, Italian, Macedonian, Norwegian, Polish, Romanian, Russian, Spanish, Swedish, Turkish, Ukrainian)
v1.3 Released 24-07-2023
- Add extension "Admin Panel Unique" (Customization of the admin panel)
- Module "puqProxmoxKVM" (1.1)
- Add DNS Zones (cloudflare.com, HesiaCP)
- Change in "Page Manager" (v1.1.1)
- Added "Page Back Ground" widget
- Added "Promo Slider" widget
- "Mini Menu" is in a healthy template
- "Mini Menu" added opening in a new tab,
- "Mini Menu" added puq-bottom template
- "Mini Menu" widget is added the ability to add a link to the www page
- Change in "Client Data Archive" (v1.1)
- fixed a bug in php8.x that sometimes showed a critical error in the client area
- added RAW data view function
-
View all button added to search
- Fix in "Fraud Check" (1.0.1)
- a sanitizer has been added to js that removes unnecessary characters that generated an error in script execution
v1.2 Released 11-07-2023
- Change in "Page Manager" (v1.1.1)
- Added to tinymce editor <style> tag permission
- Change in "OverwriteTaxRules" (v1.1)
- Add "ModulePuqProxmoxKVM" (PUQ ProxmoxKVM module management extension)
- Change in "ProratedNextDueDate" (v1.0.1)
- Excluded from propata are those who are in line for terminated
- Fixed a bug with duplicate service data on the invoice.
- Change in "Show Services Ip Username" (v1.1)
- If the IP is empty or 0.0.0.0 then we take the first one with assigned ips
v1.1.1 Released 29-06-2023
- Change in "Page Manager" (v1.1)
- Added "Mini Menu" widget
- Added functionality for cloning widgets
- Added a button in the client area for the admin 'Edit in PUQ Customization'
- Added floating button to save pages
- Added copying of translations among themselves
- Fixed a bug with language in the "GDPR Tools" extension
- Fixed a bug in the "Maintenance Mode" extension
v1.1 Released 21-06-2023
- Added extension "Fraud Check"
- Added extension "Overwrite Tax Rules"
- Adapted the "Account Statement" extension regarding the "Overwrite Tax Rules" extension
- Fixed a bug in the "Maintenance Mode" extension regarding the date format.
- Added to the "Service Data Archive" extension raw data view in archive data search
v1.0 Released 31-05-2023
First version
Installation/Update and configuration guide
PUQ Customization module WHMCS
Order now | Download | FAQ
Module is coded ionCube v13
Supported php version:
- php 7.4 WHMCS 8.11.0 -
- php 8.1 WHMCS 8.11.0 +
- php 8.2 WHMCS 8.11.0 +
To install and update a module, you must perform one and the same action.
1. Download the latest version of the module.
PHP 8.2
wget http://download.puqcloud.com/WHMCS/addons/PUQ-Customization/php82/PUQ-Customization-latest.zipPHP 8.1
wget http://download.puqcloud.com/WHMCS/addons/PUQ-Customization/php81/PUQ-Customization-latest.zipPHP 7.4
wget http://download.puqcloud.com/WHMCS/addons/PUQ-Customization/php74/PUQ-Customization-latest.zip
All versions are available via link: http://download.puqcloud.com/WHMCS/addons/PUQ-Customization/
2. Unzip the archive with the module.
unzip PUQ-Customization-latest.zip3. Copy and Replace "puq_customization" to "WHMCS_WEB_DIR/modules/addons/"
4. Login to the admin zone of your WHMCS and go to "Configuration->Addons Modules"
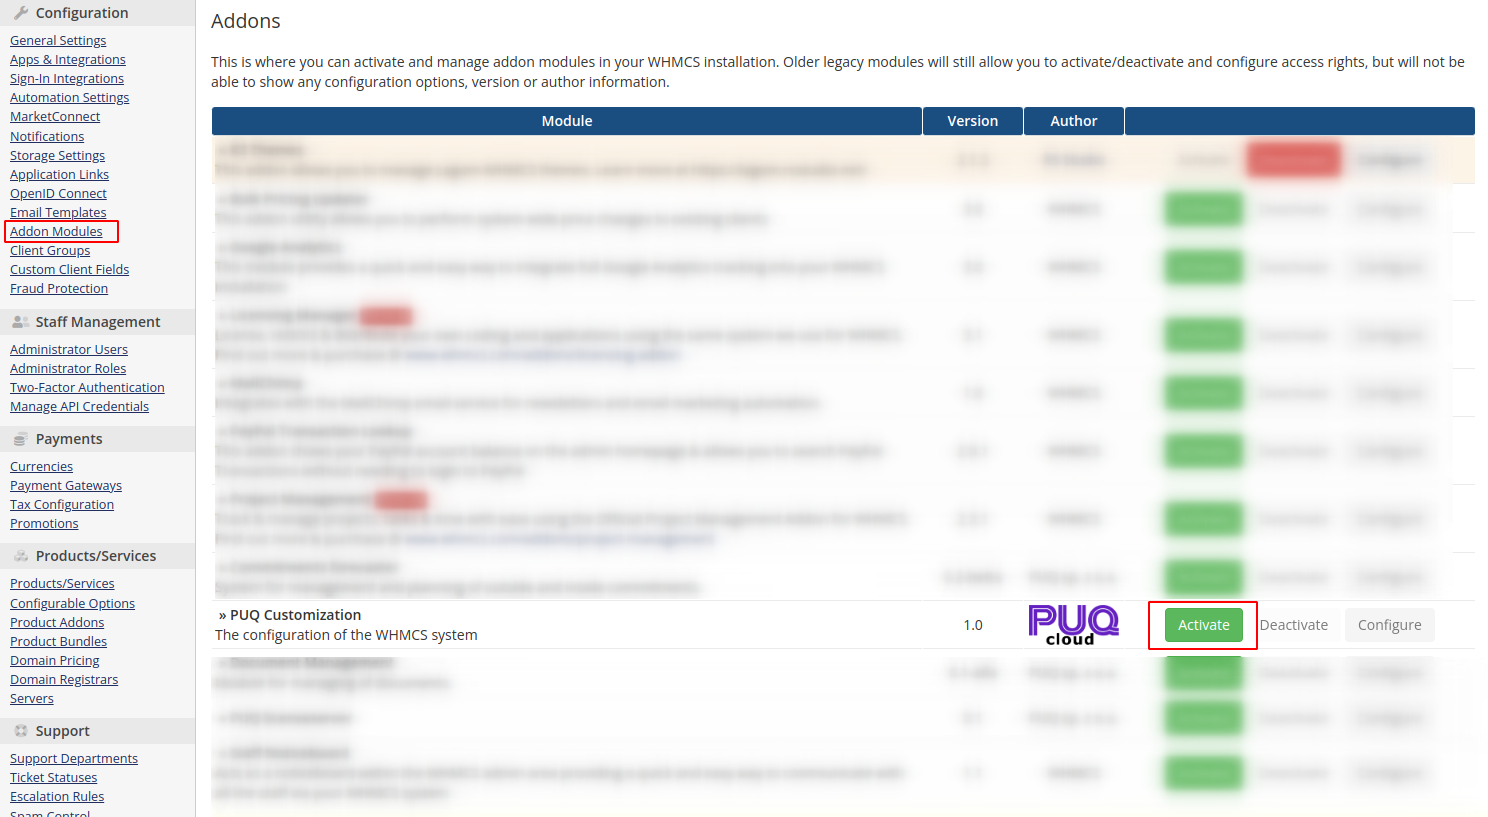
5. From the list of modules, select the "PUQ Customization" module and click the "Activate" button. After these actions, the module will be activated and will create the necessary tables in the database for work.
Note that deactivating a module will delete all tables created by the module.
6. After activation, don't forget to configure module access rights and enter a license key if you want to use all extensions without restrictions.

License PUQ Customization WHMCS module
PUQ Customization module WHMCS
Order now | Download | FAQ
Introduction
To start using the PUQ Customization module, you do not require a license. Simply install the modules, and you will have access to the extensions that do not require a license. These extensions are marked as free within the system. However, if you wish to utilize the full functionality of the module without any limitations, you will need to have a valid license for the module. With a valid license, you have the right to fully utilize the module without restrictions for the duration of the license and for a single instance of the WHMCS system.
Validating License
To check the validity of your license, your WHMCS instance should have access to our license verification servers (IP address range: 77.87.125.0/24).
Licensing Policy
We value our customers and adopt a customer-friendly approach. If your license expires at any point, we only restrict the management of paid extensions from the administrator's side. It is important to emphasize that all automation and client-side configurations set within the extensions will continue to function as they were before the license expiry.
Conclusion
A valid license is an integral part of the PUQ Customization module to ensure its proper functioning, specifically in terms of configuring extensions. However, if for any reason the license becomes irrelevant, your clients will not notice the absence of a license, and it will not affect the functionality of your WHMCS or your business operations.
Please note that having a valid license provides you with the complete set of features and benefits offered by the PUQ Customization module, ensuring a seamless customization experience for your WHMCS system.
Module Home Page
PUQ Customization module WHMCS
Order now | Download | FAQ
To access the module settings you must log in to the administrator area and go to the menu item "Addons->PUQ Customization"
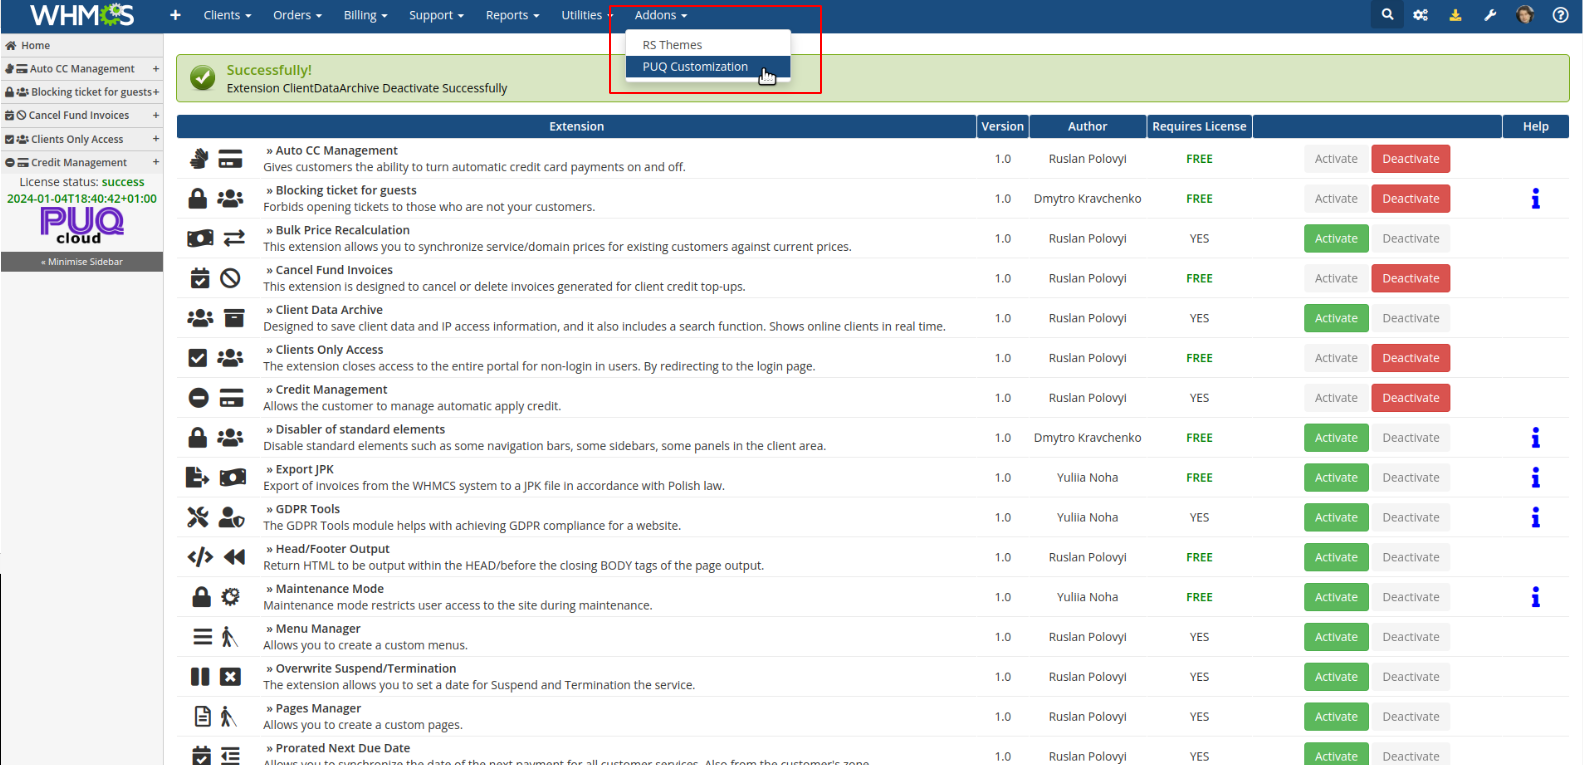
In the main section of the module, you will find a comprehensive list of all available extensions, along with their respective versions and authors. It also provides information regarding the license requirements for each extension. To manage the activation and deactivation of an extension, convenient buttons are provided.
Additionally, if you require assistance or detailed instructions on how to use a particular extension, you can simply click on the "I" icon in the Help field. This will provide you with access to helpful resources and instructions specific to that extension.
This user-friendly interface allows you to easily navigate through the various extensions, enabling you to activate or deactivate them as needed, while also providing convenient access to relevant documentation and instructions for seamless usage.
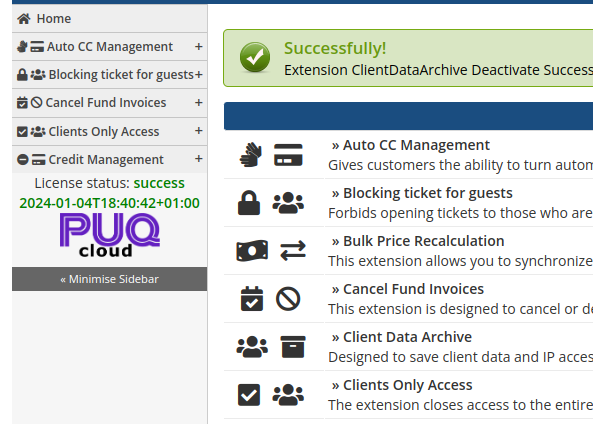
On the left side of the main screen, you will find a navigation menu that expands as you activate modules. This menu is designed for your convenience, with menu names and icons corresponding to the names and icons of the respective extensions.
This intuitive design allows for easy navigation through the modules, ensuring a seamless user experience. The license status section keeps you informed about the status of your license and provides relevant alerts if any issues arise.
Module puqProxmoxKVM
PUQ ProxmoxKVM module management extension
Description
PUQ Customization module WHMCS
Order now | Download | FAQ
The "Module puqProxmoxKVM" extension is designed for managing and configuring additional options for the ProxmoxKVM module within the WHMCS platform.
To learn more about this ProxmoxKVM WHMCS module, please refer to the documentation at
https://doc.puq.info/books/proxmoxkvm-whmcs-module (Order now | Dowload | FAQ)


IP Pools
PUQ Customization module WHMCS
Order now | Download | FAQ
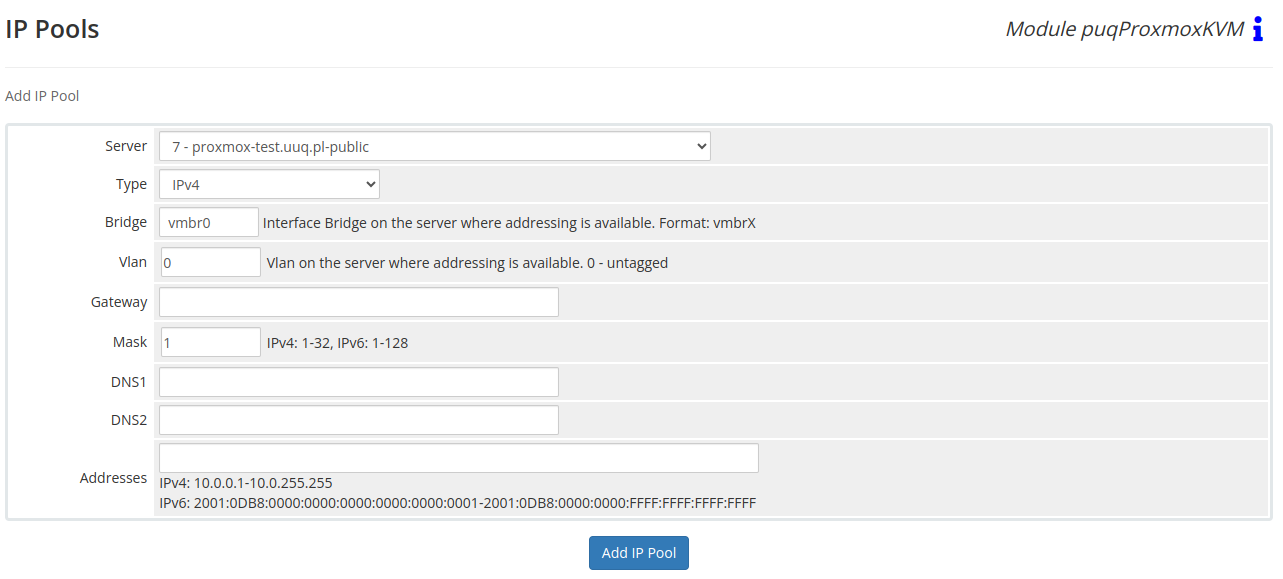
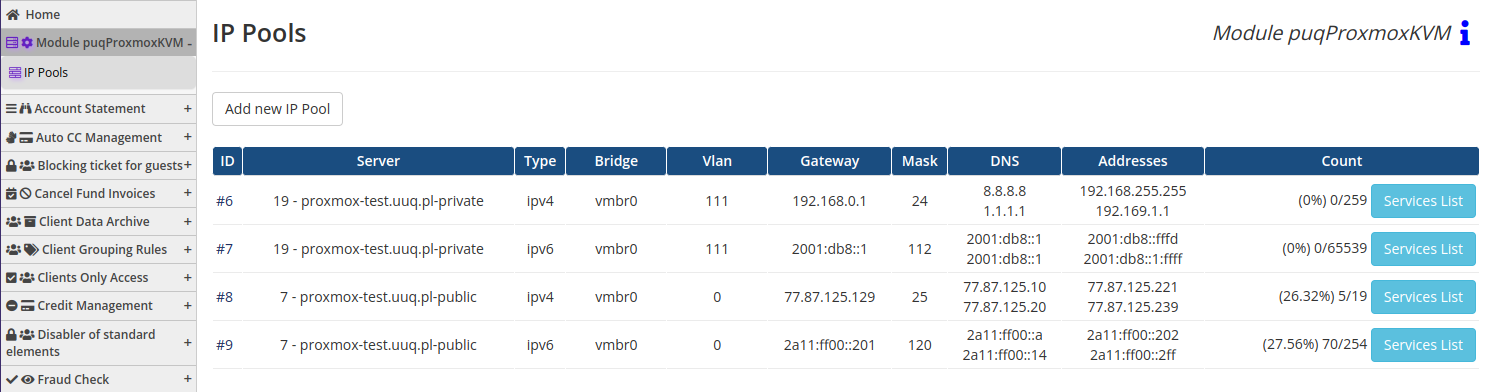
To enable the provision of virtual machines with virtual IP addresses, both IPv4 and IPv6, the configuration of an IP Pool is available.
An IP Pool is an abstract object that contains the following information:
- Server: The Proxmox server within the WHMCS system for which this pool will be active.
- Type: The type of the pool, which can be IPv4 or IPv6.
- Bridge and VLAN: Corresponding parameters that will be configured on the virtual machine if it receives an IP from this pool. (Please note that the addressing must be available on this Bridge and VLAN.)
- Gateway: The default gateway that will be configured on the virtual machine.
- Mask: The subnet mask that will be configured on the virtual machine.
- DNS1/DNS2: The DNS servers that will be configured on the virtual machine.
- Addresses: The range of addresses included in this pool. Please note that the Gateway will be excluded from the pool but will be listed as an occupied IP if it is part of the pool.
By configuring an IP Pool, you can streamline the allocation of virtual IP addresses for your virtual machines, ensuring efficient network management and connectivity within the Proxmox environment.

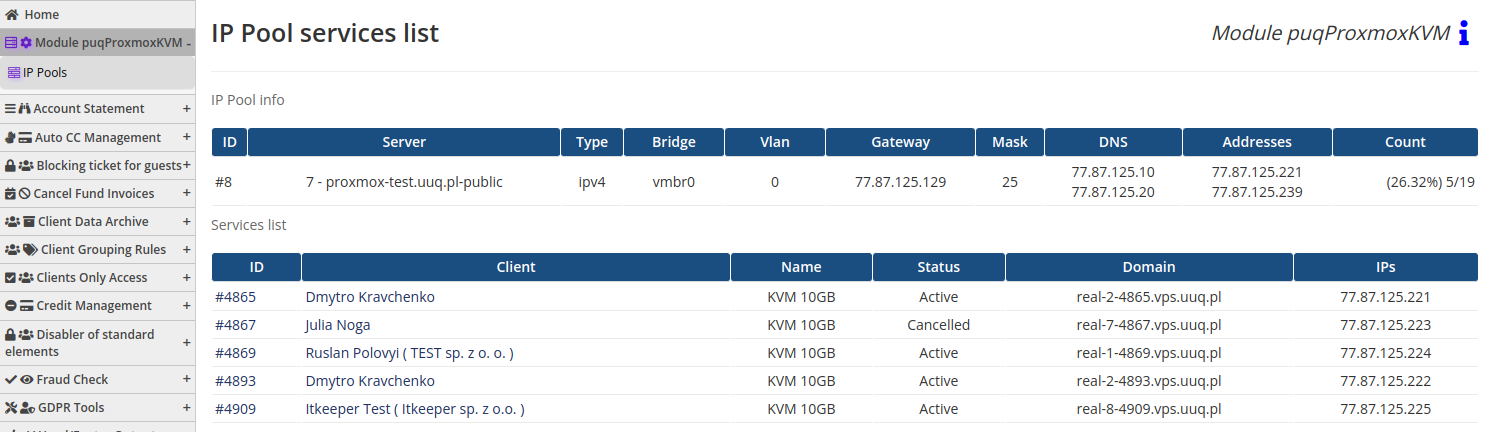
When viewing the list of IP pools, you will find information about the pool's size and its utilization. Additionally, there is a button available to view the services associated with IP addresses from that pool.
The size of the pool indicates the total number of available IP addresses within it, while the utilization provides insights into how many IP addresses have been allocated or are in use.
To gain further visibility into the services utilizing IP addresses from a particular pool, you can click on the designated button. This will provide you with a comprehensive overview of the services and associated virtual machines that currently utilize IP addresses from that specific pool. By accessing this information, you can effectively manage and monitor IP address allocation within your infrastructure.

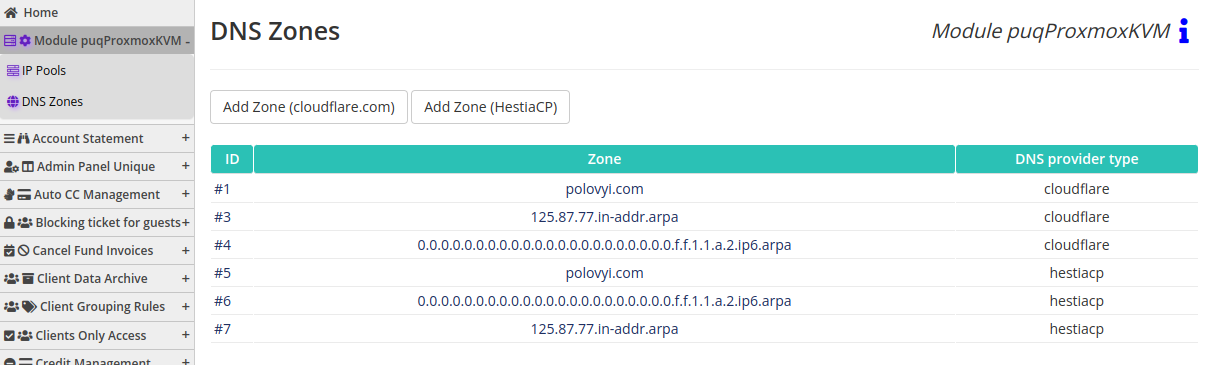
DNS Zones
PUQ Customization module WHMCS
Order now | Download | FAQ
Instructions: Configuring DNS Synchronization for Virtual Machines in puqProxmoxKVM
In order to enable DNS records synchronization for virtual machines managed by the puqProxmoxKVM module, you have the option to create DNS zones. A DNS zone is an object that is part of the API connection configuration to the DNS provider, allowing the puqProxmoxKVM module to synchronize DNS records.
How it Works:
- When creating a new service, modifying an existing one, or when a client requests a change to their virtual machine's revDNS record, the module will attempt to find the corresponding DNS zone for synchronization.
- Forward Zone: The domain and subdomain are taken from the service's Domain field, and the module matches them with the added zones. If there's a match, it performs actions to synchronize the A and AAAA records. The IPv4 address is taken from the Allocated IP field for the service, and for IPv6 synchronization, the first available IPv6 address for that service is used.
- Reverse Zone: All IP addresses are converted into a DNS zone, which is then compared with the list of existing zones. When there's a match, the records are synchronized.
By synchronization, it means that the records will be removed from the remote server and then recreated. Except for service creation, where records are created without deletion. Also, when a service is deleted, the records will be deleted and not recreated.
After adding the zone, you can click the "Test Zone" button to verify the correctness of the added data and perform a test on the DNS provider using the API.
Supported DNS Providers:
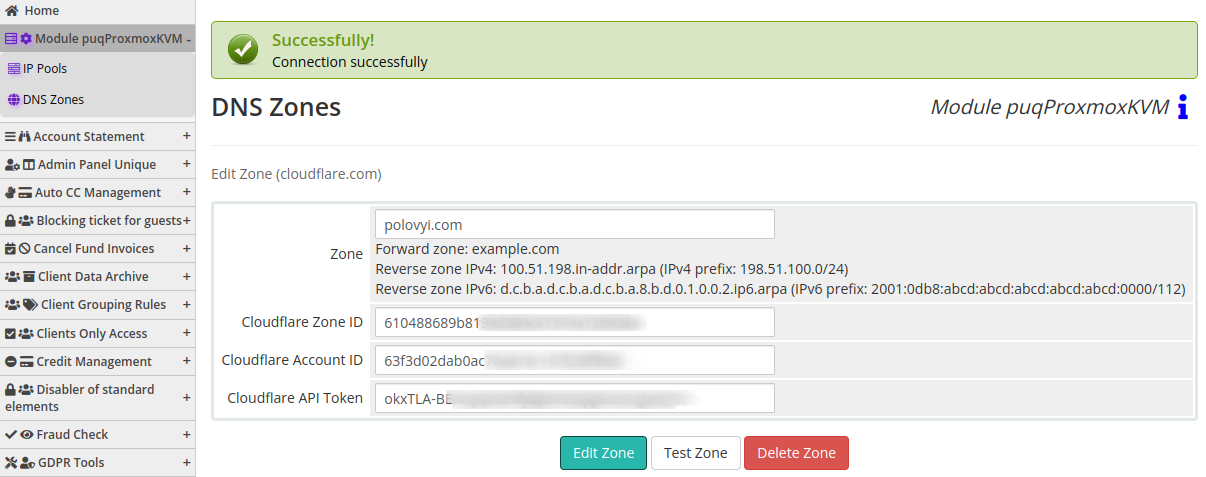
cloudflare.com
-
- Required data for zone creation:
- Zone Name
- Zone ID
- Account ID
- API Token Before adding a zone, you must create the zone on the service and obtain all the necessary data with sufficient access rights.
- Required data for zone creation:
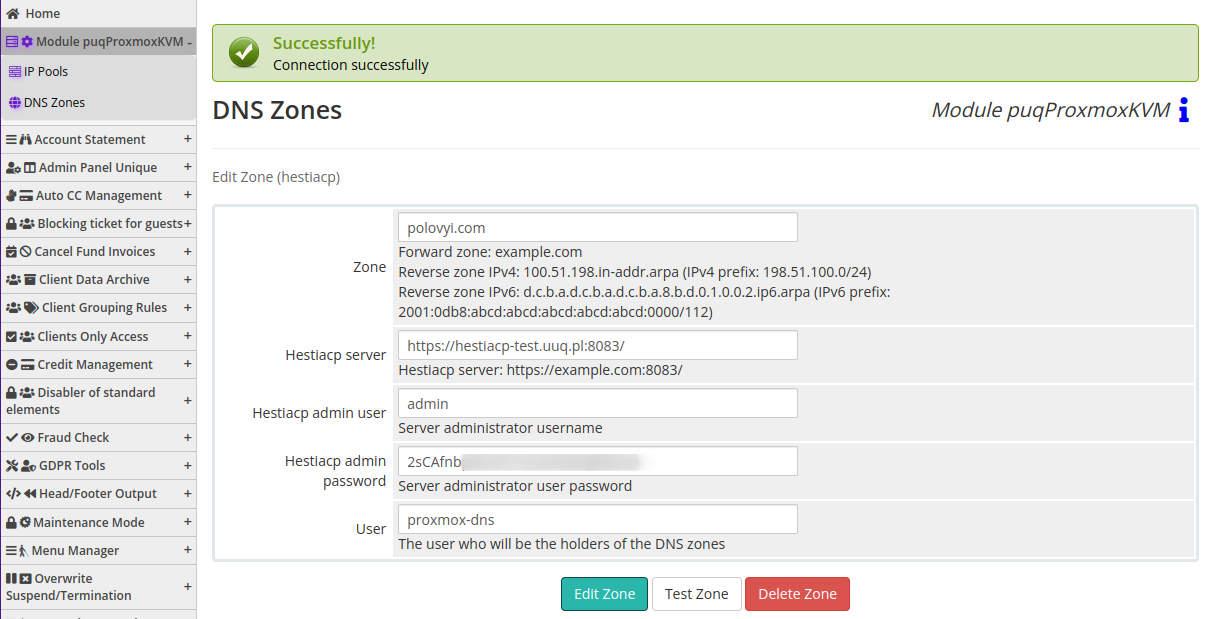
HestiaCP Server
-
- Required data for zone creation:
- Zone
- Hestiacp server
- Hestiacp admin user
- Hestiacp admin password
- User (The user who will be the holder of the DNS zones) When adding a zone, create it on the remote server and allow WHMCS access to the HestiaCP server via API.
- Required data for zone creation:
Note:
- The synchronization will occur for all matching zones. If you add two identical zones on different DNS providers, synchronization will occur for both of these identical zones.
- Synchronization is not instantaneous but occurs at scheduled cron tasks and may take some time.
- If there are any connection errors or other issues during the synchronization process, they will be logged in the module's logs. Synchronization errors will not stop the service or disrupt automation processes.
Forward/Reverse DNS Zones for IPv4 and IPv6
PUQ Customization module WHMCS
Order now | Download | FAQ
Configuring Forward and Reverse DNS Zones for IPv4 and IPv6
DNS zones are used to translate domain names into IP addresses and vice versa. To properly configure forward and reverse DNS zones for IPv4 and IPv6, you need to know the subnets associated with the respective IP addresses. Below are instructions on how to build zones for IPv4 and IPv6.
Forward DNS Zones for IPv4/IPv6:
Forward DNS zones are used to map domain names to IPv4 addresses.
-
Determine the domain name for your server or device. For example: myserver.example.com.
-
Determine the IPv4 address that will correspond to this domain name. For example: 203.0.113.10.
myserver.example.com. IN A 203.0.113.10- Determine the IPv6 address that will correspond to this domain name. For example: 2001:0db8:85a3:0000:0000:8a2e:0370:7334.
myserver.example.com. IN AAAA 2001:0db8:85a3:0000:0000:8a2e:0370:7334Reverse DNS Zones for IPv4 and IPv6:
Reverse DNS zones convert IP addresses back into domain names. Please note that reverse DNS zones for IPv4 and IPv6 have slightly different formats.
Reverse DNS Zones for IPv4:
Reverse DNS zones for IPv4 are based on the four octets of an IPv4 address.
-
Split the IPv4 address into octets and reverse them, adding ".in-addr.arpa" at the end.
For example: 10.113.0.203.in-addr.arpa -
Create a new zone in the DNS configuration file (e.g., reverse.db) with the specified reverse domain name and your server's domain name:
10.113.0.203.in-addr.arpa. IN PTR myserver.example.com.
Reverse DNS Zones for IPv6:
Reverse DNS zones for IPv6 are based on the hexadecimal representation of the IPv6 address.
-
Write the IPv6 address in hexadecimal form, separating each group of digits with colons and adding ".ip6.arpa" at the end.
For example: 4.3.3.7.0.e.3.7.0.2.e.a.8.0.0.0.0.0.0.0.0.0.0.0.3.8.a.5.8.b.d.0.1.0.0.2.ip6.arpa -
Create a new zone in the DNS configuration file (e.g., reverse.db) with the specified reverse domain name and your server's domain name:
4.3.3.7.0.e.3.7.0.2.e.a.8.0.0.0.0.0.0.0.0.0.0.0.3.8.a.5.8.b.d.0.1.0.0.2.ip6.arpa. IN PTR myserver.example.com.
Menu Manager
Allows you to create a custom menus.
Description
PUQ Customization module WHMCS
Order now | Download | FAQ
Menu Manager
Description of the "Menu Manager" extension:
Key features of the extension:
-
Building a two-level menu with easy drag-and-drop of menu items. You can create and customize your own menu according to your needs.
-
Multilingual support for menu items. You can specify different menu item names for different languages, allowing you to adapt the menu to different audiences.
-
Ability to display menu items for logged-in clients, non-logged-in clients, or both. You can configure the visibility of menu items based on the client's authentication status.
-
Each menu item can have a designated link. Users can navigate to different sections and pages by clicking on these links.
-
Option to open links in new browser tabs. This is useful when you want users to be able to view the menu and navigate through links simultaneously.
-
The extension also allows you to add separators in the menu to create a more structured and visually appealing layout.
- You can assign a personalized icon to each menu item, enhancing the visual appeal and helping clients intuitively navigate through the menu. The use of icons improves the overall user experience by providing visual cues and increasing client understanding of the menu structure.
One of the notable features of the extension is the availability of pre-built menu templates that can be installed at any time. This enables you to quickly create menus and adapt them to your needs.


Configuration
PUQ Customization module WHMCS
Order now | Download | FAQ
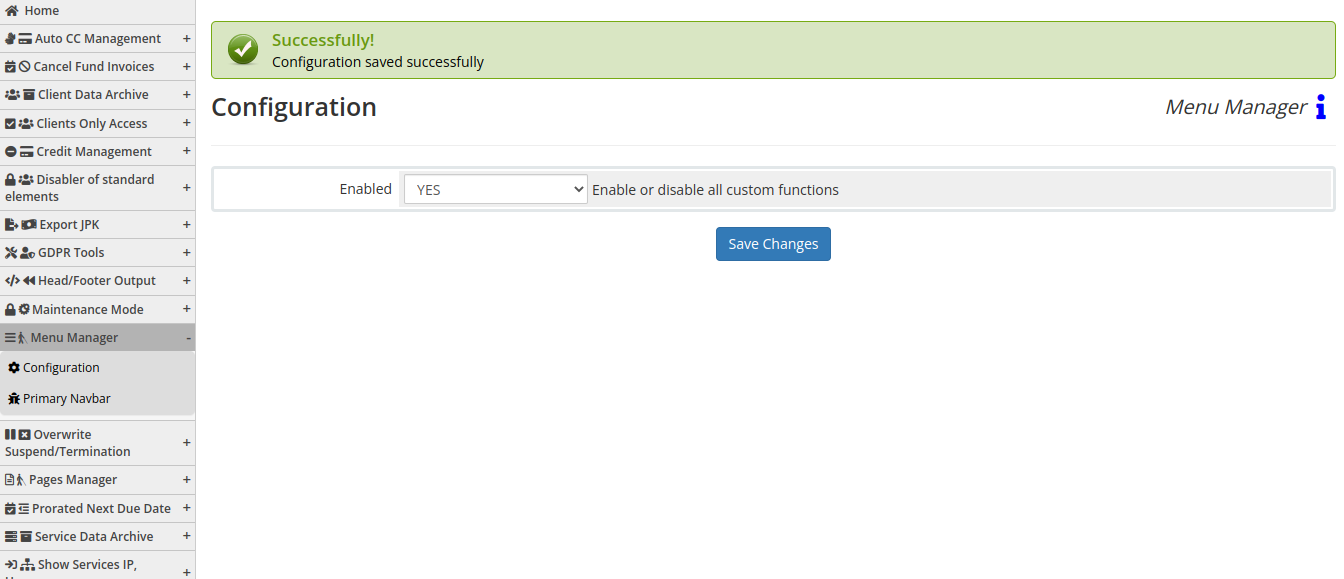
Enabled - Enabling or disabling all custom functions of this extension affects the automation and visibility of its features in the client area. When extension disabled, the automation capabilities and related features provided by the extension will not be active or visible to clients. However, as an administrator, you will still have access to configure and utilize the extension's functionalities through the administration interface. This gives you the flexibility to control the visibility and automation aspects of the extension based on your specific needs and preferences.
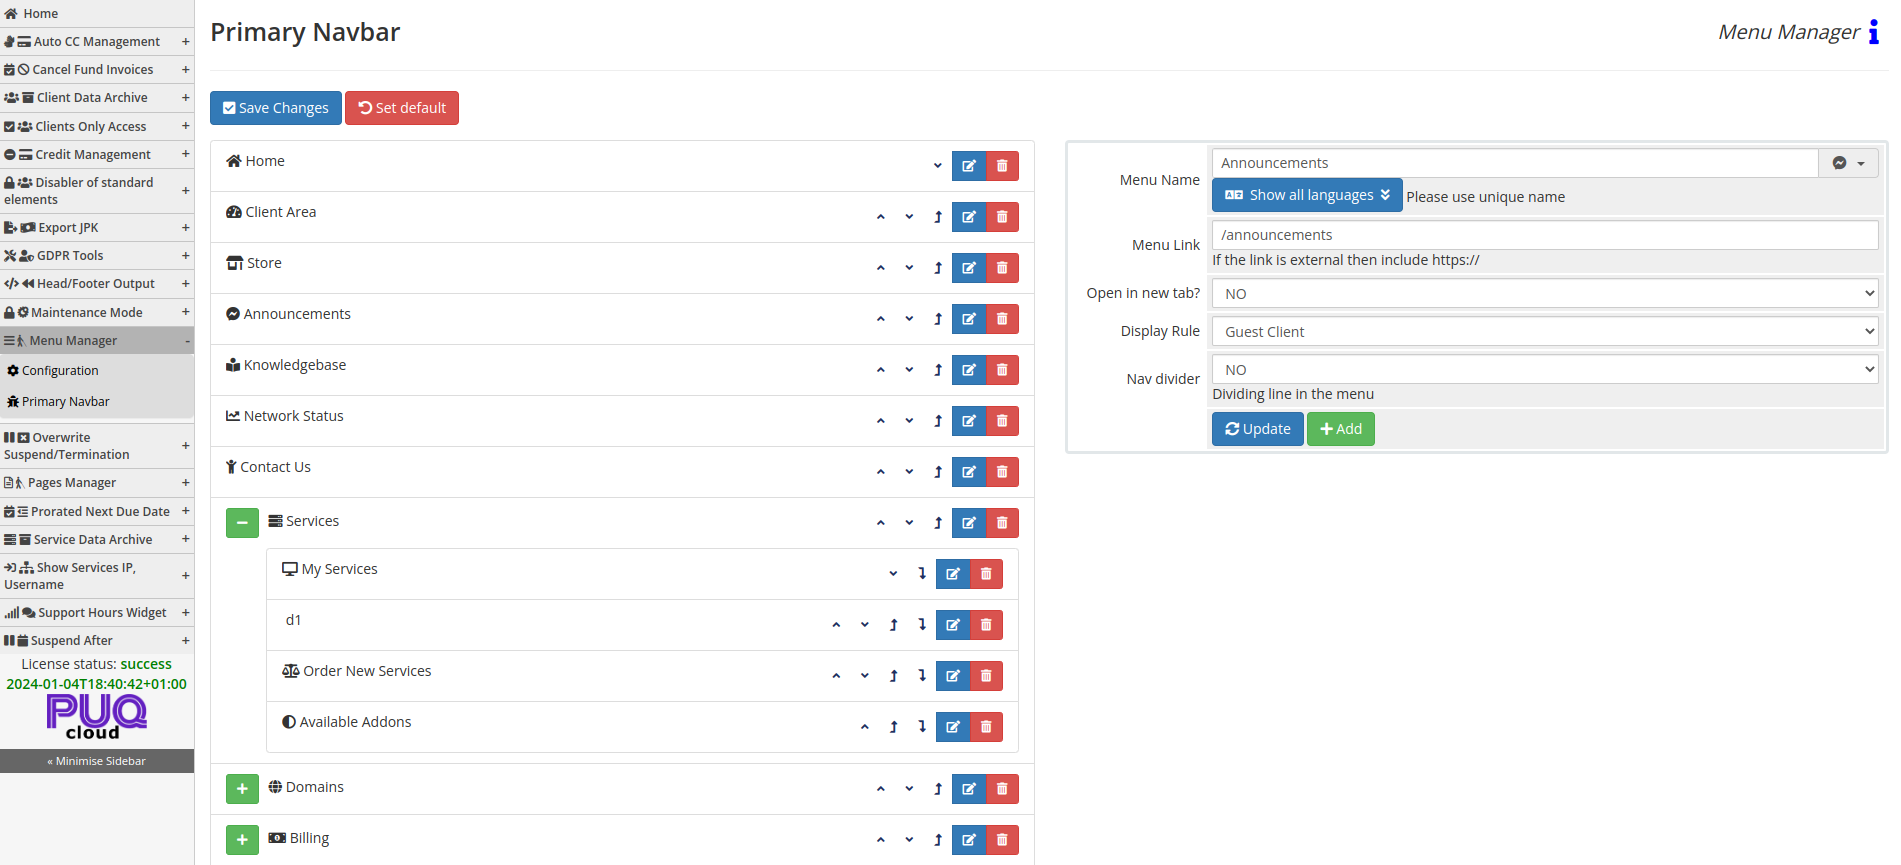
Primary Navbar
PUQ Customization module WHMCS
Order now | Download | FAQ
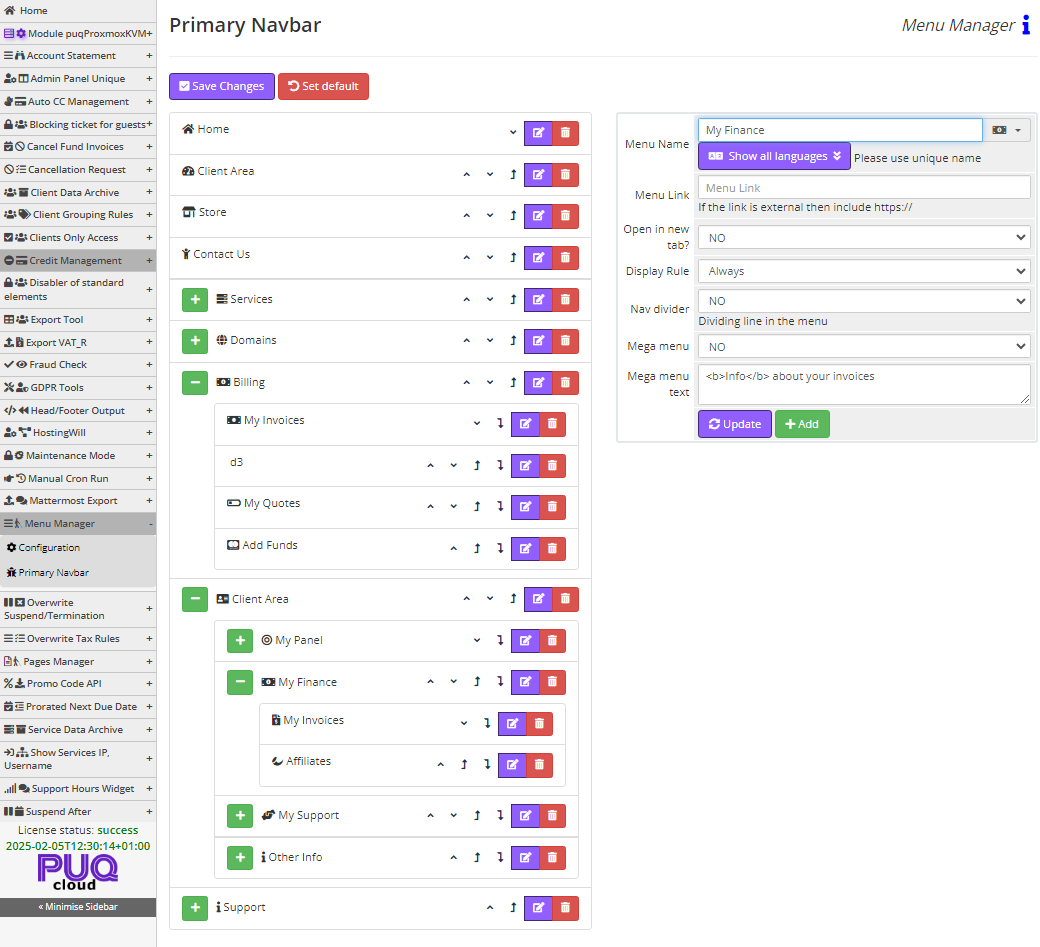
When configuring the menu for the first time, it will be empty. To populate it with default menu items, click the "Set Default" button.
-
On the right-hand side, you have a panel for adding and editing menu items. In this panel, you will find the following fields:
- Menu Name: Enter the name of the menu item that will be displayed in the client area. You can provide translations for all available languages.
- Icon: Choose an icon for the menu item from the dropdown list.
- Menu Link: Enter the URL to which the client will be redirected when clicking the menu item.
- Open in New Tab: Determine whether the URL should be opened in a new tab or not.
- Display Rule: Set the visibility of the menu item for logged-in clients, non-logged-in clients, or both.
- Nav Divider: This option creates a horizontal separator in the menu instead of a regular menu item.
- There are two buttons, "Update" and "Add," for updating the menu item's data or creating a new menu item, respectively.
-
On the left-hand side, you have the actual menu structure. You can navigate through the menu items using the navigation buttons. Each menu item has "Edit" and "Delete" buttons for performing the corresponding actions. Clicking the "Edit" button will populate the right-hand panel with the menu item's data, which you can edit. Remember to click the "Update" button after making changes.
After you have constructed the menu, don't forget to save your changes by clicking the "Save Changes" button in the top left corner. Next to the "Save Changes" button, there is a "Set Default" button that, when clicked, will set the menu as the default menu.
Mega Menu
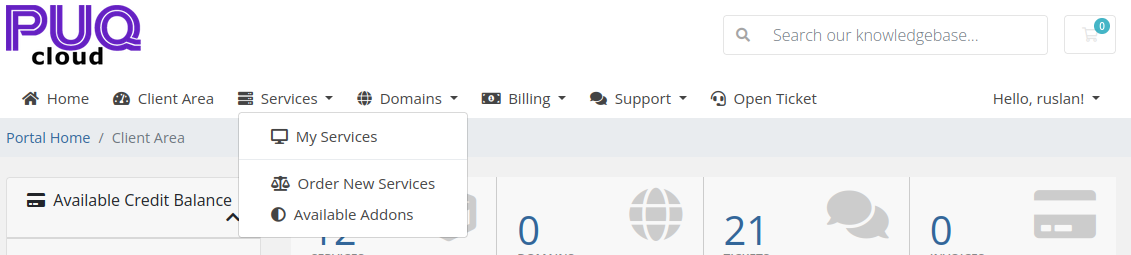
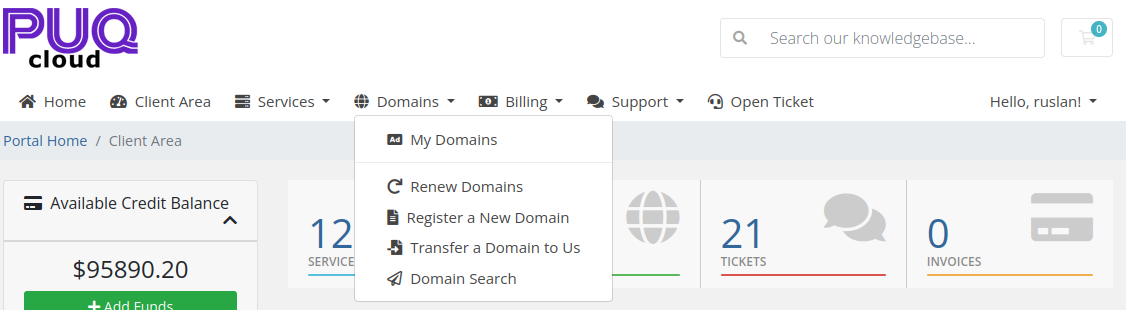
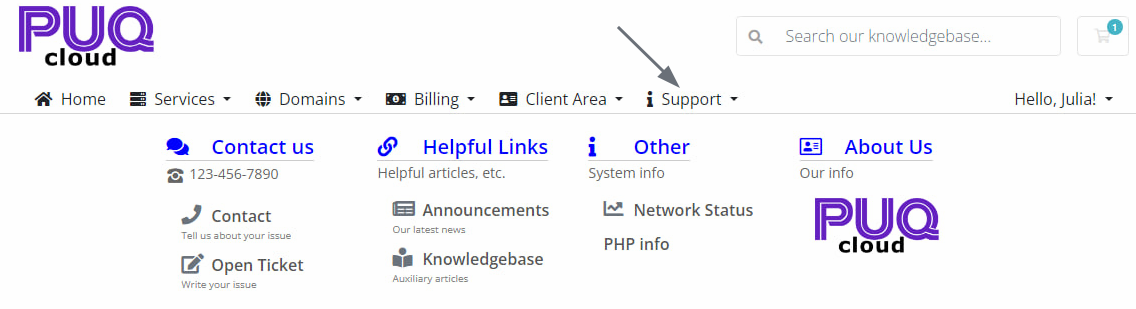
Client Area
PUQ Customization module WHMCS
Order now | Download | FAQ
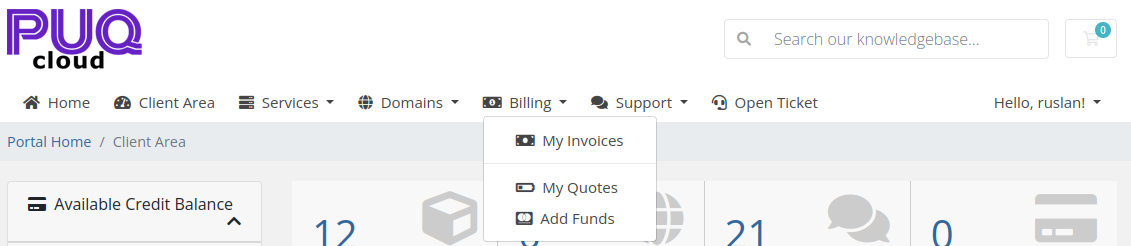
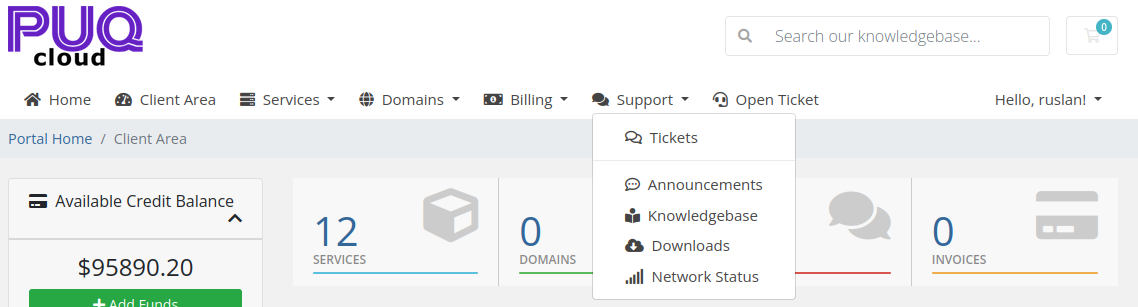
In the client area, the menu looks like this
Not for logged in users

For logged in users


Pages Manager
Allows you to create a custom pages.
Description
PUQ Customization module WHMCS
Order now | Download | FAQ
Pages Manager
"Pages Manager" is an exceptional extension that will revolutionize your WHMCS experience by providing unparalleled customization options. This powerful tool allows you to elevate and enhance the standard WHMCS functionality to new heights.
With "Pages Manager," you can easily customize and tailor the frontend of your WHMCS and its default themes to reflect your unique brand identity. This extension empowers you to effortlessly create stunning custom pages using intuitive block widgets. Say goodbye to generic templates and embrace a fully personalized WHMCS interface that perfectly aligns with your business objectives.
The possibilities are endless with "Pages Manager." You have the freedom to redefine your WHMCS homepage and craft captivating product descriptions. Each custom page can be enriched with SEO tags, including OG title, OG description, OG image, and keywords, ensuring optimal search engine visibility and driving organic traffic to your website.
Furthermore, "Pages Manager" fully embraces multilingual capabilities, allowing you to create a truly global online presence. You can effortlessly create a multilingual website, where each page is individually tailored to the language preferences of your visitors. This level of flexibility goes beyond mere translation, as you can customize widget layouts and page elements to cater to the specific needs of each language audience, providing an unmatched level of customer-centricity.
Prepare to be impressed by the extensive collection of widgets at your disposal. The "Pages Manager" boasts a diverse range of widget options, each offering an extensive array of customization settings for colors, sizes, and styles. Our dedicated team of developers is continually crafting unique styles for each widget, ensuring that your website exudes professionalism and sophistication.
One of the standout features of "Pages Manager" is that all widgets come with their own independent CSS styles. This means that the appearance of the widgets remains consistent across any WHMCS theme you choose. However, should you encounter any compatibility issues with your current theme, rest assured that we are committed to providing prompt assistance and tailor-made solutions to meet your specific requirements.
It is important to emphasize that "Pages Manager" is not just another theme or template for WHMCS. It is a comprehensive package of powerful widgets that seamlessly integrate with your existing WHMCS setup. This means you can enhance the capabilities of your WHMCS without interfering with your chosen theme.
Say goodbye to the need for expensive WHMCS themes. With "Pages Manager," you gain the power to customize and personalize the standard WHMCS templates such as "twenty one" and "six" to an extraordinary degree. This means you can achieve a level of customization that surpasses traditional theme options, all while saving costs and streamlining your online presence.
Unlock the true potential of your WHMCS with "Pages Manager." Experience unrivaled customization, enhanced user experience, and a level of personalization that will leave a lasting impression on your clients. Take control of your WHMCS frontend and embark on a journey of limitless possibilities.
Currently, "Pages Manager" offers the following widgets:
- Text Editor TinyMCE: a widely recognized text editor that provides limitless possibilities for textual and graphical content on your website.
- Domain Search: a widget that allows clients to search for desired domains and redirect them to the domain ordering page.
- Domain TLD: a visually appealing widget showcasing a list of domain TLDs, complete with prices and promotions.
- Slider Logos: an advertising slider displaying the logos of your business partners and affiliations.
- Product Cards: a configurable widget that beautifully presents and showcases groups of products on your website.
- Team Slide: a widget that enables you to create staff cards to showcase your team on your company information page.
We are continuously developing and implementing additional widgets, and we are open to your suggestions for new widget ideas.
Configuration
PUQ Customization module WHMCS
Order now | Download | FAQ
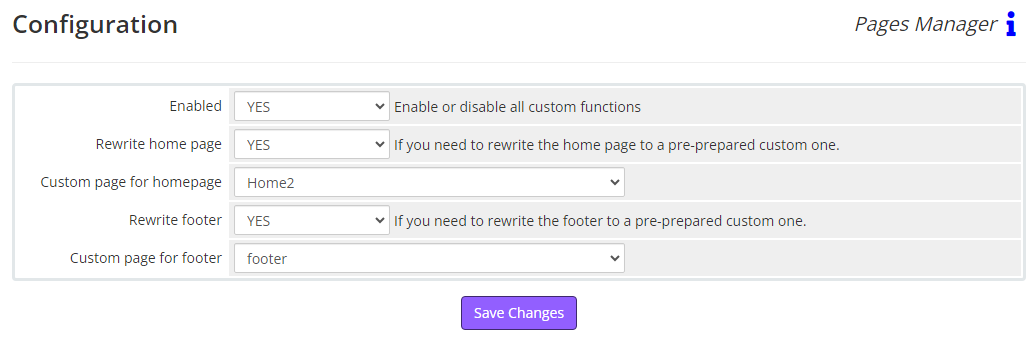
Enabled - Enabling or disabling all custom functions of this extension affects the automation and visibility of its features in the client area. When extension disabled, the automation capabilities and related features provided by the extension will not be active or visible to clients. However, as an administrator, you will still have access to configure and utilize the extension's functionalities through the administration interface. This gives you the flexibility to control the visibility and automation aspects of the extension based on your specific needs and preferences.
Rewrite home page - If you need to rewrite the home page to a pre-prepared custom one.
Rewrite footer - If you need to rewrite the footer to a pre-prepared custom one.
Rewrite domain link - If you need to rewrite the footer to a pre-prepared custom one.
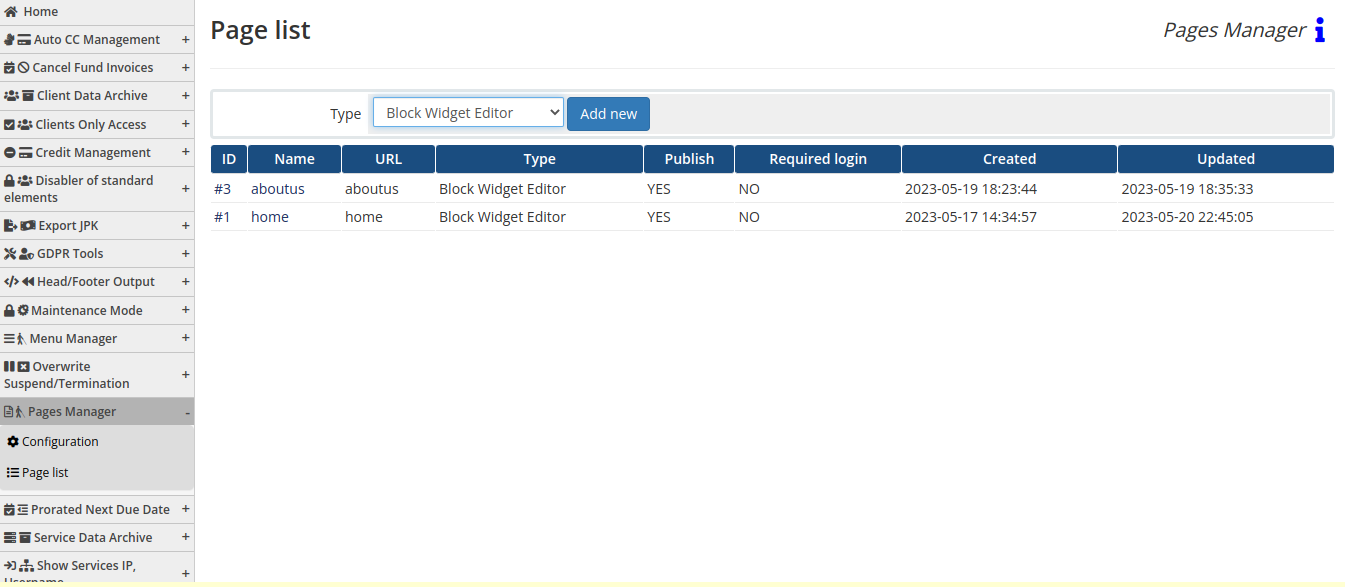
Page list
PUQ Customization module WHMCS
Order now | Download | FAQ

On the Page List page, you will find a comprehensive list of your custom pages. The table includes the following fields: ID, Name, URL, Type, Publish, Required login, Created, and Updated.
To create a new custom page, simply select the desired type for the page and click the "Add New" button. This will initiate the process of creating a unique page tailored to your specific needs.
Add New Page
PUQ Customization module WHMCS
Order now | Download | FAQ
To create a new custom page, simply select the desired type for the page and click the "Add New" button. This will initiate the process of creating a unique page tailored to your specific needs.
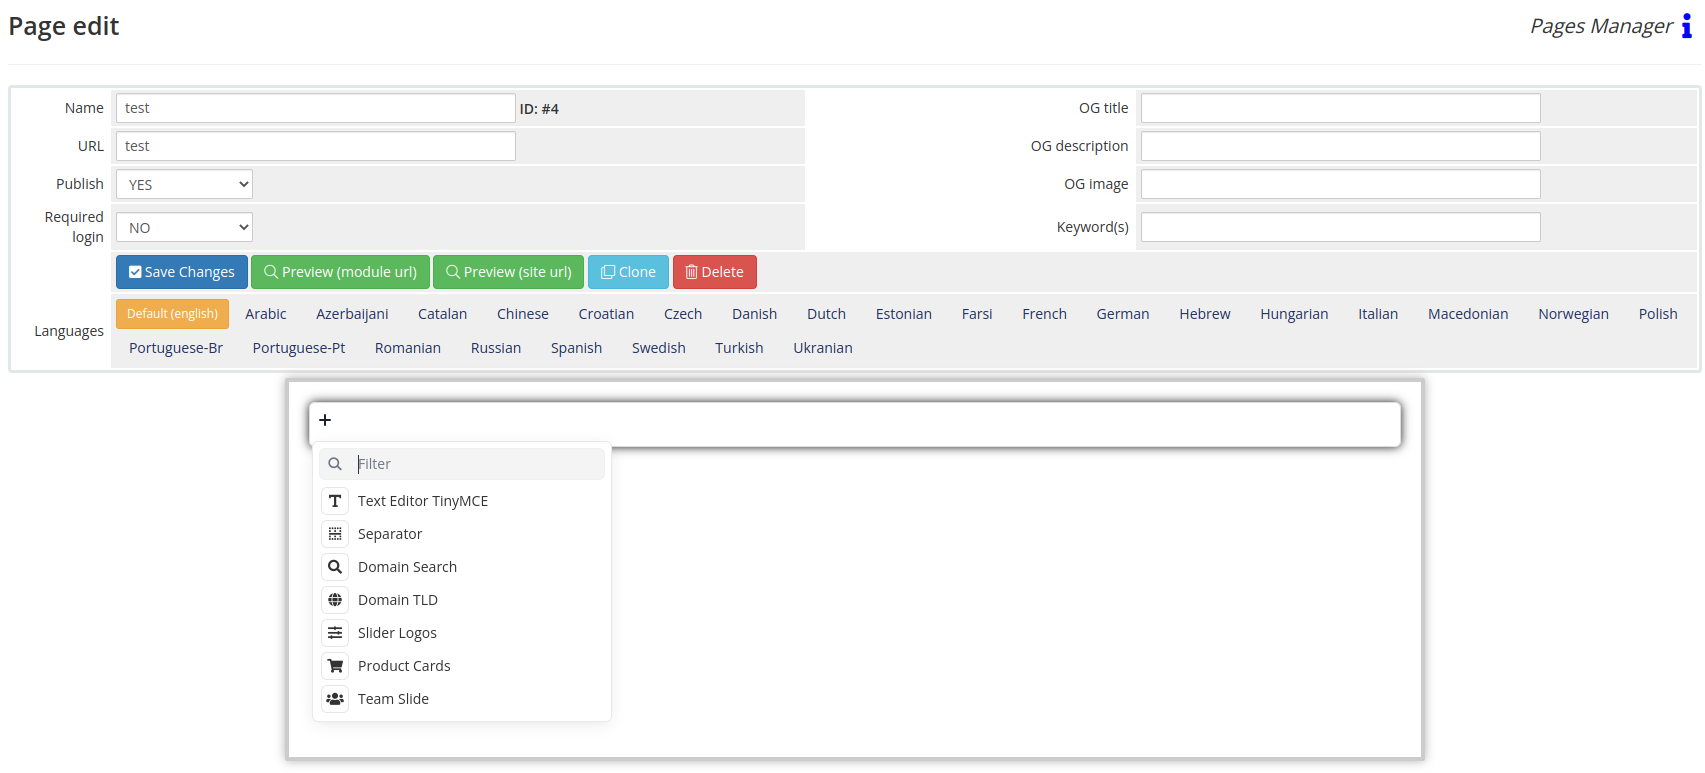
To edit the newly created page and configure it for each language separately, please follow these instructions:
-
Locate the custom page you want to edit in the Page List table.
-
Find the corresponding row for the page and click on the page's name or edit button (if available) to access the page editing interface.
-
In the editing interface, you will find fields to modify the page details.
-
Update the "Name" field with the desired name for your page.
-
Set the "URL" field to your preferred URL slug, for example, "home" (without spaces or special characters).
-
Set the "Publish" parameter to "Yes" to make the page visible on your website.
-
Additionally, you have the option to enter the following parameters for better SEO optimization:
- "OG title": Specify the Open Graph title for the page.
- "OG description": Provide an Open Graph description for the page.
- "OG image": Enter the URL or select an image for the Open Graph representation.
- "Keyword(s)": Add relevant keywords for the page, separated by commas.
-
If you have multiple languages enabled in WHMCS, you will see language tabs or a language dropdown menu in the editing interface.
-
Select the desired language tab or choose the appropriate language from the dropdown menu.
-
Modify the page content, settings, and SEO parameters specifically for the selected language.
-
Repeat steps 9 and 10 for each language you want to customize the page for.
-
Once you have finished editing the page for all desired languages, save your changes.
By following these instructions, you can edit and configure the custom page individually for each language, allowing you to provide tailored content and settings to your website visitors based on their language preferences.
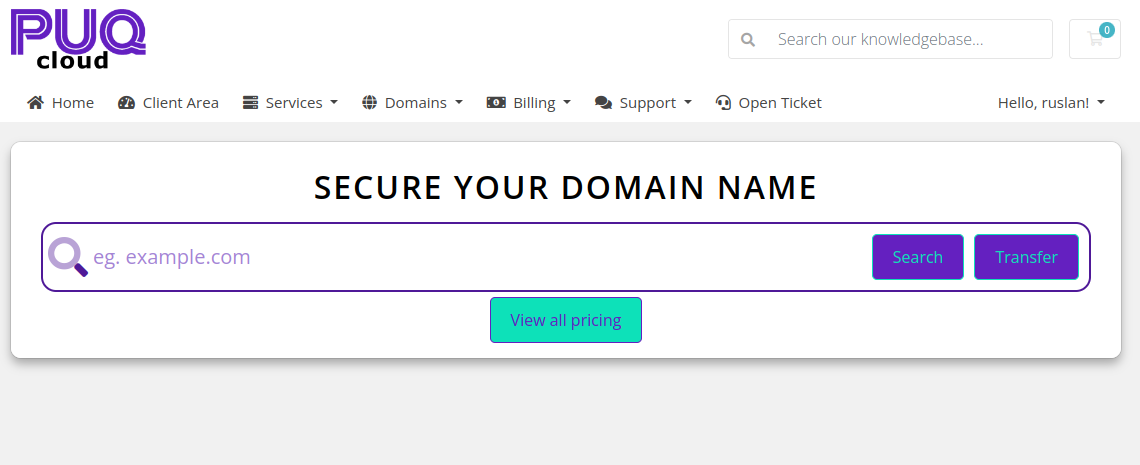
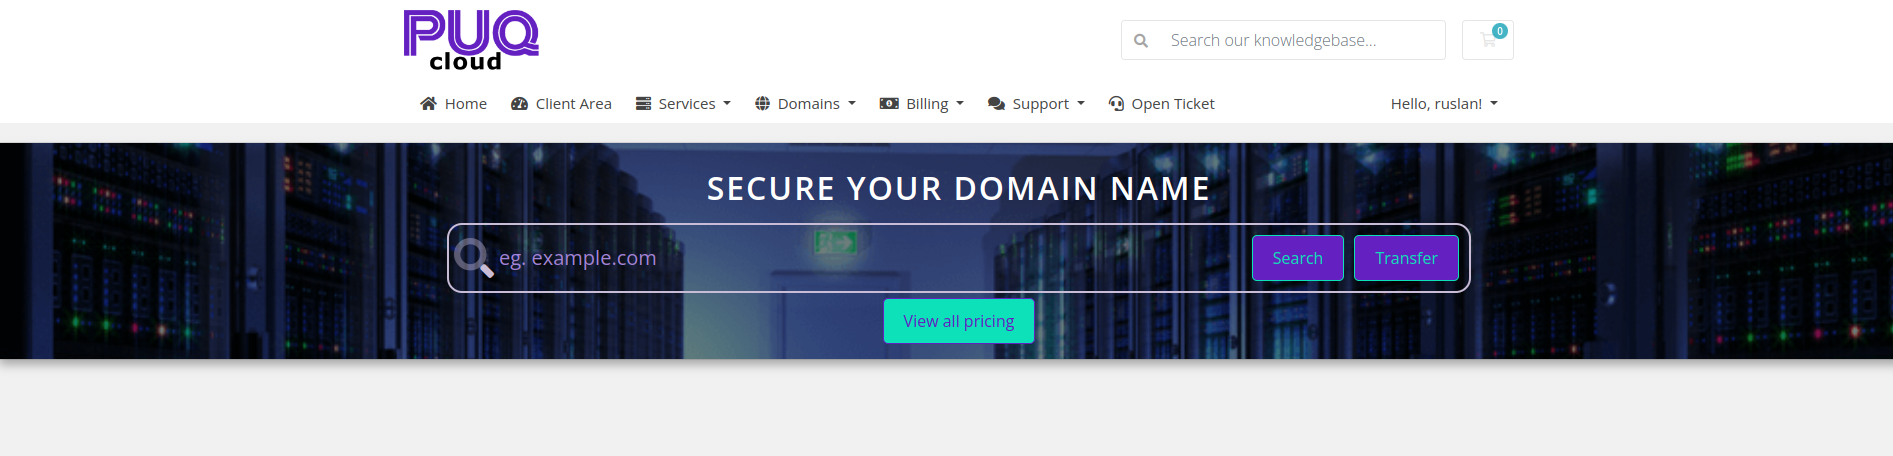
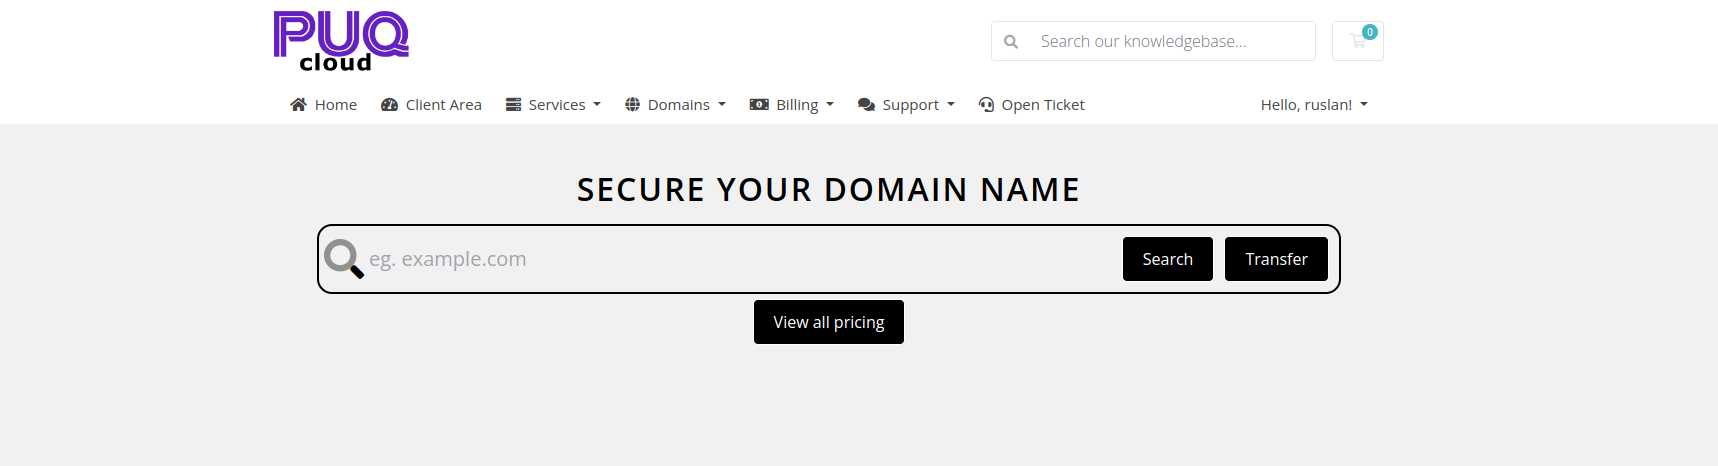
Widget Domain Search
PUQ Customization module WHMCS
Order now | Download | FAQ
Аdmin configuration
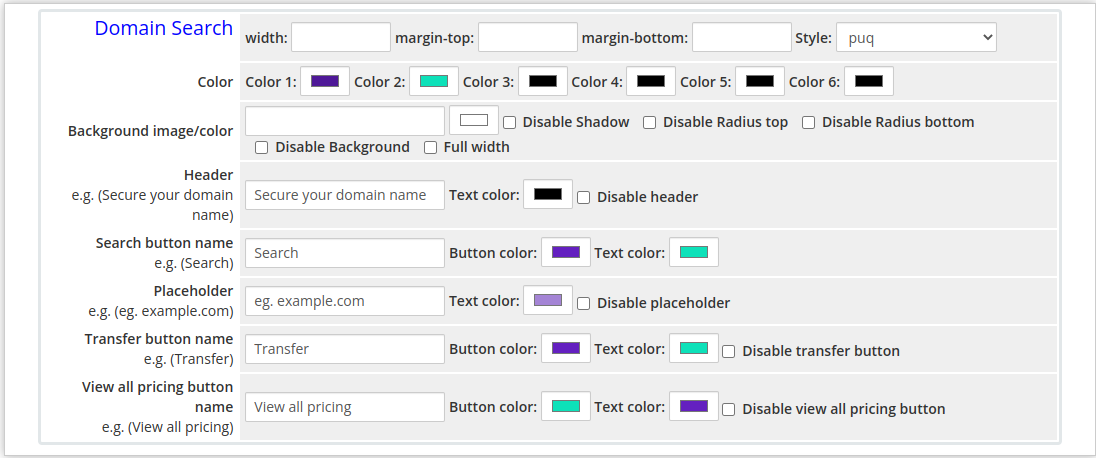
Example of how the widget might look in the client area, all colors and sizes are customizable.
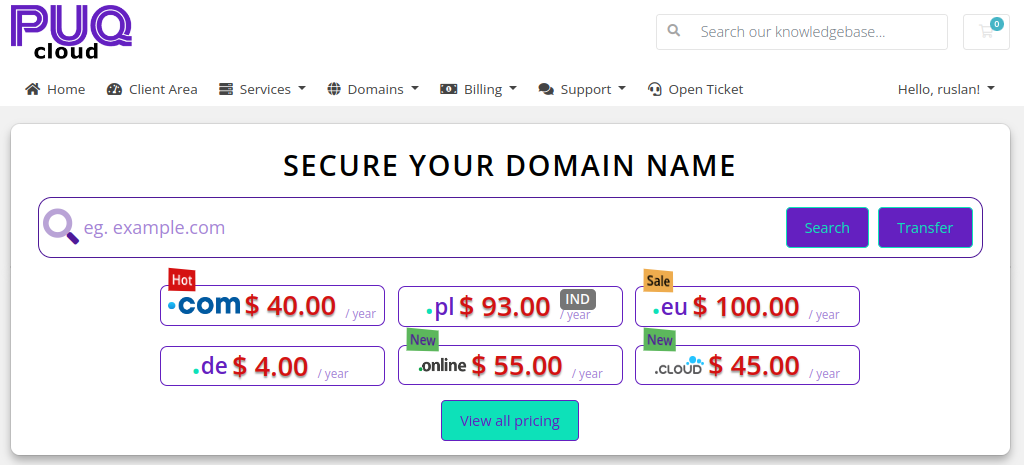
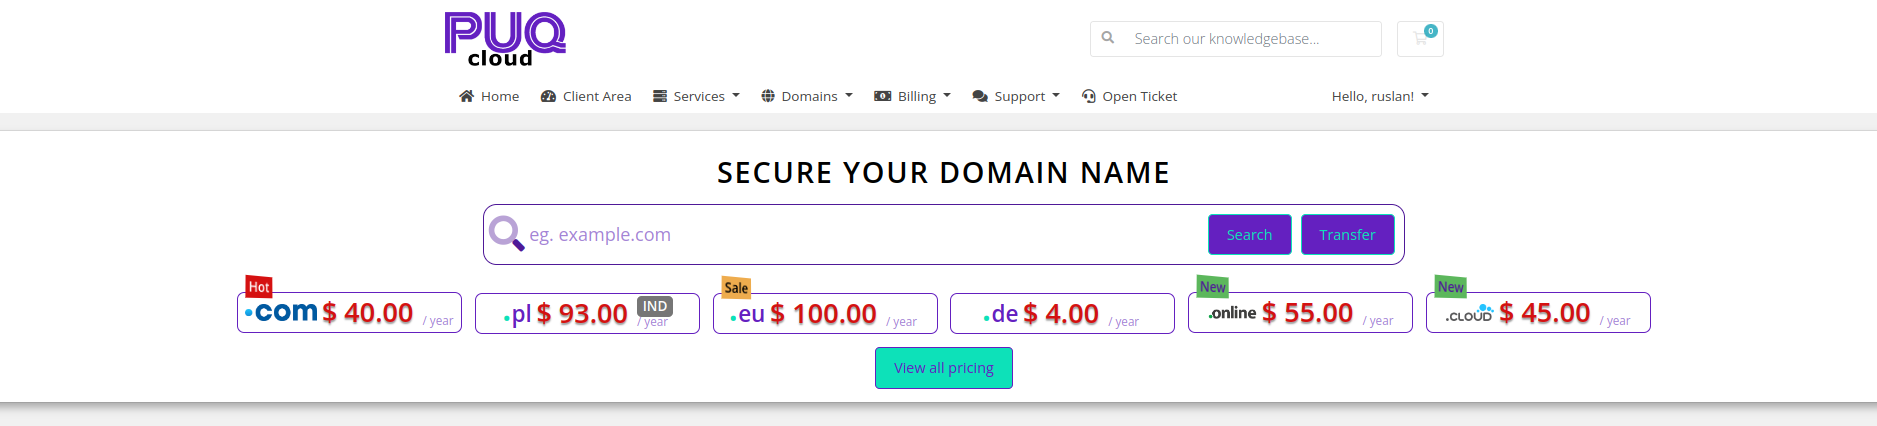
Widget Domain TLD
PUQ Customization module WHMCS
Order now | Download | FAQ
Аdmin configuration
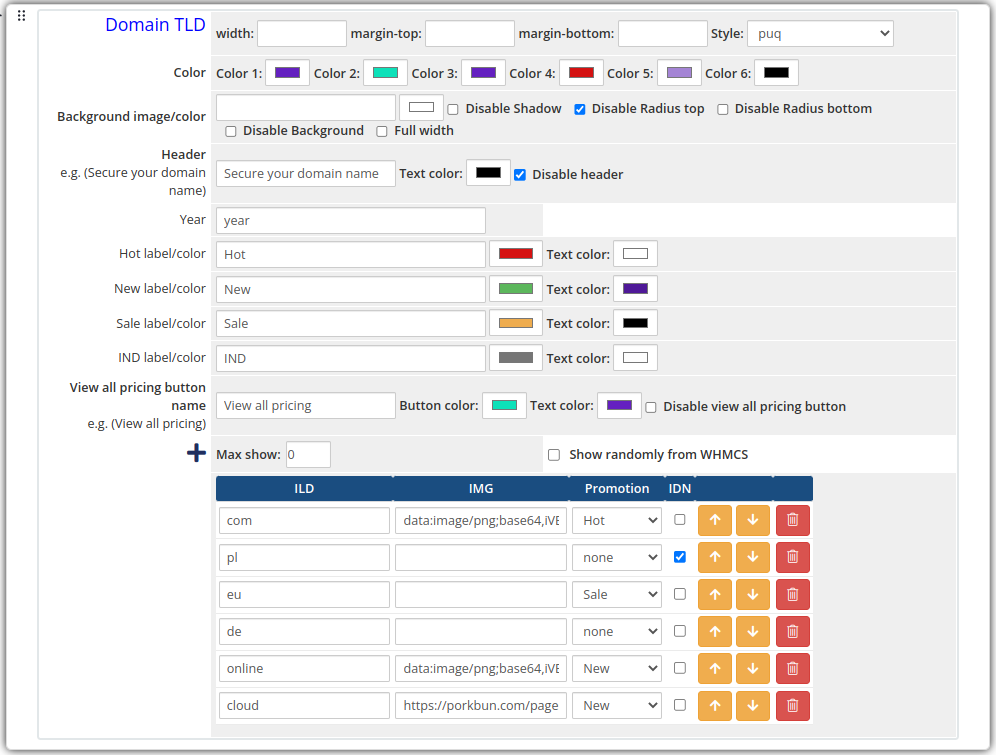
Example of how the widget might look in the client area, all colors and sizes are customizable.

Widget Product Cards
PUQ Customization module WHMCS
Order now | Download | FAQ
Аdmin configuration
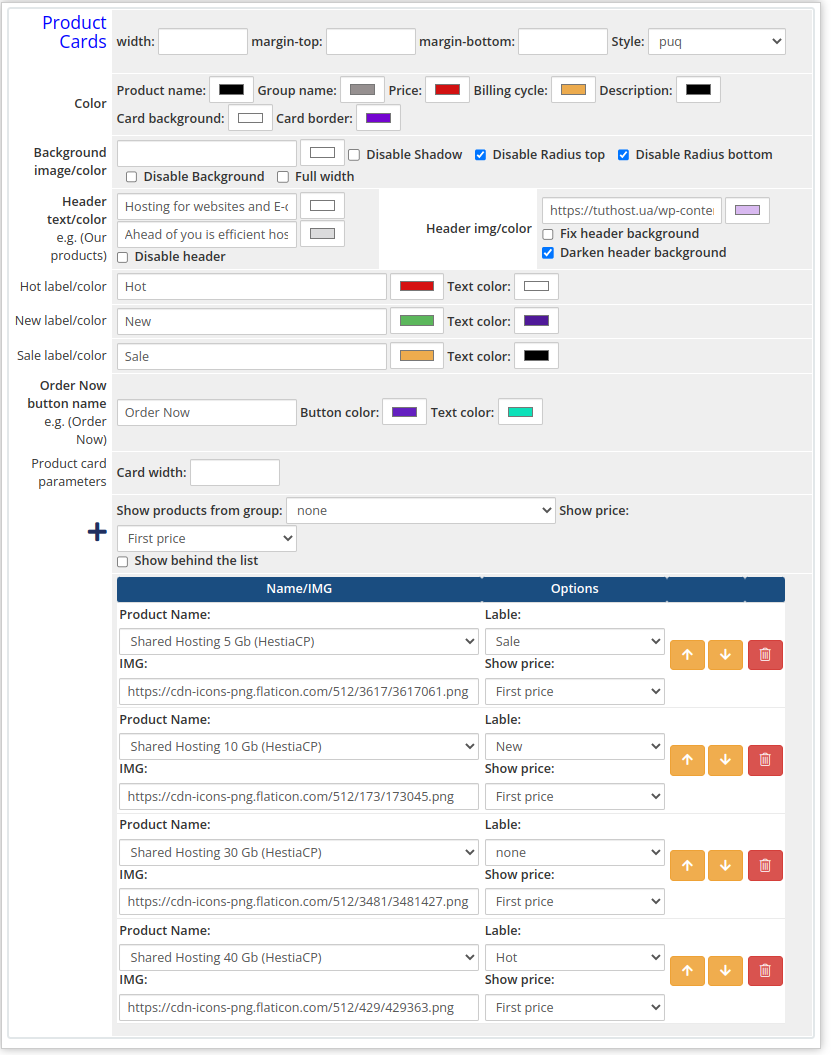
Example of how the widget might look in the client area, all colors and sizes are customizable.


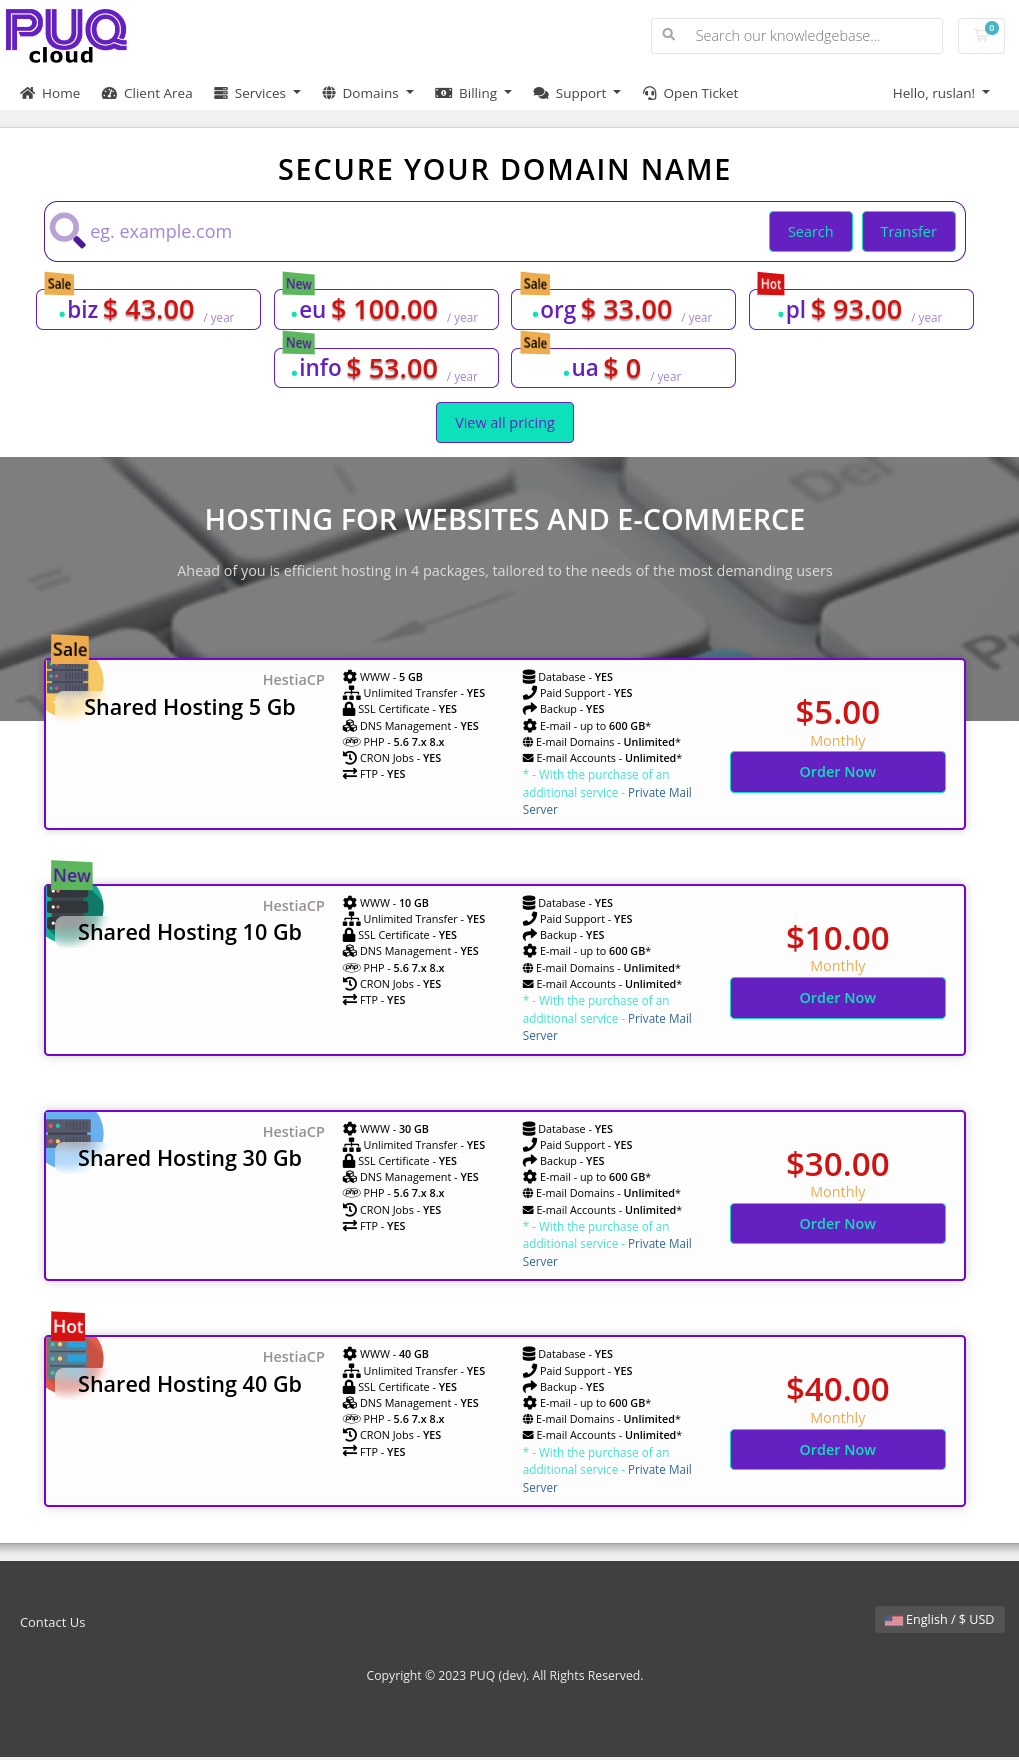
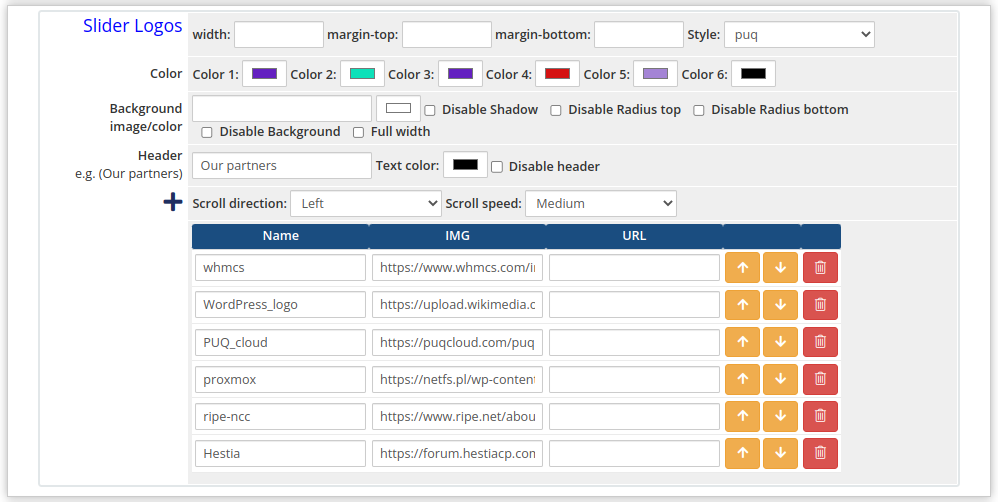
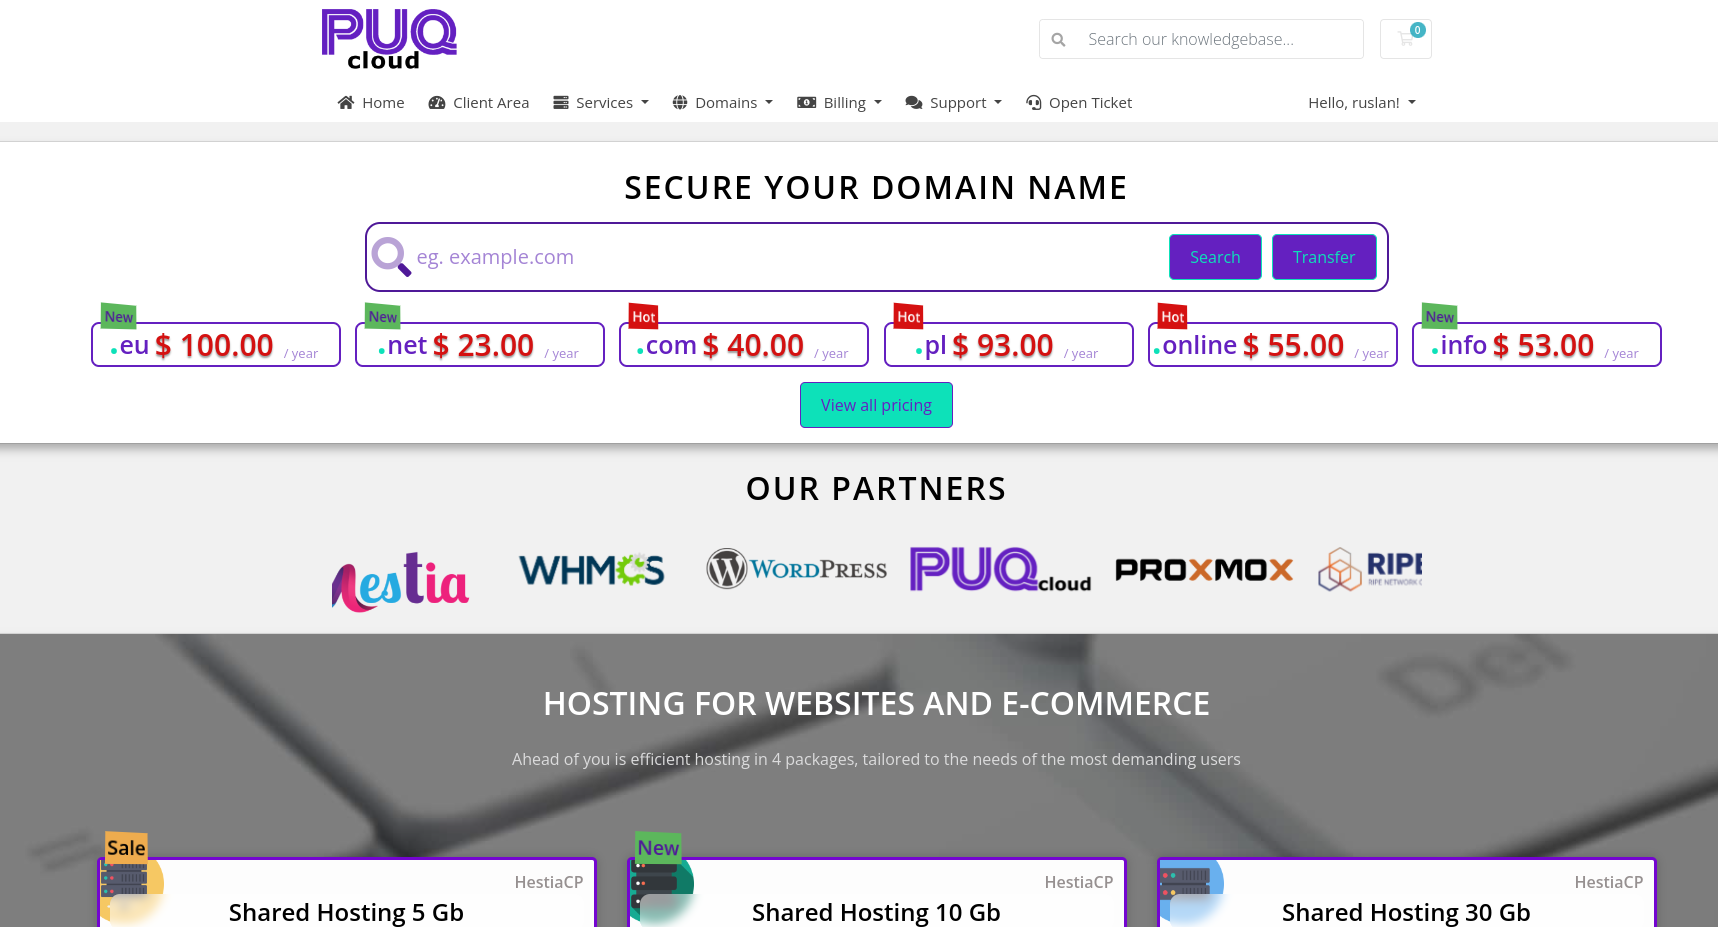
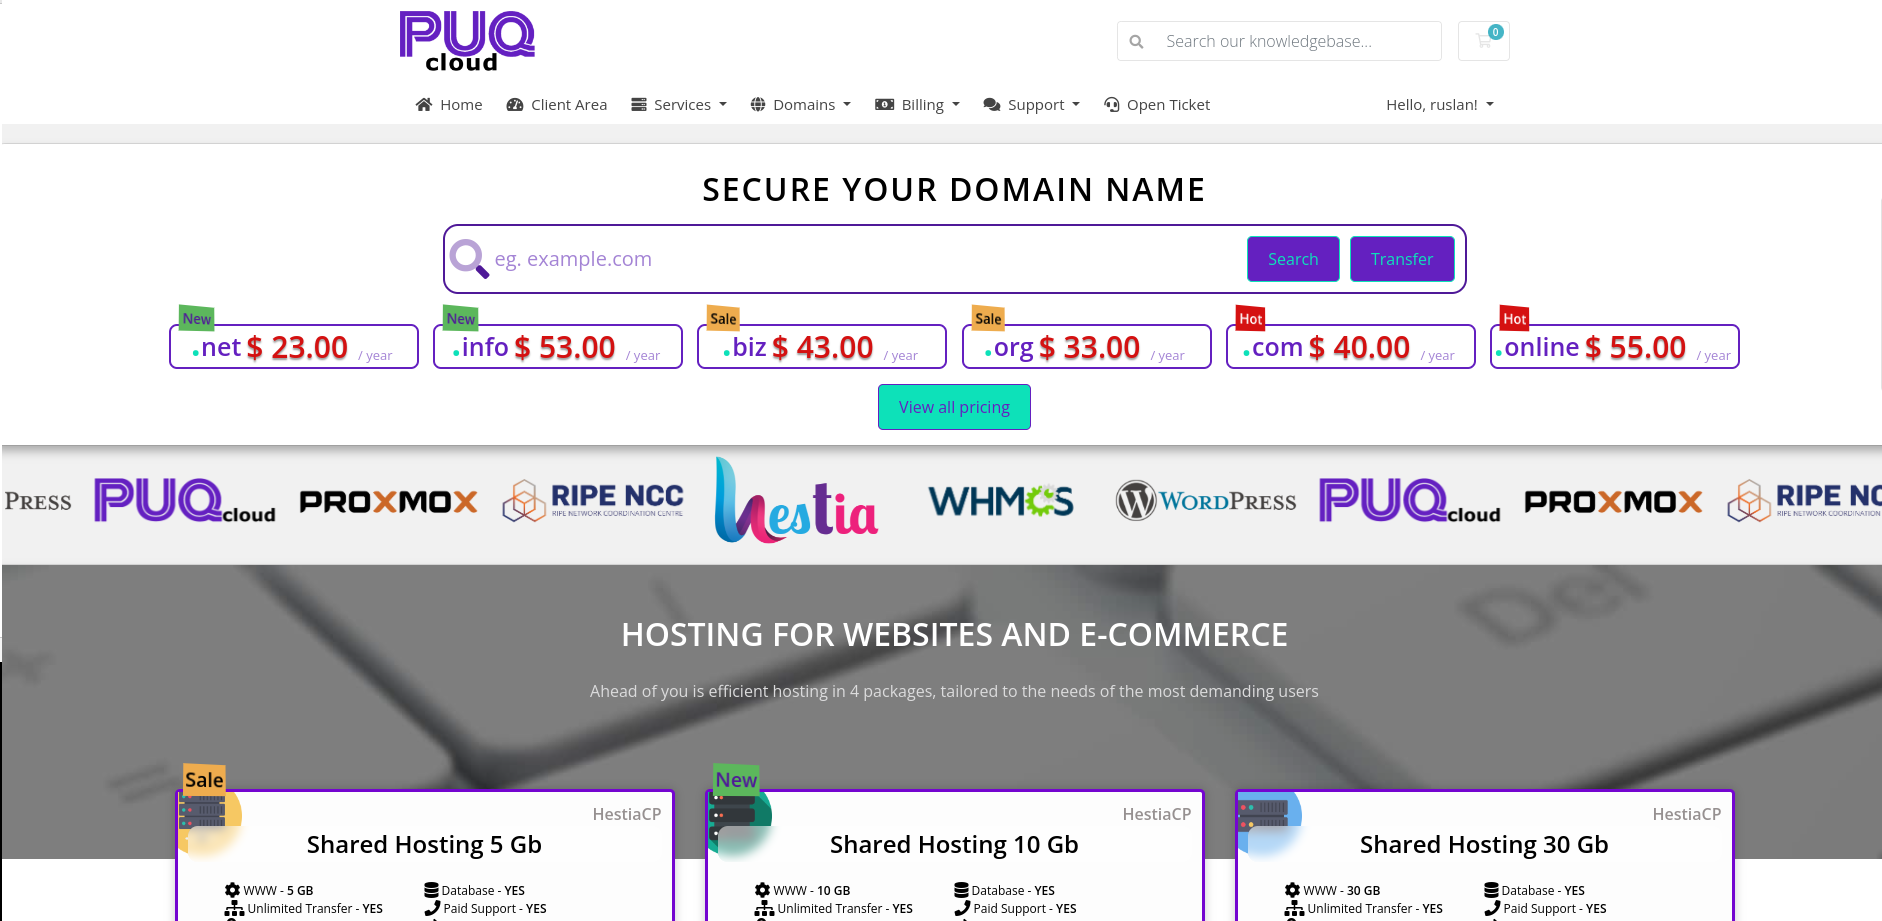
Widget Slider Logos
PUQ Customization module WHMCS
Order now | Download | FAQ
Аdmin configuration
Example of how the widget might look in the client area, all colors and sizes are customizable.
Widget Team Slide
PUQ Customization module WHMCS
Order now | Download | FAQ
Аdmin configuration

Example of how the widget might look in the client area, all colors and sizes are customizable.


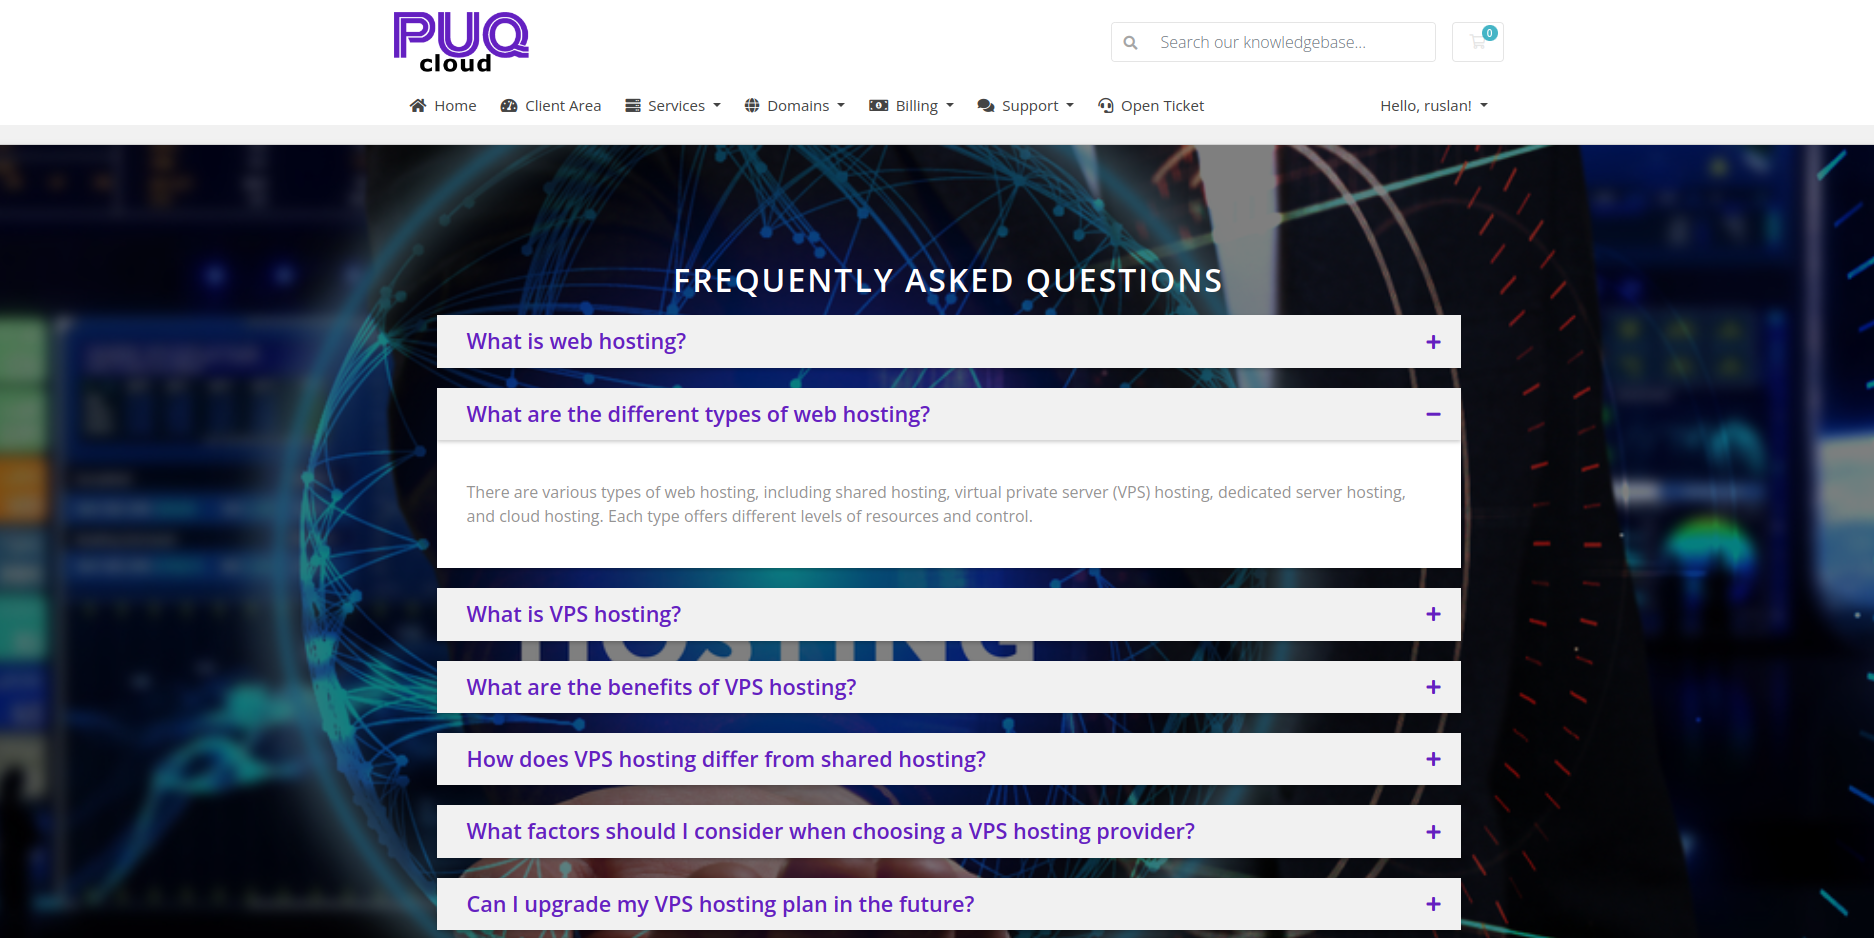
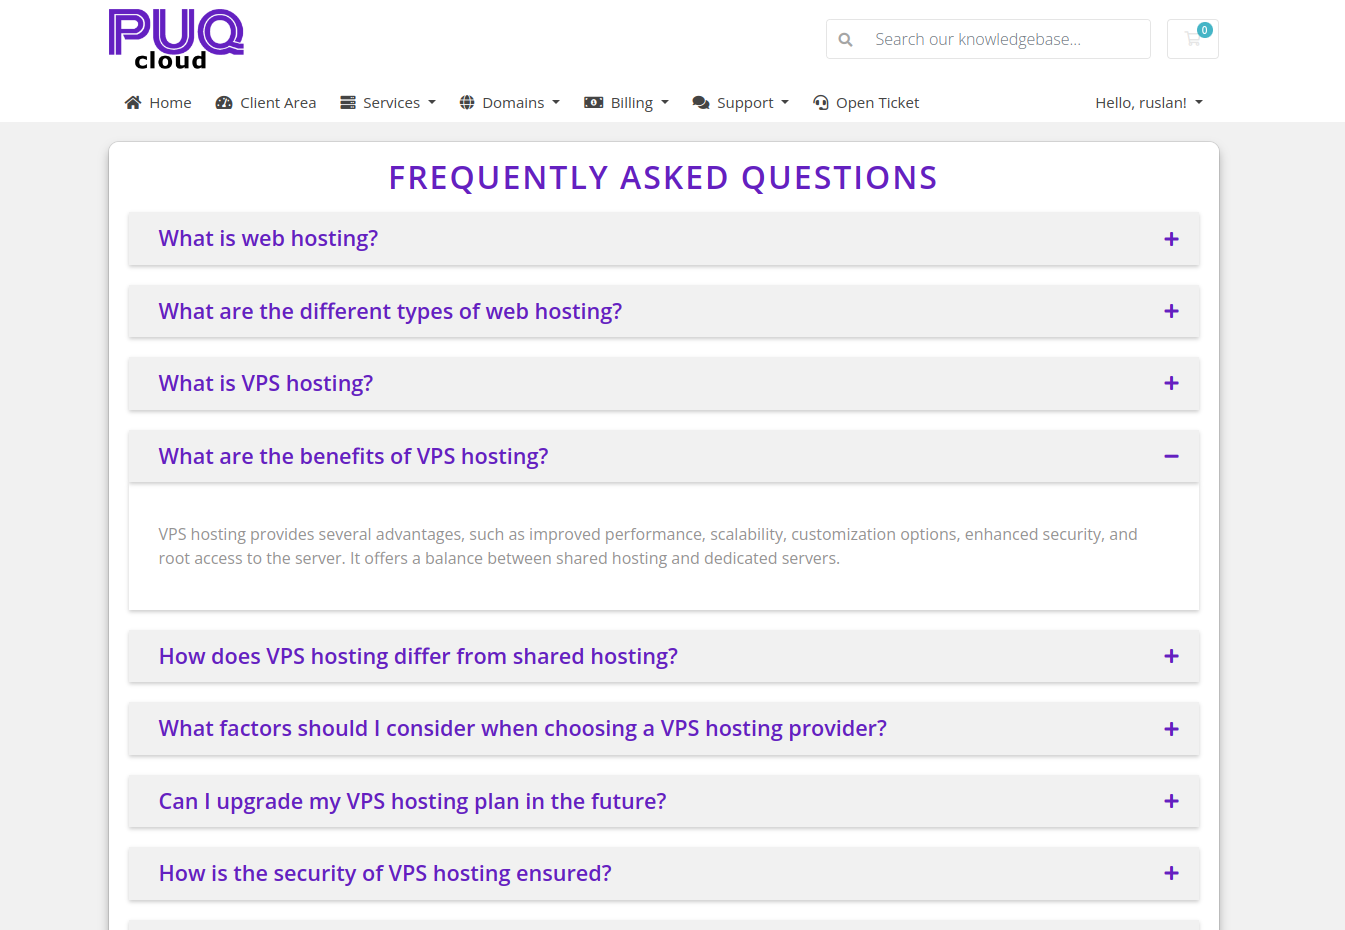
Widget Question Answer
PUQ Customization module WHMCS
Order now | Download | FAQ
Аdmin configuration
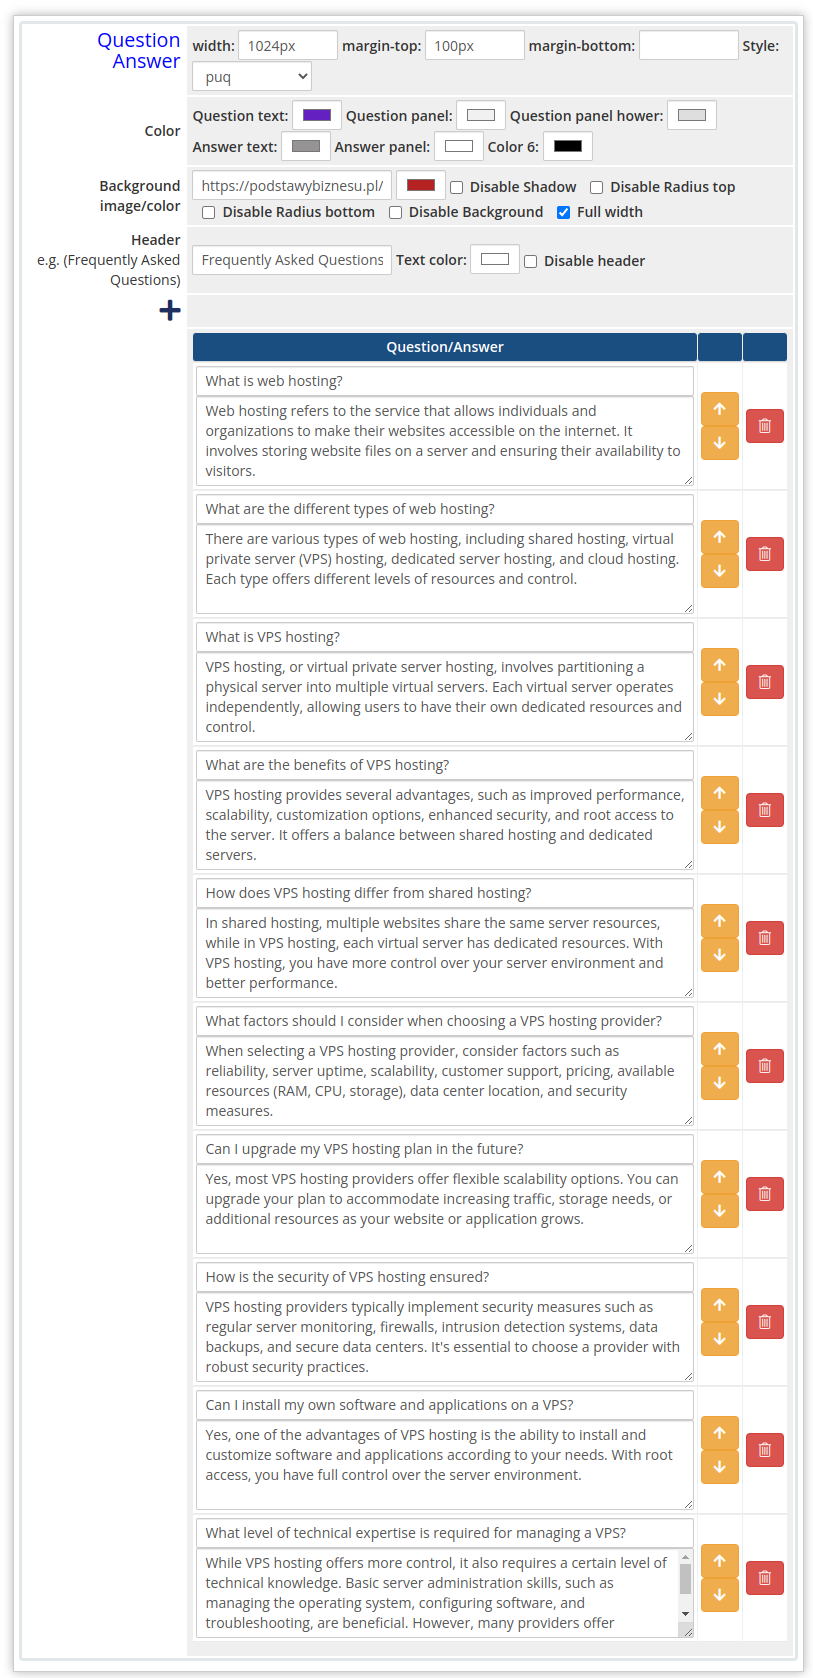
Example of how the widget might look in the client area, all colors and sizes are customizable.
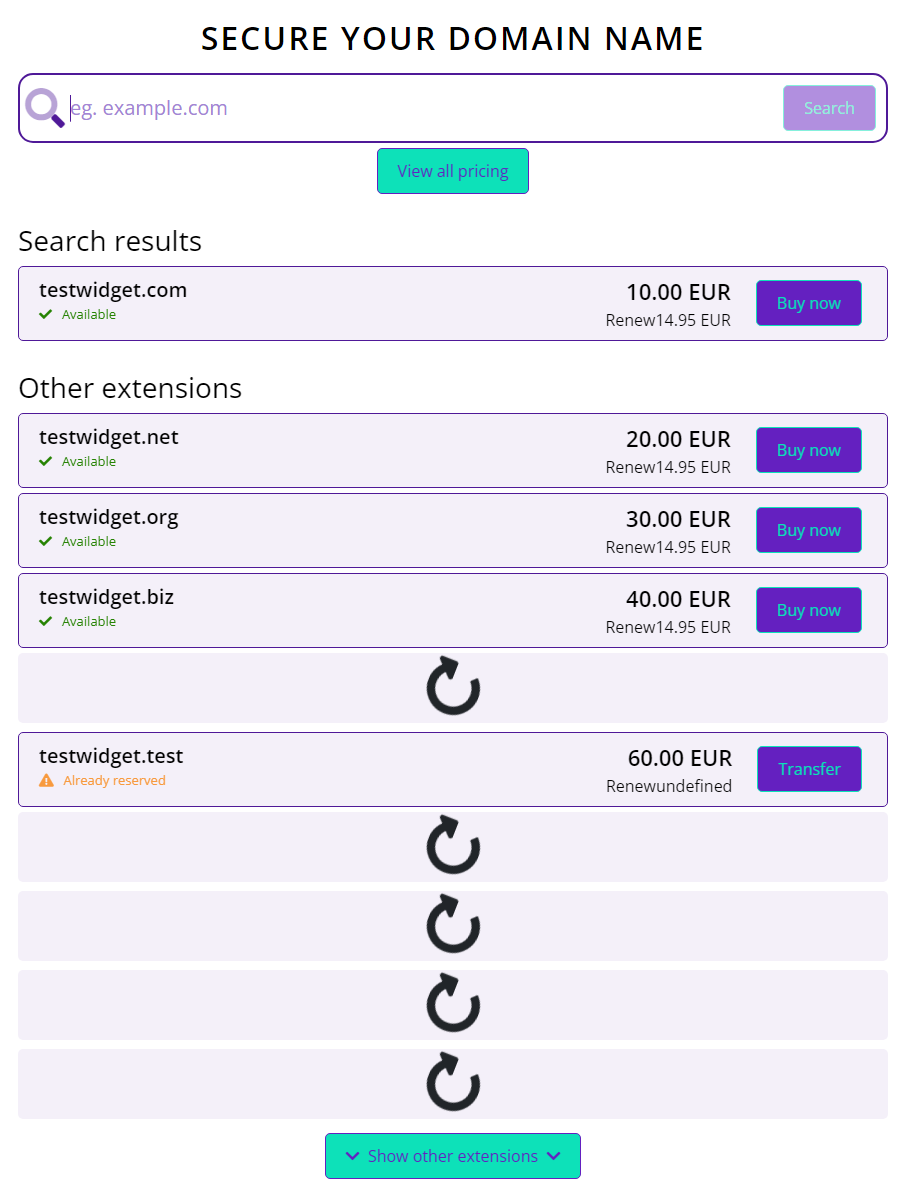
Widget Intelligent Domain Search
PUQ Customization module WHMCS
Order now | Download | FAQ
Аdmin configuration
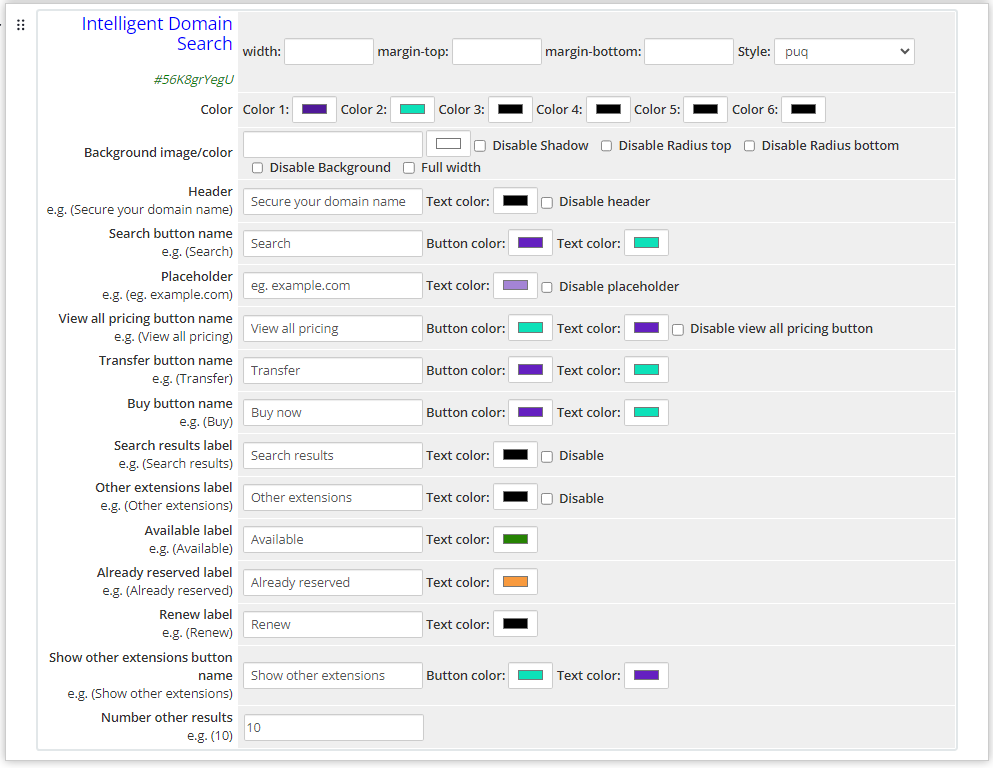
Example of how the widget might look in the client area, all colors and sizes are customizable.
Account Statement
Description
PUQ Customization module WHMCS
Order now | Download | FAQ
Account Statement
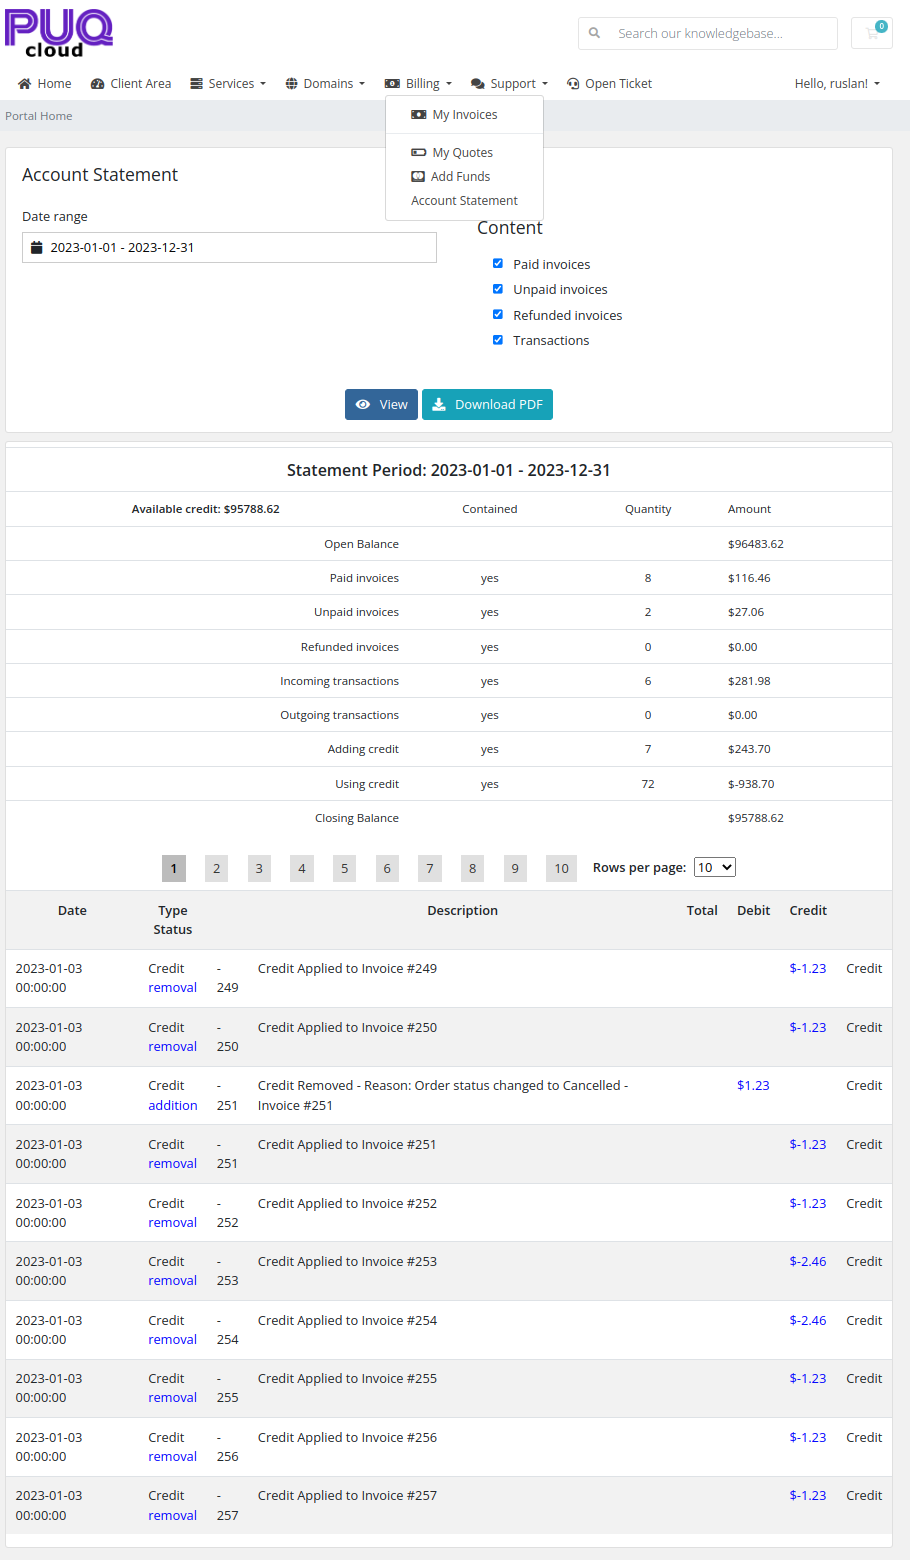
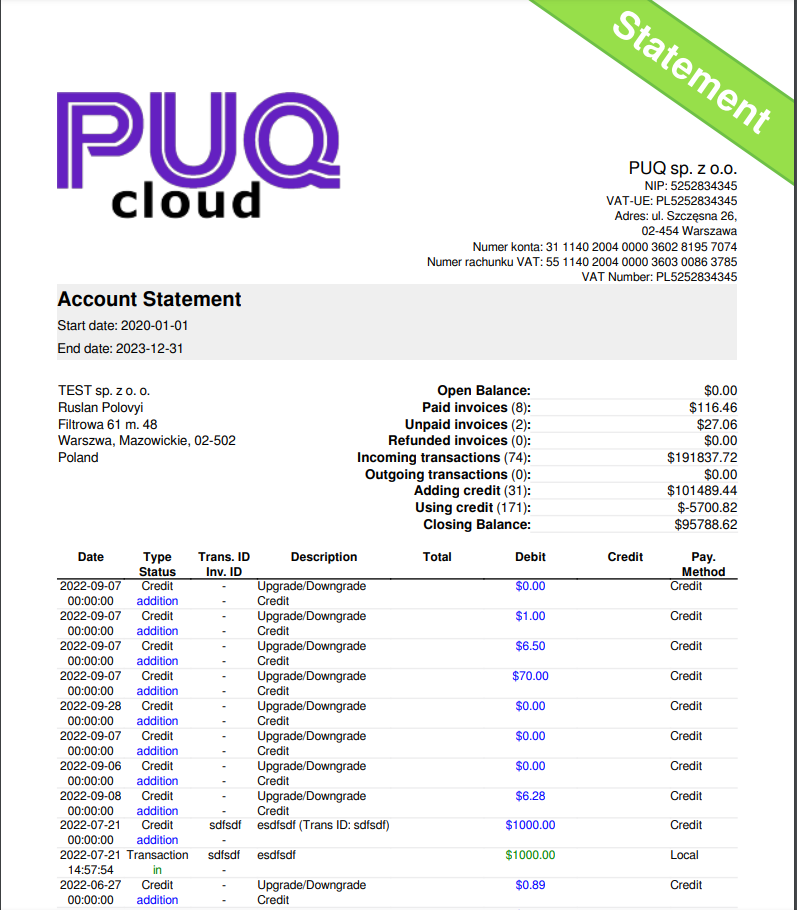
The "Account Statement" extension provides both administrators and clients with the ability to generate a statement summarizing their financial activities within the WHMCS system. This statement can be viewed as an HTML page or downloaded as a PDF file, offering flexibility and convenience. The extension allows users to access information on paid invoices, unpaid invoices, refunded invoices, transactions, and credits.
The "Account Statement" extension enhances the functionality of WHMCS by allowing administrators and clients to generate comprehensive financial statements. With the ability to view statements in HTML or download them as PDF files, users can conveniently track and review their financial activities within the system. The extension's flexible configuration options further enhance its usability and adaptability to suit individual needs.
Configuration
PUQ Customization module WHMCS
Order now | Download | FAQ
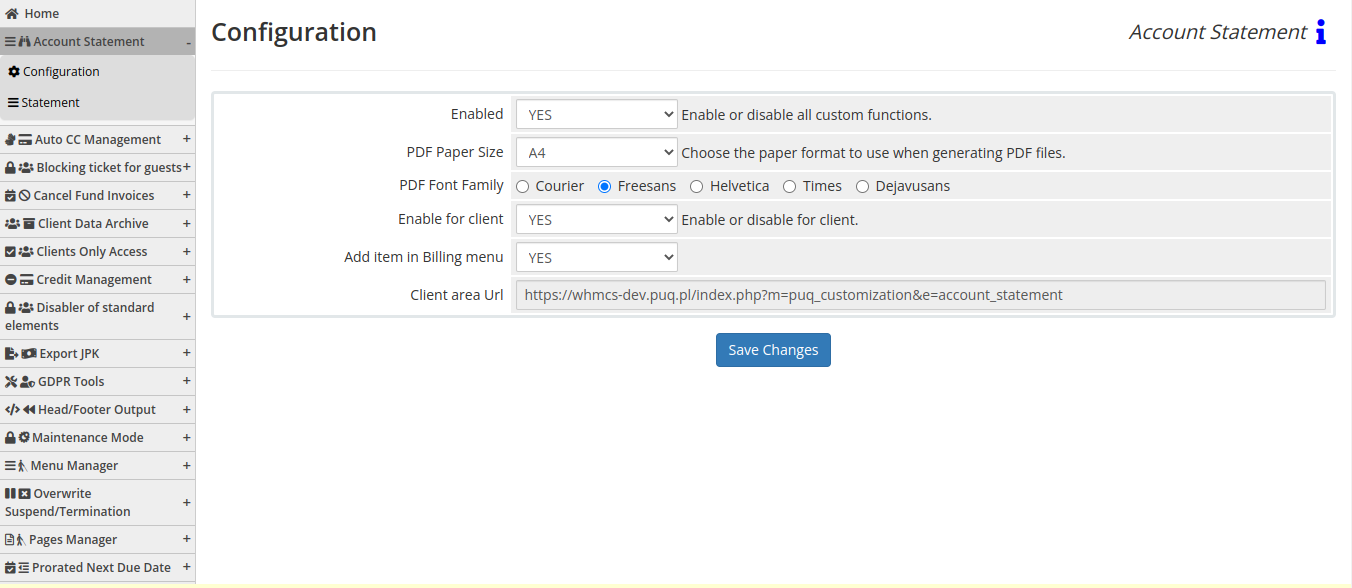
Enabled - Enabling or disabling all custom functions of this extension affects the automation and visibility of its features in the client area. When extension disabled, the automation capabilities and related features provided by the extension will not be active or visible to clients. However, as an administrator, you will still have access to configure and utilize the extension's functionalities through the administration interface. This gives you the flexibility to control the visibility and automation aspects of the extension based on your specific needs and preferences.
The "Account Statement" extension offers various configuration options to customize its functionality. To configure the extension, follow the steps below:
Configuring PDF Options: The following options allow you to customize the PDF generation settings:
-
PDF Paper Size: Choose the preferred paper format for generating PDF files. Select either A4 or Letter.
- If you prefer the A4 paper size, select "A4" from the dropdown menu.
- If you prefer the Letter paper size, select "Letter" from the dropdown menu.
-
PDF Font Family: Select the font family to use in the PDF statement. Choose from the available options: Courier, Freesans, Helvetica, Times, Dejavusans.
- Select the desired font family that best suits your preferences and formatting requirements.
Client Configuration: The following option allows you to control the visibility and availability of the account statement feature for clients:
- Enable for client: Specify whether the account statement feature should be enabled or disabled for clients.
- Select "YES" to enable the account statement feature for clients.
- Select "NO" to disable the account statement feature for clients.
- Add item in Billing menu: Decide whether you want to include a dedicated item in the billing menu.
- Select "YES" to add a menu item for quick access to the account statement.
- Select "NO" to exclude the account statement from the billing menu.
Additional Information: If you need to access the client area URL related to the account statement, you can use the following URL:
- Client area URL
Remember to save your configuration changes once you have completed the desired settings adjustments.
Conclusion: By configuring the options provided by the "Account Statement" extension, you can customize the PDF generation settings, control client access to the feature, and integrate the account statement within the billing menu, tailoring it to your specific requirements and preferences.
Admin Area
PUQ Customization module WHMCS
Order now | Download | FAQ
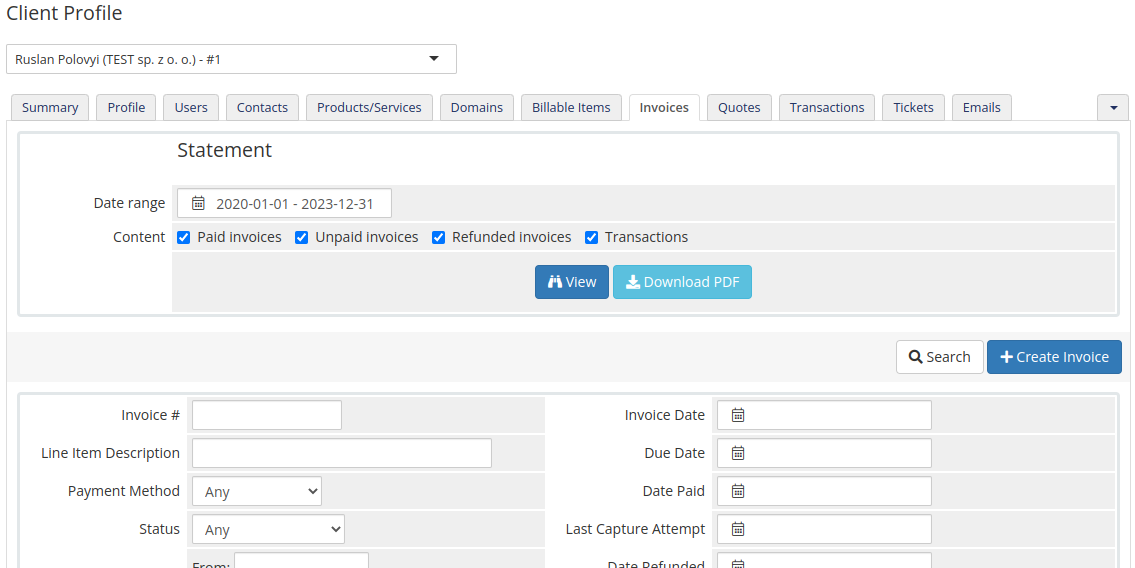
As an administrator, you have access to generate an account statement through the client's profile in the "Invoices" tab. To generate an account statement, follow the steps below:
- Log in to your WHMCS admin area.
- Navigate to the client's profile for whom you want to generate the account statement.
- Click on the "Invoices" tab within the client's profile.
Generating the Account Statement:
-
Specify the desired date range for the account statement by entering the start and end dates in the provided field.
-
Select the data you want to include in the account statement. You can choose from the following options:
- Paid Invoices
- Unpaid Invoices
- Refun
- ded Invoices
- Transactions
- Credits
-
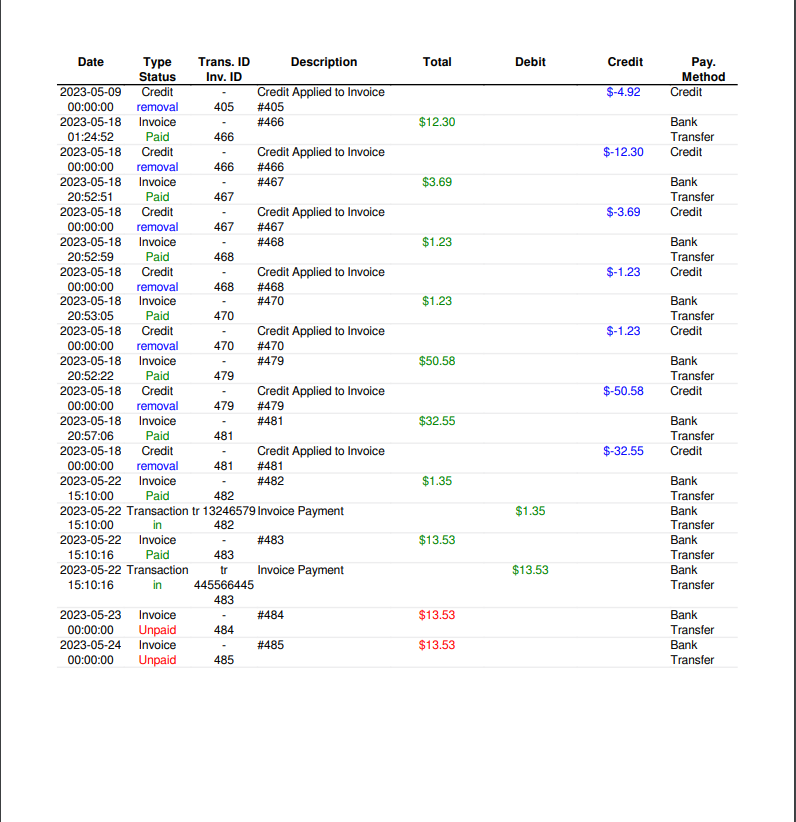
Once you have selected the desired options, click on the "View" or "Download PDF" button.
- If you click "View," the account statement will be displayed as an HTML page.
- If you click "Download PDF," the account statement will be generated as a downloadable PDF file.
-
Review the generated account statement, which will include the selected data within the specified date range.
Note: The account statement provides a comprehensive overview of the client's financial activity based on the selected criteria.
By following these steps, you can generate and view/download the account statement for the selected client, allowing you to review their financial information and activity within the specified date range.


Client Area
PUQ Customization module WHMCS
Order now | Download | FAQ
Generating Account Statement as a Client
-
Log in to your client area using your login credentials.
-
In the main navigation menu, locate the "Billing" section and click on it.
-
In the dropdown menu, find and select "Account Statement".
-
You will be redirected to the "Account Statement" page where you can configure the statement.
-
Enter the desired date range in the respective fields. You can choose the start and end dates to define the period for which you want to generate the account statement.
-
Check the relevant content options for the statement. Available options include "Paid invoices," "Unpaid invoices," "Refunded invoices," and "Transactions."
-
Once you have entered the date range and selected the content options, click the "View" button to see the statement in a tabular format, which will be displayed in the same window.
-
If you prefer to save the statement as a PDF file, click the "Download PDF" button. The PDF file will be downloaded to your device.
-
After you have finished using the account statement page, remember to log out of your client area, especially if you are on a shared computer or using a device accessible to others.
Please note that the account statement generation functionality is subject to your permissions and access rights in the WHMCS system. If you have any questions or issues, please reach out to your account administrator or customer support for assistance.

Auto CC Management
The Auto CC Management extension empowers customers with the ability to conveniently enable or disable automatic credit card payments. This feature offers flexibility and control over their payment preferences, allowing them to manage their payment methods according to their specific needs. With the Auto CC Management extension, customers can easily toggle the automatic credit card payment option on or off, providing them with a seamless payment experience tailored to their preferences.
Description
PUQ Customization module WHMCS
Order now | Download | FAQ
CC Management
Auto CC Management is a powerful extension included in the PUQ Customization module.
With Auto CC Management, your clients have the ability to enable or disable automatic credit card payments. This means that they can choose whether they want their payments to be processed automatically using their saved credit card information or if they prefer to make manual payments each time.
The extension offers several key functionalities:
Easy Activation: Clients can activate the Auto CC feature during the registration process, ensuring a seamless and automated payment experience right from the start.
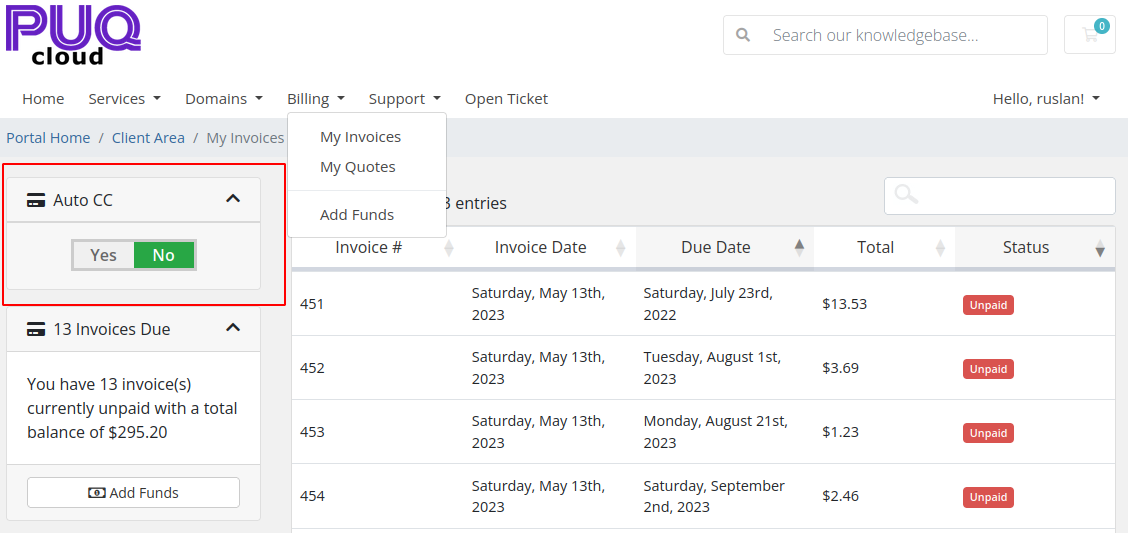
Client Control: The module provides a button widget in the client area, allowing clients to conveniently toggle the Auto CC functionality on or off at any time. This empowers them with the flexibility to manage their payment preferences according to their needs.
Global Management: As an administrator, you have the ability to enable or disable Auto CC for all clients with just one click. This centralized control simplifies the management of the feature across your entire client base.
Status Overview: The module offers a clear overview of the number of clients who have Auto CC enabled and disabled. This information gives you valuable insights into the adoption and usage of the automatic payment feature among your client base.
Configuration
PUQ Customization module WHMCS
Order now | Download | FAQ
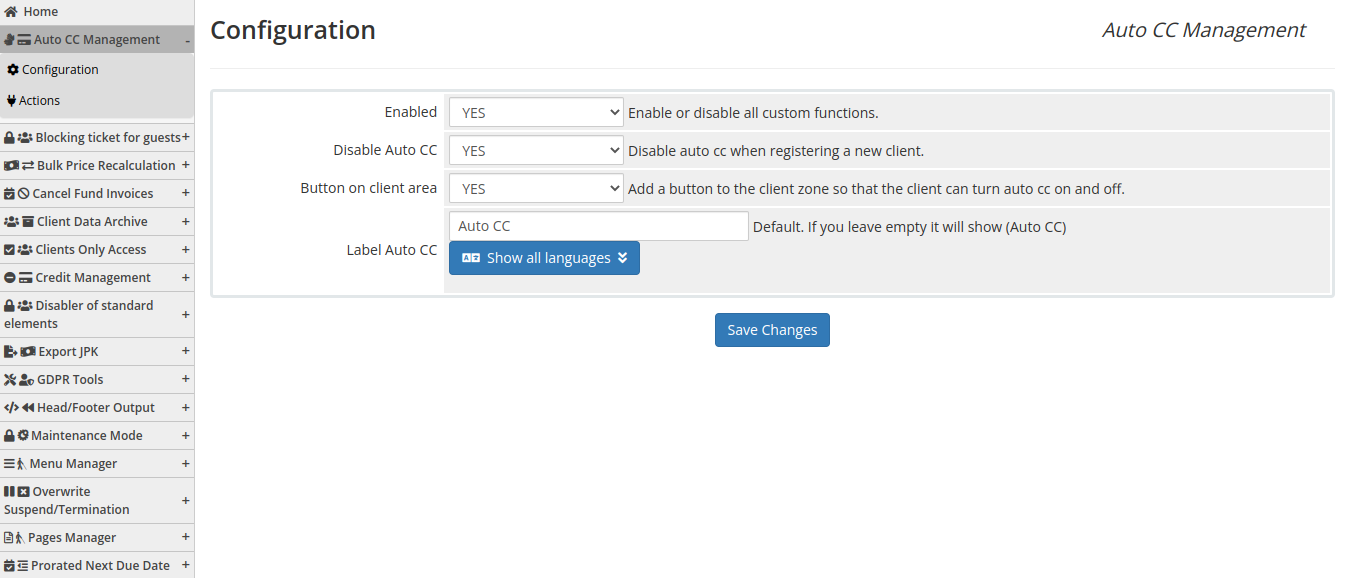
Enabled - Enabling or disabling all custom functions of this extension affects the automation and visibility of its features in the client area. When extension disabled, the automation capabilities and related features provided by the extension will not be active or visible to clients. However, as an administrator, you will still have access to configure and utilize the extension's functionalities through the administration interface. This gives you the flexibility to control the visibility and automation aspects of the extension based on your specific needs and preferences.
Disable Auto CC - The option to enable or disable the Auto CC function is available for users during the registration process. When enabled, users registering on the platform will have the Auto CC feature activated by default, allowing automatic credit card payments. On the other hand, if the Auto CC function is disabled, users registering on the platform will not have the Auto CC feature enabled, and they will need to manually set up their payment methods for making payments.
Label Auto CC - The label that will be displayed in the client area, the default value will be displayed in case of not filling multilingual labels.
Actions
PUQ Customization module WHMCS
Order now | Download | FAQ
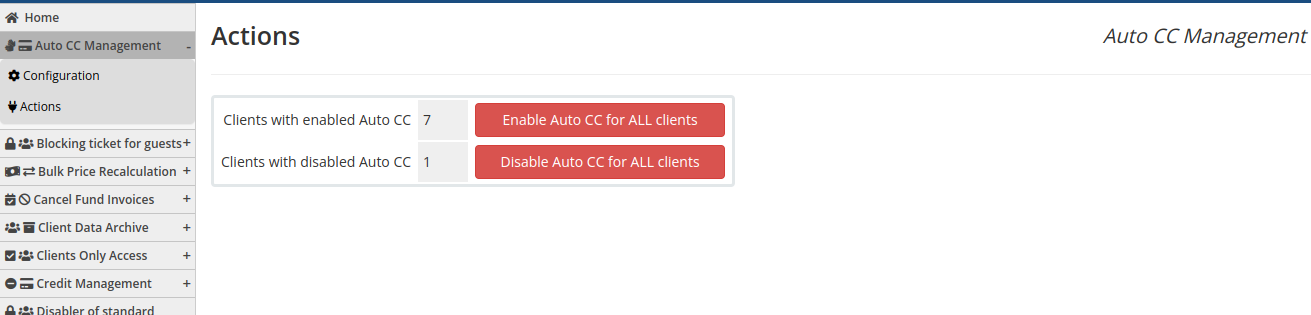
In the "Actions" menu, you have the option to enable or disable Auto CC for all clients with just one click. This convenient feature allows you to quickly toggle the Auto CC functionality globally, affecting all clients on the system.
Additionally, the menu provides a clear overview of the number of clients with Auto CC enabled and disabled. This information gives you a quick snapshot of how many clients have opted to use the Auto CC feature for automated credit card payments and how many have chosen to have it disabled.
Client Area
PUQ Customization module WHMCS
Order now | Download | FAQ
The widget in the client area is available on the "My Invoices" page.
Cancel Fund Invoices
The Cancel Fund Invoices extension, included in the PUQ Customization module, is designed to cancel or delete invoices generated for client credit top-ups.
Description
PUQ Customization module WHMCS
Order now | Download | FAQ
Cancel Fund Invoices
The "Cancel Fund Invoices" extension provides the ability to cancel or delete unpaid invoices for credit fund deposits generated by clients but not paid. This extension can be automated using a daily or each cron job.
In the extension settings, you can specify the desired action to be taken with the invoices. You can choose between canceling the invoice or deleting it. You can also configure the number of days of payment overdue after which the selected action will be performed, with separate parameters for cancellation and deletion.
The extension also offers a safe testing mode where you can preview information about the invoices that will be canceled or deleted. If needed, there is a button available to manually perform the cancellation action on the list of invoices, as well as a button for their deletion.
The "Cancel Fund Invoices" extension is part of our PUQ Customization module for WHMCS, providing additional functionality to customize the WHMCS system according to your business needs. It is one of the many extensions offered by our module, and you can easily enable or disable it as per your requirements to avoid conflicts with other modules from our competitors.
Configuration
PUQ Customization module WHMCS
Order now | Download | FAQ
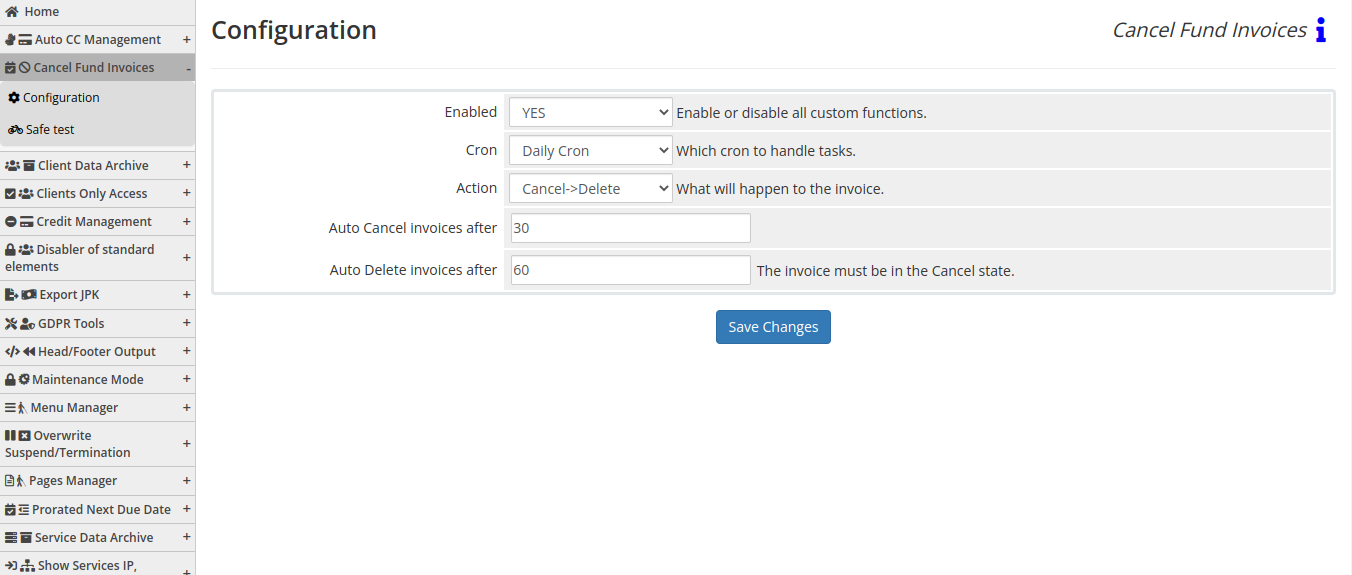
Enabled - Enabling or disabling all custom functions of this extension affects the automation and visibility of its features in the client area. When extension disabled, the automation capabilities and related features provided by the extension will not be active or visible to clients. However, as an administrator, you will still have access to configure and utilize the extension's functionalities through the administration interface. This gives you the flexibility to control the visibility and automation aspects of the extension based on your specific needs and preferences.
Cron:
- Daily Cron: Selects the daily cron job to handle tasks.
- Hourly Cron: Selects the hourly cron job to handle tasks.
Action:
- Cancel -> Delete: Specifies that the selected action will be to cancel the invoice and then delete it.
Auto Cancel invoices after:
- Sets the number of days after which the invoices will be automatically canceled if they are not paid.
Auto Delete invoices after:
- Sets the number of days after which the invoices in the canceled state will be automatically deleted.
Safe test
Order now | Download | FAQ
On the "Safe Test" page, you have the following options and actions available:
Preview Queued Invoices: This option allows you to view the invoices that are currently queued for cancellation or deletion without enabling the extension. It provides a list of invoices that are awaiting the action.
Manual Cancellation: If you want to manually initiate the cancellation of invoices from the previewed list, there is a corresponding button available. By clicking this button, you can manually cancel the selected invoices.
Manual Deletion: Similarly, if you wish to manually initiate the deletion of invoices from the previewed list, there is a separate button provided. Clicking this button will manually delete the selected invoices.
These manual actions provide you with control over the cancellation and deletion processes, allowing you to review the queued invoices and to do process manually, without enabling the extension in automated mode.
Safe test
PUQ Customization module WHMCS
Order now | Download | FAQ

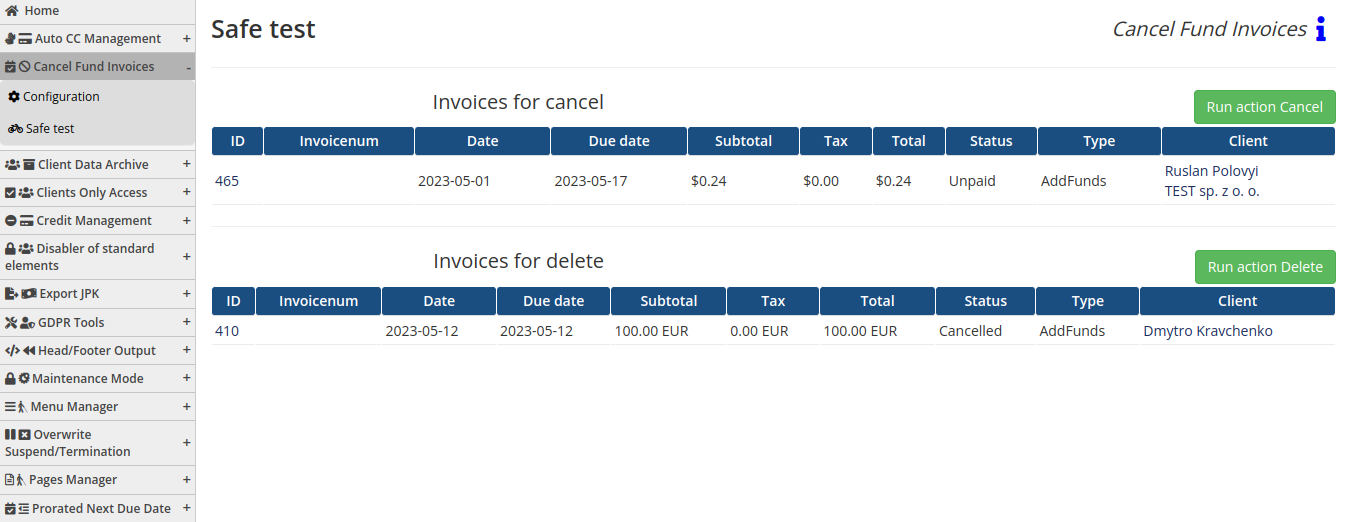
On the "Safe Test" page, you have the following options and actions available:
Preview Queued Invoices: This option allows you to view the invoices that are currently queued for cancellation or deletion without enabling the extension. It provides a list of invoices that are awaiting the action.
Manual Cancellation: If you want to manually initiate the cancellation of invoices from the previewed list, there is a corresponding button available. By clicking this button, you can manually cancel the selected invoices.
Manual Deletion: Similarly, if you wish to manually initiate the deletion of invoices from the previewed list, there is a separate button provided. Clicking this button will manually delete the selected invoices.
These manual actions provide you with control over the cancellation and deletion processes, allowing you to review the queued invoices and to do process manually, without enabling the extension in automated mode.
Client Data Archive
Designed to save client data and IP access information, and it also includes a search function. Shows online clients in real time.
Description
PUQ Customization module WHMCS
Order now | Download | FAQ
Client Data Archive
The "Client Data Archive" extension is designed to collect and store client data every time it is modified. This extension is particularly useful for easily tracking changes made by clients and finding specific clients based on their updated information.
The primary functionality of this extension is the ability to search for clients who have used the same IP address, allowing you to identify clients who may have multiple accounts. The integrated search feature seamlessly integrates with the WHMCS search system, making it convenient to locate clients based on their ID, IP address, or keywords.3
Important Note: Actions performed by an administrator while logged in as a client are not captured or recorded by the Client Data Archive extension. The extension records data when clients themselves make changes to their information. Therefore, any actions taken by an administrator posing as a client will not be saved, and the client will not be shown as online during that time. It's important to keep this distinction in mind when using the Client Data Archive extension and interpreting the online status of clients.
Key Features:
IP Address Search: The extension enables you to search for clients who share the same IP address, helping you identify potential duplicate accounts.
Integrated Search:
The extension integrates smoothly with the WHMCS search system, allowing you to perform searches by client ID, IP address, or keywords.
Duplicate User Detection:
You have the option to view a list of duplicated users based on their IP addresses, making it easier to manage and identify potential duplicate accounts.
Online Client Monitoring:
The extension provides the ability to view a list of clients who are currently online on your website. This real-time monitoring feature helps you stay informed about client activity.
Admin Panel Widget:
The extension includes a widget for the admin panel that displays the number of online clients in real-time, providing an overview of current client activity.
The "Client Data Archive" extension enhances the functionality of your WHMCS system by providing valuable tools for tracking client data changes and managing client accounts more efficiently.
Configuration
PUQ Customization module WHMCS
Order now | Download | FAQ
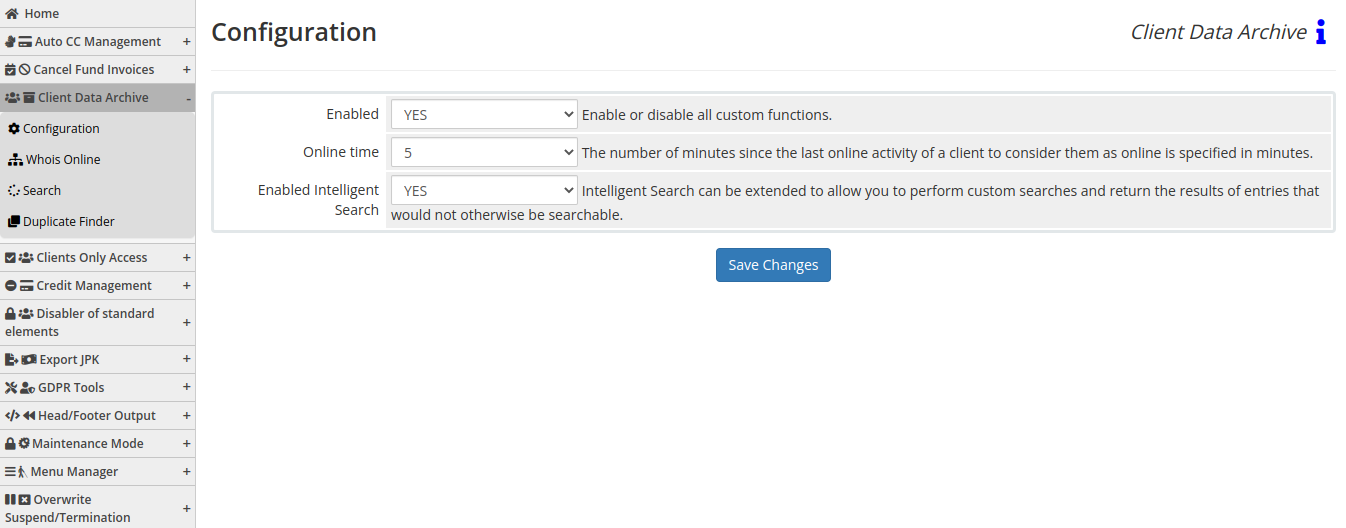
Enabled - Enabling or disabling all custom functions of this extension affects the automation and visibility of its features in the client area. When extension disabled, the automation capabilities and related features provided by the extension will not be active or visible to clients. However, as an administrator, you will still have access to configure and utilize the extension's functionalities through the administration interface. This gives you the flexibility to control the visibility and automation aspects of the extension based on your specific needs and preferences.
Online time - Specifies the number of minutes since the last online activity of a client to consider them as "online" within the system.
Enabled Intelligent Search - Enables the Intelligent Search feature, which extends the search capabilities to include custom searches and return results for entries that may not be searchable using standard search functions. (integrates smoothly with the WHMCS search system)
Please note that the "Online time" option determines the threshold for considering a client as "online" based on their last activity within the specified number of minutes. The "Enabled Intelligent Search" option expands the search functionality, allowing for custom searches and returning results that may not be accessible through regular search methods.
Whois Online
PUQ Customization module WHMCS
Order now | Download | FAQ
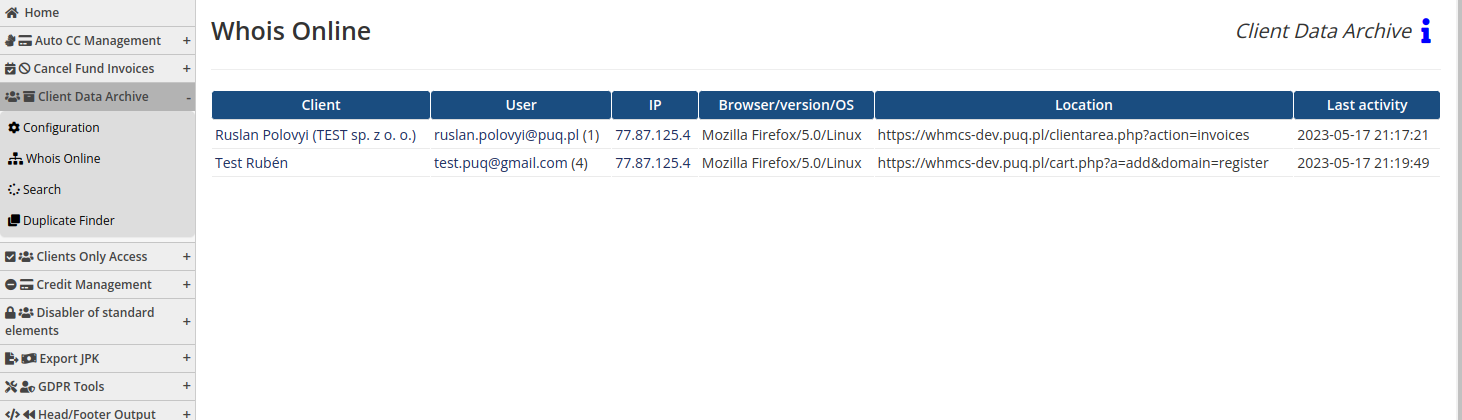
On the "Whois Online" page, you will find a list of clients who are currently online, along with the following client data:
-
Client: This column displays the client's username or display name.
-
User: This column shows the user account associated with the client.
-
IP: The IP column indicates the IP address from which the client is accessing the site.
-
Browser/version/OS: This column provides information about the client's web browser, its version, and the operating system they are using.
-
Location on site: This column specifies the location or page on your website where the client is currently active or browsing.
-
Last activity: The "Last activity" column displays the timestamp or date and time of the client's most recent activity on the site.
The page offers you real-time visibility into clients who are currently active and using your website. It allows you to monitor their activity, track their location on the site, and see details about their browsing environment, enhancing your ability to provide timely support or assistance when needed.
The administrator widget
PUQ Customization module WHMCS
Order now | Download | FAQ
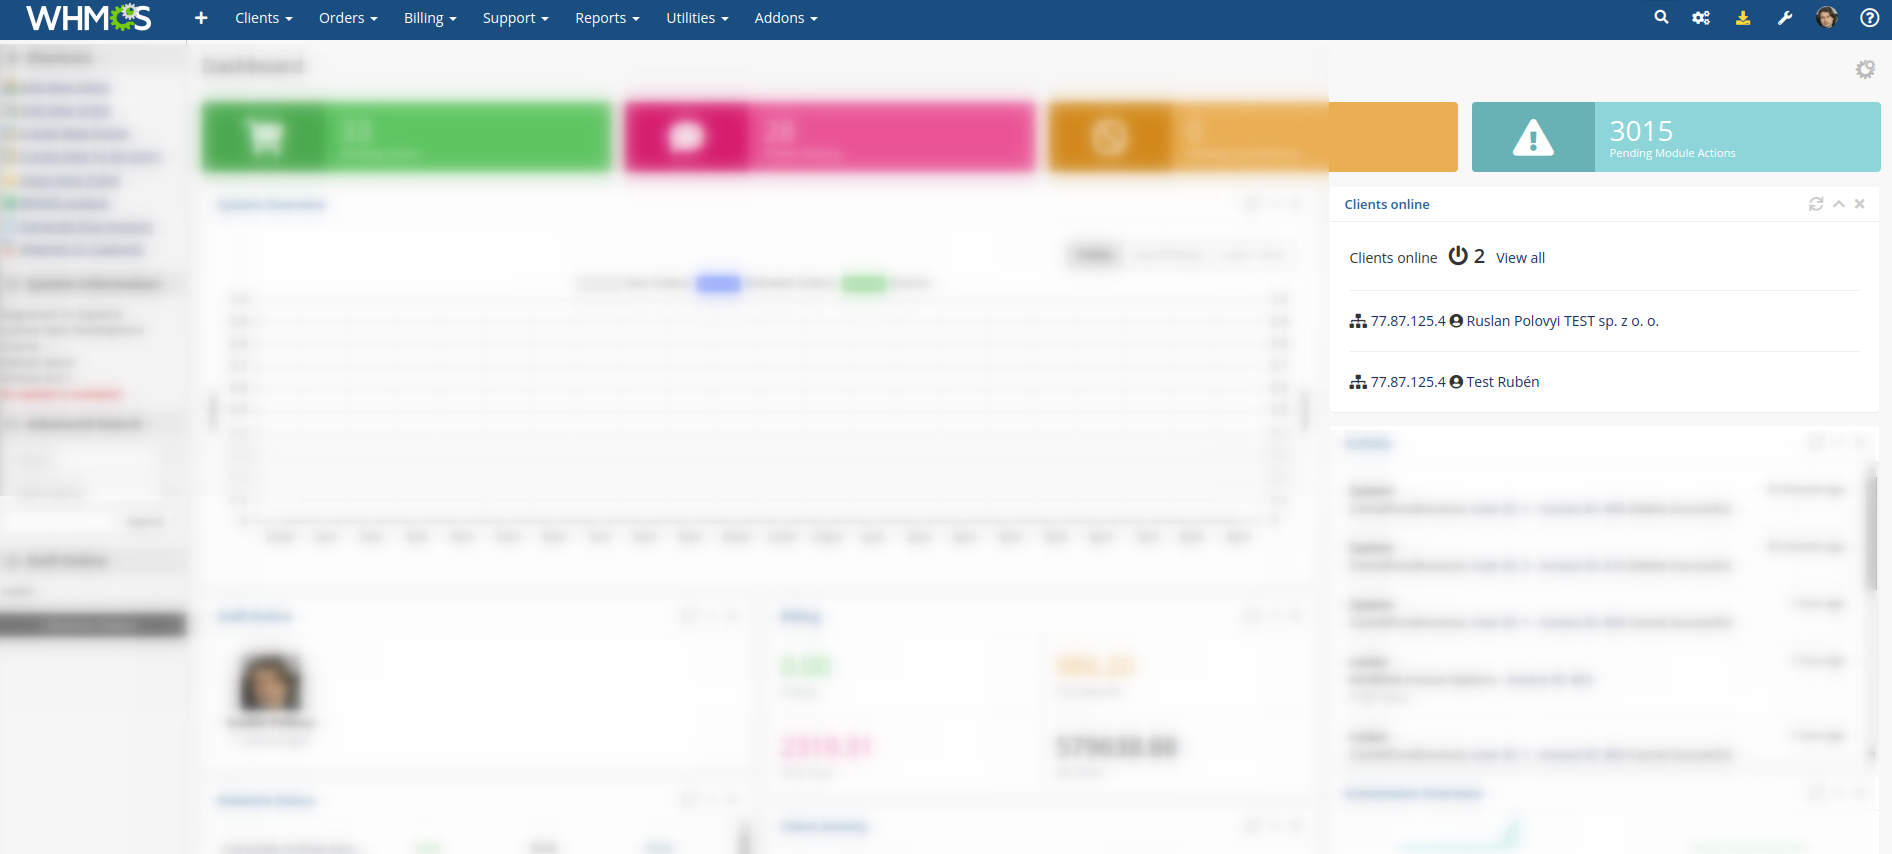
The administrator widget provides a summarized view of online clients and their IP addresses. It includes the following information:
-
Online Client Count: This section displays the total number of clients currently online.
-
List of Online Clients: This section presents a concise list of the clients who are currently online.
-
IP Addresses: Alongside each online client, their corresponding IP address is displayed.
The administrator widget offers a quick overview of the number of clients online and their IP addresses. This allows administrators to have an at-a-glance understanding of the current online client activity and easily access the information they need.
Search
PUQ Customization module WHMCS
Order now | Download | FAQ
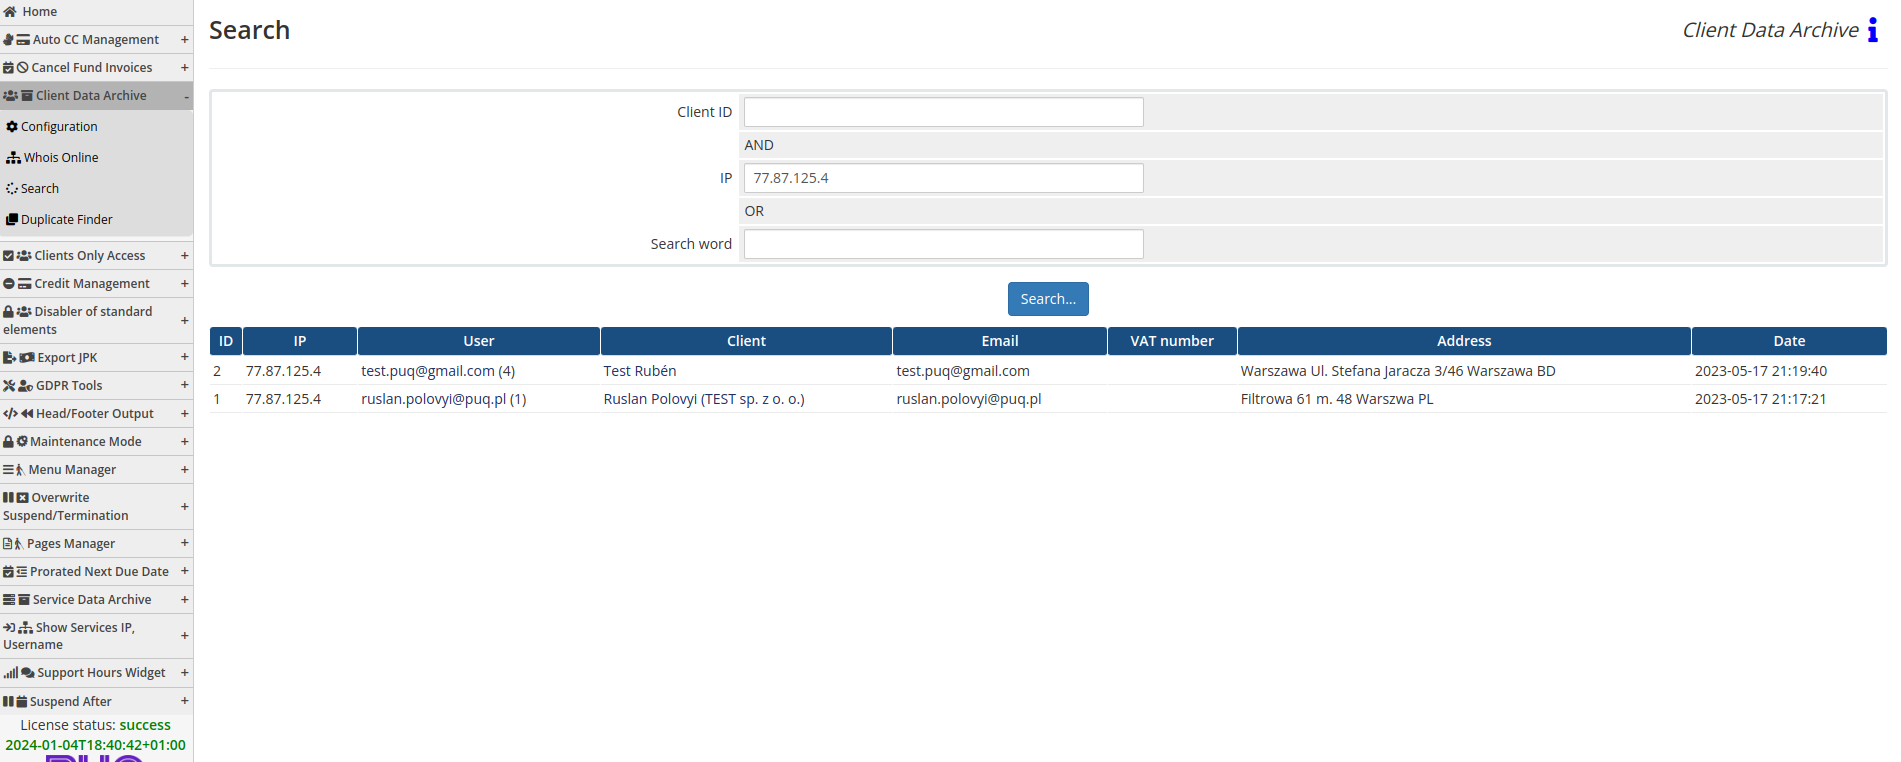
On the "Search" page, you have the ability to search for saved data based on the following parameters: Client ID, IP, and Search word. Upon conducting a search, you will be presented with a table of results containing the following fields:
-
IP: This field displays the IP address associated with the saved data.
-
User: The "User" field indicates the user account related to the saved data.
-
Client: This field shows the client's username or display name.
-
Email: The "Email" field displays the email address associated with the saved data.
-
VAT Number: If applicable, this field contains the VAT (Value Added Tax) number associated with the client or data.
-
Address: The "Address" field presents the address information associated with the saved data.
-
Date: This field indicates the date when the data was saved or recorded.
The search functionality allows you to retrieve and view specific saved data based on the provided parameters. The resulting table provides a clear overview of the relevant fields associated with each search result, enabling you to quickly find the desired information.
Duplicate Finder
PUQ Customization module WHMCS
Order now | Download | FAQ
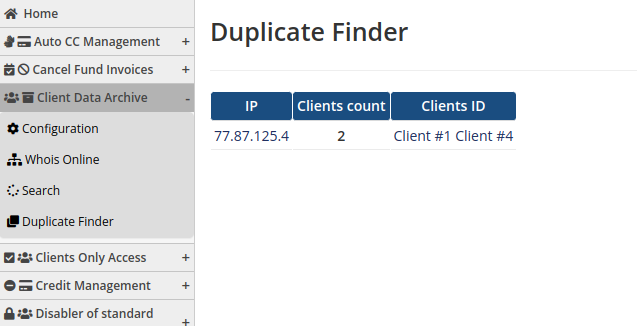
On the "Duplicate Finder" page, you will find a list of IP addresses along with the number of clients who have used each IP address to log in to the website. Please note that the list only includes IP addresses with multiple clients associated with them. IP addresses with only one client will not be displayed in the list.
The table on the "Duplicate Finder" page contains the following fields:
IP: This field displays the IP address for which duplicate client logins have been identified.
Clients count: The "Clients count" field indicates the number of clients who have used the corresponding IP address for authentication.
Clients ID: This field provides the client IDs or unique identifiers associated with each client who has used the IP address for login.
The "Duplicate Finder" functionality allows you to identify IP addresses that have been used by multiple clients, indicating potential duplicate accounts or suspicious activity. By reviewing the table, you can gain insights into the IP addresses and the corresponding client counts, helping you manage and investigate any instances of duplicate client logins effectively.
Intelligent Search
PUQ Customization module WHMCS
Order now | Download | FAQ
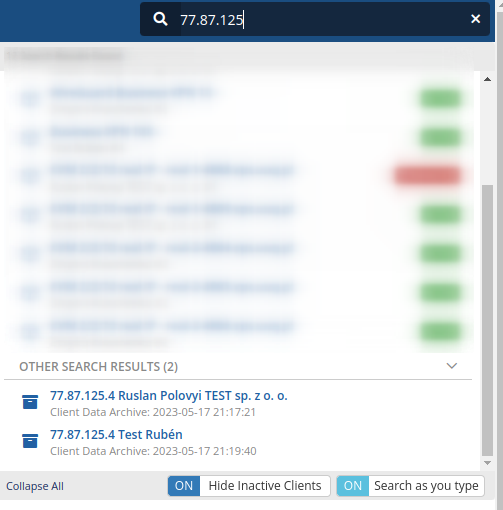
Intelligent Search:
The Intelligent Search feature is integrated into the WHMCS search system. When you enter any word or phrase into the WHMCS search, it performs a search across the database using a matching search word method. The results are displayed in the "Other Search Results" section of the search interface. This feature proves to be very useful for conducting searches in your day-to-day WHMCS administration tasks.
The Intelligent Search functionality enhances the search capabilities within WHMCS, allowing you to quickly find relevant information by matching search terms against the recorded data. It provides an efficient way to retrieve specific records or entries that match your search criteria, assisting you in efficiently managing your WHMCS system.
Clients Only Access
The extension closes access to the entire portal for non-login in users. By redirecting to the login page.
Description
PUQ Customization module WHMCS
Order now | Download | FAQ
Clients Only Access
The "Clients Only Access" extension is designed to restrict access to all website content, allowing only the login window to be accessible to visitors. Once a client logs in, they gain full access to the website in its standard mode. However, if they log out, they will be redirected back to the login window and won't be able to browse the site. If they attempt to manually access any page by entering a URL, they will be redirected to the login page.
This extension provides the following options for disabling certain elements:
Disabled account menu: The account menu will not be available to non-logged-in users.
Allow password reset: Non-logged-in users will be allowed to reset their passwords.
Allow registration: Non-logged-in users will have the option to register for an account.
By customizing these options, you can create a restricted access environment where only registered clients can fully interact with the website while non-logged-in users are limited to the login window. This helps ensure that sensitive information and functionality are accessible only to authorized clients.
Configuration
PUQ Customization module WHMCS
Order now | Download | FAQ
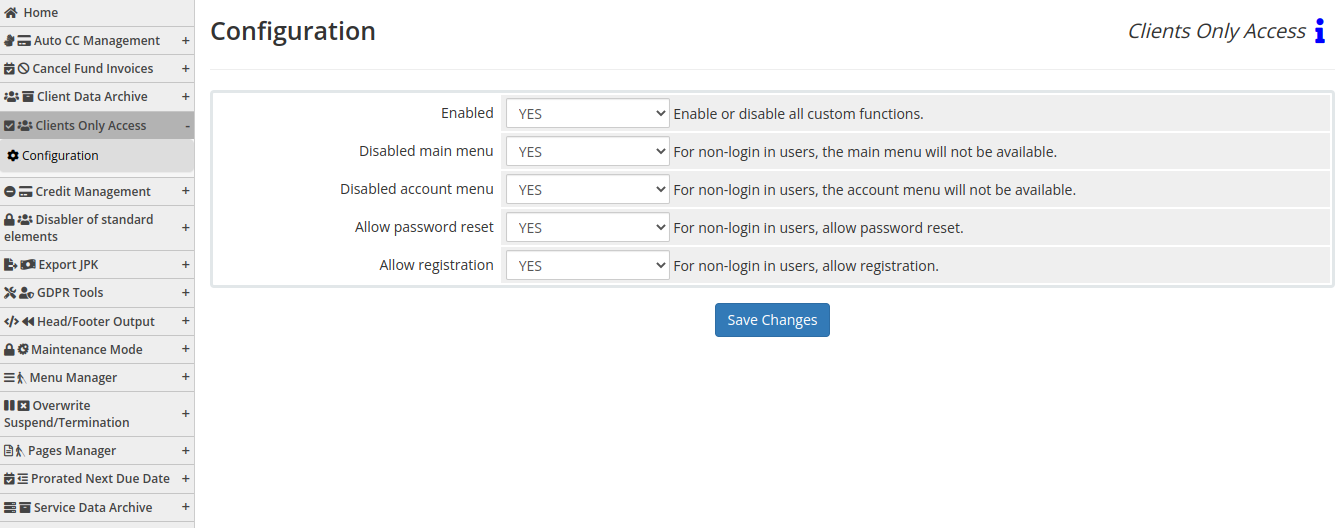
Enabled - Enabling or disabling all custom functions of this extension affects the automation and visibility of its features in the client area. When extension disabled, the automation capabilities and related features provided by the extension will not be active or visible to clients. However, as an administrator, you will still have access to configure and utilize the extension's functionalities through the administration interface. This gives you the flexibility to control the visibility and automation aspects of the extension based on your specific needs and preferences.
On the configuration page, you have the option to enable or disable the following features:
By configuring these options, you can customize the access and functionality available to non-logged-in users. Enabling or disabling these features allows you to control the user experience and tailor it to your specific requirements.
Client Area
PUQ Customization module WHMCS
Order now | Download | FAQ
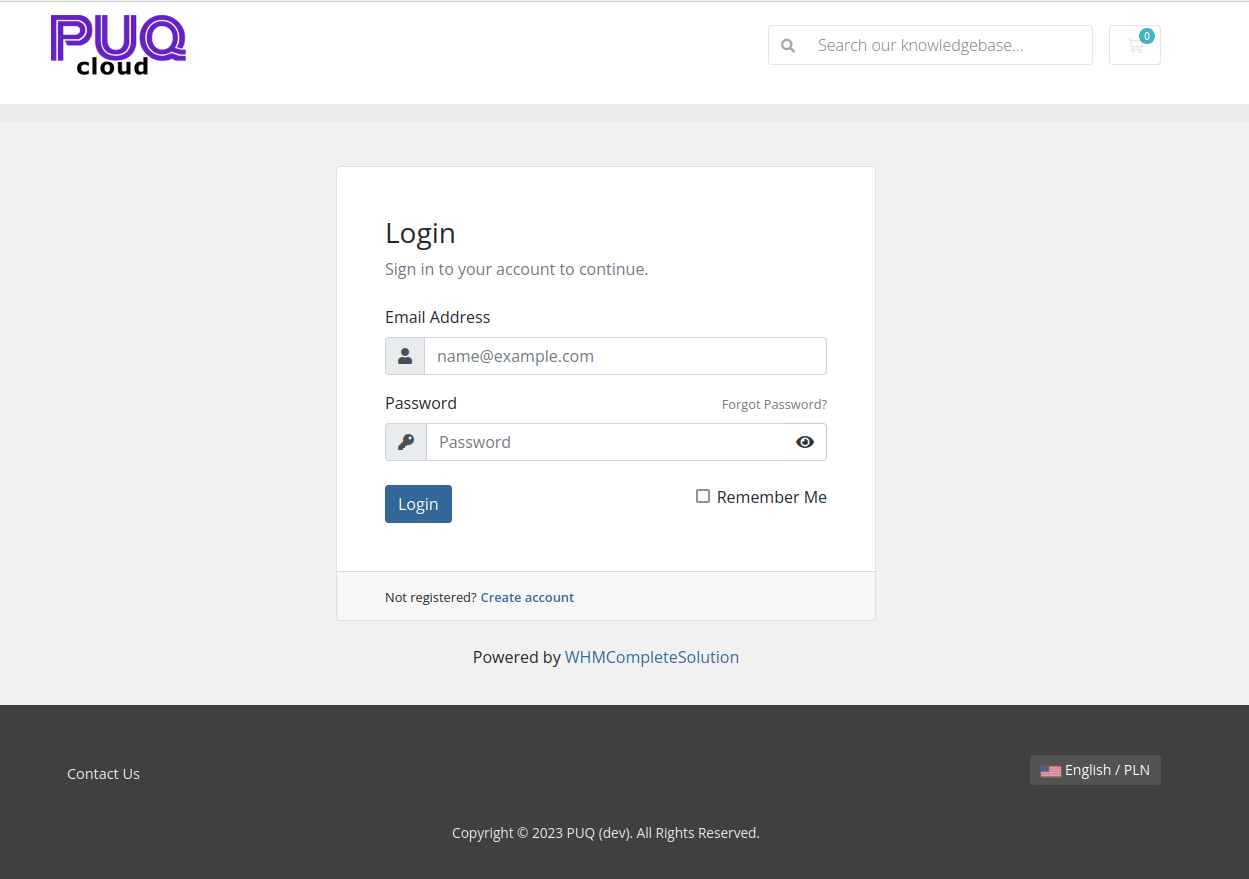
When the "Clients Only Access" extension is enabled, the client area will display without the main menu and account menu. This means that both the main menu and user menu will be absent in the client area.
Credit Management
Allows the customer to manage automatic apply credit.
Description
PUQ Customization module WHMCS
Order now | Download | FAQ
Credit Management
The "Credit Management" extension provides clients with the ability to manage automatic payments from their credit balance for invoices. In other words, clients can choose to enable or disable automatic payments using their credit balance and selectively utilize the credit for specific invoices. The key feature of this extension is that it offers this functionality on an individual client level, rather than applying it to all clients collectively as in the standard WHMCS configuration.
With this extension, administrators can enable or disable the automatic credit application for a particular client. The client area includes a widget and panel that allow clients to manage this option. The widget displays the client's credit balance, a button to add funds to the credit balance, and a toggle switch for automatic credit application.
It's important to note that by default, the global configuration has automatic credit application enabled for all registered users.
Еhe extension provides a list of clients who have disabled the automatic credit application.
Additionally, the extension supports multilingual capabilities, ensuring that clients can access and utilize this feature in their preferred language.
The 'Credit Management' extension enhances the flexibility and control clients have over their credit balance and payment preferences, offering a personalized experience within the WHMCS system.
Configuration
PUQ Customization module WHMCS
Order now | Download | FAQ

Enabled - Enabling or disabling all custom functions of this extension affects the automation and visibility of its features in the client area. When extension disabled, the automation capabilities and related features provided by the extension will not be active or visible to clients. However, as an administrator, you will still have access to configure and utilize the extension's functionalities through the administration interface. This gives you the flexibility to control the visibility and automation aspects of the extension based on your specific needs and preferences.
Widget type:
Amount:
- Checkbox: Show amount available for use in the widget
Add Funds:
- Checkbox: Show "Add Funds" button in the widget
Auto apply credit switch:
- Checkbox: Show "Auto apply credit" switch in the widget
Label for auto apply credit (Default. If left empty, it will show "Auto apply credit")
These configuration options allow you to customize the appearance and functionality of the client area widget for the 'Credit Management' extension. You can choose the widget type, whether to display the amount available for use, the option to add funds, and the switch for enabling or disabling auto application of credit. Additionally, you can provide a custom label for the auto apply credit switch.
Clients
PUQ Customization module WHMCS
Order now | Download | FAQ
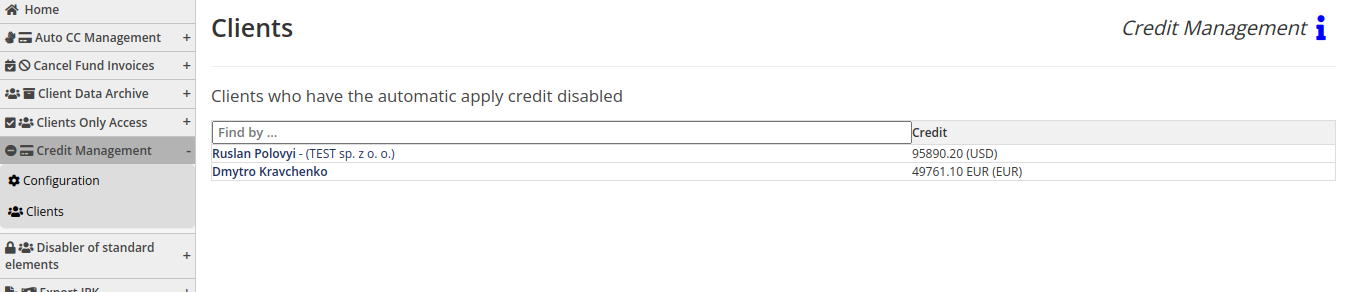
On the Clients page of the 'Credit Management' extension, there is a list of clients who have the auto apply credit option disabled. The table displays the following fields for each client:
- Client Name: The name of the client.
- Credit Balance: The current credit balance of the client.
This table allows you to easily view and manage clients who have chosen to disable the automatic credit application feature.
Switch in admin area
PUQ Customization module WHMCS
Order now | Download | FAQ
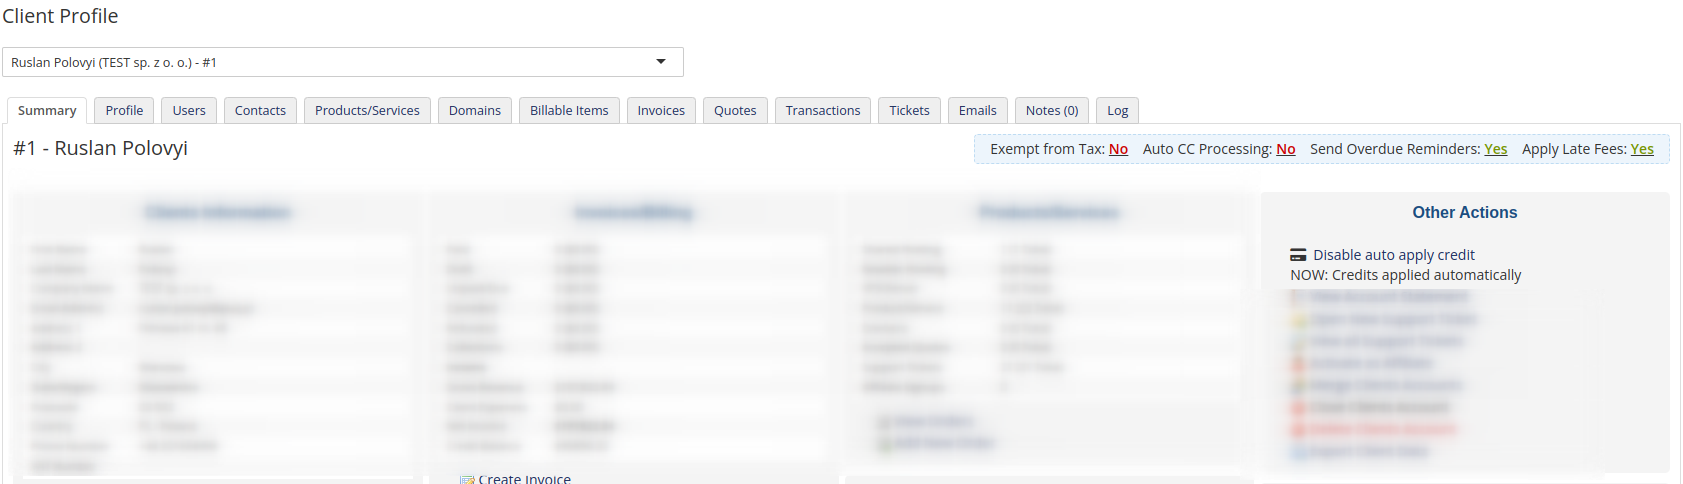
To enable the administrator to manage the toggling of automatic credit application for a client, there is a position in the "Other Actions" menu on the client's summary tab. From there, it is possible to individually enable or disable credit application for that specific client.
This feature provides convenient access for administrators to modify the auto apply credit setting on a per-client basis, allowing them to customize the credit management experience for each client as needed.
Client Area Widget
PUQ Customization module WHMCS
Order now | Download | FAQ
The Client Area Widget consists of two widgets that display the following information:
Slider Widget: This widget is designed as a slider and is located on the side. It includes the client's credit balance, a button to add funds to the credit balance, and a toggle switch for automatic credit application. The slider widget provides a convenient and accessible way for clients to view their credit balance and manage automatic credit application.
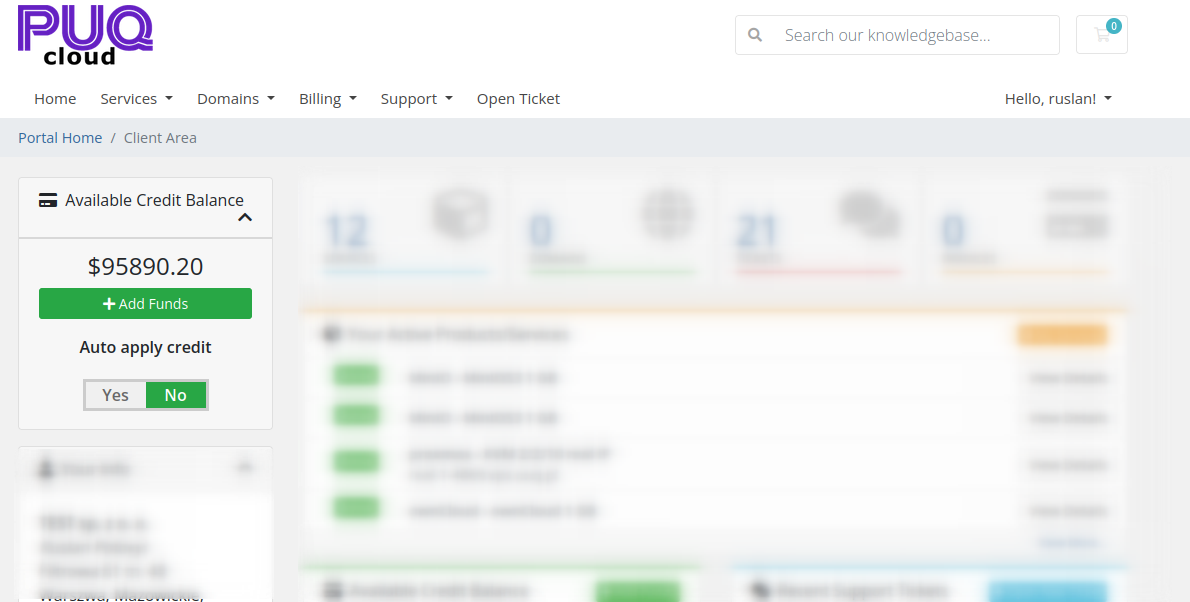
Dashboard Panel Widget: This widget is placed on the client's dashboard and is visible only on the dashboard. Similar to the slider widget, it displays the client's credit balance, a button to add funds, and a toggle switch for automatic credit application. The dashboard panel widget provides an alternative location for clients to access their credit-related information and settings directly from their dashboard.
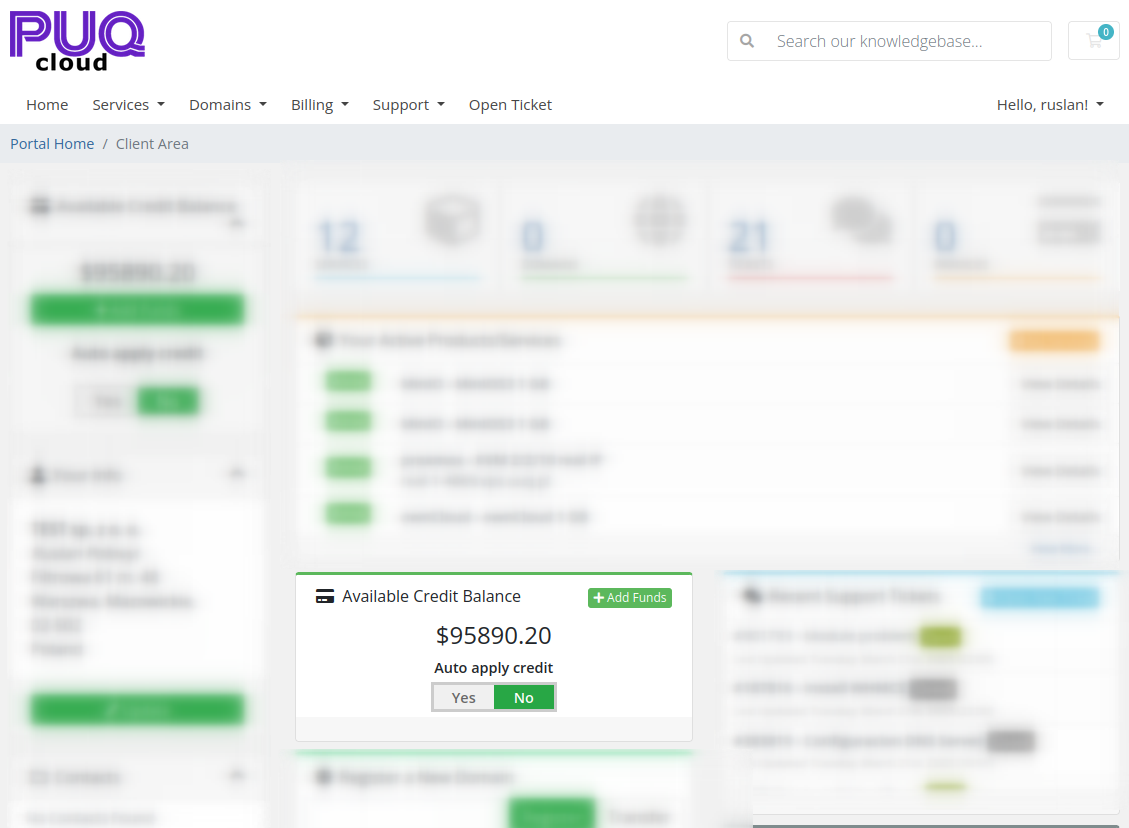
Both widgets offer a user-friendly interface that allows clients to monitor and control their credit balance, add funds when needed, and enable or disable automatic credit application according to their preferences.
Head/Footer Output
Return HTML to be output within the HEAD/before the closing BODY tags of the page output.
Description
PUQ Customization module WHMCS
Order now | Download | FAQ
Head/Footer Output
The extension offers several configuration options to cater to different needs:
-
Return HTML to be output within the HEAD tags of the page output: This allows you to include specific HTML code or scripts in the head section of the page. For example, you can insert custom meta tags for SEO purposes or add tracking codes for analytics tools.
-
Return HTML to be output before the closing BODY tag of the page output: This enables you to add custom content or scripts just before the closing body tag of the page. You can utilize this functionality to insert JavaScript code for certain functionality, such as live chat widgets or social media integration.
-
Return HTML to be output within the HEAD tags of the admin area: This feature allows you to include custom HTML or scripts specifically in the head section of the admin area. It can be useful for adding admin-specific stylesheets or custom JavaScript code for enhancing the admin interface.
-
Return HTML to be output before the closing BODY tag of the admin area: With this option, you can insert custom content or scripts before the closing body tag of the admin area. It provides flexibility to add custom functionalities or enhancements specific to the admin area.
Examples of how this functionality can be applied:
-
Custom Tracking Codes: You can use the "Return HTML to be output within the HEAD tags" option to insert tracking codes from services like Google Analytics or Facebook Pixel to track user activities on your client area or admin area.
-
Custom CSS Styling: By utilizing the "Return HTML to be output within the HEAD tags" option, you can add custom CSS stylesheets to modify the appearance and layout of specific pages in the client area or admin area.
-
Integration with Third-Party Tools: The "Return HTML to be output before the closing BODY tag" option allows you to integrate external tools or widgets into the client area or admin area. For example, you can add live chat functionality or embed social media feeds using custom JavaScript code.
-
Custom Messages or Announcements: With the "Return HTML to be output before the closing BODY tag" option, you can display custom messages or announcements on specific pages of the client area or admin area, providing important information or updates to users.
Remember, the possibilities are vast, and this functionality allows you to tailor the head and footer sections of your WHMCS environment according to your specific requirements.
Configuration
PUQ Customization module WHMCS
Order now | Download | FAQ
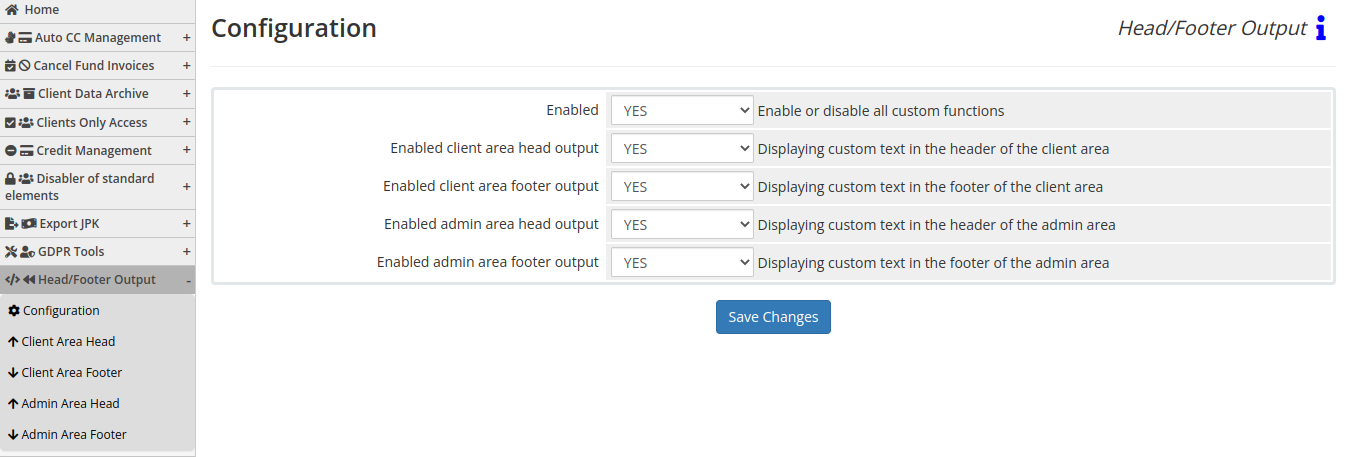
On the configuration page, you have the following options:
-
Enabled client area head output: When set to "YES," it enables the display of custom text in the header of the client area. This allows you to insert your own text or HTML code at the top of the client area pages.
-
Enabled client area footer output: When set to "YES," it enables the display of custom text in the footer of the client area. This allows you to insert your own text or HTML code at the bottom of the client area pages.
-
Enabled admin area head output: When set to "YES," it enables the display of custom text in the header of the admin area. This allows you to insert your own text or HTML code at the top of the admin area pages.
-
Enabled admin area footer output: When set to "YES," it enables the display of custom text in the footer of the admin area. This allows you to insert your own text or HTML code at the bottom of the admin area pages.
By enabling these options, you can customize the header and footer sections of both the client area and admin area by adding your own text or HTML code. This provides the flexibility to display important information, announcements, branding elements, or any other content you wish to include in those areas.
Data input
PUQ Customization module WHMCS
Order now | Download | FAQ
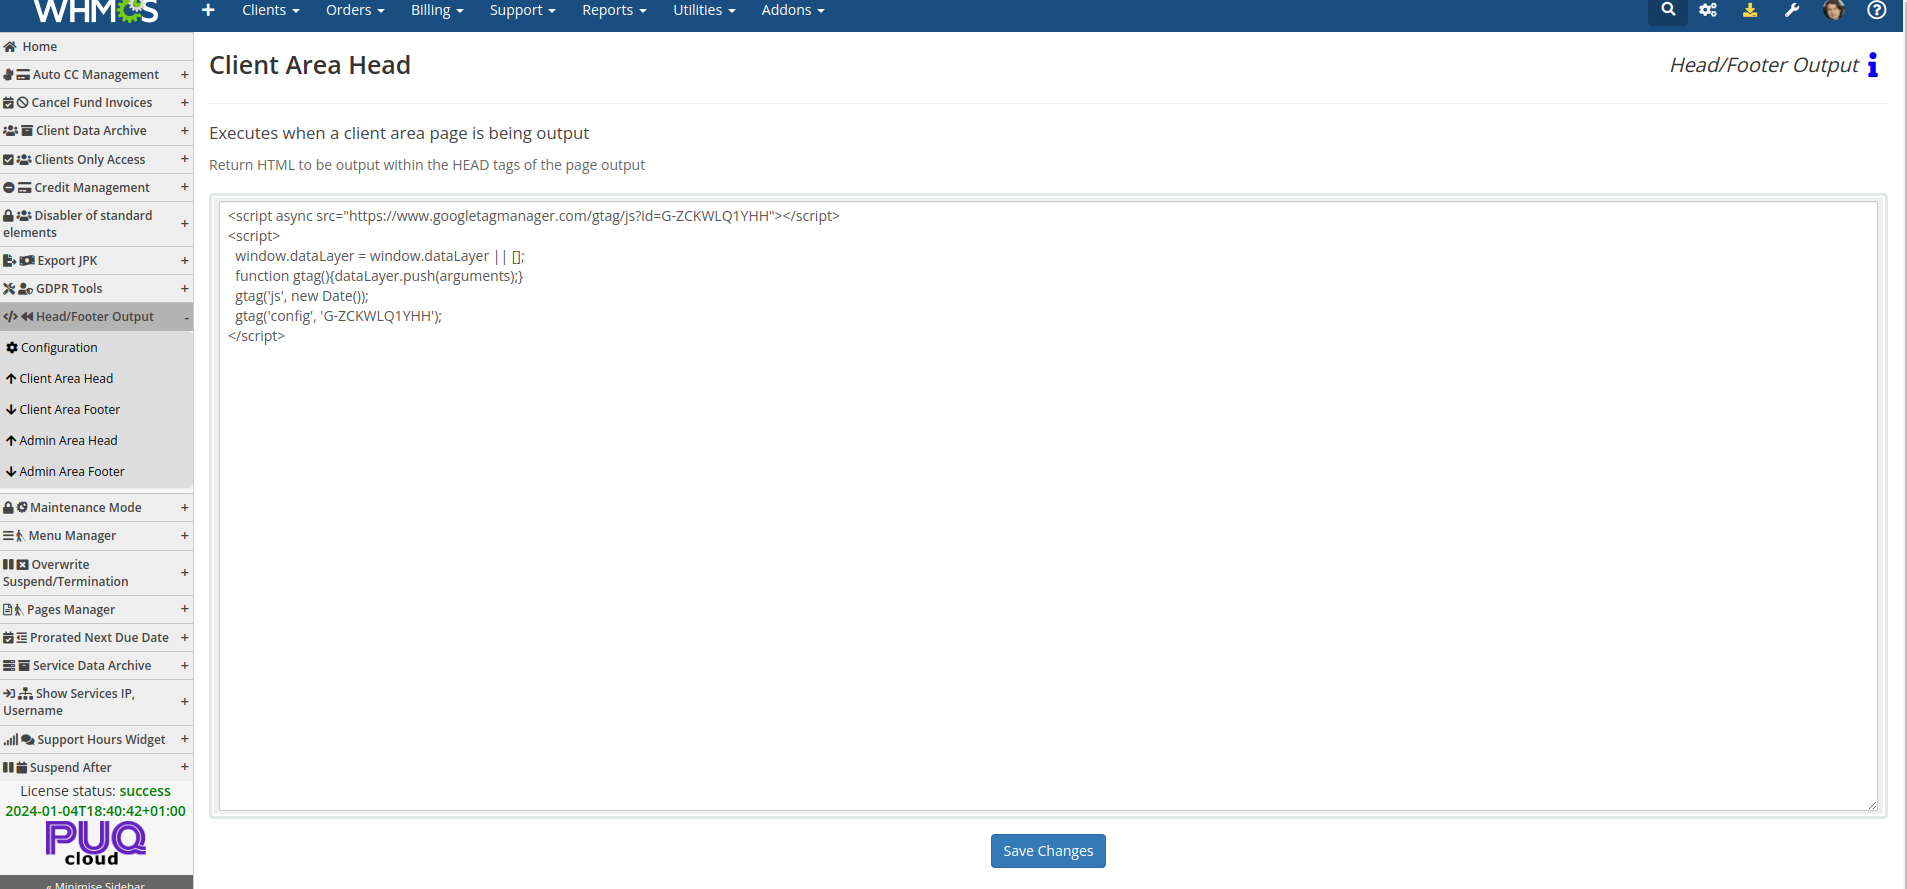
To edit any of the four code fragments, follow these steps:
-
Select the corresponding menu option for the fragment you want to edit. For example, choose "Client Area Head" to edit the code displayed in the header of the client area.
-
Enter the desired text or HTML code that you want to be displayed in the selected section.
-
Click the "Save" button to save your changes.
Repeat these steps for each fragment you wish to edit: "Client Area Footer," "Admin Area Head," and "Admin Area Footer."
Overwrite Suspend/Termination
The extension allows you to set a date for Suspend and Termination the service.
Description
PUQ Customization module WHMCS
Order now | Download | FAQ
Overwrite Suspend/Termination
This is a unique extension that allows overriding the suspension and termination days for services in case of non-payment. The extension extends the automation options for suspending and terminating services in WHMCS global settings. It provides the flexibility to set custom overrides for specific products or product groups, enabling efficient management of client service suspensions and terminations.
Configuration:
- Overwrite type: Specifies whether the overrides apply to individual products or product groups.
- Cron: Determines the cron job to process the tasks, either running on every cron or daily.
- Send Suspension Email: Enables sending suspension notification emails upon successful suspension.
Parameter Rules: To set a parameter, enable the "Overwrite Suspension" and/or "Overwrite Termination" checkbox. The "Overwrite Suspension" parameter cannot exceed the "Suspend Days" value from the global configuration (if enabled). In such cases, the override setting will not take effect due to the global configuration. The "Overwrite Termination" parameter cannot exceed the "Termination Days" value from the global configuration (if enabled). In such cases, the override setting will not take effect due to the global configuration. The "Overwrite Suspension" parameter must always be less than the "Overwrite Termination" parameter (if enabled). The "Overwrite Termination" parameter must always be greater than the "Overwrite Suspension" parameter (if enabled). If the global parameters (Enable Suspension, Suspend Days, Enable Termination, Termination Days) are modified, the parameters (Overwrite Suspension, Suspend Days, Overwrite Termination, Termination Days) will not be adjusted accordingly.
Behavior for Product-Based Processing: If the configuration is set to process overrides based on individual products:
- If a product is moved from one group to another, its override settings will remain unchanged.
Behavior for Group-Based Processing: If the configuration is set to process overrides based on product groups:
- The product's parameters will depend on the group to which it belongs.
Suspension Process:
- Suspend action is triggered.
- If the "Overwrite Suspension" checkbox is enabled for the product or its group.
- The product is an active service for the client.
- The service has an "Active" status.
- The sum of the "Next Due Date" for the service and the "Overwrite Suspension" parameter is less than or equal to the cron execution date.
- The suspend command of the corresponding module is executed. If the module returns a "Suspended" error, the system waits for the next cron execution and repeats the process (the behavior depends on the handling defined in the module).
- If the module is not present on the service, the service's status is changed to "Suspended".
Termination Process:
- Termination action is triggered.
- If the "Overwrite Termination" checkbox is enabled for the product or its group.
- The product is a suspended service for the client.
- The service has a "Suspended" status.
- The sum of the "Next Due Date" for the service and the "Overwrite Termination" parameter is less than or equal to the cron execution date.
- The termination command of the corresponding module is executed. If the module returns a "Terminated" error, the system waits for the next cron execution and repeats the process (the behavior depends on the handling defined in the module).
- If the module is not present on the service, the service's status is changed to "Terminated".
Invoice Handling:
- If an invoice contains only one position that transitions to the "Terminated" status, the invoice is changed to "Cancelled".
- If an invoice contains multiple positions, a new invoice (excluding the ID) is created with the status "Cancelled". The position that transitions to the "Terminated" status is added to the new invoice, while it is removed from the previous invoice.
All configuration and Suspend/Termination actions are logged for diagnostic purposes.
Purpose of this Functionality: Suppose you sell virtual machines, and a client fails to make the payment. On the same day, the extension can suspend the virtual machine service. However, if another client has purchased a more lucrative dedicated server and also missed the payment, you may want to inform them about the overdue invoice instead of immediately suspending their service. Since dedicated server services are more valuable and prestigious, this extension allows you to differentiate the suspension and termination priorities based on the services.
The extension is designed for convenience and better management of service suspensions and terminations, while allowing prioritization and flexibility in handling different types of services.
Configuration
PUQ Customization module WHMCS
Order now | Download | FAQ
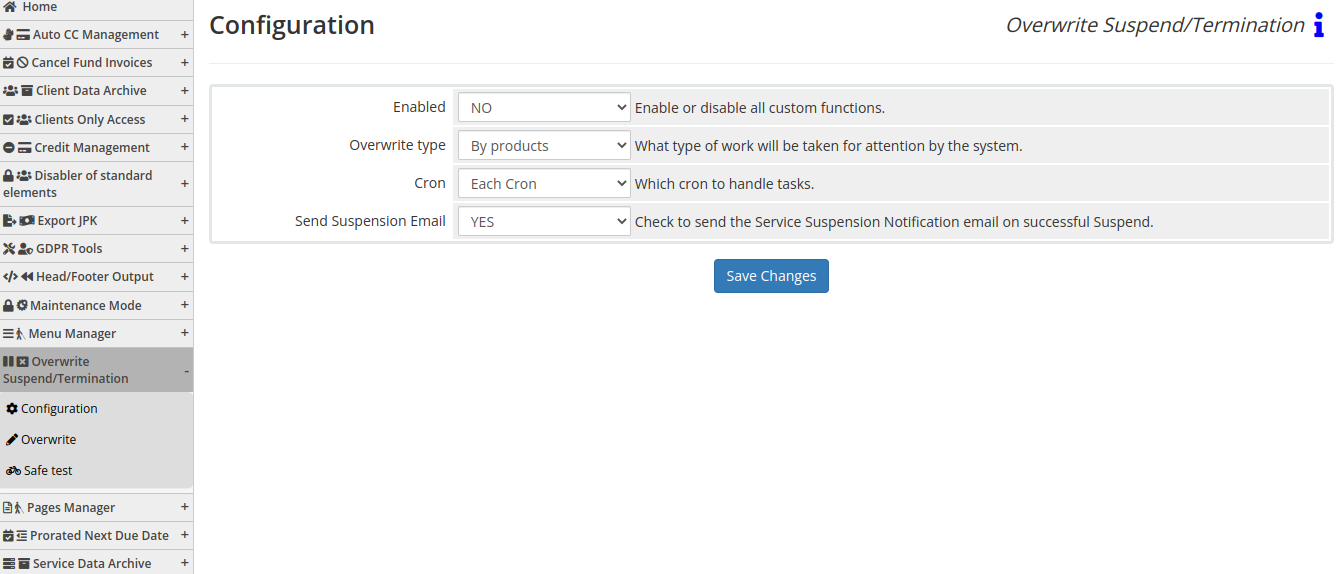
Enabled - Enabling or disabling all custom functions of this extension affects the automation and visibility of its features in the client area. When extension disabled, the automation capabilities and related features provided by the extension will not be active or visible to clients. However, as an administrator, you will still have access to configure and utilize the extension's functionalities through the administration interface. This gives you the flexibility to control the visibility and automation aspects of the extension based on your specific needs and preferences.
Overwrite type - This option determines the scope of the override, whether it applies to individual products or product groups. In this case, the configuration is set to "By products," meaning overrides will be applied on a per-product basis.
Cron - This option specifies which cron job will handle the execution of the tasks. The configuration is set to "Each Cron," indicating that the tasks will be processed during each cron run.
Send Suspension Email - When enabled (set to "YES"), this option triggers the sending of a suspension notification email to the client when a service is successfully suspended.
Overwrite
PUQ Customization module WHMCS
Order now | Download | FAQ
Screenshot of Overwrite Suspend/Termination configuration view by product
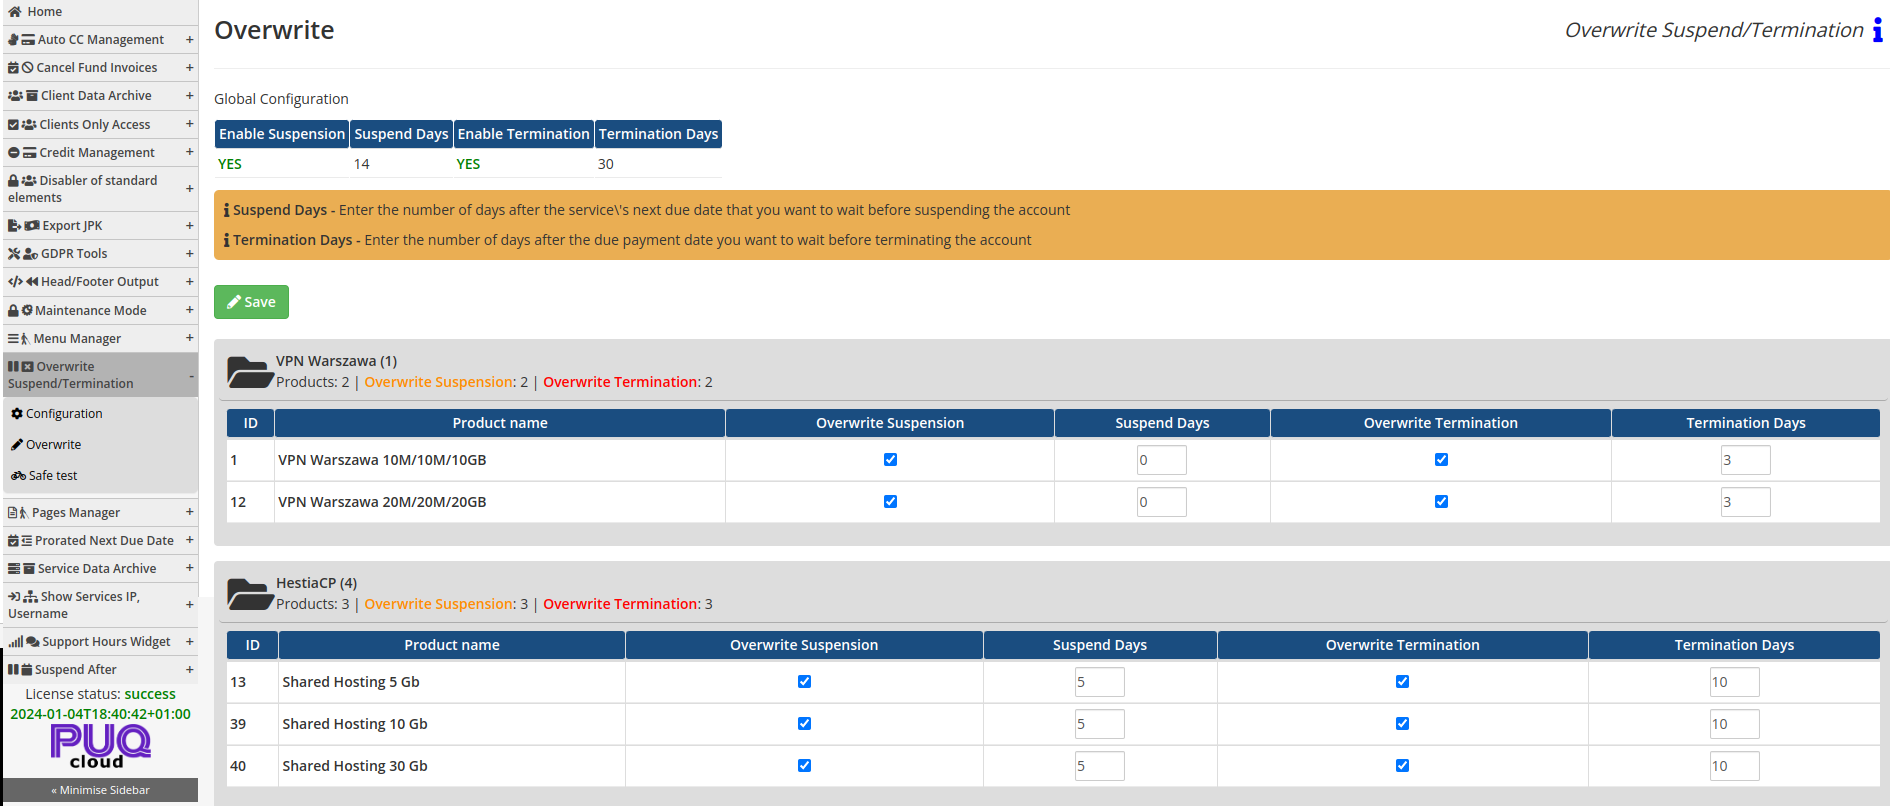
Screenshot of Overwrite Suspend/Termination Configuration View by Group
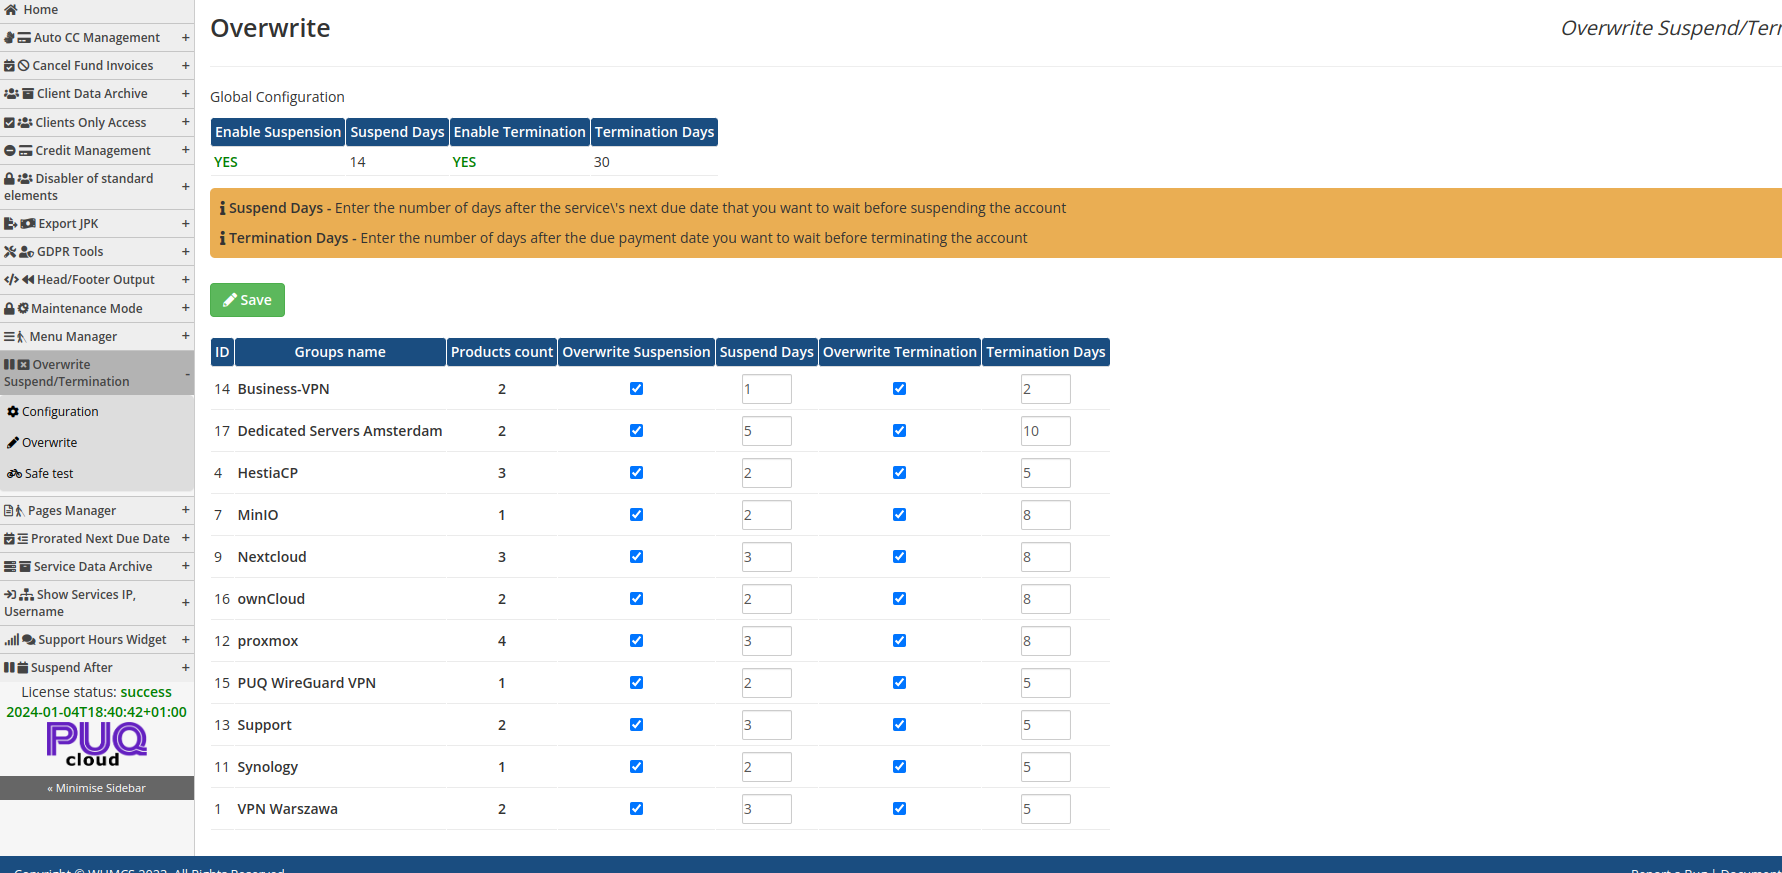
On the "Overwrite" page, there will be a list of products or groups to set the "Overwrite Suspension" and "Overwrite Termination" parameters.
Here is a detailed description of the rules for setting these parameters:
-
Overwrite Suspension:
- For a product: If you want to set personalized suspension parameters for a specific product, locate it in the product list on the "Overwrite" page. Check the "Overwrite Suspension" checkbox next to the corresponding product.
- For a group: If you want to apply personalized suspension parameters to all products within a specific group, find the corresponding group in the group list on the "Overwrite" page. Check the "Overwrite Suspension" checkbox next to it.
-
Overwrite Termination:
- For a product: If you want to set personalized termination parameters for a specific product, locate it in the product list on the "Overwrite" page. Check the "Overwrite Termination" checkbox next to the corresponding product.
- For a group: If you want to apply personalized termination parameters to all products within a specific group, find the corresponding group in the group list on the "Overwrite" page. Check the "Overwrite Termination" checkbox next to it.
Setting the parameters involves selecting the appropriate checkbox for each product or group on which you want to apply the overwrite for suspension or termination. You can choose products, groups, or both simultaneously.
It is important to follow these rules:
- The value of the "Overwrite Suspension" parameter should not exceed the value of the "Suspend Days" from the global configuration (if it is active).
- The value of the "Overwrite Termination" parameter should not exceed the value of the "Termination Days" from the global configuration (if it is active).
- The value of the "Overwrite Suspension" parameter should always be less than the value of the "Overwrite Termination" parameter if both parameters are active.
Note that if there are changes in the global parameters (enabling suspension, suspension duration, enabling termination, termination duration), the overwritten parameters (Overwrite Suspension, Suspend Days, Overwrite Termination, Termination Days) will not be automatically adjusted.
In the case of configuration by products, if a product is moved from one group to another, its parameters will not change. If configuration by groups is used, the product's parameters will depend on the group it belongs to.
Safe test
PUQ Customization module WHMCS
Order now | Download | FAQ
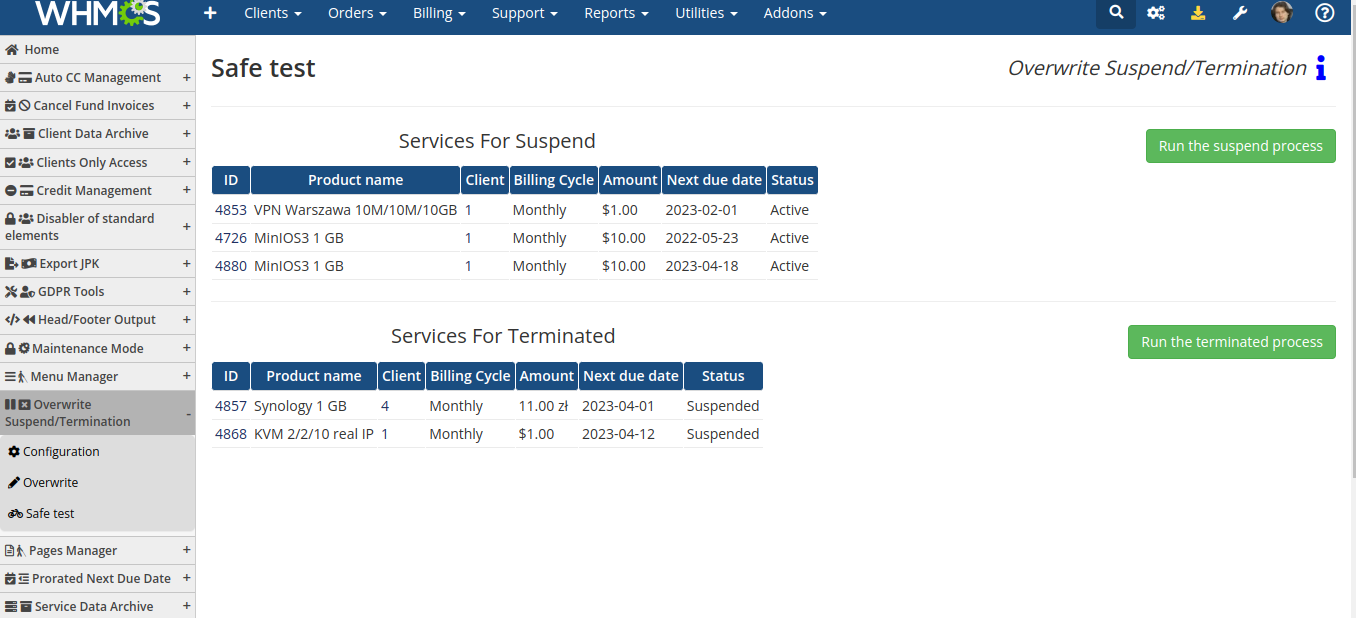
The extension also includes a page called "Safe Test." On this page, the services that are queued for suspension and termination, based on the extension's configuration, are displayed. This feature provides a convenient way to perform a safe test and see which services will be suspended or terminated. You have the option to enable or disable the extension and manually initiate the suspension or termination process by clicking the corresponding buttons: "Run the suspend process" and "Run the termination process."
The table on the "Safe Test" page contains the following fields for each service:
- ID: The unique identifier of the service.
- Product Name: The name of the product or service.
- Client: The client associated with the service.
- Billing Cycle: The billing cycle of the service (e.g., monthly, quarterly, annually).
- Amount: The amount due for the service.
- Next Due Date: The date when the next payment is due for the service.
- Status: The current status of the service (active, suspended, terminated).
This page provides an overview of the services that are in the queue for suspension or termination based on the extension's configuration. It allows you to manually trigger the suspension or termination process for testing purposes, ensuring that you can see which services will be affected without actually executing the action.
Prorated Next Due Date
Allows you to synchronize the date of the next payment for all customer services. Also from the customer's zone.
Description
PUQ Customization module WHMCS
Order now | Download | FAQ
Prorated Next Due Date
The "Prorated Next Due Date" extension provides the ability for both administrators and clients to align their payment cycles to a specific day of the month.
This extension is designed for mass alignment of service payments to a designated day of the month for a particular client. It also empowers clients to independently perform such alignment.
The configuration of the extension includes the following parameters:
The mechanism of proration works as follows:
- It allows alignment for all services with different billing cycles.
- Alignment can be done for services with specific billing cycles.
- Only active and suspended services are eligible for alignment.
- If the Next Due Date matches the Prorata Date, the service does not participate in the alignment.
- Services with Next Due Date in the past are aligned to the nearest future Prorata Date (relative to the date of usage).
- Services with Next Due Date in the future are aligned to the nearest future Prorata Date from the Next Due Date.
- Proration invoices are created based on the service payment method (each payment method has its own invoice with proration items).
- If there is an unpaid position for a service in an invoice, the position will be removed, and the invoice will be adjusted.
- After invoice adjustment, if the invoice has no positions, it will be deleted.
- After alignment, a proforma proration invoice is generated.
- Importantly, the Next Due Date will only change after payment of the proforma proration invoice.
The module also includes a widget for the client area, allowing clients to manage the alignment of their payment dates independently.
Configuration
PUQ Customization module WHMCS
Order now | Download | FAQ
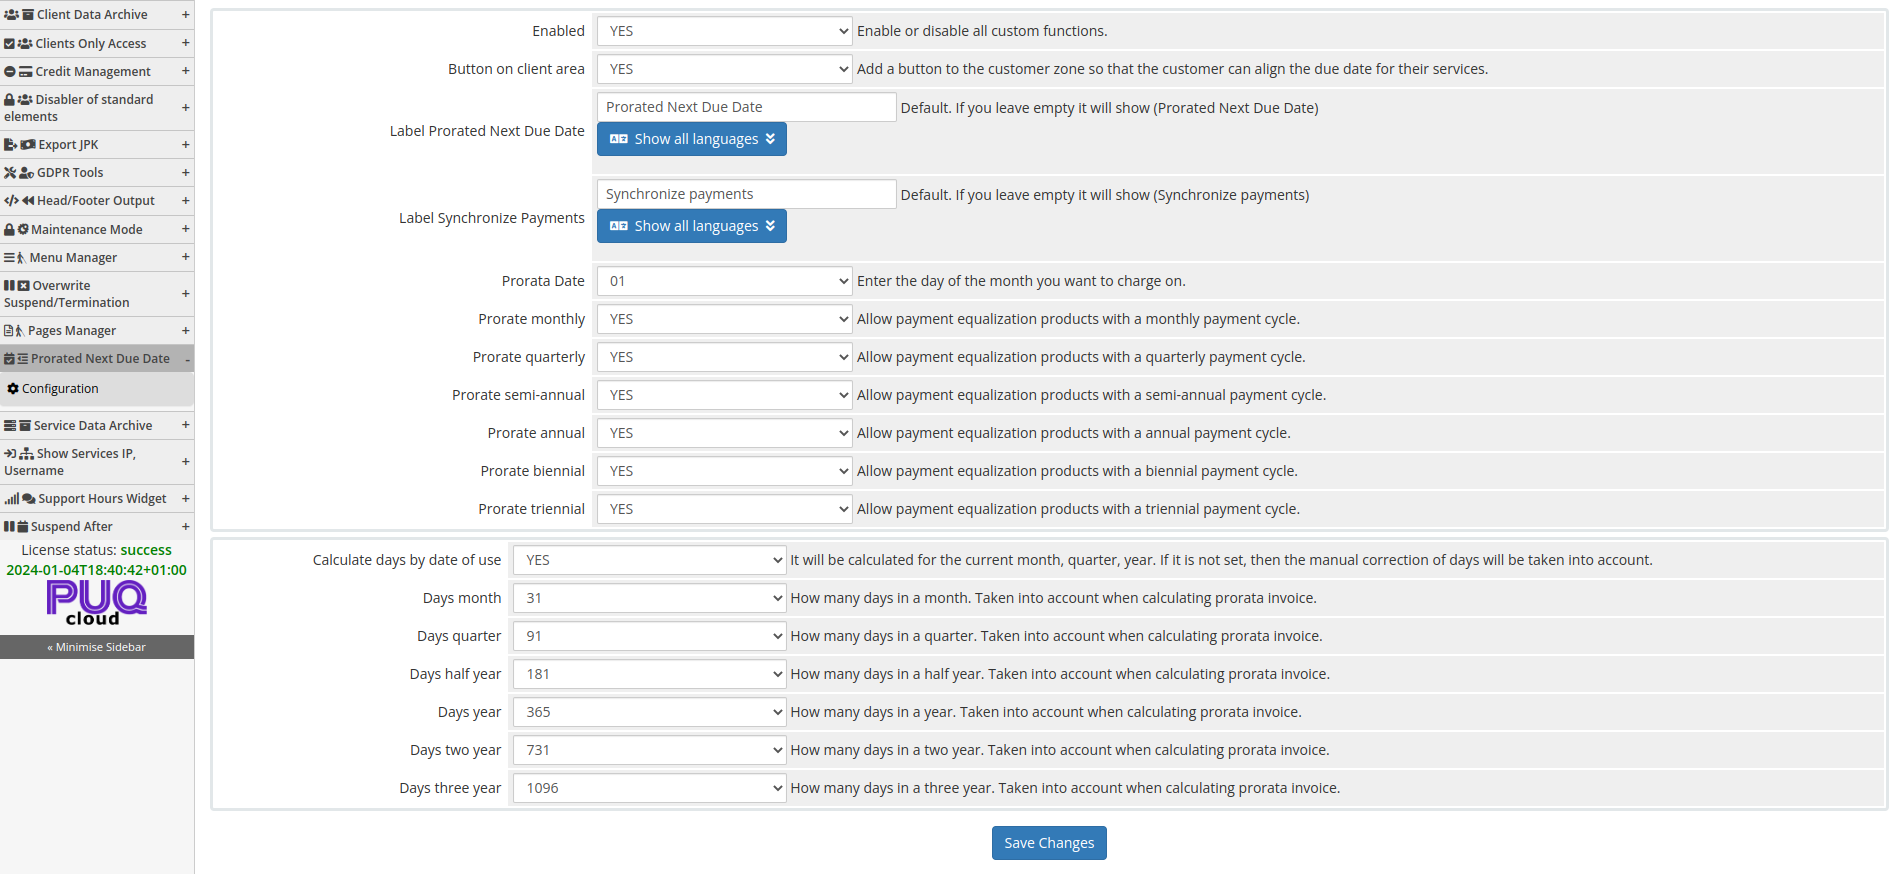
Enabled - Enabling or disabling all custom functions of this extension affects the automation and visibility of its features in the client area. When extension disabled, the automation capabilities and related features provided by the extension will not be active or visible to clients. However, as an administrator, you will still have access to configure and utilize the extension's functionalities through the administration interface. This gives you the flexibility to control the visibility and automation aspects of the extension based on your specific needs and preferences.
On the settings page, you can configure the following parameters:
Prorata Date: Enter the day of the month on which you want to charge for the services.
Prorate monthly: If set to "YES," it enables payment equalization for products with a monthly payment cycle.
Prorate quarterly: If set to "YES," it enables payment equalization for products with a quarterly payment cycle.
Prorate semi-annual: If set to "YES," it enables payment equalization for products with a semi-annual payment cycle.
Prorate annual: If set to "YES," it enables payment equalization for products with an annual payment cycle.
Prorate biennial: If set to "YES," it enables payment equalization for products with a biennial payment cycle.
Prorate triennial: If set to "YES," it enables payment equalization for products with a triennial payment cycle.
Calculate days by date of use: If set to "YES," the system will automatically calculate the number of days for the current month, quarter, and year. If not set, manual correction of days will be considered.
Days month: Specify the number of days in a month. This value is taken into account when calculating prorata invoices.
Days quarter: Specify the number of days in a quarter. This value is taken into account when calculating prorata invoices.
Days half year: Specify the number of days in a half-year. This value is taken into account when calculating prorata invoices.
Days year: Specify the number of days in a year. This value is taken into account when calculating prorata invoices.
Days two year: Specify the number of days in two years. This value is taken into account when calculating prorata invoices.
Days three year: Specify the number of days in three years. This value is taken into account when calculating prorata invoices.
Admin Area
PUQ Customization module WHMCS
Order now | Download | FAQ
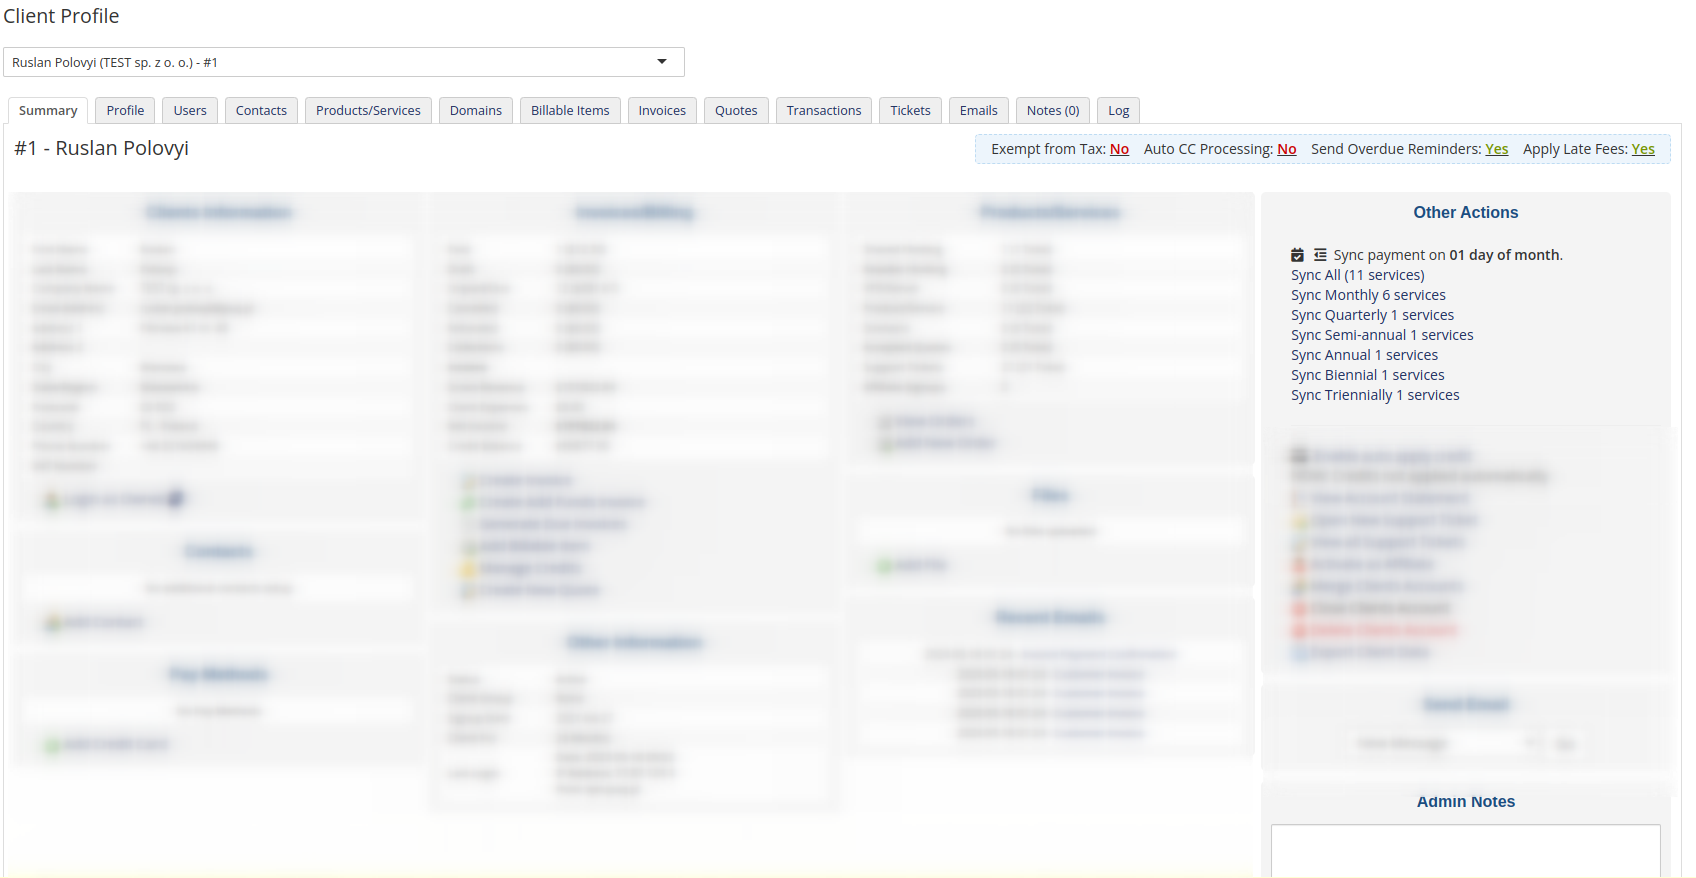
In the admin area of WHMCS, on the customer profiles, under the "Summary" tab, there is a section called "Other Actions" that provides a menu for administrators to synchronize the payment of all or selected services to a specific date.
- Sync payment on 01 day of the month.
- Sync All (11 services)
- Sync Monthly (6 services)
- Sync Quarterly (1 service)
- Sync Semi-annual (1 service)
- Sync Annual (1 service)
- Sync Biennial (1 service)
- Sync Triennially (1 service)
By selecting the desired option from the menu, the extension will perform proration and generate a proration invoice for the specified services.
This feature allows administrators to easily synchronize the payment cycles of services according to the chosen date, ensuring consistent billing and streamlining the management of customer accounts.
Client Area
PUQ Customization module WHMCS
Order now | Download | FAQ
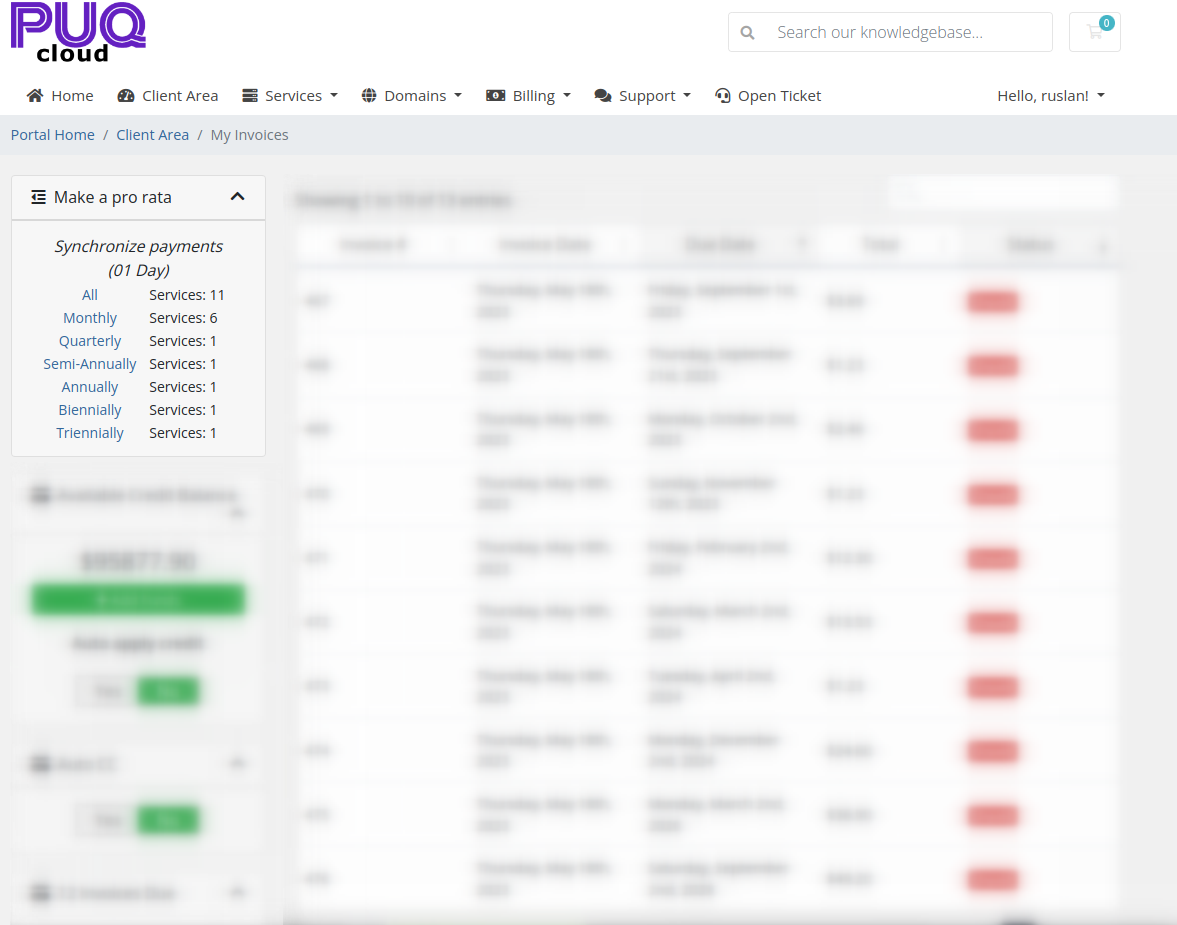
In the customer portal, there is a widget that allows clients to align the payment cycles of their services. It appears as a menu with the following options:
Synchronize payments (01 Day)
- All Services: 11
- Monthly Services: 6
- Quarterly Services: 1
- Semi-Annually Services: 1
- Annually Services: 1
- Biennially Services: 1
- Triennially Services: 1
When a client clicks on a specific option, the system will synchronize the payment cycles to the chosen day of the month. It will generate a proration invoice, and once the invoice is paid, all services will be set to the same due date.
This widget provides clients with a convenient way to manage and align the payment cycles of their services, ensuring easier financial planning and consistency in billing. By selecting the desired option, clients can streamline their payment schedules and simplify the management of their services.
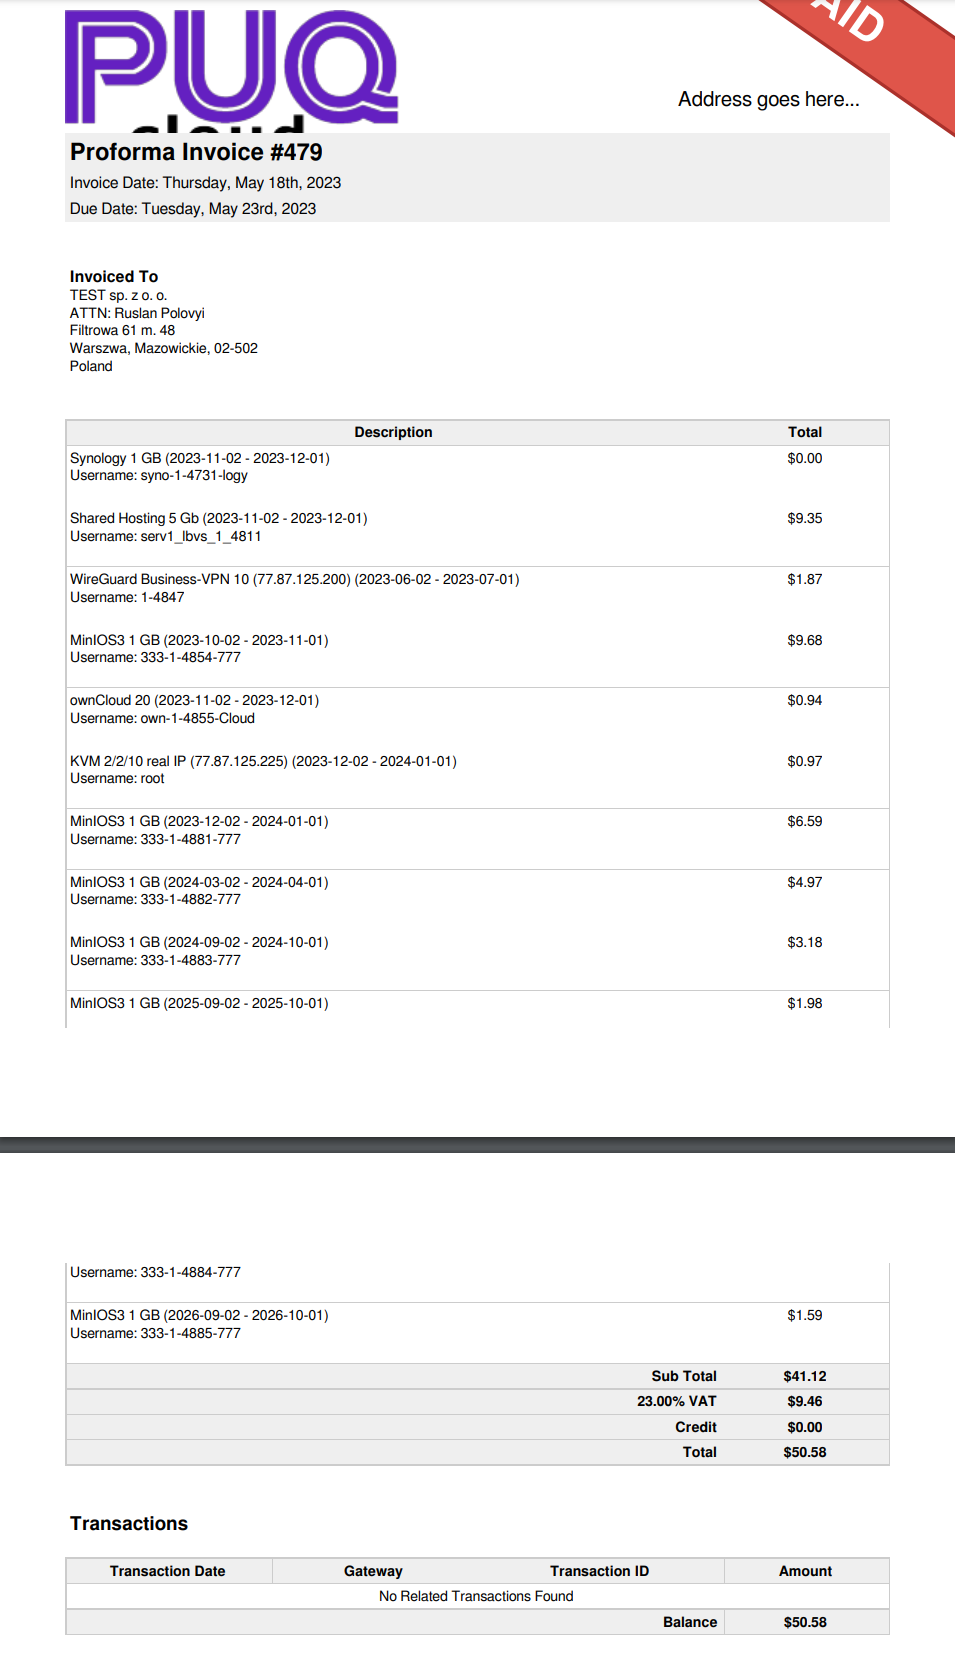
Service Data Archive
This functionality is designed to save all changes in the service configuration.
Description
PUQ Customization module WHMCS
Order now | Download | FAQ
Service Data Archive
The "Service Data Archive" extension provides a way to collect and store service information for clients. The extension runs on a cron job and gathers the following data:
Client: First name, last name, company name, email, address line 1, address line 2, city, state, postcode, country, phone number, tax ID.
Service: Package name, registration date, billing cycle, termination date, username, dedicated IP, assigned IPs, notes, custom fields, created date.
This data collection process is referred to as a "dump" because it gathers information about the client and their services in one place. This enables identification of the client even if they or their services have been deleted. The primary purpose of collecting service data is to control and preserve historical records of the client's services, such as the IP address. IP addresses often play a crucial role in cybercrimes committed by clients, and as a service provider, you may be obligated to provide your client's data to authorities in situations that require it. With this extension, finding a client based on the IP address associated with their service at a specific point in time becomes a seamless process.
The extension also offers a convenient search feature using Client ID, Service ID, or a search term, allowing you to easily locate the desired data.
Overall, the "Service Data Archive" extension helps you maintain control over and preserve historical service data, ensuring compliance with legal obligations and facilitating efficient client data management.
Configuration
PUQ Customization module WHMCS
Order now | Download | FAQ
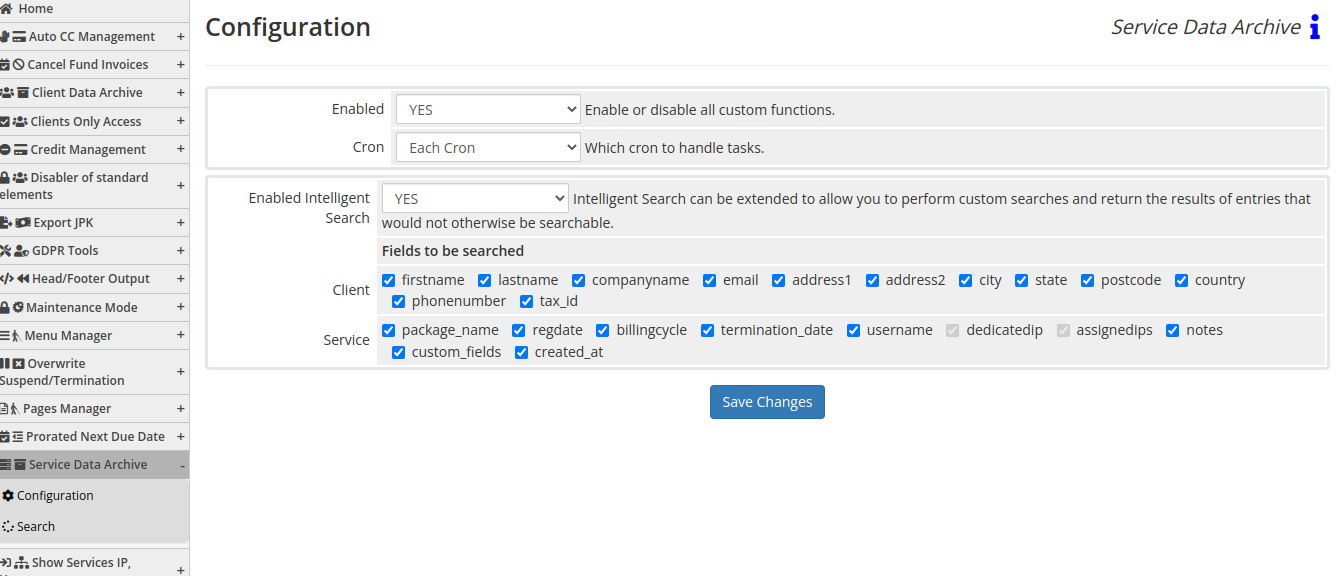
Enabled - Enabling or disabling all custom functions of this extension affects the automation and visibility of its features in the client area. When extension disabled, the automation capabilities and related features provided by the extension will not be active or visible to clients. However, as an administrator, you will still have access to configure and utilize the extension's functionalities through the administration interface. This gives you the flexibility to control the visibility and automation aspects of the extension based on your specific needs and preferences.
Cron:
- Daily Cron: Selects the daily cron job to handle tasks.
- Each Cron: Selects the Each cron job to handle tasks.
Enabled Intelligent Search - Enables the Intelligent Search feature, which extends the search capabilities to include custom searches and return results for entries that may not be searchable using standard search functions. (integrates smoothly with the WHMCS search system)
Next, there is a list with data fields that will participate in searches integrated into WHMCS. For a more precise search, select the required fields.
Search
PUQ Customization module WHMCS
Order now | Download | FAQ
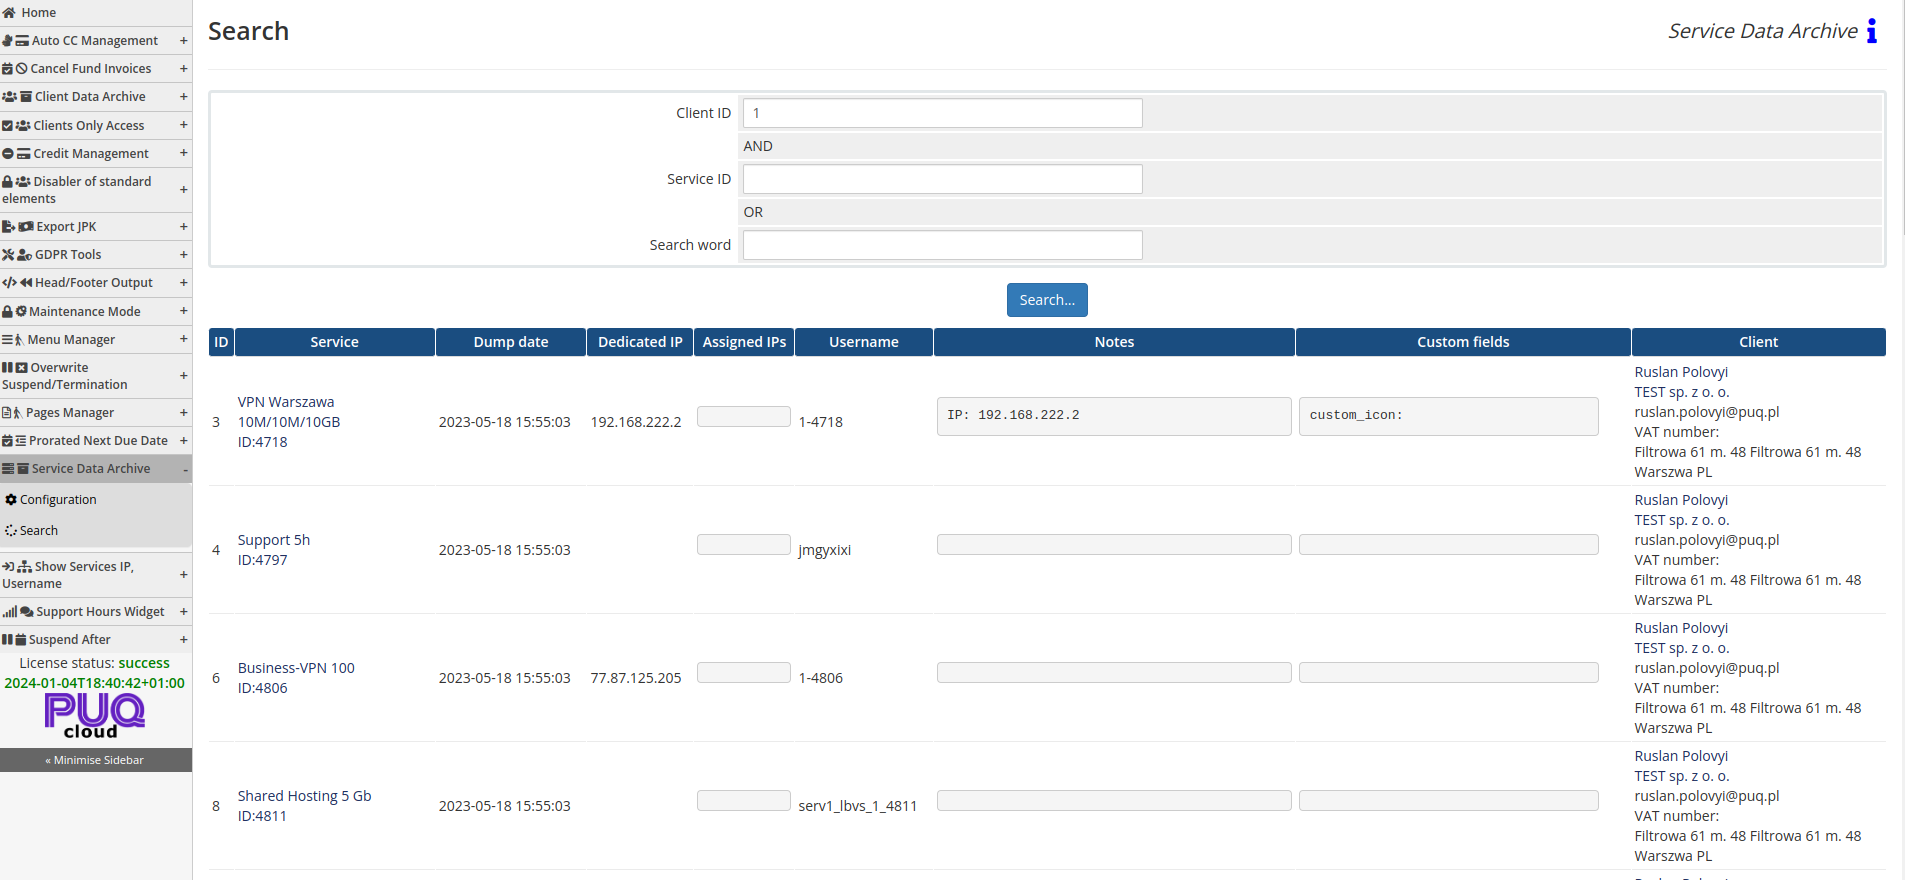
On the search page, you have the ability to search for service dumps using the following criteria: Client ID, Service ID, Search word.
After entering the search criteria, the resulting service dump entries will be displayed in a table with the following fields:
- Service: The name of the service.
- Dump date: The date when the dump was created.
- Dedicated IP: The dedicated IP address associated with the service (if available).
- Assigned IPs: The assigned IP addresses associated with the service (if available).
- Username: The username associated with the service.
- Notes: Any additional notes related to the service.
- Custom fields: Any custom fields associated with the service.
- Client: Client information, including first name, last name, email, and other details.
The table provides a convenient view of the search results, allowing you to easily review information about the found service dumps and facilitate the process of searching and managing data.
Intelligent Search
PUQ Customization module WHMCS
Order now | Download | FAQ
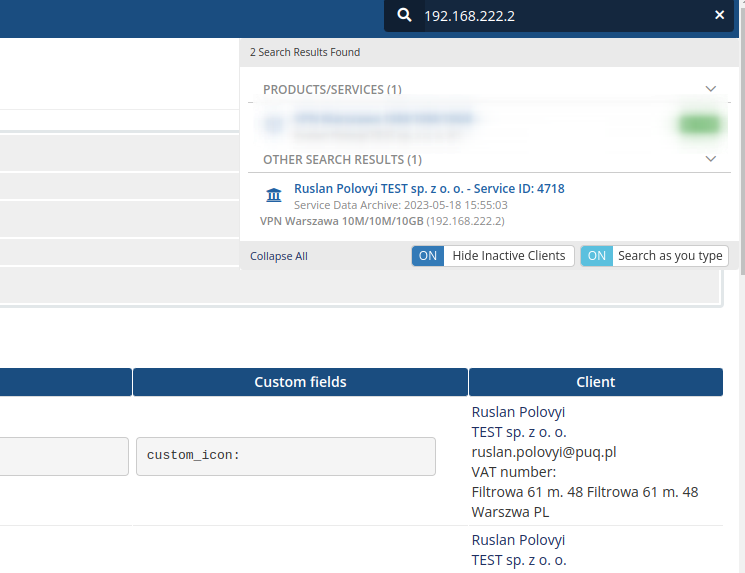
Intelligent Search:
The Intelligent Search feature is integrated into the WHMCS search system. When you enter any word or phrase into the WHMCS search, it performs a search across the database using a matching search word method. The results are displayed in the "Other Search Results" section of the search interface. This feature proves to be very useful for conducting searches in your day-to-day WHMCS administration tasks.
The Intelligent Search functionality enhances the search capabilities within WHMCS, allowing you to quickly find relevant information by matching search terms against the recorded data. It provides an efficient way to retrieve specific records or entries that match your search criteria, assisting you in efficiently managing your WHMCS system.
Show Services IP, Username
Shows the IP address / Username of the services in the invoice and in the lists of services in the client area.
Description
PUQ Customization module WHMCS
Order now | Download | FAQ
Show Services IP, Username
The extension allows for displaying the IP address and/or username of services in the service list within the client area. This feature enables clients to conveniently identify their services, especially when they have multiple ones.
Additionally, the extension allows adding the IP address and/or username of a service to the description of the corresponding item on the invoice. This functionality proves useful for both clients and you as it helps in identifying the service in relation to its position on the invoice.
The extension's configuration includes the following options:
-
Show IP on the invoices: This option determines whether the IP address should be displayed on the invoices.
-
Show IP in the lists of services in the client area: This option controls the display of the IP address in the service lists within the client area.
-
Show Username on the invoices: This option specifies whether the username should be shown on the invoices.
-
Show Username in the lists of services in the client area: This option governs the visibility of the username in the service lists within the client area.
These configuration settings provide flexibility in choosing which elements to display, allowing you to customize the visibility of IP addresses and usernames according to your preference and the needs of your clients.
Configuration
PUQ Customization module WHMCS
Order now | Download | FAQ
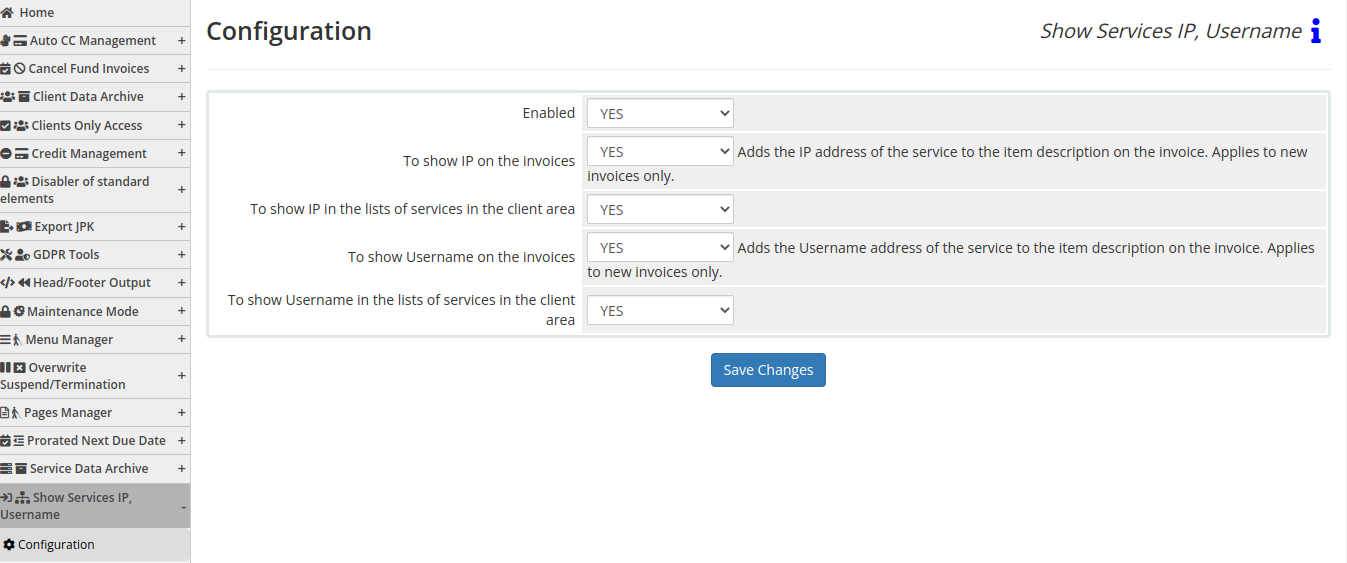
Enabled - Enabling or disabling all custom functions of this extension affects the automation and visibility of its features in the client area. When extension disabled, the automation capabilities and related features provided by the extension will not be active or visible to clients. However, as an administrator, you will still have access to configure and utilize the extension's functionalities through the administration interface. This gives you the flexibility to control the visibility and automation aspects of the extension based on your specific needs and preferences.
Show IP on the invoices - This option determines whether the IP address should be displayed on the invoices.
Show IP in the lists of services in the client area - This option controls the display of the IP address in the service lists within the client area.
Show Username on the invoices - This option specifies whether the username should be shown on the invoices.
Show Username in the lists of services in the client area - This option governs the visibility of the username in the service lists within the client area.
Result look like
PUQ Customization module WHMCS
Order now | Download | FAQ
Displaying a list of services in the client area has been introduced
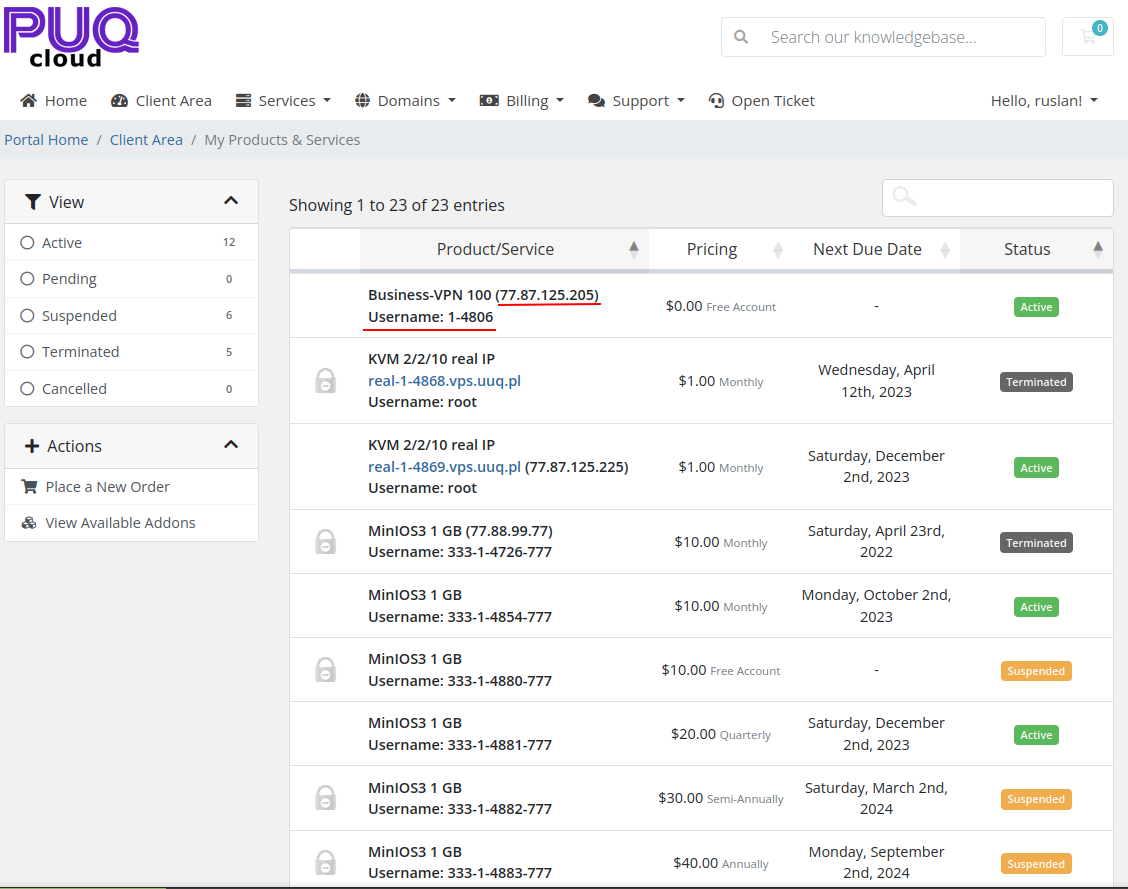
Invoice presented in client panel
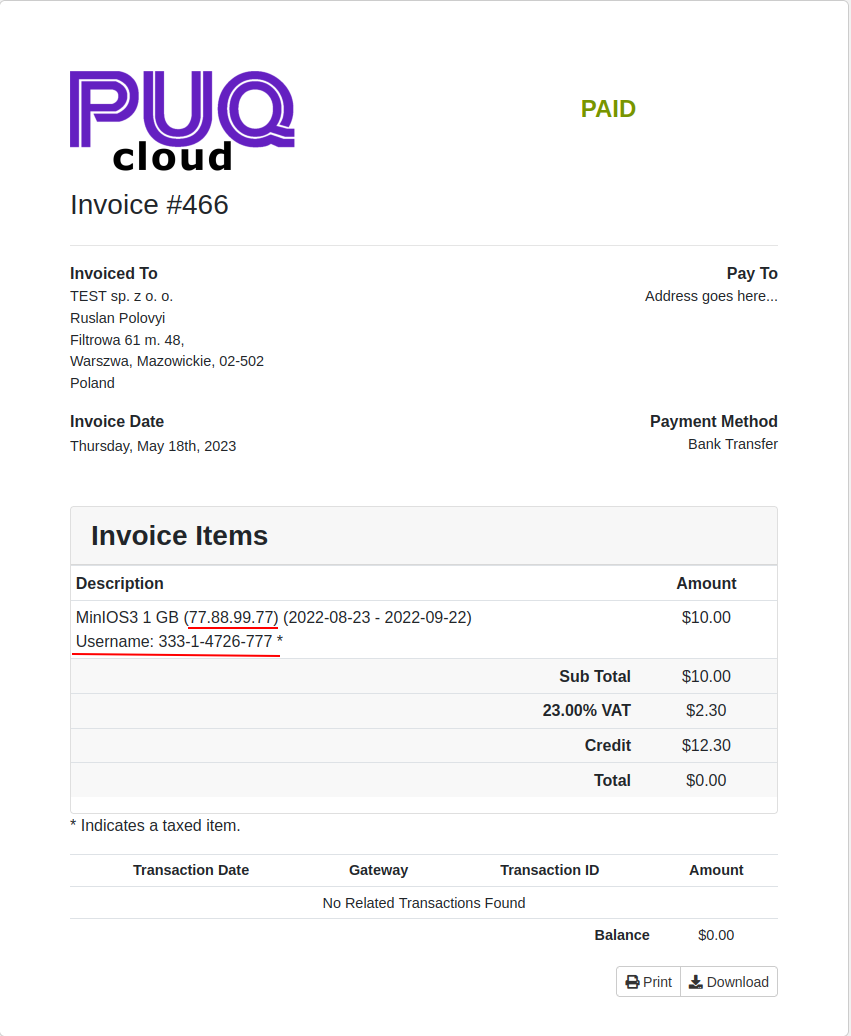
Presented invoice in PDF format
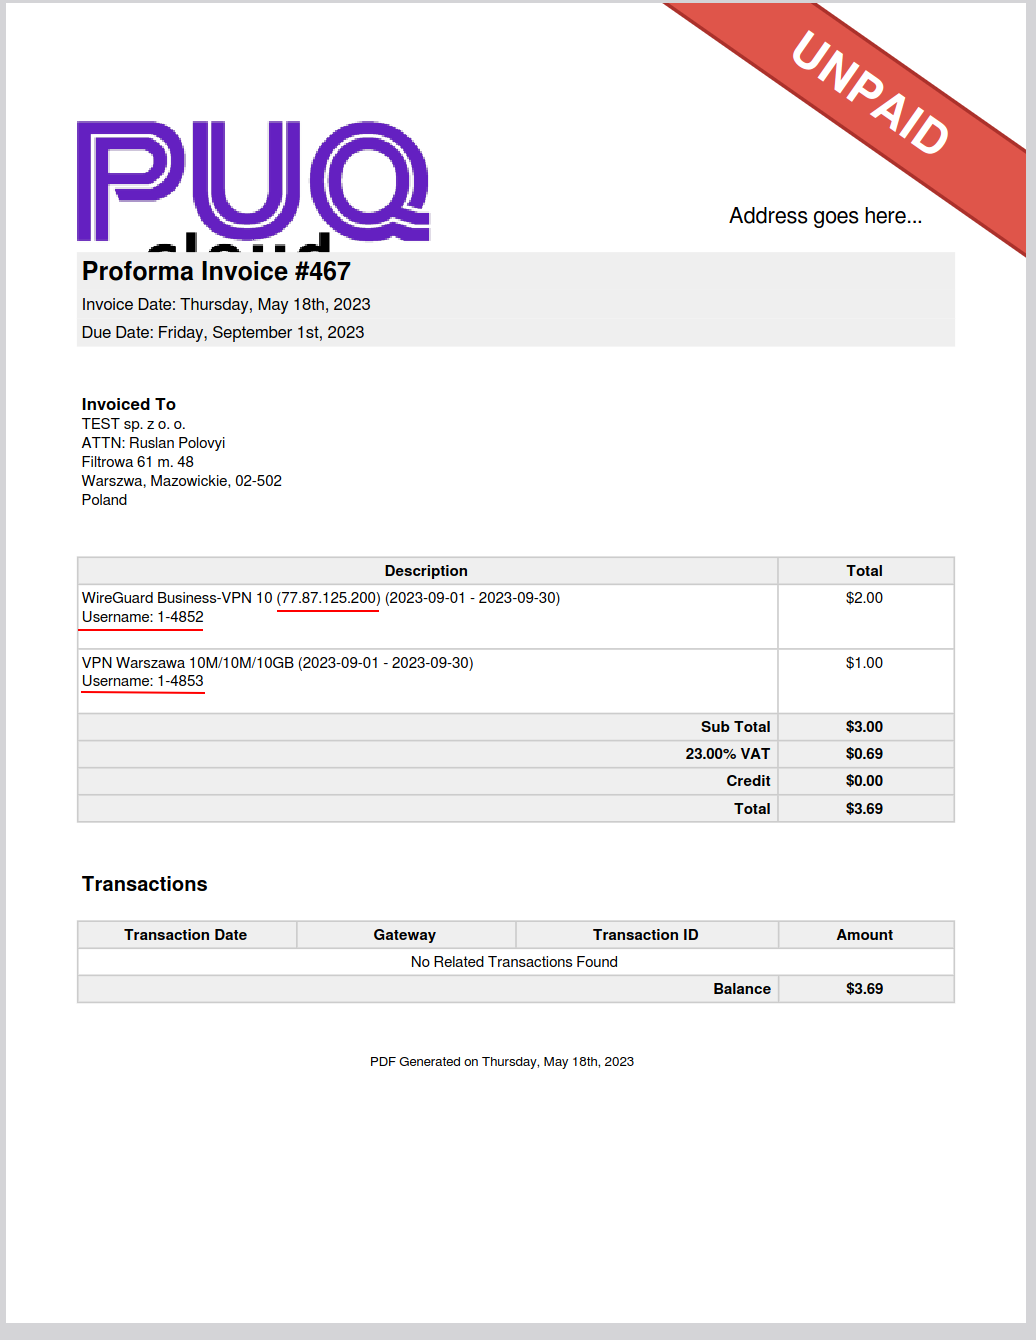
Support Hours Widget
Support hours widget in the top of the sidebar on the submit ticket page.
Description
PUQ Customization module WHMCS
Order now | Download | FAQ
The "Support Hours Widget" extension provides the ability to display a widget in the client area on the support ticket submission page, showing the support department's working hours and their online or offline status.
In the module configuration, you can configure the following data:
Panel Title: The title of the widget (supports multi-language).
Online Notice: The message to display when the support department is online (supports multi-language).
Offline Notice: The message to display when the support department is offline (supports multi-language).
Time Format: Choose between a 24-hour format or the American-style AM/PM format.
Additionally, you specify the working hours for the support department for each day of the week. You can also set a day as a non-working day or indicate 24/7 availability.
Based on the configured data, the extension will display the appropriate widget to the client based on the current day of the week and time. It's important to note that the status will be processed according to the server's timezone in WHMCS, so it's advisable to set it according to your target audience's timezone.
This widget enhances the customer experience by providing them with information about the support department's availability and working hours, helping them understand when they can expect assistance.
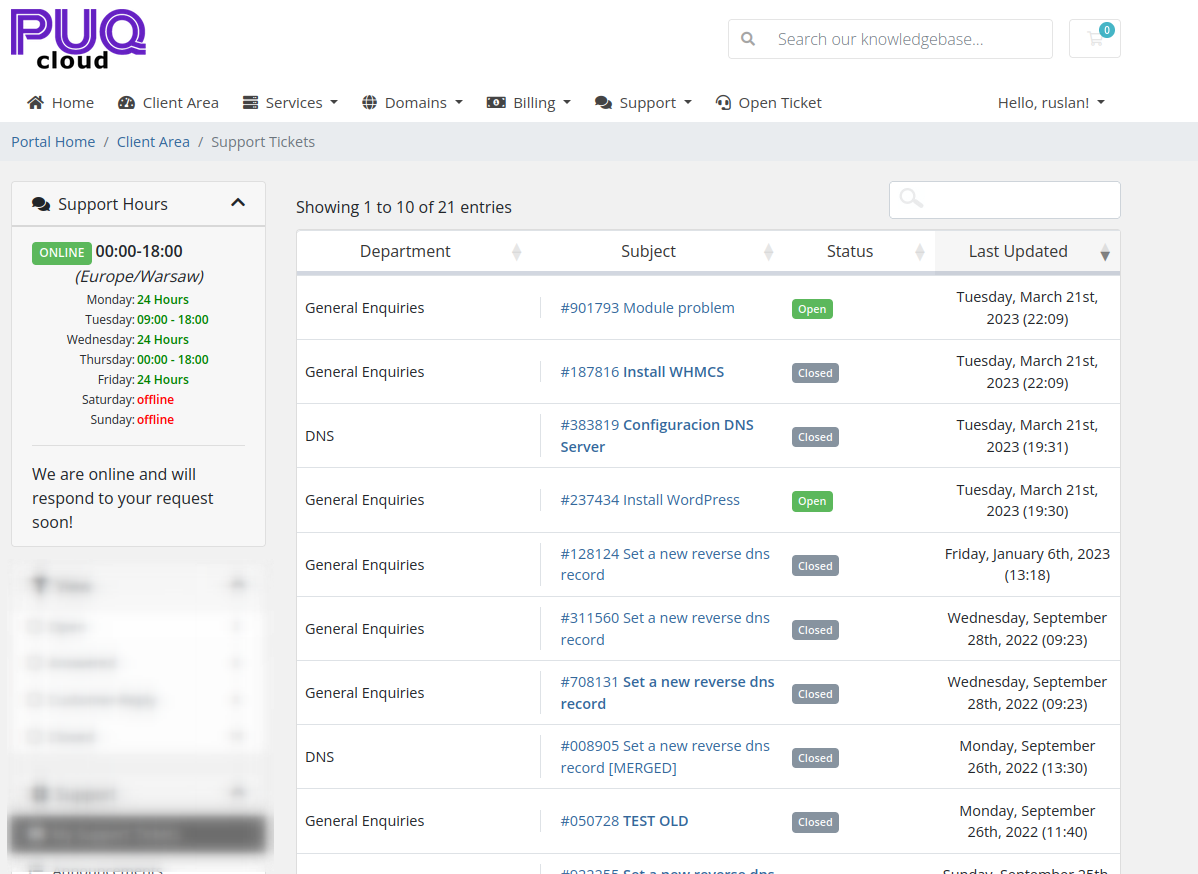
Configuration
PUQ Customization module WHMCS
Order now | Download | FAQ
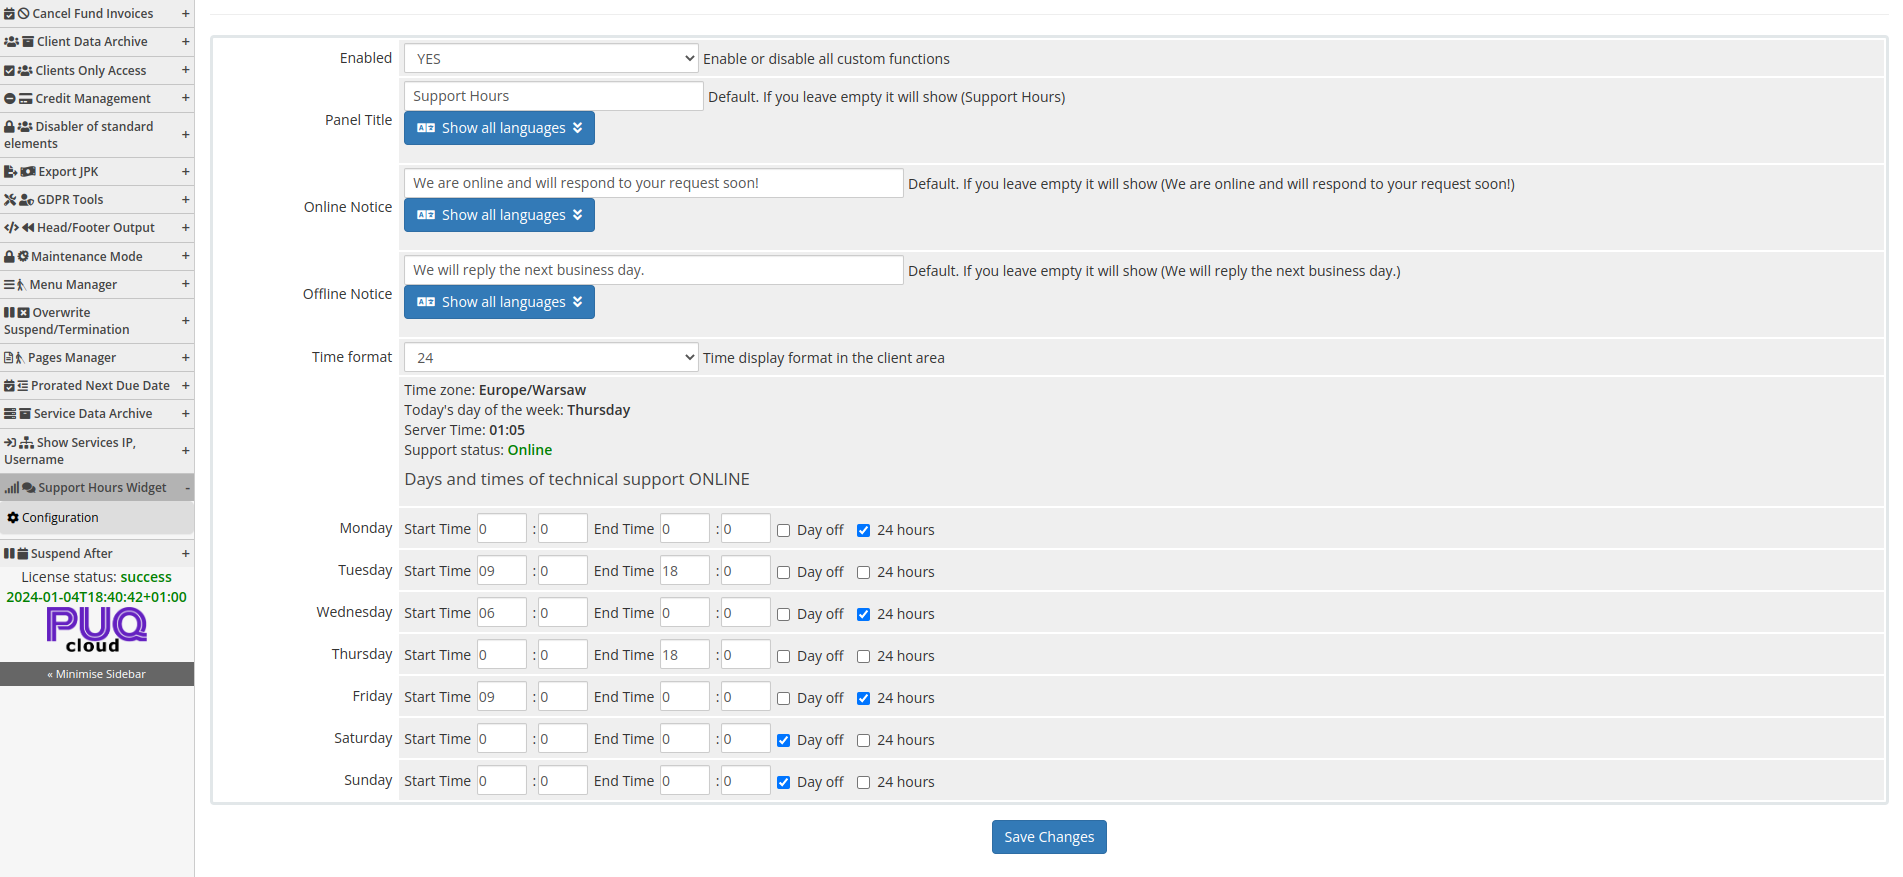
Enabled - Enabling or disabling all custom functions of this extension affects the automation and visibility of its features in the client area. When extension disabled, the automation capabilities and related features provided by the extension will not be active or visible to clients. However, as an administrator, you will still have access to configure and utilize the extension's functionalities through the administration interface. This gives you the flexibility to control the visibility and automation aspects of the extension based on your specific needs and preferences.
The extension provides the ability to display a widget in the client area on the support ticket submission page, indicating the support team's working hours and their online or offline status.
In the module configuration, you can set the following details:
-
Panel Title: The title of the widget (supports multi-language). You can specify the header for the widget that will be displayed in the client area. For example, "Support Hours".
-
Online Notice: The message displayed when the support team is online (supports multi-language). This message will be shown to the client when the support team is available to respond. For example, "We are online and will respond to your request soon!".
-
Offline Notice: The message displayed when the support team is offline (supports multi-language). This message will be shown to the client when the support team is unavailable. For example, "We will reply the next business day.".
-
Time format: The display format for time in the client area. You can choose between a 24-hour format or the AM/PM format.
-
Days and times of technical support availability: You can specify the working hours for the support team for each day of the week. Additionally, you have the option to mark a specific day as a day off or as a 24-hour working day.
Based on the configured settings, the extension will display the appropriate widget to the client, considering the working hours for each day of the week and the time of day. Please note that the support status will be processed based on the server's time zone in WHMCS, so it is advisable to set it according to your target audience's time zone.
Clien Area
PUQ Customization module WHMCS
Order now | Download | FAQ

Suspend After
Allows you to set the date and time after which you want to Suspend the client service.
Description
PUQ Customization module WHMCS
Order now | Download | FAQ
Suspend After
"Suspend After" is a unique add-on that allows administrators to set a date and time for suspending a client's service before the end of the billing cycle. This functionality serves several purposes. Firstly, it enables the automation of service suspension for violations of usage policies. For instance, if a virtual server belonging to a client has been compromised and is engaging in malicious activities, the client is notified and given 24 hours to rectify the issue. If no action is taken within that timeframe, the service will be suspended. This method helps the support team to ensure that problematic services are not overlooked.
Here are four examples of situations where this functionality can be beneficial:
-
Compliance Enforcement: If a client's service is found to be in violation of compliance regulations, such as hosting illegal content, the "Suspend After" feature can be utilized to automatically suspend the service after a specified grace period. This ensures prompt action is taken to address the violation.
-
Payment Reminders: In cases where a client's payment is overdue, the "Suspend After" functionality can be employed to set a deadline for payment. If the client fails to settle the outstanding balance within the specified timeframe, their service can be automatically suspended until payment is received.
-
Resource Abuse Prevention: If a client consistently exceeds the allocated resources of their service plan, causing strain on the server or negatively impacting other clients, the "Suspend After" feature can be used to temporarily suspend their service until the issue is resolved or they upgrade to a higher resource plan.
-
Security Response: In the event of a security breach or suspected malicious activity originating from a client's service, the "Suspend After" functionality can be employed to promptly suspend the service until a thorough investigation is conducted and the issue is resolved, ensuring the security and integrity of the system.
By using the "Suspend After" add-on, administrators can effectively manage and enforce compliance, streamline payment processes, prevent resource abuse, and maintain the security and stability of the hosting environment.
Configuration
PUQ Customization module WHMCS
Order now | Download | FAQ
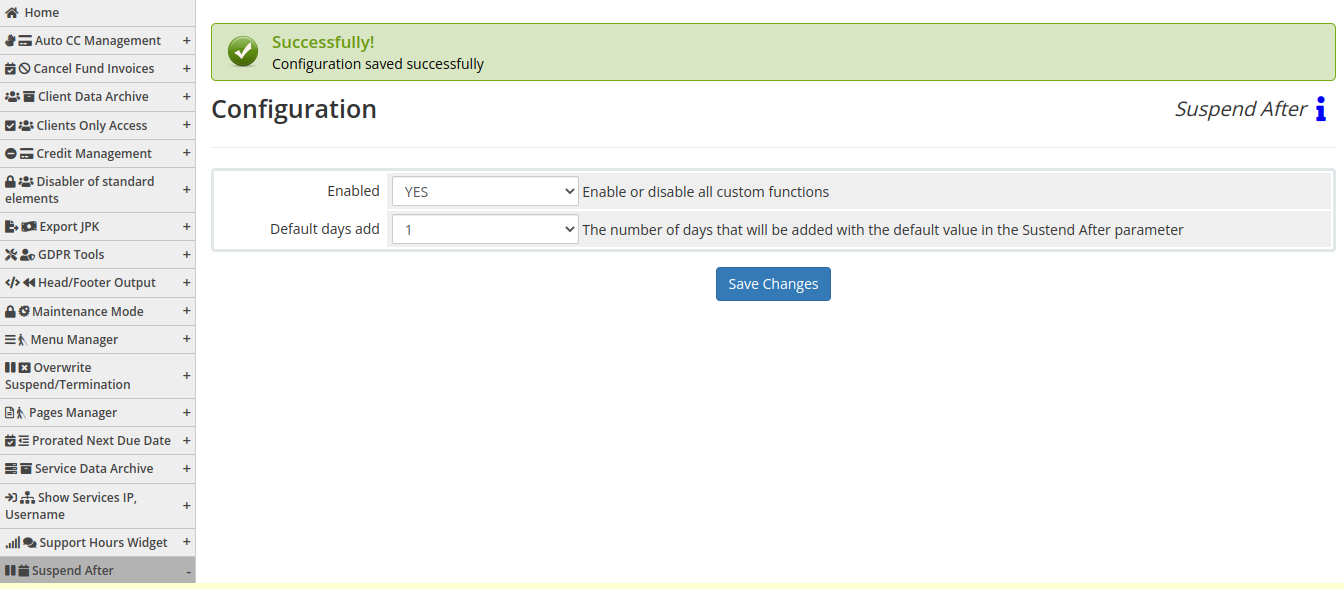
Enabled - Enabling or disabling all custom functions of this extension affects the automation and visibility of its features in the client area. When extension disabled, the automation capabilities and related features provided by the extension will not be active or visible to clients. However, as an administrator, you will still have access to configure and utilize the extension's functionalities through the administration interface. This gives you the flexibility to control the visibility and automation aspects of the extension based on your specific needs and preferences.
Default days add - The number of days that will be added with the default value in the Sustend After parameter
Pending suspend
PUQ Customization module WHMCS
Order now | Download | FAQ
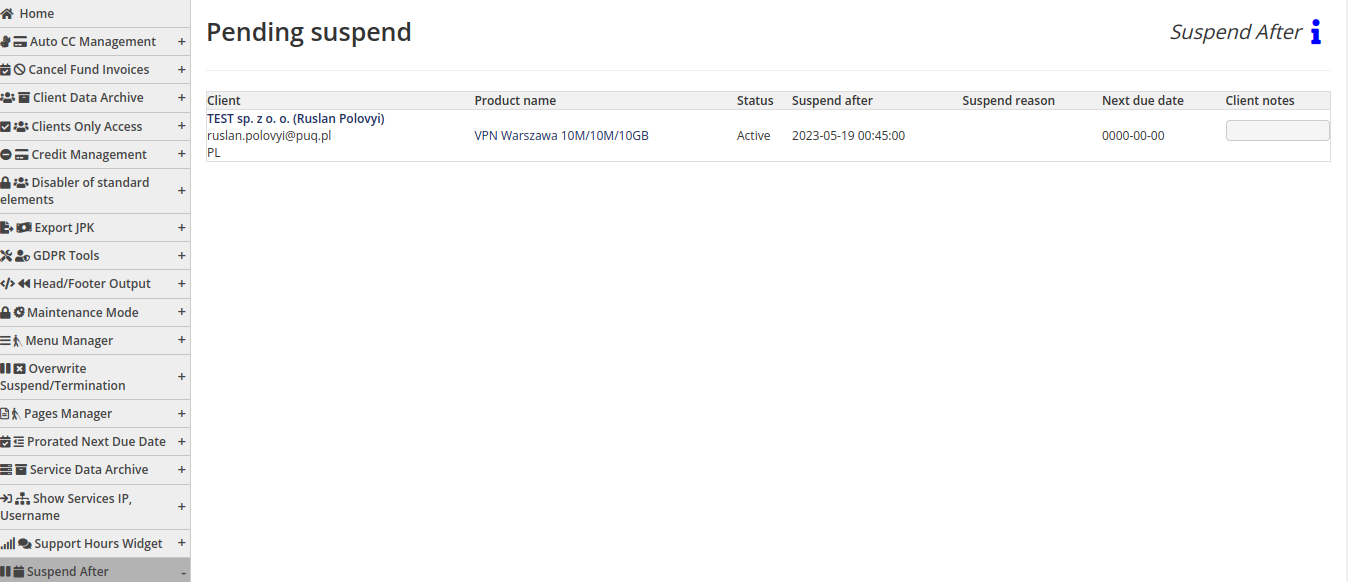
On the "Pending Suspend" page, you will find a list of services that are queued for suspension. The table consists of the following fields:
- Client: The name or identifier of the client associated with the service.
- Product Name: The name or description of the service/product.
- Status: The current status of the service, indicating whether it is pending suspension.
- Suspend After: The date and time when the service is scheduled to be suspended.
- Suspend Reason: The reason or explanation for the upcoming suspension.
- Next Due Date: The next due date or renewal date of the service.
- Client Notes: Any additional notes or comments related to the client or service.
This table provides an overview of services that are awaiting suspension, allowing you to manage and monitor the pending suspensions efficiently. You can review the details and take appropriate actions based on the information provided in each field.
Admin area
PUQ Customization module WHMCS
Order now | Download | FAQ
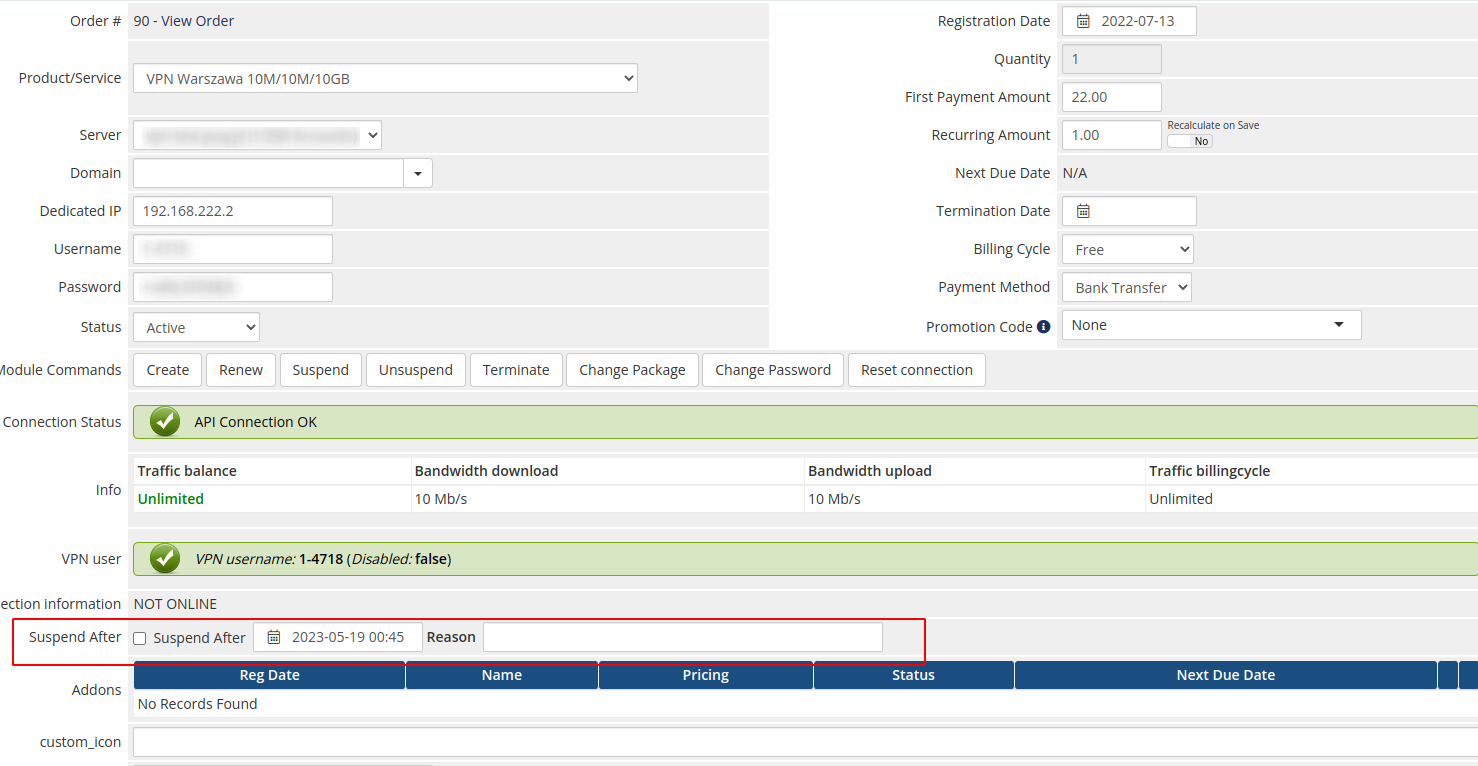
To set a date for when a service will be suspended, follow these steps:
-
Locate the specific service for which you want to configure the suspension. This can typically be done through the service management section or client management area of your administration panel.
-
Access the configuration settings for the chosen service. This may involve selecting the service and navigating to its details page or accessing an edit option for the service.
-
Look for the "Suspend After" field or checkbox within the service configuration. Enable the checkbox to activate the suspension feature.
-
Enter the desired date and time when the service should be suspended. This can usually be done by selecting a calendar date and inputting the time or by entering the date and time manually in a specific format.
-
Provide a reason or explanation for the suspension. This helps communicate the purpose of the suspension to both the client and the support team.
-
Save the changes to update the configuration for the service. This ensures that the specified suspension date and reason are applied.
By following these steps, you can effectively set a specific date and time for suspending a service, ensuring that it will be automatically blocked according to your configuration.
Blocking Ticket For Guests
PUQ Customization WHMCS Addon extension blocking ticket submission from unauthenticated users.
Description
PUQ Customization module WHMCS
Order now | Download | FAQ
Blocking Ticket For Guests
Description of the "Blocking Ticket For Guests" extension:
The "Blocking Ticket For Guests" extension is a robust, effective tool for managing ticket submissions within the WHMCS environment. Its primary function is to prevent non-registered users, or guests, from submitting support tickets, thereby streamlining the ticketing process and focusing resources on assisting registered users.
Key features of the extension include:
-
User Authentication: The extension implements a user authentication check before a ticket is submitted. If the user is not logged in, they will be unable to submit a ticket.
-
Redirection of Unregistered Users: In the event an unregistered user attempts to submit a ticket, they will be redirected to a login page. This ensures that only authenticated clients can interact with the support team through the ticketing system.
-
Custom Redirection: The extension provides the flexibility to specify the redirection page. This can either be a specific page set in the configuration or a custom page with a defined HTML message.
-
Maintained Functionality for Registered Users: For authenticated clients, the functionality remains unchanged. They are able to submit tickets to the support team without restrictions.
-
Menu Link Removal: The extension also removes "Open Ticket" links from the primary and secondary menus for unregistered users, minimizing the likelihood of ticket submission attempts by guests.
One notable aspect of the extension is the ability to customize redirections and messages, allowing it to be tailored to specific site requirements and providing users with a more intuitive and user-friendly feedback system.
The "Blocking Ticket For Guests" extension is an invaluable tool for you seeking to optimize their WHMCS support ticket system, enhancing client navigation and simplifying support operations. With a focus on user authentication, it ensures that support resources are dedicated to assisting registered clients, thereby improving overall service efficiency and user satisfaction.
Configuration
PUQ Customization module WHMCS
Order now | Download | FAQ
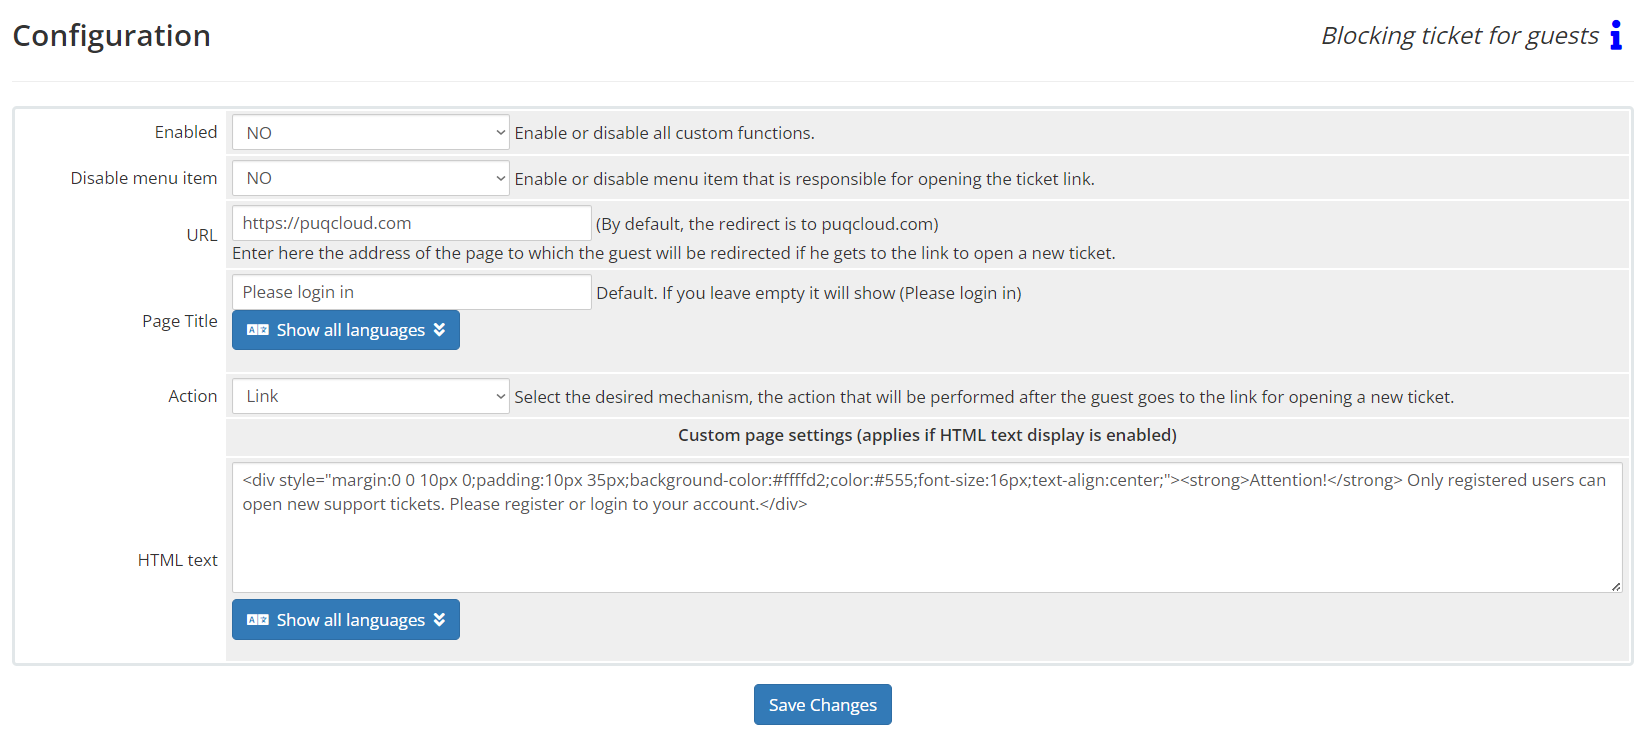
The "Blocking Ticket for Guests" extension configuration page, a part of the PUQ Customization WHMCS Addon, offers a robust set of options to enhance your WHMCS user experience:
-
Enabled: This control allows administrators to toggle the entire functionality of this extension, playing a critical role in WHMCS customization and user accessibility.
-
Disable menu item: This setting provides control over the availability of the ticket opening link in the menu, a feature that significantly impacts user navigation within WHMCS.
-
URL: This field allows redirection configuration for guests attempting to open a new ticket, an essential security measure in the WHMCS ticketing system.
-
Page Title: A customizable element for the login page title, this option also supports multilingual settings, contributing to international user friendliness of your WHMCS system.
-
Action: This selection lets administrators determine the action after a guest clicks the ticket opening link, a pivotal choice in the WHMCS user journey.
-
HTML text: This field allows the input of HTML text, providing an opportunity for personalized messages on your WHMCS system in different languages.
At the end of the configuration process, the changes can be saved with a dedicated "Save Changes" button.
Optimize your WHMCS system with the "Blocking Ticket for Guests" extension, part of the PUQ Customization WHMCS Addon, to enhance user navigation, security, and overall experience. Remember, the actual labels on the buttons and fields may vary depending on the current interface language.
Disabler of standard elements
"Disabler of Standard Elements" is an extension for the WHMCS system, enabling precise control over the visibility of standard interface components to enhance user experience.
Description
PUQ Customization module WHMCS
Order now | Download | FAQ
Disabler of Standard Elements
The "Disabler of Standard Elements" is an integral component of our PUQ Customization module, designed to offer a higher degree of control over the standard WHMCS interface. This extension affords you the ability to disable specific standard elements such as navigation bars, sidebars, and panels within the client area, thereby providing a cleaner and more focused user experience.
The key functionality of our extension lies in its ability to custom tailor the WHMCS system's appearance without altering the core code. It's not merely a theme or hook; rather, it's a collection of logical extensions that enables you to modify your WHMCS frontend in a way that suits your specific business needs while maintaining a universal graphic design across different themes.
One of the distinct features of this extension is its seamless compatibility and multilingual support. Without the need to manually edit language files, it fully supports multilingual capabilities, making it highly accessible and user-friendly. Its settings are easily adjustable, allowing you to modify the extension as per your requirements.
Each functionality within the extension can be enabled or disabled with ease to ensure smooth operation and prevent any conflicts with other modules.
A glimpse into the functionalities offered by the Disabler of Standard Elements extension:
This description provides just a snapshot of the extensive range of features and functionalities offered by our "Disabler of Standard Elements" extension. We continuously strive to update and improve our module based on your feedback and needs. We believe that this extension will serve as a powerful tool for creating a unique and customizable WHMCS experience for you and your clients.
Configuration
PUQ Customization module WHMCS
Order now | Download | FAQ
 The "Blocking Ticket for Guests" extension configuration page, a part of the PUQ Customization WHMCS Addon, offers a robust set of options to enhance your WHMCS user experience:
-
Enable or Disable All Custom Functions: If set to YES, this will enable all custom functions. If set to NO, it will disable them.
-
Turn Off Client Area Primary Sidebar: This option allows you to disable and enable the primary sidebar in the client area for either guests or registered users. The following items in the primary sidebar can be individually controlled:
- Client Details Sidebar
- Sidebar Invoices Summary
- My Invoices Status Filter
- My Services Status Filter
- My Domains Status Filter
- My Quotes Status Filter
- Ticket List Status Filter
- Network Status
- Account
- Profile
- Already Registered
-
Turn Off Client Area Secondary Sidebar: Similar to the primary sidebar, you can also control visibility of elements in the secondary sidebar for either guests or registered users. Elements in the secondary sidebar that can be individually controlled include:
- Sidebar Categories on Store
- Sidebar Actions on Store
- Sidebar Announcements Months
- Sidebar Support Knowledgebase Categories
- Sidebar Popular Downloads
- Sidebar Support
- Sidebar Domains Actions
- Sidebar Shortcuts
- Sidebar My Services Actions
- Sidebar Contacts
- Sidebar Billing
- Sidebar Recent Tickets
- Sidebar Choose Currency on Store
-
Turn Off Client Area Homepage Panels: You can disable and enable various panels on the client area homepage. The following panels can be individually controlled:
- Overdue Invoices Panel
- Active Products/Services Panel
- Register a New Domain Panel
- Recent Support Tickets Panel
- Recent News Panel
Each of these options is accompanied by a YES or NO dropdown box, allowing you to enable or disable the corresponding element as needed. Please make sure to save your changes after adjusting these settings.
Maintenance mode
Restricts user access to the site during maintenance.
Description
PUQ Customization module WHMCS
Order now | Download | FAQ
The "Maintenance Mode" extension provides advanced settings for managing the state of your maintenance page. It offers the following features:
- Enable/Disable Maintenance Mode: You can easily activate or deactivate maintenance mode, which redirects all visitors to the maintenance page. This is useful when you need to perform technical work on your website or services.
- Restrict Access to the Admin Area: The extension allows you to limit access to the WHMCS admin area for selected administrators. By doing so, you can ensure the security and confidentiality of your website's backend during maintenance.
- Redirect URL or Ready-made Solutions in Three Customizable Templates: You have the option to set a custom URL to redirect visitors during the maintenance period or use one of three customizable templates that you can choose from or modify according to your style and brand. These templates provide pre-designed layouts for your maintenance page, making it easy to create a professional and visually appealing experience.
- Countdown Timer for the Completion of Technical Work: The extension also includes a countdown timer feature. You can display a timer on the maintenance page, informing visitors about the remaining time until the completion of the technical work.
Overall, the "Maintenance Mode" extension empowers you to create a customized and engaging maintenance page for your WHMCS-powered website. It ensures that you can inform your customers about scheduled maintenance or temporary disruptions while maintaining a consistent brand identity and user experience.
Configuration
PUQ Customization module WHMCS
Order now | Download | FAQ
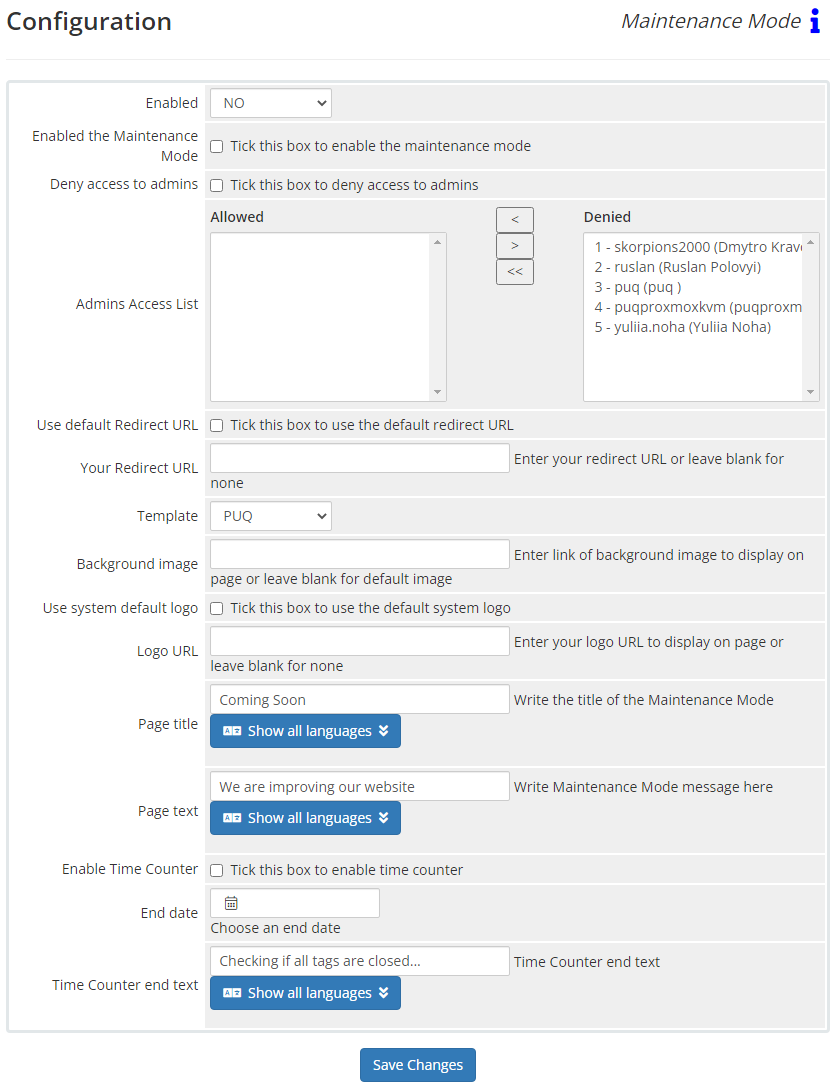
Enabled - Enabling or disabling all custom functions of this extension affects the automation and visibility of its features in the client area. When extension disabled, the automation capabilities and related features provided by the extension will not be active or visible to clients. However, as an administrator, you will still have access to configure and utilize the extension's functionalities through the administration interface. This gives you the flexibility to control the visibility and automation aspects of the extension based on your specific needs and preferences.
Enabled the Maintenance Mode - You can easily activate or deactivate maintenance mode, which redirects all visitors to the maintenance page.
Deny access to admins - Limit access to the WHMCS admin area for selected administrators. You can choose administrators whom you want to allow access to the admin panel during maintenance mode. (You cannot restrict access for yourself, as stated in the restriction.)
Allowed - A list of administrators who are granted access to the admin panel during maintenance mode.
Denied - A list of administrators who are denied access to the admin panel during maintenance mode.
Your Redirect URL - Set your own URL for redirect to display in the client area during maintenance mode
If the Use default Redirect URL option is enable, Your Redirect URL option will not work.
Use default Redirect URL - Enable this option to use our custom tamplates.
If the Use default Redirect URL option is disable, custom templates and all subsequent options will not work.
Template - Choose from ready-made page templates to display in the client area during maintenance mode.
You have the option to add your custom template! More information:
Background image - You can add your own background image to the page displayed in the client area during maintenance mode. Just enter the image link in this field.
If you leave this field blank, the default image will be used.
Use system default logo - Enable this option to use the logo you have set in the general settings of WHMCS.
Logo URL - You can add your own logo to the page displayed in the client area during maintenance mode. Simply enter the image link in this field.
If you leave this field blank and the "Use system default logo" option is disabled, no space for the logo will be displayed on the page.
Page title - Set your own title for the page displayed in the client area during maintenance mode (supports multi-language).
Page text - Set your own message about the technical work for the page displayed in the client area during maintenance mode (supports multi-language).
Enable Time Counter - Enable this option to add a timer that will be displayed in the client area during maintenance mode.
End date - Choose the date and time when the timer will expire.
Time Counter end text - You can specify the text that will be displayed below the timer when the time expires if you are unable to finish the technical work before the timer ends (supports multi-language).
Client Area
PUQ Customization module WHMCS
Order now | Download | FAQ
Templates displayed on the client area during maintenance mode
Puq
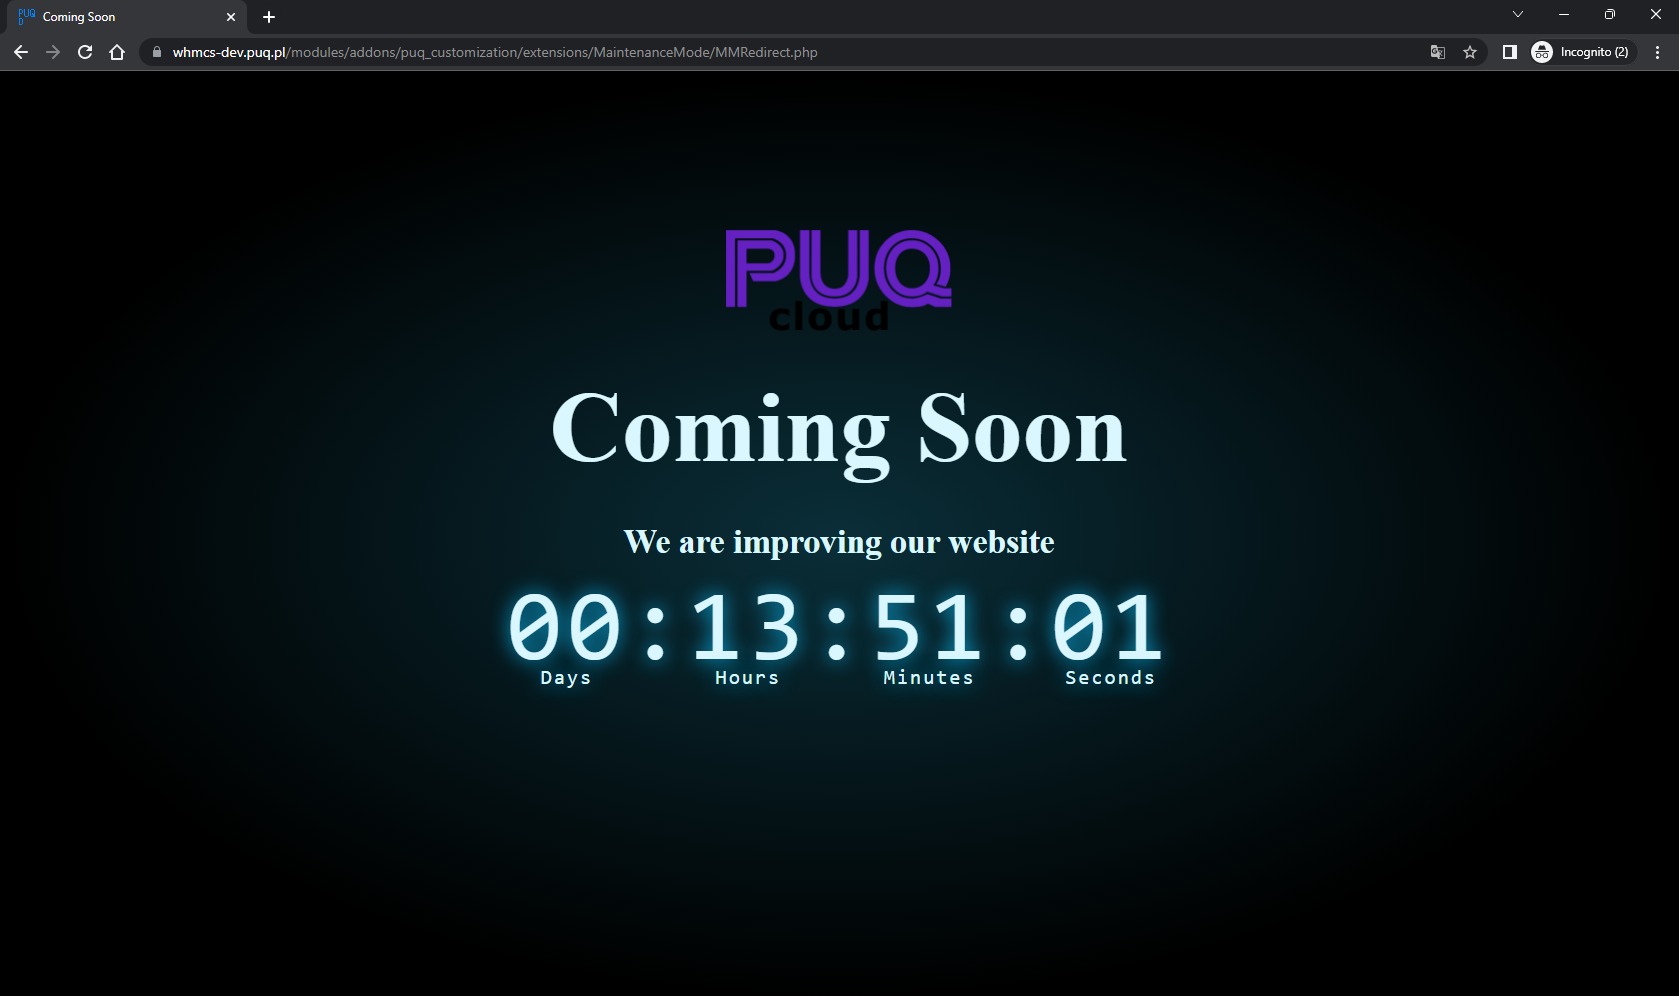
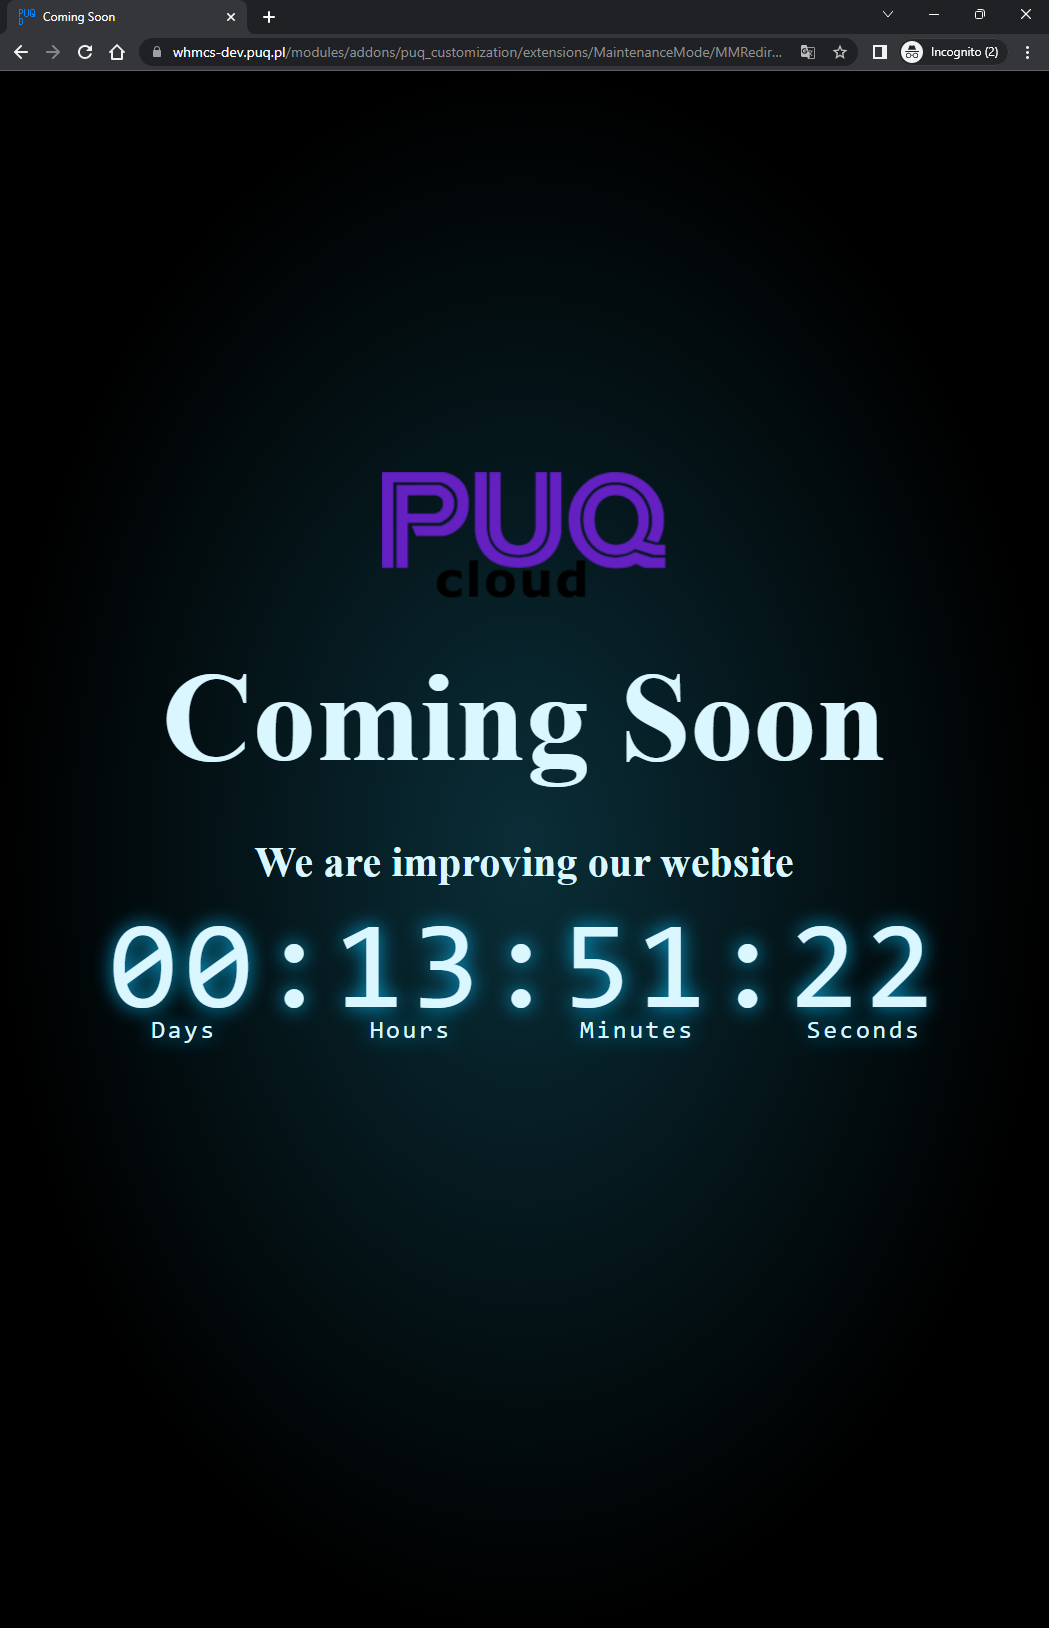
Basic
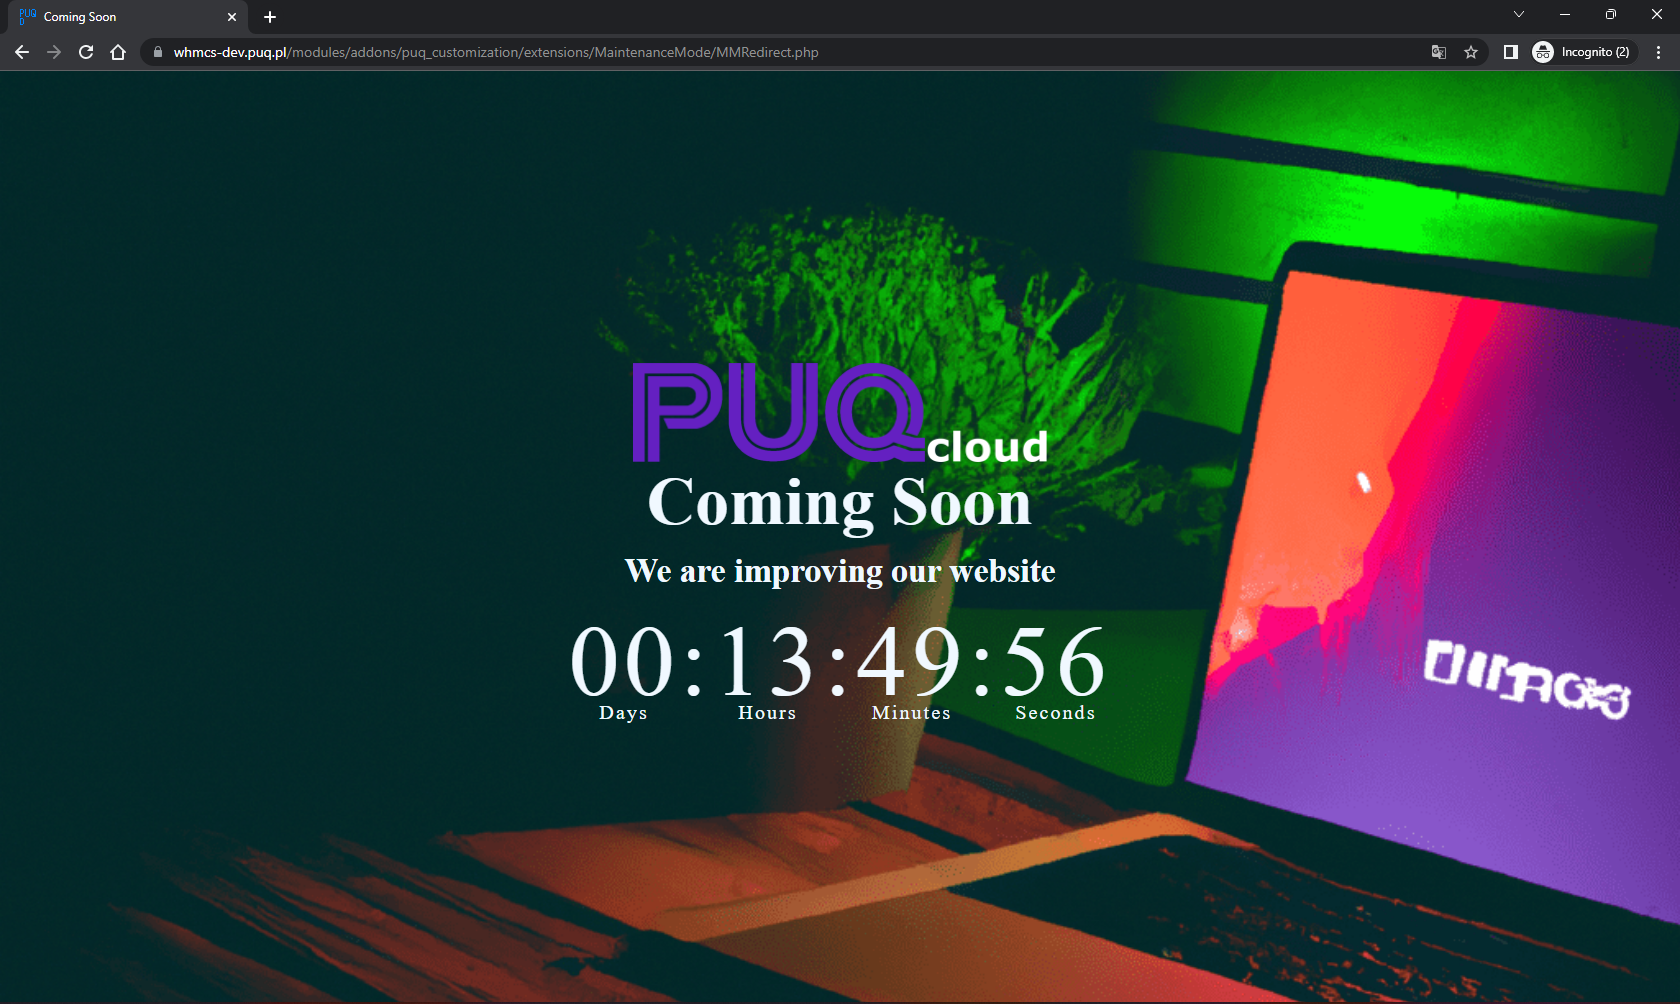
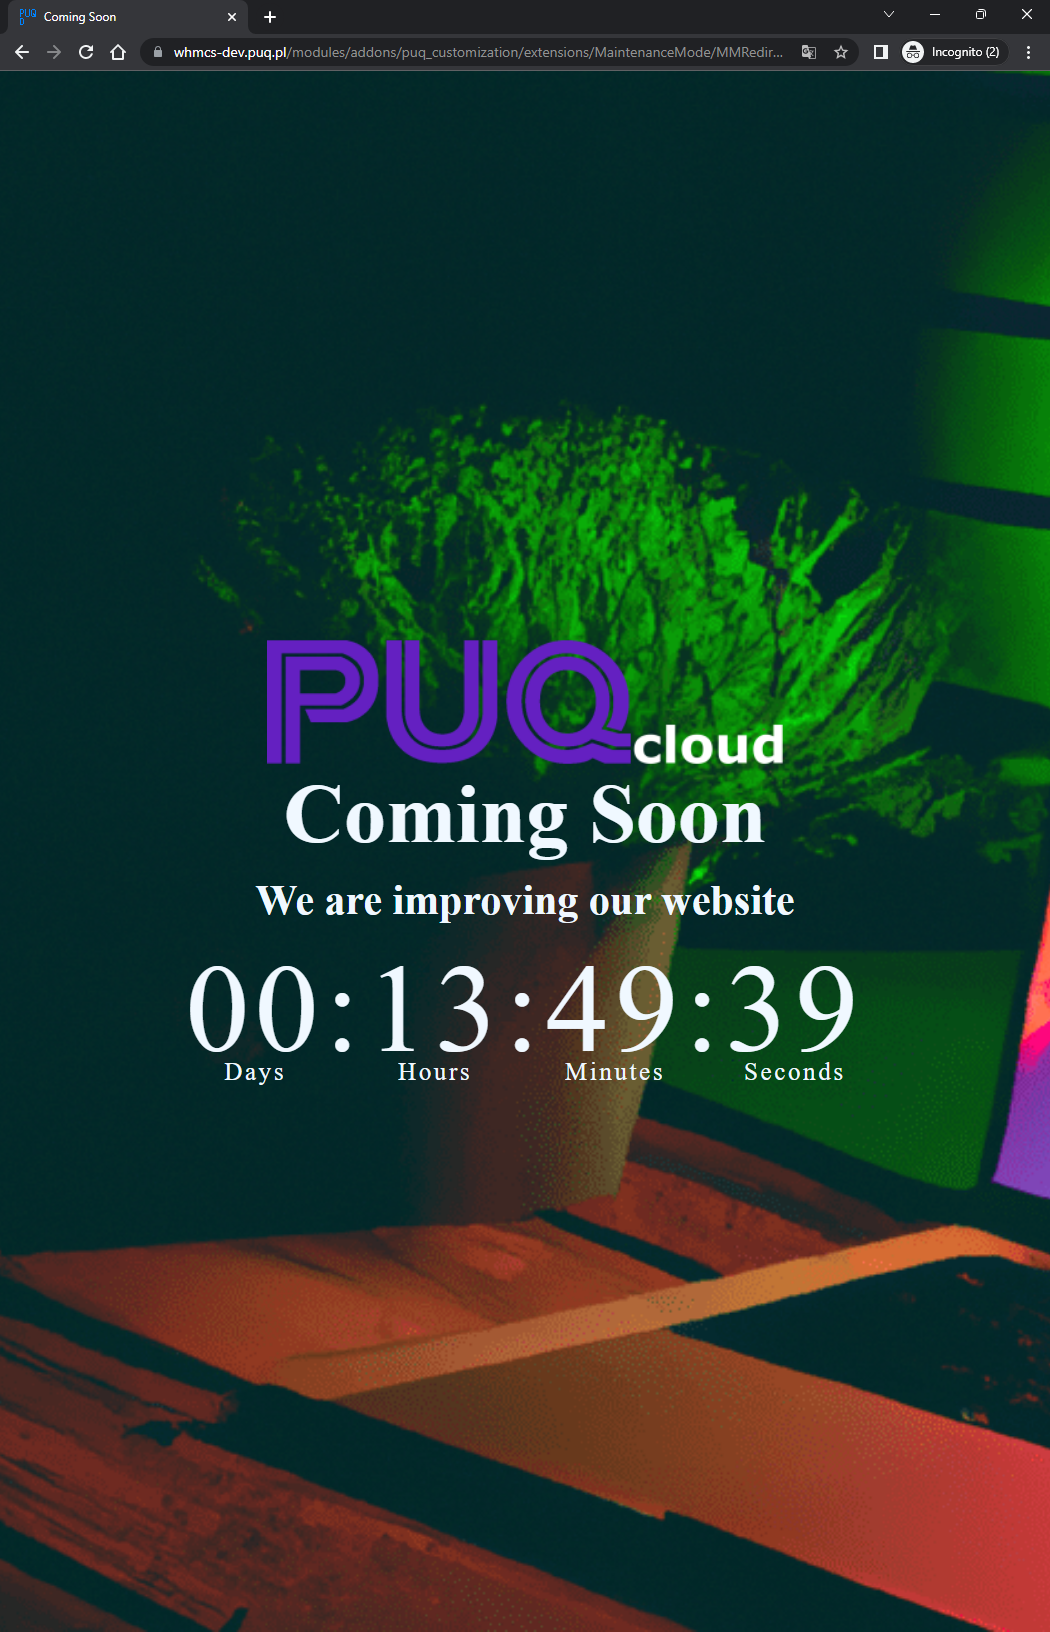
Columns
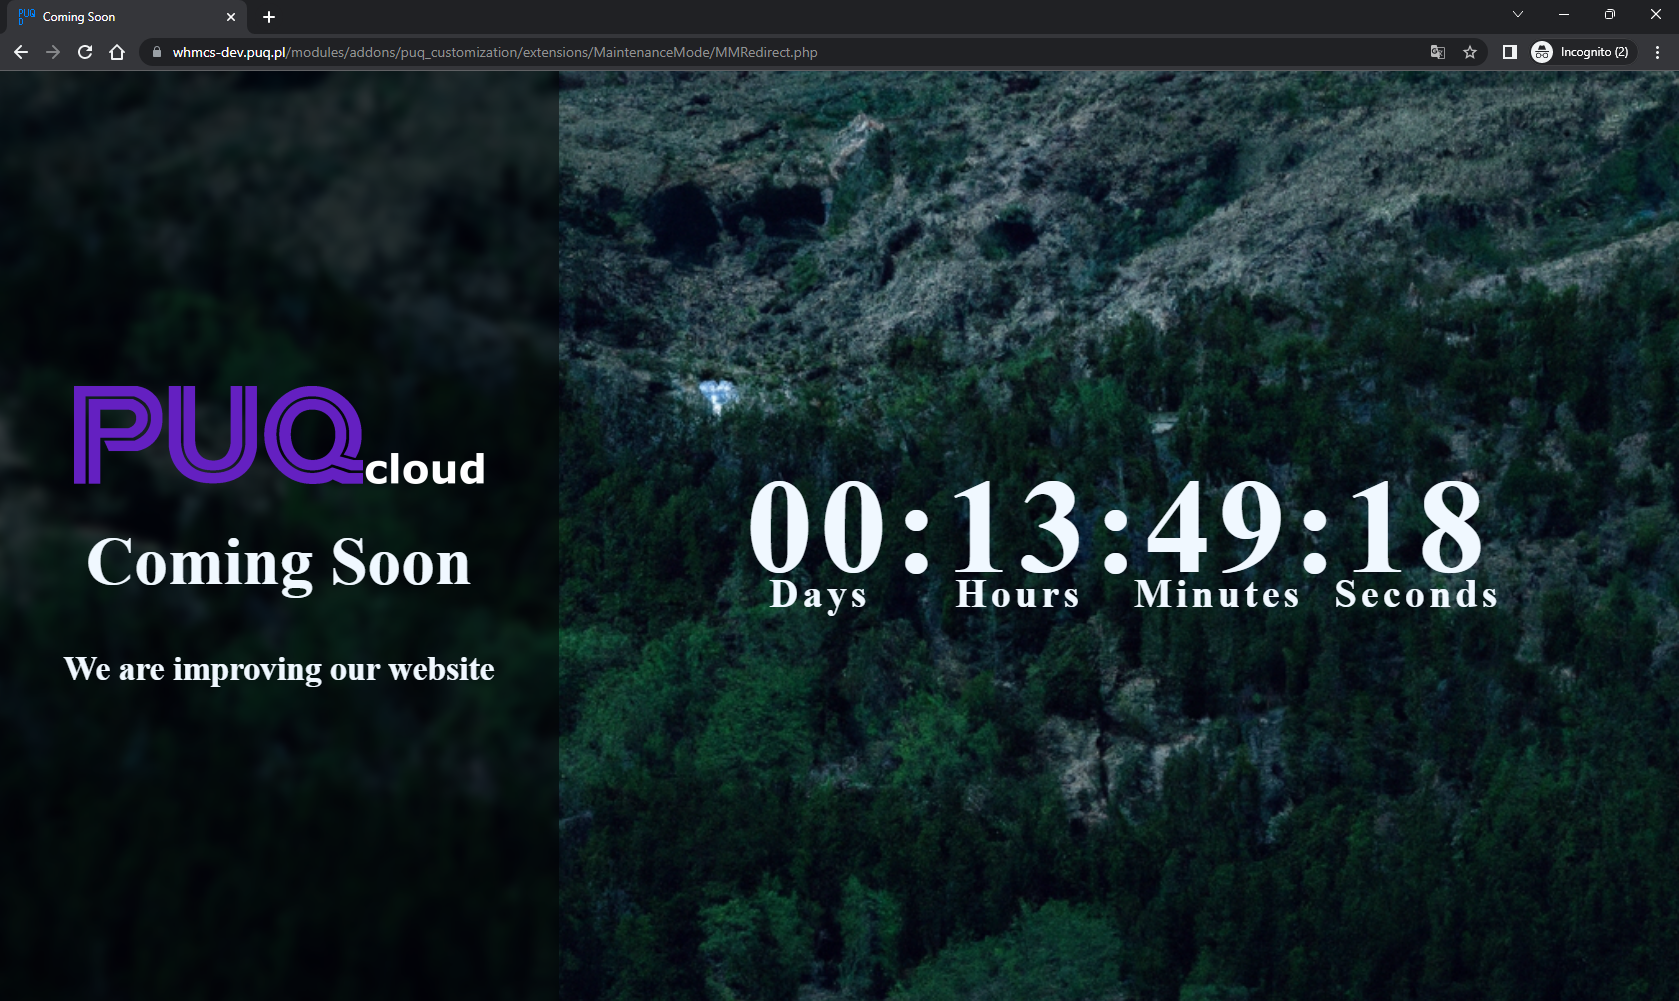

Custom Template
PUQ Customization module WHMCS
Order now | Download | FAQ
Your template should be named
custom.tpl, otherwise, it will contradict the logic of this extension, and your template will simply not be displayed.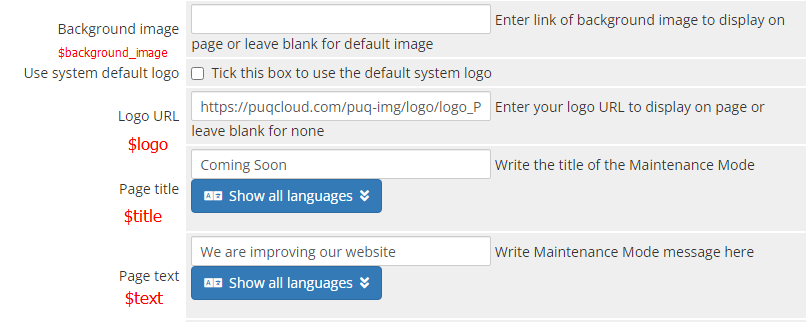
Example usage:
<style>
body {
margin: 0;
padding: 0;
background-image: url("{$background_image}");
background-size: cover;
background-position: center;
font-size: 2vw;
}
</style>Example usage:
<body>
<img src="{$logo}" alt="Logo">
</body>Example usage:
<head>
<title>{$title}</title>
</head>
<body>
<h1 class="title">{$title}</h1>
</body>Example usage:
<body>
<h1 class="text">{$text}</h1>
</body>To add a timer, insert the following code in the appropriate place:
{if $enabled_counter eq 'on'}
{include file='templates/timer.tpl'}
{/if}Now that your template meets the requirements, connect it to the MaintainceMode extension.
custom.tpl file to addons-> puq_customization-> extensions-> MaintainceMode-> templates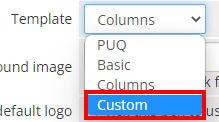
GDPR Tools
Assists with achieving GDPR compliance for your website.
Description
PUQ Customization module WHMCS
Order now | Download | FAQ
The "GDPR Tools" extension provides functionality for managing compliance with the GDPR (General Data Protection Regulation) on your website. GDPR is a data protection regulation in the European Union that requires businesses to protect individuals' personal data and give individuals control over their data. GDPR introduces requirements for consent, data subject rights, data breach notifications, privacy by design, and data processing agreements. Our WHMCS module helps websites comply with GDPR by managing consent, handling data requests, and implementing privacy measures.
The key features of the "GDPR Tools" extension include:
- Consent Management: The module allows you to effectively manage user consent for the processing and storage of their personal data. You can create custom agreements and include necessary privacy policies to comply with GDPR requirements.
- Implementation of Privacy Measures: The "GDPR Tools" module offers features that help you implement privacy measures required by GDPR. This includes the ability to pseudonymize or encrypt personal data, control data access, and enforce privacy policies by default.
- One-Click Data Deletion Request: The extension adds the feature for customers to request data deletion with a single button on the account details page. Once the request is made, a ticket is automatically created and sent to the administrator in the system for further action.
- GDPR Compliance: The "GDPR Tools" extension helps your website comply with key aspects of GDPR by enabling efficient data management and protection of personal information in accordance with the law.
Overall, the functionality of the "GDPR Tools" extension allows your website to effectively comply with GDPR requirements, ensuring data protection and providing users with control over their personal information, including the ability to easily request the deletion of their data.
Configuration
PUQ Customization module WHMCS
Order now | Download | FAQ
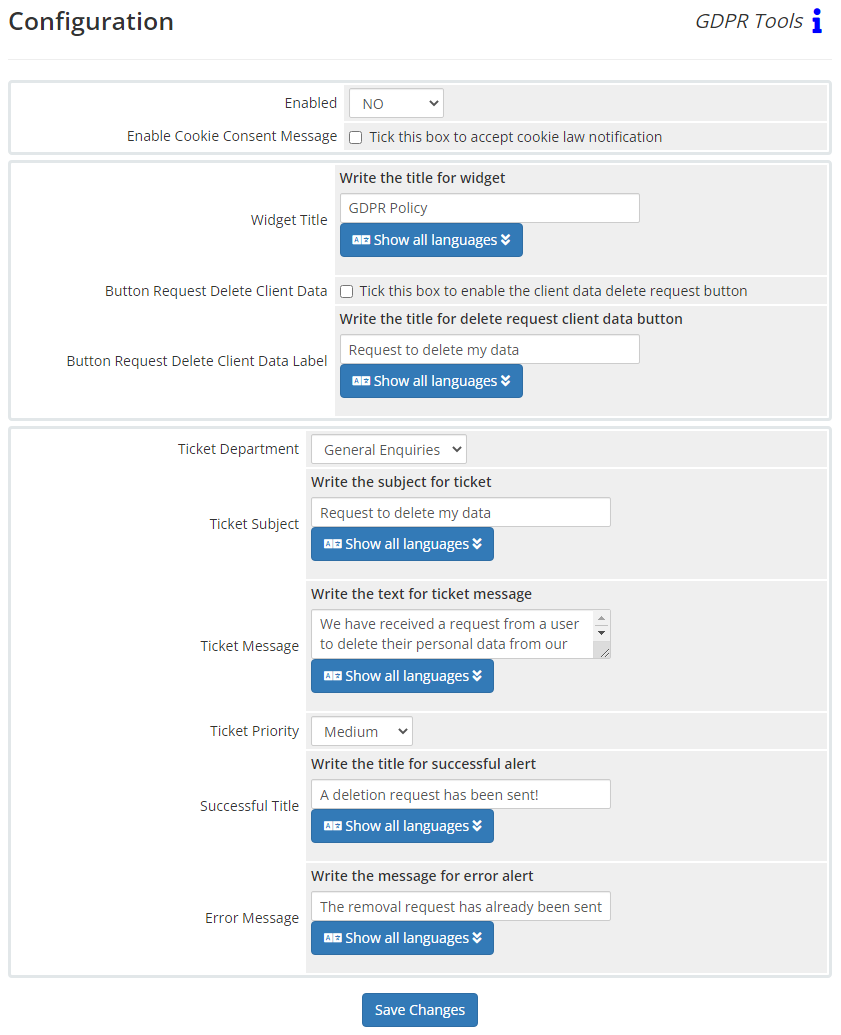
Enabled - Enabling or disabling all custom functions of this extension affects the automation and visibility of its features in the client area. When extension disabled, the automation capabilities and related features provided by the extension will not be active or visible to clients. However, as an administrator, you will still have access to configure and utilize the extension's functionalities through the administration interface. This gives you the flexibility to control the visibility and automation aspects of the extension based on your specific needs and preferences.
You can customize the banner for your website in the "Cookie Banner" tab. More information:
Client Data Deletion Request:
Widget Title - Set your own title for the widget displayed in the client area on the Account Details page (supports multi-language).
If this button is not enabled, the entire widget will not be displayed in the client area.
Ticket Department - Choose the department to which the ticket will be opened when the client clicks the button to request the deletion of their data.
Ticket Subject - Set your own subject for the ticket that will be opened when the client clicks the button to request the deletion of their data (supports multi-language).
Ticket Message - Set your own message for the ticket that will be opened when the client clicks the button to request the deletion of their data (supports multi-language).
Ticket Priority - Set the priority for the submitted ticket that will be opened when the client clicks the button to request the deletion of their data.
Successful Title - Set your own title that will be displayed to the client upon successful submission of the ticket when they click the button to request the deletion of their data (supports multi-language).
Error Message - Set your own error message that will be displayed to the client in case of an error while submitting the ticket when they click the button to request the deletion of their data (supports multi-language).
Cookie Banner
PUQ Customization module WHMCS
Order now | Download | FAQ
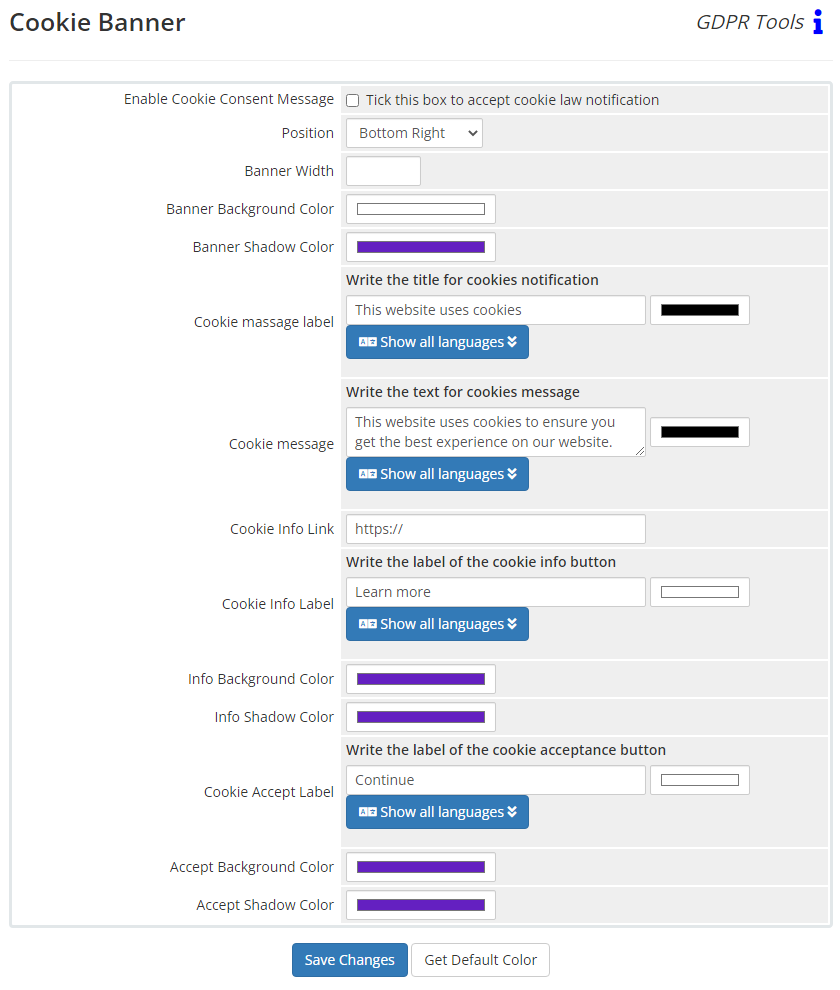
This configuration will help you customize the cookie consent banner message on your website to match your site's style.
Position - Select one of the positions on the page for the cookie consent banner message.
Info Background Color - Choose the background color of the information button on the cookie consent banner message.
Info Shadow Color - Choose the shadow color of the information button on the cookie consent banner message.
Accept Background Color - Choose the background color of the accept button on the cookie consent banner message.
Accept Shadow Color - Choose the shadow color of the accept button on the cookie consent banner message.
You can also click "Get Default Color" to set the default colors.
Deletion Request Table
PUQ Customization module WHMCS
Order now | Download | FAQ
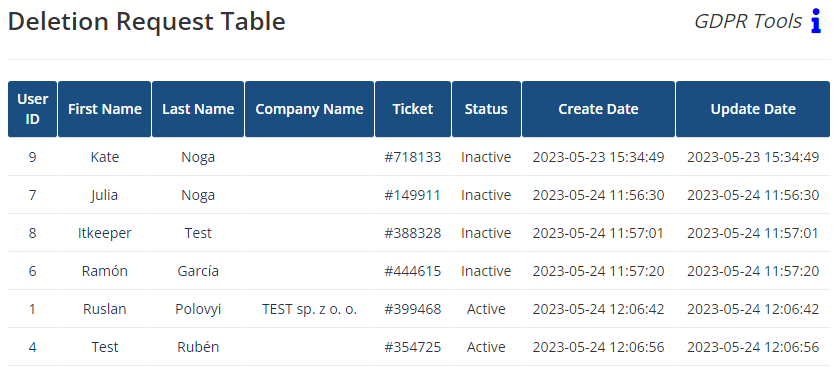
Deletion Request Table is a table that contains information about user data deletion requests. It includes the following columns: User ID, First Name, Last Name, Company Name, Ticket, Status, Create Date, and Update Date.
The table is useful for several reasons:
Tracking Deletion Requests: It allows you to track and manage user requests for data deletion. Each entry in the table represents a specific request made by a user.
User Identification: The User ID, First Name, and Last Name columns provide quick links to access detailed information about the user, enabling easy identification and retrieval of client records.
Ticket Management: The Ticket column provides a link to the description of the deletion request ticket. This helps in understanding the specific details and requirements of the request.
Status Monitoring: The Status column indicates the current status of each deletion request. It allows you to track whether a request is pending, completed, or in progress, providing visibility into the progress of data deletion operations.
Audit Trail: The Create Date and Update Date columns provide timestamps for when the deletion request was initially created and when it was last updated. This information can be valuable for audit purposes or to ensure compliance with data protection regulations.
In summary, the Deletion Request Table serves as a centralized repository for managing and monitoring user data deletion requests, providing a convenient way to access user information and track the progress of deletion operations.
Client Area
PUQ Customization module WHMCS
Order now | Download | FAQ
Cookie Consent Banner
Banner position: Bottom Right
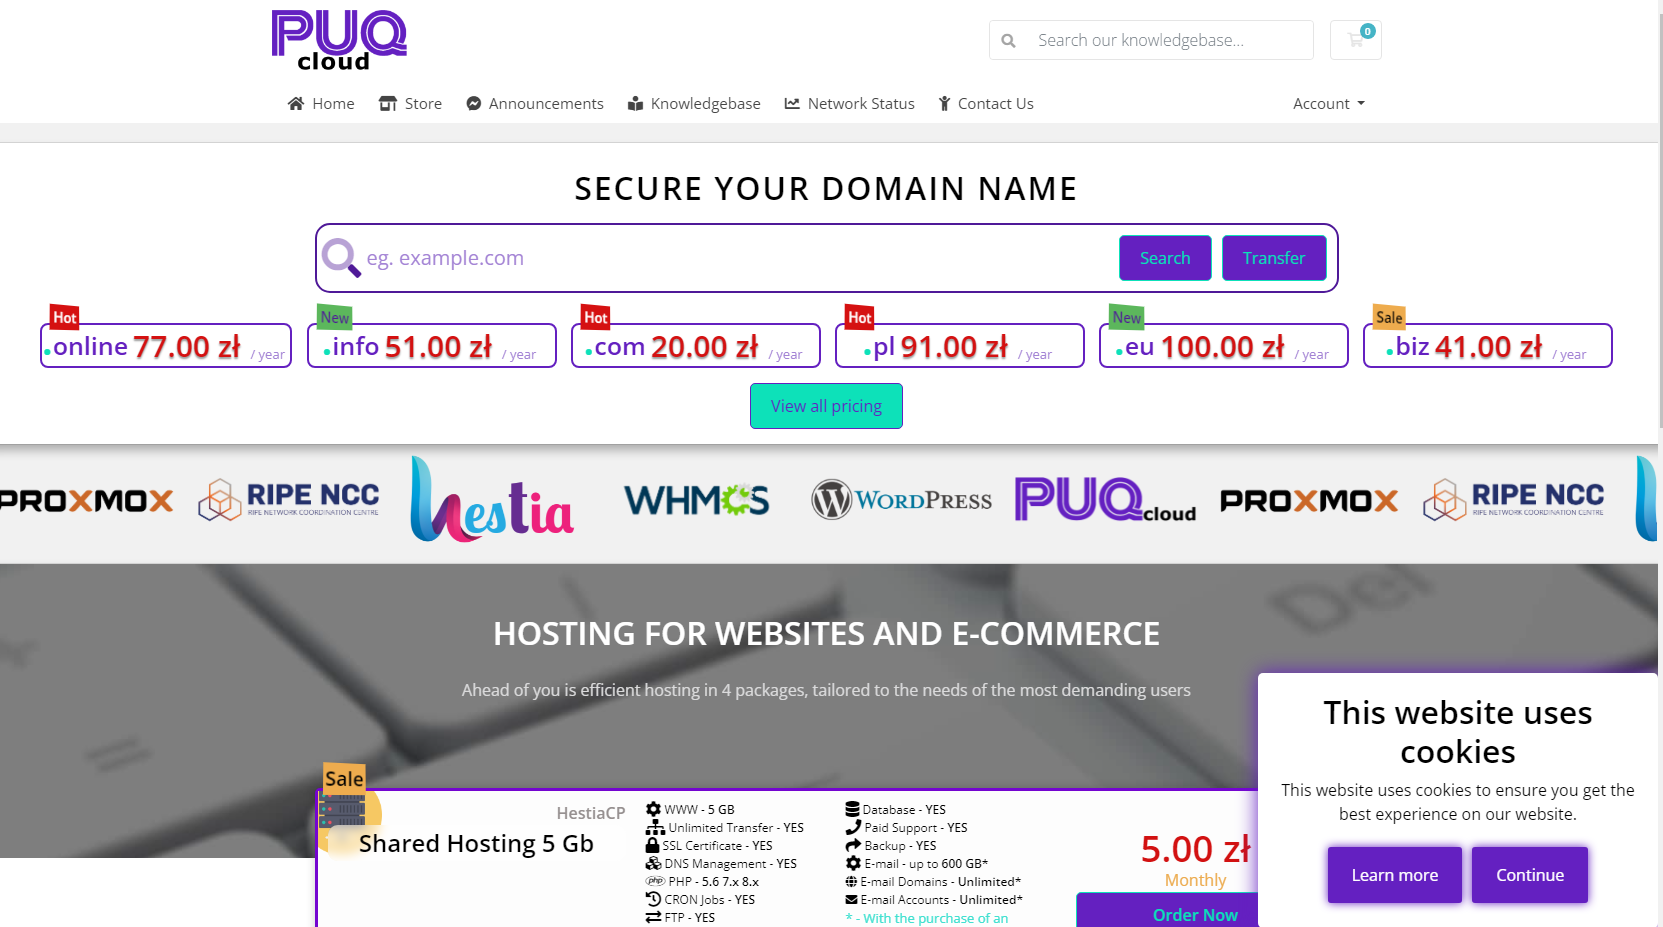
Banner position: Bottom Center
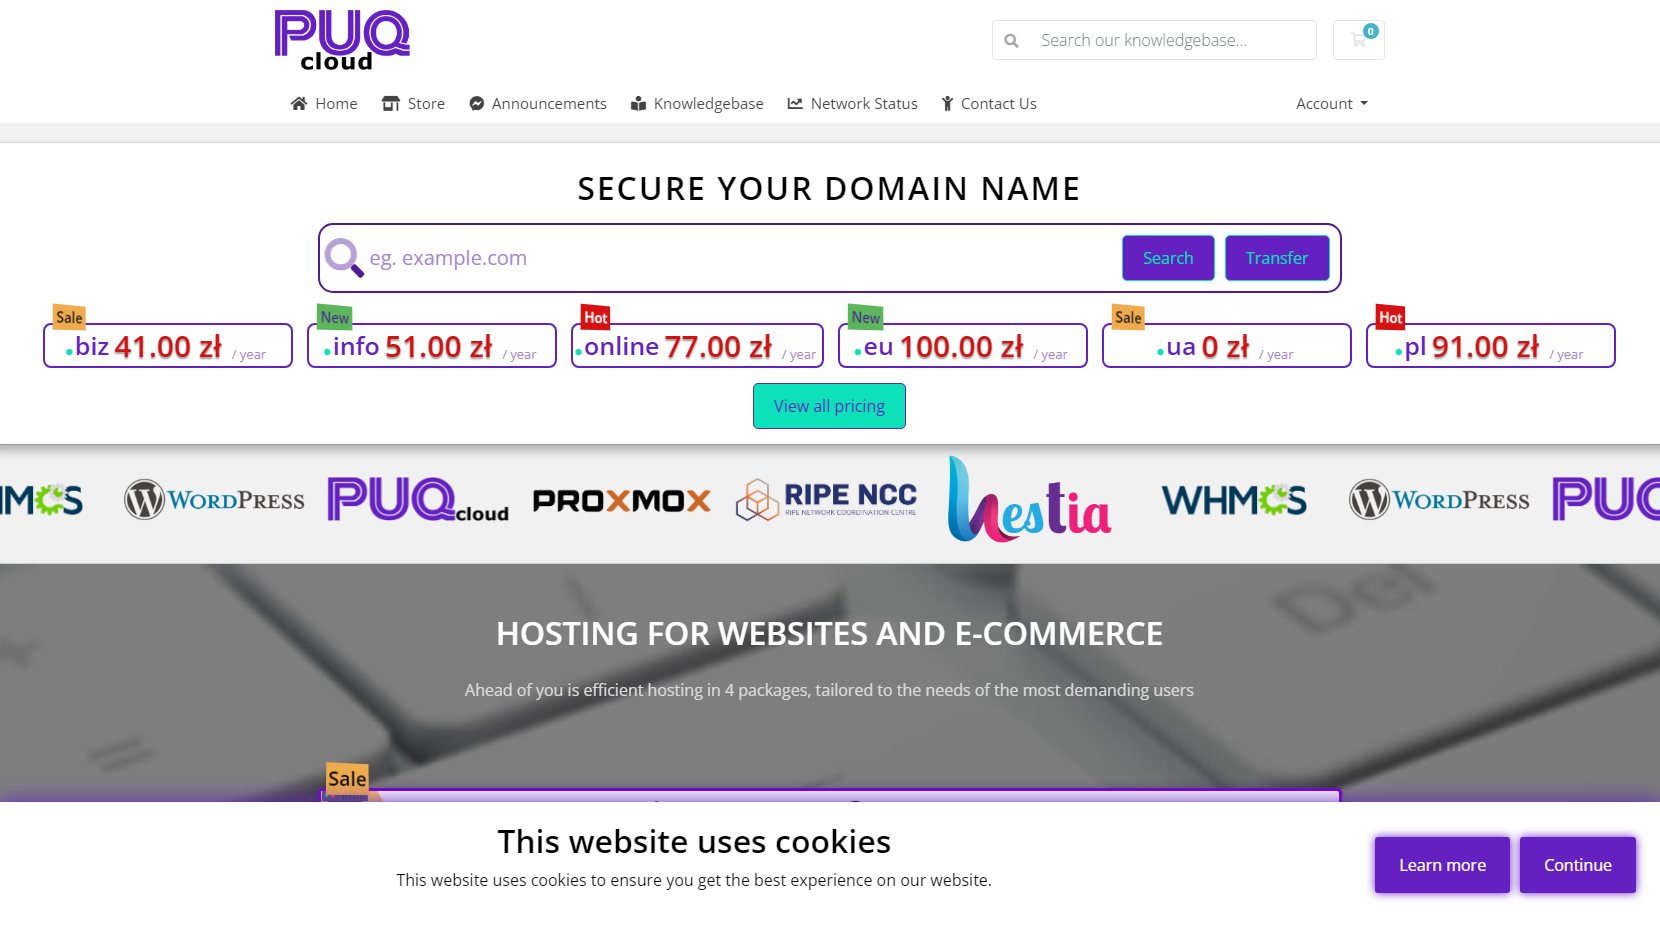
Banner position: Bottom Left
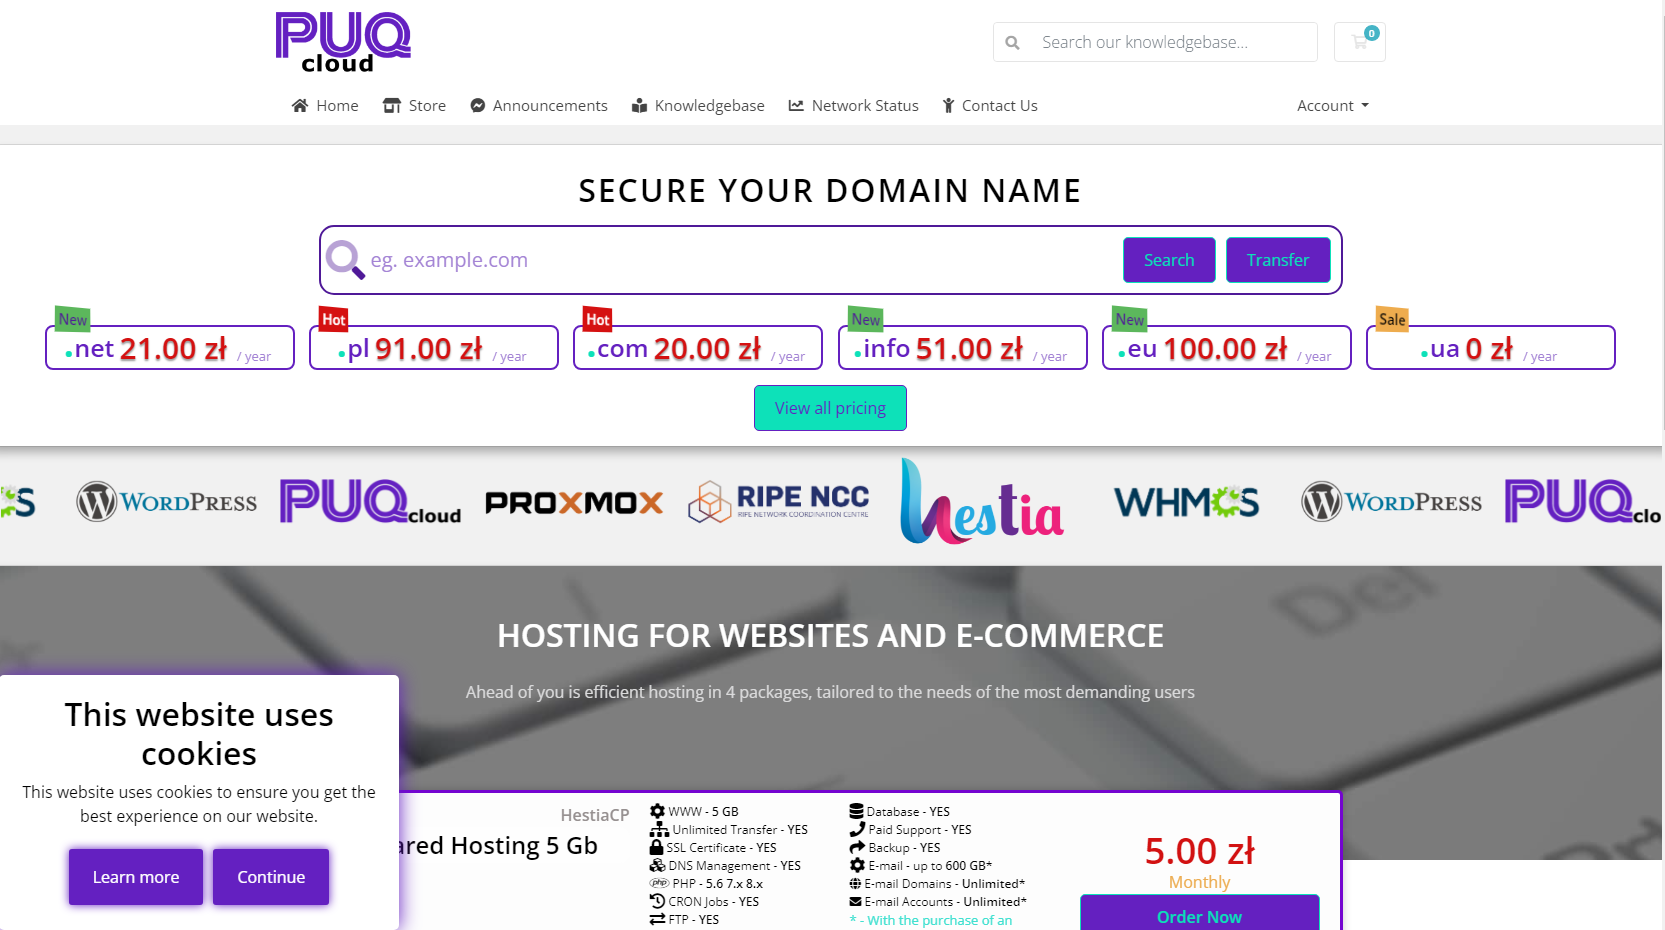
Request Delete Client Data
Request Delete Client Data widget
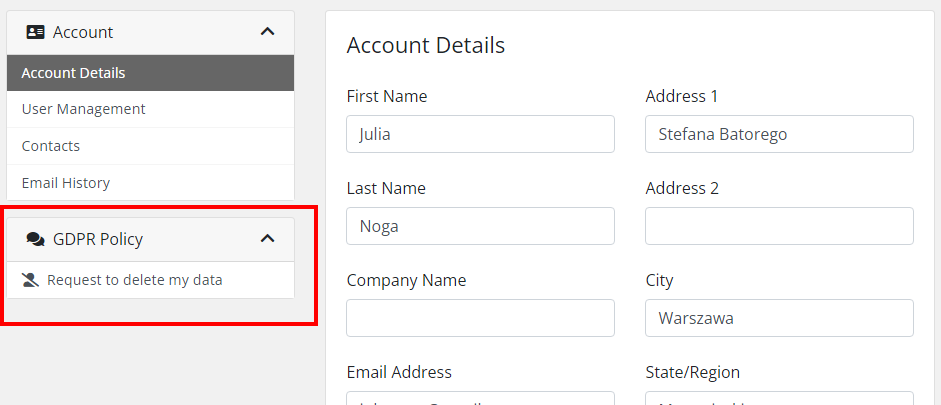
Request Delete Client Data Successful
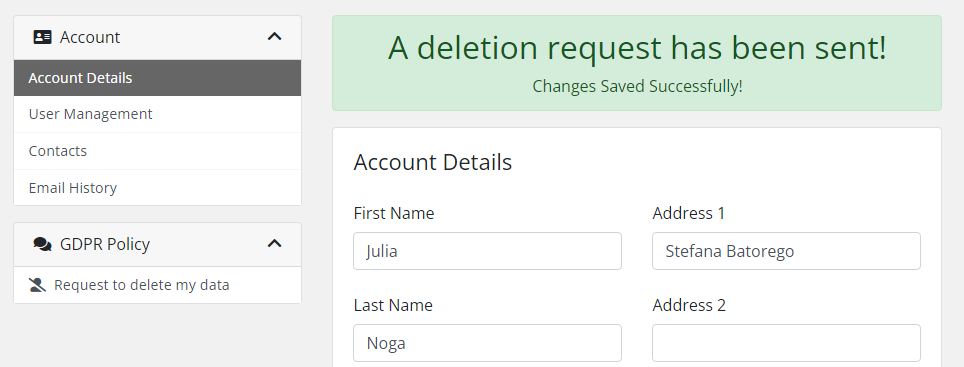
Request Delete Client Data Error

Fraud Check
Description
PUQ Customization module WHMCS
Order now | Download | FAQ
Fraud Check
"Fraud Check" is an extension that allows you to check for fraudulent clients using the verification databases provided by https://fraudrecord.com/ and https://ipqualityscore.com/. In the extension settings, you will need to enter API keys for these services. The fraud check can be performed in the following events: when registering a client, when editing a client, when creating an order, and manually.
The extension adds a section in the client view area that displays information about the fraud check. It includes the following details:
- Fraudrecord: Indicates whether any data was found in the https://fraudrecord.com/ service.
- Fraud IP: Determines if the client's IP address is suspicious based on the data from https://www.ipqualityscore.com/.
- Fraud Email: Determines if the client's email address is suspicious based on the data from https://www.ipqualityscore.com/.
Additionally, this panel features a button to view all the raw data collected from the fraudrecord.com and ipqualityscore.com services based on the client's information. There is also a button available to create a report on the fraudulent client and submit it to the fraudrecord.com and ipqualityscore.com services.
When you encounter a suspicious client, you can utilize the extension's reporting feature to generate a comprehensive report based on the gathered data. The report includes relevant information about the client's activities, such as their IP address, email address, and any other relevant data collected during the fraud check process.
Once the report is created, you have the option to submit it directly to the fraudrecord.com and ipqualityscore.com services. By doing so, you contribute to the collective effort of identifying and preventing fraudulent activities across the internet.
The "Fraud Check" extension enhances your ability to identify potential fraudulent clients by leveraging the capabilities of these verification services and provides you with valuable insights to make informed decisions and take appropriate actions.

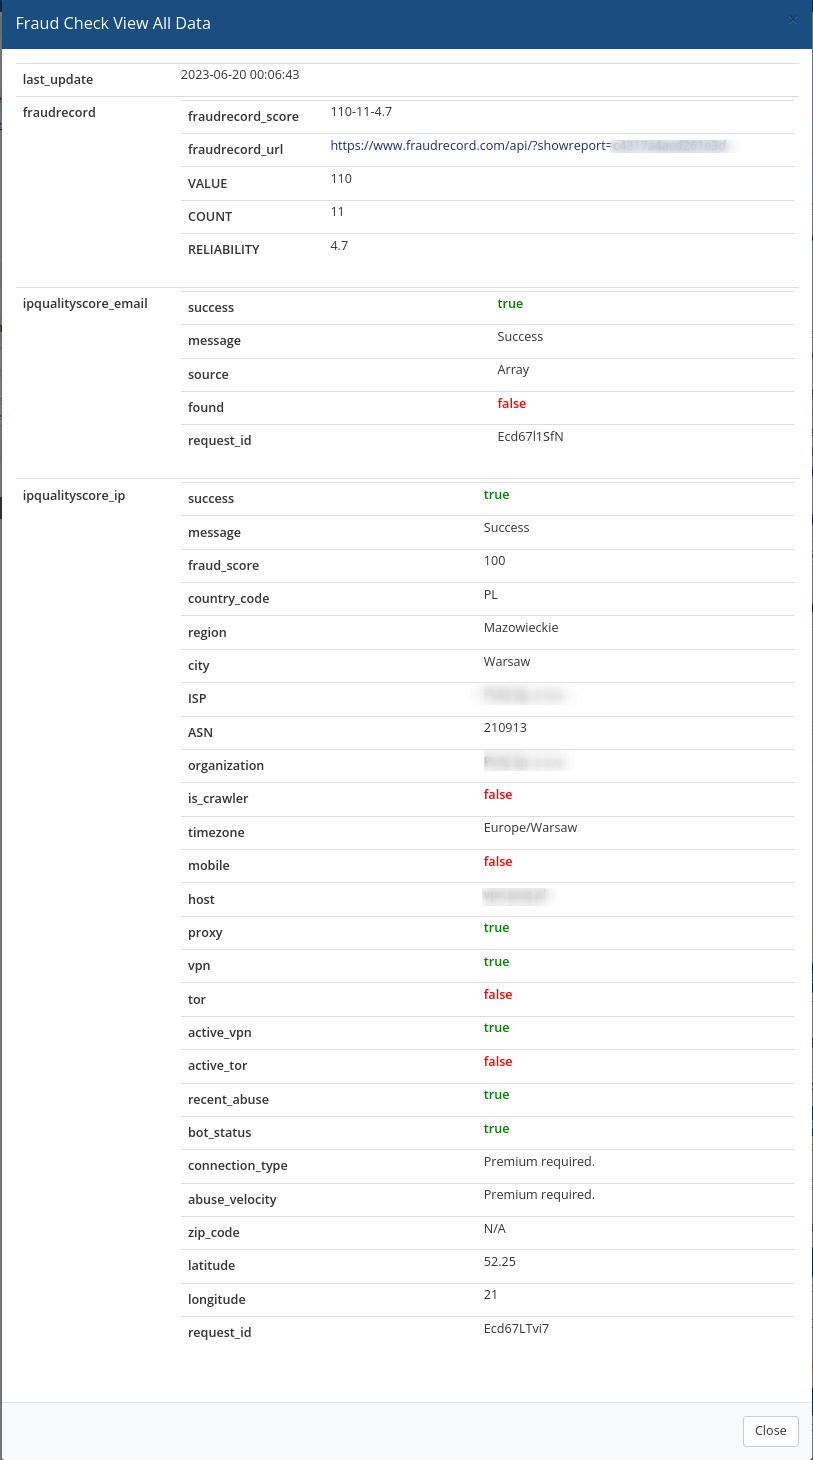

Configuration
PUQ Customization module WHMCS
Order now | Download | FAQ
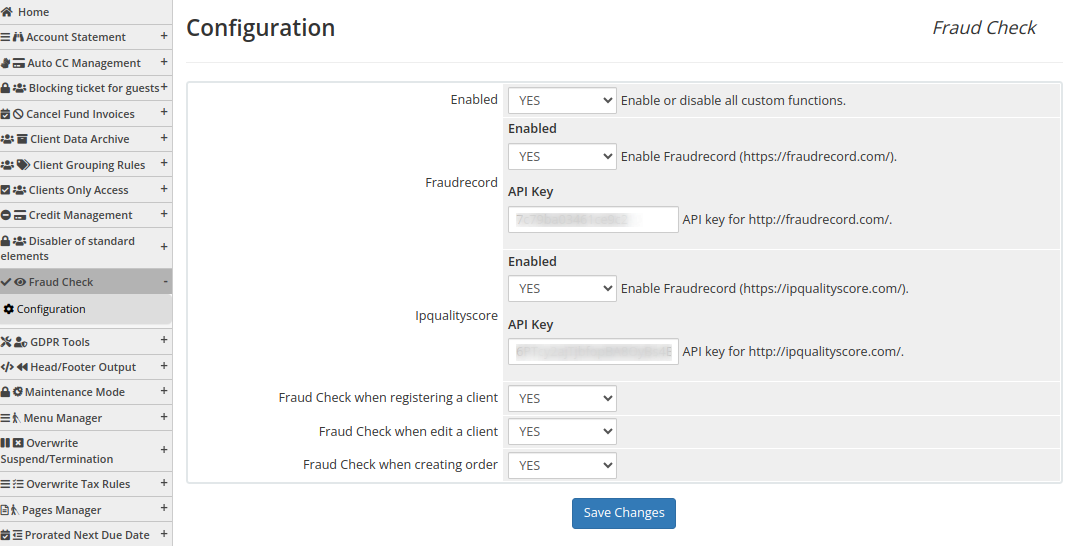 Enabled - Enabling or disabling all custom functions of this extension affects the automation and visibility of its features in the client area. When extension disabled, the automation capabilities and related features provided by the extension will not be active or visible to clients. However, as an administrator, you will still have access to configure and utilize the extension's functionalities through the administration interface. This gives you the flexibility to control the visibility and automation aspects of the extension based on your specific needs and preferences.
On the settings page of the "Fraud Check" extension, you have the following configuration options:
-
Enable Fraudrecord (https://fraudrecord.com.): This option allows you to enable or disable the integration with the Fraudrecord service. You can choose either "YES" or "NO" to indicate whether you want to utilize the Fraudrecord database for fraud checks.
-
API key for http://fraudrecord.com/: Here, you need to enter the API key associated with your Fraudrecord account. This key is required to establish a connection and access the fraud checking functionality provided by Fraudrecord.
-
Enable Fraudrecord (https://ipqualityscore.com/): This option enables or disables the integration with the IPQualityScore service. You can choose "YES" or "NO" to indicate whether you want to utilize IPQualityScore's database for fraud checks.
-
API key for http://ipqualityscore.com/: In this field, you should provide the API key associated with your IPQualityScore account. This key is necessary to establish a connection and access the fraud checking features offered by IPQualityScore.
-
Fraud Check when registering a client: This setting determines whether a fraud check should be performed when a new client registers on your platform. You can choose either "YES" or "NO" to specify whether the check should be carried out during client registration.
-
Fraud Check when editing a client: This option controls whether a fraud check should be performed when editing an existing client's details. You can select "YES" or "NO" to indicate whether you want to conduct a fraud check during client editing.
-
Fraud Check when creating an order: This setting decides whether a fraud check should be conducted when creating a new order. You can choose "YES" or "NO" to specify whether the check should be performed during the order creation process.
By configuring these parameters according to your preferences, you can customize the behavior of the "Fraud Check" extension and determine when and how fraud checks should be conducted for your clients and orders.
Overwrite Tax Rules
Description
PUQ Customization module WHMCS
Order now | Download | FAQ
Overwrite Tax Rules
The "Overwrite Tax Rules" extension allows you to overwrite and configure tax rules in WHMCS in a highly flexible manner, without relying on the standard WHMCS tax rules. It offers the following key features:
-
Multiple Home Companies: You can configure separate parameters for each home company, including company name, country, tax ID/VAT number, tax name, tax rate, pay-to text, proforma invoice numbering, and invoice numbering. These home companies are used in tax rules and when creating client invoices, providing a convenient way to create multi-brands in the financial aspect of WHMCS.
-
Country Sets: These are groups of countries that participate in tax rule settings.
-
Tax Rules: These rules have parameters for filtering and applying to client invoices. You can specify the client's country or a set of countries to which the rule should apply, the client type (private client, company without VAT ID, company with VAT ID), the home company that will serve the client. You can also set an individual tax rate and tax name to be used on the invoice; otherwise, the parameters from the home country will be used.
-
Freeze Client and Home Company Data: The extension fully supports freezing client and home company data on invoices. This means that the data on the invoice will not change if the client modifies it in their profile. However, administrators have the ability to modify these data.
-
VIES VAT Number Validation: The extension includes built-in support for validating VAT numbers through VIES (VAT Information Exchange System) in the following scenarios: validation when registering a client, validation when editing a client, validation when creating an order, and manual validation.
-
Client Overview Widget: The admin area includes a widget that displays information about the client, such as client type, home company, tax rule number, VIES status (valid) and last validation date, and tax exemption.
-
Invoice Editing: When editing an invoice, a section is added that displays the current and frozen data of the client and home company.
-
PDF Invoice Customization: The extension provides a small integration code for adapting the PDF invoice template.
The "Overwrite Tax Rules" extension fulfills a wide range of invoicing and multi-brand needs that are not achievable through standard WHMCS configuration. Furthermore, this extension is available for free compared to well-known competing modules.
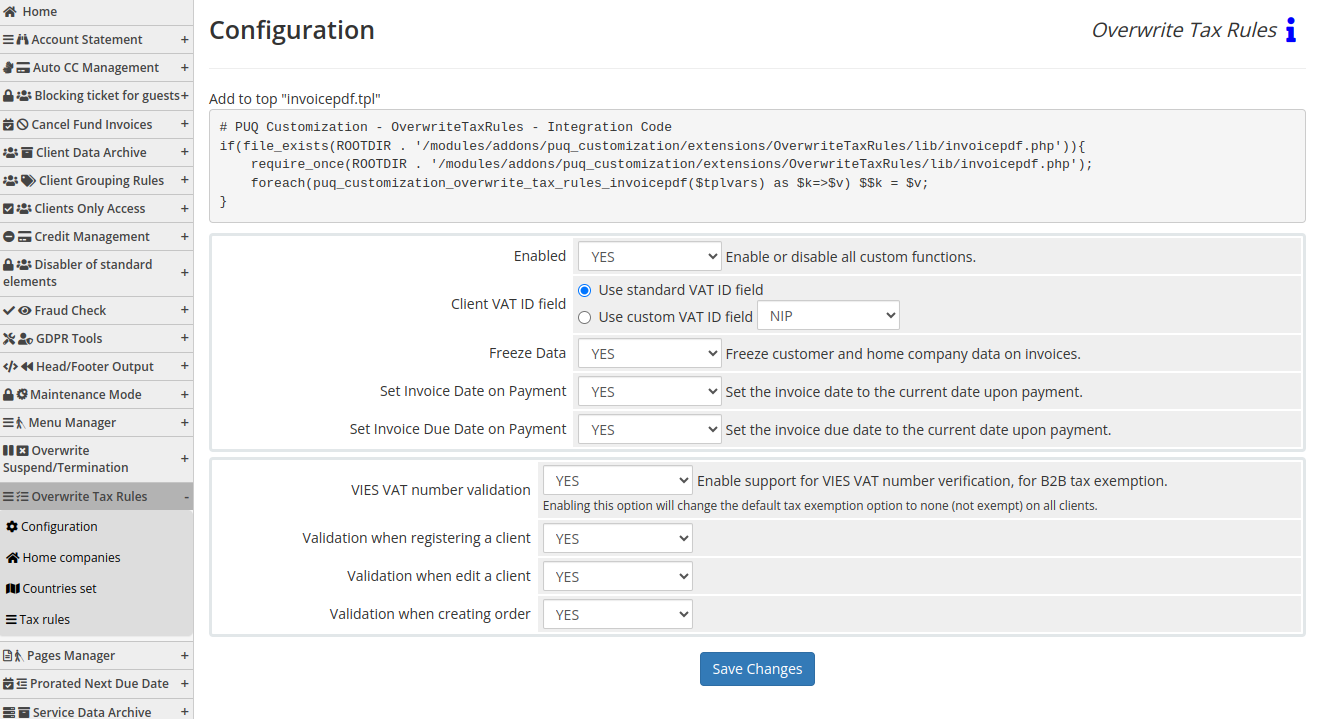
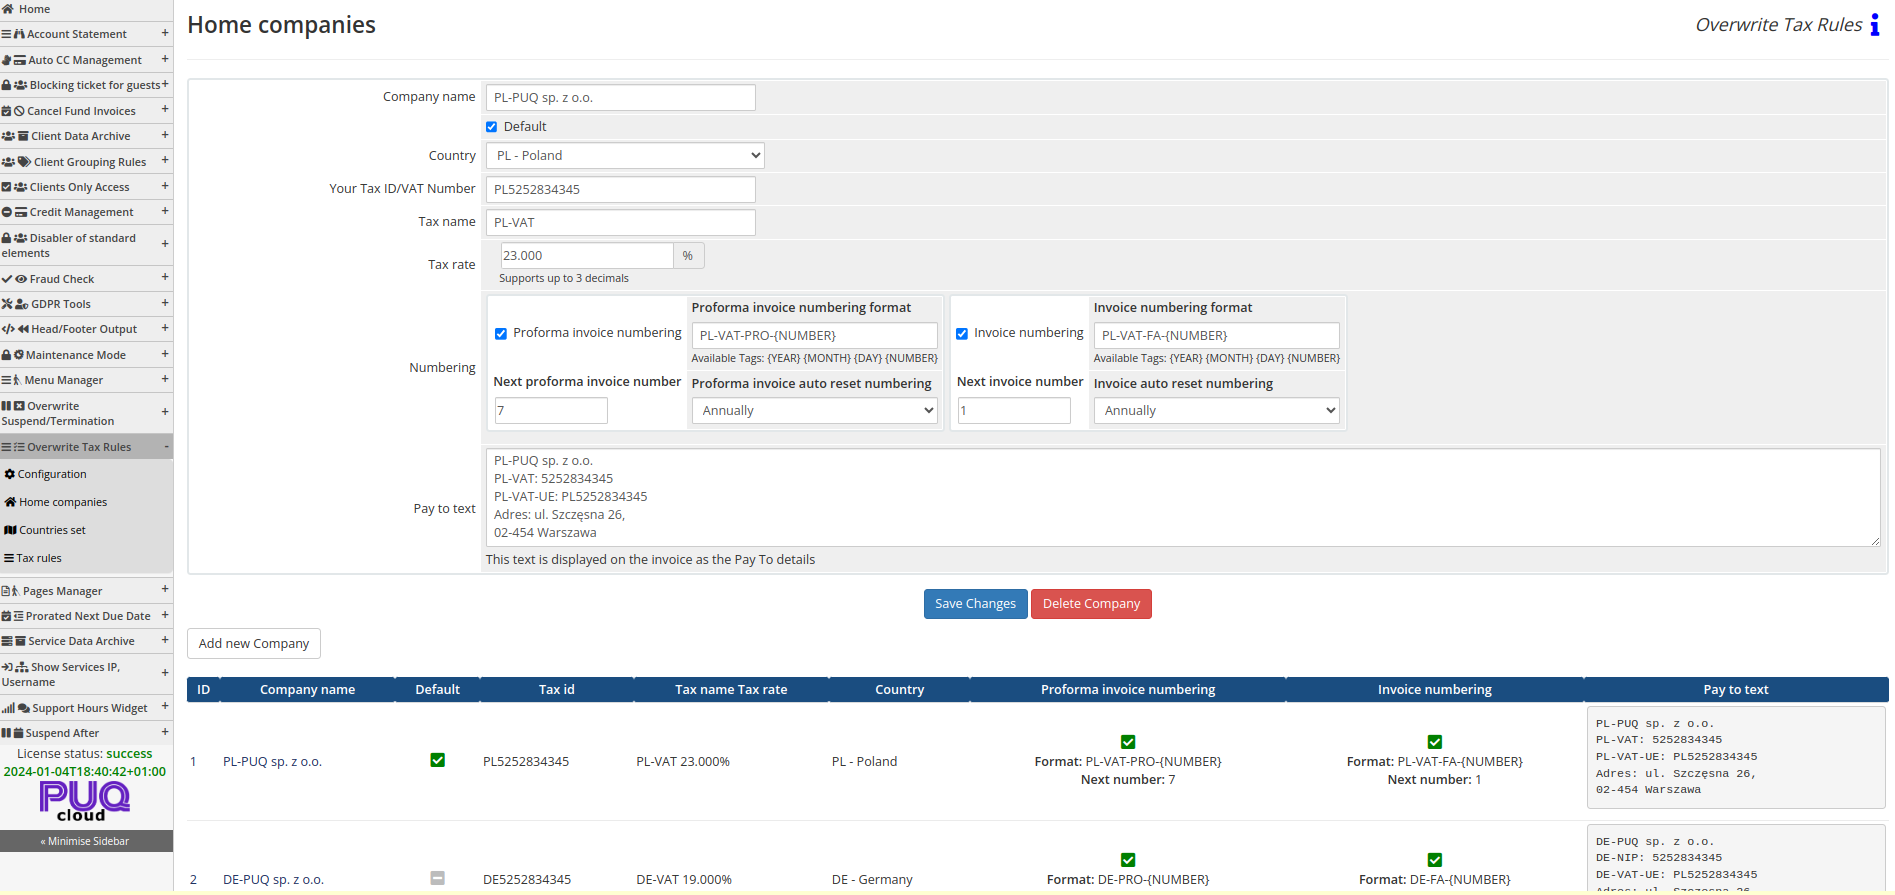
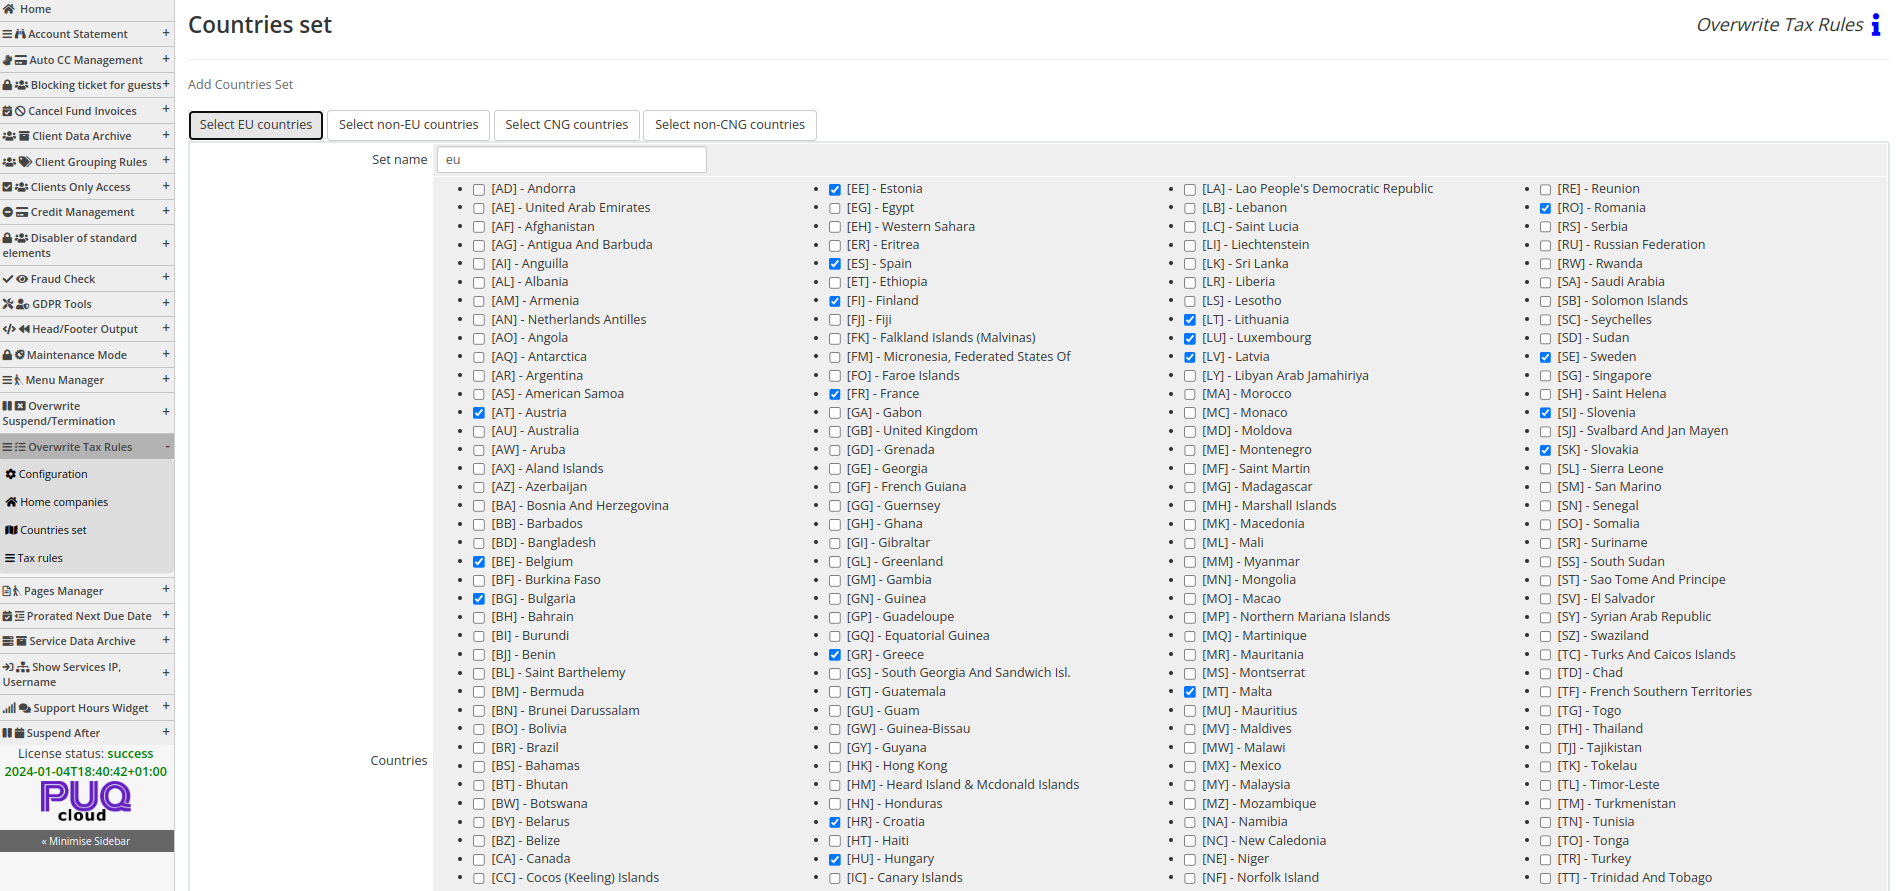
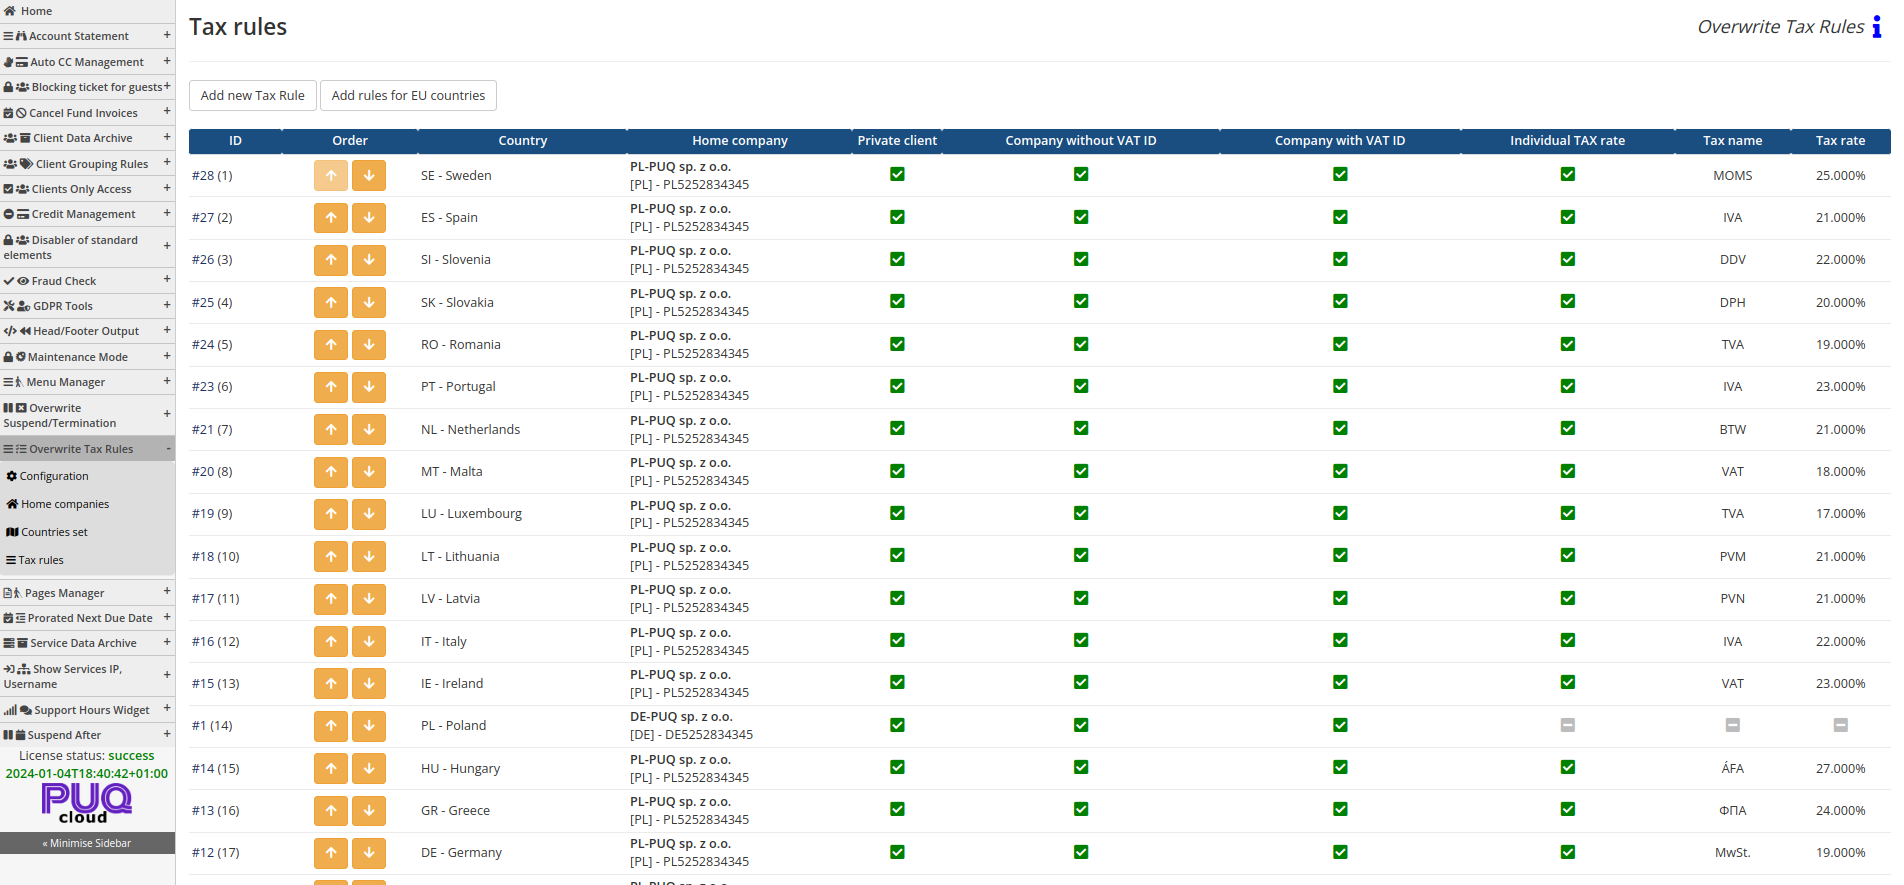
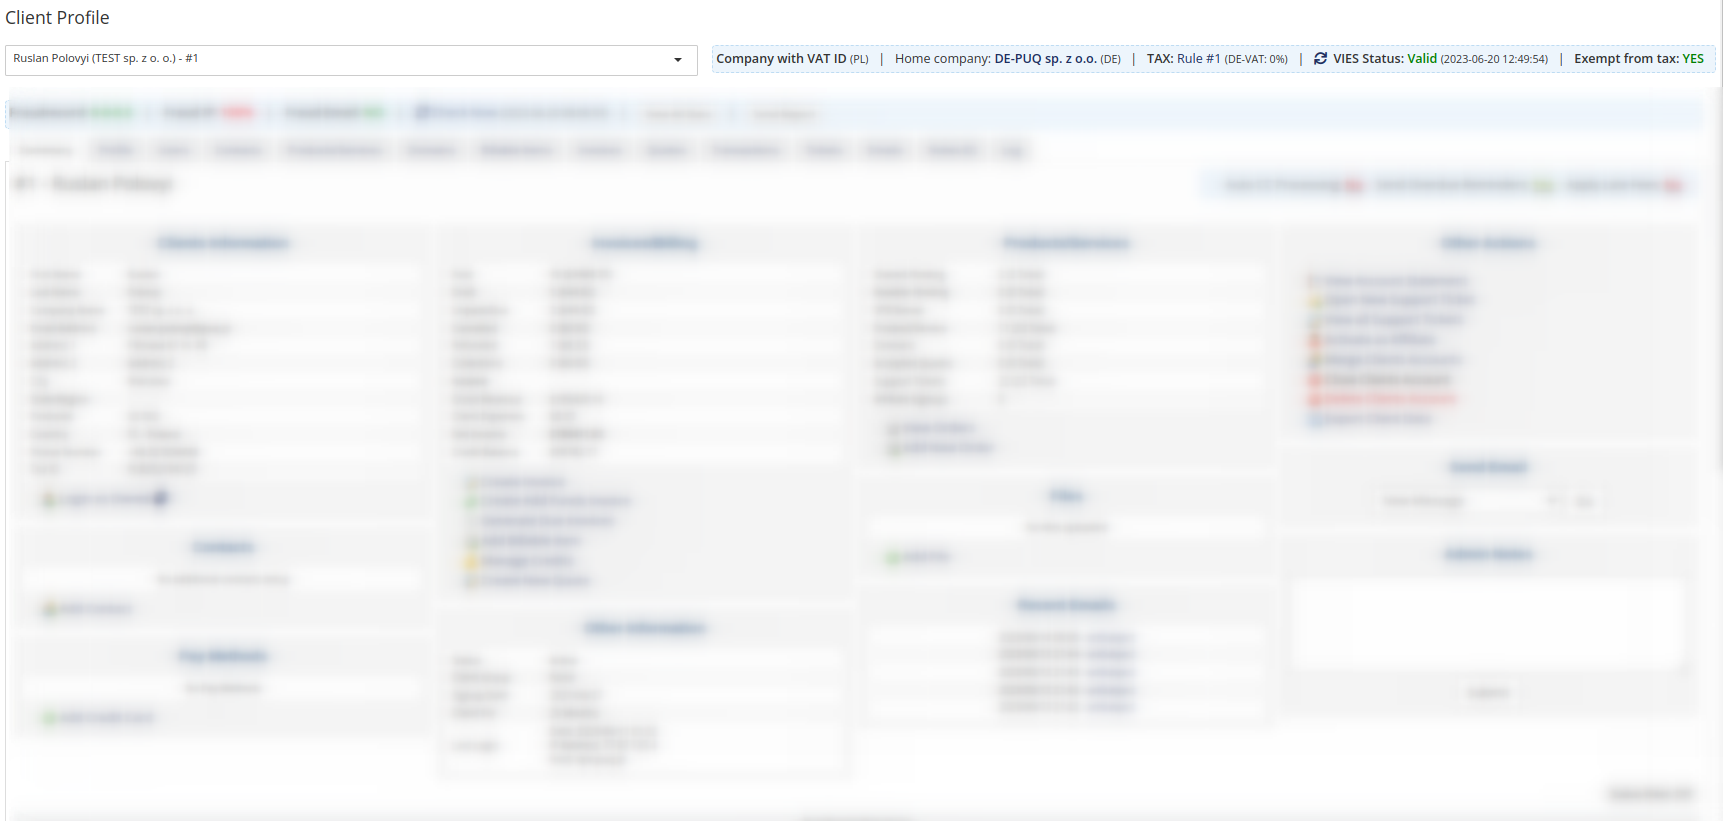
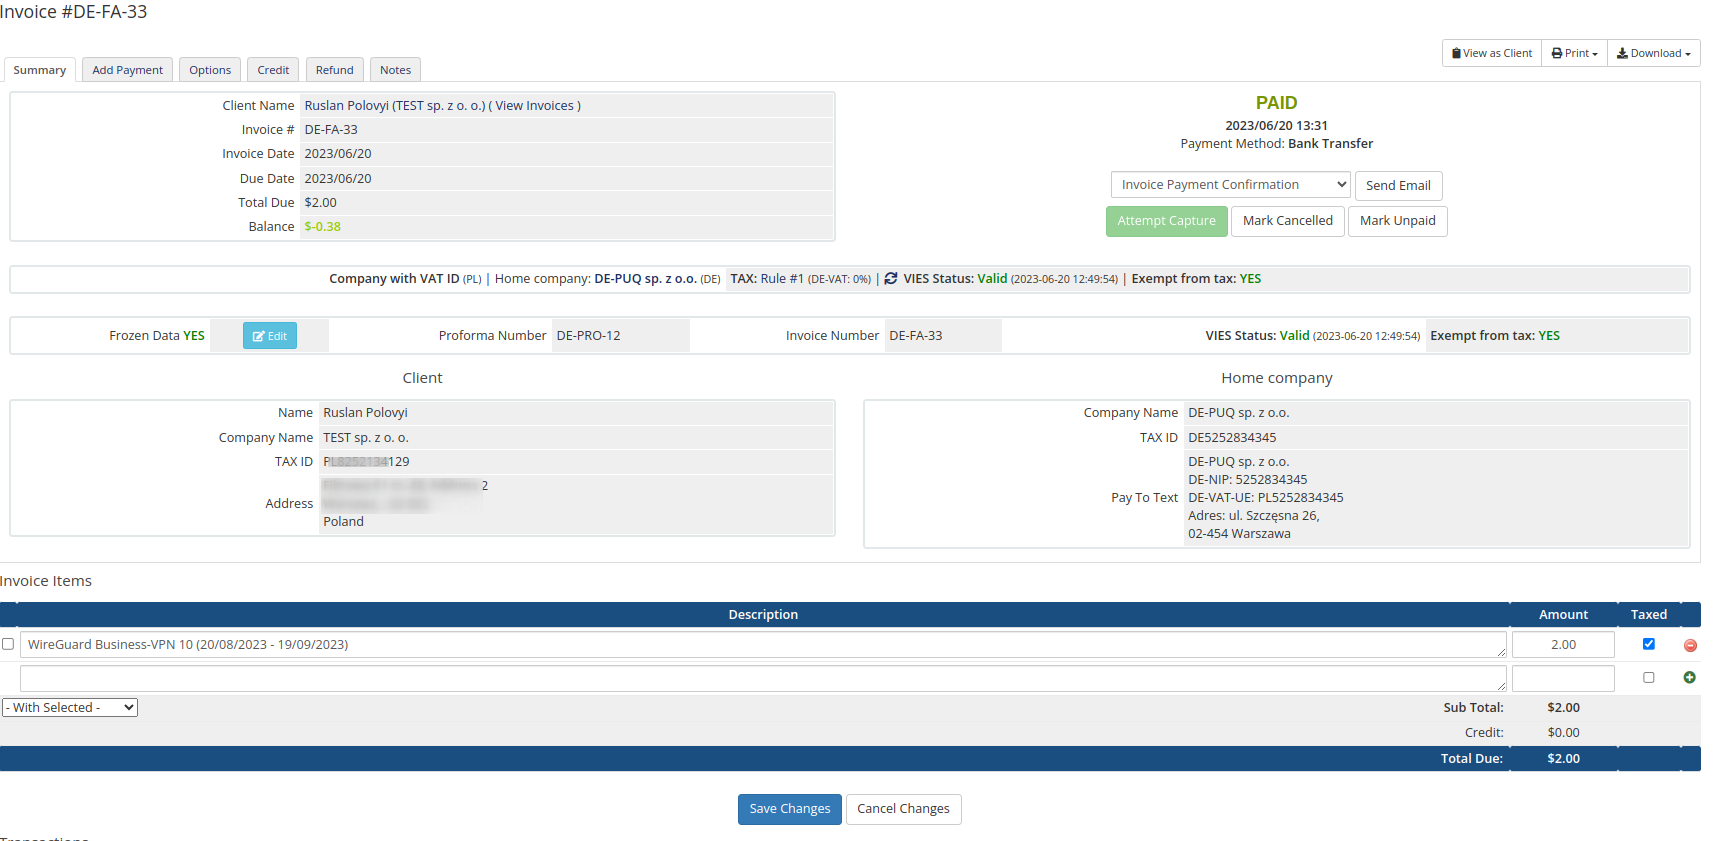
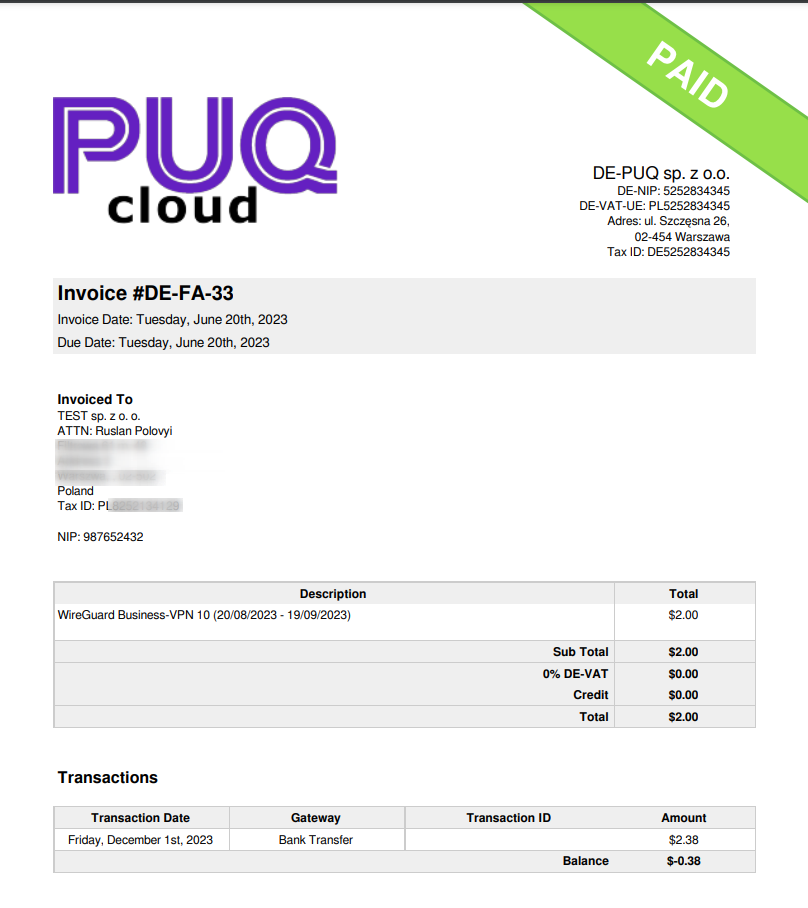
Configuration
PUQ Customization module WHMCS
Order now | Download | FAQ

Enabled - Enabling or disabling all custom functions of this extension affects the automation and visibility of its features in the client area. When extension disabled, the automation capabilities and related features provided by the extension will not be active or visible to clients. However, as an administrator, you will still have access to configure and utilize the extension's functionalities through the administration interface. This gives you the flexibility to control the visibility and automation aspects of the extension based on your specific needs and preferences.
On the configuration page, you will find the following settings:
-
PUQ Customization - OverwriteTaxRules - Integration Code: This is a PHP code snippet named "PUQ Customization - OverwriteTaxRules - Integration Code." It serves as a hint for users to add this code to the top of their invoice template.
-
Client VAT ID field: This setting allows you to choose between using the standard VAT ID field or a custom VAT ID field for clients.
-
Freeze Data: This option can be set to "YES" or "NO." When enabled, the system will populate invoices with the frozen data that was captured when the invoice was created. Note that data is always frozen, but this option controls whether it is displayed on the invoice.
-
Set Invoice Date on Payment: When set to "YES," the invoice date will be automatically set to the current date upon payment.
-
Set Invoice Due Date on Payment: Similarly, when set to "YES," the invoice due date will be automatically set to the current date upon payment.
-
VIES VAT number validation: Enabling this option allows for support of VIES VAT number verification for B2B tax exemption. Please note that activating this option will change the default tax exemption option to "none" (not exempt) for all clients.
-
Validation when registering a client: This setting determines whether VIES VAT number validation is performed when registering a client. It can be set to "YES" or "NO."
-
Validation when editing a client: Similarly, this setting controls VIES VAT number validation when editing a client's information.
-
Validation when creating an order: This setting determines whether VIES VAT number validation is performed when creating an order.
These configuration options provide flexibility and control over various aspects of the "Overwrite Tax Rules" extension's functionality.
Home companies
PUQ Customization module WHMCS
Order now | Download | FAQ
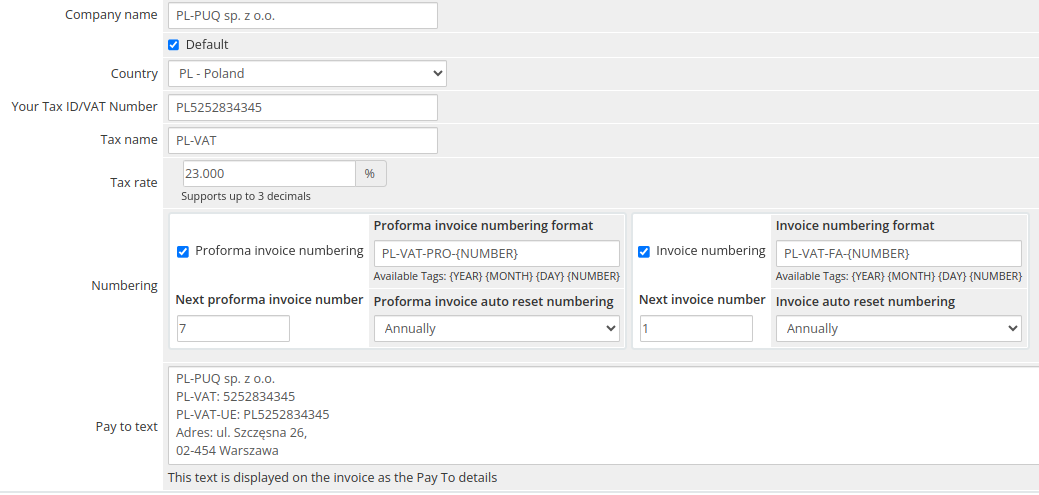
On the "Home Companies" page, you have the option to add home companies that will be involved in your document management with clients. Please note that at least one home company must be configured.
The following options are available for configuration:
-
Company Name: Enter the name of the company.
-
Default: One of the home companies must be designated as the default. It will be assigned to clients who do not match any tax rules.
-
Country: Select the country where the company is registered.
-
Your Tax ID/VAT Number: Enter the tax identification or VAT number if applicable.
-
Tax Name: Specify the tax name in the native language of the company.
-
Tax Rate: Set the applicable tax rate for this company.
-
Numbering: Configure the numbering format for invoices and proformas. You can use tags such as {YEAR}, {MONTH}, {DAY}, and {NUMBER}. Additionally, you can enable auto-reset of numbering on an annual or monthly basis.
-
Pay to Text: Enter the text that will be displayed on the invoice as the payment recipient.
These configuration options allow you to define and customize the home companies that will be involved in your invoicing process.
Countries set
PUQ Customization module WHMCS
Order now | Download | FAQ
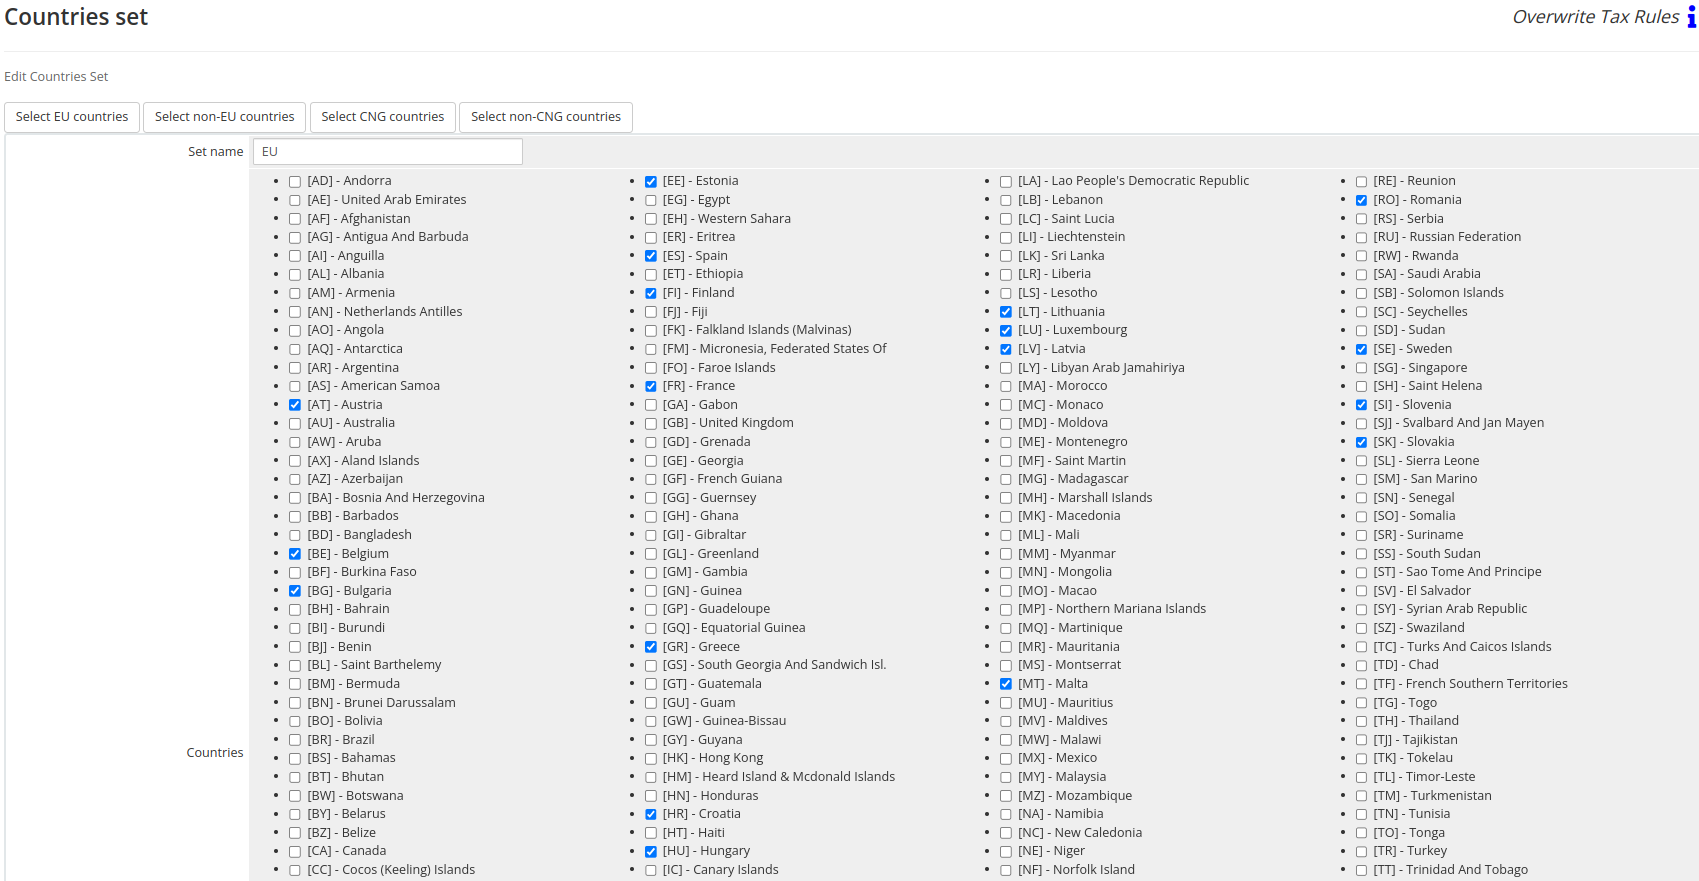
On the "Countries Set" page, you can configure sets of countries that will be involved in the conditions of your tax rules.
To configure a countries set, follow these steps:
-
Assign a name to the set by entering it in the designated field.
-
To add countries to the set, click on the checkbox next to the country you want to include. By selecting the checkbox, you indicate that the respective country will be part of the countries set.
By selecting specific countries for each set, you can define which countries will be considered in the tax rule conditions. This allows you to customize and apply tax rules based on the selected countries within each set.
Tax rules
PUQ Customization module WHMCS
Order now | Download | FAQ
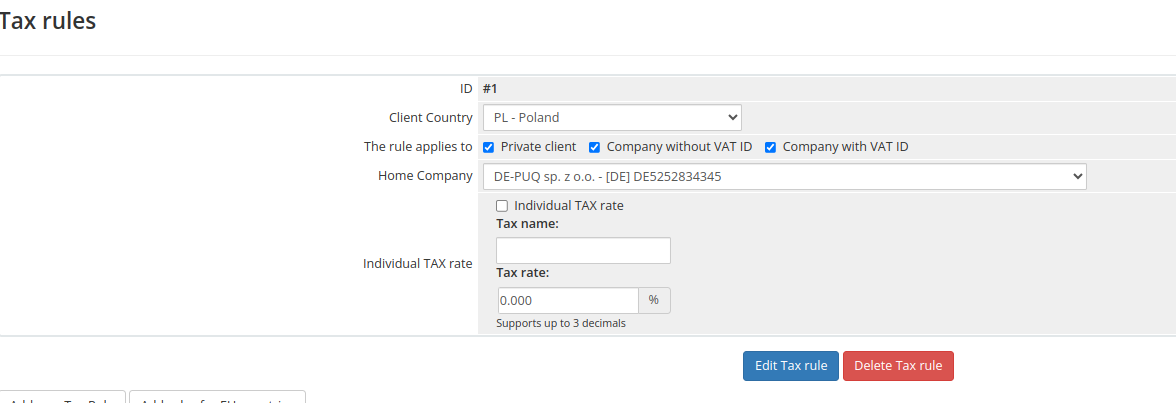
On the "Tax Rules" page, you can add tax rules, each of which allows you to specify the following parameters:
-
Client Country: This field determines the country or set of countries to which the tax rule applies. You can select a specific country or a predefined set of countries.
-
The rule applies to: This parameter defines the type of client to whom the tax rule applies. You can choose from the following options:
- Private client
- Company without VAT ID
- Company with VAT ID
-
Home Company: This field specifies the home company that serves clients falling under this tax rule. You can select the appropriate home company from the available options.
-
Individual TAX (Tax name, Tax rate): If you need to apply an individual tax with a specific name and rate to clients matching this rule, you can enter the tax name and rate in this section. This allows for customized tax calculations for clients assigned to this tax rule.
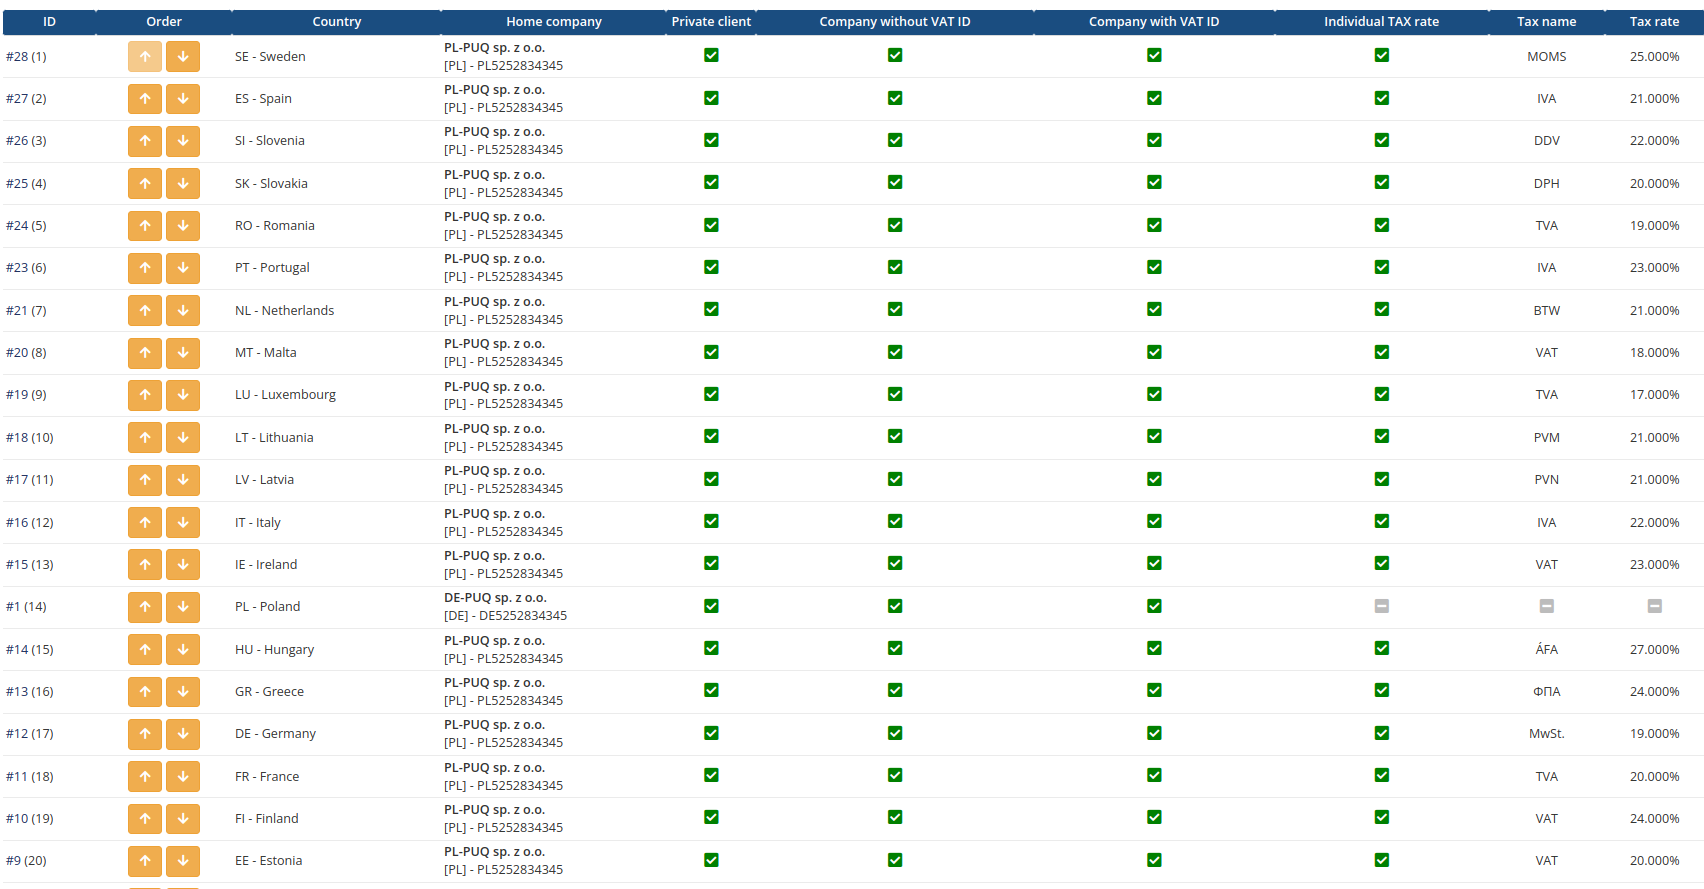
On the "Tax Rules" page, you can also manage the order of tax rules. To move a rule down, click the arrow-down button next to the corresponding rule. To move a rule up, click the arrow-up button on the respective rule.
Please note that the order of rules is crucial as they are applied from top to bottom. The rules are evaluated each time an invoice is created or transitions to the "Paid" state.
Client Overview Widget
PUQ Customization module WHMCS
Order now | Download | FAQ

The extension adds a data panel in the admin panel for viewing and editing client information. This panel includes the following data:
- Client Type: Indicates the type of client.
- Home Company: Displays the home company associated with the client.
- Tax Rule Number: Shows the number of the tax rule applicable to the client.
- VIES Status: Indicates the status of VIES (VAT Information Exchange System) validation for the client's VAT number, with "Valid" indicating a successful validation. It also displays the date of the last validation.
- Tax Exemption: Indicates if the client is exempt from tax.
These details provide quick access to essential information related to the client's tax status and company association.
Invoice Editing
PUQ Customization module WHMCS
Order now | Download | FAQ
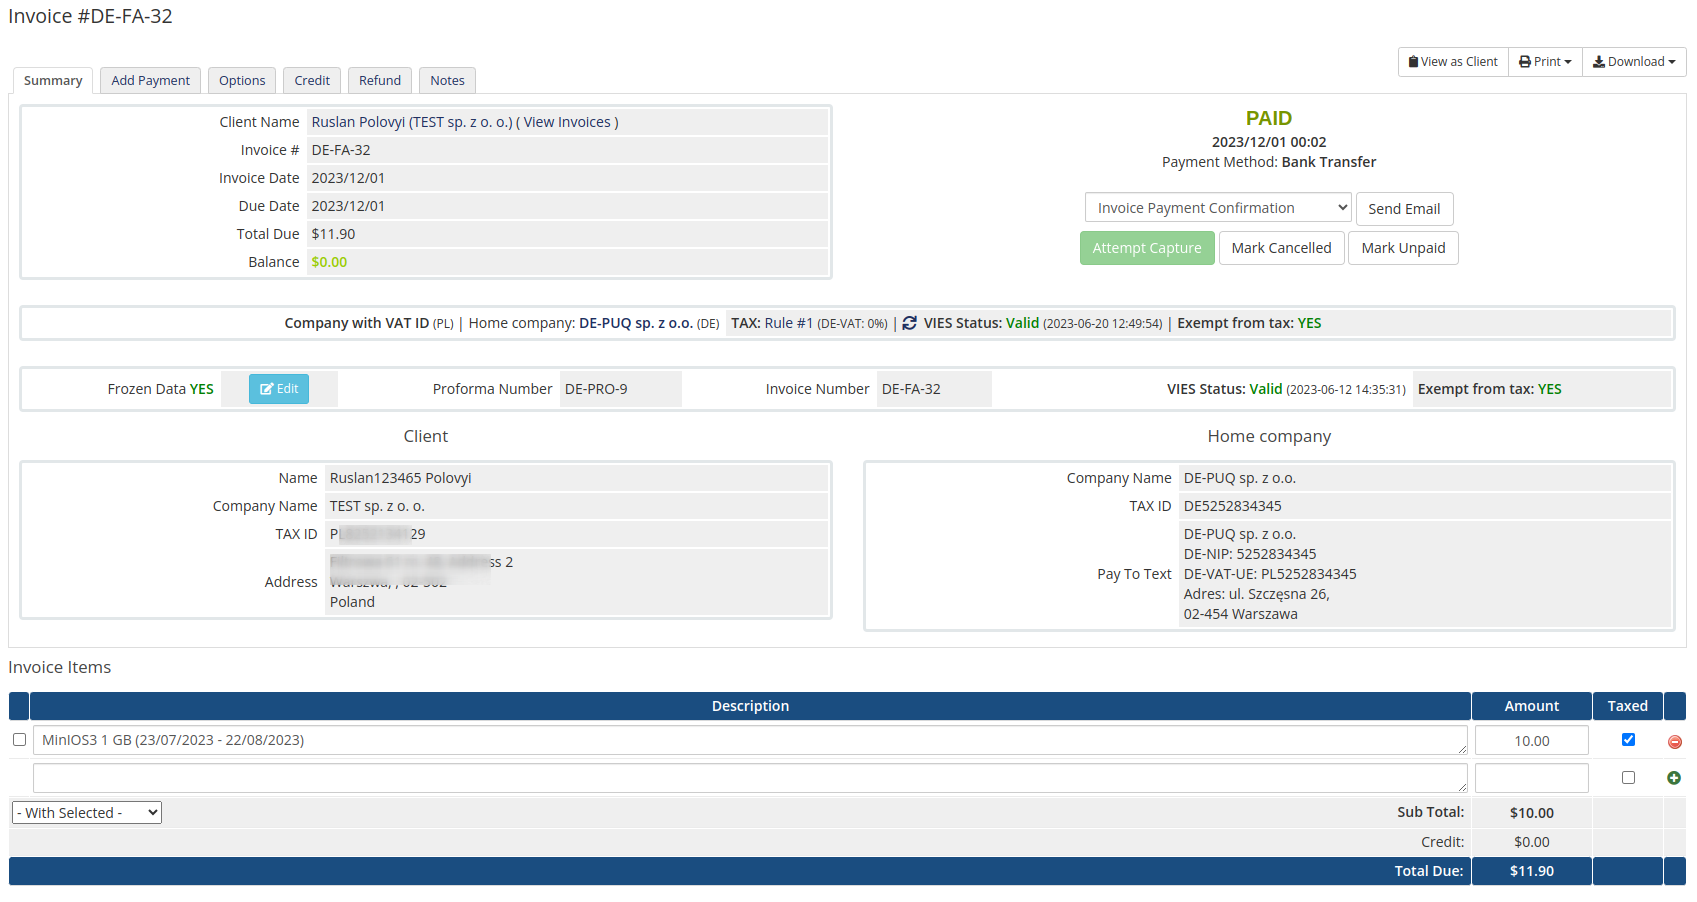
When editing an invoice, a section is added to display both the current and frozen data of the client and home company. The frozen data represents the information that was originally frozen when the invoice was created, meaning it remains unchanged even if the client modifies it in their profile.
However, if there is a need to edit the frozen data for any reason, you can click on the "EDIT" button. This action allows you to modify the frozen data, giving you the flexibility to make necessary adjustments.
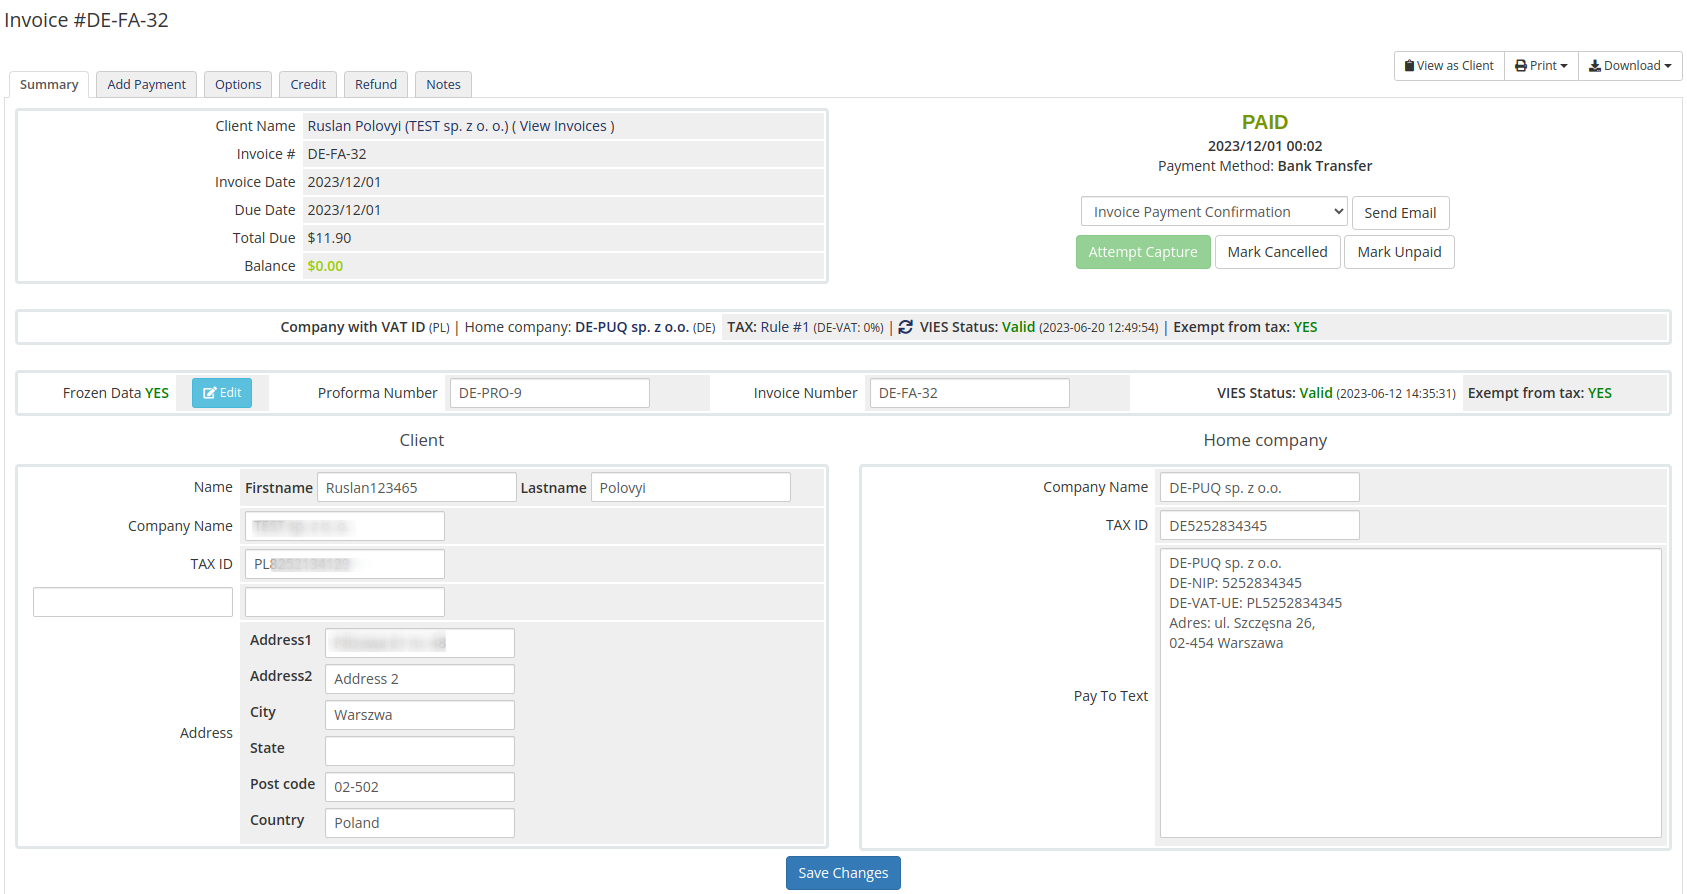
Integration Code
PUQ Customization module WHMCS
Order now | Download | FAQ
PUQ Customization - OverwriteTaxRules - Integration Code
Add to top "invoicepdf.tpl"
# PUQ Customization - OverwriteTaxRules - Integration Code
if(file_exists(ROOTDIR . '/modules/addons/puq_customization/extensions/OverwriteTaxRules/lib/invoicepdf.php')){
require_once(ROOTDIR . '/modules/addons/puq_customization/extensions/OverwriteTaxRules/lib/invoicepdf.php');
foreach(puq_customization_overwrite_tax_rules_invoicepdf($tplvars) as $k=>$v) $$k = $v;
}By including this code in your invoice template file, you enable the integration of the OverwriteTaxRules extension with the PDF generation process. It allows the extension to modify and customize the invoice PDF output.
Please make sure to place this code immediately after the <?php tag in your invoice template file.
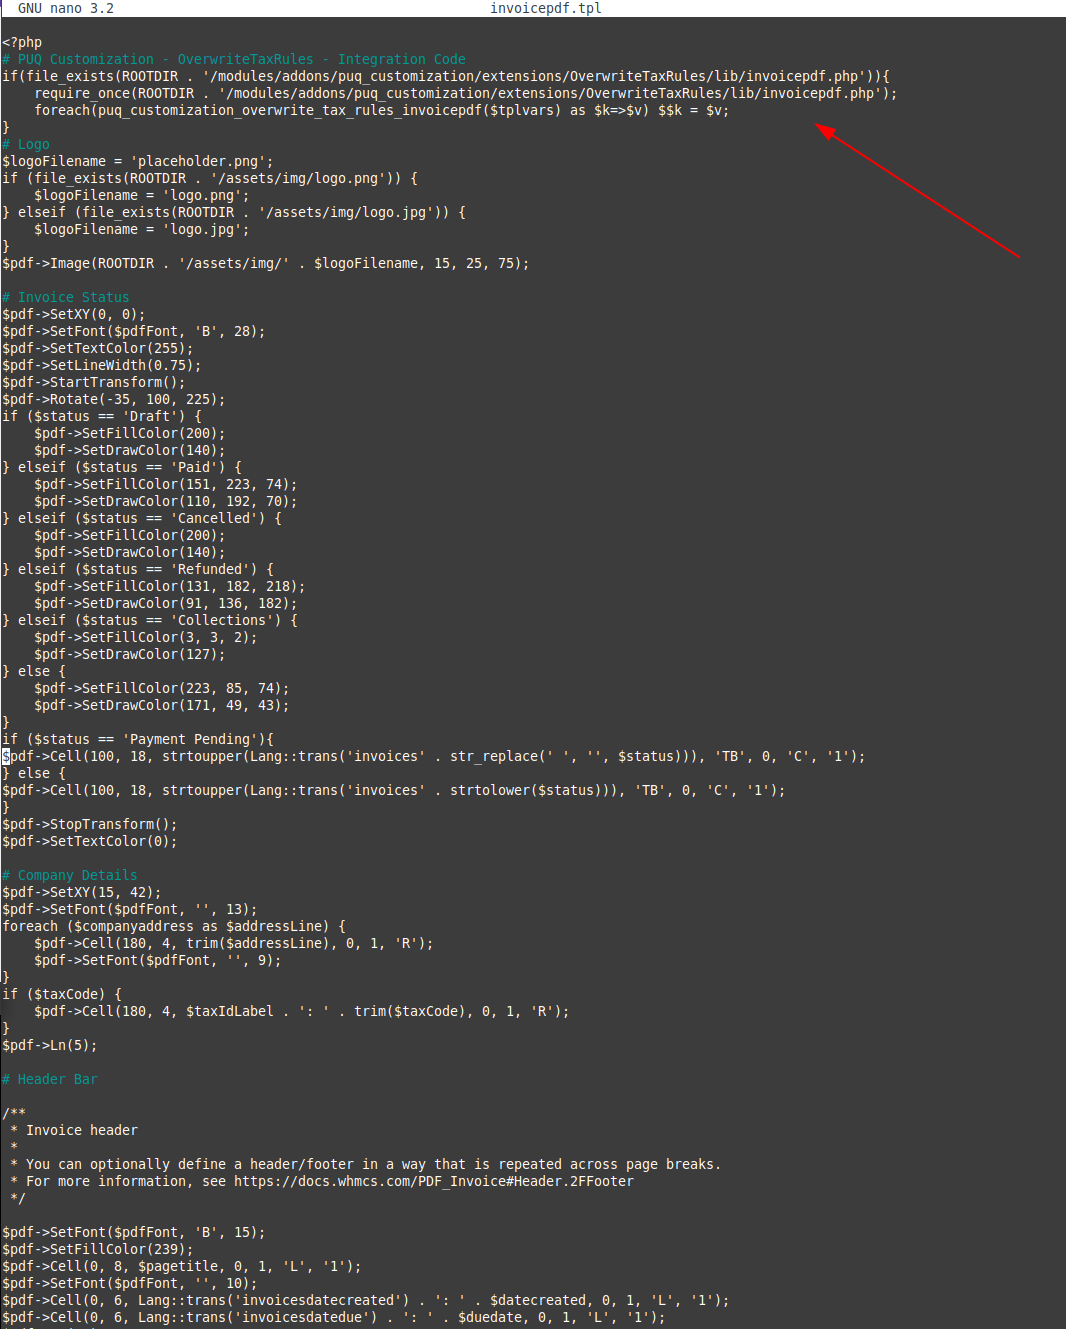
Admin Panel Unique
Customization of the admin panel, changing colors, logo and more.
Description
PUQ Customization module WHMCS
Order now | Download | FAQ
Admin Panel Unique is an extension that modifies the styles in the admin panel of your WHMCS. With this extension, you have the flexibility to customize the colors for each individual element or utilize a color palette from the predefined set.
The admin panel serves as a crucial interface for managing and operating your WHMCS system efficiently. It provides a centralized hub for administrators to perform various tasks, such as managing clients, invoicing, support tickets, and system settings.
By implementing Admin Panel Unique, you can enhance the visual appeal of your WHMCS admin panel and create a personalized experience. The extension allows you to tailor the appearance to align with your brand identity or simply bring a fresh look to the interface.
With the ability to select colors for each element separately, you have granular control over the visual hierarchy. This level of customization ensures that your admin panel reflects your unique preferences and enhances usability for administrators.
In addition to the manual color selection, Admin Panel Unique also offers a color palette with a range of pre-defined colors. This feature simplifies the customization process, providing you with a diverse selection of color combinations that you can easily apply to your admin panel.
With Admin Panel Unique, you can transform the default WHMCS admin panel into a visually appealing and personalized workspace. This extension empowers you to create an admin panel that aligns with your brand, enhances user experience, and facilitates efficient management of your WHMCS system.
Configuration
PUQ Customization module WHMCS
Order now | Download | FAQ
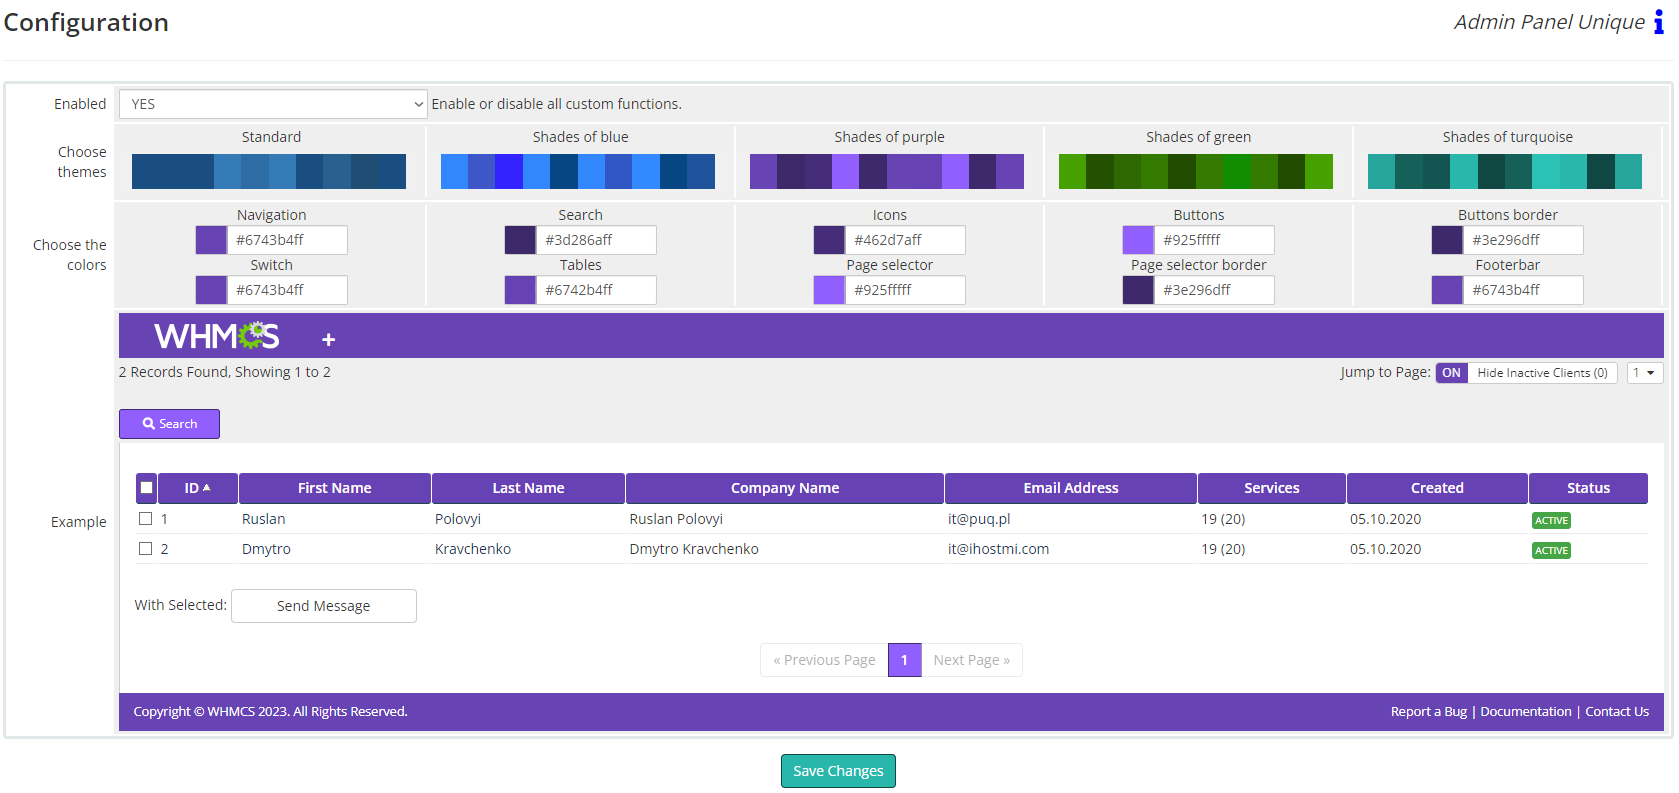
Enabled - enabling or disabling all user features of this extension affects the visibility of its modifications in the admin area. When the extension is disabled, the functionalities associated with it, provided by the extension, will not be active or visible to administrators. When the extension is disabled, the default WHMCS theme will be applied.
If you select 'NO' in the Enabled option, in such a case, the data will be automatically saved.
If Enabled is set to 'NO', in such a case, the color selection fields will be disabled.
Choose themes - this section includes several themes to choose from, namely Standard, Shades of blue, Shades of purple, Shades of green, and Shades of turquoise.
Choose the colors - in this section, you will find fields for selecting colors. You can choose any color and adjust the transparency if required according to your preferences.
Example - in this section, you will find elements of the WHMCS admin panel where you can observe real-time changes.
Save Changes - a button to save the modifications.
Manual Cron Run
Manual Cron Run extension provides users with the ability to manually execute cron jobs.
Description
PUQ Customization module WHMCS
Order now | Download | FAQ
The "Manual Cron Run" extension is a powerful tool that offers users the flexibility to manually execute various cron jobs. With this extension, you can take control of your website's scheduled tasks and ensure they run exactly when needed. Here are the key features of the "Manual Cron Run" extension:
- Manual Execution of Daily Cron: With this feature, you can easily initiate the execution of the Daily Cron job at any time you desire.
- On-Demand System Cron Execution: The extension allows you to run the System Cron job on-demand. By manually triggering this essential task, you can ensure that critical system-level processes and maintenance tasks are executed promptly and efficiently.
- Run Specific Cron Jobs from the Table: The "Manual Cron Run" extension offers a comprehensive list of cron jobs, presented in a convenient table format. From this list, you can handpick specific cron jobs that need immediate attention and execute them individually.
By giving you the power to manually run cron jobs, the "Manual Cron Run" extension provides unparalleled control over your website's backend processes. You no longer have to wait for the scheduled cron execution, as you can initiate these tasks at your convenience.
It does not disrupt your regular cron setup but rather enhances it by providing additional control and management options.
Manual execution of cron jobs enables you to closely monitor their performance and ensure that they complete successfully. If any issues arise during the execution, you can promptly address them, keeping your website running smoothly.
By enabling manual triggering of Daily Cron, System Cron, and specific cron jobs from a user-friendly interface, this "Manual Cron Run" extension becomes an indispensable tool for optimizing your WHMCS website's performance and efficiency.
Configuration
PUQ Customization module WHMCS
Order now | Download | FAQ
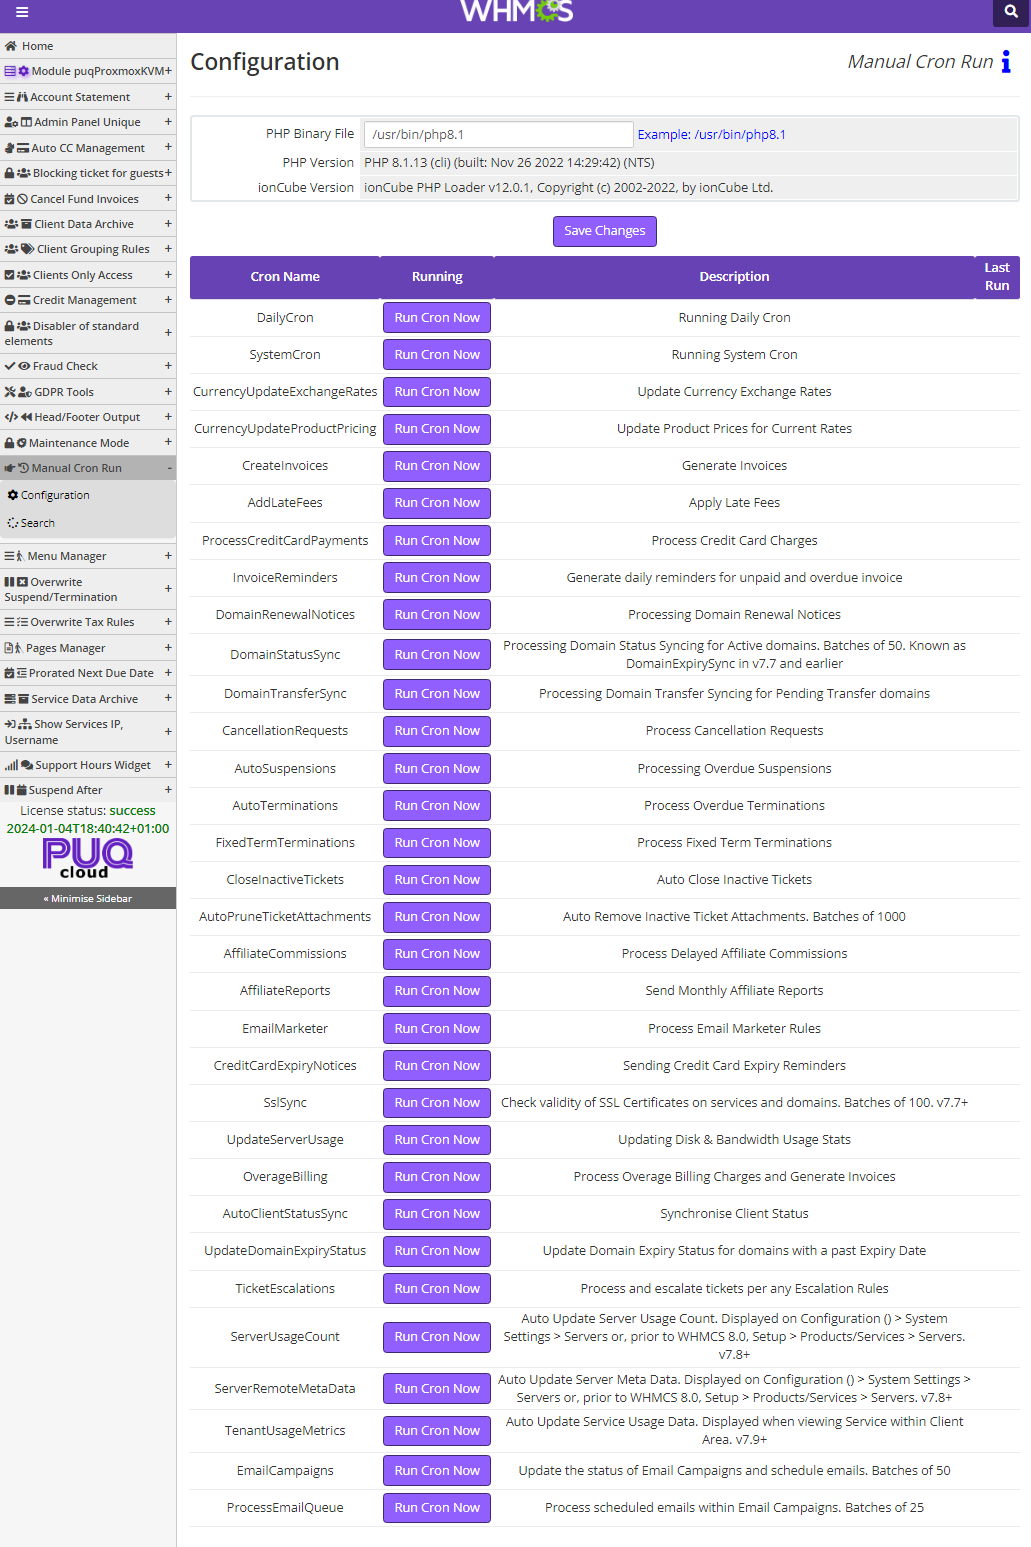
PHP Binary File
First, find out the version of PHP and ionCube on your WHMCS. You can do this by navigating to Utilities -> System -> PHP Info.
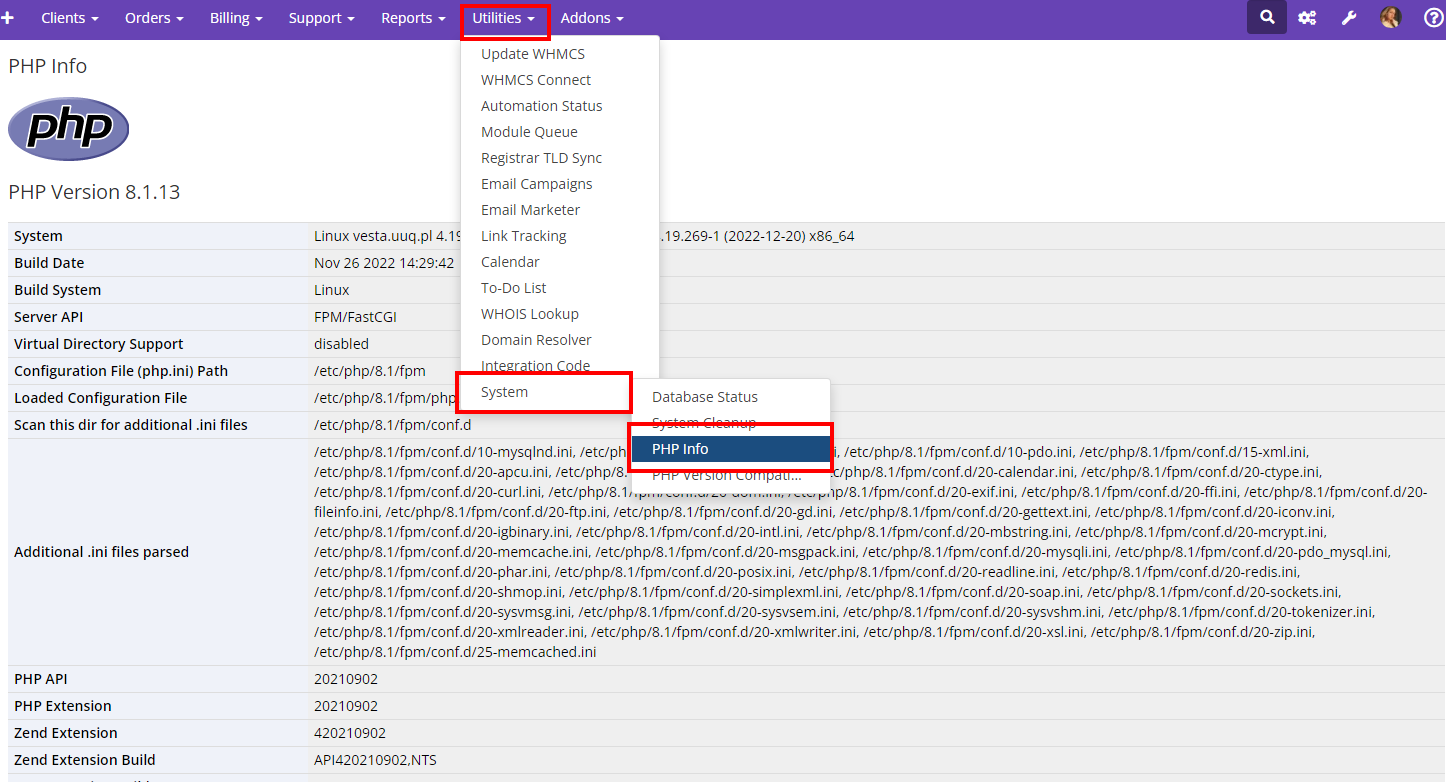
It is crucial that your ionCube version is v12 and above; otherwise, our extensions will not function correctly.
After determining the PHP version of your WHMCS and ensuring that your ionCube is v12 and above, you need to find out where the PHP binary file is located on your server. To do this, run the command "whereis your_php_version" in the console, replacing "your_php_version" with your PHP version:

When entering this path in the configuration menu of this extension, make sure it is correct. If the path is incorrect, the extension will produce an error, and you won't be able to continue working with this extension:
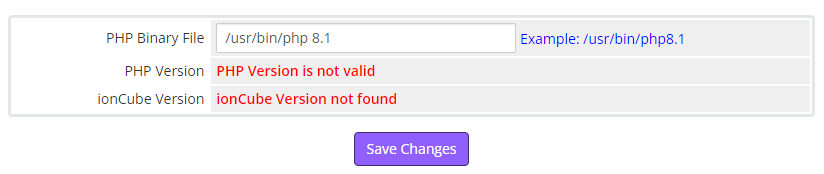
Crons List
You can find a complete list of available crons in the official WHMCS documentation ( Task Options for skip and do )
To activate a specific cron, all you need to do is click on "Run Cron Now," confirm the request to execute the cron, and wait until the loader disappears and redirects you to another page.
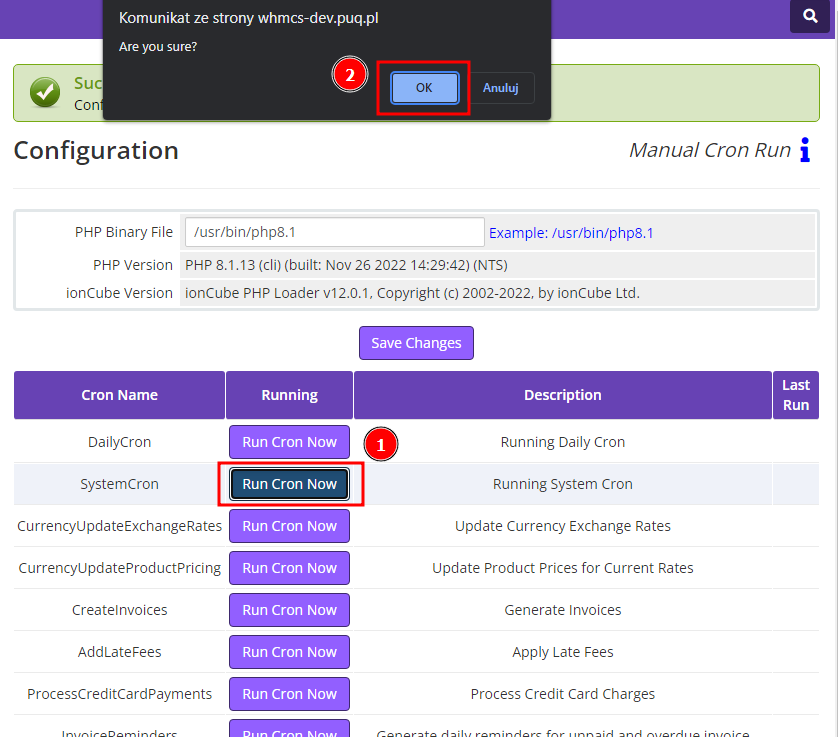
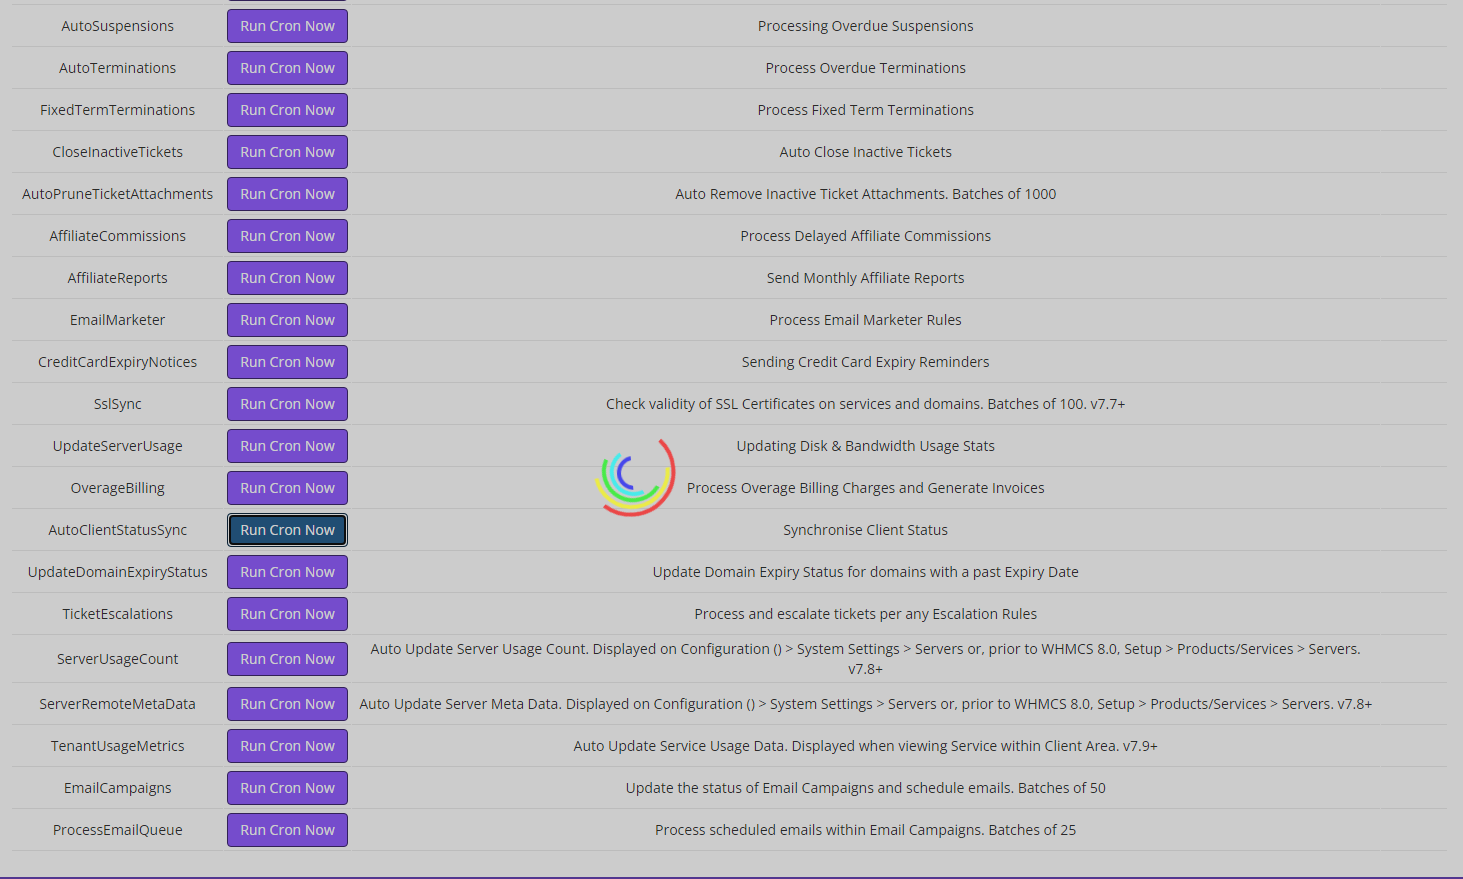
Search
PUQ Customization module WHMCS
Order now | Download | FAQ
This page is created for you to control your cron jobs and their outputs.
Here are displayed:
- Command Name
- Process/Output of the command
- Date and time of execution
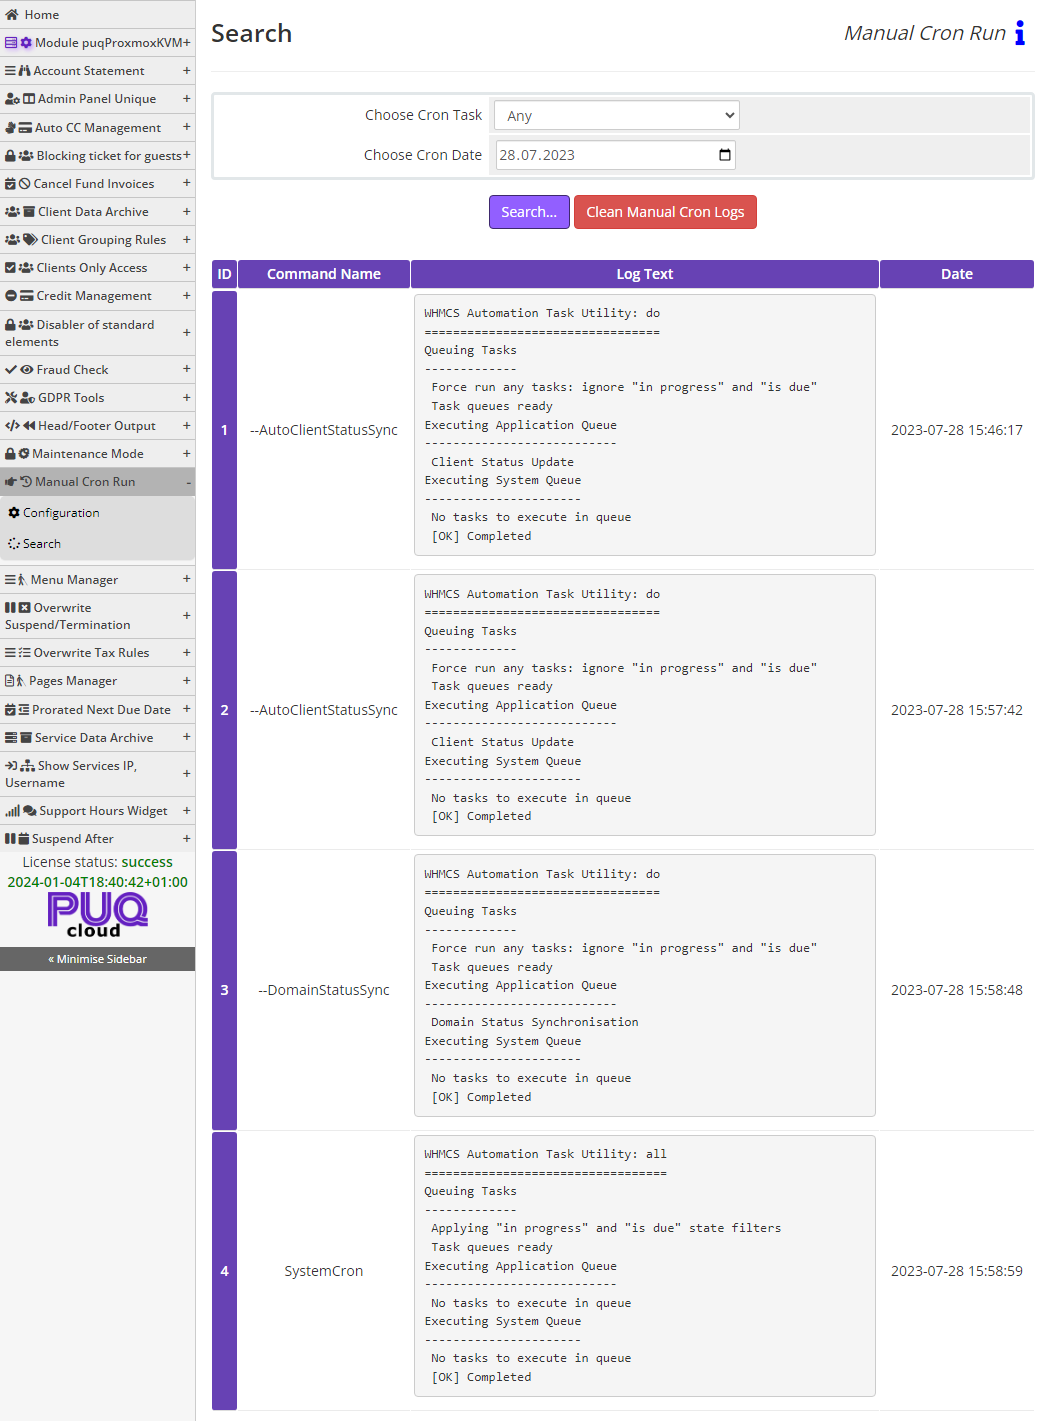
Redirecting to the Search page upon activating a cron.
When you manually launch any cron, you will be redirected to the Search page, where all executed cron jobs with the specified name for the current day will be shown.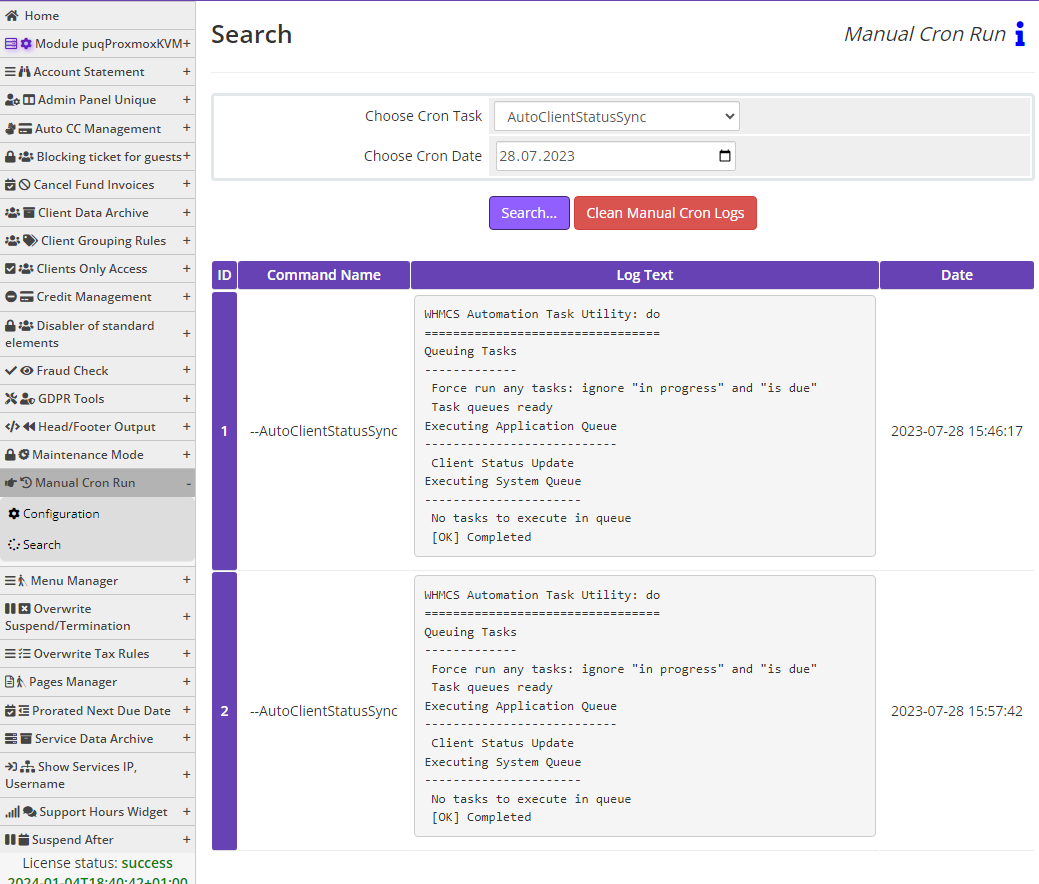
Viewing the list of completed cron jobs.
You can view the list of any cron job for any day by selecting the date in the form and clicking "Search...". If you want to view all cron job entries, simply select "Any" in the "Choose Cron Task" list.

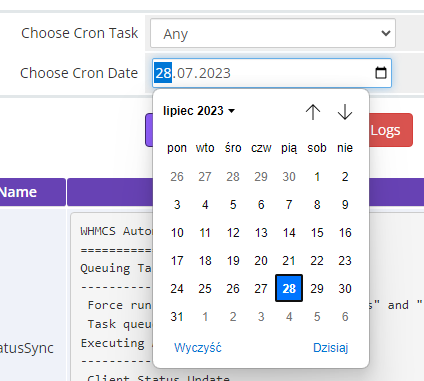
Clearing the list of manually executed cron job logs:
To clear the list, simply click on the "Clean Manual Cron Logs" button and confirm the prompt that appears.
When you click the button to clear the list of manually executed cron job logs, ALL data recorded in this table about manually executed cron jobs will be deleted.
Please be cautious before performing the deletion.
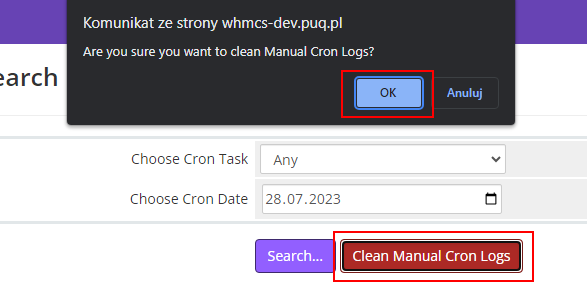
Promo Code API
The Promo Code API extension helps with creation of promo codes from the API.
Description
PUQ Customization module WHMCS
Order now | Download | FAQ
The 'Promo Code API' extension revolutionizes the creation of promo codes by offering advanced API configurations tailored to your needs. This extension includes:
- Promo Code Template Creation: Effortlessly craft custom promo code templates perfectly suited to your promotional strategies. These templates serve as the foundation for generating promo codes using the API.
- URL Generation for cURL Requests: Upon creating a promo code set, the extension generates a unique URL. By making a simple cURL request to this link you receive an automated response containing the generated promo code within your WHMCS platform.
- Integration with Other Services: The extension allows seamless integration of the promo code creation process into your WHMCS system from external services using straightforward cURL requests. Now, you can easily generate promo codes within your WHMCS system from external sources with specifically cURL requests, streamlining the entire process for utmost convenience and speed.
The 'Promo Code API' extension streamlines the promo code generation process, empowering seamless integration with external systems. Generate promo codes effortlessly within your WHMCS system from external sources, facilitating a swift and efficient workflow.
Configuration
PUQ Customization module WHMCS
Order now | Download | FAQ
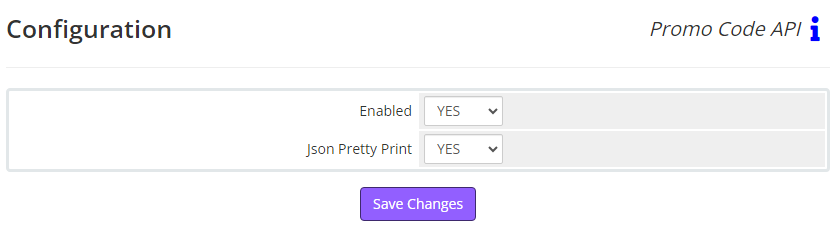
Enabled - Enabling or disabling all custom functions of this extension affects the automation and visibility of its features in the client area. When extension disabled, the automation capabilities and related features provided by the extension will not be active or visible to clients. However, as an administrator, you will still have access to configure and utilize the extension's functionalities through the administration interface. This gives you the flexibility to control the visibility and automation aspects of the extension based on your specific needs and preferences.
Json Pretty Print - The "Json Pretty Print" option enables the JSON_PRETTY_PRINT function, which formats the response, following a CURL request, into a neatly organized JSON structure. When this option is activated, the output data received after the CURL request will be formatted considering the nested objects and arrays, making it easier to comprehend and analyze.
Promo Sets
PUQ Customization module WHMCS
Order now | Download | FAQ

Add New Promo Set - upon clicking this button, a template for creating a Promo Set is opened. For more information about creating/editing/deleting promo sets, please refer to the following link: Click here
Table:
- ID: Promo Set ID
- Set Name/ API Ip Address: This cell contains the Promo Set name, API IP Address, and URL for cURL requests.
- Promo Code Type: Indicates the types of promo codes that can be created in the future. These may include: Percentage, Fixed Amount, Price Override, Free Setup.
- Value: Specifies the value to be set in the created promo codes.
- Recurring: Indicates the discount will apply or not to renewal invoices. If enabled, specifies the frequency of use.
- Max Uses: Specifies the maximum number of times this promo code can be used, i.e., the number of clients who can use it.
- Start Date: The date when the promo code starts to be effective.
- Expiry Date: The date when the promo code expires.
- Notes: Admin notes.
To open the editing template, click on either the set name or the ID.
Add/Edit/Delete Promo Set
PUQ Customization module WHMCS
Order now | Download | FAQ
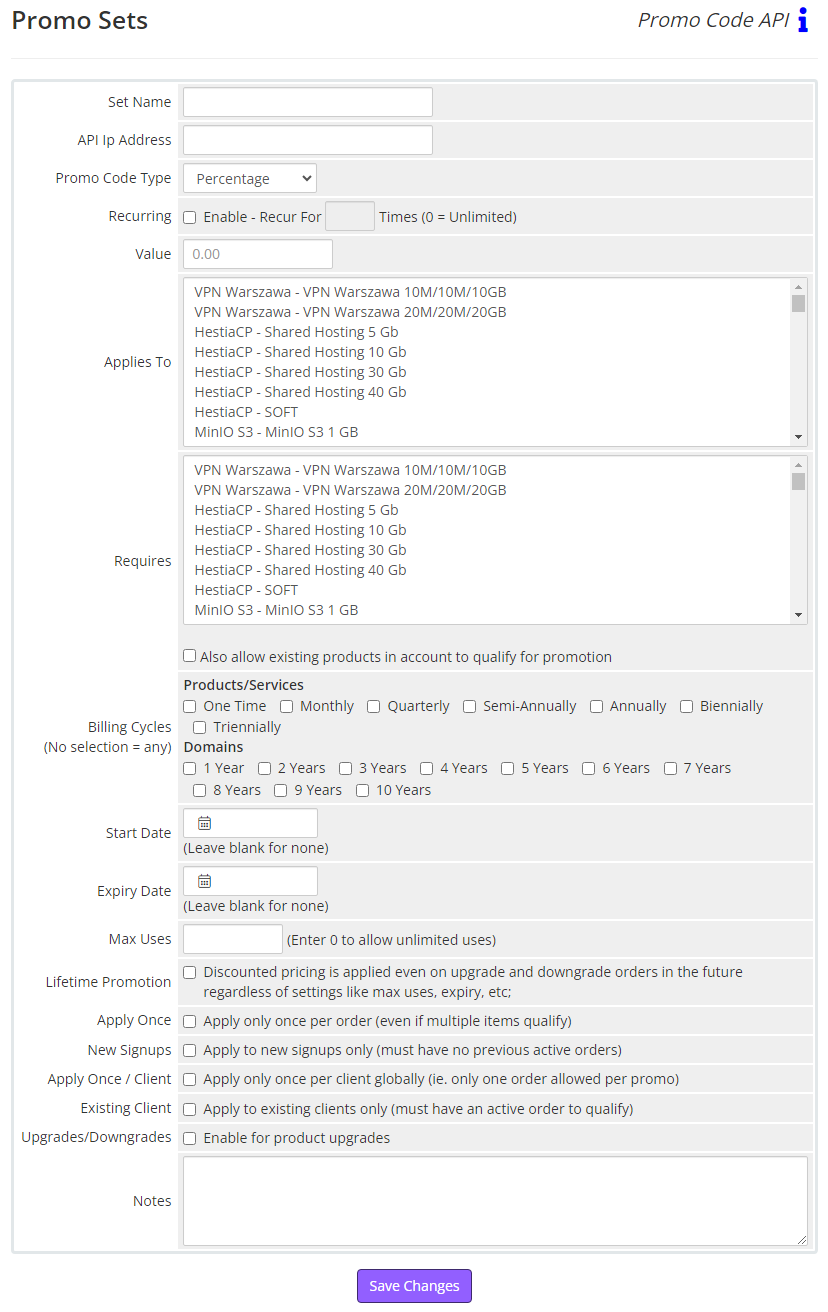
Add Promo Set
Click Add new Promo Set at the top of the Promo Sets page.
Set Name: Enter a set name.
API Ip Address: Enter Ip adress for API connection.
Promo Code Type: Choose one of the four promotion types:
- Percentage — Discount by a percentage of the original price.
- Fixed Amount — Discount a specified amount from the original price.
- Price Override — Changes the product price to this value. Use this to offer a consistent discount across multiple billing cycles.
- Free Setup — Discount any setup fee from the original price.
Recurring: To have the discount only apply to the first invoice, do not check it. When you check this, the discount will apply to renewal invoices.
Set Recur For to 0 for all future renewals to discount, or enter a different number to specify how many cycles the discount lasts for. This is in addition to the initial invoice for the product. If you wish to provide a discount 6 times, enter 5 in the recurring box.
Value: enter the amount of the discount in positive numbers (up to 2 decimals) only.
Applies To: Select the products, addons, and domain TLDs that the promotion applies to and what billing cycles or registration periods the discount requires. These should match those of your products.
Your can press Ctrl+click to select multiple entries.
Requires: By selecting products from Requires, you can stipulate which products or services the client must also have in their shopping cart before applying the discount. You can use this to offer "buy x get y half price" promotions.
Also allow existing products in account to qualify for promotion allows the system to include active products that the client already owns in the promotion criteria.
Billing Cycles: Selecting a billing cycle denotes that the promo code can be applied to products with specified billing cycles only.
Optionally, set the start and expiration dates. If you use one or both of these settings, the coupon will only start working after the start date and will stop working at expiration.
The expiry date must be a date in the future.
The expiry date must be later than the start date.
For Maximum Uses, enter the number of uses that you want to allow.
The number of times that customers have used the promotion will display below this setting.
For unlimited uses, enter 0.
Use the following checkboxes to specify who can use the promotion:
Lifetime Promotion: Discounted pricing is applied even on upgrade and downgrade orders in the future regardless of settings like max uses, expiry, etc;
Apply Once: Apply only once per order (even if multiple items qualify)
New Signups: Only new clients can use the promotion.
Apply Once / Client: If a client has an existing active order that uses this promotion, they will not be able to use the code a second time.
Existing Client: Only existing clients with one or more active orders can use the promotion.
Upgrades/Downgrades:
(For more info read a WHMCS documentation: Click here)
- Select Products/Services or Configurable Options as the Upgrade Type.
-
Products/Services:
-
Select Products/Services as the Upgrade Type.
-
Use Type, Recurring, and Value fields to specify the value of the discount and how long it lasts.
-
Use Applies To to select which products to apply the promotional code to. The client will receive the discount when upgrading to this product.
-
For upgrades and downgrades, use Requires slightly differently. It restricts which products clients can upgrade. For example, they can upgrade from a selected product to this product and receive a discount, but not upgrade from an unselected product and receive a discount.
-
- Configurable Options
- To offer discounts to clients for configurable options, select Configurable Options as the Upgrade Type.
- Use Upgrade Discount to specify the discount value as a percentage or fixed amount for the configurable options.
- Then, use Config Options Upgrades to select which option this discount applies to.
- If you use the main Type, Recurring, and Value at the top of the page, the system will apply a discount to the parent product as well as to the configurable option. Leave this blank to only apply the discount to the configurable option.
Notes: In the admin notes section, add information that admins may need about the promotion.
Edit Promo Set
Clicking on the set name or ID opens a template for editing a Promo Set.

After opening the template for editing a Promo Set, you can reconfigure or amend the set.
It's important to note that any promo codes generated prior to these changes to the set of promo codes will not be altered.

Delete Promo Set
Clicking on the set name or ID opens a template for editing a Promo Set.
After opening the template for editing a Promo Set, you can click on "Delete Set" for deletion a set.

API requests
PUQ Customization module WHMCS
Order now | Download | FAQ
To simply generate a promo code, use the link generated when creating a set to get the required promo code by invoking the cURL command:
- Clicking on the set name or ID opens a template for editing a Promo Set.
- Copy an URL next to IP Adress"

Method: POST
Example:
curl \
-X POST YOUR_URL_FROM_SETResponse example:
{
"id": 61,
"code": "XABKKA",
"type": "Percentage",
"recurring": 1,
"value": "25.50",
"cycles": "Quarterly,Semi-Annually,Annually,5Years,6Years,7Years",
"appliesto": "12,40,18",
"requires": "13,50,D.ua",
"requiresexisting": 0,
"startdate": "2024-01-01",
"expirationdate": "2024-01-27",
"maxuses": 11,
"uses": 0,
"lifetimepromo": 0,
"applyonce": 1,
"newsignups": 1,
"existingclient": 0,
"onceperclient": 0,
"recurfor": 0,
"upgrades": 1,
"upgradeconfig": "a:4:{s:5:\"value\";s:2:\"11\";s:4:\"type\";s:7:\"product\";s:12:\"discounttype\";s:10:\"Percentage\";s:13:\"configoptions\";a:2:{i:0;s:2:\"11\";i:1;s:2:\"13\";}}",
"notes": "TEST TEST"
}You can also include some additional data if needed:
name - Adds the beginning of the promo code for clarity regarding its set association.
value - Specifies the value for promo codes.
promo_code_type - Specifies the discount type for promo codes, which can be:
- Percentage
- Fixed Amount
- Price Override
- Free Setup
start_date - Specifies the promo code's access start date.
expiry_date - Specifies the promo code's access end date.
notes - Adds notes from the author.
Method: POST
Example:
curl \
-X POST YOUR_URL_FROM_SET \
-d "name=puqcloud.com&\
value=50&\
promo_code_type=Fixed Amount&\
start_date=2024-01-01&\
expiry_date=2024-12-30&\
notes=TEST FOR DOCUMENTATION"Response example:
{
"id": 66,
"code": "puqcloud.com-PFC",
"type": "Fixed Amount",
"recurring": 1,
"value": "50.00",
"cycles": "Quarterly,Semi-Annually,Annually,5Years,6Years,7Years",
"appliesto": "12,40,18",
"requires": "13,50,D.ua",
"requiresexisting": 0,
"startdate": "2024-01-01",
"expirationdate": "2024-12-30",
"maxuses": 11,
"uses": 0,
"lifetimepromo": 0,
"applyonce": 1,
"newsignups": 1,
"existingclient": 0,
"onceperclient": 0,
"recurfor": 0,
"upgrades": 1,
"upgradeconfig": "a:4:{s:5:\"value\";s:2:\"11\";s:4:\"type\";s:7:\"product\";s:12:\"discounttype\";s:10:\"Percentage\";s:13:\"configoptions\";a:2:{i:0;s:2:\"11\";i:1;s:2:\"13\";}}",
"notes": "TEST FOR DOCUMENTATION"
}Errors:
- The expiry date must be a date in the future.
- The expiry date must be later than the start date.
If you send a request using the GET method, it will return information about the network:
Method: GET
Example:
curl \
-X GET YOUR_URL_FROM_SETResponse example:
{
"id": 1,
"name": "test",
"api_ip_address": "77.87.125.4",
"api_key": "XJCRRFKY9GZ55CDR9H98NFJND",
"promo_code_type": "Percentage",
"recurring": 1,
"recur_for": 0,
"promo_value": 25.5,
"applies_to": [
"12",
"40",
"18"
],
"requires": [
"13",
"50",
"D.ua"
],
"requires_existing": 0,
"cycles": [
"Quarterly",
"Semi-Annually",
"Annually",
"5Years",
"6Years",
"7Years"
],
"start_date": "2024-01-01",
"expiration_date": "2024-01-27",
"max_uses": 11,
"lifetime_promo": 0,
"apply_once": 1,
"new_signups": 1,
"once_per_client": 0,
"existing_client": 0,
"upgrades": 1,
"upgrade_type": "product",
"upgrade_discount_type": "Percentage",
"upgrade_value": "11",
"config_option_upgrades": [
"11",
"13"
],
"notes": "TEST TEST",
"url": "XJCRRFKY9GZ55CDR9H98NFJND-1-7dc8108e1a78c37c136732d464208a22"
}Secure, Unique Generated Links
PUQ Customization module WHMCS
Order now | Download | FAQ
To get a generated link:
- Clicking on the set name or ID opens a template for editing a Promo Set.
- Copy an URL next to IP Adress"
Link Security and Uniqueness Basics
The uniqueness and security of the generated links lie in their generation process. The link is created using an API key generated upon set creation, the set's ID, and a special key generated from your unique WHMCS code, the set's API key, and the IP address you specified during set creation.
Furthermore, a verification code is also generated using the unique WHMCS code, the set's ID, the set's API key, and the IP address.
Due to this complex combination of parameters, each link generated for every set is unique and is tied to the specific WHMCS instance, ensuring both individuality and security.
Also this ensures that only users with the designated IP address can access the link associated with their set, enhancing its security measures.
Cancellation Request
The Cancellation Request extension helps manage unpaid and canceled invoices by transitioning them to a "Cancelled" status or removing already canceled invoices, both manually and via cron jobs.
Description
PUQ Customization module WHMCS
Order now | Download | FAQ
The "Cancellation Request" extension is designed to streamline the management of invoices, specifically targeting those with products in a cancelled status and termination dates that are at least a month in the past from the current date.
Here are the key functionalities offered by this extension:
1. Automatic Status Change: This feature automatically changes the status of all unpaid invoices whose associated products are marked as cancelled and have termination dates that are at least a month old from the current date.
2. Invoice Item Deletion: Invoices often contain multiple items, some of which may be cancelled products. With this extension, invoice items that are marked as cancelled and have termination dates at least a month in the past from the current date are automatically deleted. This helps keep your invoices clean and up-to-date, removing unnecessary clutter and improving overall clarity.
3. Cron Job Configuration: The extension is configured to execute these actions based on chosen cron jobs, allowing for automated processing according to your specified schedule. This ensures consistency and reliability in managing cancellation requests without manual intervention.
4. Manual Functionality: While automated processing is the primary mode of operation, the extension also offers manual functionality. This enables administrators to manually trigger the execution of these actions as needed, providing flexibility and control over the cancellation request process.
Overall, the "Cancellation Request" extension simplifies the handling of cancellation requests within your invoicing system. By automating status changes and invoice item deletions for eligible products, it helps maintain accuracy and efficiency in managing cancellations, ultimately enhancing the overall invoicing experience for both administrators and clients.
Configuration
PUQ Customization module WHMCS
Order now | Download | FAQ
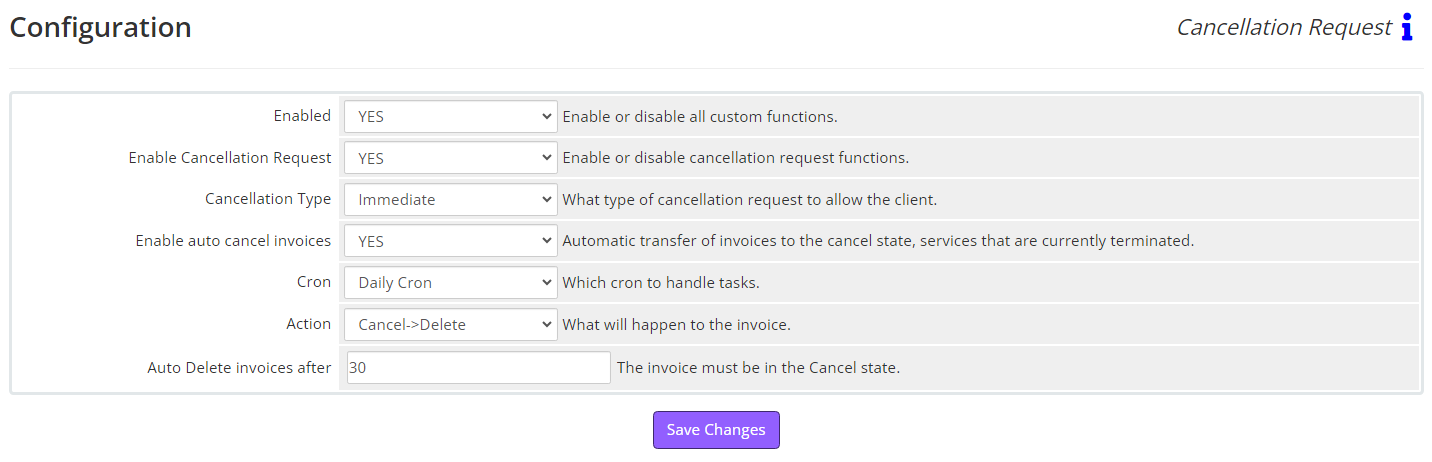
Enabled - Enabling or disabling all custom functions of this extension affects the automation and visibility of its features in the client area. When extension disabled, the automation capabilities and related features provided by the extension will not be active or visible to clients. However, as an administrator, you will still have access to configure and utilize the extension's functionalities through the administration interface. This gives you the flexibility to control the visibility and automation aspects of the extension based on your specific needs and preferences.
Enable Cancellation Request - Enable or disable cancellation request functions.
Cancellation Type - Choose type of cancellation request to allow the client.
Enable auto cancel invoices - Enable or disable automatic transfer of invoices to the cancel state, services that are currently terminated
Cron - Choose the cron job during which the cancellation request will be executed
Action - What should happen to the invoice: "Cancel" or "Cancel, then Delete"
Auto Delete invoices after - The number of days the invoice must be in the Cancel state after which the invoice will be automatically deleted (only applies when Action = "Cancel->Delete").
Safe test
PUQ Customization module WHMCS
Order now | Download | FAQ
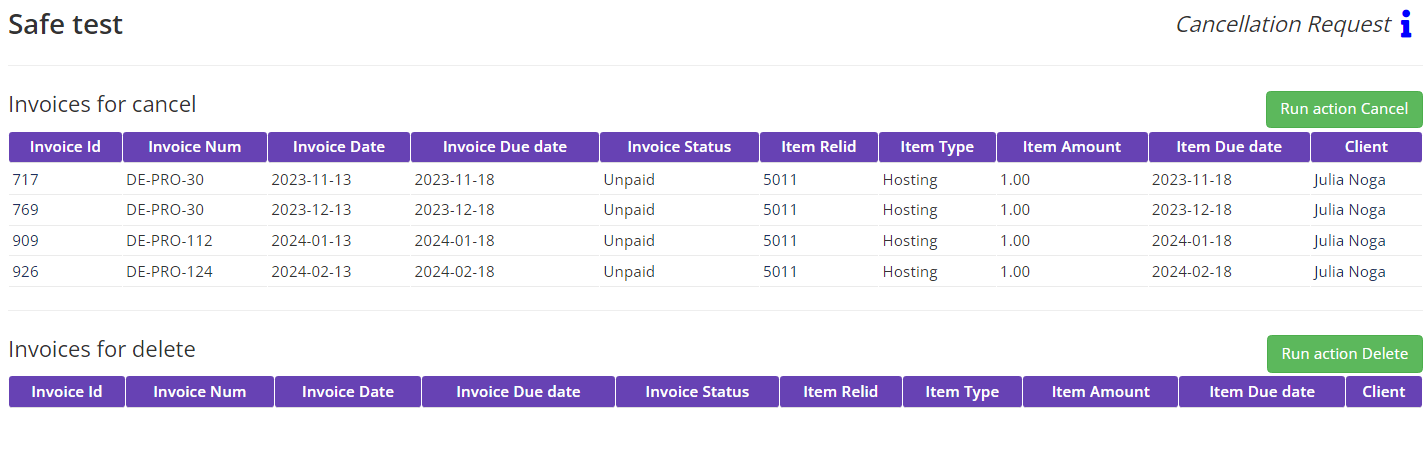
Invoices for cancel - Unpaid invoices whose products have a status of cancelled and the termination date of the products is not closer than a month ago to the current date.
Invoices for delete - Invoice items that have a status of cancelled and the termination date of the products is not closer than a month ago to the current date.
All of this happens automatically as described in the configuration you've set up, but there's also the option to perform all actions manually.
Run action Cancel - Manual execution of the function that changes the status of all unpaid invoices whose products have a status of cancelled, and the termination date of the products is not closer than a month ago to the current date, to cancelled.
Run action Delete - Manual execution of the function that deletes invoice items that have a status of cancelled and the termination date of the products is not closer than a month ago to the current date.
Mattermost Export
Instantly share WHMCS reports, tickets, and invoices in your Mattermost server.
Description
PUQ Customization module WHMCS
Order now | Download | FAQ
The "Mattermost Export" extension establishes a unidirectional link from your WHMCS server to your Mattermost workspace, facilitating seamless communication and timely notifications for events. This extension is designed to efficiently transmit updates regarding new tickets, payments, client responses to tickets, and reports deliveries directly to your Mattermost messenger.
Key Features:
- Ticket Notifications: Receive instant notifications in your designated Mattermost channels whenever a new ticket is created in your WHMCS system. Stay informed of client inquiries and support requests without the need to continuously monitor your WHMCS dashboard.
- Payment Alerts: Stay up-to-date on payment activities by receiving notifications in Mattermost whenever a new invoice is paid by a client. This feature ensures that you are promptly notified of successful transactions, enabling you to maintain accurate financial records and provide timely service delivery.
- Client Interaction Updates: Receive notifications in Mattermost when clients respond to tickets, allowing you to engage with client inquiries and provide timely assistance. This feature enhances communication efficiency by ensuring that your team is promptly alerted to client interactions within your WHMCS platform.
- Report Delivery: Streamline the distribution of reports by automatically sending them to designated Mattermost channels or users. Keep your team informed of important metrics, financial summaries, or other relevant data without the need for manual distribution.
- Customizable Notification Settings: Tailor the notification preferences to suit your team's needs with customizable settings. Specify the types of notifications to be sent to Mattermost, adjust notification channels, and fine-tune the integration to align seamlessly with your workflow.
Overall, the "Mattermost Export" extension enhances collaboration and efficiency by delivering timely notifications for key events within your WHMCS system directly to your Mattermost messenger. By leveraging this integration, you can ensure that your team stays informed, responsive, and coordinated, ultimately enhancing customer service and operational effectiveness.
Configuration
PUQ Customization module WHMCS
Order now | Download | FAQ

Enabled - Enabling or disabling all custom functions of this extension affects the automation and visibility of its features in the client area. When the extension is disabled, the automation capabilities and related features provided by the extension will not be active or visible to clients. However, as an administrator, you will still have access to configure and utilize the extension's functionalities through the administration interface. This gives you the flexibility to control the visibility and automation aspects of the extension based on your specific needs and preferences.
Server URL - The URL of your Mattermost server to which you want to send all data and notifications. Please be careful when filling out this field as it is one of the most important in this extension. When entering, it is very important to maintain the correct structure: before the domain or IP address, enter http:// or https://, depending on your server settings, and then add a trailing slash (/).
Access Token - This is the personal token of the administrator from whose account all notifications will be sent. You can obtain this token by following the instructions here: https://docs.mattermost.com/developer/personal-access-tokens.html
The user role from which notifications will be sent must be System Admin. Otherwise, most of the functionality may not work properly.
Test Connection - Button to test the connection to the server.
Tickets Export
PUQ Customization module WHMCS
Order now | Download | FAQ
Export Setup

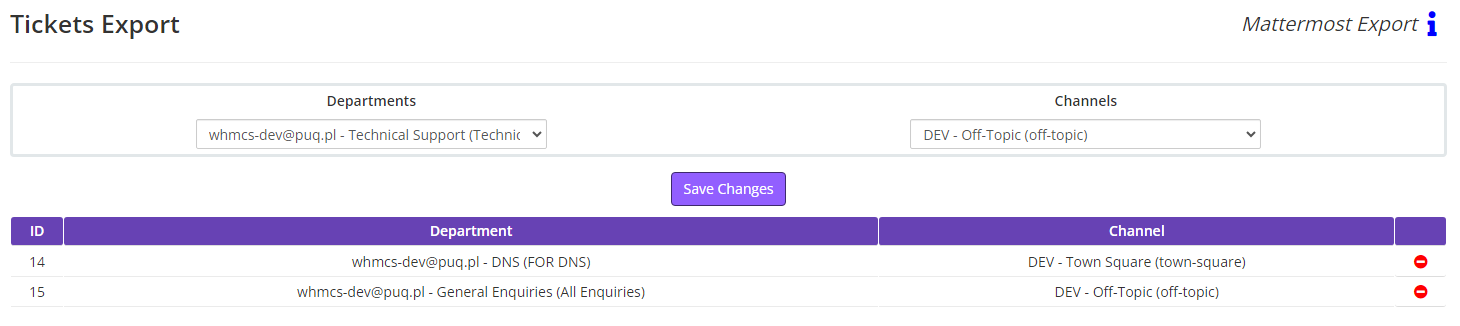
To configure notifications for new tickets, establish a connection between departments and channels. You can create this connection by selecting the department and the corresponding notification channel, then click the "Save Changes" button.
You can delete the necessary connection to change the channel for a particular department. To do this, click on the red icon " "
"
Annotation containing a direct link to discuss
When creating a new ticket, an annotation will appear within the same ticket from the administrator's side, containing a direct link to discuss this ticket on your Mattermost server.
If you encounter an error upon accessing the link, it indicates that you do not have access to this channel.
What new ticket notifications look like
The main view of the ticket has a special structure and represents a link directly to the ticket in your WHMCS: #(Ticket Number) - (Ticket Title). There is also a reaction  indicating that the ticket is new and has no new replies from the client.
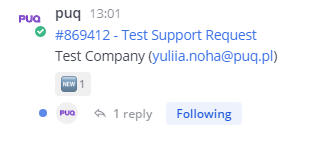
In the Thread, the message about the new ticket will have the text of the client's email. This will help you immediately see the content of the ticket.
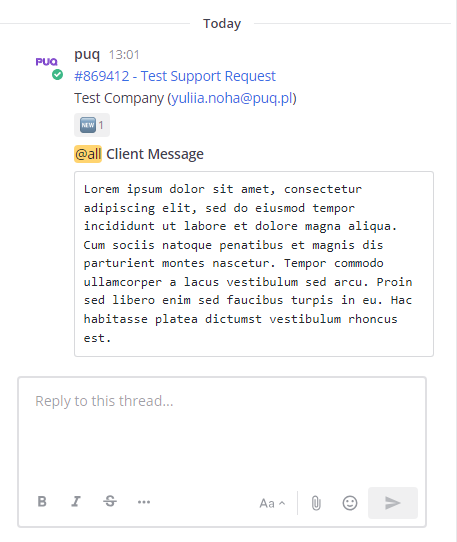
What ticket reply notifications look like
When receiving a notification that the client has replied to the ticket, the Thread will display the text of the client's email. The reaction will also change to indicate that the ticket has a client reply.
Please note that this only works with tickets created after installing and configuring this module. All tickets opened before this and their replies will not be displayed on your Mattermost server.
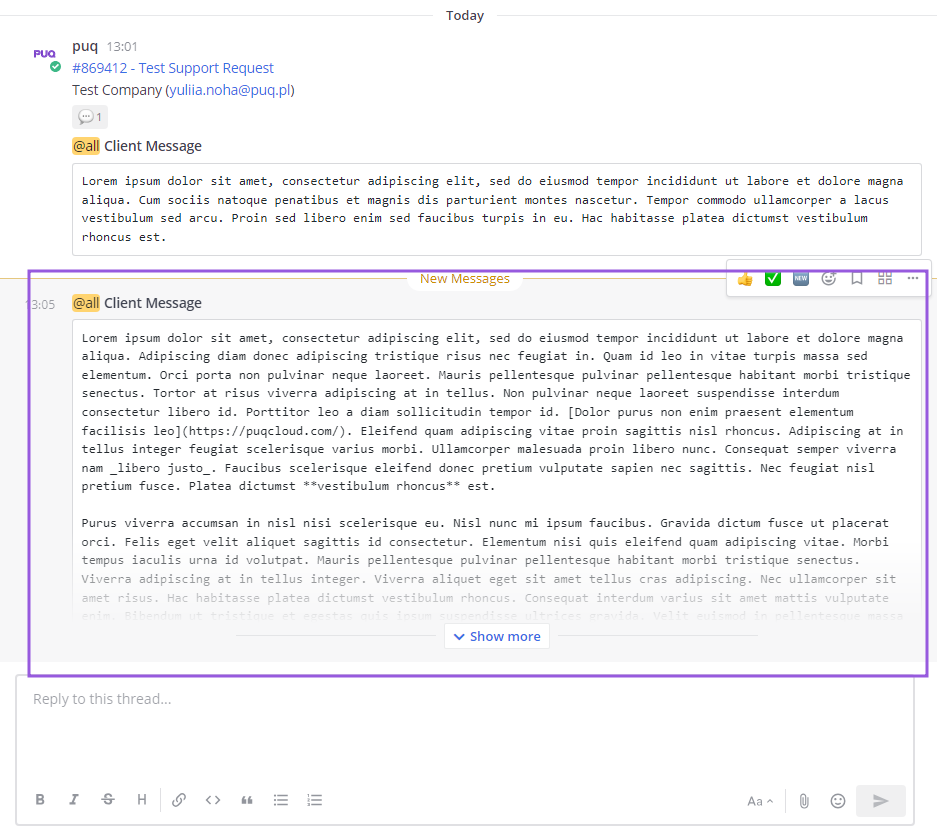
What closed ticket notifications look like
When a ticket is closed, the reaction will change to  indicate that the ticket has a closed status.
Invoices Export
PUQ Customization module WHMCS
Order now | Download | FAQ

Enabled Reports Export - You can easily activate or deactivate sending notifications about paid invoices.
Channel for sending invoices - Select the channel on your server where notifications about paid invoices will be sent.
Color for invoice message - Choose the color of the sidebar on notifications about paid invoices.
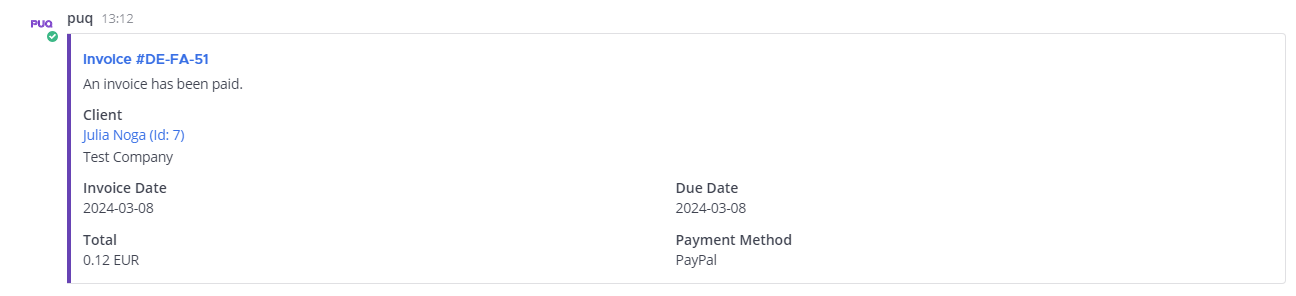
Reports Export
PUQ Customization module WHMCS
Order now | Download | FAQ

Enabled Reports Export- You can easily activate or deactivate sending reports from your WHMCS.
Channel for sending reports - Select the channel on your server where reports from your WHMCS will be sent.
Color for report message - Choose the color of the sidebar on report notifications.
Reports are sent when the daily cron job runs.
Daily Report - The report is generated every day for the previous day, i.e., the previous date (for example, if today is 02/13/2024, the report will be for the period 02/12/2024 00:00:00 - 02/12/2024 23:59:59).
Weekly Report - The report is generated every Monday for the previous week (for example, if today is 02/13/2024 (Monday), the report will be for the period 02/05/2024 00:00:00 (Monday) - 02/11/2024 23:59:59 (Sunday)).
Monthly Report - The report is generated on the first day of each month (for example, if today is 02/01/2024, the report will be for the period 01/01/2024 00:00:00 - 01/31/2024 23:59:59).
All data except for unpaid invoices is taken for a specific period (day, week, month). Information about unpaid invoices is aggregated. This means that the report includes the total number of unpaid invoices on your server at the time of report generation and sending.
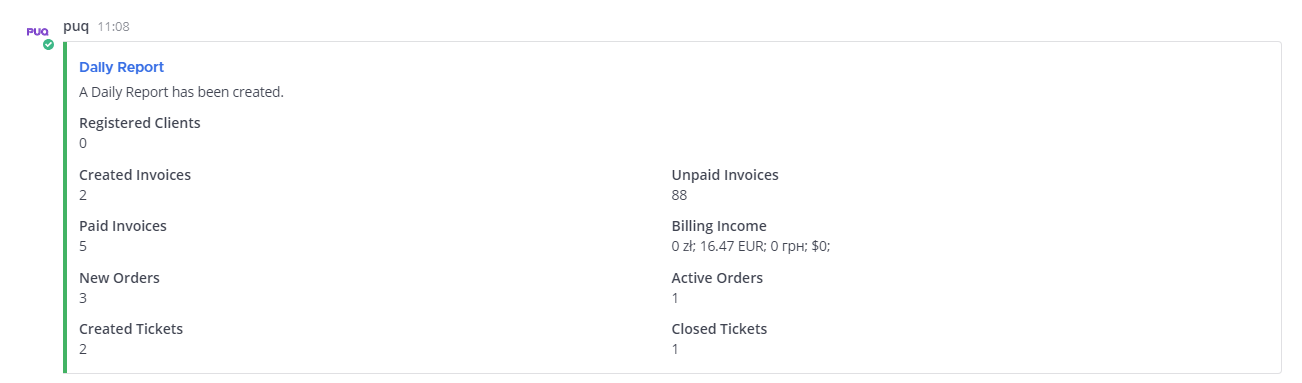

Export Tools
The "ExportTool" extension for WHMCS enables seamless JSON or XML export of data from various WHMCS tables, offering customizable, secure, and efficient data management and integration capabilities.
Description
PUQ Customization module WHMCS
Order now | Download | FAQ
Export Tools
The "ExportTool" extension for WHMCS is a powerful and flexible tool designed to facilitate the export of data in JSON and XML format directly from WHMCS tables. It allows you to create unlimited groups of tables for targeted data management and extraction. With the inclusion of "WHERE" conditions that can be combined using "AND", it offers granular control over the data being exported. Each table group generates a unique URL, providing secure and direct access to the exported data. Additionally, the extension supports data pagination, ensuring efficient data retrieval and handling, even for large datasets. Moreover, the tool enables external applications to connect and access data seamlessly, offering an ideal solution for integrating WHMCS data with third-party software and services. This combination of features makes the ExportTool extension an essential utility for advanced data integration and management within the WHMCS ecosystem.
Configuration
PUQ Customization module WHMCS
Order now | Download | FAQ
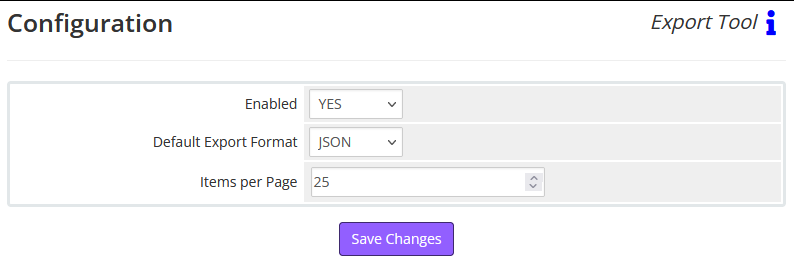
On the "Configuration" page of the Export Tool, you are presented with a straightforward interface to manage the settings for data export functionalities:
1. Enabled: This dropdown allows you to toggle the export feature on (YES) or off (NO). When set to 'YES', the Export Tool is active and can perform data export operations. If set to 'NO', the export capabilities are disabled.
2. Default Export Format: Here you can select the format in which data will be exported. The dropdown menu currently offers 'JSON' and 'XML', which is a common data interchange format that encapsulates data in a structured, key-value pair format. It is widely used because of its text-based nature, making it easy to read and write while also being language-independent.
3. Items per Page: This field lets you specify the number of items you want to display on each page of your exported data. It is pre-set to '25', which means that if you have more than 25 records, they will be paginated accordingly. You can adjust this number based on how much data you want to process or view at once.
At the bottom of the page, the "Save Changes" button allows you to apply any adjustments you've made to the settings. It's crucial to click this after making changes to ensure that your preferences are stored and will be used in future export operations.
These settings provide an initial configuration for how the Export Tool operates, offering a layer of customization to fit your data management needs.
Groups Export
PUQ Customization module WHMCS
Order now | Download | FAQ
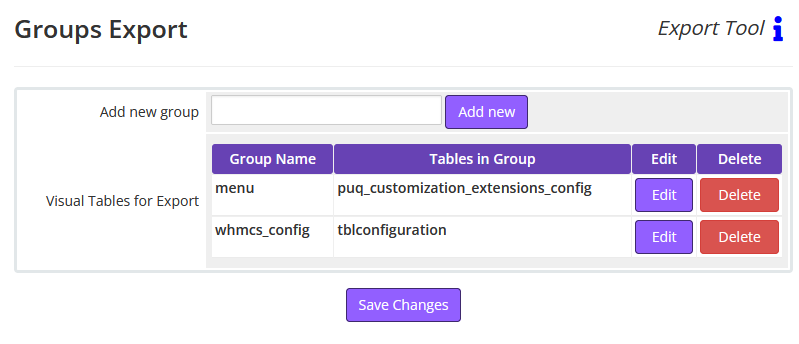
On the "Groups Export" page of the Export Tool, the interface is designed for managing groups of tables that you have set up for exporting data:
1. Add new group: Here, you can create a new group for organizing your tables. Simply type the name of the new group into the text field and click the "Add new" button. This action will create a new group which you can then configure by adding specific tables and setting export conditions.
2. Visual Tables for Export: This section displays the groups that are currently set up for export along with the tables included in each group. For each group listed, there are options to "Edit" or "Delete":
- - Group Name: This column lists the names of the groups you have created, providing an easy reference to manage multiple sets of tables.
- - Tables in Group: Next to each group name, you see the tables that are included in that group. These are the tables whose data you can export using the configurations you have set up for that specific group.
- - Edit: Clicking the "Edit" button next to a group allows you to modify the group's settings. This typically includes changing the tables in the group, adjusting export conditions, or altering access permissions.
- - Delete: If you wish to remove a group entirely, clicking the "Delete" button will remove the group and all associated configurations from the export tool.
Finally, at the bottom of the page, the "Save Changes" button should be clicked after making any changes to commit them to the system.
This page is crucial for organizing your data export activities into manageable groups, which simplifies the process of exporting data from multiple tables and ensures that you can easily access and modify your export settings as needed.
Edit Group
PUQ Customization module WHMCS
Order now | Download | FAQ
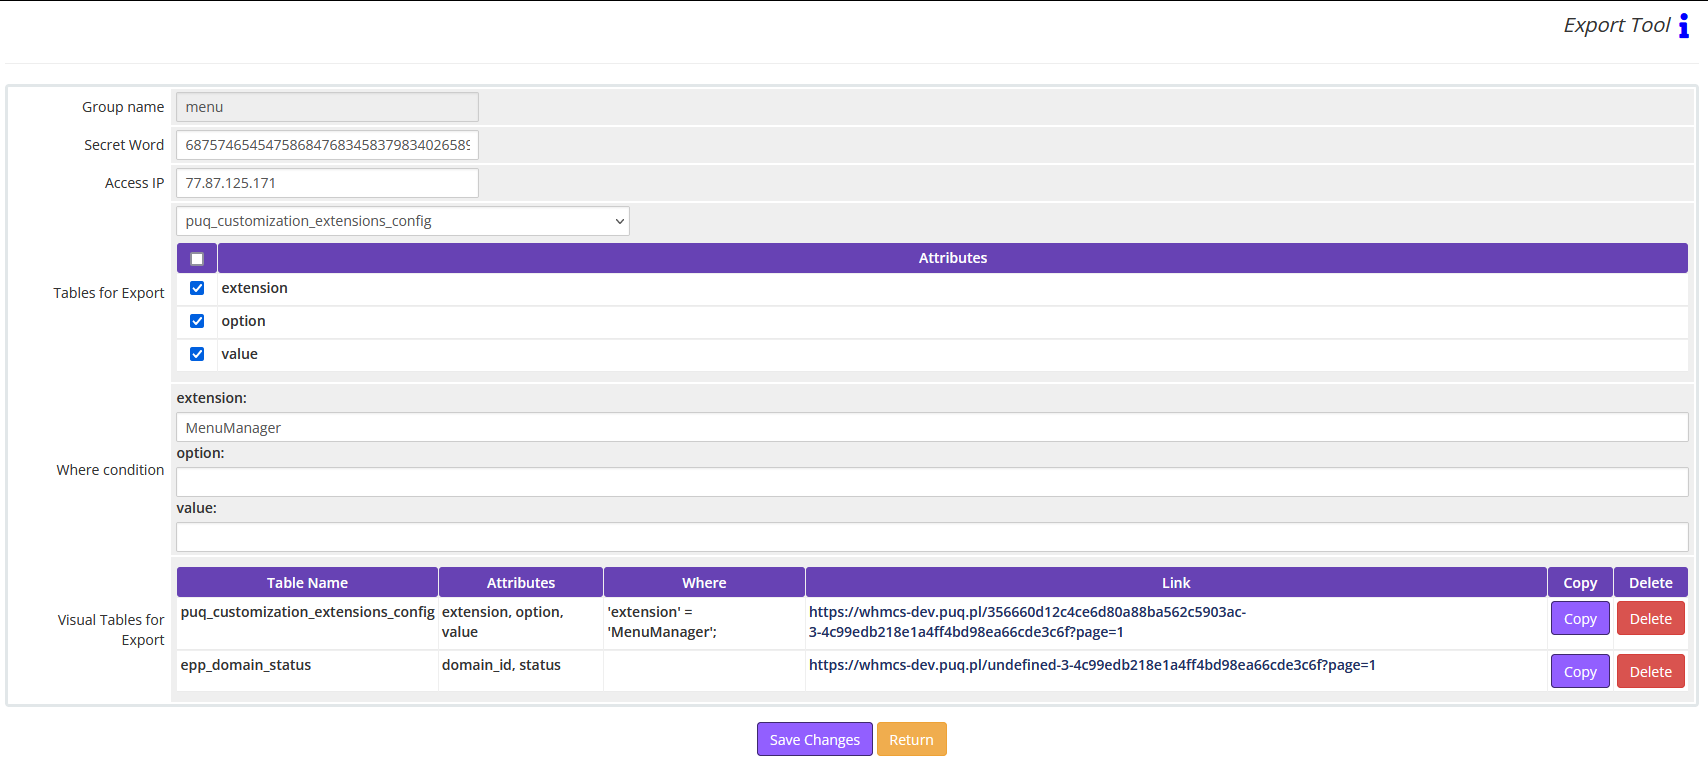
The "Edit Group" page in the ExportTool module is designed to manage and create new groups of data for export. Here's a breakdown of the functionalities available on this page:
- Group Name: This field is where you name your group. It serves as an identifier for the set of data you wish to export.
- Secret Word: Here, you can enter any string which acts as a secret key for generating the hash part of the URL. This is part of the security mechanism to prevent unauthorized access.
- Access IP: This field determines which IP addresses are allowed to access the exported data. You can list multiple IPs separated by commas or use "0.0.0.0" to allow access from any IP. Note that changing this will also change the generated link, as the access IP is factored into the hash generation.
- Tables for Export: A dropdown menu allows you to select from all available tables in your database. Upon selection, all the attributes (columns) available in that table are displayed. You can check the attributes you wish to export, which will then be reflected in the "Visual Tables for Export" section.
- Where Condition: This interactive field allows you to input 'WHERE' conditions that work like 'AND' for each value entered. This feature enables you to refine your data selection based on specific criteria.
- Visual Tables for Export: Displays all the tables you've selected for export along with their attributes and 'WHERE' conditions. In this section, you can see the generated link for data access, copy it, or remove tables from the export group.
To finalize your settings, use the "Save Changes" button. This will update the configurations, including the unique URL generated for data access based on the secret word and access IP you've provided. Remember, each change you make will potentially alter the unique URL, so it's essential to save only after finalizing your settings to ensure consistency and security.
Export VAT_R
Extension specifically designed for the Polish market! The Export VAT_R extension enables generating VAT_R reports for tax settlements from invoices within your WHMCS system.
Description
PUQ Customization module WHMCS
Order now | Download | FAQ
Introducing the "Export VAT_R" extension, tailor-made for the dynamic Polish market! Simplify your tax settlement processes with this specialized tool designed to seamlessly generate VAT_R reports directly from your WHMCS invoicing system.
Compliance Disclaimer: While "Export VAT_R" diligently compiles data for your reports, it is essential to note that we do not assume responsibility for the accuracy or completeness of the information provided. If you identify any discrepancies or require assistance in ensuring compliance with legal regulations, please do not hesitate to reach out to us.
Key Features:
- Effortless VAT_R Reporting: Streamline your tax reporting obligations by effortlessly generating VAT_R reports from invoice data stored within your WHMCS system.
- Integration with WHMCS: "Export VAT_R" seamlessly integrates with your existing WHMCS infrastructure, pulling invoice details, payment methods, and other relevant data to compile comprehensive VAT_R documents for your accounting needs.
- Real-Time Data Updates: Stay up-to-date with the latest currency exchange rates and pricing information by leveraging the API of Narodowy Bank Polski (National Bank of Poland), ensuring that your VAT_R reports reflect the most accurate and current data available.
- Flexible Reporting Options: Generate reports for any desired period by simply inputting and saving the desired timeframe within the "download" window, providing you with the flexibility to meet your reporting needs efficiently.
- Compatibility with "Overwrite Tax Rules" Extension: Seamlessly integrate "Export VAT_R" with the "Overwrite Tax Rules" extension to ensure accurate tax calculations and compliance with Polish tax regulations.
Empower your accounting team with "Export VAT_R", the essential extension for simplifying VAT_R reporting and ensuring compliance with Polish tax laws. Streamline your tax settlement processes and focus on growing your business with confidence.
Configuration
PUQ Customization module WHMCS
Order now | Download | FAQ

Enabled - Enabling or disabling all custom functions of this extension affects the automation and visibility of its features in the client area. When extension disabled, the automation capabilities and related features provided by the extension will not be active or visible to clients. However, as an administrator, you will still have access to configure and utilize the extension's functionalities through the administration interface. This gives you the flexibility to control the visibility and automation aspects of the extension based on your specific needs and preferences.
Client VAT ID field: This setting allows you to choose between using the standard VAT ID field or a custom VAT ID field for clients.
Static Data
PUQ Customization module WHMCS
Order now | Download | FAQ
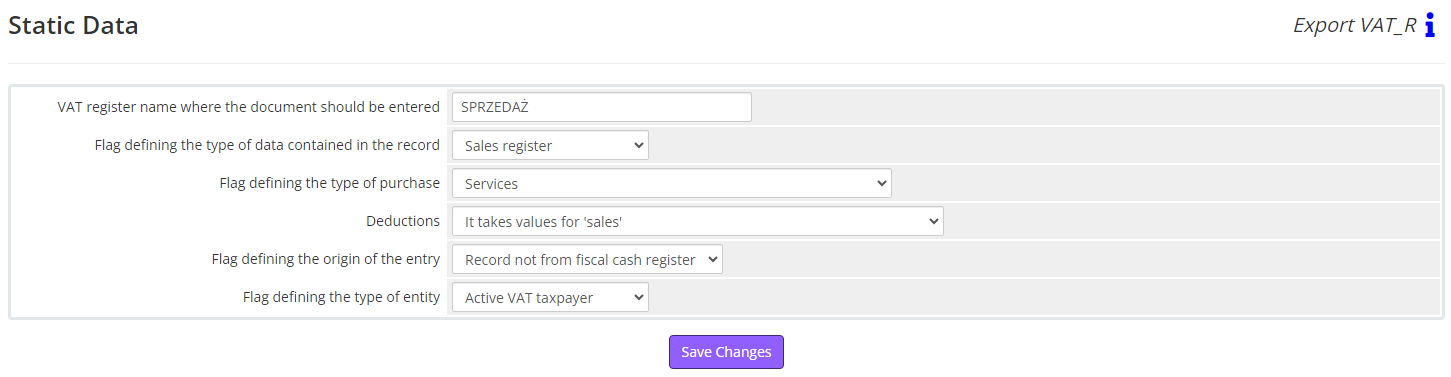
Please ensure to fill in these details with your accounting department to ensure all data complies with regulations, and perform checks before sending to Uzhondu.
Static data - these are the details we assign to all invoices and remain unchanged regardless of the invoices, namely:
- VAT register name where the document should be entered
- Flag defining the type of data contained in the record
- Purchase register
- Sales register
- Cost ledger item
- Revenue ledger item
- Flag defining the type of purchase
- Value provided for transactions of type (field TYPE) 2, 3, and 4
- Purchase of goods for resale
- Other purchases
- Purchase of fixed assets
- Services
- Purchase of means of transport
- Purchase of real estate
- Purchase of fuel
- Deductions
- It takes values for 'sales'
- Does not take values for 'sales'
- Takes values for 'sales' only in nominative case
- Three-party transaction (only if 'EXPORT' - intra-Community delivery)
- The buyer is a taxpayer
- Purchase from a taxpayer not domiciled in Poland (only if 'EXPORT' - intra-Community delivery or export)
- To be settled in the VAT-UE declaration
- The buyer is a taxpayer (only if 'EXPORT' - intra-Community delivery or export) or three-party transaction (only if 'EXPORT' – domestic transaction)
- Flag defining the origin of the entry
- Record not from fiscal cash register
- Record from fiscal cash register
- Flag defining the type of entity
- Inactive VAT taxpayer
- Individual
- Active VAT taxpayer
Payment Methods
PUQ Customization module WHMCS
Order now | Download | FAQ
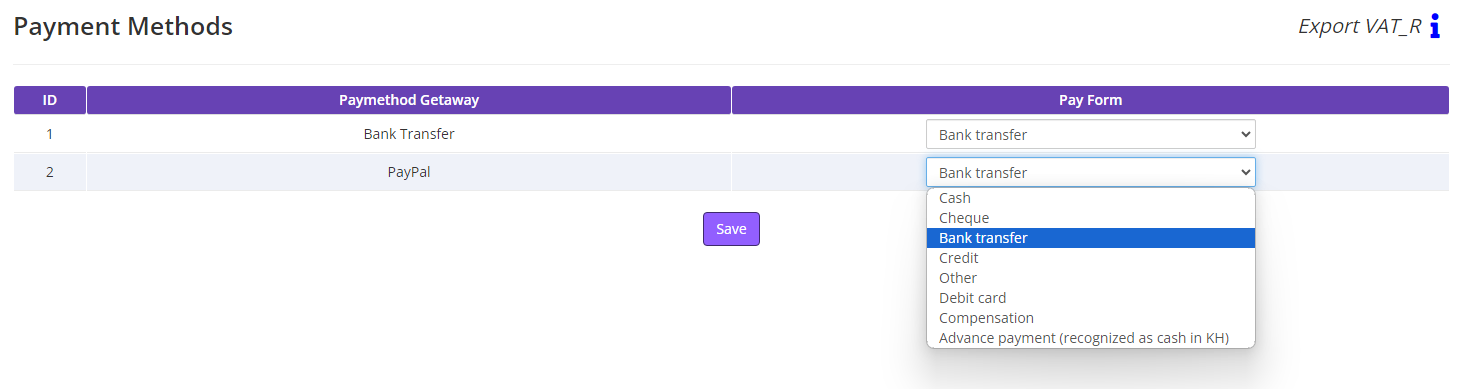
In the "Paymethod Getaway" column, all Paymethod Gateways from your WHMCS system will be listed. For each of them, you will need to select the corresponding Pay Form so that invoices with different Paymethod Gateways are correctly documented in the report.
Currencies
PUQ Customization module WHMCS
Order now | Download | FAQ
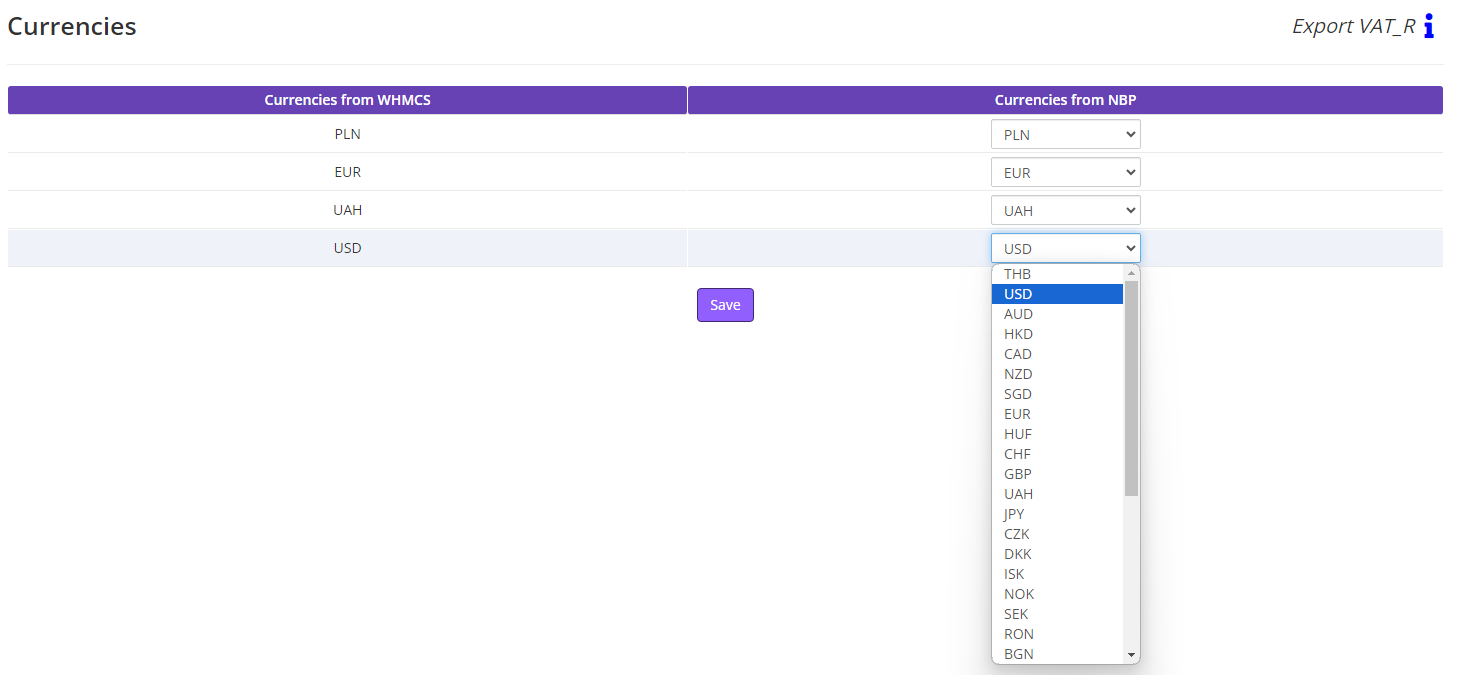
In the "Currencies from WHMCS" column, all currencies from your WHMCS system will be listed. For each of them, you will need to select the corresponding "Currencies from NBP" (taken from the official NBP website) so that invoices with different currencies have accurate prices based on the exchange rates on the day of payment, in the report.
Download
PUQ Customization module WHMCS
Order now | Download | FAQ

Date from - the starting date of the period for which you need to generate the report.
Date to - the ending date of the period for which you need to generate the report.
VAT_R.txt view
PUQ Customization module WHMCS
Order now | Download | FAQ
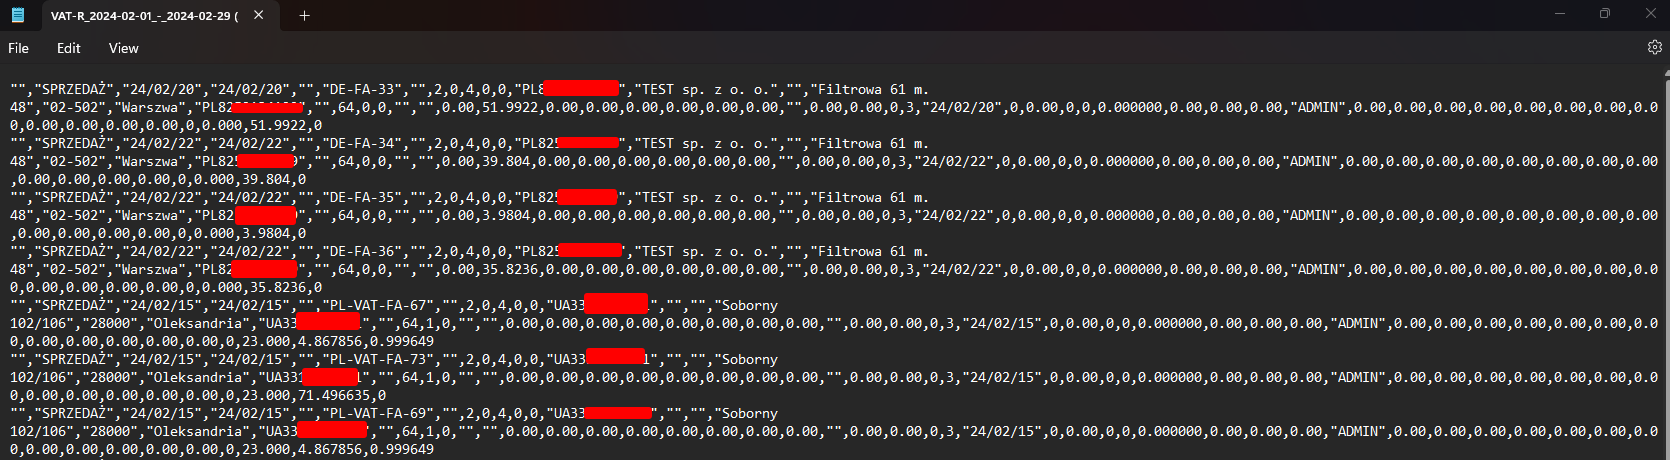
Lang Detect
This extension automatically detects and applies the browser's preferred language and currency for WHMCS platforms, streamlining localization and improving user experience by presenting content in the visitor's native language.
Description
PUQ Customization module WHMCS
Order now | Download | FAQ
Lang Detect
The "Lang Detect" extension is designed to enhance the localization process for WHMCS platforms by automatically detecting and applying the visitor's preferred language and currency based on their browser settings. This functionality ensures that users are presented with content in their native language, significantly improving the overall user experience. Through streamlined localization, this extension makes it easier for businesses to cater to a global audience, fostering a more inclusive and accessible digital environment.
Configuration
PUQ Customization module WHMCS
Order now | Download | FAQ
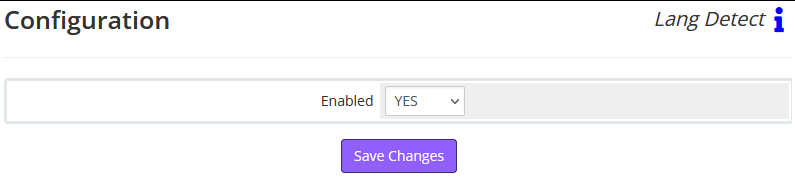
On the "Configuration" page of the Export Tool, you are presented with a straightforward interface to manage the settings for Lang Detect functionalities:
1. Enabled: This dropdown allows you to toggle the Lang Detect feature on (YES) or off (NO). When set to 'YES', the Lang Detect is active and can perform operations. If set to 'NO', the are disabled.
At the bottom of the page, the "Save Changes" button allows you to apply any adjustments you've made to the settings. It's crucial to click this after making changes to ensure that your preferences are stored and will be used in future operations.
Lang settings
PUQ Customization module WHMCS
Order now | Download | FAQ
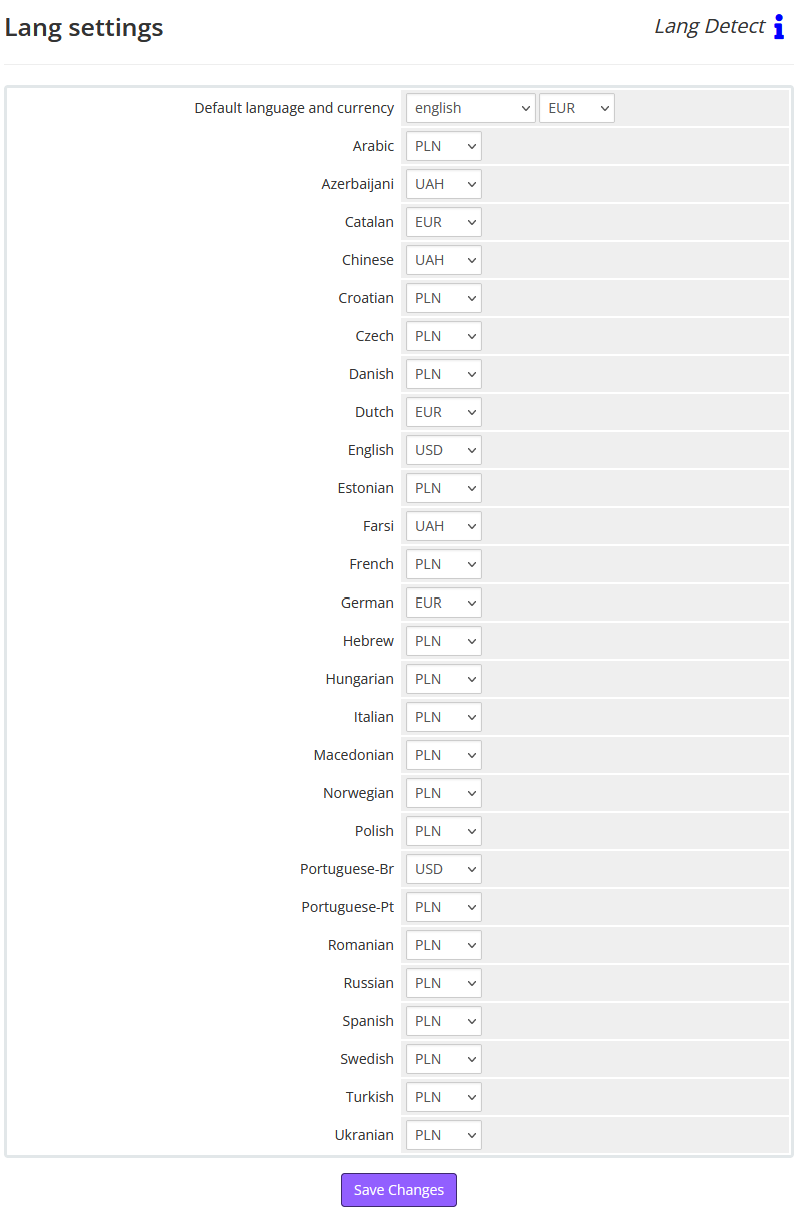
On the "Lang settings" page of the Lang Detect extension, the interface is designed to optimize the user experience by automatically setting the language and currency preferences on your WHMCS platform based on browser detection:
1. Default language and currency: At the top, you have dropdowns to set the default language and currency. This is the fallback setting that will be used if the browser’s language cannot be detected or is not supported.
2. Language-specific currency settings: Below the default settings, there is a list of languages supported by your WHMCS platform, each with a corresponding dropdown menu to select the preferred currency for that particular language. This configuration ensures that users are presented with prices in the currency most familiar to them based on their chosen language.
- Each language is listed along with its default currency setting, providing a clear and organized view of how your platform will present itself to users of different languages.
- The dropdown menu next to each language allows you to customize the currency setting individually. This is crucial for businesses that cater to an international audience and want to offer a tailored browsing experience.
3. Save Changes: After you have made your selections or changes to the language and currency settings, clicking the "Save Changes" button at the bottom of the page will ensure that your configurations are applied to the platform.
This page is essential for managing the language and currency localization settings of your WHMCS platform, making it intuitive for international visitors by automatically aligning with their preferences. It simplifies the process for users and potentially increases engagement by reducing the friction of having to manually select a language or currency.
Ticket Auto-Reply
The extension allows configuring messages to be sent to clients automatically in response to their inquiries.
Description
PUQ Customization module WHMCS
Order now | Download | FAQ
The "Ticket Auto-Reply" extension streamlines communication with clients by automating responses to their inquiries. Users can configure default replies for all support departments or customize responses for each department individually. Additionally, administrators can set the username for replies and specify the time frame for auto-responses after ticket creation.
This extension offers flexibility by allowing different replies for registered clients based on whether they have selected a specific product or not, as well as for unregistered clients. Users can include merge field variables in auto-replies, which are dynamically replaced with user data upon sending.
Key Features:
- Automated Responses: Automatically send predefined messages to clients in response to their inquiries, reducing response times and improving customer satisfaction.
- Department-specific Replies: Customize auto-replies for each support department to ensure tailored responses that meet the needs of different client inquiries.
- Flexible Configuration: Set the admin username for replies and adjust the timing of auto-responses to align with your support workflow.
- Client Segmentation: Tailor responses based on client registration status and product selection, enhancing personalization and relevance.
- Merge Field Support: Include merge field variables in auto-replies to dynamically insert client-specific information for a personalized touch.
Overall, the "Ticket Auto-Reply" extension enhances efficiency and customer service by automating response processes and providing flexibility in configuring replies based on client characteristics and support department requirements.
Configuration
PUQ Customization module WHMCS
Order now | Download | FAQ

Enabled - Enabling or disabling all custom functions of this extension affects the automation and visibility of its features in the client area. When the extension is disabled, the automation capabilities and related features provided by the extension will not be active or visible to clients. However, as an administrator, you will still have access to configure and utilize the extension's functionalities through the administration interface. This gives you the flexibility to control the visibility and automation aspects of the extension based on your specific needs and preferences.
Default admin Username For Reply - Set the admin username for default replies
Default Reply - Please enter your message here. If you check "Auto-Reply" chackbox in the "Replies" tab but do not check "Overwrite Reply" chackbox, the response to the client will contain the text from this field.
Default number of minutes - The time after the client's request is created when an auto-reply will be sent. Please note that this time depends entirely on your WHMCS cron job. For example: If a client submits a request at 11:41 and you set this field to "6", and the cron job runs every 5 minutes, then the auto-reply will be sent at 11:50, i.e., in the next cron run.
Replies
PUQ Customization module WHMCS
Order now | Download | FAQ
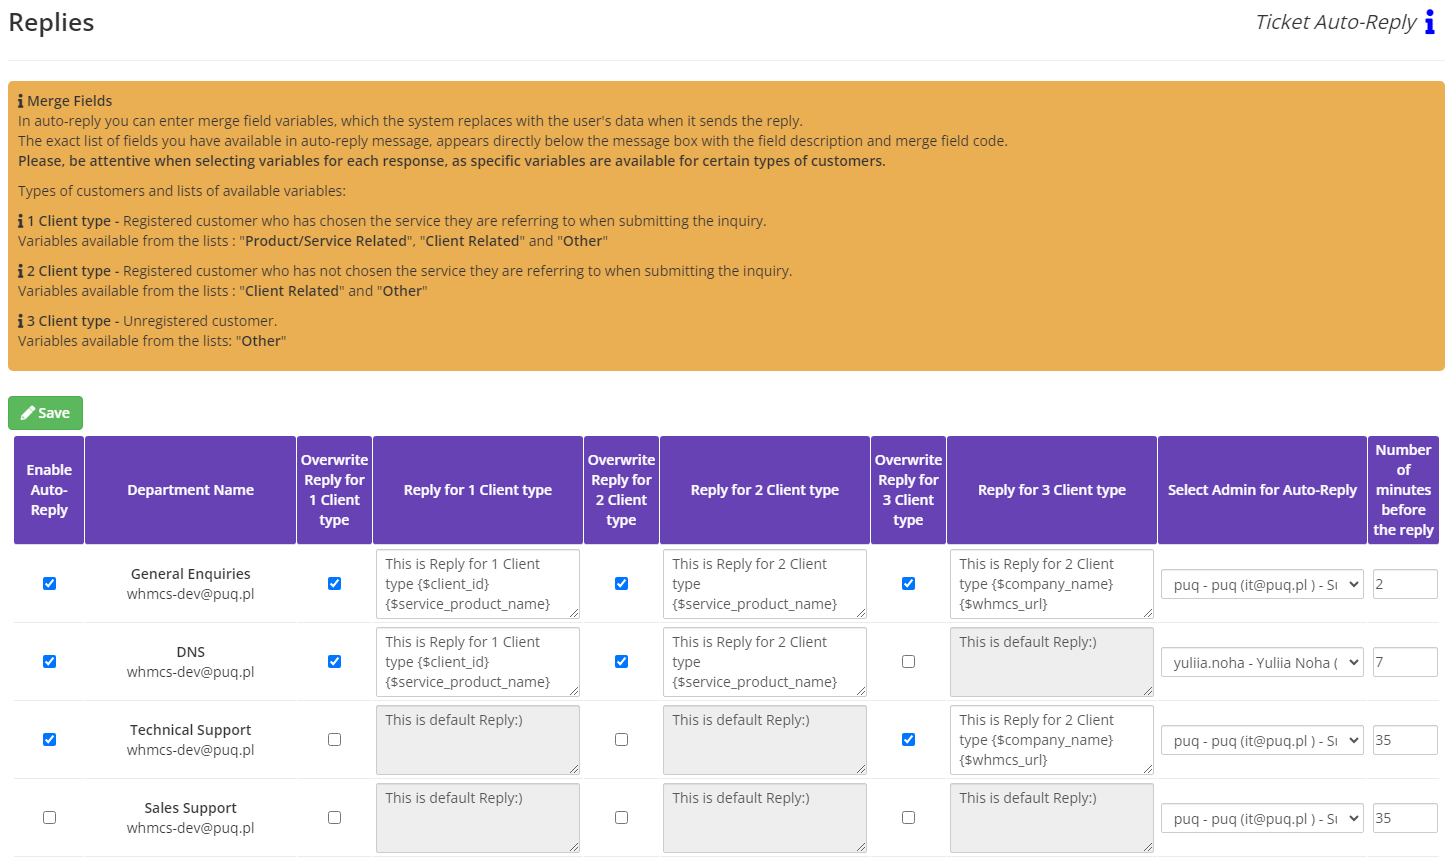

Enable Auto-Reply - Enable this option if you want an automatic reply to be sent upon receiving requests to this department.
Merge Fields
In auto-reply you can enter merge field variables, which the system replaces with the user's data when it sends the reply.
The exact list of fields you have available in auto-reply message, appears directly below the message box with the field description and merge field code.
Please, be attentive when selecting variables for each response, as specific variables are available for certain types of customers.
Types of customers and lists of available variables:
1 Client type - Registered customer who has chosen the service they are referring to when submitting the inquiry.
Variables available from the lists : "Product/Service Related", "Client Related" and "Other"
2 Client type - Registered customer who has not chosen the service they are referring to when submitting the inquiry.
Variables available from the lists : "Client Related" and "Other"
3 Client type - Unregistered customer.
Variables available from the lists: "Other"
Overwrite Reply for 1/2/3 Client type - Enable this option if you want to customize the text of the auto-reply. Otherwise, the Default Reply specified in the Configuration will be sent.
Reply for 1/2/3 Client type - Enter the text of the auto-reply for this department. If Overwrite Reply for 1/2/3 Client type is disabled, this message will not be saved, and the Default Reply specified in the Configuration will be sent. Here, you can enter merge field variables, which the system replaces with the user's data when it sends the reply. The exact list of fields available in the auto-reply message appears directly below the message box with the field description and merge field code.
Select Admin for Auto-Reply - Specify the admin username for auto-replies. Otherwise, the Default Admin Username For Reply specified in the Configuration will be selected.
Number of minutes before the reply - The time after the client's request is created when an auto-reply will be sent. Please note that this time depends entirely on your WHMCS cron job. For example: If a client submits a request at 11:41 and you set this field to "6", and the cron job runs every 5 minutes, then the auto-reply will be sent at 11:50, i.e., in the next cron run. Otherwise, the Default number of minutes specified in the Configuration will be used.
Currency Exchange
Allows you to synchronize currencies with the selected bank API
Description
PUQ Customization module WHMCS
Order now | Download | FAQ
Currency Exchange
The CurrencyExchange extension is designed to manage currency exchange rates within the WHMCS (Web Host Manager Complete Solution) system. The main functionalities of this extension include:
- API Integration for Currency Rates: The extension can connect to external APIs to fetch real-time currency exchange rates that are used within the system.
- Currency Rate Settings Management: Administrators can configure which currencies to update and when, including the option to add a percentage markup to the actual rates for adjusted final values.
- Saving Currency Rate History: Currency rates can be automatically saved in the database on a scheduled basis (CRON) or manually, allowing for tracking changes and analyzing historical data.
- Interface for Managing Currency Rates: The extension provides an interface for viewing and editing current currency rates, as well as the history of their changes.
Additionally, the extension offers the ability to enable or disable its functionality, configure the API for currency synchronization, and manage language settings, making it adaptable to various user requirements and business processes.
Configuration
PUQ Customization module WHMCS
Order now | Download | FAQ
On the "Configuration" page of the Currency Exchange, you are presented with a straightforward interface to manage the settings for Currency Exchange functionalities:
1. Enabled: This dropdown allows you to toggle the Currency Exchange feature on (YES) or off (NO). When set to 'YES', the Currency Exchange is active and can perform operations. If set to 'NO', the are disabled.
At the bottom of the page, the "Save Changes" button allows you to apply any adjustments you've made to the settings. It's crucial to click this after making changes to ensure that your preferences are stored and will be used in future operations.
Exchange settings
PUQ Customization module WHMCS
Order now | Download | FAQ
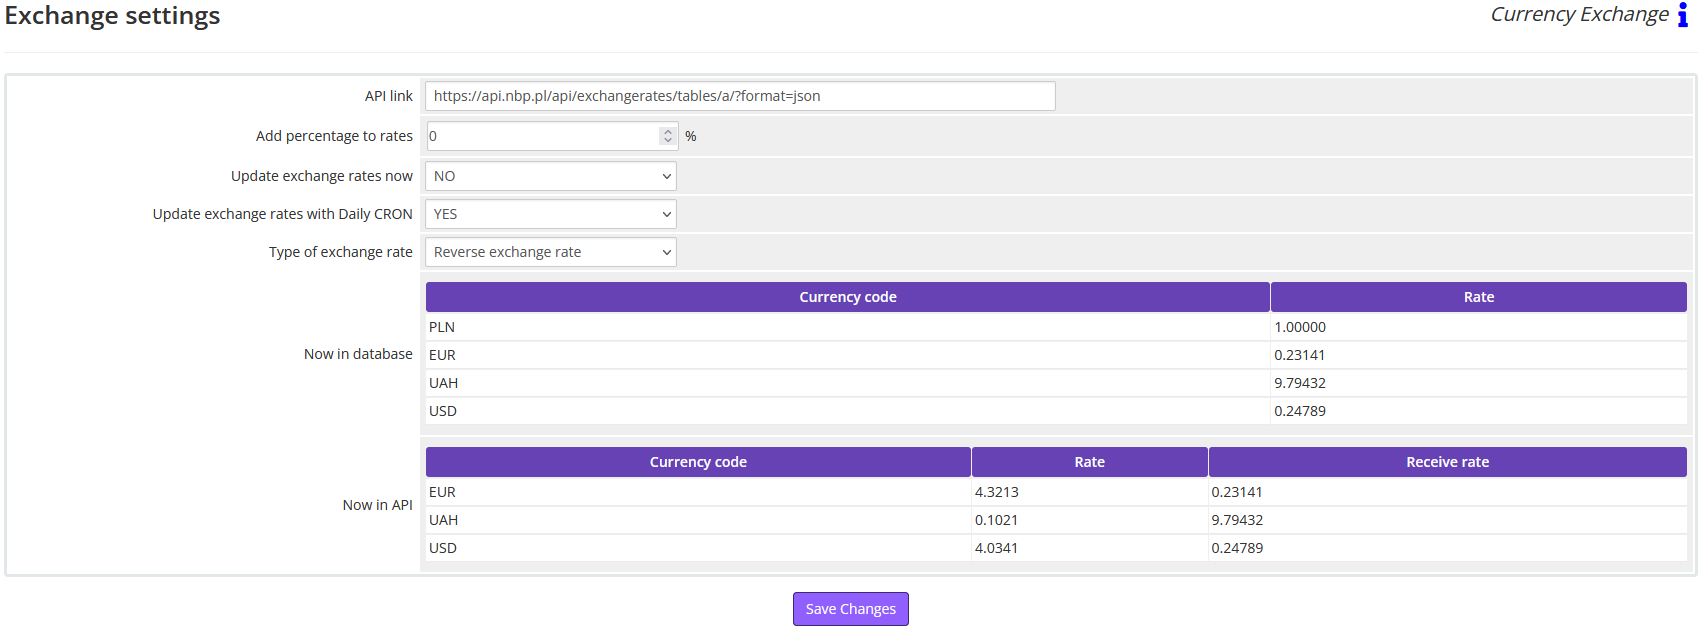
The "Exchange Settings" page of the Currency Exchange extension is designed to manage the integration and settings related to currency exchange rates. Here's a detailed description of each component on this page:
- API Link in JSON format: This input field allows users to specify the URL of the external API from which the system fetches the exchange rates. For example, the filled-in Polish Bank URL
https://api.nbp.pl/api/exchangerates/tables/a/?format=jsonindicates the source API that returns the currency rates in JSON format. - Add Percentage to Rates: This numeric input allows the user to specify a percentage that is added on top of the fetched exchange rates. This can be used to cover additional charges or provide a buffer against rate fluctuations. The current setting shows "0%", indicating no additional percentage is added.
- Update Exchange Rates Now: A dropdown menu that enables immediate updating of exchange rates. Options include "YES" and "NO", with the current selection being "NO". This setting controls whether the exchange rates should be updated immediately upon changing settings or submitting the form.
- Update Exchange Rates with Daily CRON: Another dropdown menu that controls whether the exchange rates should be automatically updated on a daily basis using a CRON job. The options are "YES" and "NO", with "YES" currently selected, indicating daily automatic updates are enabled.
- Type of Exchange Rate: This dropdown allows the selection between "Reverse exchange rate" and other methods of calculating the exchange rate to be used. The "Reverse exchange rate" option, which is currently selected, suggests that the system calculates and uses the inverse of the fetched exchange rate.
- Now in Database: This section displays a list of currency codes and their corresponding rates currently stored in the database. Each row shows the currency code (like PLN, EUR, UAH, USD) alongside its rate, indicating what is currently used by the system.
- Now in API: This section similarly lists currencies but shows the rates as they are fetched from the external API at the moment. It also displays the "Receive rate", which is the inverse or adjusted rate calculated based on the "Type of Exchange Rate" setting. For each currency code, the current rate and receive rate are shown, allowing users to compare these with what is stored in the database.
- Save Changes Button: A button at the bottom of the form that users click to save all changes made to the settings on this page. When clicked, it also triggers any immediate actions selected, such as updating exchange rates now if that option is set to "YES".
This page is crucial for administrators who need to ensure that their currency exchange rates are up-to-date and accurately reflect any desired markups or adjustments. The clear separation of settings and real-time data presentation makes it a practical tool for managing financial transactions in different currencies.
History
PUQ Customization module WHMCS
Order now | Download | FAQ
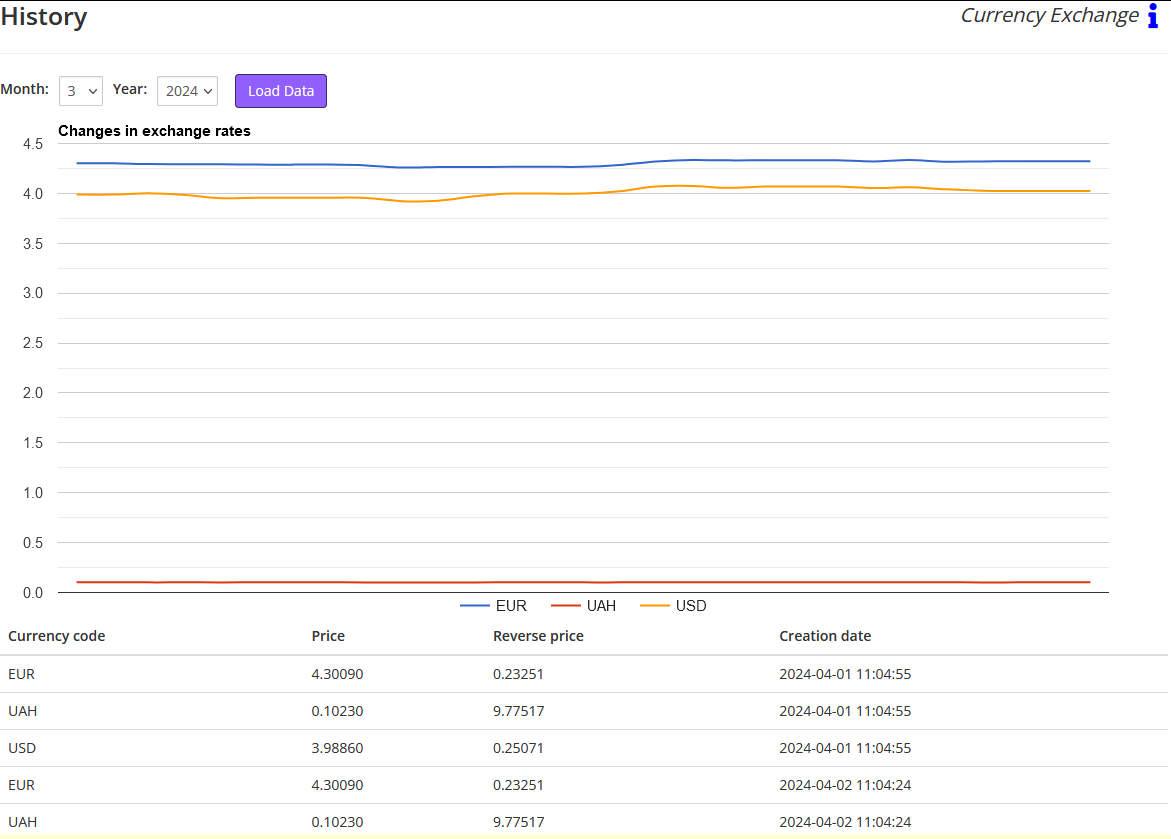
The "History" page within the Currency Exchange extension is a comprehensive tool that allows users to view and analyze the historical data of currency exchange rates. Here’s a detailed breakdown of the components on this page:
- Date Selection: At the top of the page, there are dropdown menus for "Month" and "Year," allowing users to select a specific period for which they want to view exchange rate history. Once the desired month and year are selected, clicking the "Load Data" button will fetch the exchange rates for that period.
- Graph of Changes in Exchange Rates: This is a line chart that visually represents the fluctuations in exchange rates over the selected period. Each currency has its own line with a distinct color, making it easy to track and compare their performance over time.
- Detailed Rate Table: Below the graph, there's a table displaying detailed information about the exchange rates. The columns include:
- Currency Code: Shows the three-letter code for each currency.
- Price: The exchange rate of the currency against a base currency (not explicitly mentioned, likely to be the system’s default or primary currency).
- Reverse Price: This column shows the inverse of the exchange rate, which could be useful for transactions where the inverse rate is more relevant.
- Creation Date: Indicates the exact date and time when the rate was recorded or updated in the system.
- Data Presentation: The table updates to reflect the data for the month and year selected through the dropdown menus at the top of the page. Each entry corresponds to a specific point in time, showing how exchange rates have been captured and stored systematically.
This "History" page is crucial for financial analysis and decision-making, providing a clear historical perspective on currency performance that can help in forecasting and financial planning. The integration of both graphical and tabular data presentation ensures that users can both visually appreciate trends and access precise numerical values for deeper analysis.
Product Group Order
Product Group Order extension provides users with the ability to automatically create orders based on product-group rules.
Description
PUQ Customization module WHMCS
Order now | Download | FAQ
The "Product Group Order" extension is a powerful tool that enables users to automatically generate orders based on product-group rules. With this extension, you can standardize bundles, enforce required add-ons, and complete client setups exactly when needed. Here are the key features of the "Product Group Order" extension:
- Rule-Based Ordering from Product Groups: Define what a client must already have (applies_to), what is required (requires), and which billing cycles are allowed. The extension turns these rules into consistent, compliant orders.
- Per-Client Service Analysis: The extension scans each client’s existing products and addons, maps billing cycles, and pinpoints exactly what’s missing to complete the set.
- Cycle-Aware Matching: Ensure accuracy by requiring at least one allowed billing cycle for every required product before an order is created.
- On-Demand Order Creation & Auto-Provisioning: Create the order via WHMCS Local API with your chosen payment method; the module triggers provisioning (AcceptOrder, autosetup) so services are delivered promptly and efficiently.
- Products and Addons Support: Apply rules across both products and addons to build complete, sellable bundles.
By giving you the power to convert grouping rules into precise, on-demand orders, the "Product Group Order" extension provides unparalleled control over how bundles are completed. You no longer have to rely on manual checks—initiate compliant, cycle-correct orders whenever you choose.
It does not disrupt your existing services or schedules; instead, it enhances your sales flow by adding only the necessary items to fulfill your defined rules.
Automated ordering and provisioning let you closely monitor outcomes and ensure orders complete successfully. If any issues arise, you can address them immediately—keeping operations smooth and clients satisfied.
By enabling rule-driven ordering, per-client analysis, cycle-aware matching, and one-click order + auto-provisioning, this "Product Group Order" extension becomes an indispensable tool for optimizing your WHMCS sales efficiency and revenue growth.
Configuration
PUQ Customization module WHMCS
Order now | Download | FAQ

Enabled - Enabling or disabling all custom functions of this extension affects the automation and visibility of its features in the client area. When extension disabled, the automation capabilities and related features provided by the extension will not be active or visible to clients. However, as an administrator, you will still have access to configure and utilize the extension's functionalities through the administration interface. This gives you the flexibility to control the visibility and automation aspects of the extension based on your specific needs and preferences.
Default Payment Method — The payment method used by default when orders are created automatically. You can choose any of the payment gateways configured in WHMCS. This ensures newly created orders are immediately linked to the correct payment method, with no additional manual changes required.
Product Grouping
PUQ Customization module WHMCS
Order now | Download | FAQ
Rules list

-
ID — rule identifier
-
Group Name — rule name
-
Applies To — trigger items
-
Requires — mandatory items
-
Auto Suspend — whether autosuspend is enabled
-
Notes — admin notes
-
🗑 — delete rule
Click Group Name to edit a rule.
Create / Edit a rule
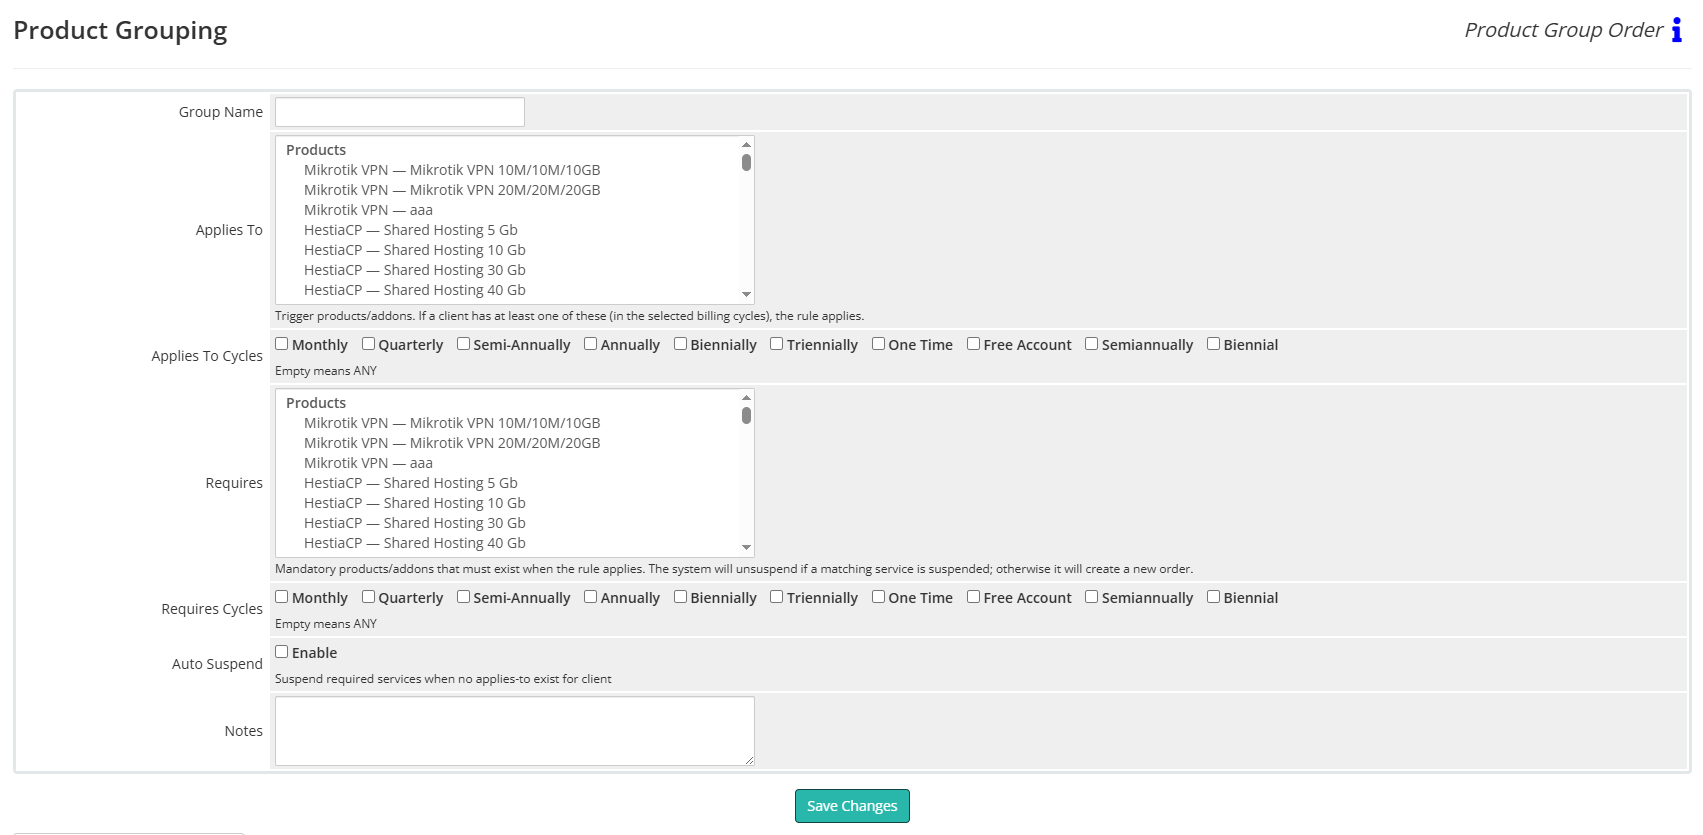
Group Name
A friendly name for the rule.
Applies To (Products/Addons)
Select trigger products/addons.
Meaning: if a client has at least one of these items in the selected billing cycles, the rule applies.
Below the list, use Applies To Cycles checkboxes.
Leaving all cycles unchecked means ANY cycle.
Requires (Products/Addons)
Select the mandatory products/addons that must exist when the rule applies.
Below the list, use Requires Cycles (existing/new service cycle; empty = ANY).
Runtime behavior when the rule applies:
-
If a matching required service already exists but is Suspended, the system will unsuspend it.
-
If a required service does not exist, the system will create a new order via WHMCS Local API using one of the allowed cycles and your Default Payment Method.
Auto Suspend → Enable
If enabled and the client no longer has any of the Applies To triggers, the module will suspend the services listed in Requires.
If disabled, no suspension is performed.
Notes
Internal notes for administrators.
Save Changes
Saves the rule.
Example (from screenshots)
Group Name: rDNS
Applies To: Proxmox KVM — VPS Start; Proxmox KVM — VPS Pro
Requires: Reverse DNS — Reverse DNS Management
Auto Suspend: Enabled
Result:
-
When the client has any listed VPS plan, the module ensures Reverse DNS Management exists (creates an order if missing, or unsuspends if suspended).
-
If the client no longer has any of those VPS plans, the module suspends Reverse DNS Management (because Auto Suspend is enabled).
Tips
- Make sure Default Payment Method is set on the Configuration page so auto-created orders use the correct gateway.
-
Test new rules on a small client set before broad use.