Click any card to jump to the filtered services list (where applicable).
- - - - - - #### Recurring Cost Breakdown Below the counters are your **Hourly / Daily / Weekly / Monthly / Yearly** spend estimates and the **Recommended Add Funds** amount. Use it to: - Forecast top-ups before renewals - Spot anomalies (e.g., a spike in Hourly vs. Monthly) - - - - - - #### Account & Security Menu Top-right avatar opens quick actions: - **My Account** (profile & company details) - **Change Password** - **Verification Center** - **Two-Factor Authentication** (enable 2FA) - **Logout** Account dropdown. [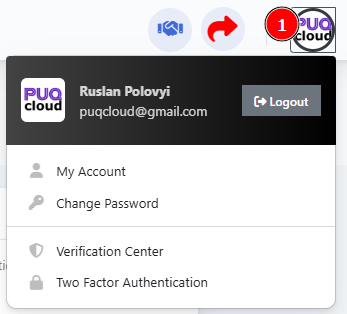](https://doc.puq.info/uploads/images/gallery/2025-09/image-1758026199954.png)**Best practice:** enable **2FA** immediately and complete **Verification Center** to lift payment/security limits.
- - - - - - #### Company Hub (Profile • Invoices • Transactions) From **My Account**, open your company tile to reach: - **Profile** — legal details, addresses, tax IDs - **Invoices** — download/print invoices & credit notes - **Transactions** — all top-ups, payments, refunds Company tile with Profile / Invoices / Transactions. [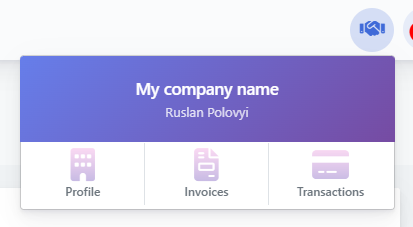](https://doc.puq.info/uploads/images/gallery/2025-09/image-1758026212119.png) - - - - - - #### Add Funds (Top-Up) From the top strip click **Add Funds** to open the payment screen. Steps: 1. Review the **Recommended amount** banner. 2. Enter **net amount** and **currency**. 3. Check **Taxes breakdown** (VAT, etc.). 4. Confirm **Balance after top-up**. 5. Click **Top Up Now**. Add Funds page. [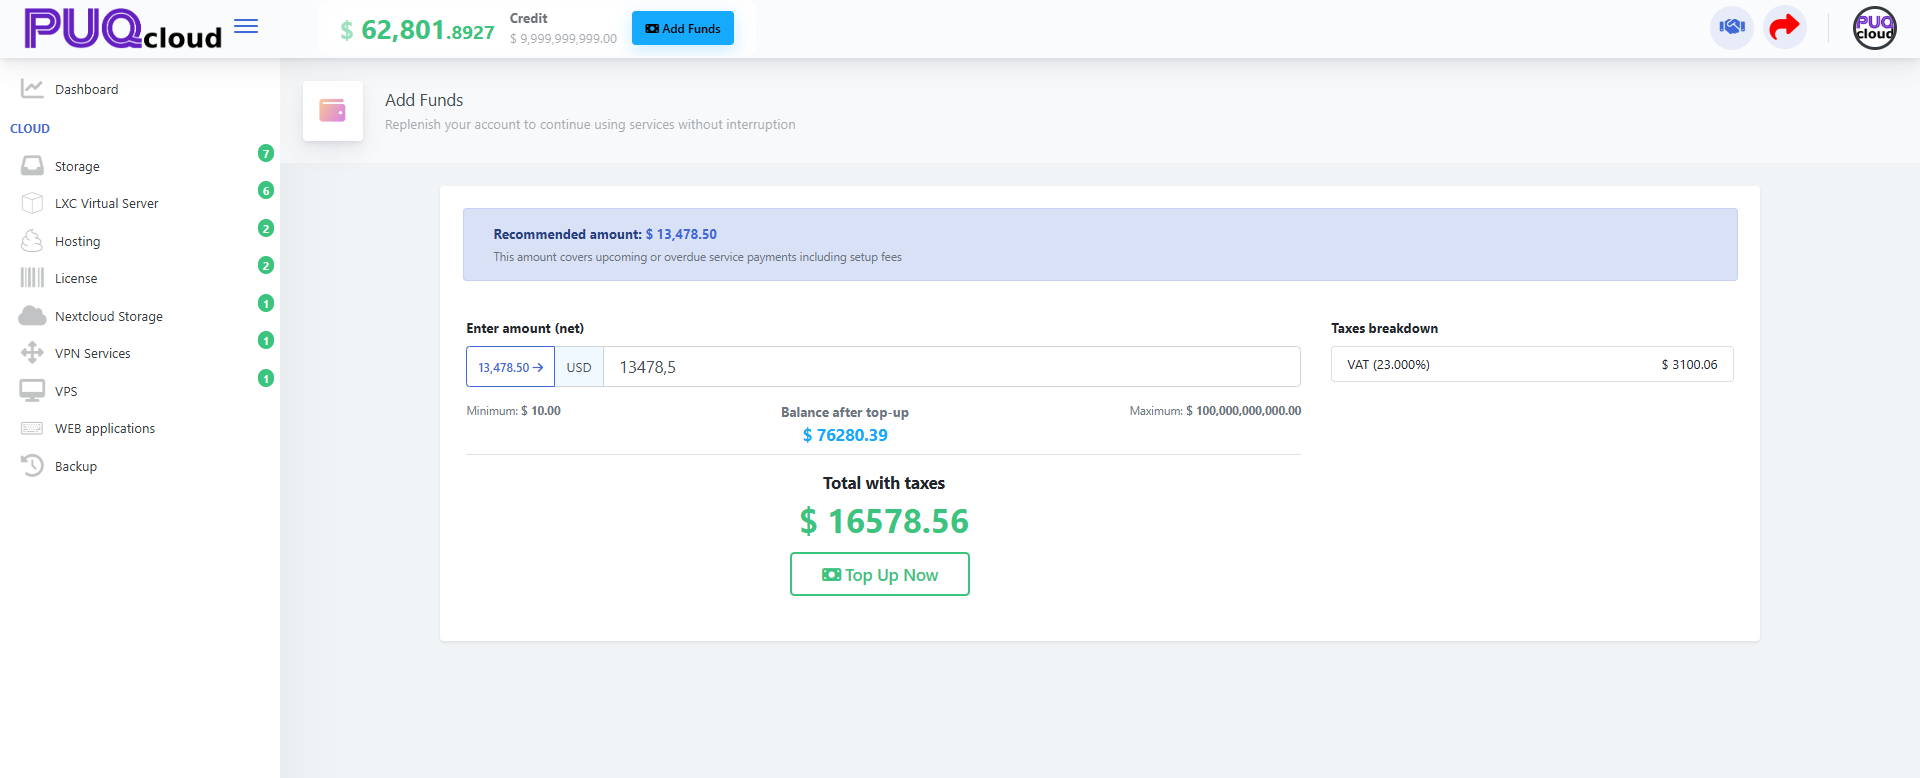](https://doc.puq.info/uploads/images/gallery/2025-09/image-1758026226209.png)Tip: If you sell in multiple currencies, keep one primary currency for predictability; taxes depend on your profile’s country/region.
- - - - - - #### Daily Workflow (5 minutes) 1. Open dashboard → check **Active** vs **Suspended**. 2. Scan **Recurring Cost Breakdown** → compare to yesterday. 3. If **Recommended Add Funds** > your comfort buffer, **Top Up**. 4. Open **Invoices** if any new charges posted. 5. Review **Transactions** for failed/duplicate payments. 6. Security sweep: confirm **2FA** is still active for all users. - - - - - - #### Troubleshooting - **Costs look too high** → open services list and verify no unintended upgrades. - **Top-up rejected** → finish **Verification Center** and confirm billing info. - **Taxes seem wrong** → check company **Tax ID** and country in **Profile**. - **See “Suspended”** → settle outstanding invoices or contact support. # Manage Your Profile in the Client Area ### PUQcloud Panel ##### [Order Now](https://puqcloud.com/puqcloud-panel.php) | [Download](https://github.com/puqcloud/PUQcloud) | [FAQ](https://faq.puqcloud.com/) #### Overview Keep your **Profile** correct to ensure proper taxes, legal invoice details, and contact emails. This guide shows how to open the Profile screen, what every field means, and the safest way to update it — with exact places to insert your screenshots. - - - - - - #### Open the Profile screen 1. On the Dashboard, click your **Company widget** in the top-right. 2. Choose **Profile**. Company dropdown (marker 1 → open menu, marker 2 → Profile). [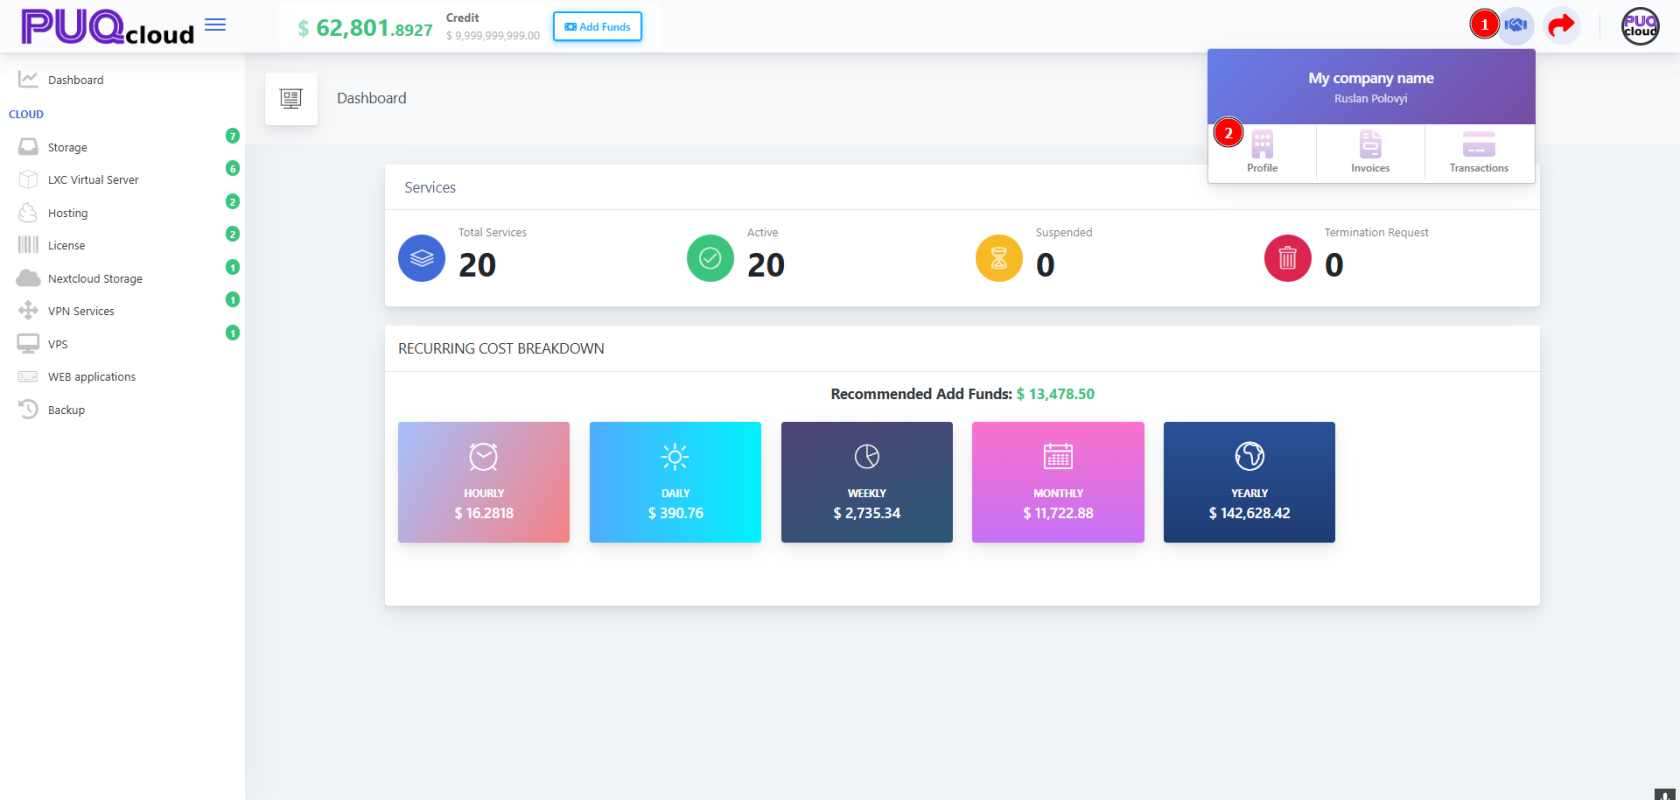](https://doc.puq.info/uploads/images/gallery/2025-09/image-1758027110963.png) - - - - - - #### Edit your details You’ll land on **Client Profile**. Update the fields below and press **Save** (top-right). Client Profile form (full page). [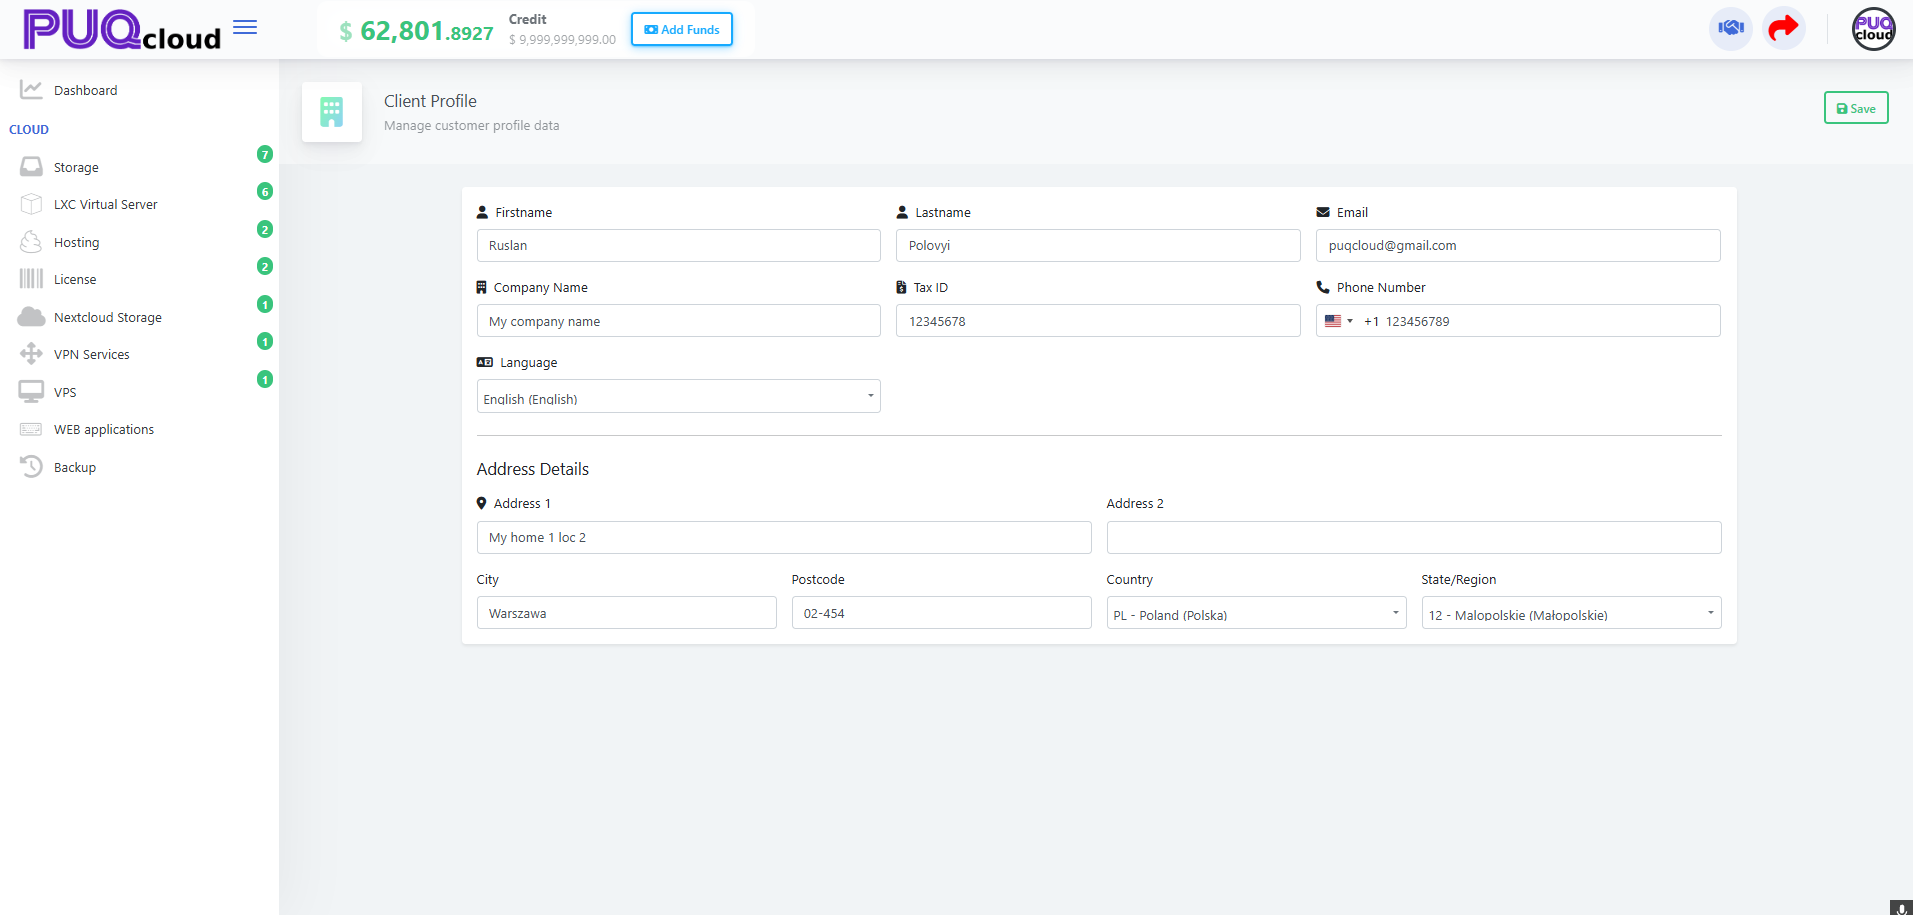](https://doc.puq.info/uploads/images/gallery/2025-09/image-1758027117322.png) #### What each field is for - **Firstname / Lastname** — Account owner name shown on invoices/receipts. - **Email** — Where invoices, payment receipts and alerts are sent. - **Company Name** — Legal entity name printed on invoices. - **Tax ID** — VAT/GST/Tax number. Required for correct tax calculation. - **Phone Number** — Include **country code** (e.g., +1, +48). - **Language** — UI language and (if enabled) document language. - **Address 1/2, City, Postcode, Country, State/Region** — Legal billing address used for taxes.Tip: If you’re not a company, leave **Company Name** empty and **Tax ID** blank — you’ll be treated as a private individual where applicable.
- - - - - - #### Best practices (1-minute checklist) - **Company vs Individual:** Fill **Company Name** and **Tax ID** only if you’re a business. - **Tax ID format:** Use your country’s official format (e.g., **PL** VAT: `PL1234567890`). - **Country & State:** Must match your real billing address — taxes depend on it. - **Phone:** Add the **country code**; avoid spaces/symbols if validation fails. - **Save:** Click **Save** before leaving, then reload the **Invoices** page to confirm the header shows your new details. - - - - - - #### When to update your profile - You see **wrong VAT/GST** on an invoice - Your company renamed, moved address, or changed tax number - You want the portal in another **Language** - Your **Email** for billing changed - - - - - - #### Troubleshooting - **“My invoice has the wrong tax.”** → Recheck **Country/State** and **Tax ID** in Profile, then regenerate or request a corrected document. - **Phone won’t save.** → Include international format `+Tip: Keep **Profile** (company name, Tax ID, address) up to date so the invoice PDF has correct legal details.
- - - - - - #### Searching & Sorting - Use the **Search** box to filter by number or text. - Click table headers (e.g., **Issue Date**, **Due Date**) to sort. - Use the **Show 10** dropdown to change page size. [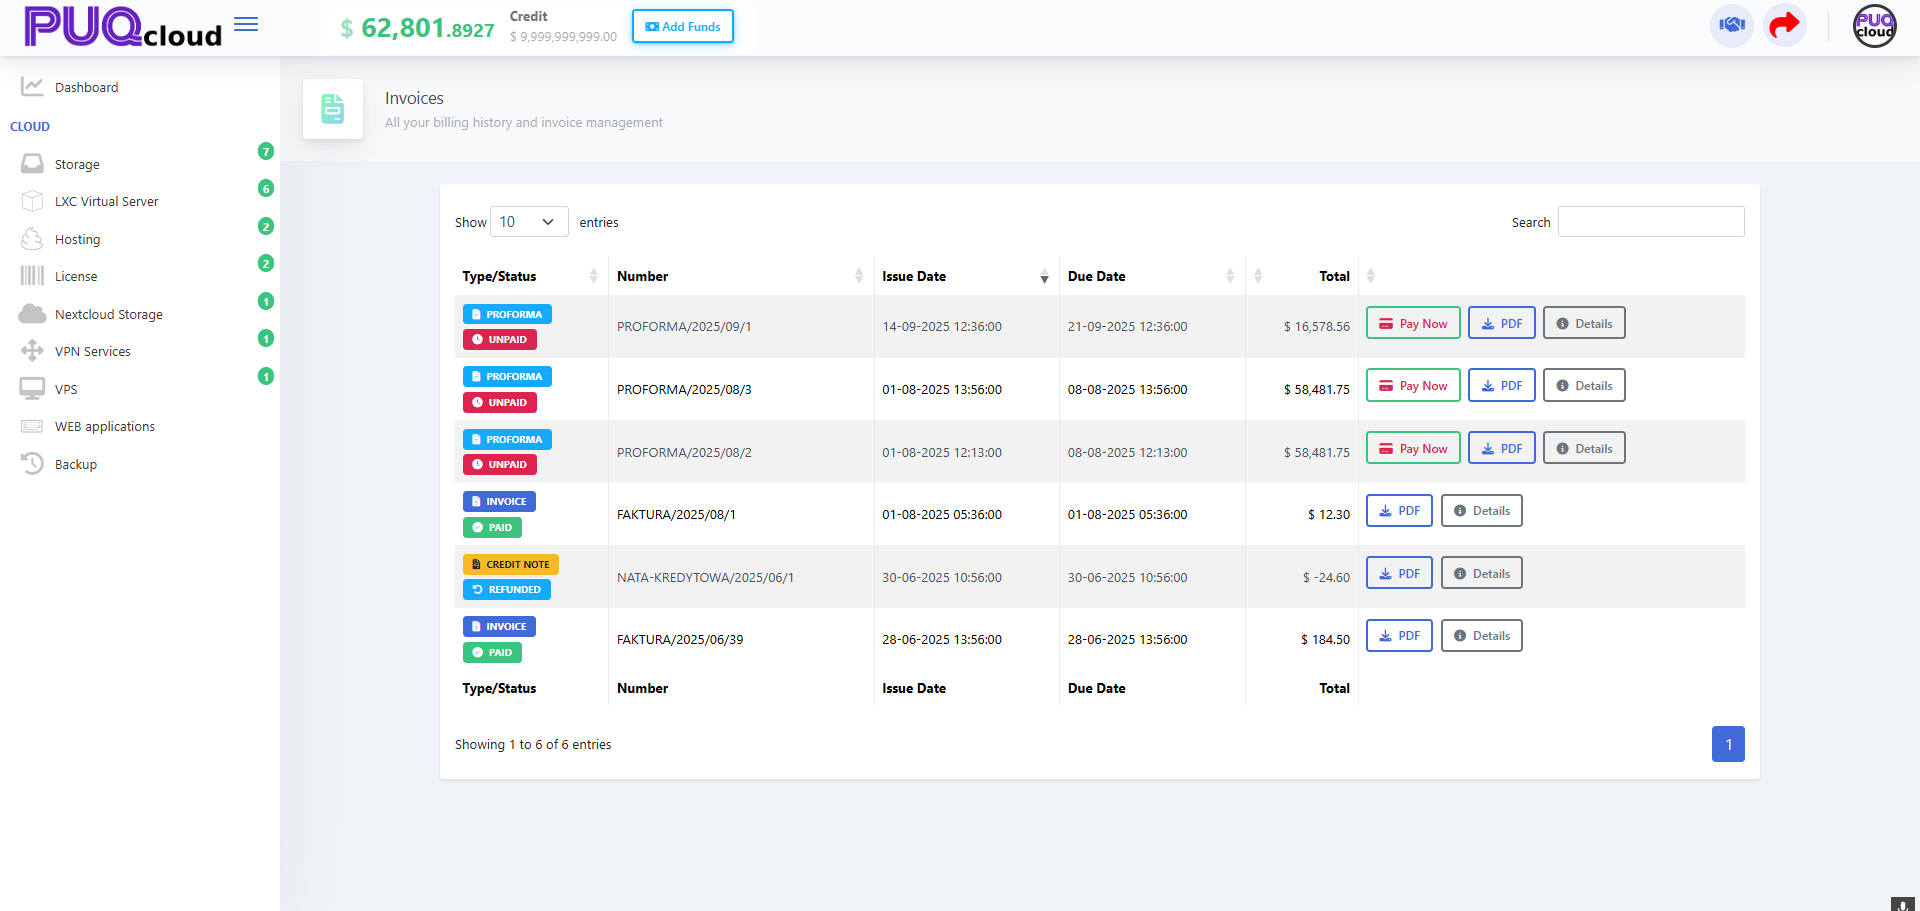](https://doc.puq.info/uploads/images/gallery/2025-09/image-1758026770098.png) - - - - - - #### Credit Notes & Refunds - **CREDIT NOTE** entries show refunds/adjustments. - Open **Details** to see amounts and download the **PDF** for your records. - - - - - - #### Troubleshooting - **Wrong tax/country on invoice?** Update **Company → Profile** (Tax ID, country, address). - **Payment failed?** Try another method or check the **Verification Center** in your account menu. - **Need an invoice reissued?** Contact support with the **Invoice Number**. # Check Transactions in the Client Area ### PUQcloud Panel ##### [Order Now](https://puqcloud.com/puqcloud-panel.php) | [Download](https://github.com/puqcloud/PUQcloud) | [FAQ](https://faq.puqcloud.com/) #### Overview The **Transactions** page shows every balance movement on your account: **top-ups, service charges, refunds, adjustments**. Here’s how to open it, read it, and quickly find what you need — with exact spots to place your screenshots. - - - - - - #### Open the Transactions page 1. On the Dashboard, click the **company widget** at the top-right. 2. Choose **Transactions**. Company dropdown (1 open menu → 2 Transactions). [](https://doc.puq.info/uploads/images/gallery/2025-09/image-1758027212427.png) - - - - - - #### Read the Transactions table On the **Transactions** page you’ll see a ledger-style list with these columns: - **Transaction ID** — a payment identifier (for card/Stripe/etc.). If it shows *No Transaction ID*, it’s usually a system **CHARGE** (usage/recurring fee). - **Gross / Net** — amount including/excluding tax (negative numbers = charge; positive = credit/refund). - **Balance** — your account balance **after** this entry posted. - **Description** — what the entry is for (service key, action, notes). - **Period** — the time window the charge covers (e.g., the specific hour for hourly billing). - **Date** — when the entry was recorded. Transactions list (full table with CHARGE rows). [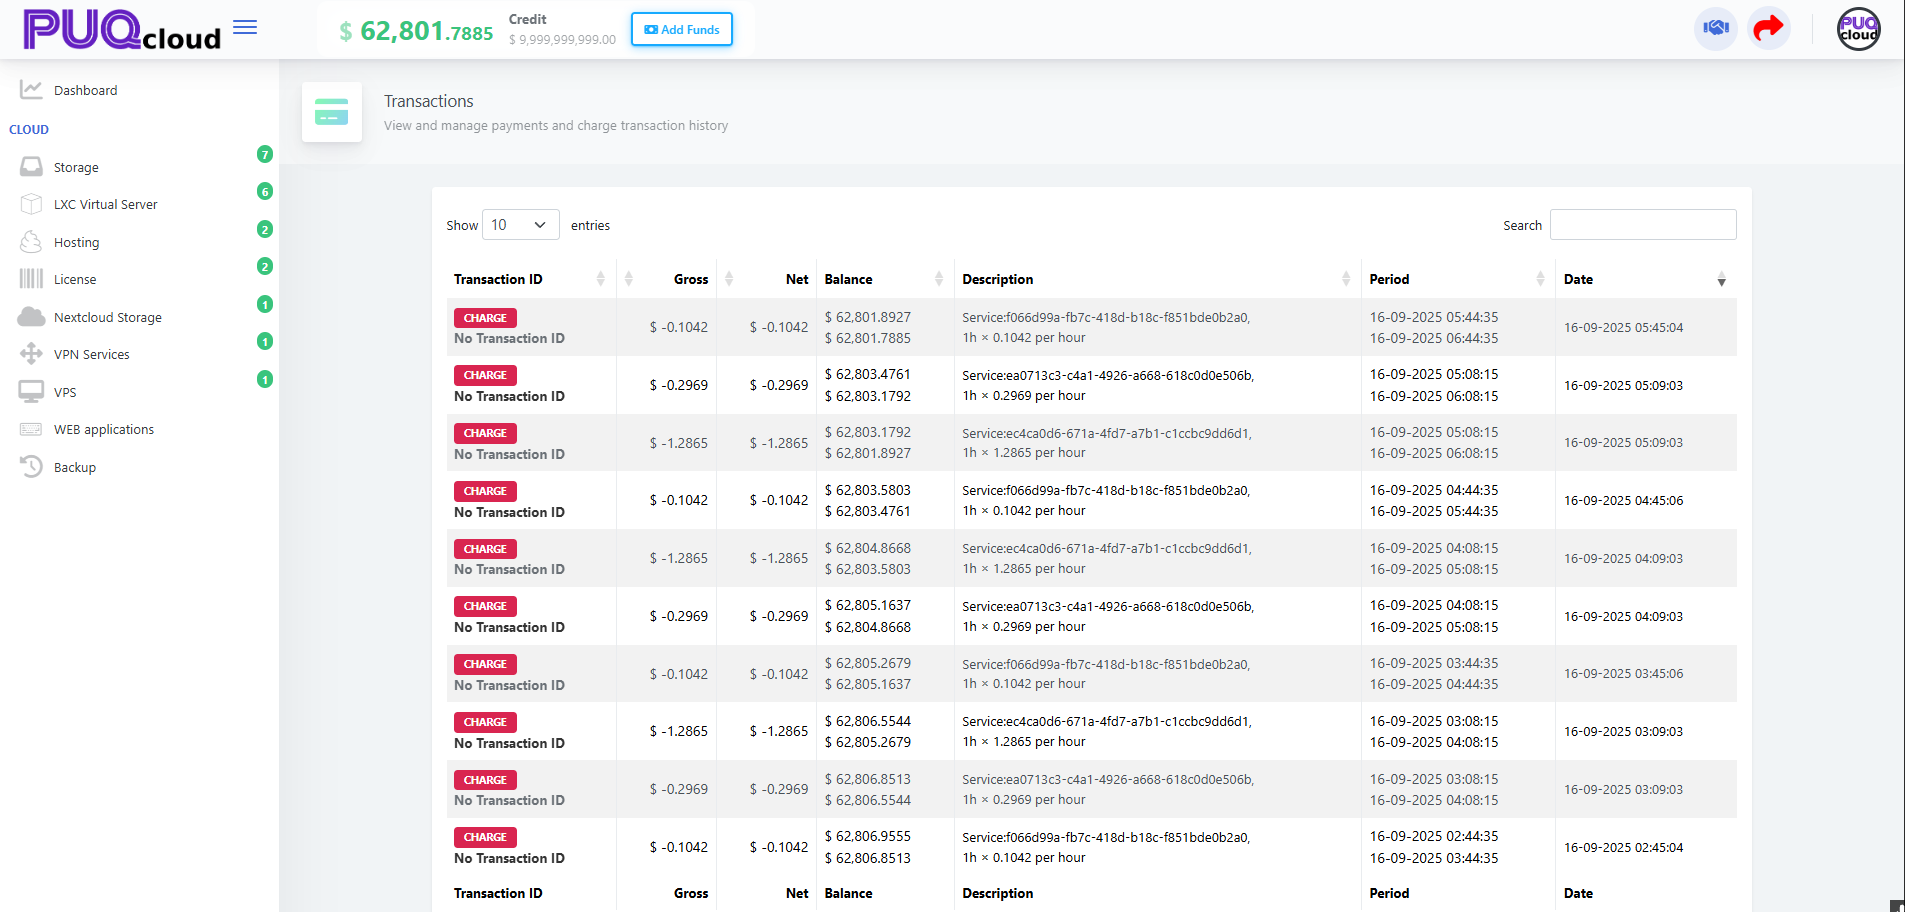](https://doc.puq.info/uploads/images/gallery/2025-09/image-1758027222298.png)Tip: To verify a **top-up**, look for a **Transaction ID** and a **positive amount**; the **Balance** column will jump up on that row.
- - - - - - #### Find a specific entry fast - Use the **Search** box (top-right) to filter by **Transaction ID**, amount, or **service key** from the Description. - Change **Show 10** to see more rows on one page. - Use the table headers to **sort** (e.g., by **Date**) if enabled in your setup. - - - - - - #### Reconcile with invoices - A **service CHARGE** here should correspond to items that later appear on your **Proforma/Invoice** totals. - To review the document: open **Company → Invoices**, then match by **date/amount**. - If a payment was made, the **Transactions** entry will show a **Transaction ID** and the invoice should show **Paid**. - - - - - - #### Common checks & quick fixes - **“My top-up isn’t visible.”** Filter by today’s **Date**; confirm payment success in your bank/processor. - **“Numbers look off.”** Compare **Gross vs Net** and check your **Profile** tax settings (country/Tax ID). - **“What was this charge?”** Read the **Description** + **Period** to see which service and which window were billed. - **Still unclear?** Copy the **Transaction ID** (if present) and share it with support. # Account & Security: manage profile, password, verification, and 2FA ### PUQcloud Panel ##### [Order Now](https://puqcloud.com/puqcloud-panel.php) | [Download](https://github.com/puqcloud/PUQcloud) | [FAQ](https://faq.puqcloud.com/) #### Open the account menu 1. On the dashboard, click your **company/avatar** in the top-right. 2. You’ll see: **My Account**, **Change Password**, **Verification Center**, **Two Factor Authentication**. Account dropdown (markers 1 & 2). [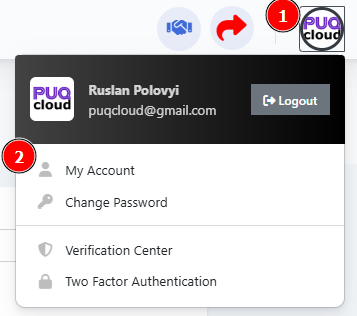](https://doc.puq.info/uploads/images/gallery/2025-09/image-1758028133434.png) - - - - - - #### My Account — contact details On **My Account**, update: - **Email**, **First name / Last name** - **Language** (UI language) - **Phone Number** (with country code, e.g., +48 …) - Confirm changes with **Existing Password** → **Save** My Account page (form). [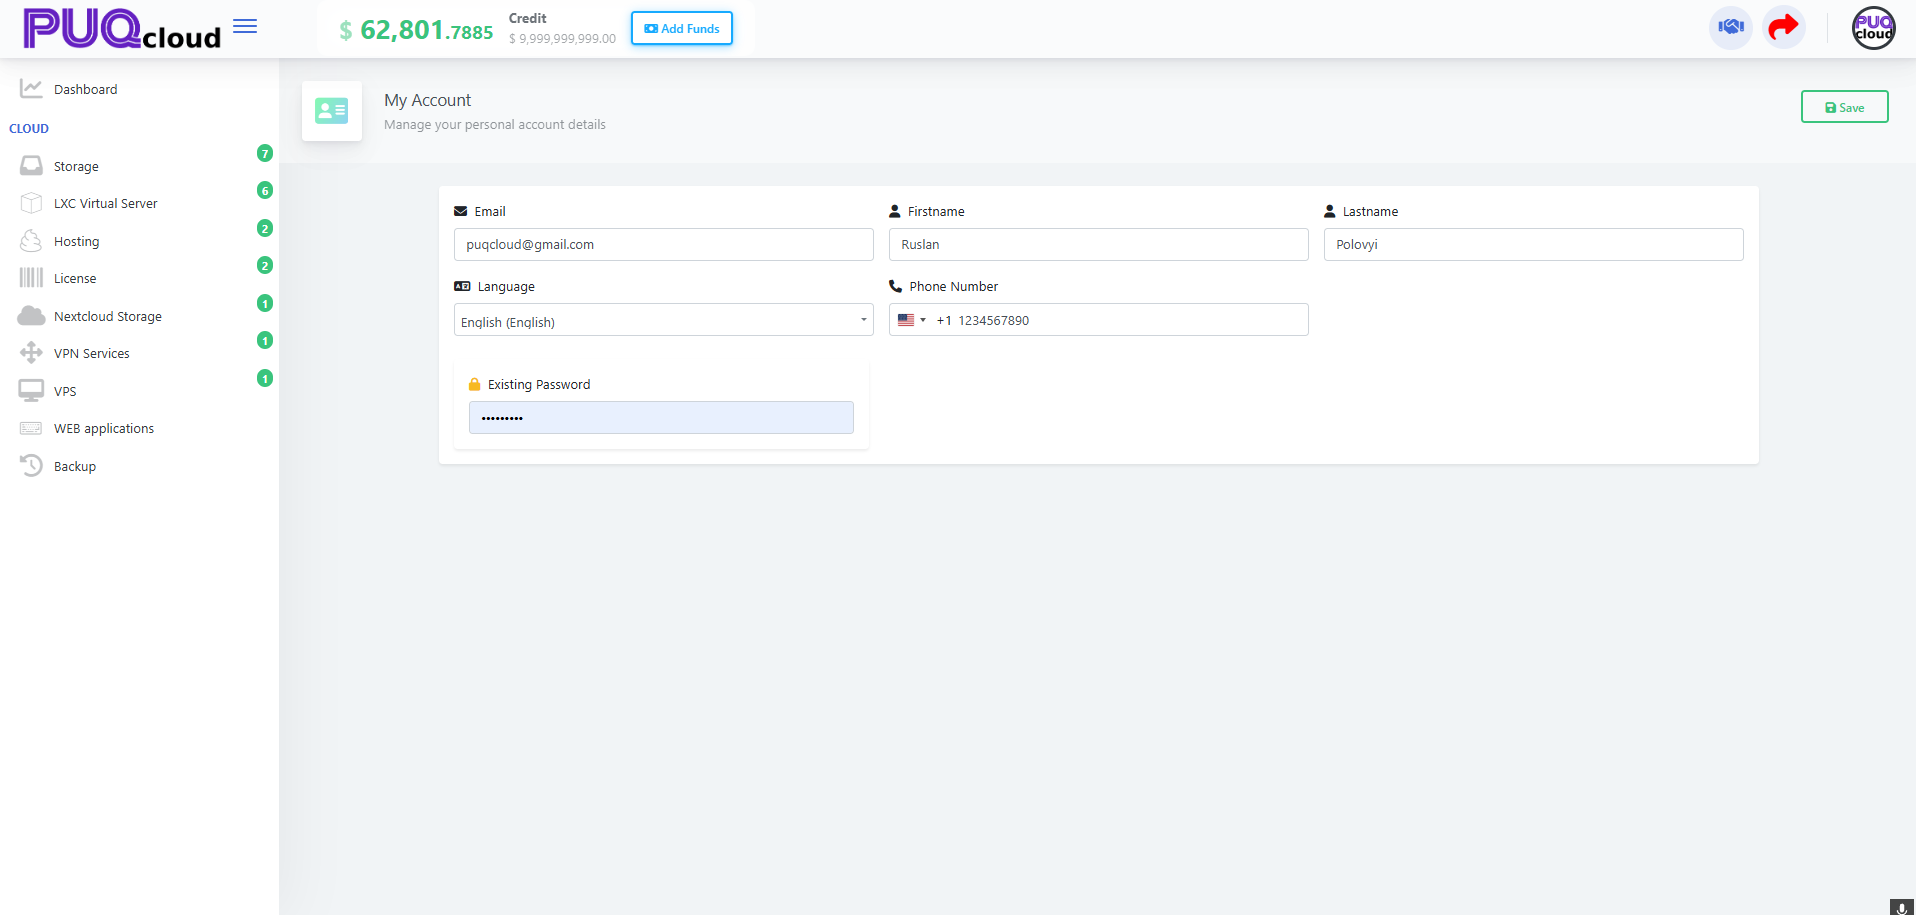](https://doc.puq.info/uploads/images/gallery/2025-09/image-1758028153500.png)Tip: After changing email, check your inbox for service confirmations.
- - - - - - #### Change Password 1. Account menu → **Change Password**. 2. Enter **Existing Password**. 3. Set **New Password** and **Confirm New Password**. Requirements: **≥ 6 characters**, **at least 1 number** and **1 special character**. 4. Click **Save**. “Change Password” menu item. [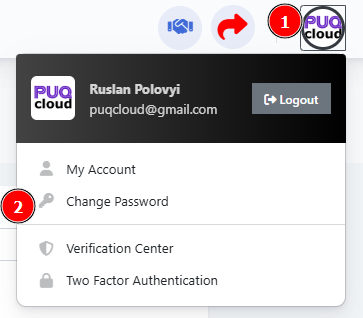](https://doc.puq.info/uploads/images/gallery/2025-09/image-1758028163954.png) Change Password form (errors/strength bar example). [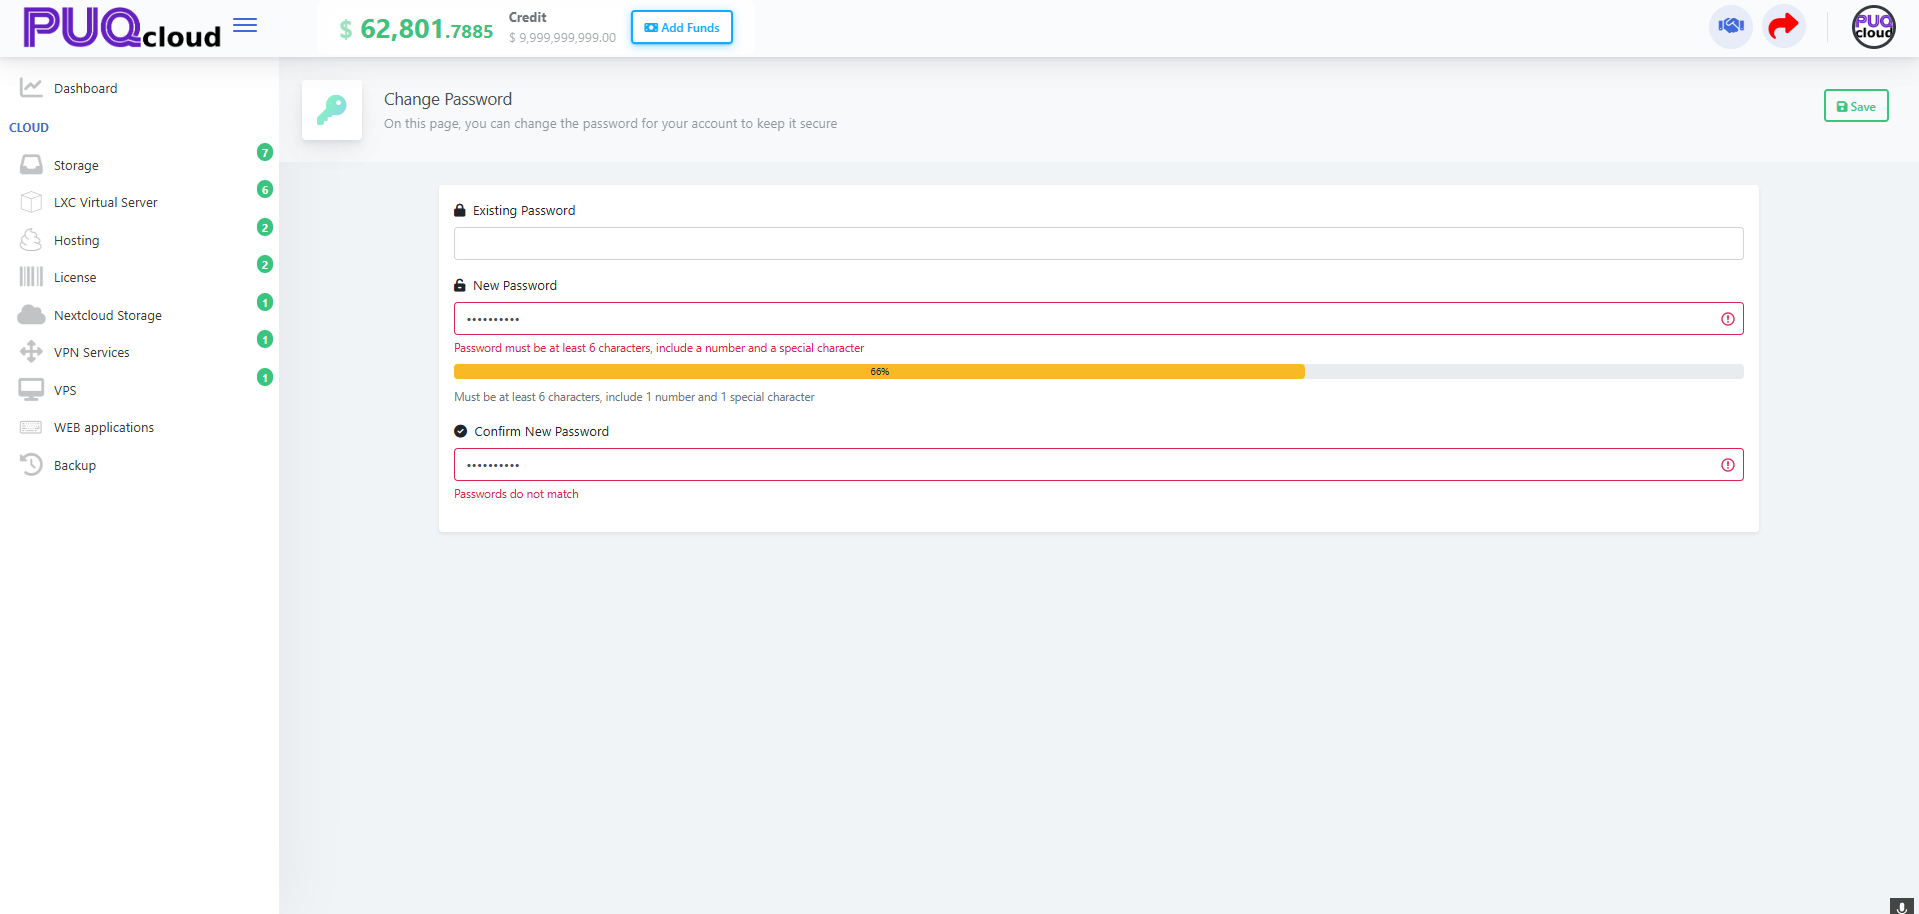](https://doc.puq.info/uploads/images/gallery/2025-09/image-1758028163977.png)If you see “Passwords do not match,” the New and Confirm fields differ.
- - - - - - #### Verification Center — verification methods Manage verification methods (email, TOTP app, etc.). Columns show: - **Value**, **Verified**, **Default**, **Last Used At**. - Star button = set as **Default**. - Bin icon = **Delete** a method. “Verification Center” menu item. [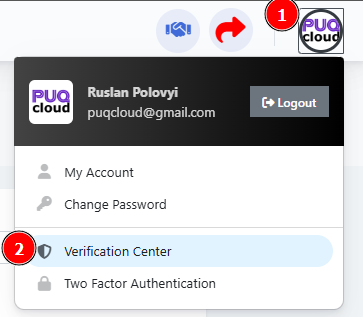](https://doc.puq.info/uploads/images/gallery/2025-09/image-1758028205585.png) Verification Center list (Email + Authenticator App). [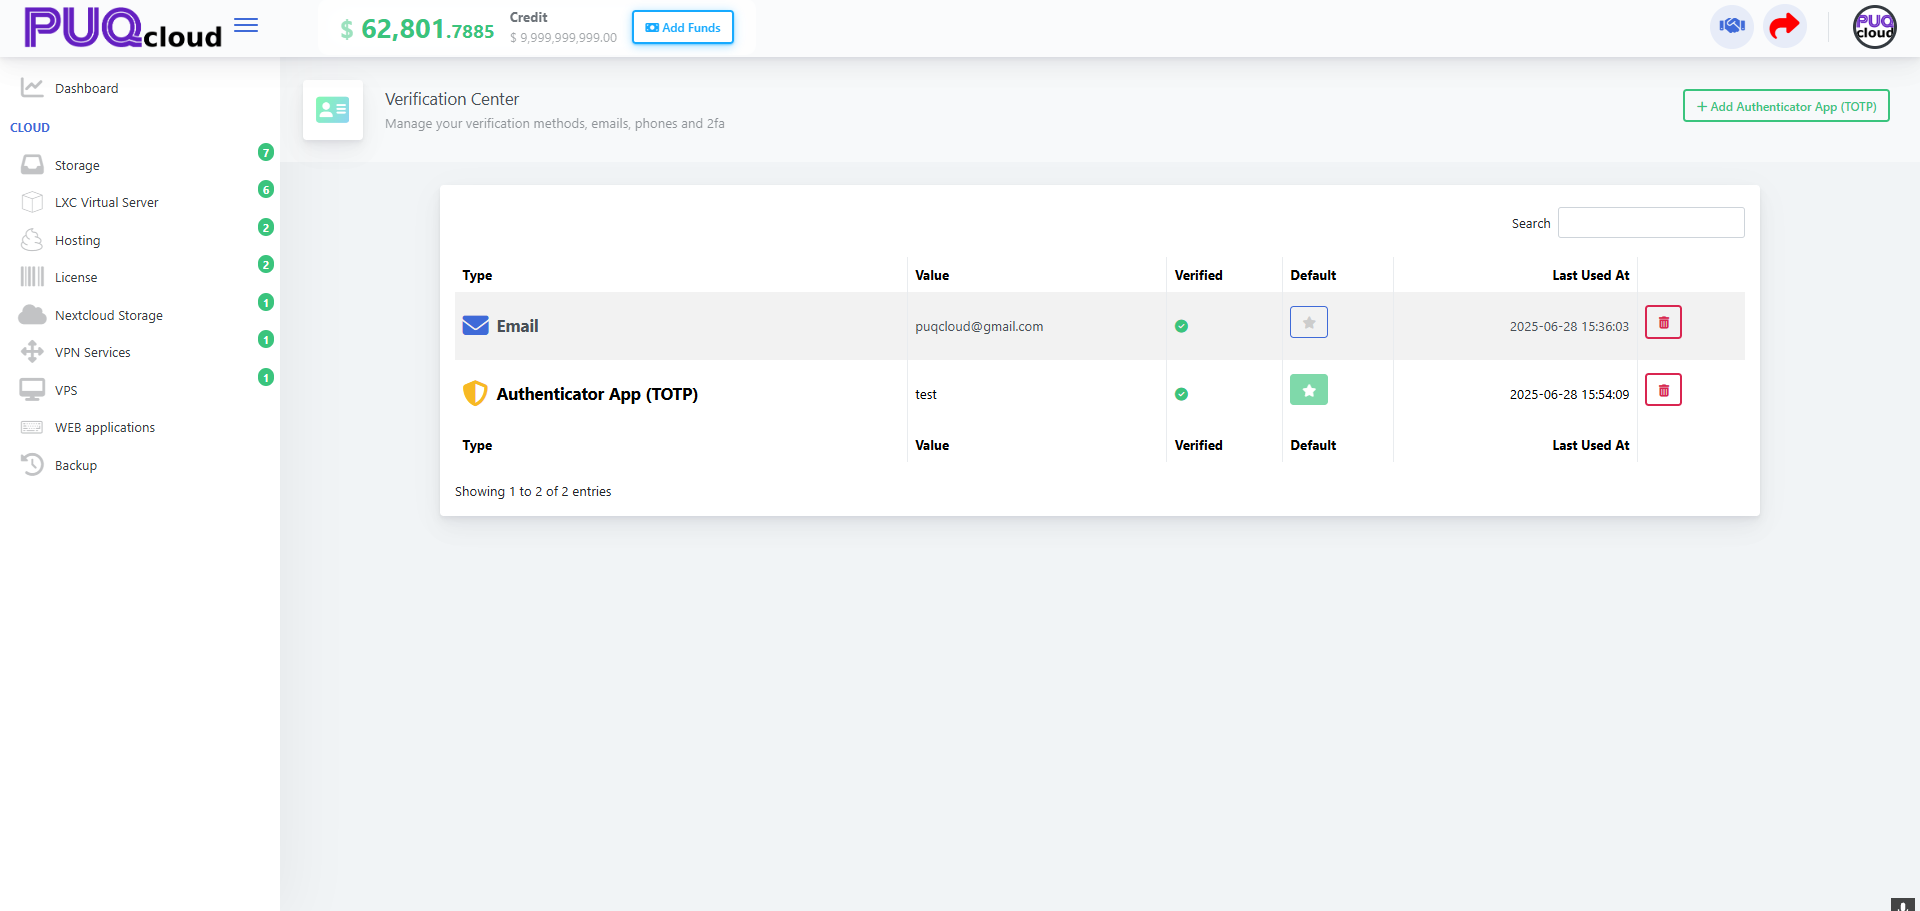](https://doc.puq.info/uploads/images/gallery/2025-09/image-1758028205613.png)Recommendation: keep at least **two** methods (Email + TOTP) so you don’t get locked out.
- - - - - - #### Add a TOTP Authenticator (Google Authenticator / Duo) 1. On **Verification Center**, click **Add Authenticator App (TOTP)**. 2. Scan the **QR code** in your app or enter the secret manually. 3. Enter the **6-digit code**, give a **Device Name** → **Save**. QR-code modal with code input. [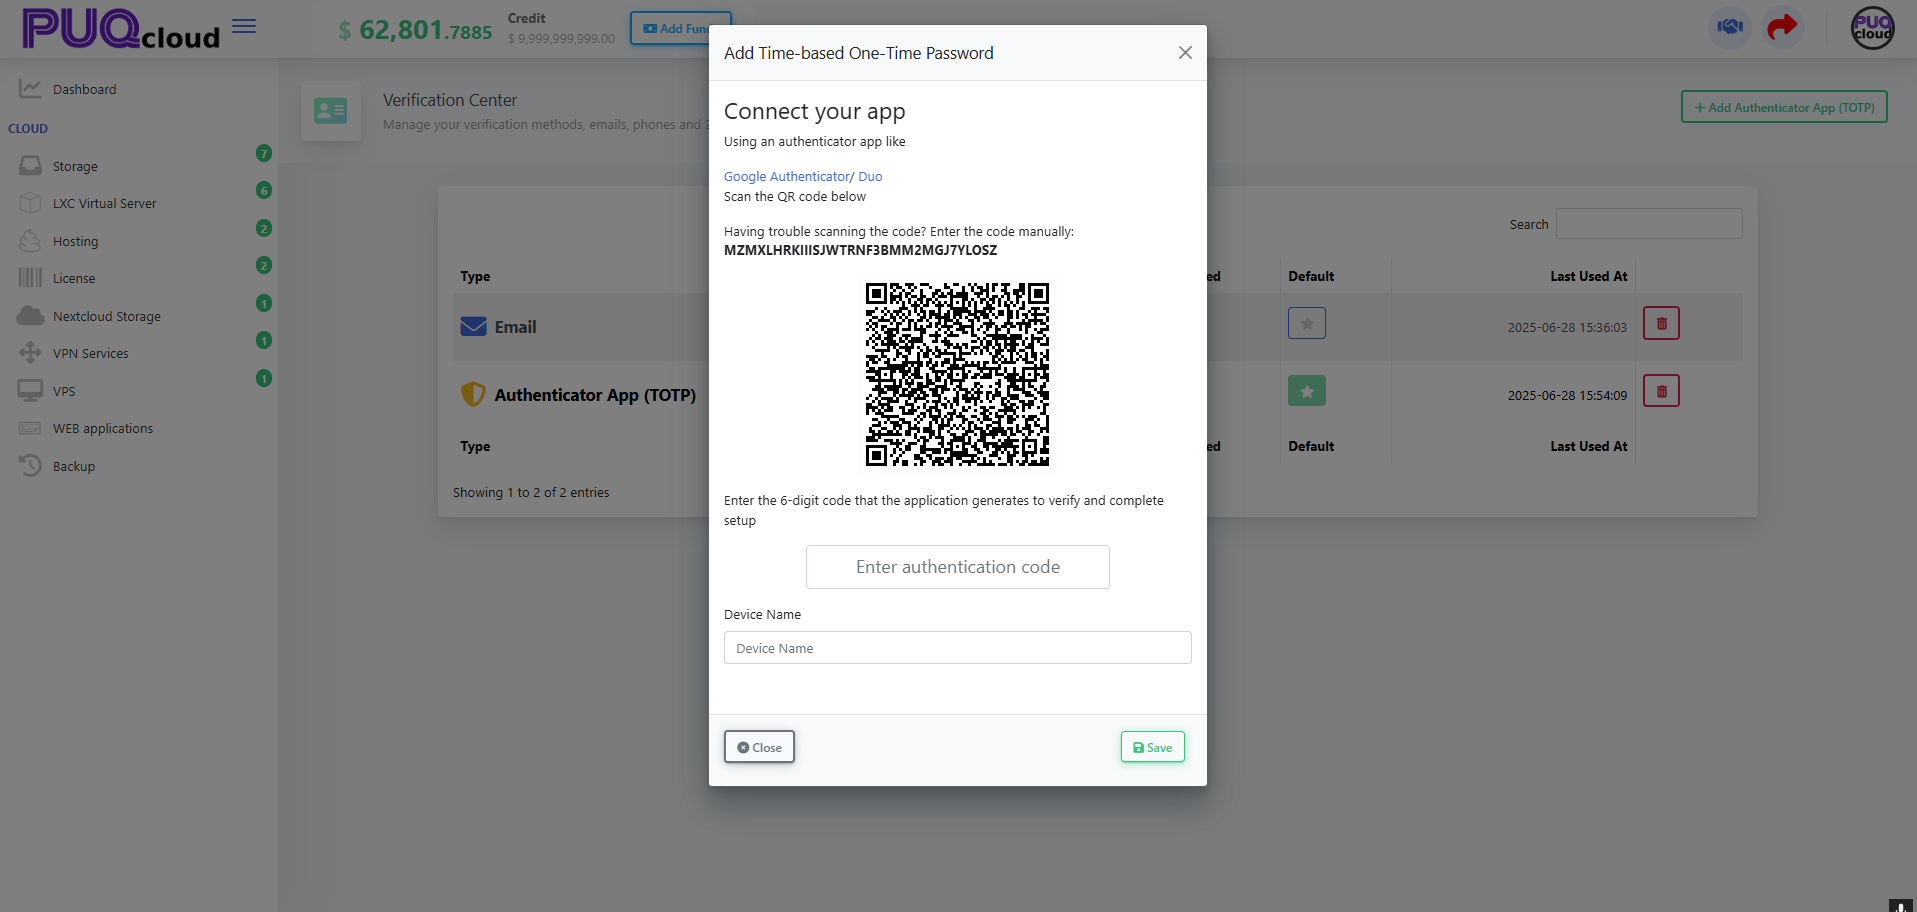](https://doc.puq.info/uploads/images/gallery/2025-09/image-1758028225891.png) - - - - - - #### Two-Factor Authentication (2FA) ##### Enable 2FA 1. Account menu → **Two Factor Authentication**. 2. Click **Enable 2FA**. 3. Enter the current **6-digit code** from your TOTP app → **OK**. “Two Factor Authentication” menu item. **[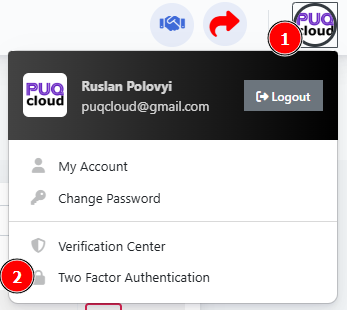](https://doc.puq.info/uploads/images/gallery/2025-09/image-1758028238508.png)** 2FA page (Disabled state, Enable 2FA button).[](https://doc.puq.info/uploads/images/gallery/2025-09/image-1758028238561.png) Enable 2FA confirmation modal (code entry). [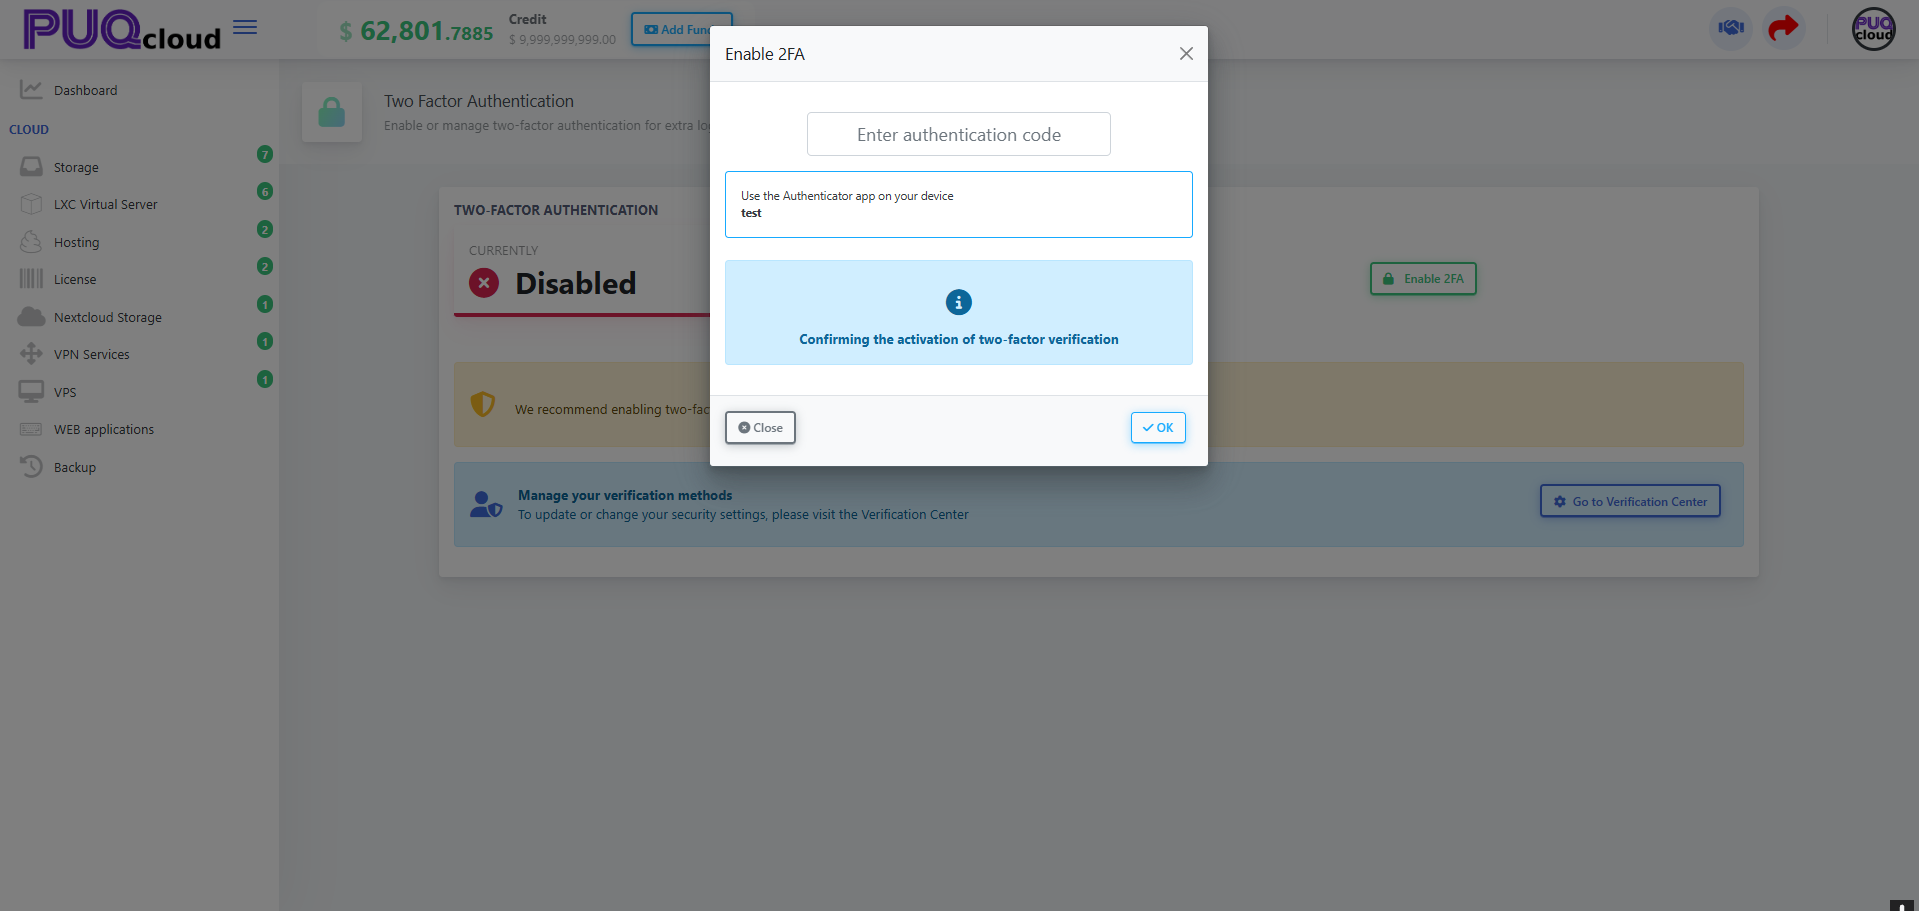](https://doc.puq.info/uploads/images/gallery/2025-09/image-1758028238535.png)If “Enable 2FA” is disabled or missing, first add a TOTP method in **Verification Center** (see Section 5).
- - - - - - #### Security quick checklist - Turn **2FA** on and set **Authenticator App** as **Default**. - Keep your **email** current (codes/alerts go there). - Use a long, unique **password**; don’t reuse it elsewhere. - Always keep **two verification methods** on file. - - - - - - #### Troubleshooting - **Code not accepted:** ensure your phone time is correct (TOTP is time-based). - **Can’t enable 2FA:** add a TOTP method in **Verification Center** first. - **Phone won’t save:** use **+** format. - **Lost TOTP device:** use your alternate method (email) or contact support for removal after identity verification.