PUQcloud Panel
The PUQcloud Panel is an open-source cloud management platform that enables IT service providers to efficiently manage cloud services and infrastructure for their customers. This book contains detailed documentation on the PUQcloud Panel, including installation instructions, configuration guides, and feature explanations. Thanks to the modular and scalable design of the PUQcloud Panel, businesses can easily integrate and customize the platform to fit their specific needs. The documentation covers various sections such as server setup, user management, networking, billing, and advanced security features.
- Description
- Admin Area Overview
- Login Page
- Dashboard and Menu Overview
- Clients: Manage Clients Overview
- Clients: Manage Users Overview
- Products: Manage Products Overview
- Products: Product Groups Overview
- Monitoring: Task Queue Overview
- Monitoring: Admin Sessions Overview
- Monitoring: Activity Log Overview
- Monitoring: Module Log Overview
- Monitoring: Notification History Overview
- Staff: Admins Management Overview
- Staff: Managing Administrator Groups Overview
- Automation: Scheduler Overview
- Automation: Horizon Overview
- Email & Notifications: Notification Senders Overview
- Email & Notifications: Notification Layouts Overview
- Email & Notifications: Notification Templates
- General: General Settings
- General: Countries
- General: Currencies
- How to use Admin Area in PUQcloud Panel
- Manage Dashboard
- Create and manage Clients
- Create and manage users
- Transactions Page
- Create and manage a Home Company
- Create and manage Tax Rules
- Create and Manage a Product
- Create and Manage Product Groups
- Create and Manage an Attribute Group
- Create and Manage Product Option Groups
- Check and manage Task Queue
- Check and manage Admin Sessions
- Check and manage Client Sessions
- Check and manage Activity Log
- Check and manage Module Log
- Check and manage Notification History
- Create & Manage Administrators
- Create & Manage Administrator Groups
- Manage scheduler in the Admin Area
- Manage Notification Senders in the Admin Area
- Manage Notification Layouts in the Admin Area
- Manage Notification Templates (Admin Area)
- DNS Manager — Server Groups
- DNS Manager — Servers
- DNS Manager — Zones
- SSL Manager - Certificate Authorities
- SSL Manager - SSL Certificates
- Manage General on Admin Area
- Сheck Countries in the Admin Area
- Create and manage Currencies in the Admin Area
- How to use Client Area in PUQcloud Panel
Description
PUQcloud Panel
Order Now | Download | FAQ
Preface
PUQcloud is ideal for businesses looking to offer a range of services, such as cloud hosting, SaaS, IT support, and hardware repair management, all while keeping costs low with its open-source model.
Technologies Used:
- Framework: Laravel
- Programming Languages: PHP, JavaScript
- Frontend: HTML, CSS, JavaScript
- Database: MySQL
- Queue Management: Redis
- API Integration: RESTful APIs
- Version Control: Git
Key Features:
- Fully Modular Design: The platform allows the easy addition of custom modules to extend functionality.
- Multitenancy Support: PUQcloud supports multiple businesses (or “companies”) under one installation, making it ideal for resellers or agencies.
- Automated Billing and Invoicing: Automate invoicing, payment processing, and service deployment.
- Cloud Services Deployment: Seamlessly deploy cloud services, manage customers, and scale services across different infrastructures.
- Helpdesk and Remote Support: Integrate support for remote hands, helpdesk systems, and ticketing, enhancing customer service and operational efficiency.
- Multi-Language Support: PUQcloud is available in multiple languages, helping businesses serve global clients.
- Advanced Taxation and Regulations: With flexible tax rules, PUQcloud allows businesses to automatically apply local tax rates based on the client's location.
- Elastic and Fast: Thanks to its queue-based architecture, PUQcloud is designed for speed and elasticity, ensuring high performance even with large-scale deployments.
Features for Service Providers:
- Cloud Management: Provision, manage, and automate the entire lifecycle of cloud services.
- Client Dashboard: Provide clients with an intuitive, self-service portal where they can view and manage their subscriptions, tickets, and usage.
- User and Access Management: Advanced user permissions and role management for service teams and clients.
- Analytics and Reporting: Real-time data and reporting to help businesses monitor performance, usage statistics, and financial metrics.
- Custom Modules: Build custom modules for unique service offerings or integrate with third-party services.
- Support for Hardware Repair Services: Manage repair services for electronic devices, offering clients an integrated service from IT support to hardware repairs.
Advantages of PUQcloud:
- Open Source: Free and open-source, making it accessible to anyone, with the ability to customize the codebase.
- Modular and Flexible: Add or remove modules as your business grows or your needs evolve.
- Free to Use: Unlike other cloud management systems, PUQcloud is free, lowering the cost for businesses starting out in the IT services market.
- Scalable: PUQcloud is built to scale, supporting businesses from small IT startups to large cloud service providers.
- Reliability: Built with best practices for high availability, PUQcloud is designed for mission-critical environments.
- Global Community: Collaborate with developers from all around the world, contributing to and benefiting from a vibrant open-source ecosystem.
Who is PUQcloud For?
- IT Service Providers: Automate and manage your client’s IT services from cloud hosting to software-as-a-service (SaaS).
- Cloud Resellers: Offer scalable cloud hosting solutions to clients with seamless billing and support.
- Managed Service Providers: Provide remote support, hardware repair services, and other managed IT services.
- Startups and Entrepreneurs: Start a cloud service business with a low-cost, reliable system.
Admin Area Overview
The Admin Area section of PUQcloud provides administrators with a comprehensive suite of tools to manage the platform effectively. This section is designed to give admins complete control over user management, system configuration, and monitoring features, ensuring that the cloud services run smoothly and efficiently. Administrators have access to various features and settings that allow them to manage clients, monitor server performance, and ensure that all modules are functioning as expected. The Admin Area is a critical part of the PUQcloud platform, offering both high-level oversight and detailed operational controls.
Login Page
PUQcloud Panel
Order Now | Download | FAQ
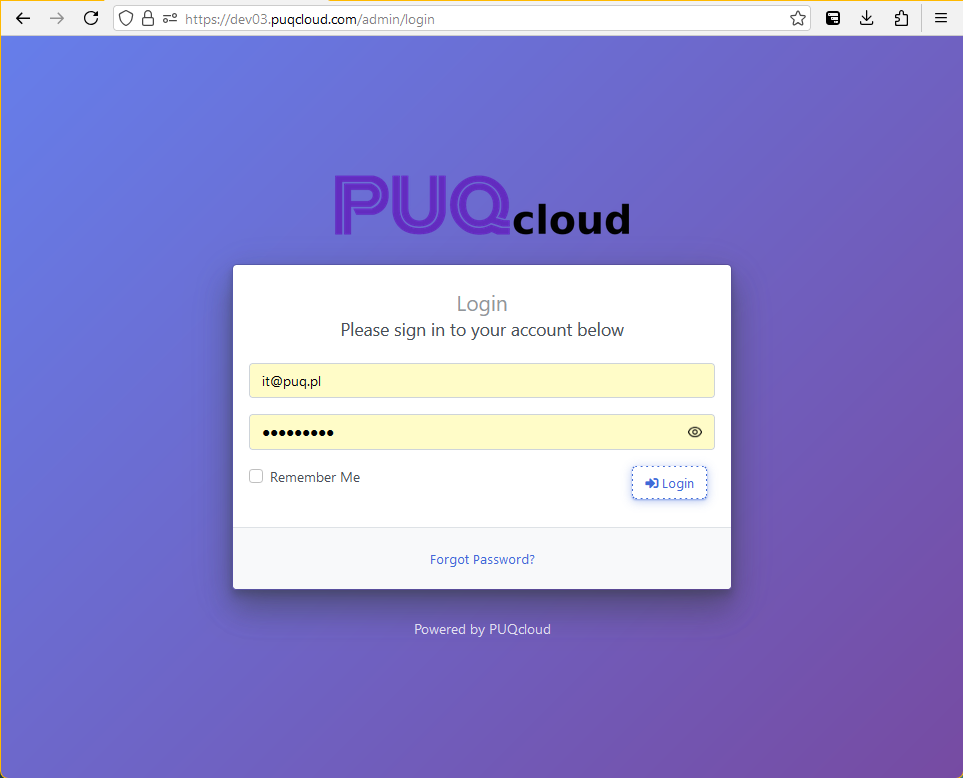
The Login Page is the initial entry point for administrators to access the Admin Area of PUQcloud. It provides a secure interface where authorized users can input their credentials to gain access to the system.
On the Login Page, users are required to enter their email address and password. The page also offers the following features:
- Remember Me: A checkbox option that allows users to stay signed in on their device.
- Forgot Password: A link that redirects users to the password recovery page in case they forget their credentials.
Security is a primary concern on the Login Page. The page uses encryption to protect user credentials during transmission, ensuring that sensitive information is not exposed. Additionally, access to the Admin Area is restricted to authorized users only.
After successful login, administrators are directed to the Admin Dashboard, where they can begin managing the PUQcloud platform.
Dashboard and Menu Overview
PUQcloud Panel
Order Now | Download | FAQ
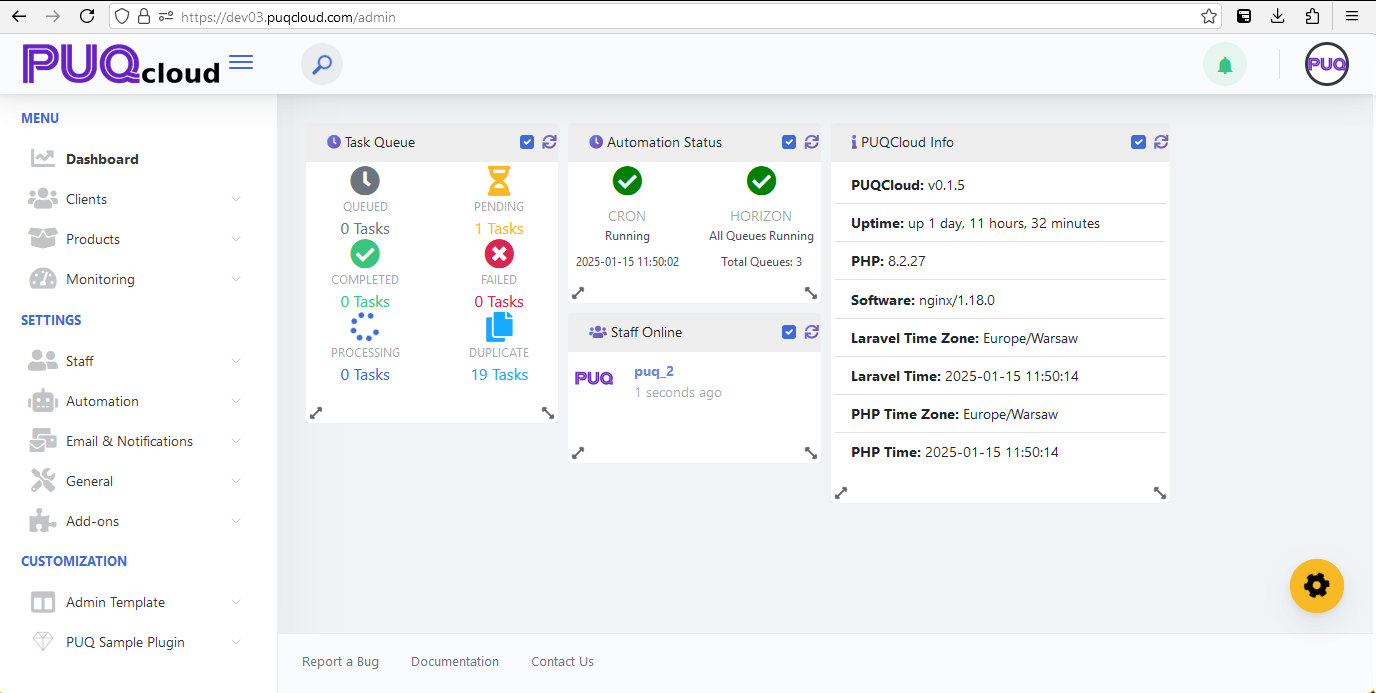
Dashboard Overview
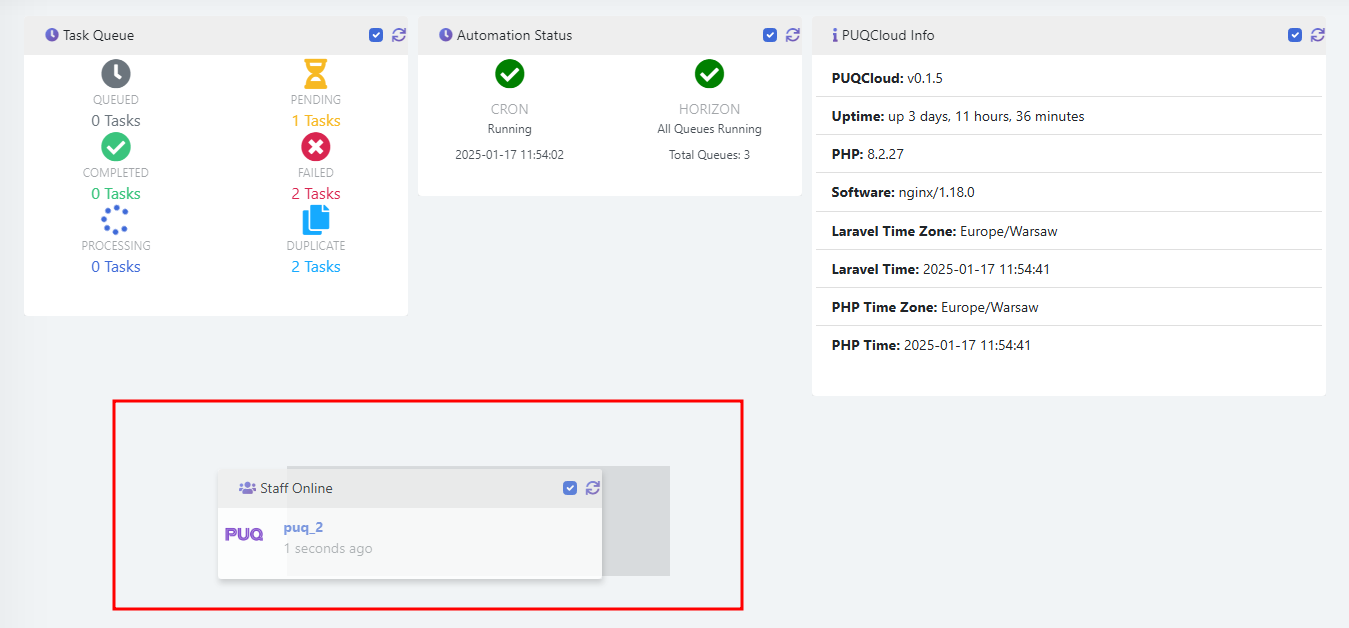
The Dashboard is the main interface of the PUQcloud admin area, providing a quick overview of essential system information. It displays task queues, staff online status, automation status, and general PUQcloud information. The dashboard is designed to give administrators real-time insights into the system's performance and operational status.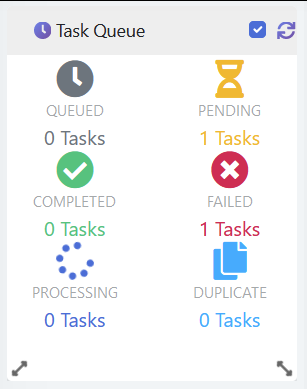
- Task Queue: Shows the number of queued, pending, completed, failed, processing, and duplicate tasks.

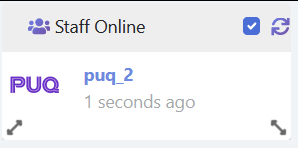
- Staff Online: Displays a list of currently logged-in administrators.

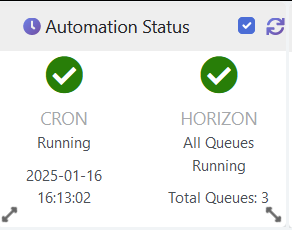
- Automation Status: Indicates the status of automated tasks such as CRON jobs and queue processing through Horizon.

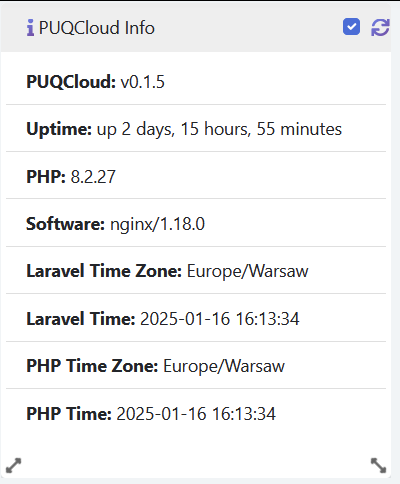
- PUQcloud Info: Displays system information including the current version, uptime, PHP version, server software, and time zone settings.
Dashboard Widgets Overview
The PUQcloud dashboard offers a flexible interface for administrators, allowing them to customize the layout by rearranging widgets. Widgets can be resized and repositioned according to user preferences, ensuring an optimal viewing experience for key system metrics and statuses.
Widget Settings Menu
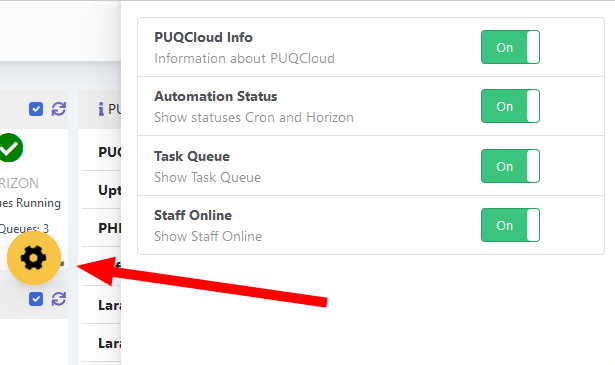
Administrators can manage the visibility of dashboard widgets through the Widget Settings menu. The settings icon, represented by a gear symbol, is located at the bottom right corner of the dashboard. Clicking on this icon opens the Widget Settings menu, where administrators can enable or disable specific widgets.
Available Widgets:
- PUQCloud Info: Displays general information about the system, including version, uptime, PHP version, and server details.
- Automation Status: Shows the current status of CRON jobs and queue processes managed by Horizon.
- Task Queue: Provides an overview of queued, pending, completed, failed, and processing tasks.
- Staff Online: Displays the list of currently active admin users.
Managing Widgets
In the Widget Settings menu, each widget has a toggle switch to enable or disable its display on the dashboard. When a widget is disabled, it will no longer appear on the dashboard, providing a cleaner interface. The settings are saved automatically, ensuring the chosen configuration is retained for future sessions.
Widget Layout Customization
To customize the layout of widgets:
- Click and hold a widget to move it to a different position on the dashboard.
- Drag the widget to the desired location and release it to set its position.
- Resize widgets by dragging their corners to adjust their dimensions.
The flexibility of the dashboard layout ensures that administrators can prioritize the information most relevant to their operations, enhancing productivity and system monitoring efficiency.
Menu Overview
Dashboard
The Dashboard link takes administrators to the main dashboard page, where they can see an overview of system performance and important metrics.
Clients
The Clients section allows administrators to manage client accounts and users.
- Manage Clients: Provides tools to add, edit, and manage client profiles.
- Manage Users: Allows administrators to manage user accounts associated with clients.
Products
The Products section is used to manage the services and products offered to clients. It includes the following submenus:
- Manage Products: Add, edit, and configure products and services.
- Product Groups: Organize products into groups for better management.
- Product Attributes: Define custom attributes for products.
Monitoring
The Monitoring section provides tools for tracking system activities and logs.
- Task Queue: View and manage queued tasks.
- Admin Sessions: Track active and past admin sessions.
- Activity Log: View a log of all system activities.
- Module Log: Track logs specific to system modules.
- Notification History: View the history of notifications sent through the system.
Staff
The Staff section is used to manage admin users and groups.
- Admins: Manage administrator accounts.
- Groups: Organize admins into groups with specific permissions.
Automation
The Automation section provides access to automated task management tools.
- Scheduler: Manage scheduled tasks.
- Horizon: Monitor and manage queue workers.
Email & Notifications
The Email & Notifications section is used to configure and manage notification settings.
- Notification Senders: Set up services for sending notifications.
- Notification Layouts: Create and manage notification templates.
- Notification Templates: Define reusable templates for notifications.
General
The General section contains general settings for the system.
- General: Configure system-wide settings.
- Countries: Manage country-specific settings.
- Currencies: Manage currency settings.
Add-ons
The Add-ons section provides access to additional modules and marketplace items.
- Marketplace: Browse and install add-ons from the marketplace.
- Modules: Manage installed modules.
Customization
The Customization section allows administrators to customize the admin interface.
- Admin Template: Configure the admin template settings.
- Info: View information about the current admin template.
- Layout Options: Customize the layout of the admin area.
- PUQ Sample Plugin: Access sample plugins for development purposes.
- Info: View information about the sample plugin.
- Simple Model Example: Access example code for creating models.
- Simple API Requests: View sample API requests.
Clients: Manage Clients Overview
PUQcloud Panel
Order Now | Download | FAQ
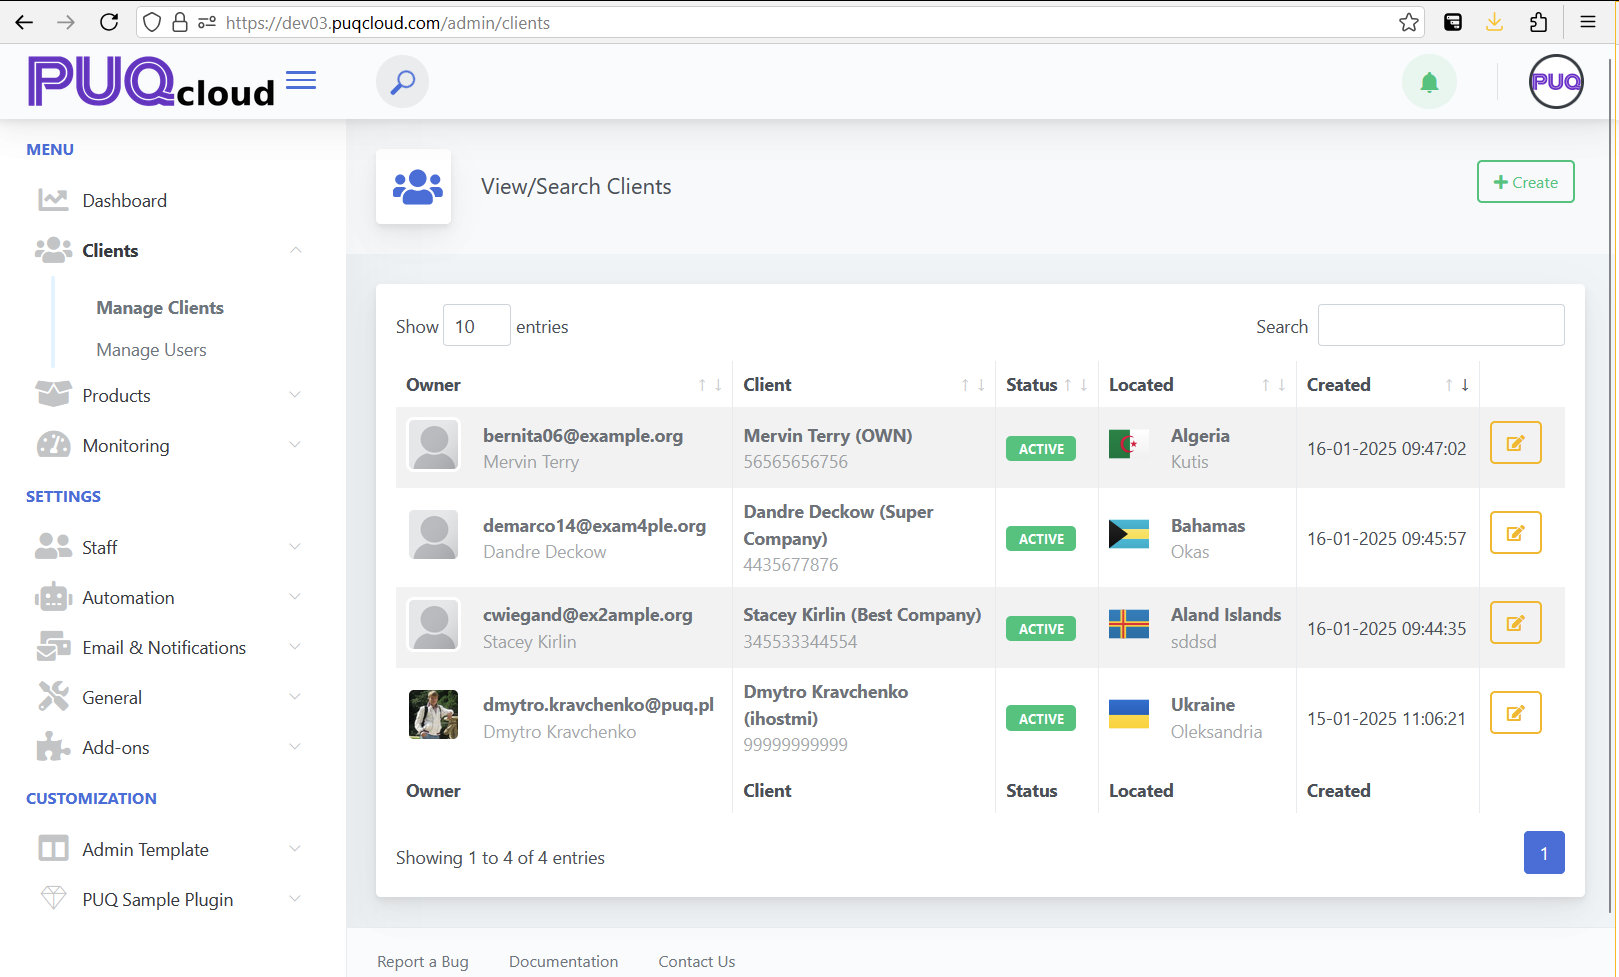
The Manage Clients section provides administrators with tools to view, search, and manage the client database within the PUQ Cloud Panel. This section is designed to simplify client management with an intuitive interface and detailed client information.
Key Features:
- Search Bar: Located at the top right corner, it allows quick searching of clients by email, name, or company.
- Client List: Displays a table with comprehensive information about each client, including:
- Owner: The email address and name of the client owner.
- Client: The client's full name and associated company (if applicable).
- Status: Indicates whether the client account is active or inactive. Active accounts are marked with a green label.
- Located: Displays the client's country and city along with a flag icon for easy identification.
- Created: Shows the timestamp when the client account was created.
- Edit Client Button: Located in the last column of the table, represented by a yellow edit icon. Clicking this button redirects to the client editing interface.
Pagination and Display Options:
- Entries Display: A dropdown menu to select how many clients are displayed per page (e.g., 10, 25, 50).
- Pagination: Allows navigation between multiple pages of clients.
Client Dashboard
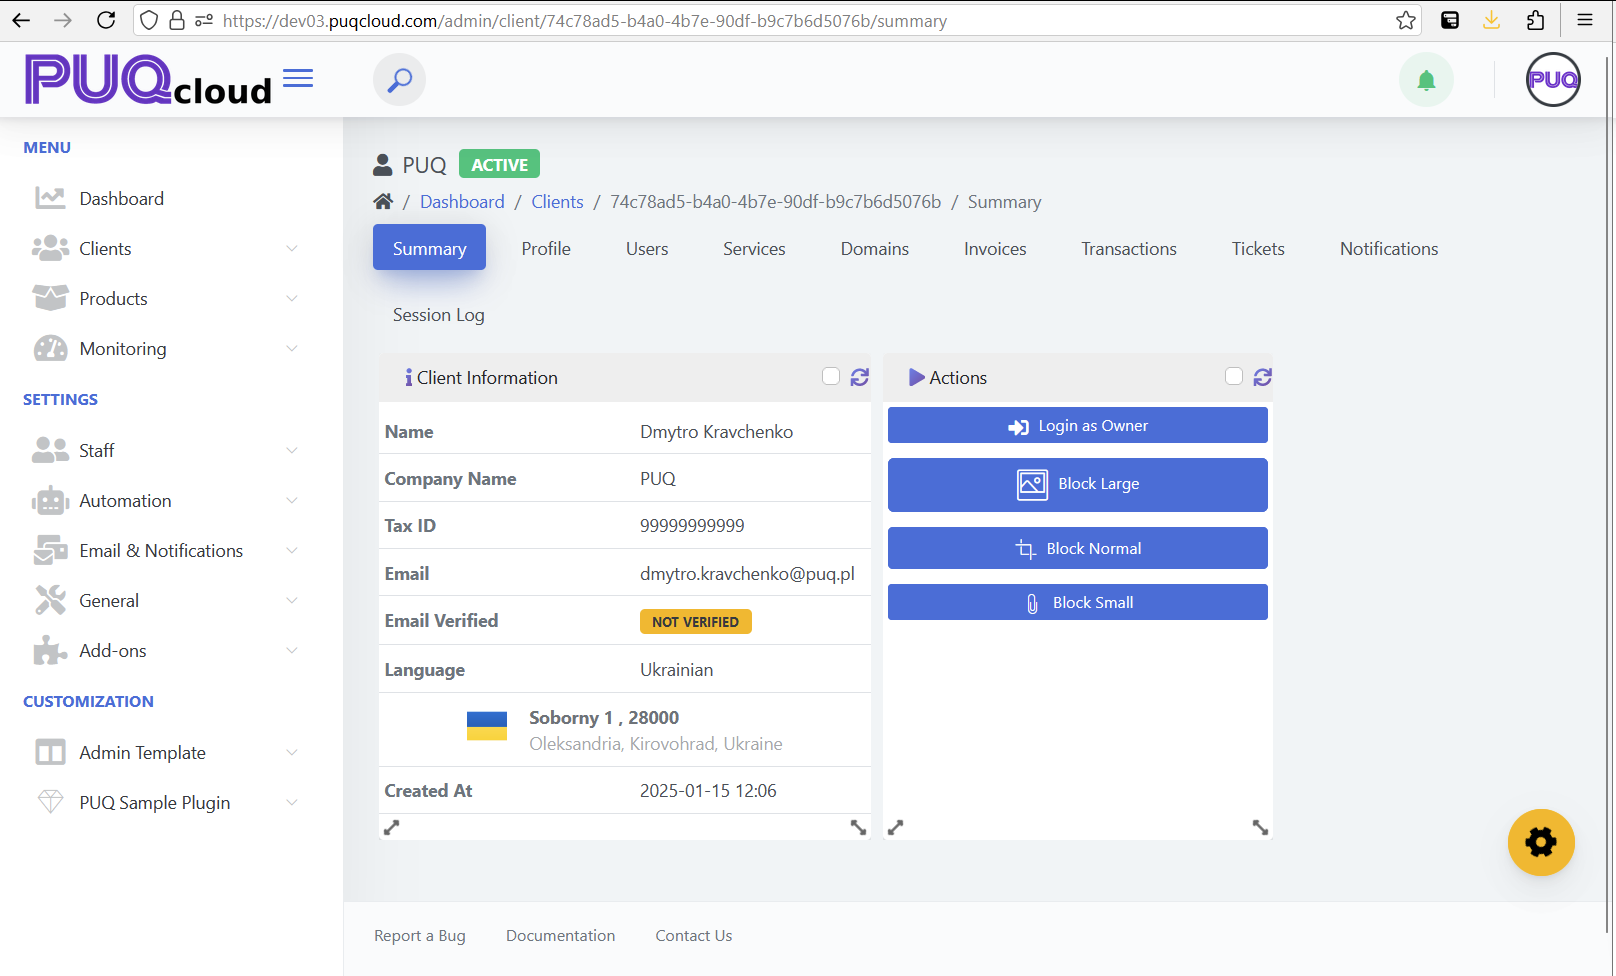
Once a client is selected, the system opens a dedicated dashboard that provides detailed information and management options for the client. The dashboard is built with widgets, which administrators can customize.
Customization Features:
- Widget Management: Widgets can be toggled on or off by clicking the gear icon in the bottom-right corner of the page. This allows administrators to personalize their view.
- Drag and Drop: Widgets can be rearranged by dragging them to a desired position on the page.
- Resizable Widgets: Each widget can be resized to better fit the administrator's workflow.
- Personalized Layouts: Widget settings and layouts are saved individually for each administrator, enabling personalized dashboards.
Widgets:
- Client Information Widget: Displays detailed information about the client, including:
- Name: The full name of the client.
- Company Name: The name of the client’s company, if applicable.
- Tax ID: The client’s tax identification number.
- Email: The client’s email address.
- Email Verified: Indicates whether the email is verified (e.g., "Not Verified").
- Language: The preferred language of the client, with a flag representing their country.
- Address: The full address of the client, including street, city, region, and country.
- Created At: The exact date and time when the client account was created.
- Actions Widget: Provides quick management actions, including:
- Login as Owner: Allows the administrator to log in as the client for troubleshooting or management purposes.
- Block Large: Blocks the client with a specific reason or category labeled as "Large."
- Block Normal: Blocks the client with a standard category labeled as "Normal."
- Block Small: Blocks the client with a minor category labeled as "Small."
Tabs:
The client dashboard includes the following tabs for comprehensive management:
- Summary: Displays an overview of the client’s information and recent activity.
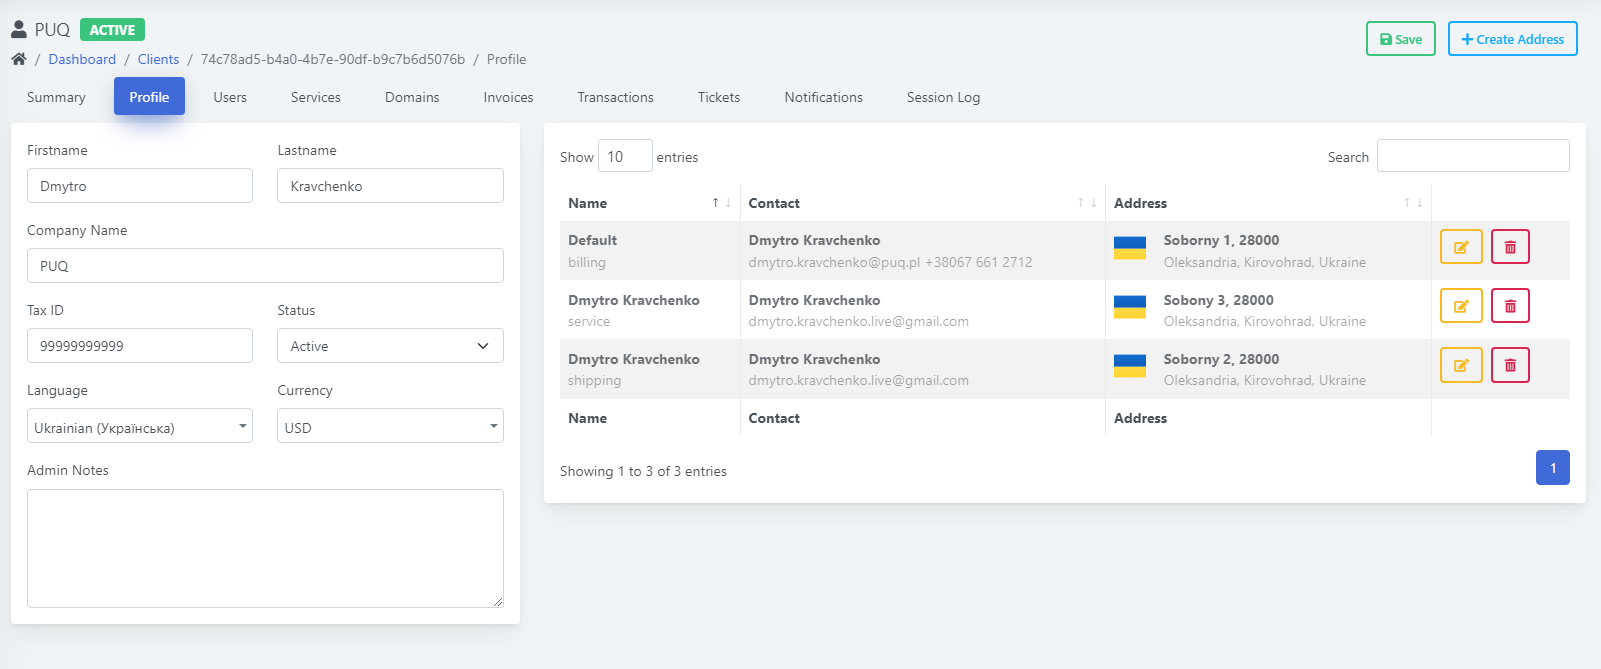
- Profile: Allows viewing and editing of the client’s personal details and preferences. Administrators can edit the client’s first name, last name, company name, tax ID, account status, preferred language, and currency. Additional notes for internal use can also be added in the "Admin Notes" field.
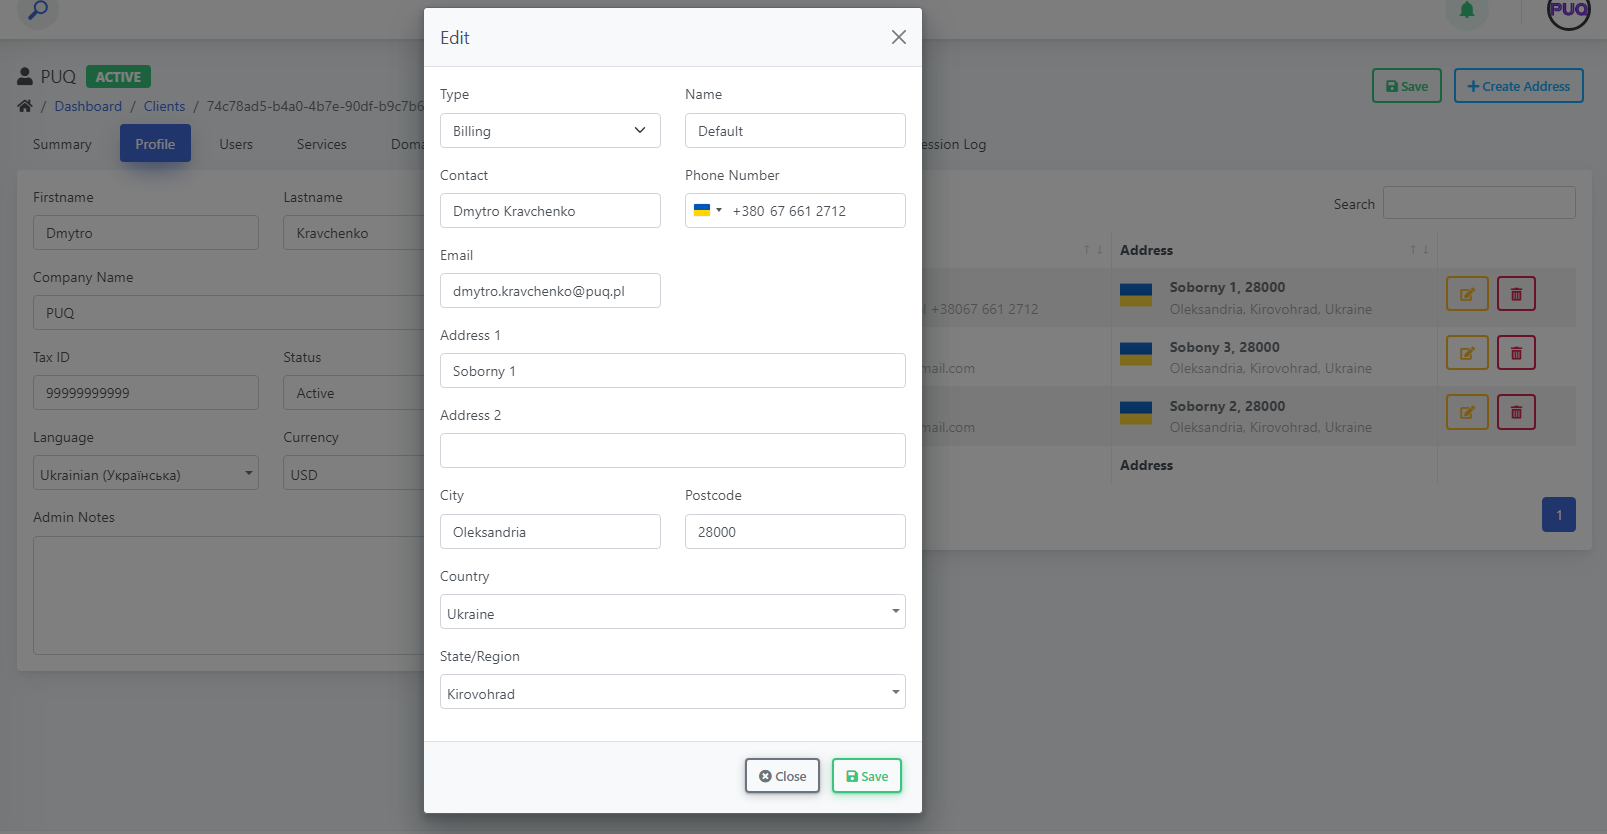
- Address Management: Administrators can manage multiple addresses associated with the client, including billing, shipping, and service addresses. Each address displays details like name, contact information, and full address. Administrators can add, edit, or delete addresses with the options available next to each entry.
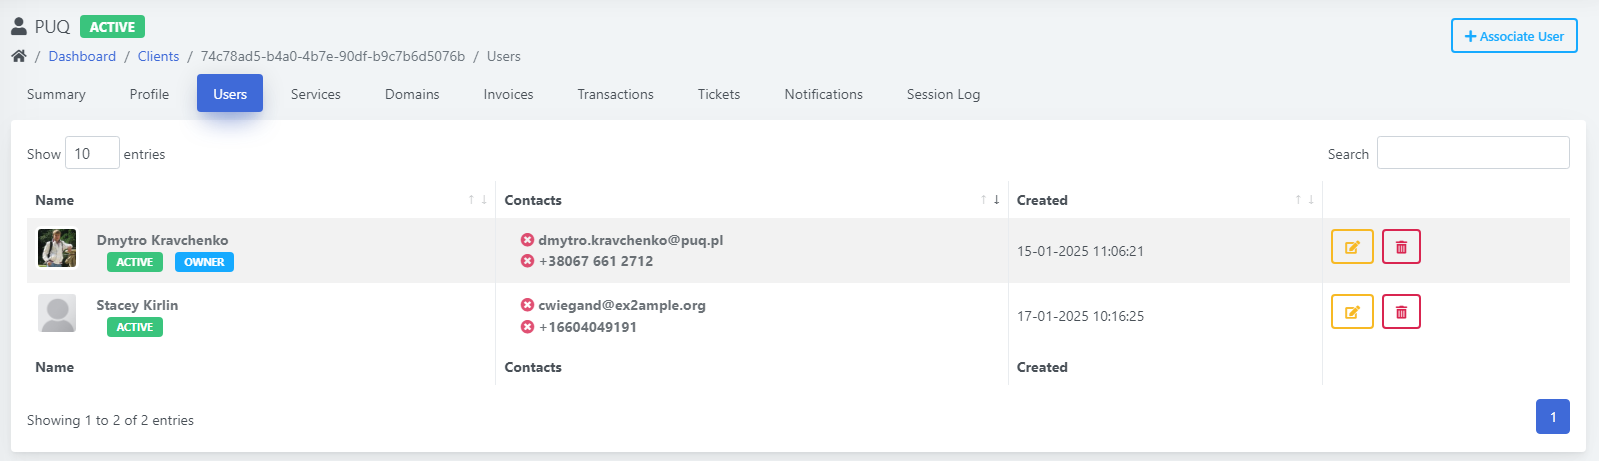
- Users: Lists all users associated with the client account.
- Services: Shows all active, suspended, or pending services related to the client.
- Domains: Displays a list of domains owned by the client.
- Invoices: Provides access to all invoices, including paid, unpaid, and overdue statuses.
- Transactions: Details all financial transactions related to the client.
- Tickets: Lists support tickets submitted by the client, along with their statuses.
- Notifications: Displays all system notifications sent to the client.
- Session Log: Records recent logins and actions performed by the client for auditing and monitoring purposes.
Usage:
This section is essential for efficiently managing individual client accounts, monitoring their status, and performing quick actions. The flexible dashboard ensures a tailored experience for administrators, improving overall management efficiency.
Users Tab
The Users tab allows administrators to manage all users associated with the client account. Features include:
- User List: Displays a list of users linked to the account, including their roles and permissions.
- Add User: Provides an option to add new users to the account with specific roles (e.g., admin, editor).
- Edit User: Allows administrators to modify existing user details such as name, email, and access permissions.
- Remove User: Enables the deletion of users no longer associated with the account.
- Search and Filter: Includes a search bar and filtering options to easily locate specific users based on criteria like name, email, or role.
This tab streamlines user management by offering comprehensive tools to customize access levels and ensure account security.
Profile Tab
The Profile tab allows administrators to view and edit the client’s profile details. Key features include:
- Edit Personal Details: Administrators can update the client’s first and last name, company name, tax ID, and account status.
- Language and Currency Settings: Adjust the client’s preferred language and default currency.
- Admin Notes: Internal notes for tracking specific details about the client.
- Multiple Addresses: Administrators can manage multiple addresses categorized as billing, shipping, and service. Each address includes fields for name, street, city, state, country, and contact information. Options to add, edit, or delete addresses are available for enhanced flexibility.
This tab ensures comprehensive management of client details, providing the flexibility to handle diverse scenarios and requirements.
Clients: Manage Users Overview
PUQcloud Panel
Order Now | Download | FAQ
The Manage Users section in the PUQ Cloud Panel provides administrators with the tools to oversee and manage user accounts efficiently. This section allows for advanced management of user details, associations with clients, and access rights, ensuring a seamless user and client management experience.
Key Features:
- User List: Displays a table with detailed information about each user. The list includes:
- Name: The full name of the user.
- Status: Indicates whether the user is active or inactive. Active users are marked with a green label, while inactive users are marked accordingly.
- Contacts: Lists the user’s primary email address and phone number for quick access.
- Clients: Displays the number of clients linked to the user. Clicking on the icon provides a detailed view of all associated clients, allowing administrators to manage these relationships effectively.
- Created: Shows the date and time when the user account was created in the system.
- Search and Filtering: A search bar at the top-right corner allows administrators to quickly locate users by name, email, or other attributes. Filters can be applied to narrow down the search based on specific criteria, such as status or client association.
- Actions: For each user, administrators can:
- Edit User: Modify the user’s details, including name, email, phone number, and associated clients. This feature ensures that all information remains up-to-date.
- Delete User: Permanently remove a user from the system. This action requires confirmation to prevent accidental deletions.
- User Creation: Administrators can add new users to the system using the Create button. During creation, key details such as name, email, phone number, and initial client associations can be defined.
Associations and Access Management:
The Manage Users section enables administrators to define and manage user-to-client relationships. This is crucial for scenarios where multiple users may need access to services or data associated with a single client.
- Client Associations: Users can be linked to one or multiple clients. Each association allows users to access specific services, invoices, tickets, or other resources tied to the client account.
- Roles and Permissions: Administrators can assign specific roles to users, such as:
- Owner: Grants full access to the client’s account, including administrative privileges.
- Editor: Allows users to modify certain details and access specific resources without full administrative rights.
- Viewer: Provides read-only access to certain data, suitable for oversight without direct interaction.
- Service Access: Users linked to a client account can be granted access to specific services, such as hosting packages, domain management, or support tickets. This granular control ensures that users only have access to the resources they need.
- Notification Settings: Each user can receive specific notifications based on their role and association with the client. This includes invoice reminders, service updates, or ticket responses.
Detailed View:
Clicking on a user’s name provides a detailed view of their profile. This view includes:
- Personal Details: Full name, email address, phone number, and account status.
- Client Links: A list of all clients associated with the user. Each entry includes the client’s name, status, and the nature of the user’s role in the client account.
- Activity Logs: A record of actions performed by the user, such as login attempts, ticket submissions, or service modifications.
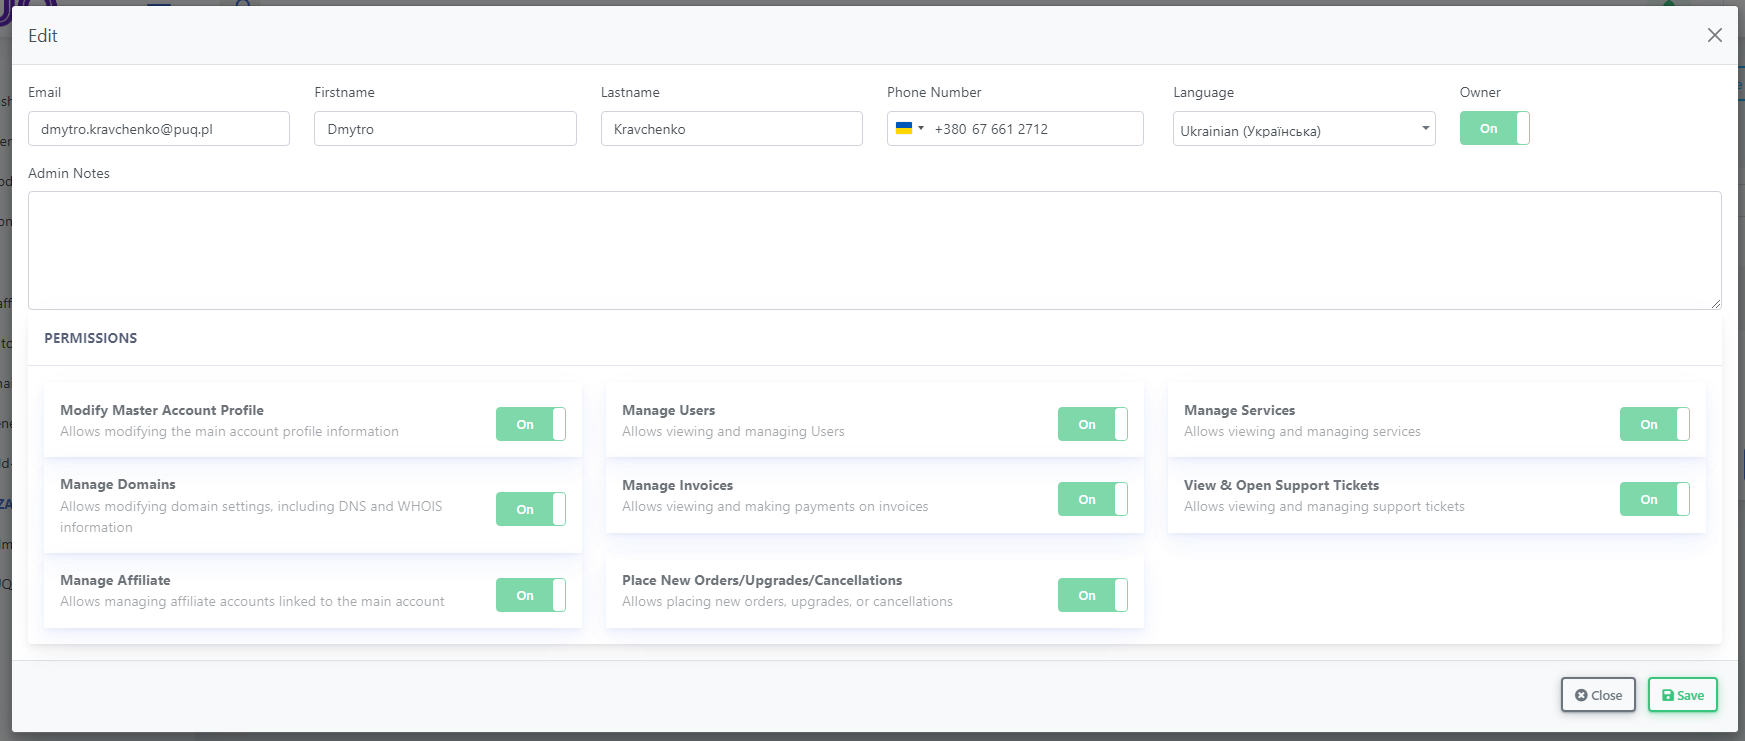
Edit User Modal:
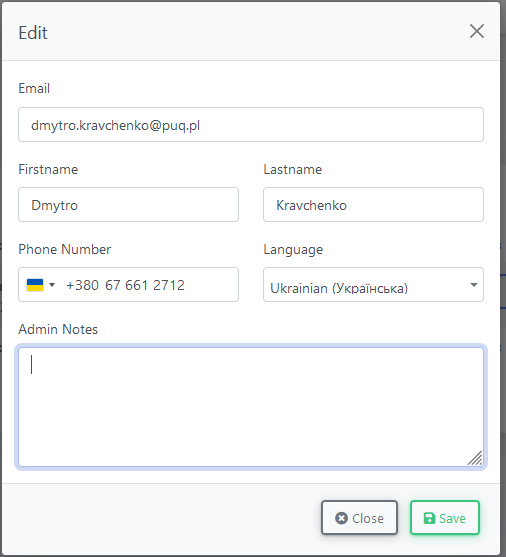
- Email: The user’s primary email address, which can be updated as needed.
- Firstname: The first name of the user.
- Lastname: The last name of the user.
- Phone Number: The user’s contact number, complete with a dropdown to select the country code.
- Language: The user’s preferred language, chosen from a dropdown list.
- Admin Notes: A text area for administrators to add internal notes about the user. These notes are visible only to administrators and can be used for reference or documentation purposes.
After making the necessary changes, administrators can save the updates by clicking the Save button, or they can discard changes by selecting Close.
Usage:
The Manage Users section is essential for maintaining an organized and secure user database. By providing detailed tools for user management, client associations, and role-based access control, this section ensures streamlined workflows and enhanced security for the PUQ Cloud Panel.
Products: Manage Products Overview
PUQcloud Panel
Order Now | Download | FAQ
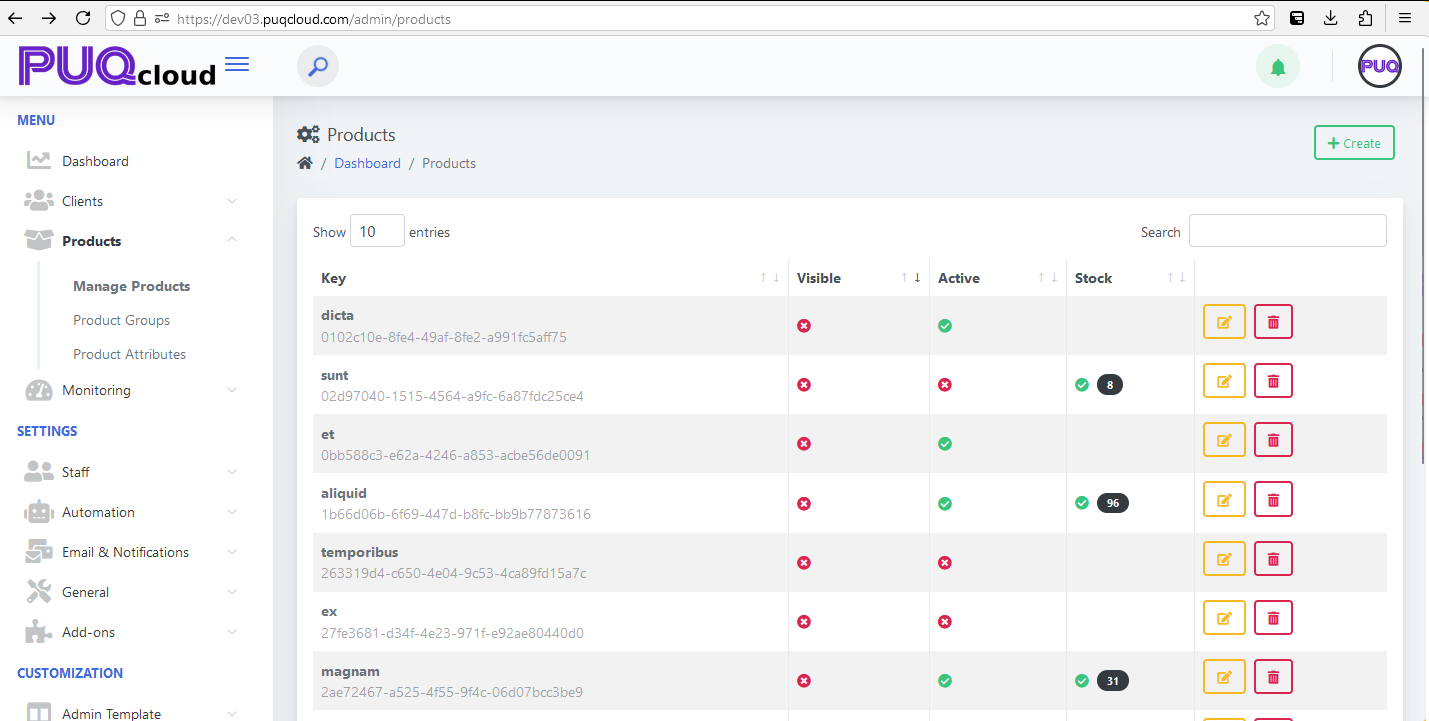
The Manage Products section in the PUQ Cloud Panel provides administrators with tools to view, edit, and manage all products within the system. This section is crucial for keeping the product inventory organized and ensuring seamless product availability and visibility across the platform.
Key Features:
- Product List: Displays a table with detailed information about each product, including:
- Key: A unique identifier for each product. This key is essential for internal operations and searching within the system.
- Visibility: Indicates whether a product is visible to customers. Visible products are marked with a green check, while hidden ones are marked with a red cross.
- Active Status: Displays whether the product is active. Inactive products cannot be purchased by customers.
- Stock: Shows the current stock level for each product, providing insight into inventory availability.
- Actions: Administrators can perform the following actions for each product:
- Edit: Modify product details, such as its name, key, visibility, status, and stock level.
- Delete: Remove a product permanently from the system. This action requires confirmation to avoid accidental deletions.
- Search and Pagination:
- Search: A search bar at the top-right corner allows administrators to quickly locate products by key, name, or other attributes.
- Pagination: Enables navigation through the product list, with options to display a specified number of entries per page.
Product Details and Attributes:
Each product in the system can have associated attributes and groupings, allowing for advanced customization and categorization. Administrators can manage these attributes through the following options:
- Product Attributes: Define specific characteristics for products, such as size, color, or technical specifications. These attributes provide additional details for customers and help in categorization.
- Product Groups: Organize products into groups for easier management and customer browsing. For instance, hosting plans, domains, or software licenses can be grouped together.
Usage:
The Manage Products section is vital for maintaining an organized product database and ensuring that all products are up-to-date, available, and visible to customers as needed. This section streamlines the administrative workflow for product management, enhancing overall system efficiency.
Editing a Product
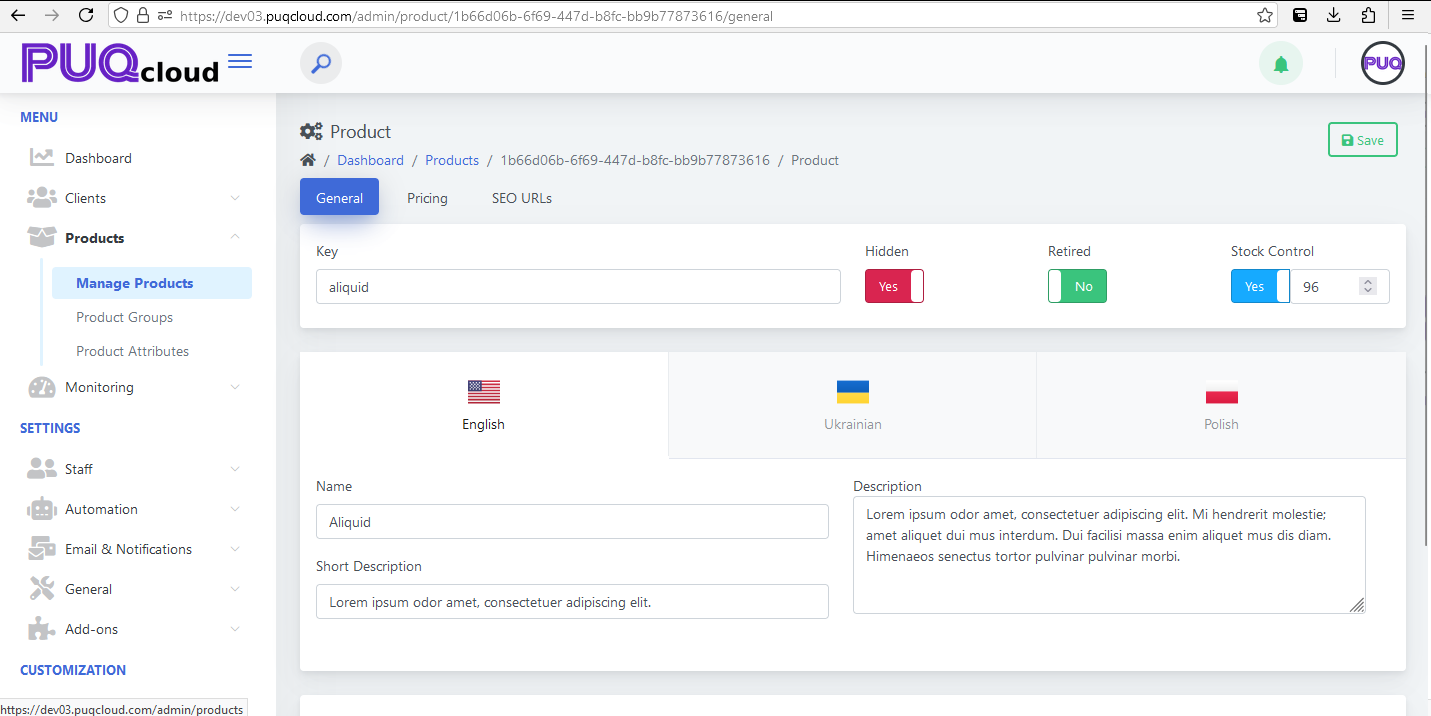
The Editing a Product section in the PUQ Cloud Panel allows administrators to modify key attributes of a product and customize its settings across multiple dimensions. This section provides flexibility to ensure each product aligns with business requirements and customer expectations.
Tabs Overview:
- General: Main settings and multi-language content editing.
- Pricing: (Description to be added).
- SEO URLs: (Description to be added).
General Tab
The General tab provides options to manage fundamental product settings. It includes the following features:
- Key: A unique identifier for the product, used internally for searching and referencing the product within the system.
- Visibility: Toggle the Hidden switch to determine whether the product is visible to customers.
- Retired: Use the Retired switch to mark the product as retired, removing it from active listings without deletion.
- Stock Control: Enable or disable stock control for the product. If enabled, specify the quantity available in stock.
Multi-Language Support
Administrators can provide content for multiple languages supported by the system. This ensures localization and customization for diverse audiences. The following fields are available for each language:
- Name: A localized name for the product.
- Short Description: A brief description of the product.
- Description: A detailed description of the product.
- Notes: Additional internal notes about the product. These are not visible to customers and are for administrative purposes only.
Language-specific content can be entered by clicking the flag icons representing available languages. This allows administrators to create tailored content for each locale.
Pricing Tab
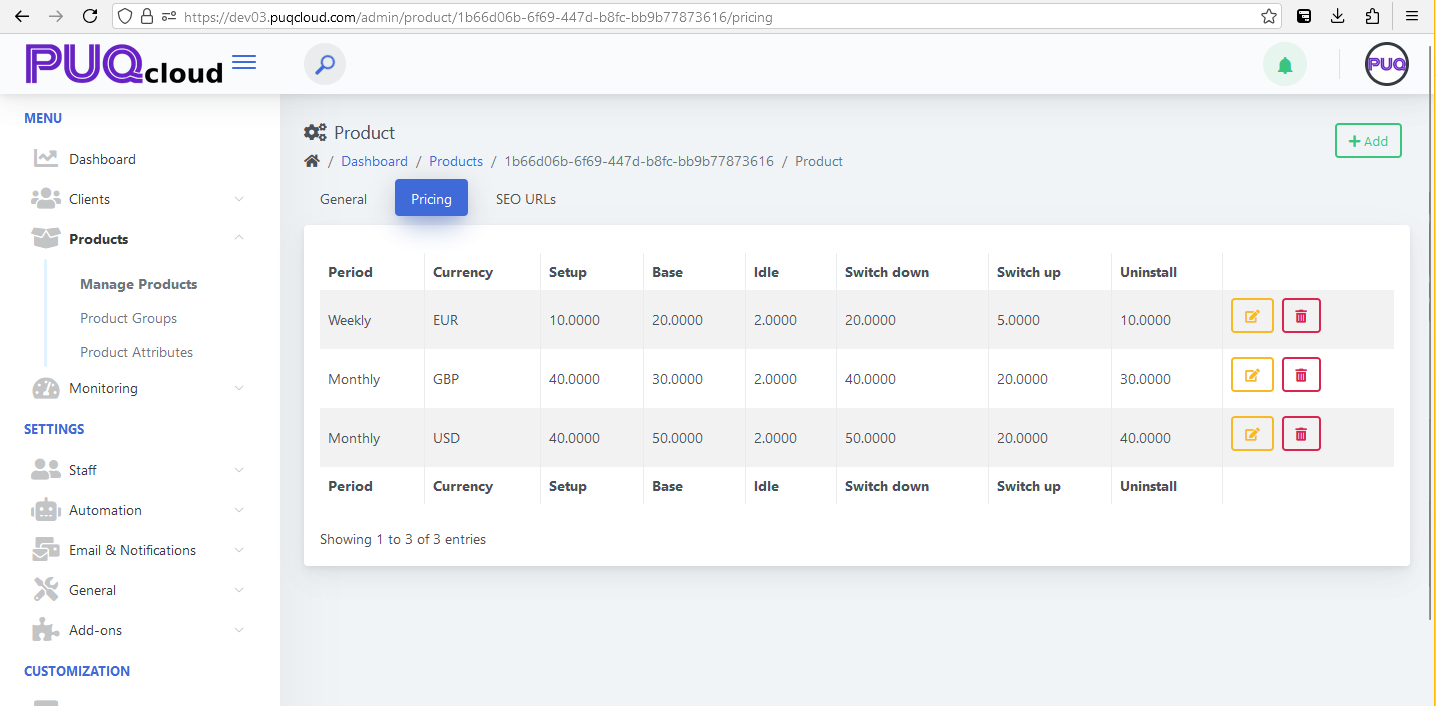
The Pricing tab in the PUQ Cloud Panel is dedicated to managing the pricing structure for products. This section allows administrators to define various payment periods, currencies, and associated costs, ensuring flexible and comprehensive pricing models for different customer needs.
Key Features:
- Periods: The pricing structure supports multiple billing periods, including:
- One-Time Payment: A single payment for the product without recurring charges.
- Daily: Recurring payments every day.
- Weekly: Recurring payments every week.
- Bi-Weekly: Recurring payments every two weeks.
- Monthly: Recurring payments every month.
- Quarterly: Recurring payments every three months.
- Semi-Annually: Recurring payments every six months.
- Annually: Recurring payments every year.
- Every Three Years: Payments recurring every three years.
- Currency: Administrators can set the pricing in multiple currencies, ensuring global compatibility and customer convenience.
- Cost Breakdown: Each period includes detailed cost fields:
- Setup Fee: A one-time cost for initializing the product.
- Base Price: The recurring cost for the selected period.
- Idle Fee: Cost incurred when the product is idle but active in the system.
- Switch Down Fee: Cost for downgrading the product or its features.
- Switch Up Fee: Cost for upgrading the product or its features.
- Uninstall Fee: Cost for removing the product from the system.
- Actions:
- Edit: Modify an existing pricing entry.
- Delete: Permanently remove a pricing entry. This action requires confirmation to prevent accidental deletion.
Adding a New Pricing Period:
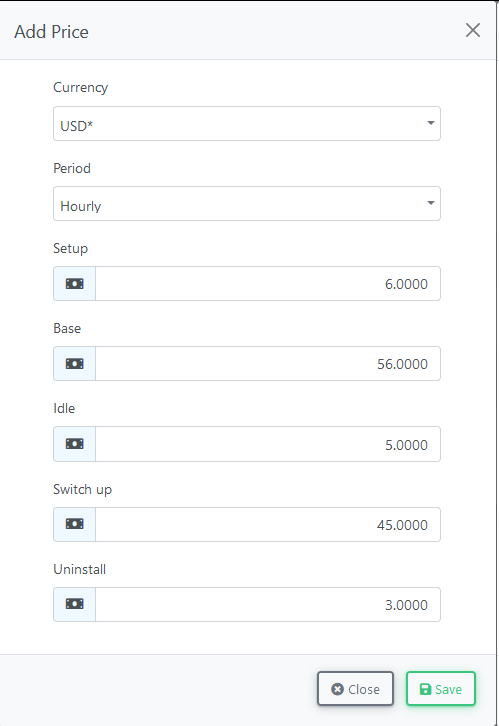
Administrators can add new pricing entries by clicking the Add button. During creation, the following fields must be defined:
- Period: Select the desired billing period from the available options.
- Currency: Choose the appropriate currency for the pricing.
- Setup Fee: Define the initial cost of setting up the product.
- Base Price: Specify the recurring price for the product.
- Idle Fee: Add a cost for idle usage, if applicable.
- Switch Down Fee: Include costs for downgrading product features.
- Switch Up Fee: Include costs for upgrading product features.
- Uninstall Fee: Define the cost of removing the product.
Usage:
The Pricing tab ensures that administrators can manage a variety of pricing models to cater to different customer requirements. By offering flexible billing periods, multiple currencies, and detailed cost breakdowns, this section supports dynamic and scalable pricing strategies.
SEO URLs Tab
The SEO URLs tab in the PUQ Cloud Panel enables administrators to configure search-engine-optimized URLs for products. This feature ensures that each product is discoverable online and ranks higher in search engine results, improving visibility and accessibility for potential customers.
Key Features:
- Customizable URLs: Administrators can define unique and descriptive URLs for each product, ensuring better identification by search engines.
- Language-Specific URLs: For multi-language systems, administrators can create distinct URLs for each supported language, enhancing localization and accessibility.
- Preview Functionality: Allows administrators to preview how the URL will appear to users and search engines.
- URL Validation: The system checks for duplicate or invalid URLs to prevent conflicts and ensure proper functionality.
Adding or Editing URLs:
When adding or editing a product's SEO URL, the following fields can be configured:
- Language: Select the language for which the URL is being configured.
- URL Path: Define the specific path for the product's URL, ensuring it is descriptive and relevant.
- Meta Title: Set a meta title that will appear in search engine results, summarizing the product.
- Meta Description: Provide a brief description that appears below the meta title in search results, offering a concise summary of the product.
- Keywords: Add relevant keywords to improve search engine indexing and ranking.
Usage:
The SEO URLs tab is essential for improving the discoverability of products in search engines. By optimizing URLs and meta information, businesses can enhance their online presence and attract more customers.
Products: Product Groups Overview
PUQcloud Panel
Order Now | Download | FAQ
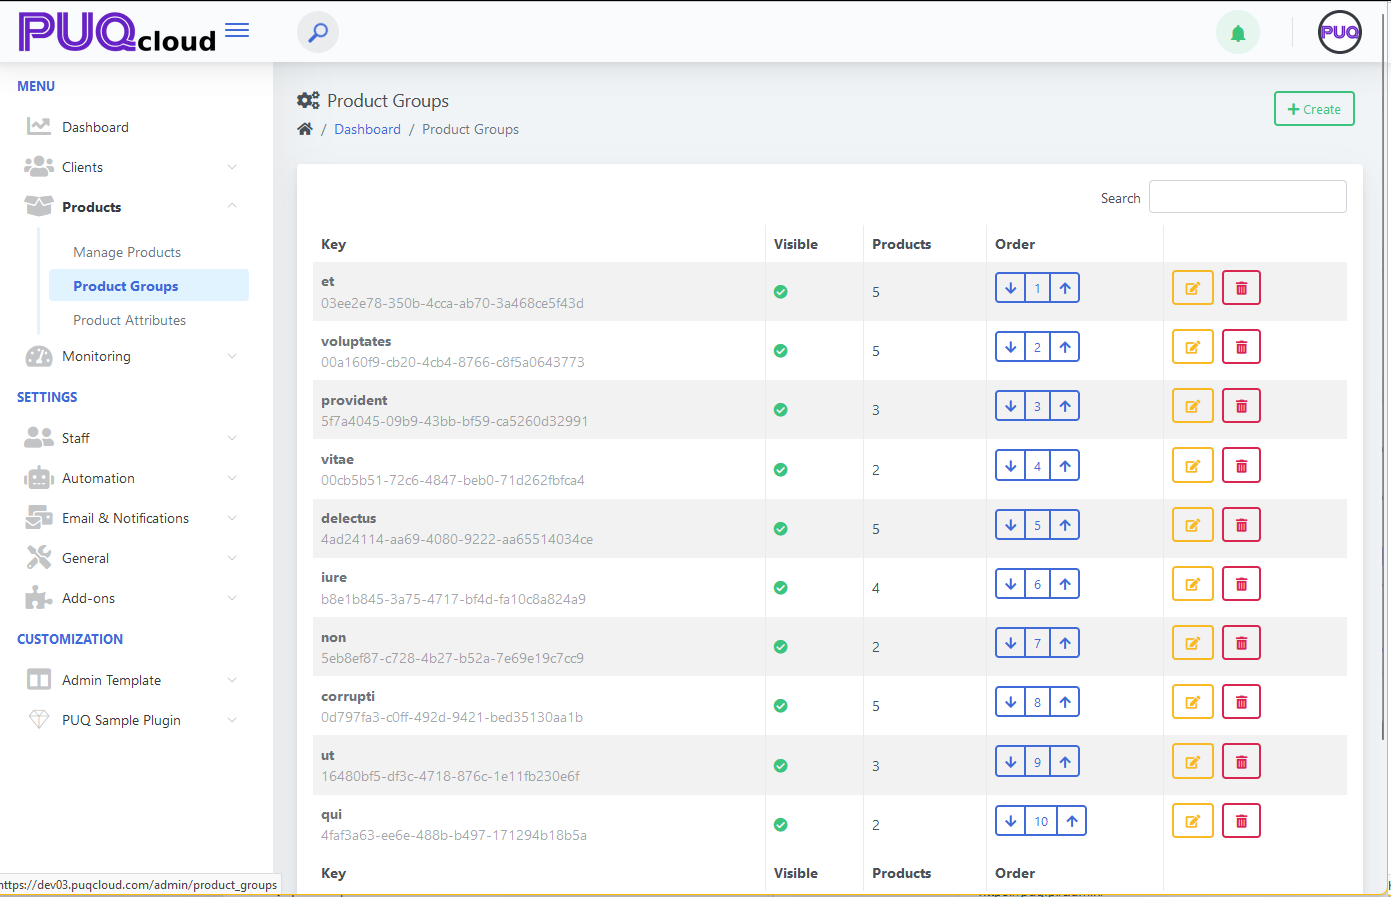
The Product Groups section in the PUQ Cloud Panel is designed to organize and manage groups of products efficiently. This feature enables administrators to categorize products into groups, making it easier to manage and navigate through large inventories.
Key Features:
- Group List: Displays all product groups in a table format, including:
- Key: A unique identifier for each product group, used for internal referencing and search functionality.
- Visibility: Indicates whether a product group is visible or hidden. Visible groups are marked with a green check, while hidden groups are marked accordingly.
- Products: Shows the number of products within each group, allowing administrators to assess group content at a glance.
- Order: Allows administrators to adjust the position of product groups in the list using up and down arrows for reordering.
- Actions:
- Edit Group: Modify the details of an existing product group, including its name, key, and visibility settings.
- Delete Group: Permanently remove a product group from the system. This action requires confirmation to prevent accidental deletions.
- Search and Filter: A search bar at the top-right corner allows administrators to locate specific groups quickly. Filters can also be applied to refine the search results.
Technical Details:
- Key Usage: The key for each group is a unique string that acts as an identifier for API calls, database queries, and other internal processes. This ensures that groups are easily distinguishable and traceable within the system.
- Visibility Settings: Visibility controls determine whether a product group is accessible to end-users or remains hidden for internal purposes. This feature allows for better inventory management and phased rollouts of new product lines.
- Order Management: The ordering functionality ensures that groups can be arranged in a hierarchy that aligns with business priorities or user navigation preferences. The system automatically updates the order index after each adjustment.
Creating a New Product Group:
Administrators can add new product groups by clicking the Create button. During creation, the following fields must be defined:
- Key: Enter a unique identifier for the group.
- Name: Provide a descriptive name for the group.
- Visibility: Set the group as visible or hidden based on its intended use.
Usage:
The Product Groups section is essential for organizing and streamlining product management. By categorizing products into logical groups, administrators can improve navigation, enhance customer experience, and ensure efficient inventory management.
Product Group Editing
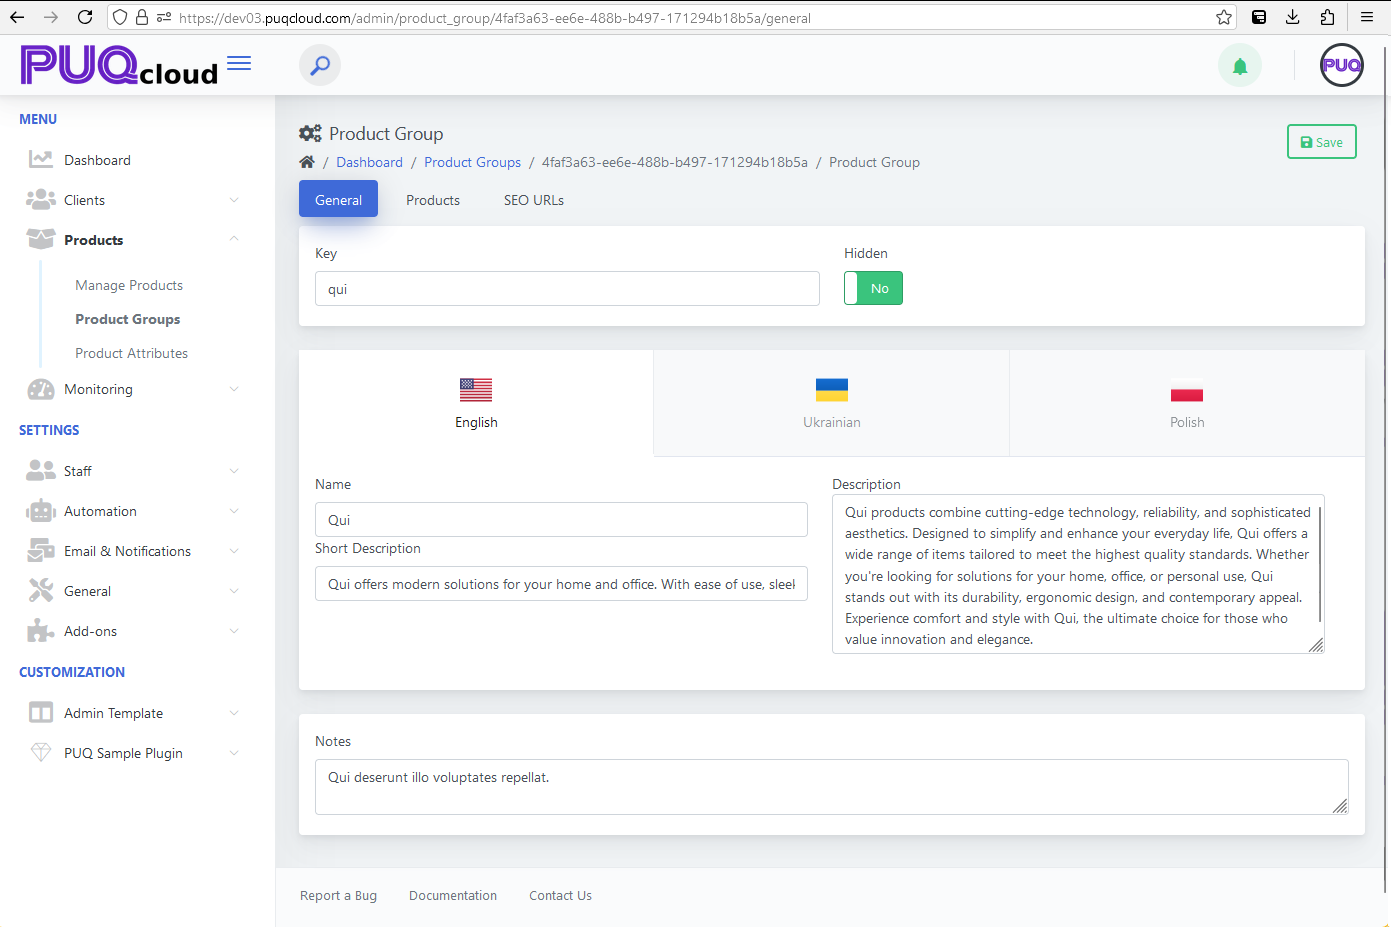
The Product Group Editing section in the PUQ Cloud Panel allows administrators to manage and customize product groups with ease. This section is divided into three key tabs:
General
The General tab provides administrators with tools to modify the overall settings of a product group. Here are its features:
-
Key: A unique identifier for the product group, used for internal reference and search functionality.
-
Hidden: Administrators can toggle this setting to hide or display the group in the product catalog.
-
Language-Specific Settings: The system supports multiple languages, and administrators can define the following for each language:
-
Name: The name of the group as it will appear to users.
-
Short Description: A brief summary of the group’s purpose or contents.
-
Description: A detailed explanation of the group, tailored for the selected language.
-
Notes: Additional internal information or instructions for the product group.
-
This tab ensures comprehensive customization for multilingual environments and provides flexibility in group visibility.
Products
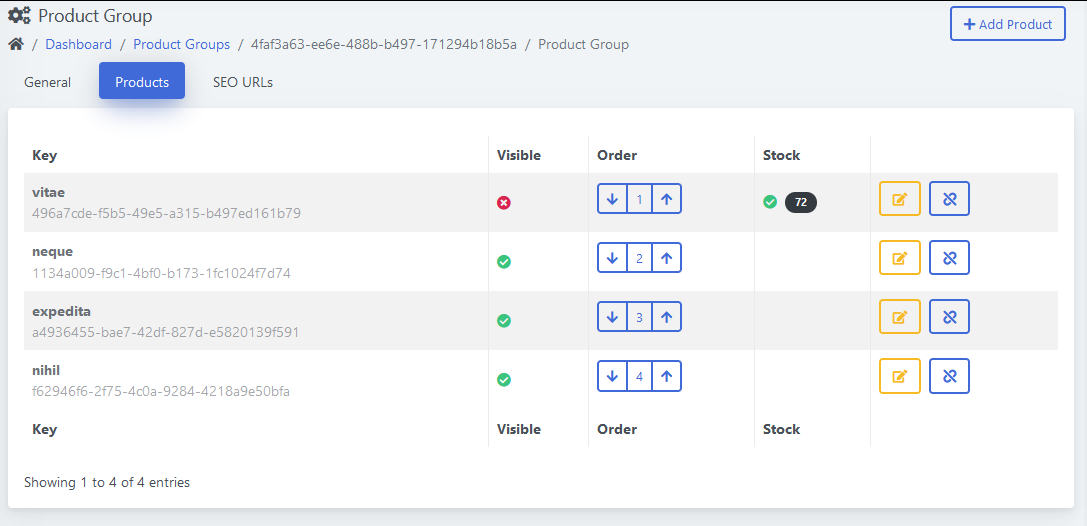
The Products tab displays all products associated with the group and allows administrators to manage them efficiently. Features include:
-
List of Products:
-
Key: A unique identifier for each product.
-
Visibility: Indicates whether the product is visible in the catalog.
-
Stock Status: Shows if the product is currently available in the store.
-
-
Positioning: Products can be reordered within the group by dragging them to the desired position, ensuring optimal display order.
-
Editing and Removal:
-
The Edit button allows administrators to modify product details directly.
-
The Remove button detaches the product from the group without deleting it from the system.
-
This tab is crucial for organizing product groups and maintaining a well-structured catalog.
SEO URLs
The SEO URLs tab enables administrators to configure search engine optimization settings for the product group. Key features include:
-
Customizable URLs: Define unique URLs for the group to enhance search engine discoverability.
-
Language-Specific URLs: Set distinct URLs for each supported language, catering to localized audiences.
-
Meta Information:
-
Meta Title: A concise, descriptive title for search engine results.
-
Meta Description: A summary that appears in search engine snippets.
-
Keywords: Relevant terms to improve indexing and ranking.
-
-
Validation: The system ensures URLs are unique and properly formatted to prevent conflicts.
This tab enhances the group’s visibility in search results, driving more traffic to the store.
Monitoring: Task Queue Overview
PUQcloud Panel
Order Now | Download | FAQ
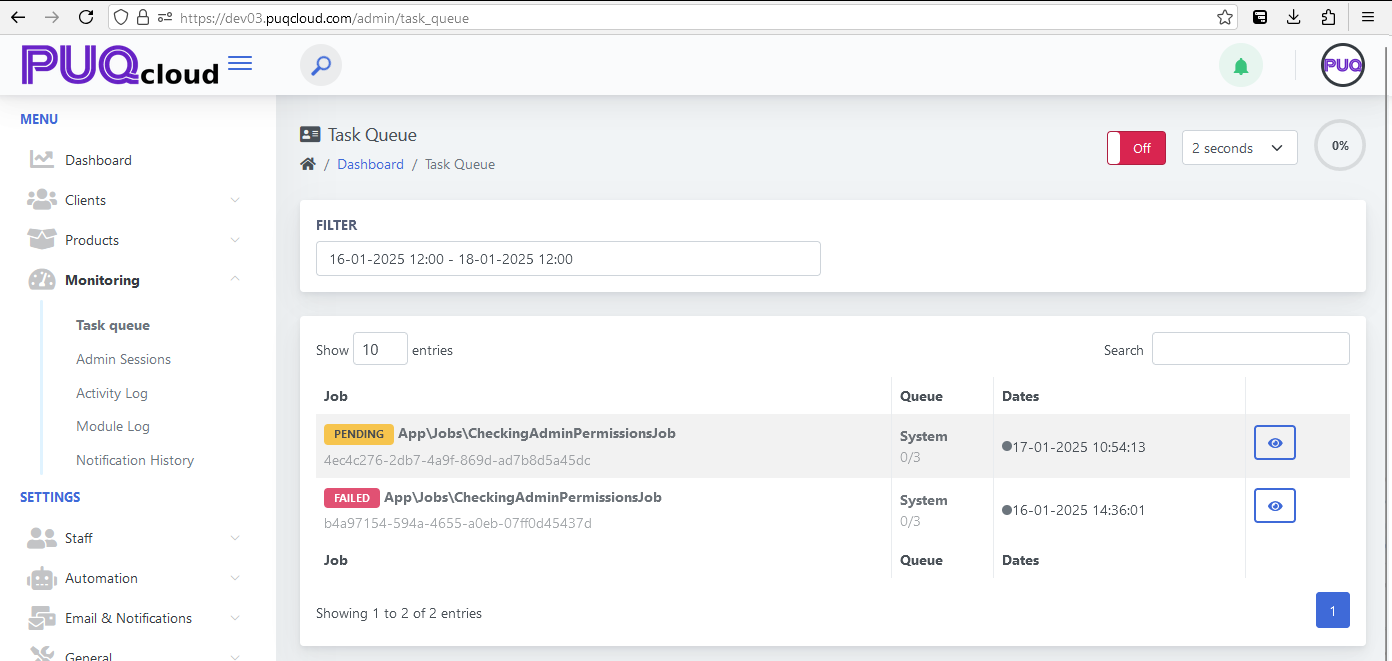
The Task Queue section in the PUQ Cloud Panel is designed to monitor and manage all tasks executed within the system. Each action triggered in the panel, such as background processes, administrative tasks, or scheduled operations, is queued and processed here. This ensures seamless and controlled execution of system jobs while providing administrators with detailed monitoring capabilities.
Key Features:
- Task Overview: Displays a list of all queued tasks, including their current status:
- Pending: Tasks waiting to be executed.
- Processing: Tasks currently being executed.
- Failed: Tasks that encountered an error during execution.
- Completed: Successfully executed tasks.
- Filtering: Administrators can filter tasks based on date ranges, making it easier to find specific jobs within a defined timeframe.
- Job Details: Each task entry includes detailed information:
- Job Name: A clear identifier for the task, such as "App\Jobs\CheckingAdminPermissionsJob."
- ID: A unique identifier for each task, enabling precise tracking.
- Queue: Indicates the queue assigned to the job, along with the number of attempts and retries (e.g., 0/3).
- Timestamp: Shows the exact date and time when the task was queued.
- Action Buttons: Includes options to view detailed information about each job, such as its logs, execution history, or potential errors.
- Real-Time Updates: Administrators can enable live updates to monitor task progress dynamically, with adjustable refresh intervals.
Usage:
This section is essential for maintaining transparency and control over system operations. Administrators can:
- Monitor ongoing tasks and their progress.
- Identify and resolve issues with failed jobs by reviewing error details.
- Ensure that critical background tasks are executed in a timely manner.
Technical Details:
- System Queue Management: The PUQ Cloud Panel leverages a robust queue system to prioritize and execute tasks efficiently. Each queue can handle multiple tasks concurrently, ensuring high system performance.
- Job Retry Mechanism: Failed tasks are retried automatically based on predefined retry policies. The retry count is displayed in the "Queue" column (e.g., 0/3).
- Error Logging: All task errors are logged for review. Administrators can access detailed error messages to diagnose and fix issues.
Screenshot Reference:
The interface provides a clean layout with filters, job statuses, and detailed task information, as shown in the attached screenshot:
- Filter: A date range selector allows narrowing down tasks to a specific period.
- Status Labels: Color-coded labels (e.g., yellow for "Pending" and red for "Failed") make it easy to identify the task's status.
- Action Icons: The eye icon enables administrators to view detailed logs and job execution specifics.
Monitoring: Admin Sessions Overview
PUQcloud Panel
Order Now | Download | FAQ

The Admin Sessions section within the Monitoring menu of the PUQ Cloud Panel provides detailed logging and tracking of administrative activity. This section ensures transparency and accountability by maintaining a comprehensive log of all administrator sessions.
Key Features:
- Session Logs: The section lists all administrative sessions, including details such as:
- Date: The exact date and time when the session occurred.
- Admin: The name or identifier of the administrator who initiated the session.
- IP Address: The IP address from which the administrator accessed the system.
- URL: The specific URL accessed by the administrator during the session, categorized as either API or WEB.
- Filtering Options:
- Date Range: Allows filtering sessions based on a specified date and time range.
- Hide Me: A toggle option to exclude the current administrator’s sessions from the view for better focus on other administrators.
- Real-Time Updates: The section can be set to auto-refresh at intervals such as 5 seconds, ensuring administrators see the latest activity logs in real-time.
- Pagination: Supports navigation through a large number of logs, with options to select the number of entries displayed per page.
Details Logged:
The following details are captured for each session:
- Type: Categorized as API calls or WEB-based interactions.
- HTTP Method: Specifies whether the action was a GET, POST, or another HTTP method.
- Session Activity: Tracks specific actions taken by the administrator within the system, such as accessing logs, modifying settings, or interacting with modules.
Usage:
The Admin Sessions section is essential for tracking administrative activities, troubleshooting issues, and maintaining the integrity of the system. By providing a detailed overview of all sessions, administrators can monitor unauthorized access attempts, audit system usage, and ensure compliance with internal policies.
Monitoring: Activity Log Overview
PUQcloud Panel
Order Now | Download | FAQ
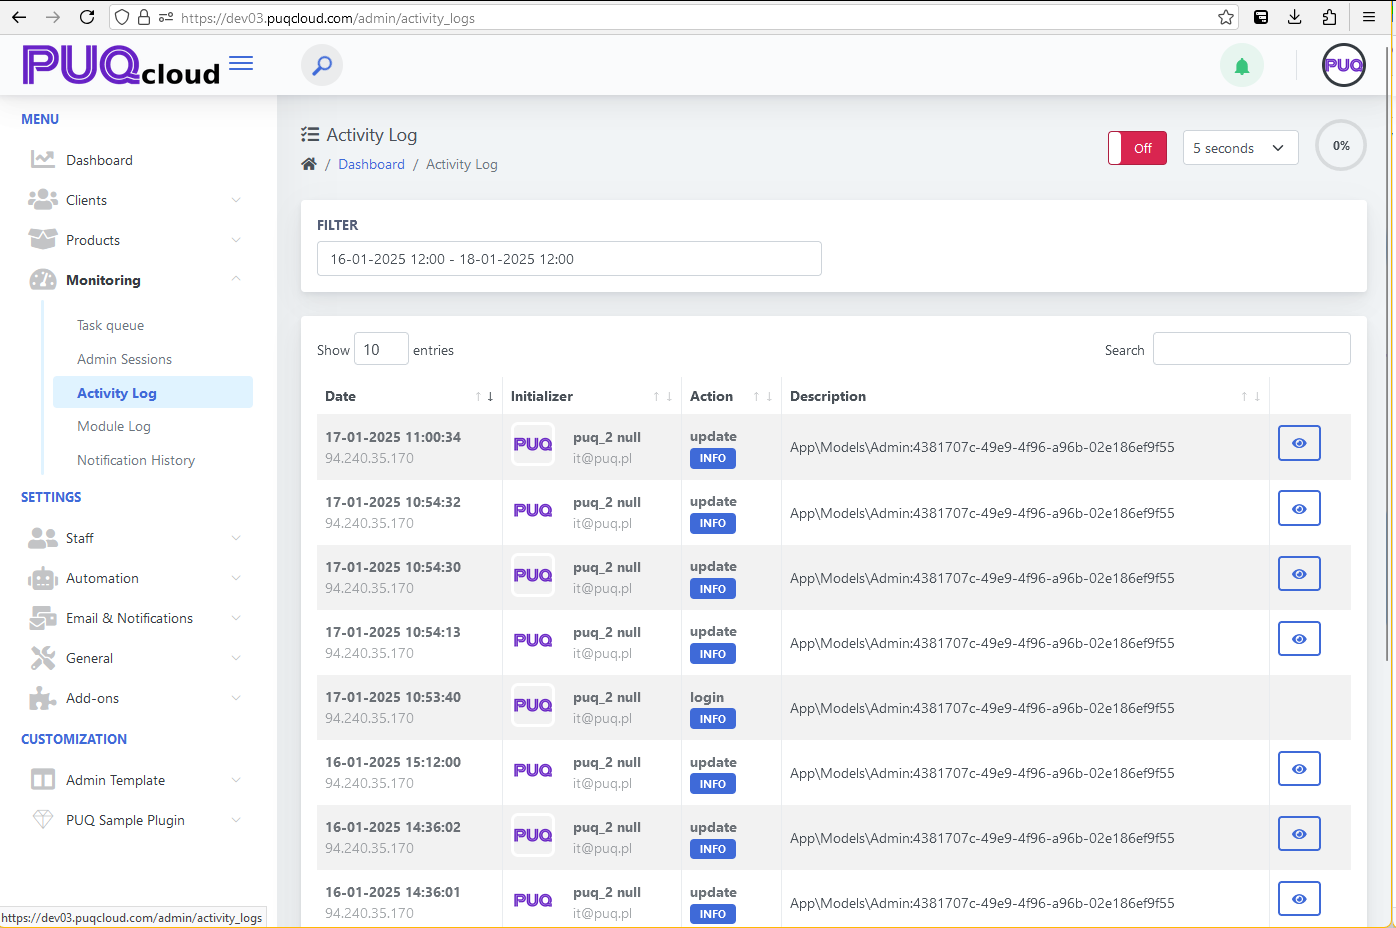
The Activity Log section in the PUQ Cloud Panel under Monitoring provides a comprehensive view of all activities performed within the system. It serves as a vital auditing tool, enabling administrators to track actions, identify changes, and ensure transparency in system usage.
Overview
This log records details about every action initiated in the system, including updates, logins, and other significant events. The information is presented in a tabular format for easy navigation and understanding.
Key Features:
- Date and Time: Displays the exact timestamp when the action occurred, ensuring chronological tracking.
- IP Address: Shows the IP address of the user or system that initiated the action, aiding in tracing the source of activity.
- Initiator: Identifies the user, system, or process responsible for the action. For administrators, this field includes the username and associated email.
- Action Type: Categorizes the type of action, such as:
- Update: Represents modifications made to system data.
- Create: Records the creation of new entities or resources.
- Delete: Captures deletions of resources or data.
- Login: Logs access attempts to the system by users or administrators.
- Description: Provides detailed information about the action, including references to models, entities, or resources affected by the activity.
- Filter Options: Administrators can narrow down results using date ranges and specific keywords to locate relevant logs efficiently.
- Search Functionality: A search bar allows quick filtering based on specific terms or identifiers.
- View Details: Each entry includes a View button, which provides in-depth information about the selected action for more granular analysis.
Technical Details:
- Data Storage: All activity logs are stored in a secure database with redundancy to prevent data loss.
- Log Retention: Logs are retained based on system policies, which can be configured by the administrator to comply with regulatory or operational requirements.
- Integration: This section integrates with other monitoring tools, such as Admin Sessions and Module Log, for holistic system insights.
Usage Scenarios:
- Auditing: Track changes made by administrators to ensure compliance with internal policies.
- Security: Identify unauthorized access or suspicious activities by monitoring login attempts and other critical actions.
- Troubleshooting: Review logs to pinpoint errors or unintended changes that may impact system functionality.
Best Practices:
- Regularly review activity logs to ensure system integrity and identify potential issues early.
- Use filters and search functionality to focus on critical periods or specific actions.
- Export logs periodically for offline storage or integration with external auditing systems.
The Activity Log is a crucial tool for maintaining accountability and transparency within the PUQ Cloud Panel. By providing a detailed and searchable record of system activities, it empowers administrators to ensure smooth and secure operations.
Monitoring: Module Log Overview
PUQcloud Panel
Order Now | Download | FAQ
The Module Log section in the PUQ Cloud Panel provides administrators with a detailed log of all activities related to the modules integrated within the system. This section is crucial for diagnosing issues, auditing changes, and monitoring the performance of various modules.
Key Features:
- Log Entries: Displays all recorded module activities, including actions, timestamps, and statuses. Each entry helps trace the execution of module-specific tasks.
- Filters: Administrators can apply date and time filters to focus on specific periods, making it easier to pinpoint relevant logs.
- Details: Each log entry includes the following fields:
- Date: The exact time when the action occurred.
- Name: Identifies the module associated with the log entry.
- Action: Describes the operation performed, such as installation, update, or removal.
- Level: Indicates the severity or status of the action, such as INFO, WARNING, or ERROR.
- Real-Time Updates: The module log can be configured to auto-refresh at specified intervals, ensuring administrators see updates as they occur.
- Search Functionality: Allows administrators to quickly find specific entries using keywords or module names.
Usage:
The Module Log is designed to streamline the monitoring and troubleshooting process for administrators. By providing a comprehensive view of module-related actions, it helps ensure system stability and efficient module management.
Example Use Cases:
- Issue Diagnosis: Identify errors or warnings generated by modules to quickly resolve technical problems.
- Performance Monitoring: Track the execution of scheduled tasks or updates performed by modules.
- Change Auditing: Review logs to confirm recent module installations or configuration changes.
Monitoring: Notification History Overview
PUQcloud Panel
Order Now | Download | FAQ
The Notification History section in the PUQ Cloud Panel provides a comprehensive log of all notifications sent through the system. This section is essential for tracking communication activities, ensuring transparency, and diagnosing any notification-related issues.
Key Features:
- Filtering Options: Administrators can filter the notification logs by specific time ranges, types of notifications, or delivery statuses to pinpoint specific entries quickly.
- Detailed Notification Entries: Each log entry includes the following information:
- Date: The exact timestamp when the notification was sent.
- Recipient: The user or system component that received the notification.
- Type: Specifies the type of notification, such as email, system message, or SMS.
- Status: Indicates whether the notification was successfully delivered, failed, or pending.
- Message Preview: A short snippet of the notification content for quick reference.
- Additional Details: Metadata associated with the notification, including priority level and system tags.
- Search Functionality: A search bar allows administrators to locate specific notifications by keywords, recipient names, or message content.
- Pagination: The system divides the notification history into pages, enabling efficient navigation through extensive logs.
- Real-Time Updates: Notifications can be monitored live with automatic refresh settings to ensure administrators have the latest information.
Viewing Notification Details:
Clicking on a specific notification entry expands a detailed view, revealing the full message content, associated metadata, and any error messages or logs related to delivery failures. This helps administrators identify and resolve issues efficiently.
Usage:
The Notification History section is critical for maintaining system reliability and ensuring successful communication with users. By providing a clear and detailed log of all notifications, it helps administrators:
- Verify the delivery of important messages.
- Investigate and troubleshoot failed notifications.
- Maintain a historical record of communication activities for auditing purposes.
Staff: Admins Management Overview
PUQcloud Panel
Order Now | Download | FAQ
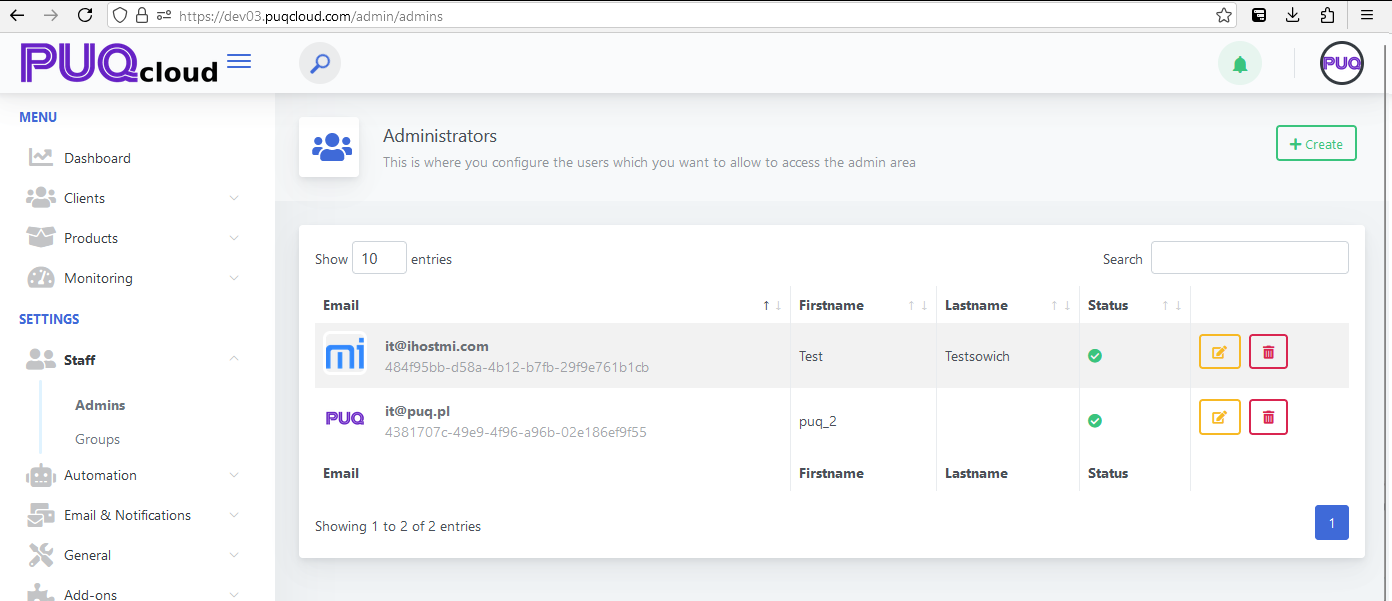
The Admins section, located within Settings > Staff, provides tools for managing system administrators. This feature is essential for controlling access to the administrative panel and ensuring proper roles and permissions for each user.
Key Features:
- Administrator List: Displays all current administrators, showing key information such as:
- Email: The email address associated with the administrator account.
- First Name: The administrator’s first name for identification purposes.
- Last Name: The administrator’s last name for identification purposes.
- Status: Indicates whether the administrator account is active (green checkmark) or inactive.
- Actions:
- Edit: Allows modifying administrator details, such as name, email, or permissions.
- Delete: Permanently removes the administrator from the system. A confirmation prompt ensures accidental deletions are avoided.
- Search: The search bar enables quick filtering of administrators by name or email.
- Pagination: Controls the number of entries displayed per page, making it easier to navigate large lists.
Adding a New Administrator:
Clicking the Create button opens a form where administrators can input the following details:
- Email: The email address for the new administrator account.
- First Name: The administrator’s first name.
- Last Name: The administrator’s last name.
- Password: A secure password for account access.
- Confirm Password: Ensures the password is entered correctly.
- Status: Specifies whether the account should be active upon creation.
Editing Administrator Details
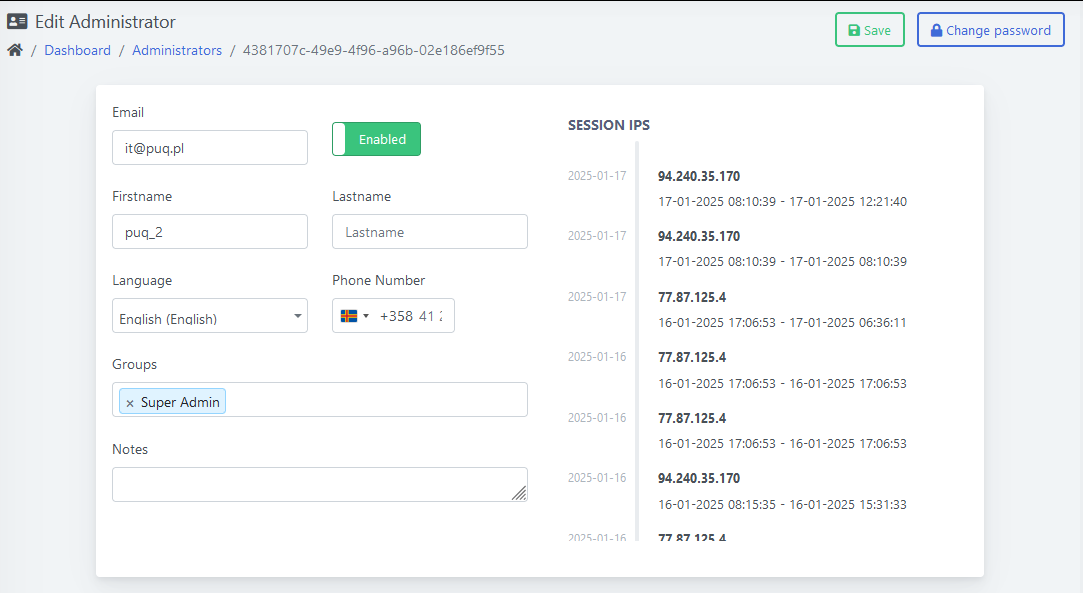
The "Edit Administrator" functionality within the PUQ Cloud Panel allows for managing detailed information about administrators and assigning them specific roles or permissions to ensure flexibility, security, and optimal organization of administrative tasks within the system.
Editable Fields
Administrators can modify the following fields in the "Edit Administrator" section:
- Email: The email address associated with the administrator's account. This field ensures that the administrator can receive important notifications and correspondence.
- Firstname: The administrator’s first name, which helps identify the user within the system and maintain proper records.
- Lastname: The administrator’s last name, used alongside the first name to provide complete identification.
- Language: The preferred language for the administrator’s interface, selectable from a dropdown menu. This ensures a user-friendly experience tailored to individual preferences.
- Phone Number: The administrator’s phone number, including country code. This field is particularly useful for contact purposes or integrating with two-factor authentication systems.
- Status: Enable or disable an administrator account ("Enabled" or "Disabled"). This feature is critical for managing active personnel and suspending access for inactive or terminated staff.
- Groups: Assign the administrator to one or multiple groups with predefined permissions. Groups dictate the administrator’s level of access and operational capabilities within the system.
- Notes: Add internal notes related to the administrator’s account or role. This can include special instructions, reminders, or historical context about the account.
Groups and Permissions
Groups are a vital feature in the PUQ Cloud Panel that allow granular control over administrator access. By assigning administrators to specific groups, you can define the scope of their permissions. Groups are highly flexible and customizable to suit various organizational needs. Below are some examples of group configurations:
- View-Only Accountant:
- Permissions: Can only view invoices and financial data. They cannot modify, delete, or add data, ensuring secure access to sensitive information.
- Use Case: Ideal for accounting staff who need access to billing information but should not edit or access other areas. This ensures separation of duties and enhances internal controls.
- Product Manager:
- Permissions: Can edit product details, manage pricing, and update inventory. They can also access relevant reports to monitor product performance.
- Use Case: Suitable for administrators responsible for managing products and their associated data. This group empowers them to maintain an up-to-date catalog and respond to market changes.
- Super Admin:
- Permissions: Full access to all sections and functionalities of the system, including user management, system logs, and settings adjustments.
- Use Case: Reserved for high-level administrators who oversee all operations. They ensure that the system runs smoothly and can intervene in critical situations.
Advanced Flexibility
Groups can be customized to allow or restrict access to specific features based on the organization’s structure. For instance:
- An administrator can be allowed to view logs but not modify system settings, maintaining accountability without compromising security.
- Permissions can be assigned for specific modules, such as allowing access only to the Task Queue or Notification History. This ensures that administrators focus on their designated responsibilities.
- Temporary permissions can be granted to an administrator for specific tasks and revoked afterward. This feature is particularly useful during audits, special projects, or temporary staffing situations.
Changing Passwords
The "Edit Administrator" section includes an option to Change Password. This is useful for resetting an administrator’s password if it is forgotten or needs to be updated for security reasons. Password changes can be enforced periodically to comply with organizational security policies.
Session IPs
Administrators can view the Session IPs associated with their account to track login activity and ensure security. This feature provides a detailed record of IP addresses used to access the account, helping identify unauthorized access attempts. Any suspicious activity can be flagged and addressed promptly, ensuring the integrity of the system.
Usage
This feature ensures that administrator accounts can be managed efficiently and securely. By leveraging the group and permission functionality, organizations can enforce strict access control while maintaining operational flexibility. The ability to customize groups and track activity adds a layer of accountability and transparency, fostering a secure and well-regulated administrative environment.
Staff: Managing Administrator Groups Overview
PUQcloud Panel
Order Now | Download | FAQ
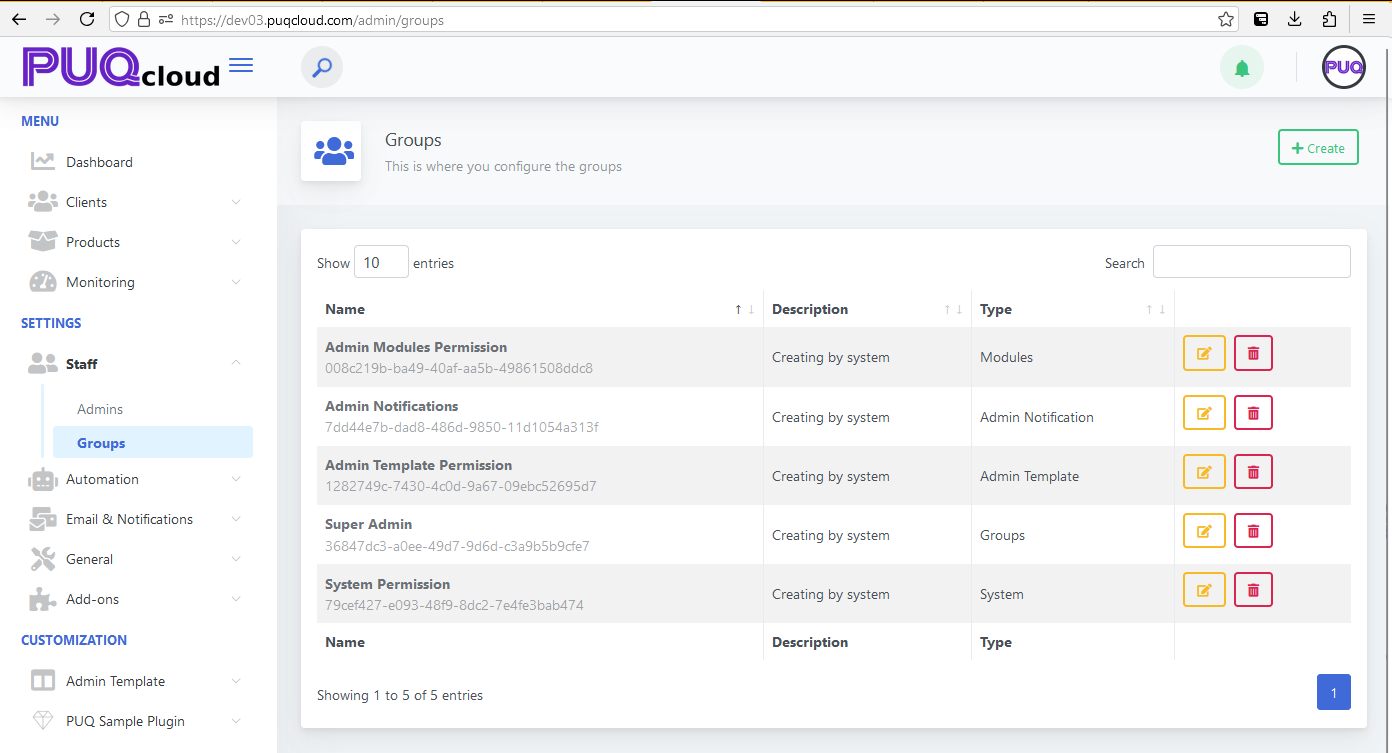
The "Groups" section in the PUQ Cloud Panel under Settings > Staff is an advanced and critical feature for configuring and managing administrator groups. This section allows for creating highly customizable roles, enabling organizations to assign specific permissions to administrators based on their responsibilities. By using this feature, the PUQ Cloud Panel ensures granular control over access and operations within the system, making it an essential tool for maintaining security and efficiency.
Overview of Groups
Administrator groups are designed to provide a structured and scalable way to manage permissions and organize administrative tasks. Each group consists of the following attributes:
- Name: A unique identifier for the group, ensuring it can be easily distinguished from others within the system. This name serves as the primary reference for its purpose.
- Description: A concise explanation of the group’s purpose, providing necessary context for its creation and functionality. This is particularly useful for larger organizations managing multiple groups.
- Type: Defines the group’s functional category, such as "Modules," "System," "Admin Notifications," or others. This categorization aids in organizing roles based on specific operational domains.
Core Functionalities
The Groups section offers a wide range of functionalities, empowering administrators to manage roles and permissions effectively:
- Create Groups: Administrators can create new groups by defining their name, description, and type. This feature enables organizations to set up custom roles tailored to unique business needs.
- Edit Groups: Update existing groups to reflect changes in organizational structure or responsibilities. For example, permissions can be expanded or restricted as necessary.
- Delete Groups: Safely remove groups that are no longer needed. This ensures the system remains uncluttered and easy to navigate, enhancing usability.
Flexibility and Customization
The PUQ Cloud Panel’s group management system is highly flexible, enabling administrators to configure roles for a variety of scenarios. Here are some examples of how groups can be utilized:
- Module-Specific Access:
- Groups can be created to grant access exclusively to certain modules, such as Monitoring, Products, or Invoices. For instance, a "Monitoring Group" might have permissions to view logs and manage task queues without accessing product configurations.
- Use Case: This approach is ideal for dividing responsibilities, ensuring that administrators focus solely on their assigned tasks.
- System-Wide Roles:
- Groups like "Super Admin" offer unrestricted access to all features and functionalities, including user management, system logs, and configurations.
- Use Case: Designed for top-level administrators, this role is critical for oversight, troubleshooting, and high-level decision-making.
- Notification Management:
- Groups dedicated to managing admin notifications allow specific users to monitor and respond to system alerts efficiently.
- Use Case: Ensures critical updates and alerts are handled by designated administrators, improving response times and reducing risk.
Nested Groups
A standout feature of the PUQ Cloud Panel is its support for nested groups. This functionality allows one group to inherit permissions from another, creating a hierarchical structure that simplifies role management. By using nested groups, administrators can avoid redundant configurations and maintain consistency across roles.
- Example: A "Finance Team" group may include "Accountant" and "Billing Manager" sub-groups. This setup ensures that all members of the Finance Team inherit the permissions of these specialized roles, streamlining administrative assignments.
Security and Accountability
Groups play a pivotal role in enhancing security by restricting access based on predefined roles. This minimizes the likelihood of unauthorized actions or data breaches. Additionally, all activities performed by group members are logged and can be reviewed in the Activity Log, ensuring accountability and transparency. These logs provide a detailed record of actions, enabling administrators to identify and address potential issues proactively.
Editing Groups

The PUQ Cloud Panel provides robust capabilities for editing existing administrator groups, ensuring that roles can be refined and adjusted as organizational needs evolve. The editing interface includes the following options:
- Name and Description: Administrators can update the group’s name and description to better align with its purpose or changes in responsibilities. This ensures clarity and relevance over time.
- Modules: Assign or modify the modules associated with the group. For instance, a group may be granted permissions to manage specific plugins, access SMTP configurations, or control PHPMAIL notifications.
- Notification Permissions: Administrators can enable or disable notification-related permissions for the group, allowing for tailored access to critical system alerts.
- Plugin Controls: Groups can be configured with permissions for specific plugins, such as managing models, API requests, or executing test connections.
These editing features highlight the panel’s flexibility, allowing administrators to create precise, role-specific configurations. For example, a "Testers" group might only have permissions for executing test connections and viewing plugin data, while a "Developers" group could have broader access, including the ability to modify plugins and analyze system logs.
Usage and Best Practices
To fully leverage the group management feature, administrators should adhere to the following best practices:
- Define Clear Roles: Conduct a thorough analysis of organizational roles and responsibilities before creating groups. This ensures that permissions align with operational needs.
- Use Descriptive Names: Choose clear and specific names for groups, such as "Support Team," "Product Managers," or "Finance Team," to avoid confusion and streamline navigation.
- Regularly Review Permissions: Periodically audit group settings to ensure they remain relevant and appropriate. Remove or update permissions as organizational needs evolve.
- Limit Super Admin Access: Restrict the "Super Admin" role to a select group of trusted individuals. This reduces the risk of accidental or intentional misuse of system-wide permissions.
Advanced Role Configurations
The flexibility of the group management system allows for advanced configurations, such as:
- Creating roles that can view specific logs without modifying system settings, ensuring transparency without compromising security.
- Setting permissions for individual modules, such as granting access solely to the "Notification History" or "Task Queue."
- Implementing temporary roles with time-limited permissions for special projects, audits, or temporary staffing needs.
Conclusion
The Groups section in the PUQ Cloud Panel offers a robust and versatile solution for managing administrative roles and permissions. By leveraging its extensive customization options, organizations can create a secure, efficient, and well-organized administrative environment. The ability to configure nested groups, define granular permissions, and track activities ensures that every administrator operates within their designated scope, contributing to a streamlined and secure workflow.
Automation: Scheduler Overview
PUQcloud Panel
Order Now | Download | FAQ
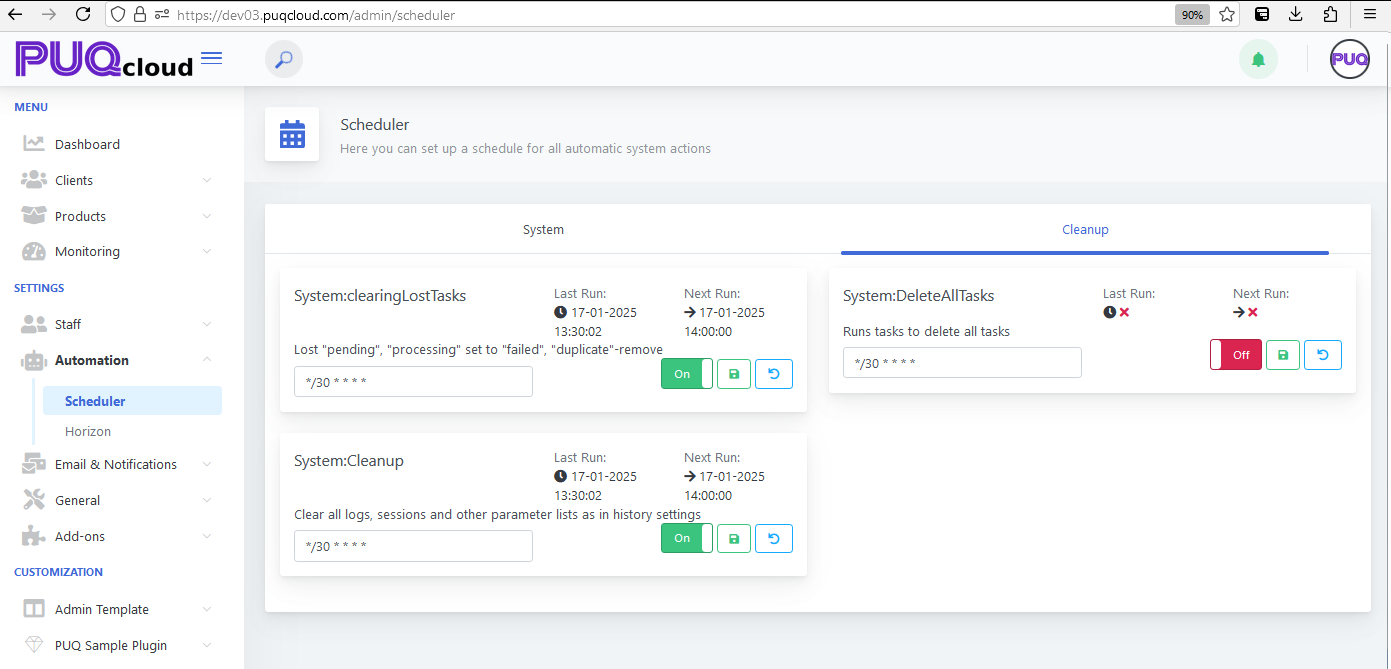
The "Scheduler" section in the PUQ Cloud Panel under Automation is a robust tool designed for managing automated tasks across the system. This feature ensures that routine operations are executed efficiently, consistently, and without manual intervention, enhancing overall system reliability and productivity.
Overview of Scheduler
Schedulers are configured instructions that automate specific system actions at defined intervals. These actions range from cleaning up logs and sessions to managing tasks and maintaining system performance. The Scheduler interface provides administrators with an intuitive and powerful way to oversee and adjust these automated operations.
Key Components
The Scheduler section is divided into multiple panels, each representing a category of tasks or system actions. The interface includes the following key elements:
- Task Name: Displays the name of the scheduled task, providing a clear understanding of its purpose (e.g., System:clearingLostTasks, System:Cleanup).
- Last Run: Indicates the most recent execution time of the task, allowing administrators to monitor activity and verify successful operation.
- Next Run: Shows the scheduled time for the task’s next execution, ensuring transparency in scheduling.
- Interval: Configurable time expressions (e.g., CRON syntax) that define the task’s execution frequency, such as every 30 minutes.
- Toggle Switch: Enables or disables specific tasks, giving administrators control over active automation processes.
- Reset Button: Allows administrators to reset task configurations to default settings if needed.
Functionality
The Scheduler enables administrators to configure and monitor automated tasks. Key functionalities include:
- Task Management: Administrators can view and modify task configurations, ensuring they align with operational requirements. Tasks such as clearing logs, processing pending tasks, or removing duplicates are standard examples.
- Custom Intervals: Using CRON expressions, administrators can define task frequencies with high precision, tailoring automation to the system’s specific needs.
- Error Handling: The interface highlights tasks that fail to execute, enabling prompt troubleshooting and minimizing disruptions to automation workflows.
- Comprehensive Status Indicators: Visual cues, such as icons and color coding, provide immediate insight into the task’s current state (e.g., pending, running, failed).
Use Cases
The Scheduler is versatile and supports various applications, including but not limited to:
- System Maintenance: Automating routine tasks like cleaning old logs and sessions ensures that the system remains efficient and clutter-free.
- Task Management: Handling recurring actions such as processing queued jobs or removing obsolete data to optimize system performance.
- Data Integrity: Regularly scheduled checks for duplicate entries or failed tasks help maintain data consistency and reliability.
Best Practices
To maximize the Scheduler’s efficiency, consider the following best practices:
- Define Clear Intervals: Use CRON expressions to set intervals that balance system performance with operational requirements.
- Monitor Task Execution: Regularly review the Last Run and Next Run fields to ensure tasks are executing as expected.
- Enable Relevant Tasks Only: Disable tasks that are not immediately needed to reduce system overhead and potential conflicts.
- Respond to Failures: Promptly address failed tasks by reviewing logs and troubleshooting issues to maintain system reliability.
Technical Details
Schedulers in the PUQ Cloud Panel utilize CRON syntax for time-based job execution. This provides flexibility in defining schedules, such as:
*/30 * * * *- Every 30 minutes0 2 * * *- Daily at 2 AM0 0 1 * *- Monthly on the first day
Each task is executed by the system’s job queue, ensuring tasks run sequentially and do not conflict with each other. Administrators can view detailed execution logs for each task in the Activity Log, aiding in diagnosing and optimizing automation processes.
Conclusion
The Scheduler is an indispensable tool in the PUQ Cloud Panel’s Automation suite, providing robust capabilities for managing system tasks with precision and efficiency. By leveraging its flexible configurations and monitoring features, organizations can automate repetitive tasks, enhance system performance, and focus on strategic initiatives. Its intuitive interface and powerful functionality make it a cornerstone of efficient system management.
Automation: Horizon Overview
PUQcloud Panel
Order Now | Download | FAQ
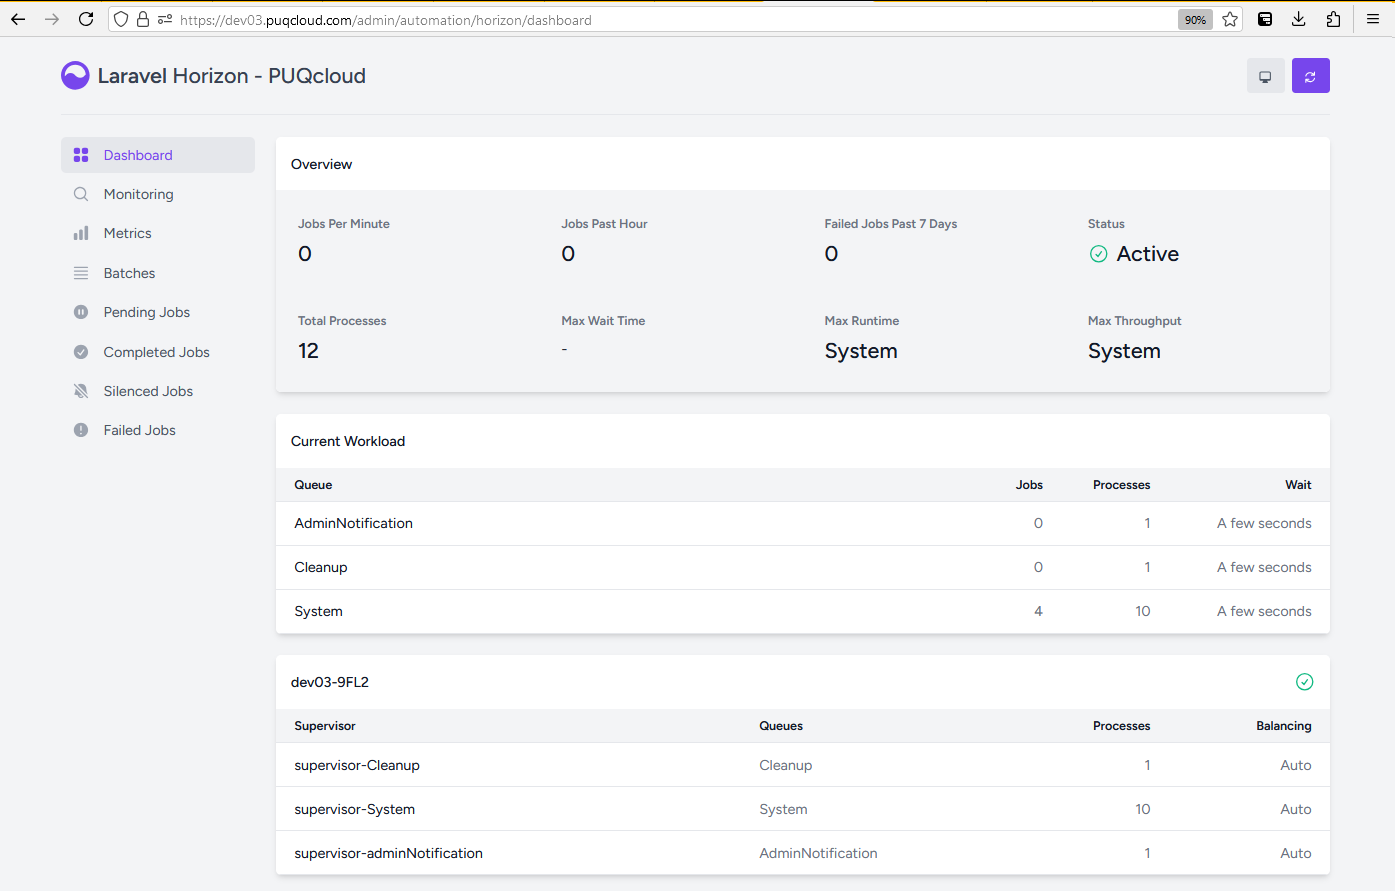
The Horizon module, integrated into the PUQ Cloud Panel under the Automation menu, serves as a sophisticated queue management and monitoring tool, leveraging the capabilities of Laravel Horizon. This module provides administrators with a robust interface to oversee and control background task execution, ensuring the system's optimal performance and reliability.
What is Laravel Horizon?
Laravel Horizon is a powerful open-source tool designed for monitoring and managing queues in applications built on the Laravel framework. It simplifies the process of overseeing jobs, provides detailed metrics, and allows for real-time monitoring of queue statuses. Horizon's intuitive dashboard offers administrators the ability to track job progress, identify bottlenecks, and optimize task processing in a seamless and efficient manner.
Key Features of Horizon in PUQ Cloud Panel
1. Real-Time Monitoring
The Horizon dashboard provides an overview of all queued tasks, their statuses, and associated metrics, such as:
- Jobs Per Minute: Displays the number of jobs processed in real-time.
- Total Processes: Indicates the total number of active processes handling queued tasks.
- Failed Jobs: Lists tasks that encountered errors during execution, enabling quick troubleshooting.
- Max Wait Time: Highlights the longest wait time for tasks in the queue.
- Status: Shows the overall activity status of the queue system (e.g., Active).
2. Queue Management
Within the PUQ Cloud Panel, Horizon facilitates efficient management of multiple queues, such as:
- AdminNotification: Handles notifications and alerts for administrators.
- Cleanup: Manages system maintenance tasks, such as clearing logs and sessions.
- System: Processes critical system tasks to ensure stability and performance.
Administrators can view the current workload for each queue, including the number of jobs, processes, and wait times, allowing for precise adjustments to queue configurations.
3. Supervisor Management
Horizon’s supervisor feature in the PUQ Cloud Panel enables administrators to assign and balance processes across queues. Supervisors can be configured to:
- Run specific queues, such as Cleanup or AdminNotification.
- Allocate a predefined number of processes to handle tasks efficiently.
- Automate load balancing for consistent performance across all queues.
4. Metrics and Statistics
Detailed metrics provided by Horizon help administrators analyze queue performance over time. These metrics include:
- Jobs Past Hour: Indicates the number of jobs processed in the last hour.
- Failed Jobs Past 7 Days: Offers insights into the stability and error rates of the system.
- Max Throughput: Tracks the system’s ability to handle tasks at peak load.
These statistics enable informed decision-making for system optimization.
5. Enhanced Debugging and Error Tracking
Horizon’s dashboard includes sections for reviewing:
- Pending Jobs: Tasks waiting to be processed.
- Completed Jobs: Successfully executed tasks.
- Failed Jobs: Errors encountered during job execution, with details for troubleshooting.
- Silenced Jobs: Jobs muted to avoid unnecessary alerts.
How Horizon is Used in PUQ Cloud
The Horizon module in PUQ Cloud is tailored to enhance the system’s automation capabilities by providing administrators with full control over background tasks. Key use cases include:
- System Maintenance: Scheduling and monitoring maintenance jobs, such as log cleanups and database optimizations.
- Notification Delivery: Ensuring timely dispatch of critical notifications to administrators or users.
- Error Resolution: Identifying and addressing issues in failed jobs to maintain service reliability.
- Performance Optimization: Analyzing queue metrics to adjust resource allocation and improve throughput.
Integration with PUQ Cloud Panel
The Horizon module seamlessly integrates with the PUQ Cloud Panel’s existing automation and monitoring features, creating a cohesive environment for managing system tasks. By providing real-time visibility and detailed analytics, Horizon ensures that the PUQ Cloud platform operates smoothly and efficiently.
Best Practices
To maximize the benefits of Horizon, administrators should:
- Regularly review queue statistics to identify and address performance bottlenecks.
- Optimize supervisor configurations to balance workloads effectively.
- Monitor failed jobs and implement fixes promptly to avoid service disruptions.
- Utilize metrics to forecast system requirements and scale resources accordingly.
Conclusion
The Horizon module is an indispensable tool within the PUQ Cloud Panel, providing unparalleled control and visibility over background task management. Its integration ensures that administrators can maintain system stability, optimize performance, and respond proactively to challenges, delivering a reliable and efficient platform for users.
Email & Notifications: Notification Senders Overview
PUQcloud Panel
Order Now | Download | FAQ
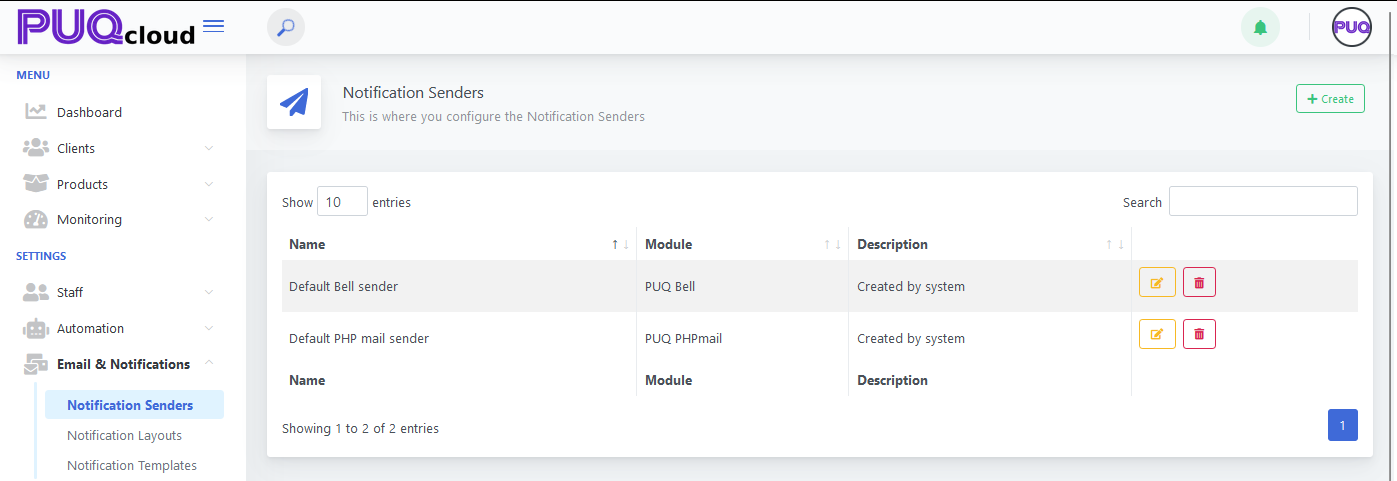
The Notification Senders section, located under Email & Notifications > Notification Senders, allows administrators to manage and configure modules responsible for sending notifications within the PUQ Cloud Panel. This section is a central hub for integrating, managing, and customizing notification delivery mechanisms. Each sender is tied to a specific module, providing flexibility and scalability in how notifications are handled.
Overview of the Notification Senders Page
The main page displays a list of available notification senders. Each entry includes the following attributes:
- Name: The name of the notification sender, providing an easily recognizable identifier for its function.
- Module: The specific module associated with the sender. For instance, modules such as PUQ Bell or PUQ PHPmail handle different notification delivery mechanisms.
- Description: A brief explanation, often set to "Created by system" for default senders.
The interface provides controls for managing senders:
- Edit: Opens the configuration page for the selected sender, allowing modifications.
- Delete: Removes the sender from the system, ensuring outdated or unused configurations do not clutter the interface.
Adding and Configuring Senders
By clicking the Create button, administrators can add new senders. The process involves selecting an appropriate module and providing necessary details based on the sender’s functionality. These configurations are tailored to the module’s capabilities, ensuring seamless integration with the system’s notification requirements.
Editing Notification Senders
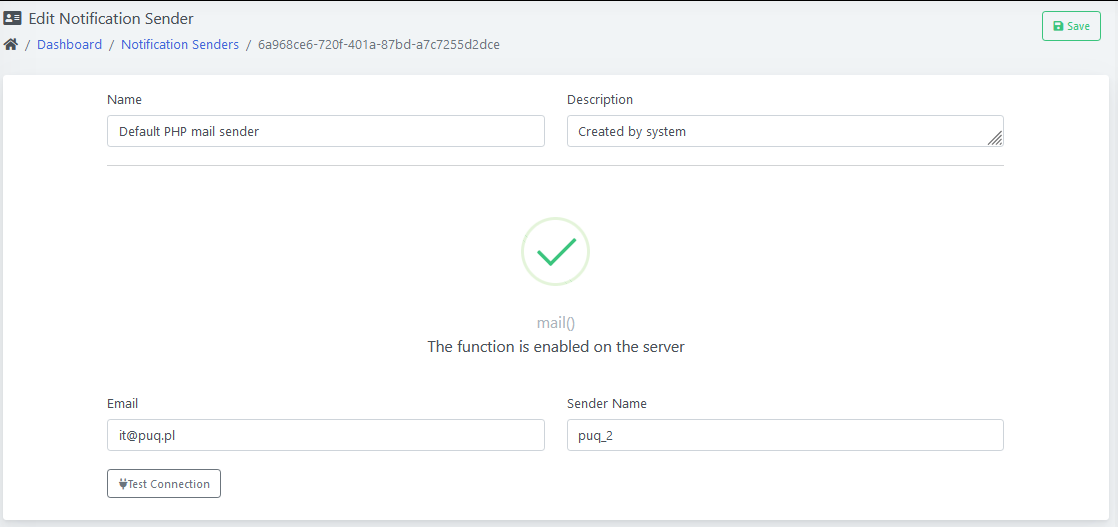
Clicking the Edit button for a specific sender opens its configuration page. This page is dynamically generated by the associated module and may include various fields and settings depending on the sender’s purpose. Examples of configurations that might appear include:
- Email Settings: SMTP details, sender address, and authentication credentials for email-based notification modules.
- API Keys: Required for senders integrating with external services such as Twilio, Slack, or other third-party platforms.
- Custom Fields: Specific to the module, such as templates, message formats, or delivery rules.
The flexibility of these configurations ensures that each sender can be optimized to meet organizational requirements without affecting others.
Technical Details
The notification senders in PUQ Cloud Panel are modular by design. Each sender represents an independent module that integrates into the system’s notification framework. These modules handle the following core tasks:
- Message Formatting: Crafting notification messages in the required format, whether it is plain text, HTML, or a structured template.
- Delivery Mechanism: Handling the technical aspects of sending notifications, such as interacting with mail servers, pushing notifications to user devices, or sending API requests to external services.
- Error Handling: Logging failures and retrying delivery where necessary, ensuring reliable communication.
Integration with Notification Modules
Notification senders rely on the underlying modules to define their behavior. Each module implements the logic for its specific notification channel. Examples include:
- PUQ Bell: Handles internal system notifications, such as user alerts or task reminders, displayed within the PUQ Cloud Panel interface.
- PUQ PHPmail: A lightweight module for sending notifications via PHP’s mail function, suitable for basic email setups.
- Third-Party Integrations: Modules like Twilio or SendGrid extend functionality to external platforms, enabling SMS, push notifications, or advanced email services.
Usage and Best Practices
To maximize the effectiveness of the Notification Senders feature, consider the following best practices:
- Keep Configurations Up-to-Date: Regularly review and update sender settings to reflect changes in organizational needs or external service providers.
- Monitor Performance: Use system logs and dashboards to track delivery success rates and address issues promptly.
- Leverage Modular Flexibility: Enable or disable senders based on current requirements, ensuring only active channels consume system resources.
Conclusion
The Notification Senders section in PUQ Cloud Panel provides a robust framework for managing communication channels within the system. By leveraging modular integration, administrators can ensure that notifications are delivered effectively, tailored to specific needs, and aligned with organizational goals. The flexibility to configure, edit, and expand notification senders empowers organizations to maintain a streamlined and responsive communication strategy.
Email & Notifications: Notification Layouts Overview
PUQcloud Panel
Order Now | Download | FAQ
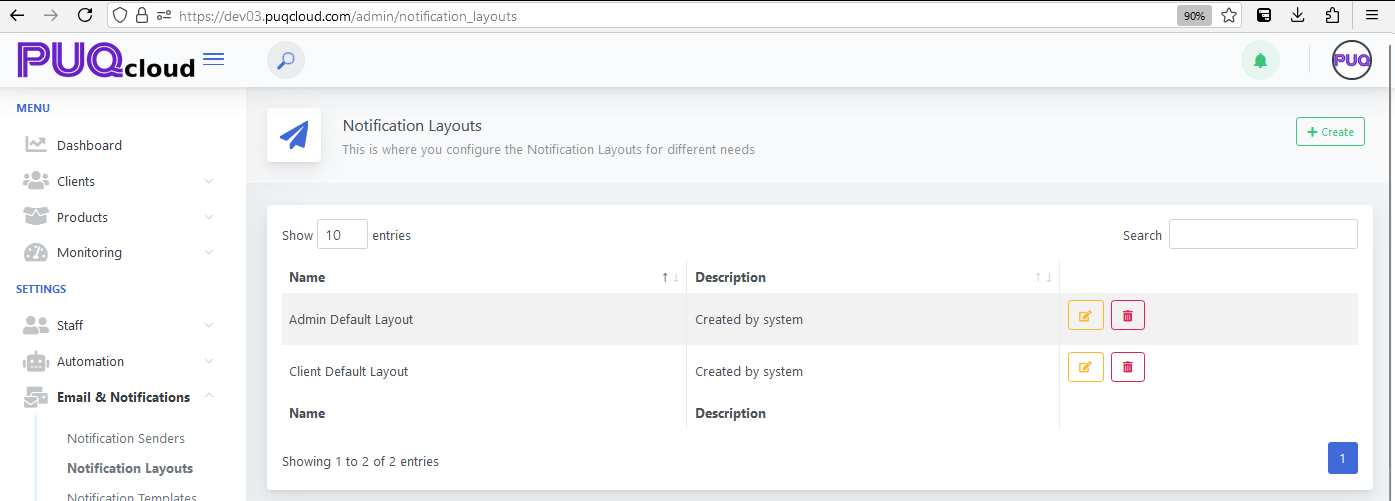
The Notification Layouts section within the PUQ Cloud Panel, located under Settings > Email & Notifications, is a crucial feature for managing the design and structure of notifications sent through the system. This section provides the tools necessary for creating, editing, and deleting notification layouts, which serve as the foundation for email or system notifications. These layouts ensure consistent branding, readability, and functionality across all communication channels.
Overview of Notification Layouts
Upon accessing the Notification Layouts page, users are presented with a table that displays the following details for each layout:
- Name: The unique identifier for the layout, such as "Admin Default Layout" or "Client Default Layout."
- Description: A brief explanation of the layout’s purpose or its creation context, e.g., "Created by system."
The interface allows for efficient management of layouts with the following actions:
- Create New Layouts: Add a new notification layout tailored to specific branding or communication needs.
- Edit Existing Layouts: Modify the content or structure of an existing layout to adapt to evolving requirements.
- Delete Layouts: Remove unused or obsolete layouts to maintain clarity and organization.
Detailed Breakdown of the Layout Editing Page
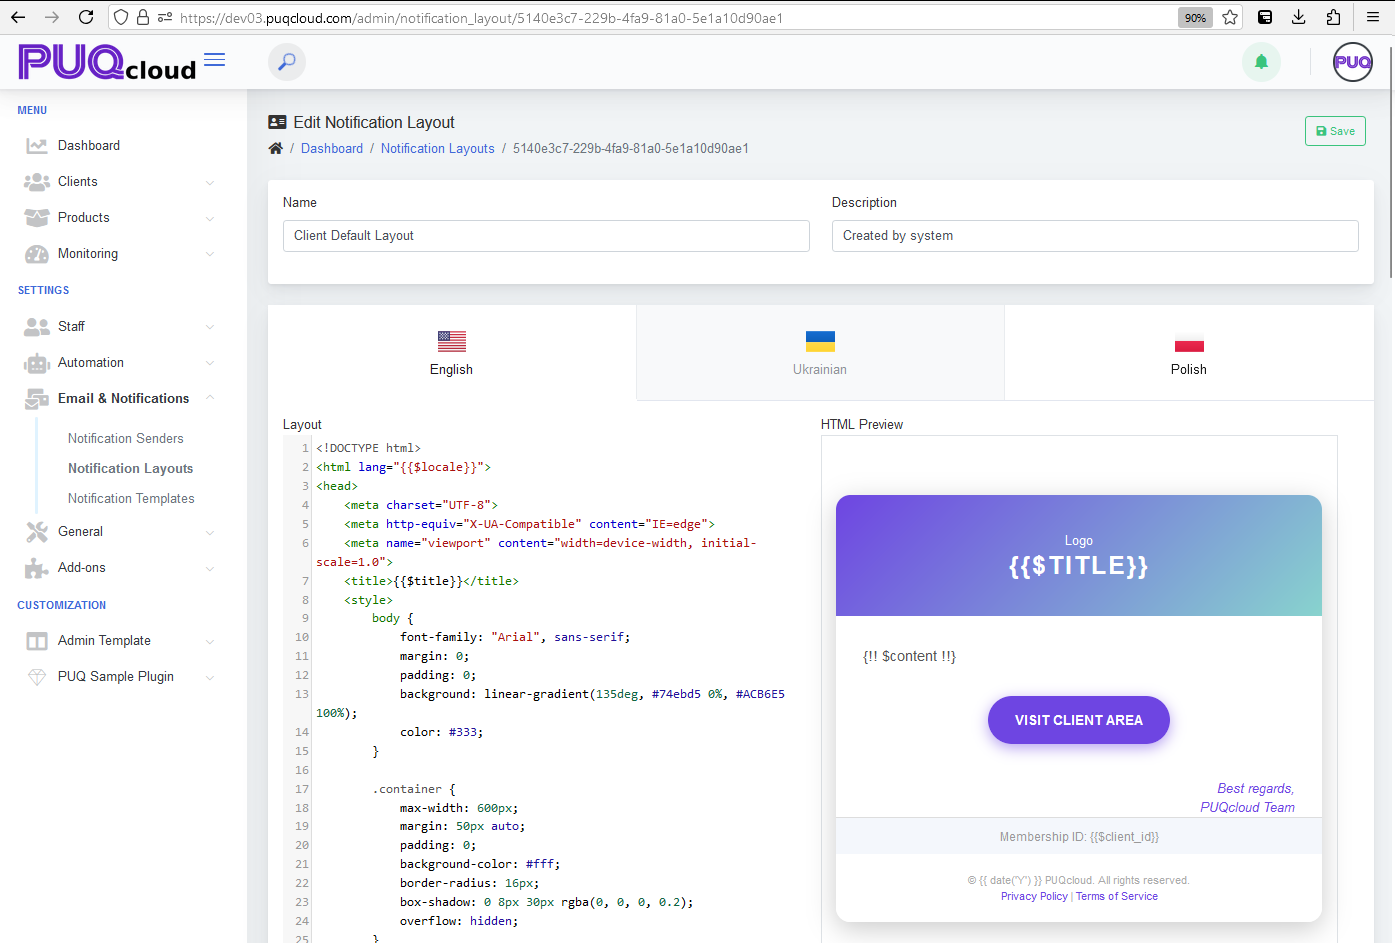
Clicking the edit button for a layout opens a detailed editor. The editor is divided into sections for configuring the layout’s content and appearance. Key features of the editing page include:
1. General Information
- Name: The editable name of the layout, which helps identify its purpose or scope.
- Description: A text field for providing a brief summary of the layout’s role or customization details.
2. Language Support
The layout editor supports multiple languages, aligned with the languages configured in the PUQ Cloud Panel. Users can toggle between language tabs (e.g., English, Ukrainian, Polish) to customize the content for specific audiences, ensuring localization and inclusivity in communication.
3. Code Editor
The primary area of the editor contains a robust HTML code editor, where users can:
- Write or Modify Code: Directly input HTML and CSS to define the layout structure and styles.
- Utilize Dynamic Variables: Integrate placeholders like
{{ $title }}or{{!! $content !!}}to dynamically populate content during runtime. - Preview Changes in Real-Time: As users update the code, the right-hand panel displays a live preview of the layout, allowing for immediate feedback on design adjustments.
4. Real-Time HTML Preview
On the right-hand side of the editor, the live preview provides a visual representation of the layout, showcasing how the notification will appear to recipients. This feature enhances the design process by reducing errors and improving efficiency.
Advanced Features and Flexibility
The Notification Layouts section is built to accommodate diverse organizational needs with advanced features:
- Custom Styling: Leverage inline CSS and advanced design techniques to create visually appealing notifications.
- Template Sharing: Easily duplicate layouts for reuse or share them across different modules and use cases.
- Integration with Notification Templates: Use layouts as a foundation and pair them with notification templates to deliver tailored messages with consistent design.
Use Cases and Benefits
The Notification Layouts feature is highly versatile, offering solutions for various communication scenarios:
- Branded Notifications: Ensure all emails and system notifications align with organizational branding guidelines.
- Localized Communication: Provide content in multiple languages to cater to diverse user bases.
- Efficient Design Management: Centralize the management of notification designs, reducing development overhead.
Conclusion
The Notification Layouts section in the PUQ Cloud Panel empowers administrators to design, customize, and manage notification layouts effectively. By providing a comprehensive editing interface with live preview capabilities and multilingual support, this feature ensures organizations can deliver consistent, professional, and localized communication to their users. Its integration with other notification tools within the panel further enhances its utility, making it an indispensable component of the PUQ Cloud ecosystem.
Email & Notifications: Notification Templates
PUQcloud Panel
Order Now | Download | FAQ
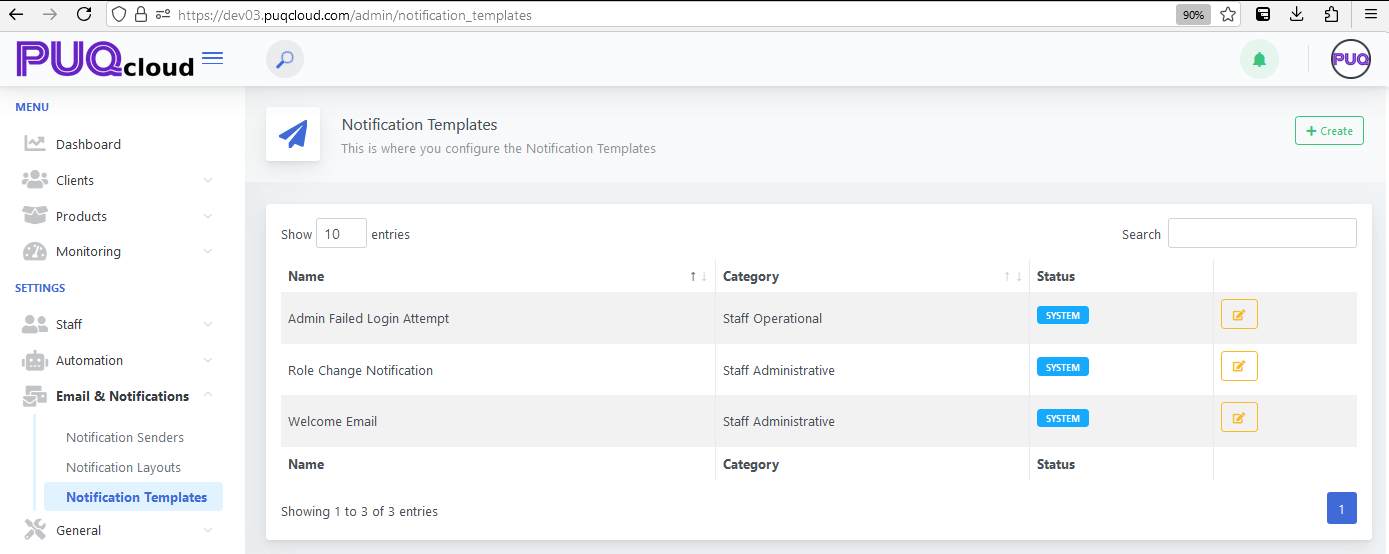
The "Notification Templates" section in the PUQ Cloud Panel under Email & Notifications is designed for creating and managing the content of emails and notifications that the system sends to clients and staff. This feature allows administrators to customize the content, structure, and language of templates to align with business needs.
Main Page Overview
The main Notification Templates page displays a table with the following details:
-
Name: The title of the notification template, such as "Admin Failed Login Attempt" or "Welcome Email."
-
Category: Specifies the type of notification, such as "Staff Operational" or "Staff Administrative."
-
Status: Indicates whether the template is a system default or custom. System templates are pre-configured and may require administrative privileges for modification.
-
Actions:
-
Edit: Opens the template editor for customizing content and settings.
-
Delete: Removes the template from the system, ensuring it is no longer used for notifications.
-
The page also features a Create button that allows administrators to design new notification templates from scratch. Additionally, the search bar enables users to quickly locate templates by name or category.
Editing a Notification Template
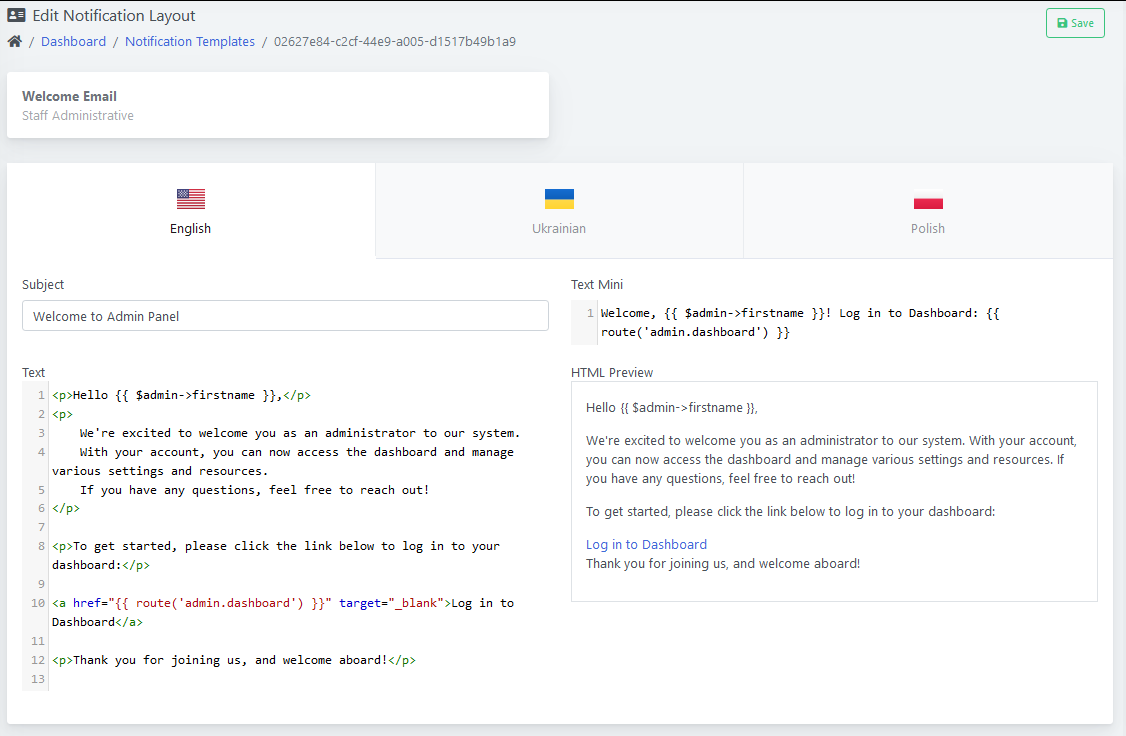
Upon clicking the edit button for a template, the user is taken to the Edit Notification Template page, which is divided into the following sections:
1. General Information
-
Name: The title of the template, editable to reflect its purpose.
-
Category: Defines the operational context of the notification, ensuring it aligns with organizational workflows.
2. Language Support
The editor supports all languages configured in the PUQ Cloud Panel, enabling multi-language customization for global audiences.
-
Tabs for Each Language: Users can switch between languages (e.g., English, Ukrainian, Polish) to define specific content for each locale.
-
This ensures that recipients receive notifications in their preferred or configured language, enhancing clarity and user experience.
3. Content Sections
-
Subject: The title or subject line of the email/notification. This field is crucial for capturing the recipient's attention.
-
Text:
-
Full Text: Designed for long-form notifications, such as emails. It supports rich formatting and HTML for creating visually appealing messages.
-
Mini Text: A condensed version of the message, used for SMS, in-app notifications, or alerts in the panel's notification bell. This ensures brevity while conveying essential information.
-
4. HTML Preview
On the right-hand side, an HTML Preview dynamically updates as the user modifies the template content. This real-time feature allows administrators to see how the notification will appear to recipients, reducing the likelihood of formatting errors.
Customization Examples
-
Welcome Email:
-
Full Text: Provides a detailed message welcoming new administrators, including a link to log in and additional guidance.
-
Mini Text: A short notification stating, "Welcome, [Admin Name]! Log in to your dashboard here: [Link]."
-
-
Admin Failed Login Attempt:
-
Full Text: Alerts the administrator with details of the failed login, including the time, IP address, and username.
-
Mini Text: "Failed login detected for [Username]. Check logs for details."
-
Benefits of Multi-Language and Dual-Text Support
-
Global Reach: Ensures inclusivity and effective communication with a diverse user base.
-
Adaptability: Provides flexibility for various notification channels, from detailed emails to succinct SMS messages.
-
Real-Time Feedback: The preview pane eliminates the need for external tools, streamlining the editing process.
Best Practices for Using Notification Templates
-
Define Clear Categories: Organize templates into logical categories to improve manageability and consistency.
-
Leverage Language Tabs: Ensure all supported languages have accurate and professional translations.
-
Utilize Previews: Regularly review the HTML preview to confirm alignment, font styles, and overall layout.
-
Test Templates: Send test notifications to validate how they appear in different channels, such as mobile devices and email clients.
Conclusion
The Notification Templates feature in the PUQ Cloud Panel is a powerful tool for creating tailored notifications that enhance communication and user experience. With its multi-language support, dual-text options, and dynamic preview, administrators can efficiently manage and optimize system notifications to meet organizational and user expectations.
General: General Settings
PUQcloud Panel
Order Now | Download | FAQ
The "General" section of the PUQ Cloud Panel, found under Settings > General, provides essential configurations for the system's operation. This section is divided into two main tabs: Time Based and Social. Each tab offers specific fields and settings tailored for managing system logs and social media integration.
Time Based Tab
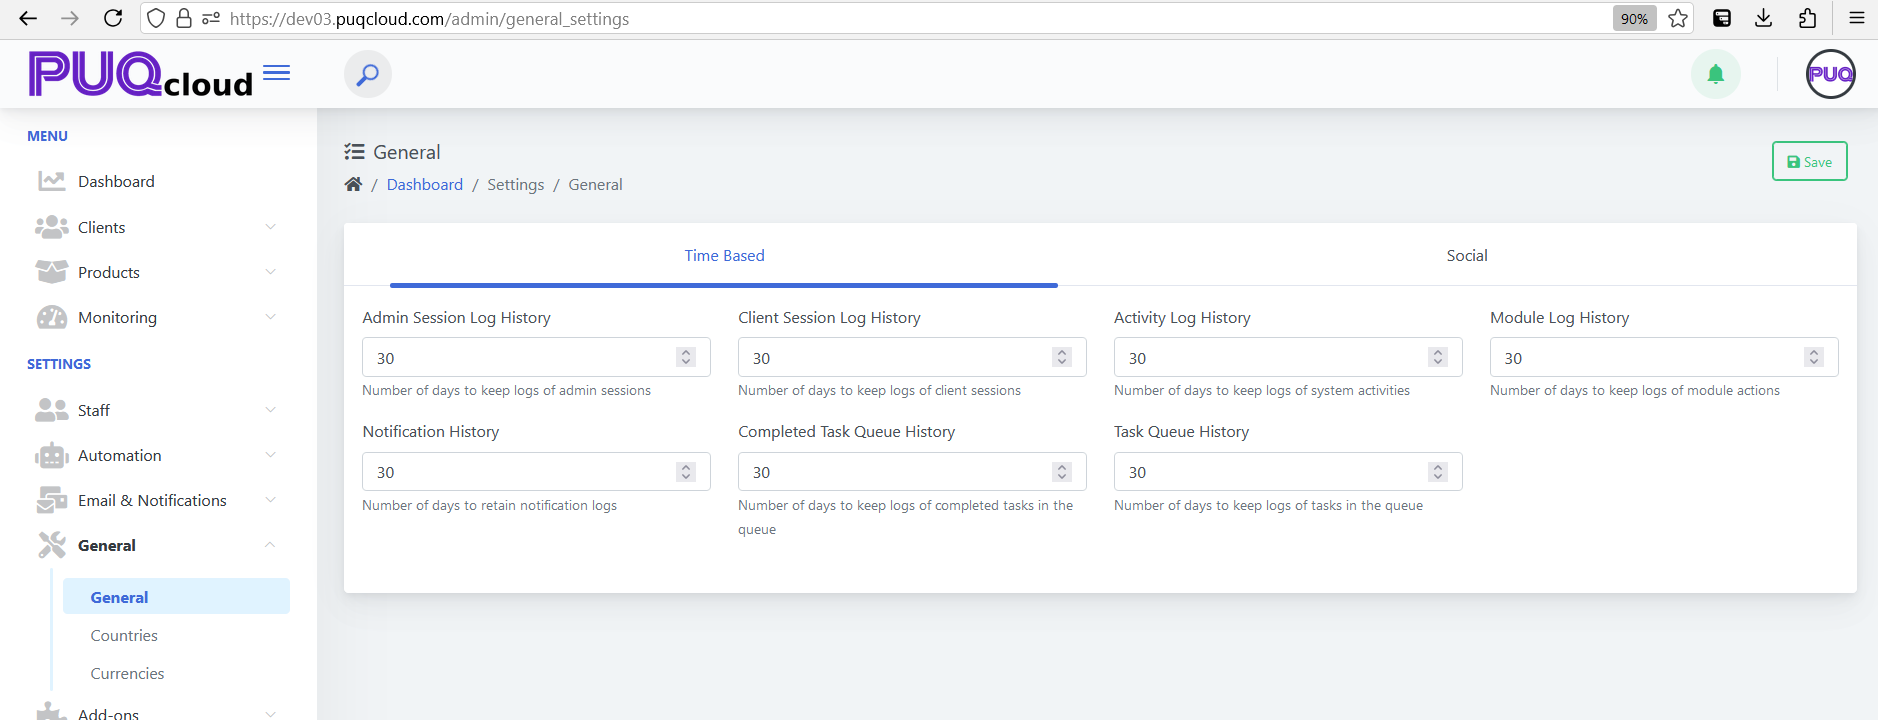
The Time Based tab focuses on defining retention periods for various logs and histories. This ensures efficient management of data while maintaining system performance and compliance requirements. Below are the fields and their functions:
- Admin Session Log History:
- Description: Sets the number of days to retain logs of administrator sessions.
- Purpose: Useful for auditing administrator activities and maintaining a history of access logs.
- Client Session Log History:
- Description: Specifies the retention period for logs of client sessions.
- Purpose: Enables tracking and reviewing client access for operational and security purposes.
- Activity Log History:
- Description: Determines how long system activity logs are stored.
- Purpose: Helps monitor system-wide events and troubleshoot issues effectively.
- Module Log History:
- Description: Defines the retention duration for logs related to module actions.
- Purpose: Essential for reviewing module performance and debugging.
- Notification History:
- Description: Configures the number of days to keep logs of notifications sent by the system.
- Purpose: Ensures accountability and helps resolve notification-related issues.
- Task Queue History:
- Description: Specifies how long task queue logs should be retained.
- Purpose: Provides insights into task executions and supports debugging.
- Completed Task Queue History:
- Description: Sets the retention period for completed tasks in the queue.
- Purpose: Helps maintain an overview of successfully executed tasks.
Social Tab
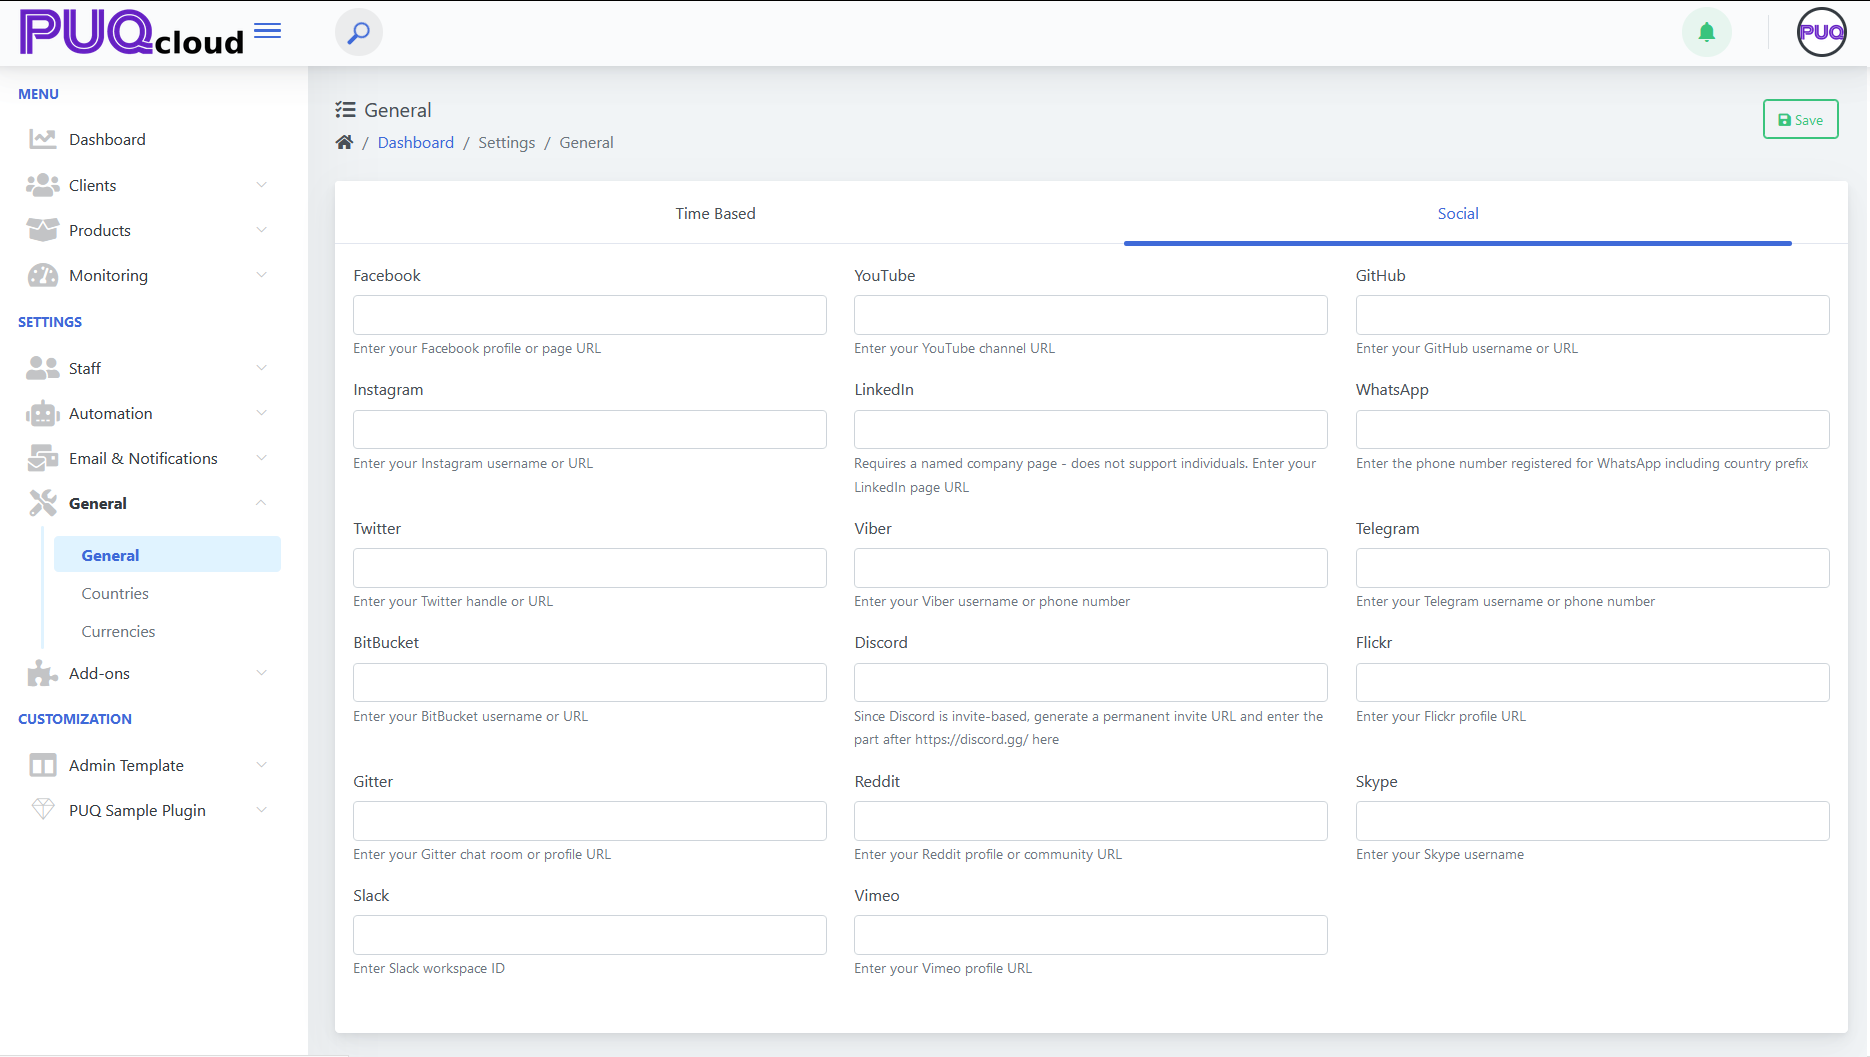
- Facebook: Enter the profile or page URL.
- Instagram: Provide the username or profile link for Instagram.
- Twitter: Add the Twitter handle or URL.
- YouTube: Include the channel URL for YouTube.
- LinkedIn: Enter the company page URL for LinkedIn. (Individual profiles are not supported.)
- GitHub: Provide the GitHub username or profile link.
- WhatsApp: Specify the registered phone number for WhatsApp, including the country code.
- Telegram: Input the Telegram username or phone number.
- Viber: Enter the Viber username or phone number.
- Discord: Provide the invite URL for Discord servers or groups.
- Reddit: Add the profile or community URL for Reddit.
- Flickr: Include the profile link for Flickr.
- Skype: Specify the Skype username.
- Slack: Enter the Slack workspace ID.
- BitBucket: Add the username or URL for BitBucket.
- Gitter: Provide the Gitter chat room or profile URL.
- Vimeo: Include the profile URL for Vimeo.
Conclusion
The "General" section is pivotal for configuring the system's operational and social settings. With its comprehensive fields in Time Based and Social tabs, administrators can maintain optimal log retention policies and integrate social platforms seamlessly. This ensures streamlined operations and enhanced connectivity with clients and stakeholders.
General: Countries
PUQcloud Panel
Order Now | Download | FAQ
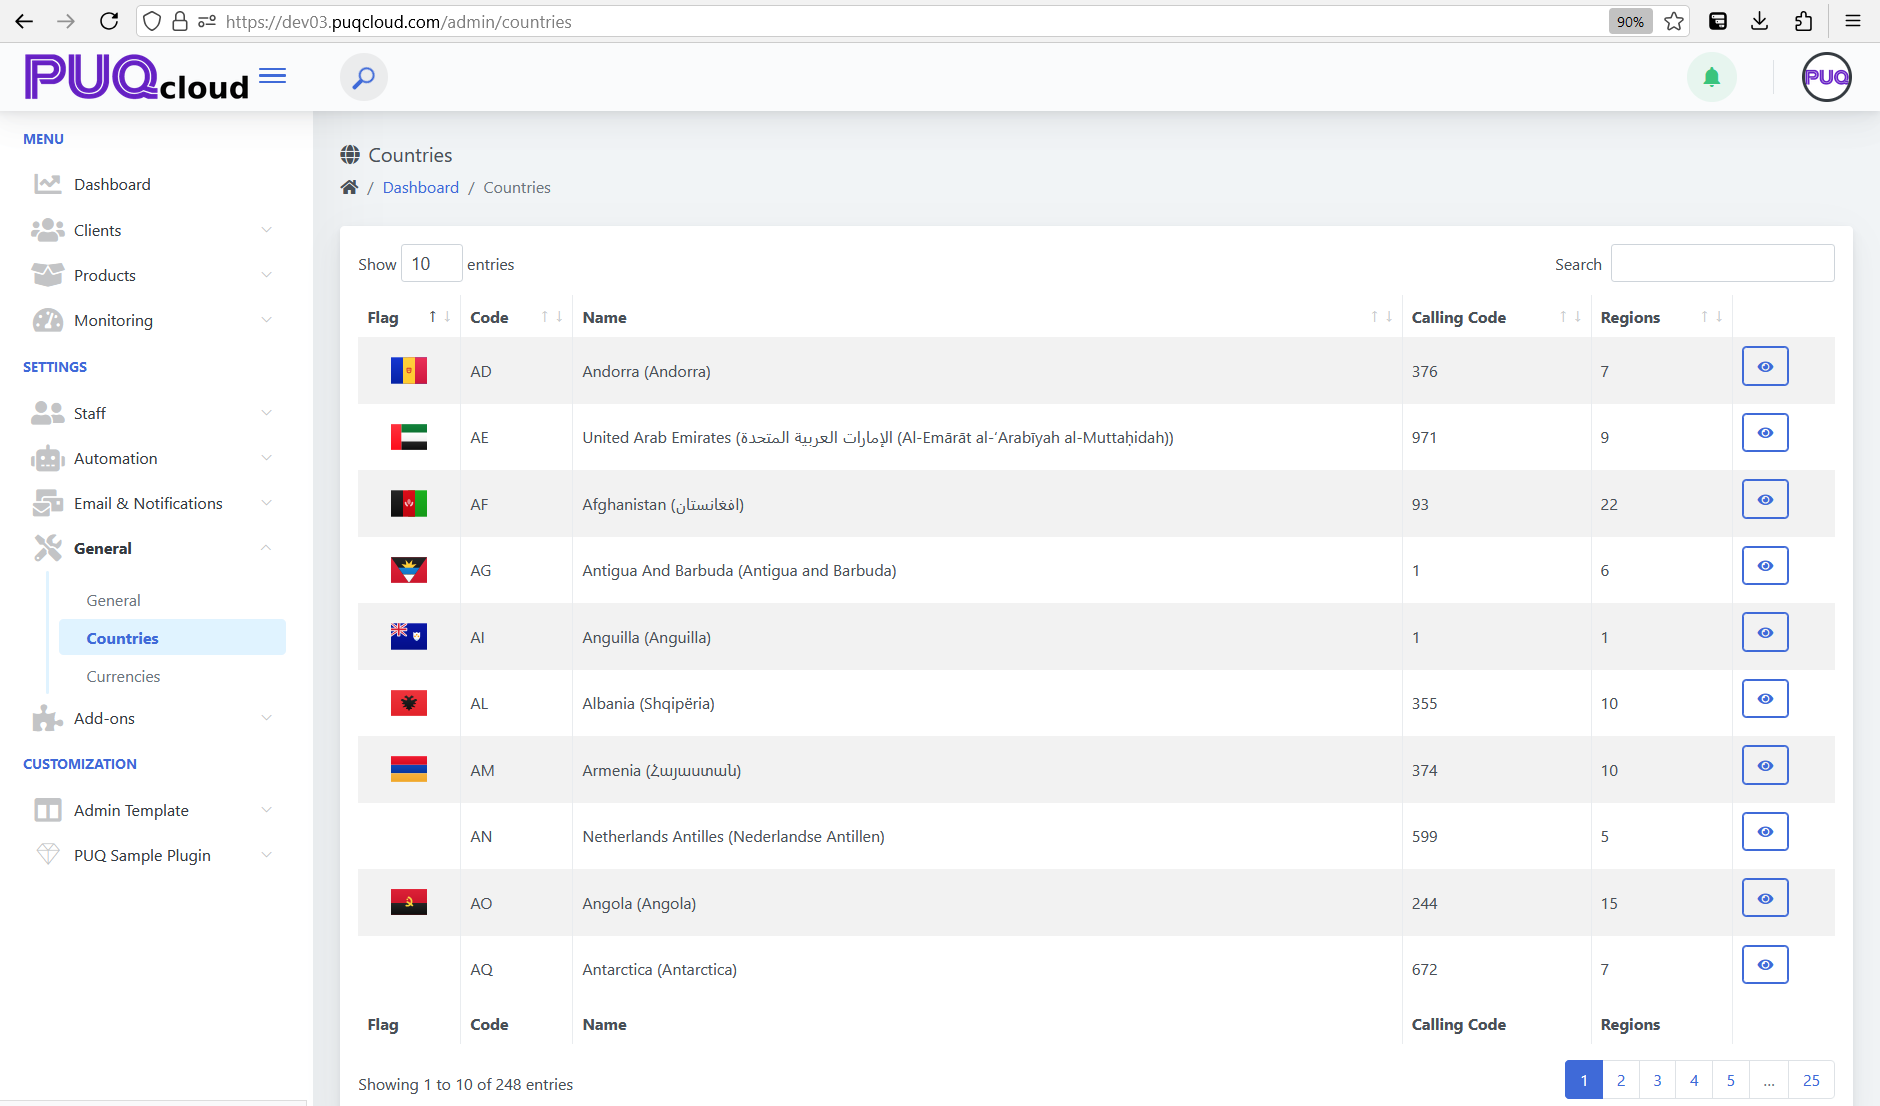
The "Countries" section within the General menu of the PUQ Cloud Panel provides a comprehensive overview and management interface for countries recognized by the system. This section plays a crucial role in enabling accurate regional settings, localized configurations, and communication requirements for various modules and functionalities.
Overview
The "Countries" section displays a list of countries with the following details for each entry:
- Flag: A visual representation of the country’s flag, aiding in quick identification.
- Code: The standardized two-letter ISO code for the country, essential for international referencing.
- Name: The full name of the country in English, often accompanied by the native script if applicable. This ensures clarity and inclusivity for multilingual users.
- Calling Code: The international dialing code for the country, utilized for telecommunications and notification modules involving phone numbers.
- Regions: The number of administrative or geographical regions associated with the country, facilitating detailed localization and specific targeting.
Features and Functionalities
- Pagination: The list supports pagination, as indicated by the numbered pages at the bottom. This allows users to navigate through a large dataset efficiently, especially when managing entries for all 248 countries.
- Search Functionality: A search bar is available in the top-right corner, enabling quick filtering of countries by any visible attribute such as name, code, or calling code.
- Detailed View: Each country entry includes an action button (“View”) on the far-right side, allowing administrators to access additional information or modify region-specific settings.
Purpose and Usage
The "Countries" section is primarily utilized for:
- Localization: Configuring system behavior and settings based on the user’s or client’s geographic location.
- Telecommunications: Using calling codes for notifications, SMS, or VoIP integrations.
- Region Management: Associating regions with countries for more granular control over localization requirements.
Integration with Other Modules
This section is tightly integrated with other functionalities in the PUQ Cloud Panel. For example:
- The "Currencies" section utilizes country data to associate specific currencies with respective countries.
- The "Notification" module may leverage calling codes when sending SMS or other notifications to users.
Details from Files
Based on the project files:
- Data Source: The country list is pre-populated based on the ISO 3166 standard, ensuring comprehensive global coverage and compatibility with international systems.
- Customization: Administrators can modify region-related data and link custom functionalities or modules to specific countries, enhancing flexibility.
- Scalability: The system supports the addition of new countries or regions if required, ensuring adaptability to future needs.
Conclusion
The "Countries" section in the PUQ Cloud Panel is a vital feature that underpins the system’s localization and internationalization capabilities. Its user-friendly interface, combined with robust integration and customization options, ensures seamless management of country-specific settings across various modules. This flexibility and comprehensiveness make it an indispensable tool for administrators managing a globally diverse user base.
General: Currencies
PUQcloud Panel
Order Now | Download | FAQ
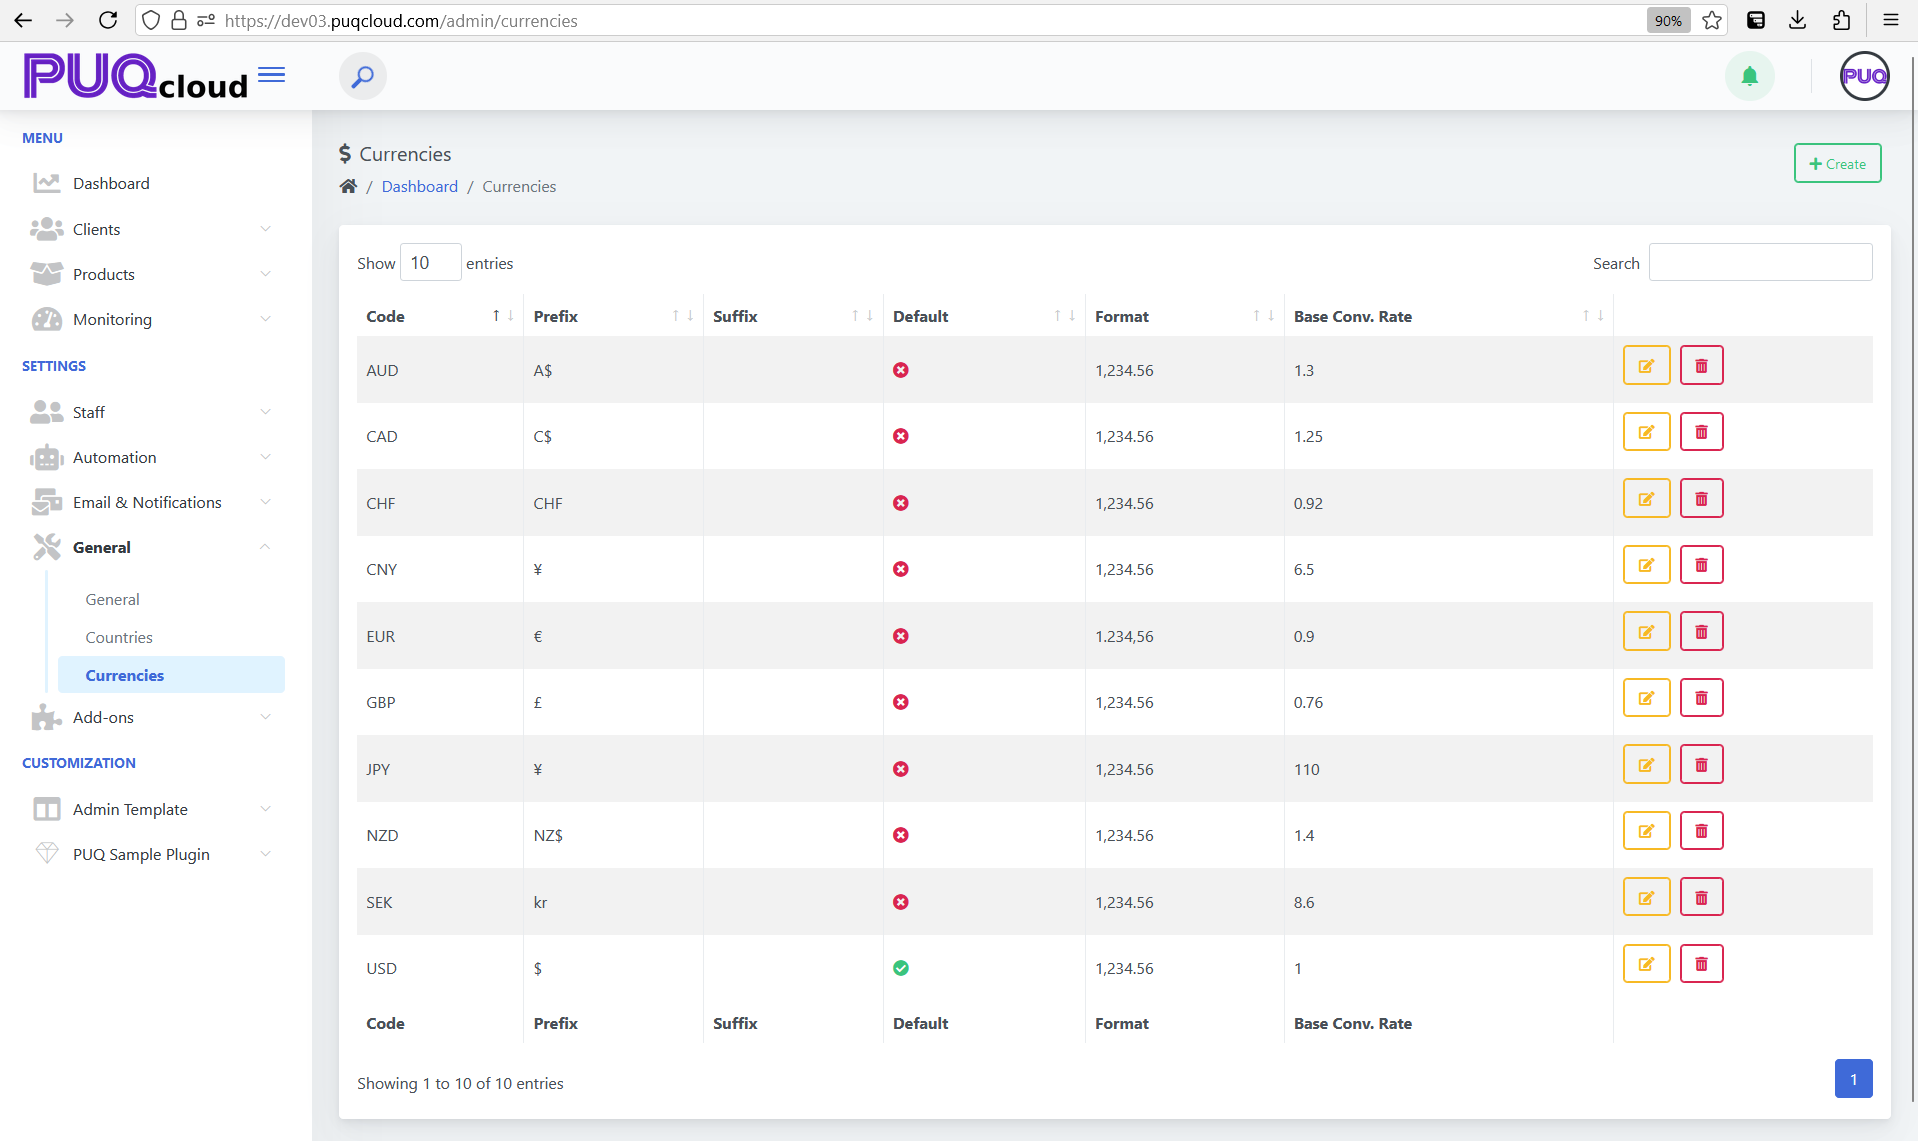
The "Currencies" section under General in the PUQ Cloud Panel provides a comprehensive interface for managing currency settings used across the system. This section allows administrators to configure, edit, and manage multiple currencies efficiently. Below is a detailed explanation of the interface and its functionalities as seen in the provided screenshot.
Overview of the Currencies Table
The main table displays all available currencies with the following columns:
- Code: The ISO 4217 currency code (e.g., USD for US Dollar, EUR for Euro) used as a unique identifier for each currency.
- Prefix: The symbol or text that appears before the currency amount (e.g., $ for USD, € for EUR).
- Suffix: Optional text or symbols displayed after the currency amount.
- Default: Indicates the system's primary currency. Only one currency can be marked as default at a time. The default currency is highlighted with a green checkmark, while others show a red cross.
- Format: Displays the numerical formatting style for currency values (e.g., "1,234.56" or "1.234,56"). This ensures clarity for different regional preferences.
- Base Conversion Rate: The conversion rate relative to the default currency. For example, if USD is the default currency and the rate for EUR is 0.9, then 1 EUR equals 0.9 USD.
- Actions: Provides options to Edit or Delete a currency. Editing allows administrators to update any field, while deleting removes the currency from the system.
Functionalities
The "Currencies" section supports the following key functionalities:
- Adding a New Currency:
- Administrators can add a new currency by clicking the "+ Create" button in the top-right corner.
- This opens a form where all required fields, including Code, Prefix, Suffix, Format, and Base Conversion Rate, can be specified.
- Editing Existing Currencies:

- Clicking the yellow "Edit" button allows administrators to modify any attribute of a currency. This is particularly useful for updating conversion rates or changing format styles.
- The editing form contains the following fields:
- Code: The ISO 4217 code for the currency.
- Prefix: Symbol or text displayed before the currency value.
- Suffix: Text or symbols displayed after the currency value.
- Exchange Rate: The conversion rate relative to the default currency.
- Format: Choose the numerical format for currency values (e.g., "1,234.56").
- Default: Checkbox to set the currency as the default.
- Deleting Currencies:
- The red "Delete" button permanently removes a currency from the system. This action is irreversible and should be performed with caution.
- Setting the Default Currency:
- Administrators can designate a currency as the default by editing it and enabling the "Default" option. This currency will be used as the base for all conversion calculations.
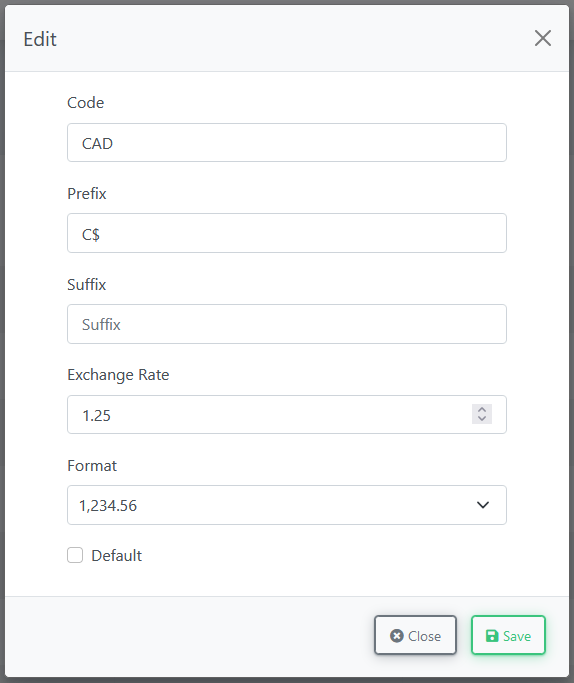
Key Details
The "Currencies" section is designed to handle multiple use cases, including:
- Multi-Currency Support: Enable businesses to operate in different regions by offering localized pricing.
- Custom Formatting: Adapt currency displays to match user expectations based on locale and regional standards.
- Efficient Management: Streamline the process of maintaining up-to-date exchange rates and ensuring accurate financial records.
Conclusion
The "Currencies" section in the PUQ Cloud Panel provides a robust and user-friendly interface for managing financial settings. Its ability to support multiple currencies, coupled with flexible formatting options and seamless integration, makes it an essential tool for businesses operating in global markets. By leveraging this section, administrators can ensure consistent and accurate currency handling across the system.
How to use Admin Area in PUQcloud Panel
Manage Dashboard
PUQcloud Panel
Order Now | Download | FAQ
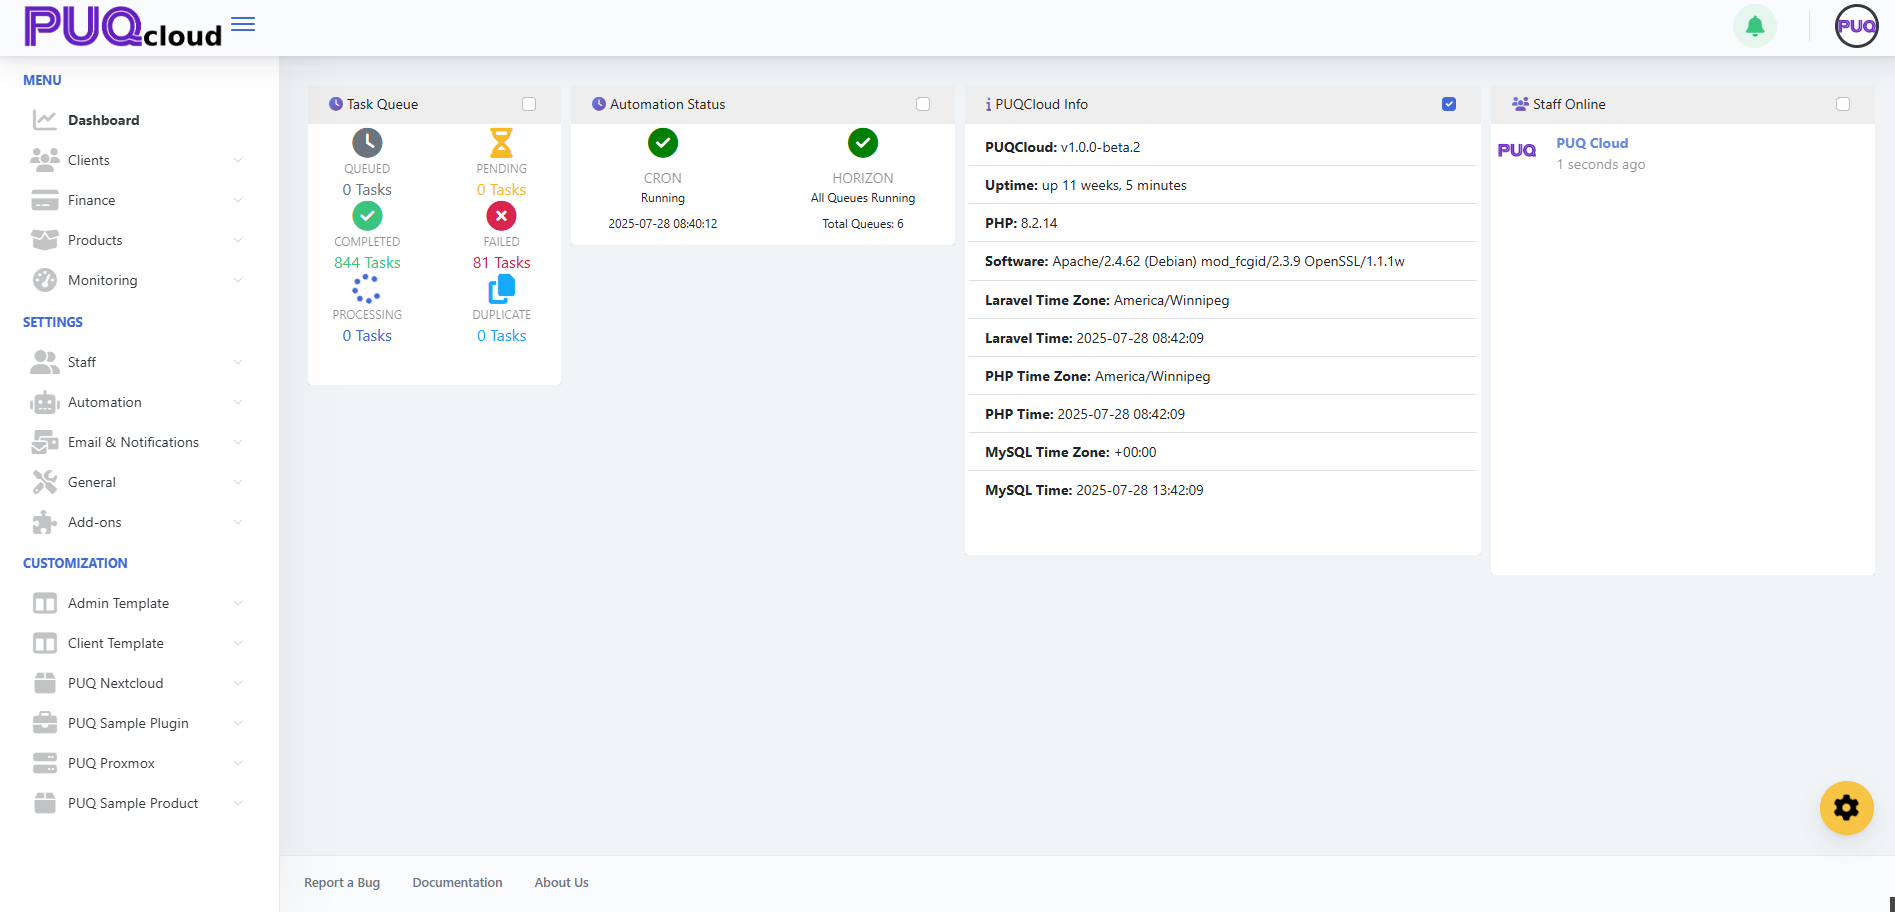
On the PUQcloud dashboard, you can see basic information such as:
-
Task Queue – Live information about all task statuses, including Queued, Pending, Completed, Failed, Processing, and Duplicate.
-
Automation Status – Information about Cron and Horizon statuses.
-
PUQcloud Info – General information about the panel.
-
Staff Online – A list of currently online staff members.
You can also manage the widgets on the dashboard.
Click the gear icon in the bottom-left corner.
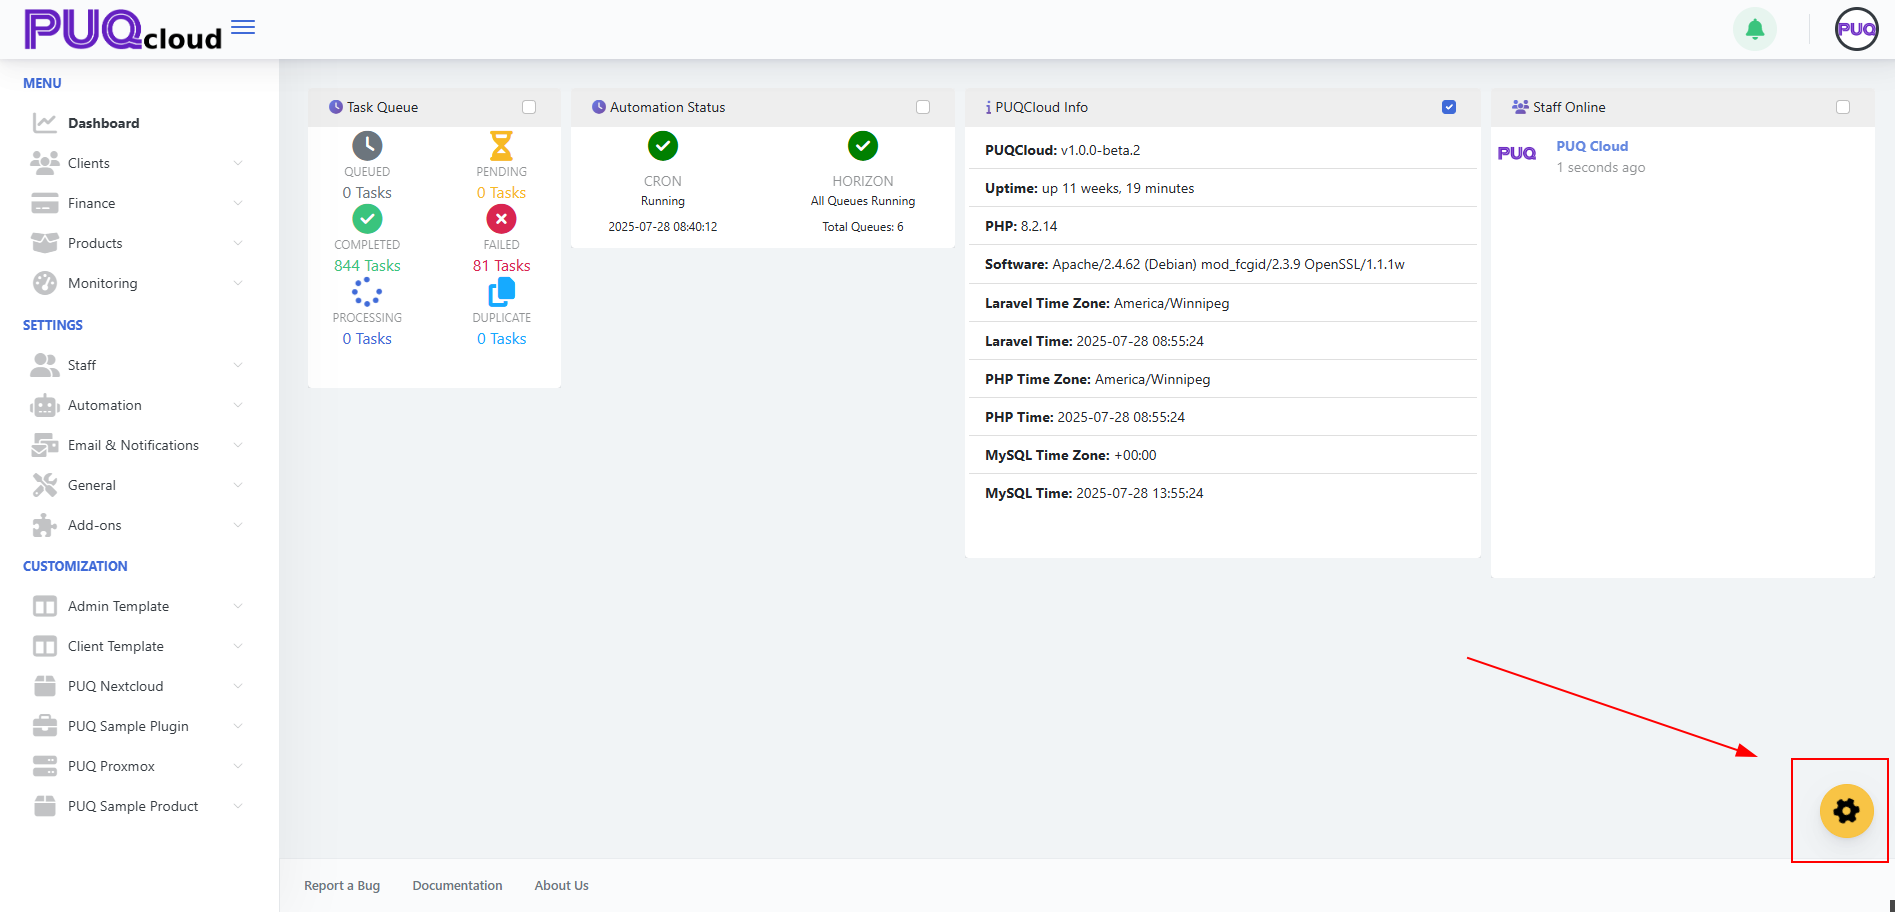
Toggle widgets on or off as needed.
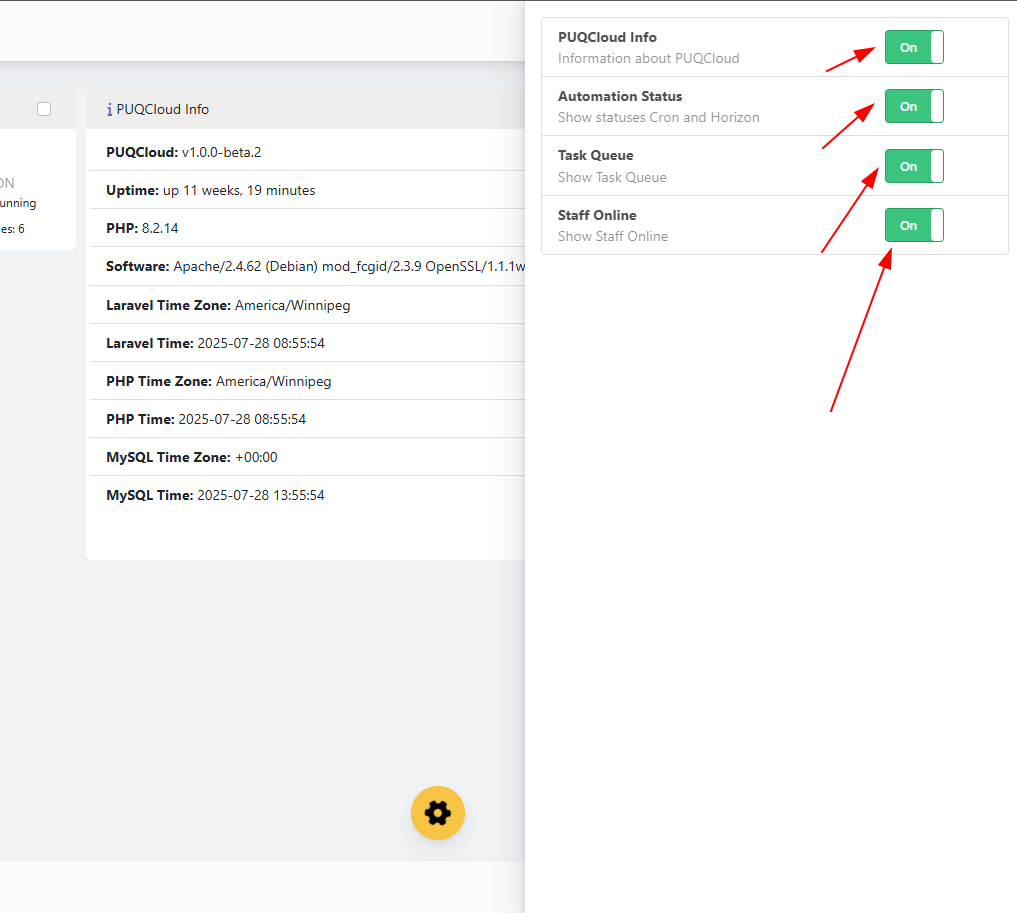
You can also rearrange any widget by simply dragging it to your preferred location.
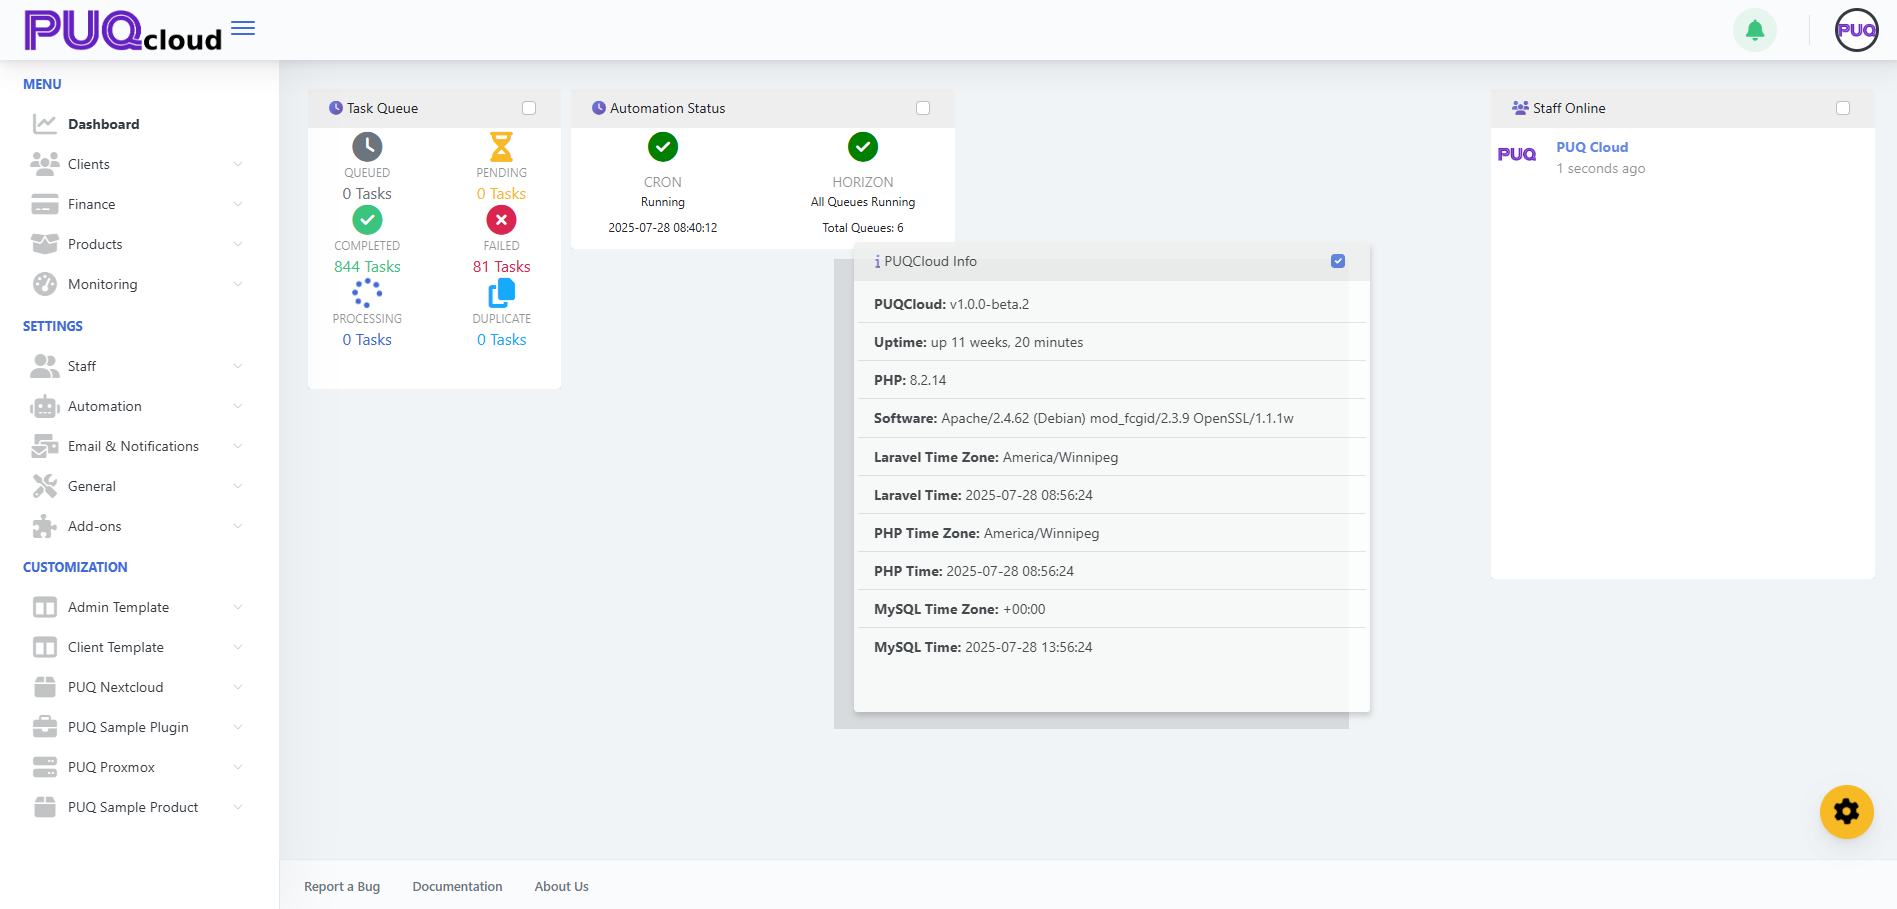
Create and manage Clients
PUQcloud Panel
Order Now | Download | FAQ
Overview
This guide shows administrators how to create new clients and manage existing ones in PUQcloud Panel. You’ll learn where to find client records, how to add a client, attach users and addresses, and how to handle services, invoices, and transactions.
Key Features
-
Centralized client directory with search, sort, and status badges.
-
Full client profile: personal/company info, language, currency, tax ID, credit limit, admin notes.
-
Addresses management: billing/shipping, multiple entries, default flags.
-
Users & permissions: associate users to the client and grant granular rights.
-
Services lifecycle: add, view status (ACTIVE/COMPLETED/ERROR), open product actions.
-
Finance tools: create invoices and manual transactions for charges/credits.
Before You Begin
-
You must be logged in as an administrator.
-
Ensure you know your home company tax settings and available products & prices.
Navigation
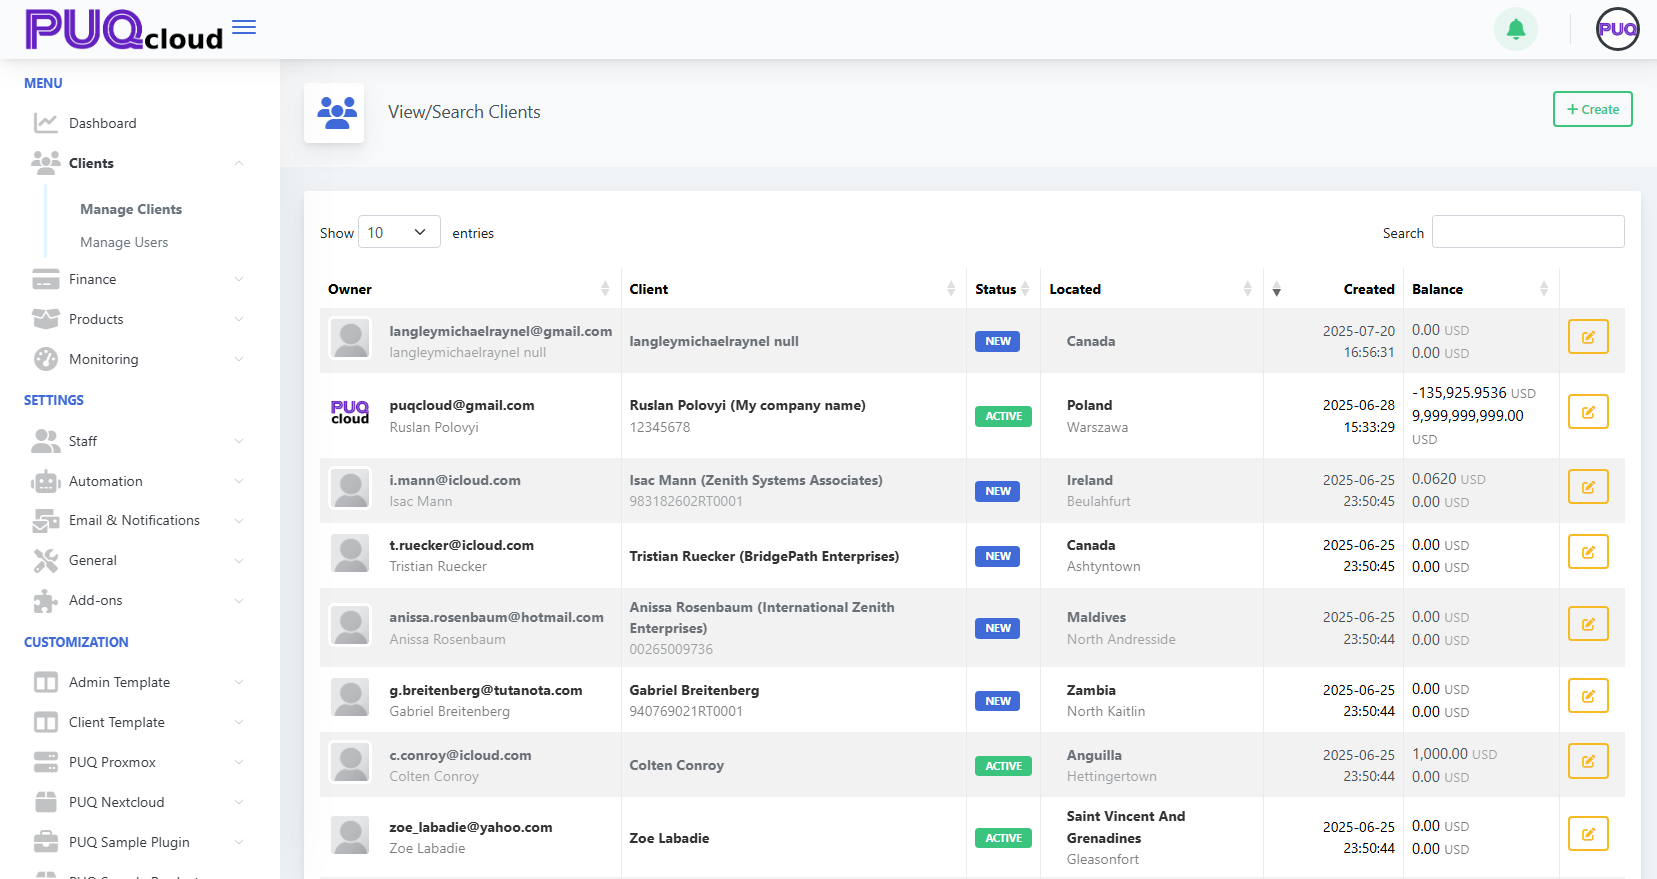
Create a New Client
-
Click + Create (top-right on the client list).
-
Fill the Client/User Information fields:
-
Email and Password
-
Firstname, Lastname
-
Company Name (optional for individuals)
-
Tax ID (if applicable)
-
Phone Number (with country code)
-
Language, Currency
-
Status (New/Active/etc.)
-
-
Fill the Billing Address: Address 1/2, City, Postcode, Country, State/Region.
-
Click Save.
(screenshot: Create a New Client form)

Tips
-
Language affects the UI for the client’s users.
-
Currency determines invoice currency defaults.
-
Use an accurate Tax ID (e.g., GST/HST/QST/VAT formats) for correct tax handling.
Client Record – Tabs & What They Do
After saving, you’ll land on the client’s page with these tabs: Summary, Profile, Users, Services, Invoices, Transactions.
Summary
-
Quick view of Client Finance (Balance, Credit Limit, VIES/Tax status) and Client Information (name, company, email, language, main address, created at).
-
Actions card: Login as Owner.
screenshot: Client → Summary tab
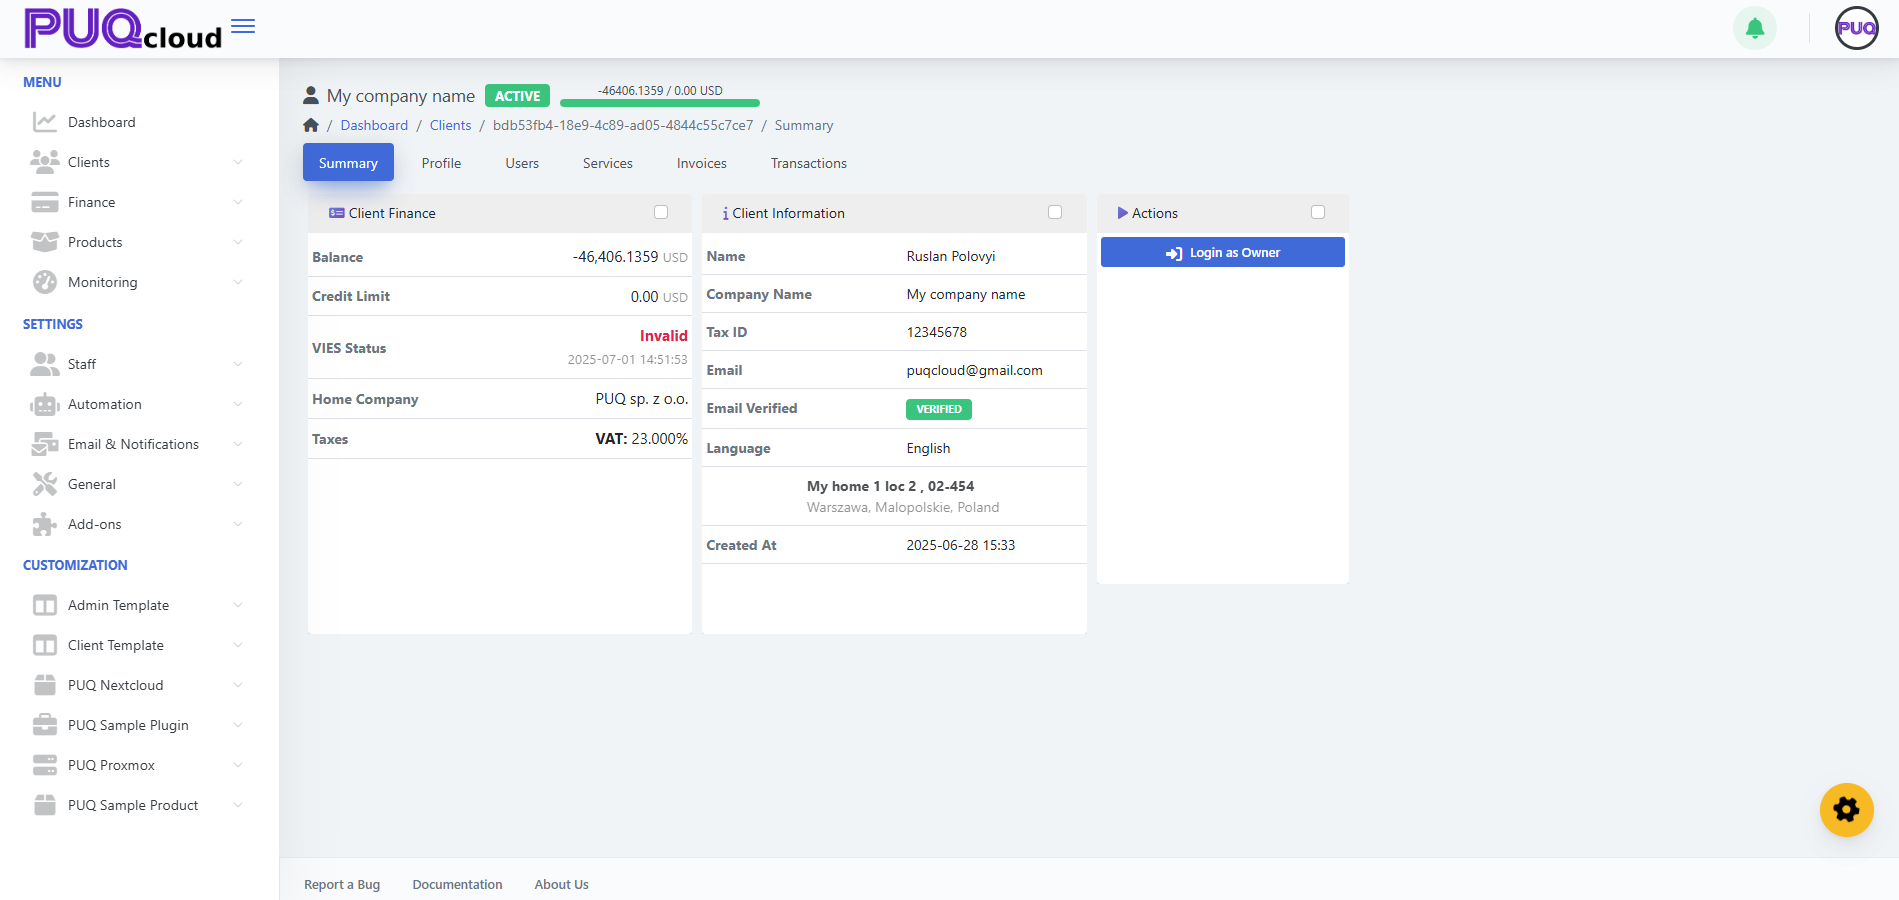
Profile
-
Update Firstname/Lastname, Company, Tax ID, Status, Language, Currency, Credit Limit, Admin Notes.
-
Right side shows the Addresses table with labels like Default (billing) or shipping; use the yellow Edit and red Delete buttons.
-
Click + Create Address to add a new address.
(screenshot: Client → Profile tab)
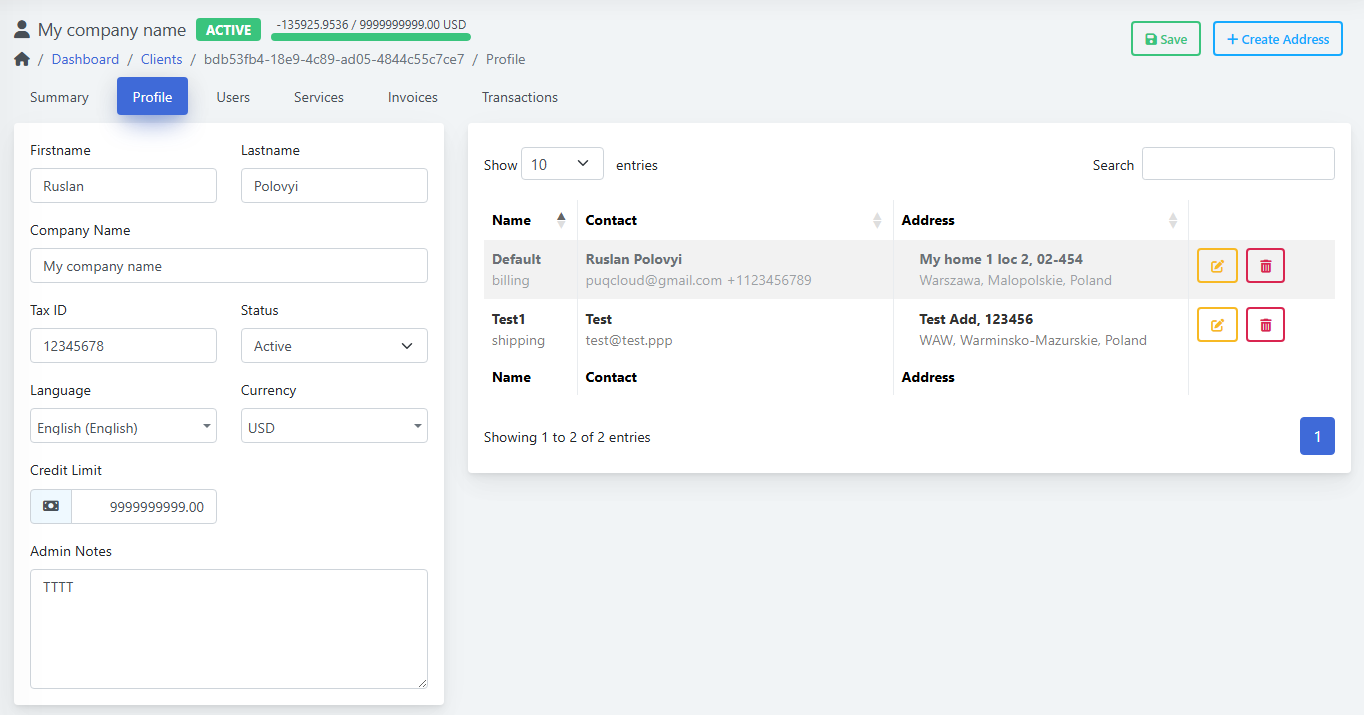
(screenshot: Create Address modal (Type, Name, Contact, Phone, Email, Address, Country, State/Region))

Address Types
-
Billing (used on invoices)
-
Shipping (for service deliveries/records)
Users
-
See associated users, 2FA status, contact info, and created date.
-
Click + Associate User to link an existing user account.
-
Choose Permissions such as: Modify Master Account Profile, Manage Users, Manage Services, Manage Domains, etc.
-
Use Edit/Delete to maintain user links.
(Screenshot: Client → Users tab)
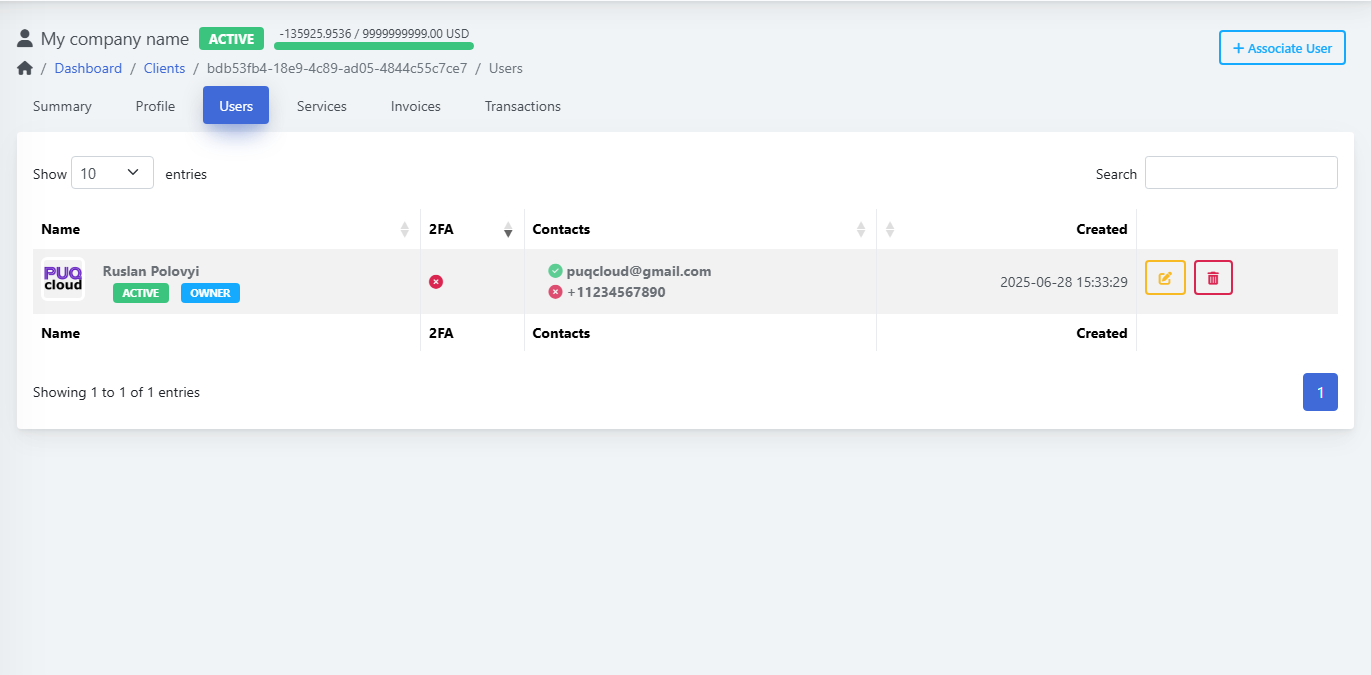
(Screenshot: Associate User modal with permissions list)
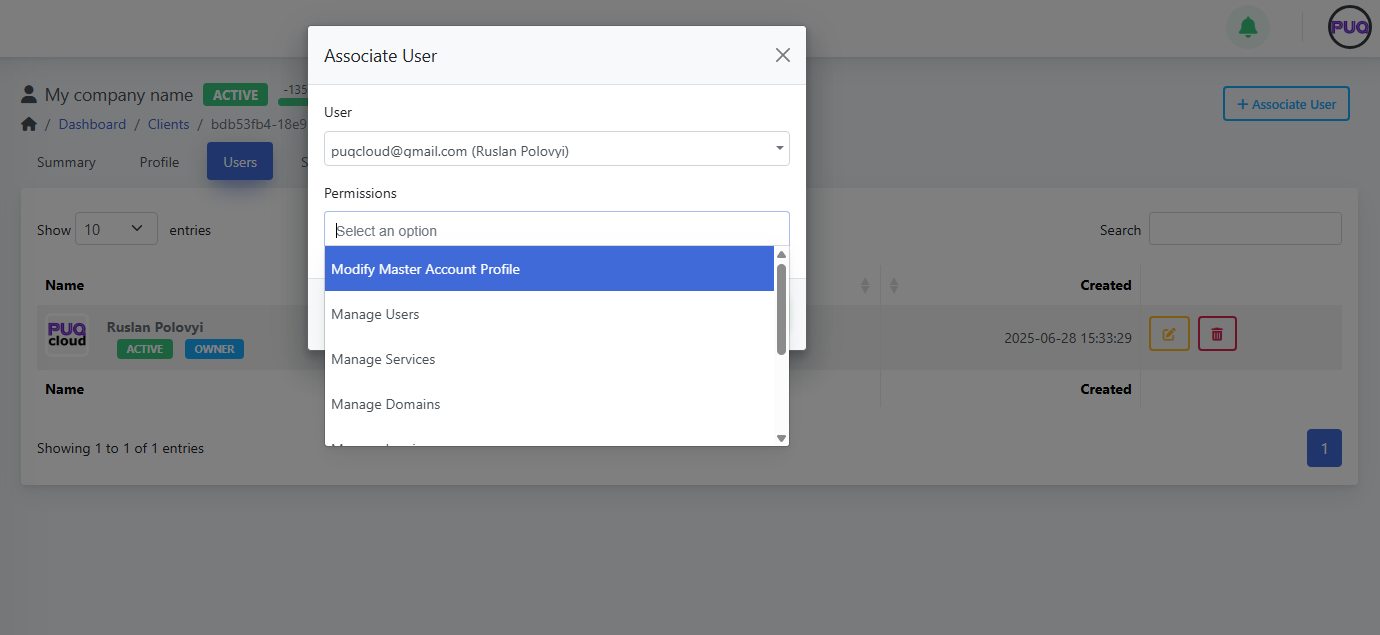
Services
-
View all services with status badges (e.g., ACTIVE, COMPLETED, ERROR).
-
See Order Date, Activation Date, and Price.
-
Click + Add Service to provision a product for this client:
-
Select Product
-
Choose Price (e.g., Monthly – 20.00 USD)
-
Click Save
-
(Screenshot: Services list)
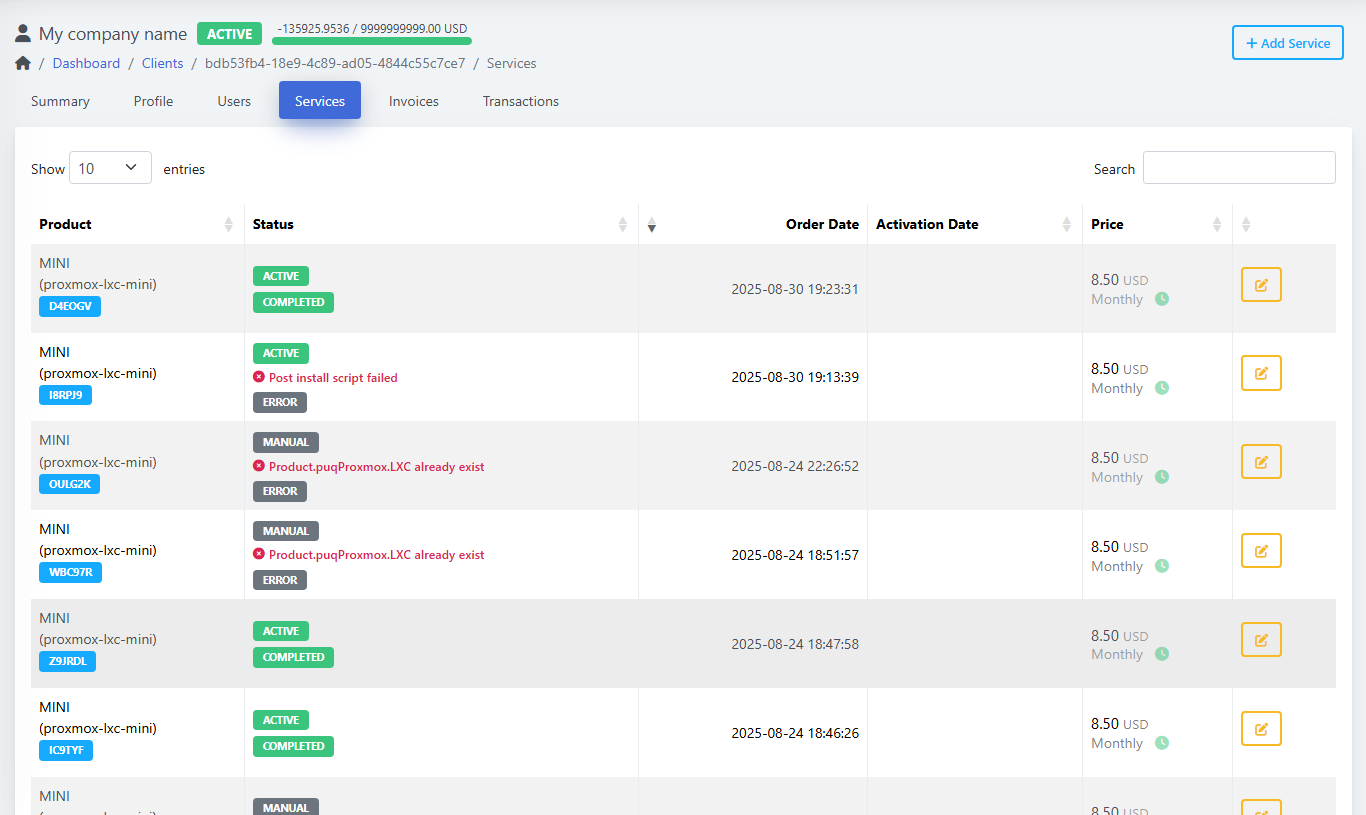
(Screenshot: Create New Service form)
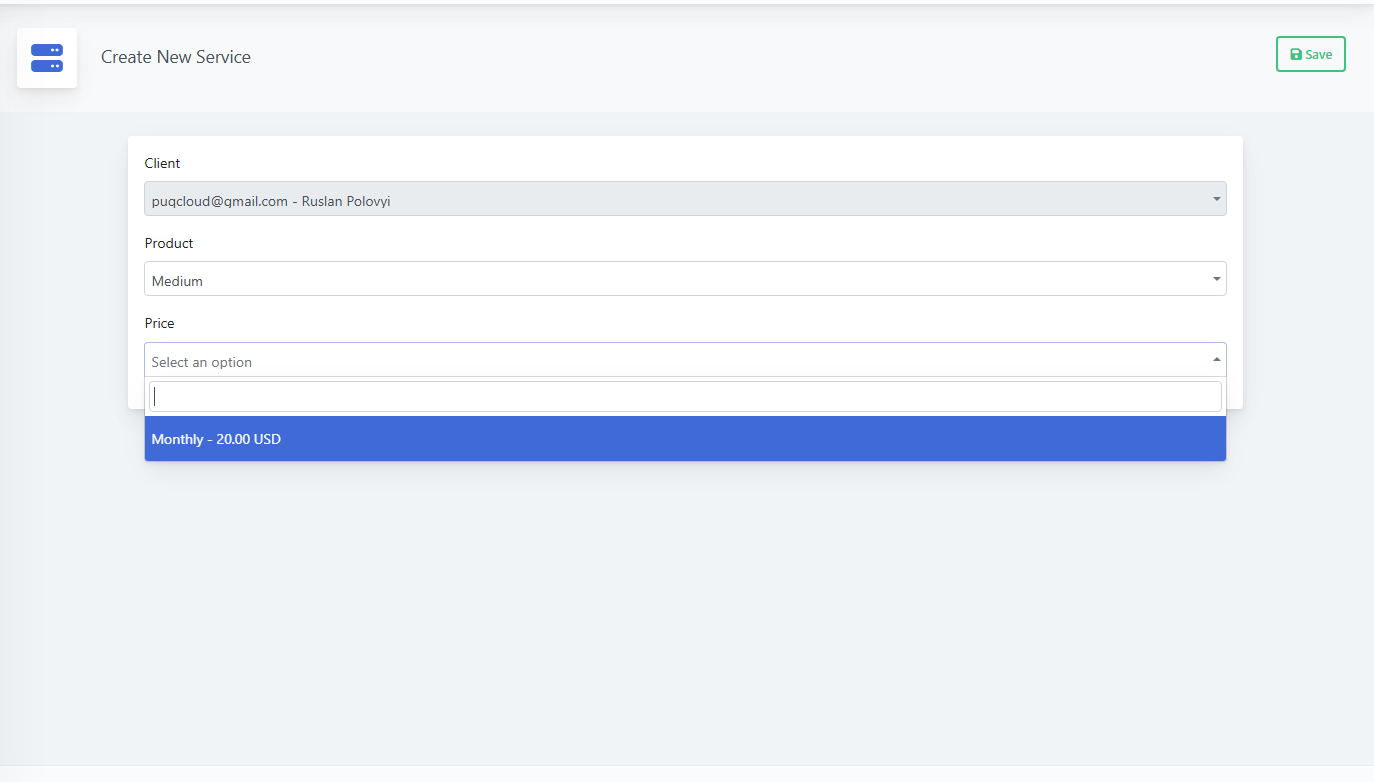
Invoices
-
List shows Type (PROFORMA/INVOICE/CREDIT NOTE), Number, Issue/Due/Paid Dates, Total, Status (UNPAID/PAID/INVOICED/REFUNDED), and Home Company.
-
Create Add Funds Proforma Invoice: opens a modal where you set Net Amount to top up client funds.
(Screenshot: Invoices list)
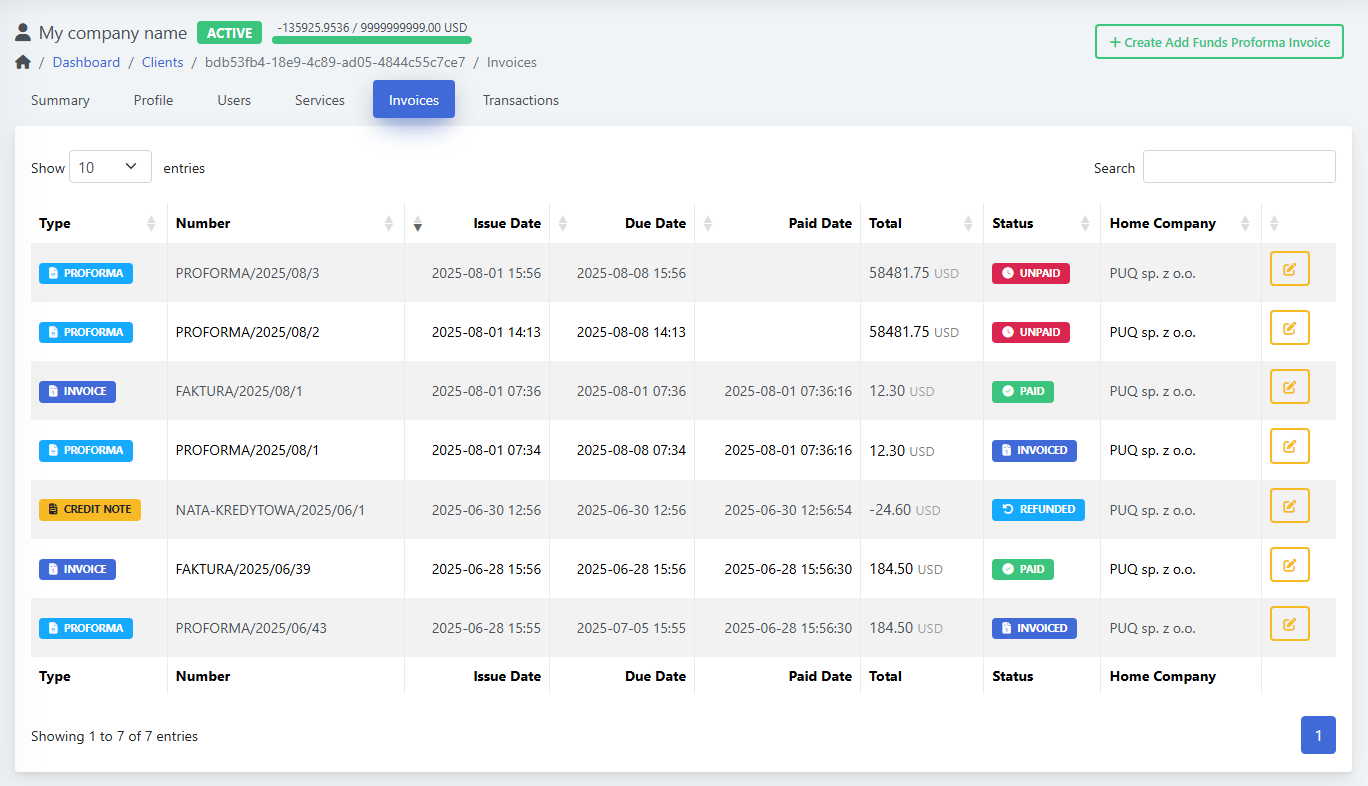
(Screenshot: Create Add Funds Proforma Invoice modal)
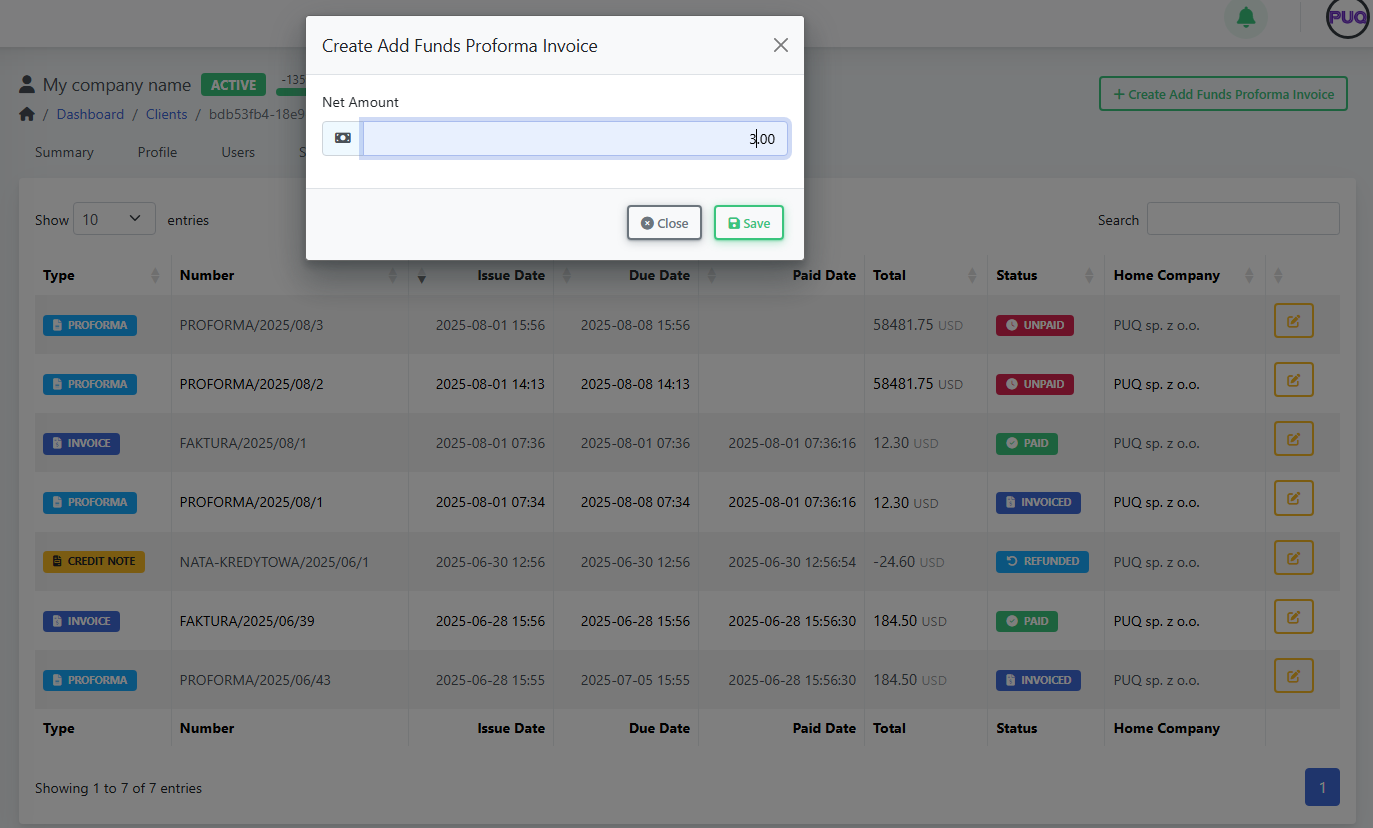
Transactions
-
Ledger of Gross, Net, Balance, Description (usually linked to a service), Period, and Date.
-
Click Create to add a manual transaction (charge or credit): set Amount, Transaction ID (optional), and Description, then Save.
(Screenshot: Transactions list)
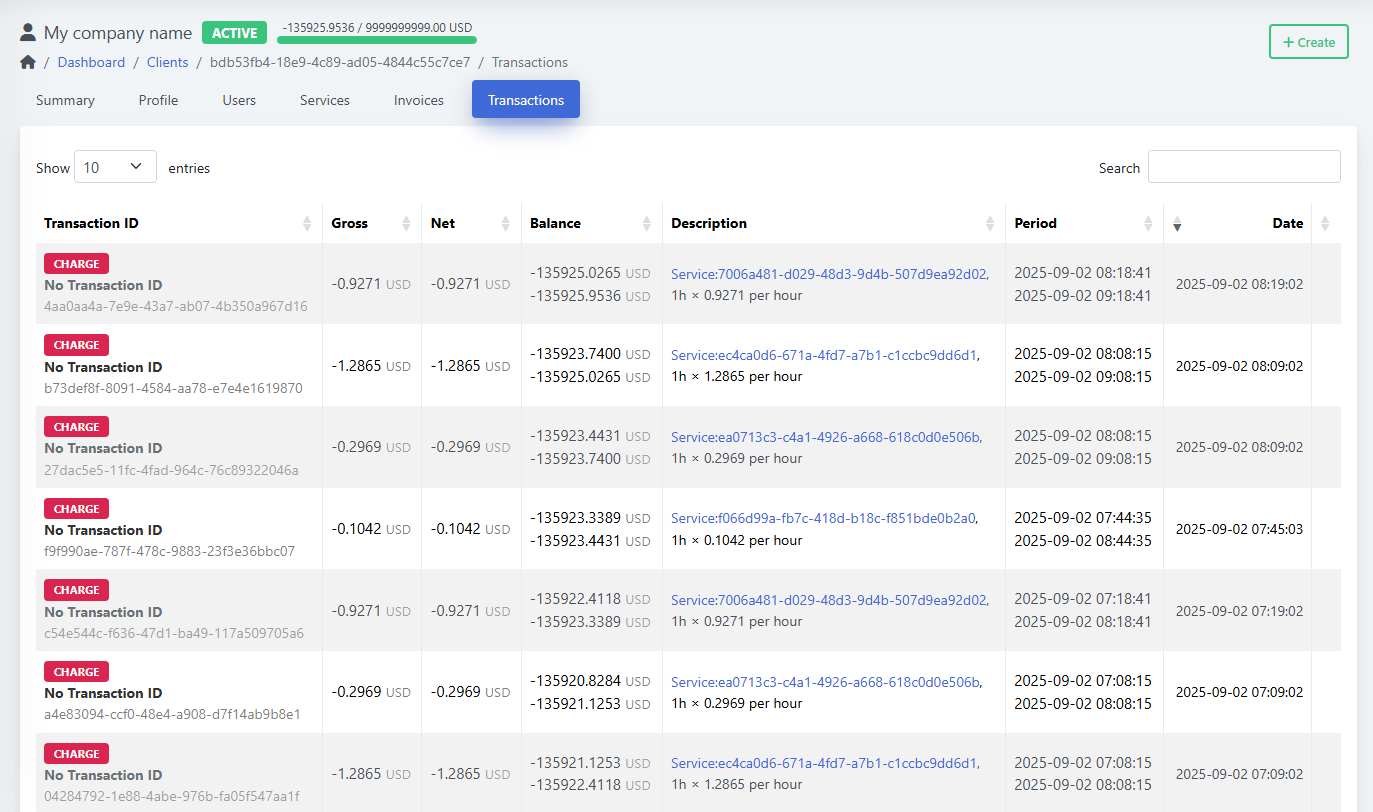
(Screenshot: Transactions → Create modal)
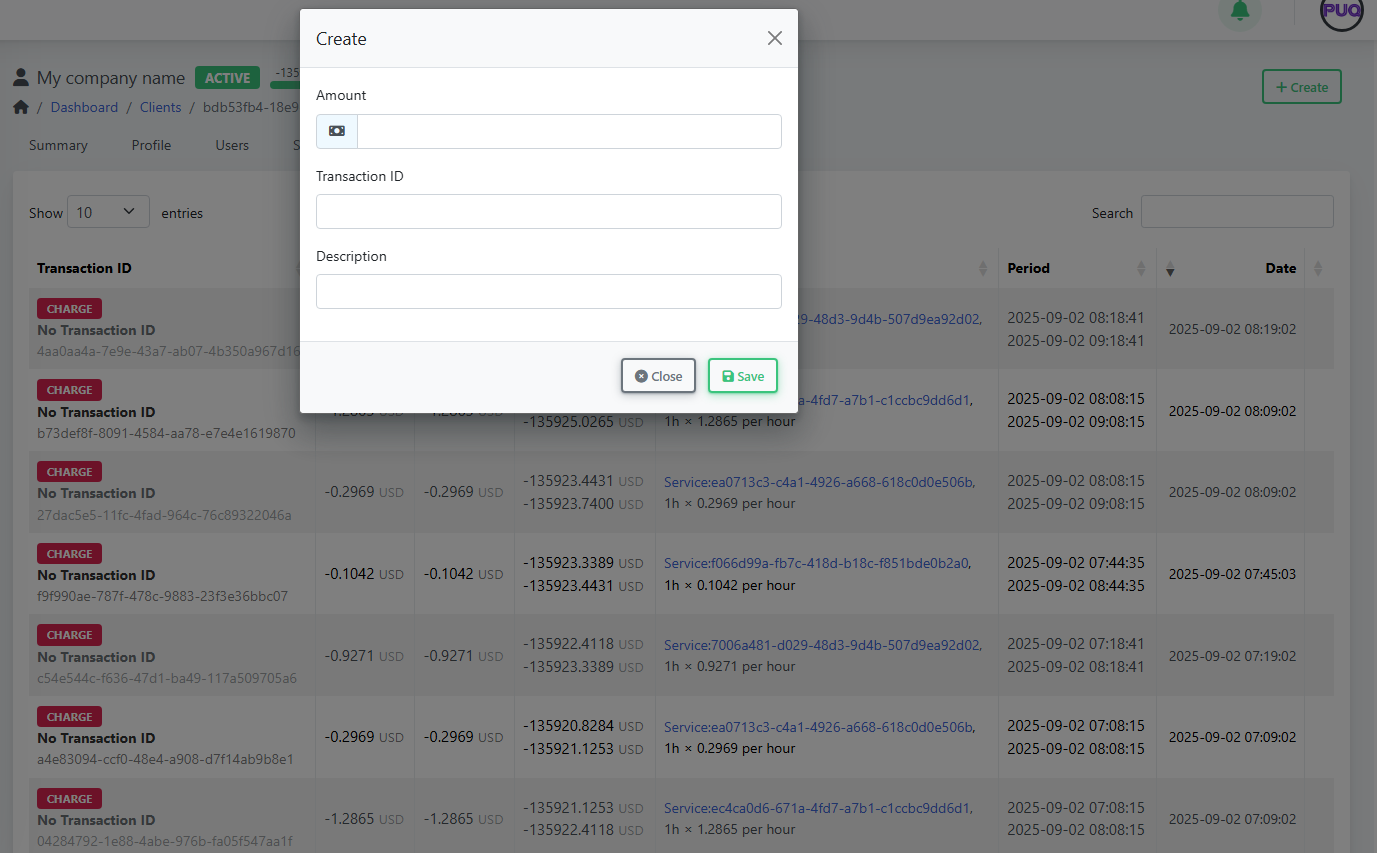
Search, Filter, and Sort Clients
-
Use the Search box on the client list to filter by name, email, or company.
-
Click column headers to sort (e.g., by Created date or Balance).
-
Status badges (NEW, ACTIVE) help you visually triage records.
Editing & Lifecycle
-
Change Status (e.g., New → Active) from the Profile tab.
-
Update Tax ID or Language/Currency any time; new settings apply to future invoices.
-
Maintain Credit Limit to control spending and alerting.
-
Keep Admin Notes for internal context (billing agreements, support history, etc.).
Best Practices
-
Keep addresses current—billing address prints on invoices.
-
Use Users & permissions to grant least-privilege access.
-
Prefer Add Funds Proforma for prepayments; reconcile via Transactions.
-
Review Services after order to confirm status (look for ERROR badges and fix product-side issues).
Troubleshooting
-
Invoice in wrong currency → Check client Currency in Profile before creating invoices.
-
Taxes not applying as expected → Verify Home Company tax rules and client Tax ID.
-
User cannot see services → Revisit Users → permissions (grant Manage Services).
-
Provisioning error on service → Open service details and review the last error note; re-run or fix product configuration.
Shortcuts
-
Clients → Manage Clients: quick search and open profile.
-
On Summary, use Login as Owner to replicate the customer view for support.
You’re done!
You can now add clients, attach their users and addresses, create services, and manage billing—everything from one place in PUQcloud Panel.
Create and manage users
PUQcloud Panel
Order Now | Download | FAQ
This guide explains how administrators can create users, view their client associations, edit details, and remove users in PUQcloud Panel.
Overview
Tip: A User is a person’s login. A Client is an account/business they belong to. One user can be associated with multiple clients (e.g., consultant, owner). Permissions are managed from the Client → Users tab.
List View (Manage Users)
In the table you’ll see: avatar, name, status badges (e.g., ACTIVE, INACTIVE, NEW), 2FA indicator, contact details (email, phone), Clients counter with an eye button, Created date, and row actions (Edit, Delete). Use Search to filter.
(Screenshot: View/Search Users list view)

Create a User
-
Go to Clients → Manage Users and click + Create.
(Screenshot: Create User modal)
-
Fill the fields:
-
Email (required)
-
Password (required)
-
2FA (toggle; optional but recommended)
-
Firstname, Lastname
-
Phone Number (with country code)
-
Language (UI language for the user)
-
Admin Notes (internal only)
-
-
Click Save. The user appears in the list.
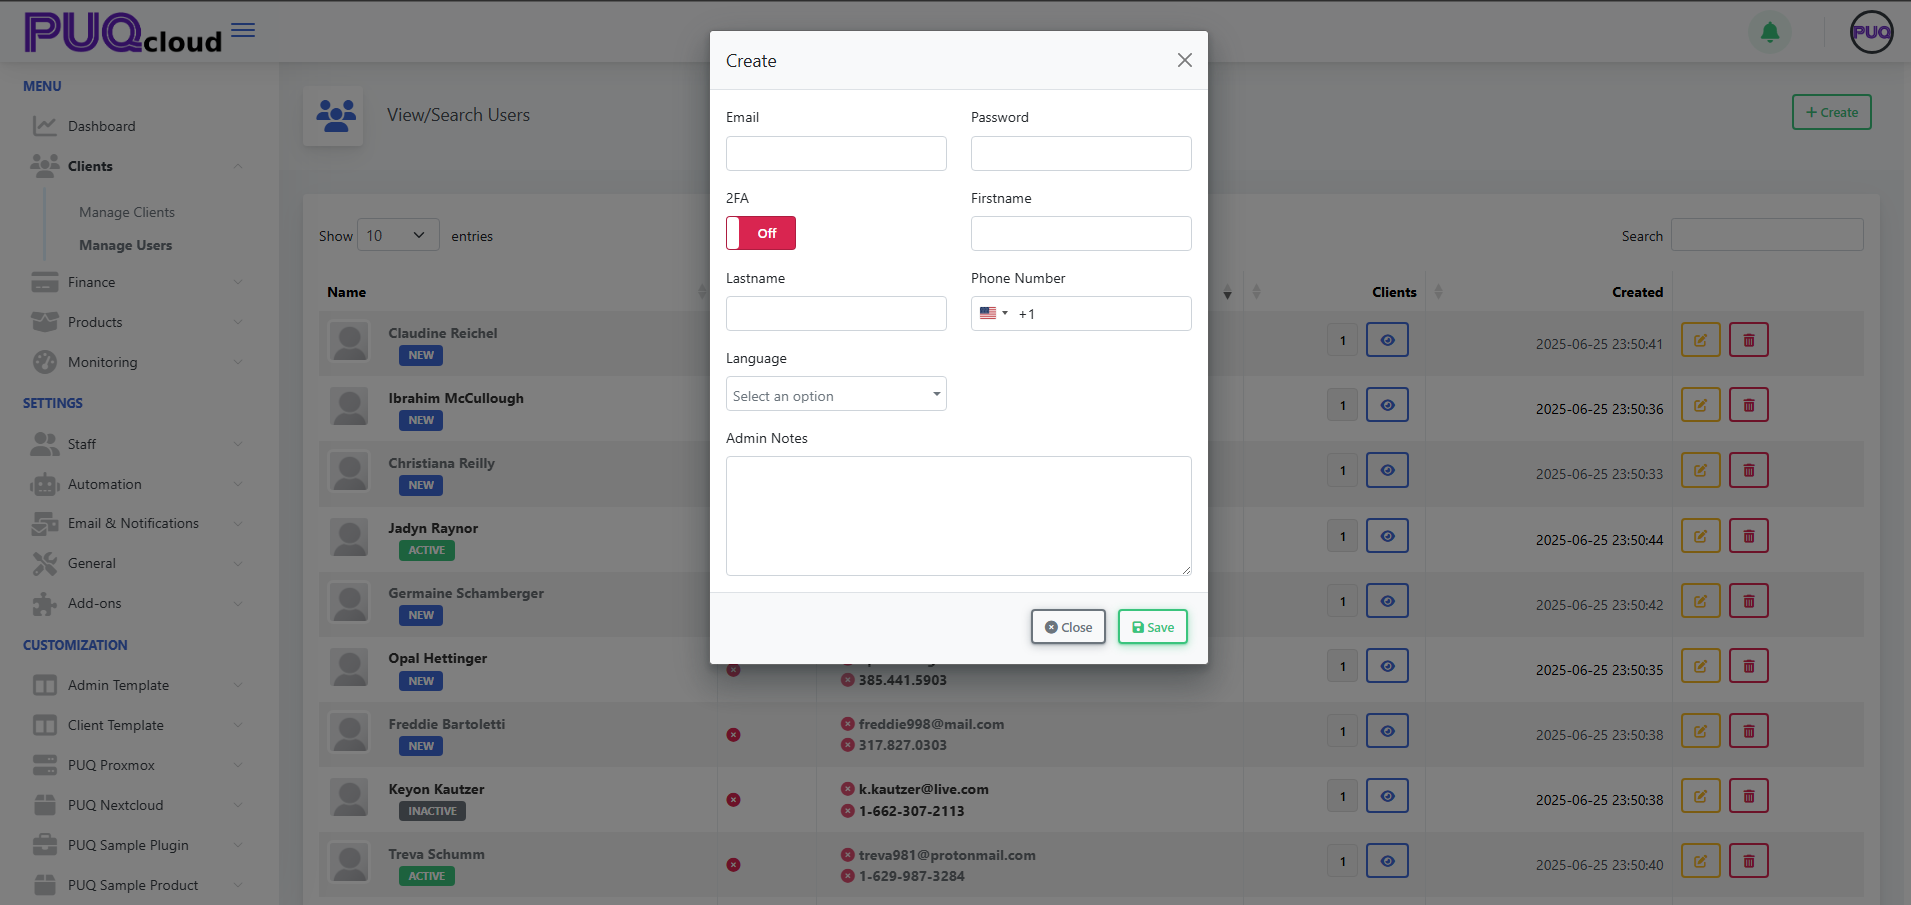
Next step: Associate this user with a client from Clients → Manage Clients → open a client → Users tab → + Associate User (choose permissions there).
View a User’s Clients
-
In Manage Users, find the user.
-
Click the eye icon in the Clients column.
-
In User Clients modal, review:
-
User Information: UUID, Name, Email, Phone.
-
Associated Clients: Client Name, Company Name, Tax ID, and Status badges (e.g., ACTIVE, OWNER).
-
-
Close when done.
(Screenshot: User Clients modal)
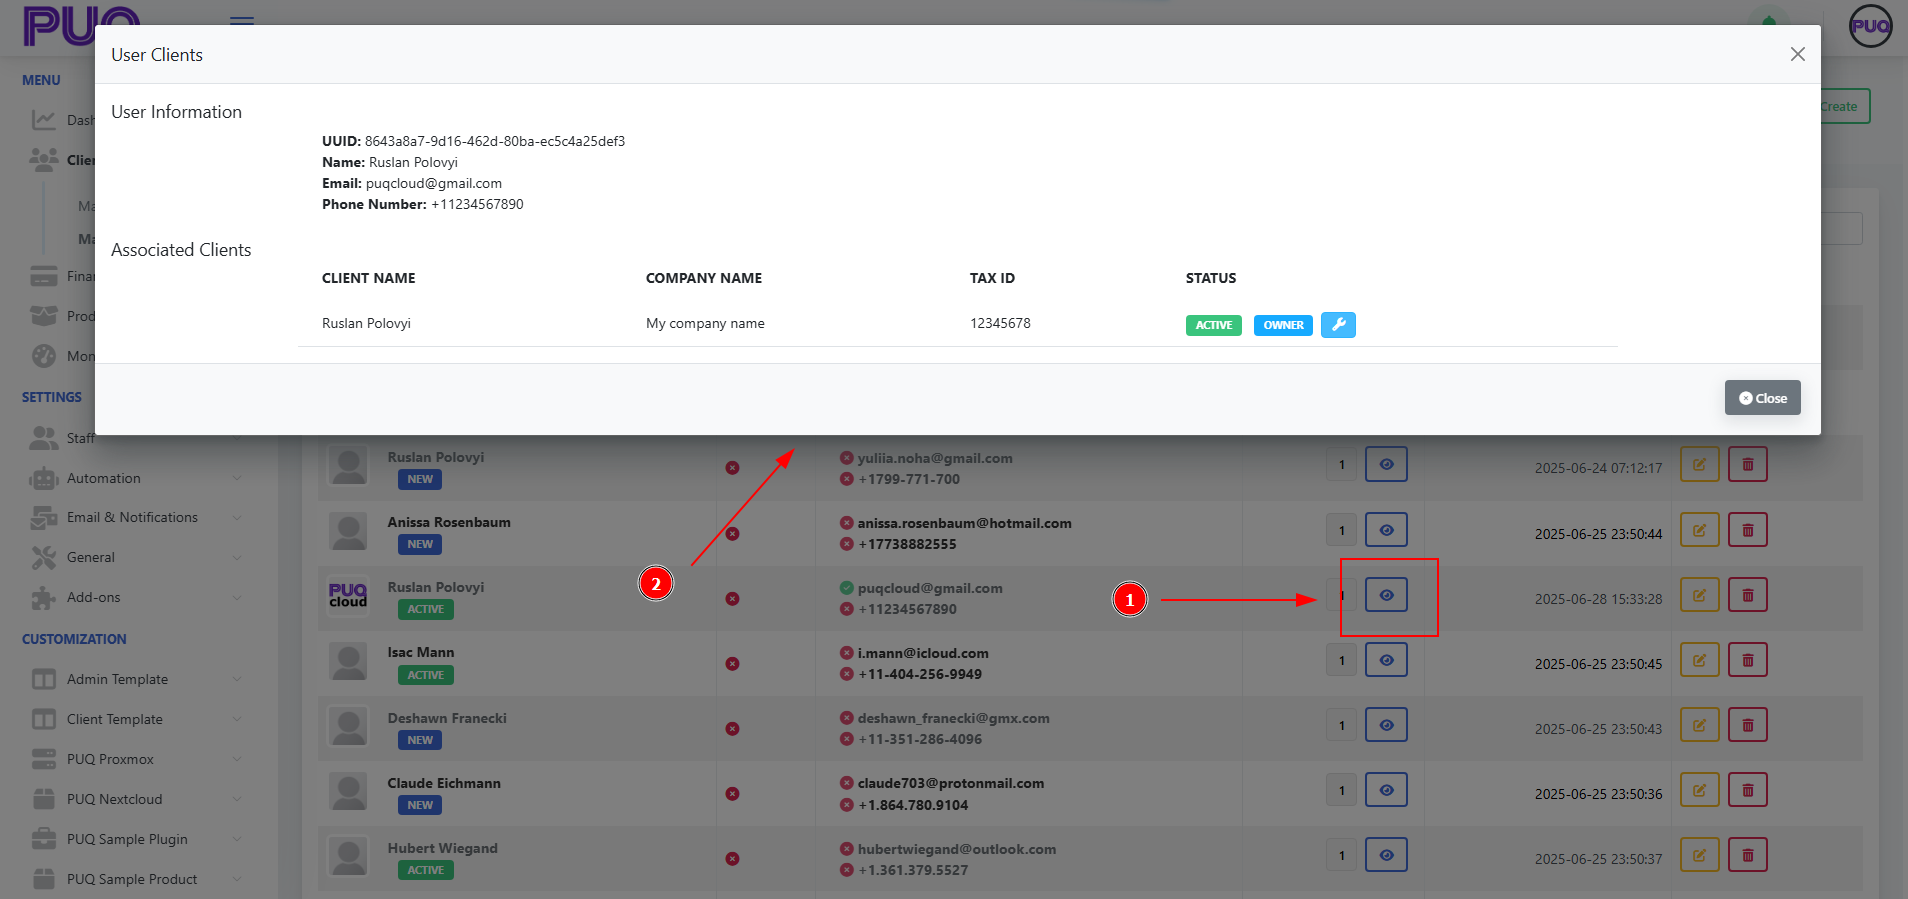
Edit a User
-
In Manage Users, click the Edit (pencil) icon on the desired row.
(Screenshot: Edit User modal)
-
Update fields:
-
Email, Password (to reset), Firstname, Lastname
-
Phone Number, Language, Admin Notes
-
Verification toggles: Email Verified, Phone Verified
-
Security toggle: 2FA (enable/disable)
-
-
Click Save.

Delete a User
-
In Manage Users, click the Delete (trash) icon.
-
Confirm the action.
Field Reference
| Field | Where | Description |
|---|---|---|
| Create/Edit | User’s login email. Must be unique. | |
| Password | Create/Edit | Set/reset the user’s password. |
| 2FA | Create/Edit | Turn on two‑factor authentication for extra security. |
| Firstname / Lastname | Create/Edit | User’s display name. |
| Phone Number | Create/Edit | Stored with international country code. |
| Language | Create/Edit | UI language for this user. |
| Admin Notes | Create/Edit | Internal notes visible to admins only. |
| Email Verified | Edit | Mark whether the email has been verified. |
| Phone Verified | Edit | Mark whether the phone has been verified. |
Good Practices
-
Require strong passwords and 2FA for staff.
-
Keep contact info and language up to date.
-
Use Admin Notes to capture context (e.g., who requested access, ticket link).
-
Manage access at Client → Users (set granular permissions per client).
Troubleshooting
-
Cannot log in → Reset Password; ensure Email Verified is On; check if the user is ACTIVE.
-
User can’t see a client → Associate them in Client → Users, verify status and permissions.
-
2FA lockout → Temporarily disable 2FA in Edit, then re‑enroll.
-
Duplicate email → Each user must have a unique email; rename or remove old account.
Transactions Page
PUQcloud Panel
Order Now | Download | FAQ
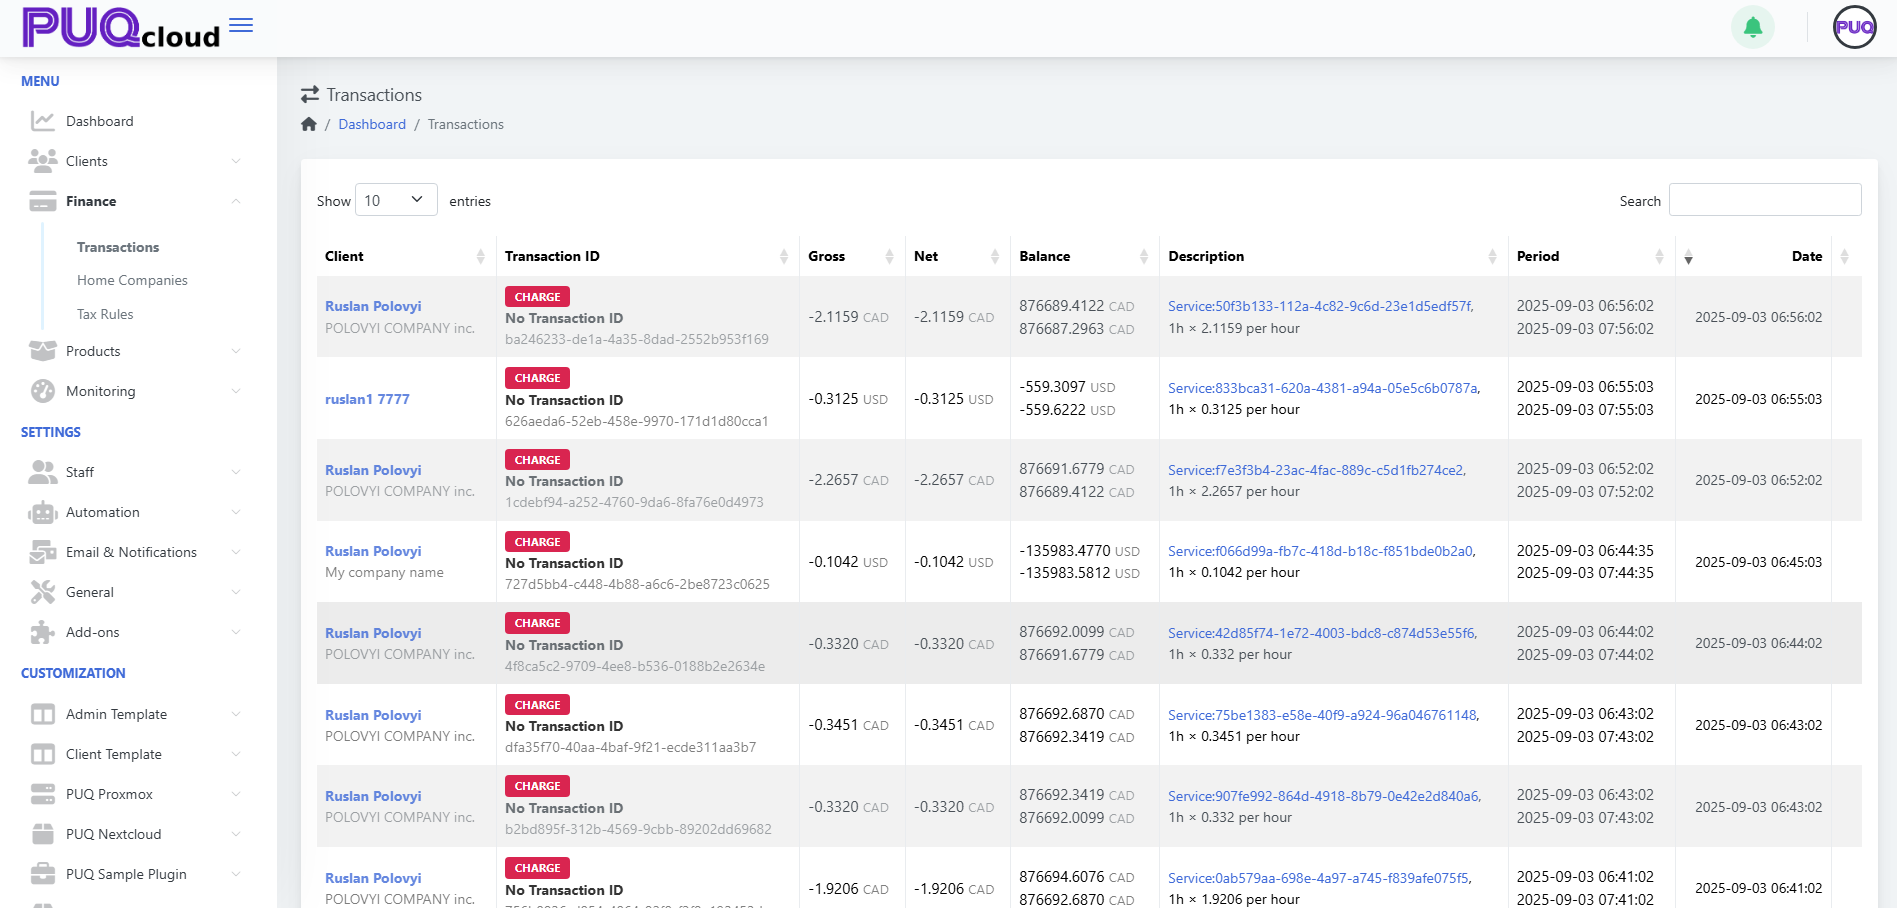
1. Open Transactions View
-
From the left-side menu, go to:
Finance → Transactions
2. Understand the Columns
Each transaction row includes the following:
| Column | Description |
|---|---|
| Client | The name of the client associated with the transaction. |
| Transaction ID | Displays the transaction type (e.g. CHARGE) and a unique ID or "No Transaction ID". |
| Gross / Net | Amount before and after fees or discounts. |
| Balance | The client’s account balance after the transaction. |
| Description | Contains a reference to the service and billing logic. |
| Period | Time range for which the charge applies. |
| Date | The exact timestamp of when the transaction occurred. |
3. Clickable Navigation
-
🔗 Click on the Client name
→ You will be redirected to the Client Summary page of that user. -
🔗 Click on the link in the Description column
→ You will be redirected to the specific Service page within the client's profile that generated the transaction.
Notes:
-
Transactions are displayed in real-time.
-
You can search, filter, and track charges per hour, per service.
-
Currency is shown per client’s preference (e.g., CAD, USD).
Create and manage a Home Company
PUQcloud Panel
Order Now | Download | FAQ
Overview
A Home Company is the legal entity that appears on your invoices, credit notes, emails, and payment pages (name, address, logo, tax IDs, etc.). You can keep one or many Home Companies and switch which one is Default.
Path: Dashboard → Home Companies
1) Create a Home Company
-
Go to Menu → Finance → Home Companies.
(Screenshot: list view with “+ Create”)
-
Click + Create.
(Screenshot: “Create” modal)
-
Enter Name (internal name, e.g., “PUQ sp. z o.o.” or “North America”).
-
Click Save.
(Screenshot: list shows new row)
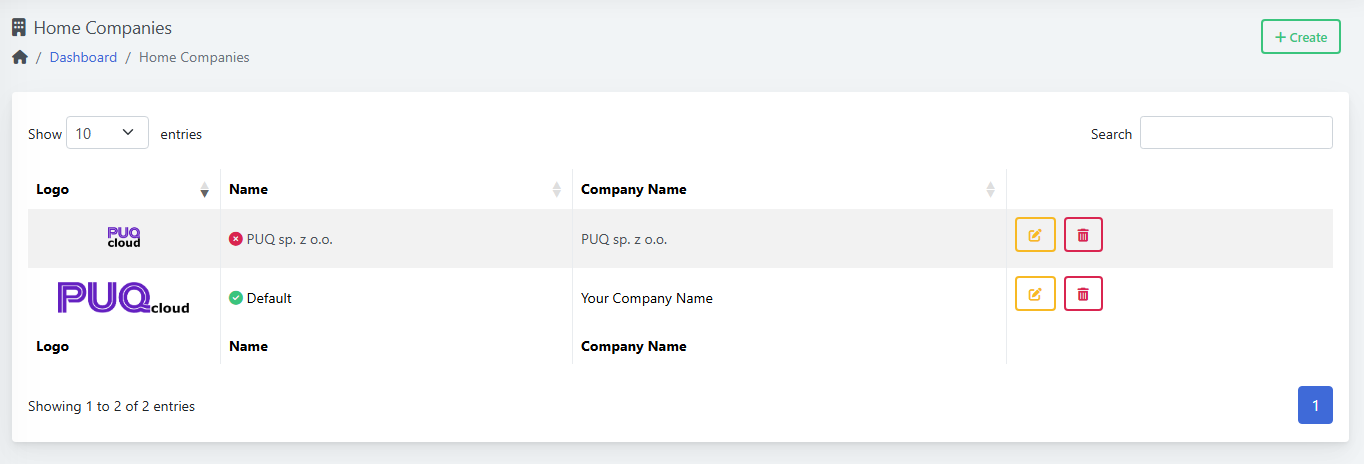
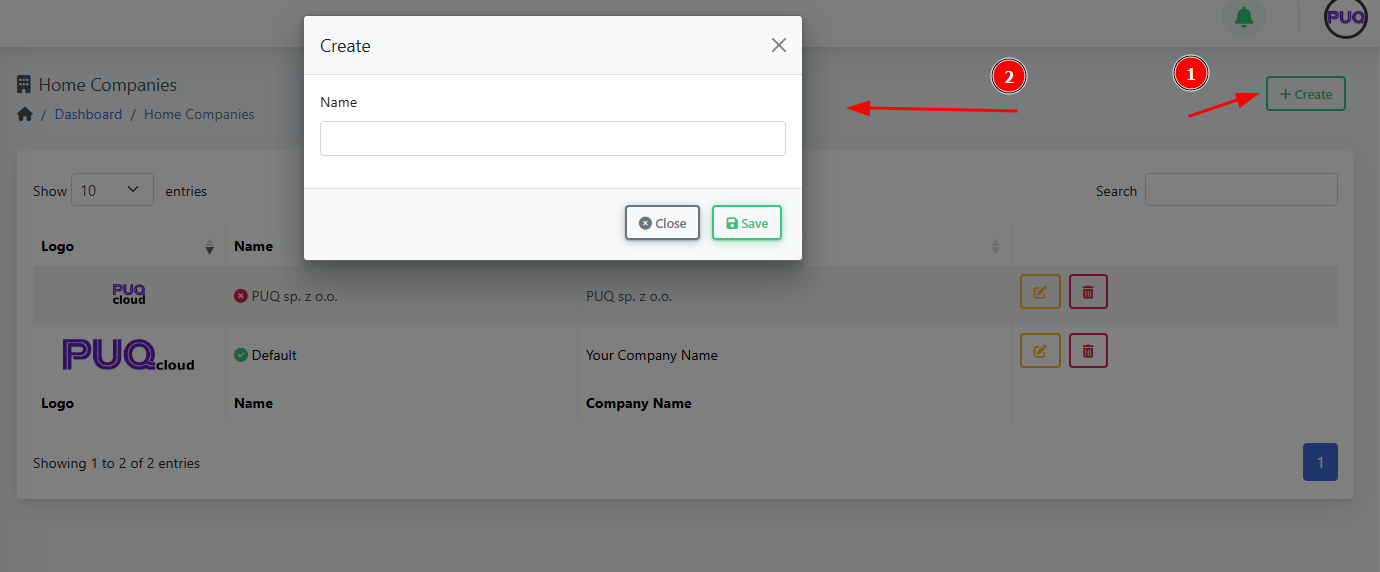
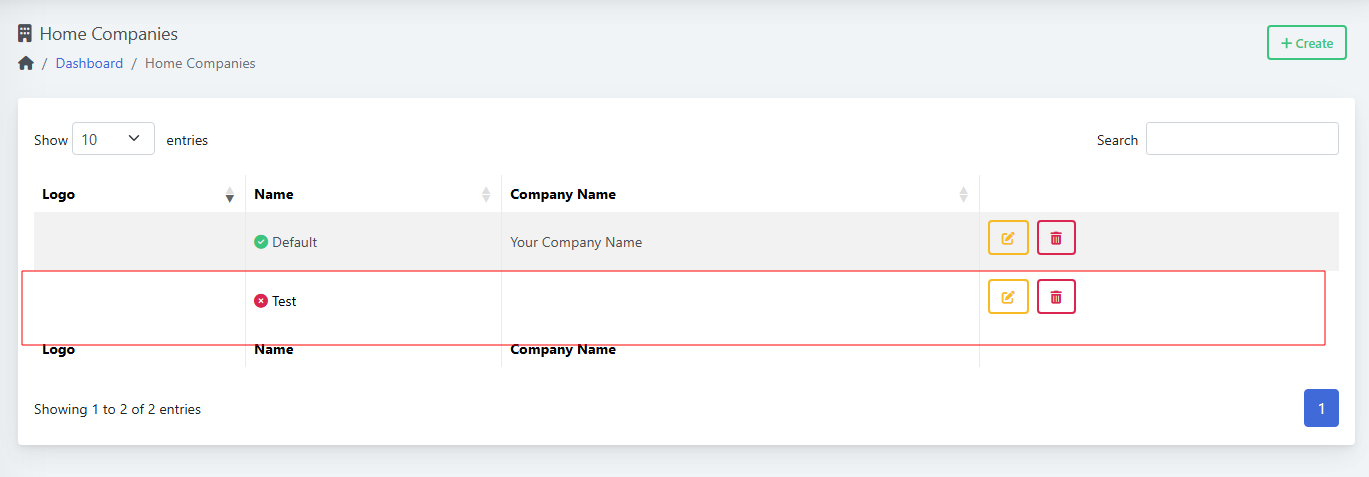
Tips
-
The green check means “Default”. The red dot means “not default”.
-
Use the search box to find companies quickly.
2) Edit a Home Company
-
In the list, click the yellow edit button on the row.
(Screenshot: edit icon highlighted)
-
You’ll open the Home Company editor with tabs:
-
General
-
Images
-
Email Settings
-
Tax Settings
-
Invoice Settings
-
Proforma Template
-
Invoice Template
-
Credit Note Template
-
Payment Gateways
-
-
After changes, click Save (top-right).
3) Fill out each tab
General
(Screenshot: General tab)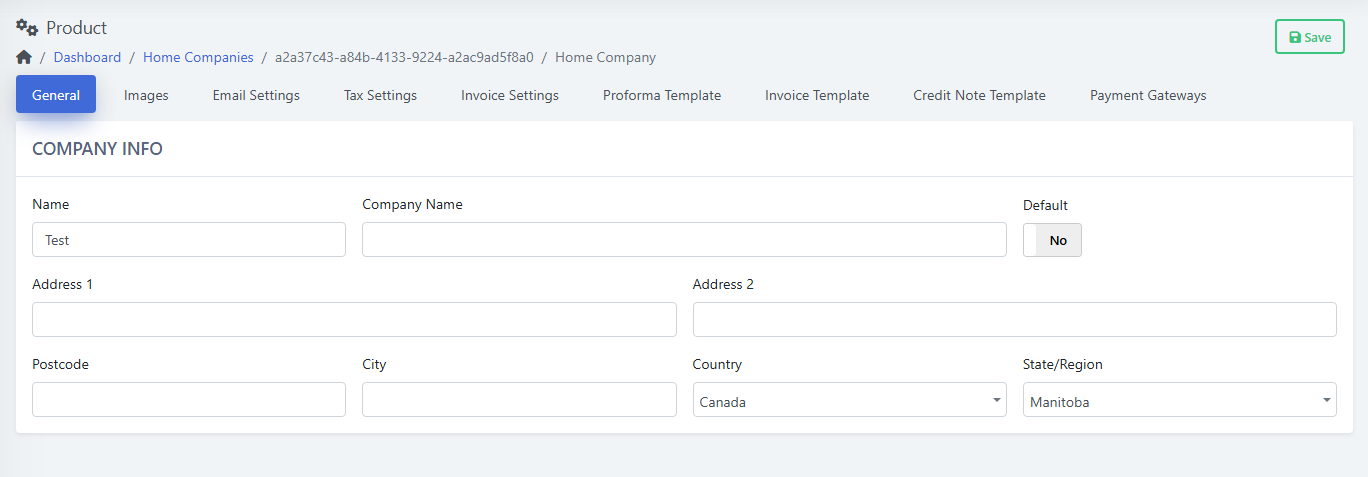
-
Name — internal label (already set).
-
Company Name — legal name shown on documents.
-
Address 1/2, Postcode, City, Country, State/Region — printed on invoices/credit notes.
-
Default: Yes/No — set this company as the Default sender across billing.
-
Click Save.
Images
(Screenshot: Images tab)
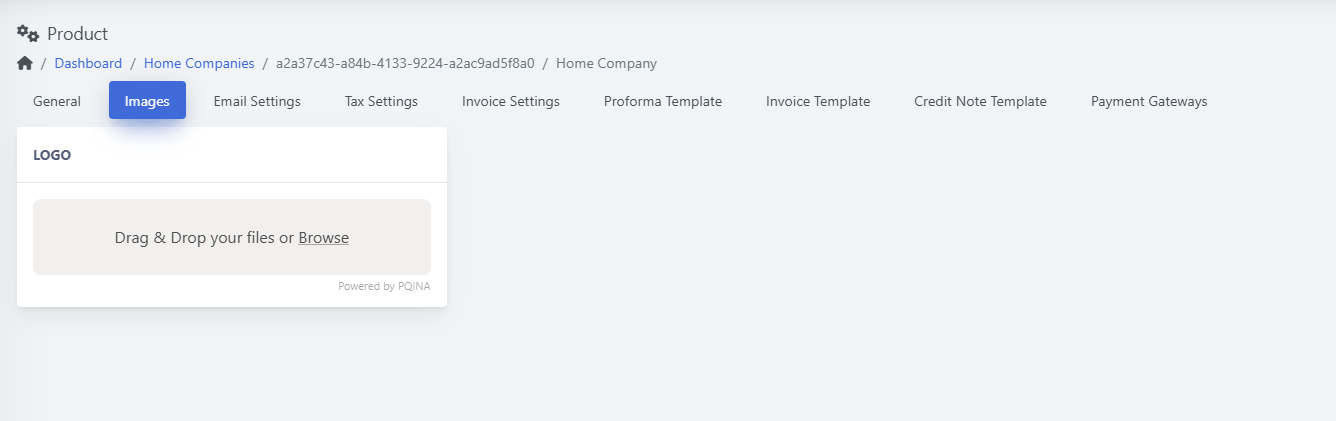
-
Upload your Logo (drag & drop or “Browse”).
-
Use a transparent PNG for best results.
-
Click Save.
Email Settings
(Screenshot: Email Settings tab)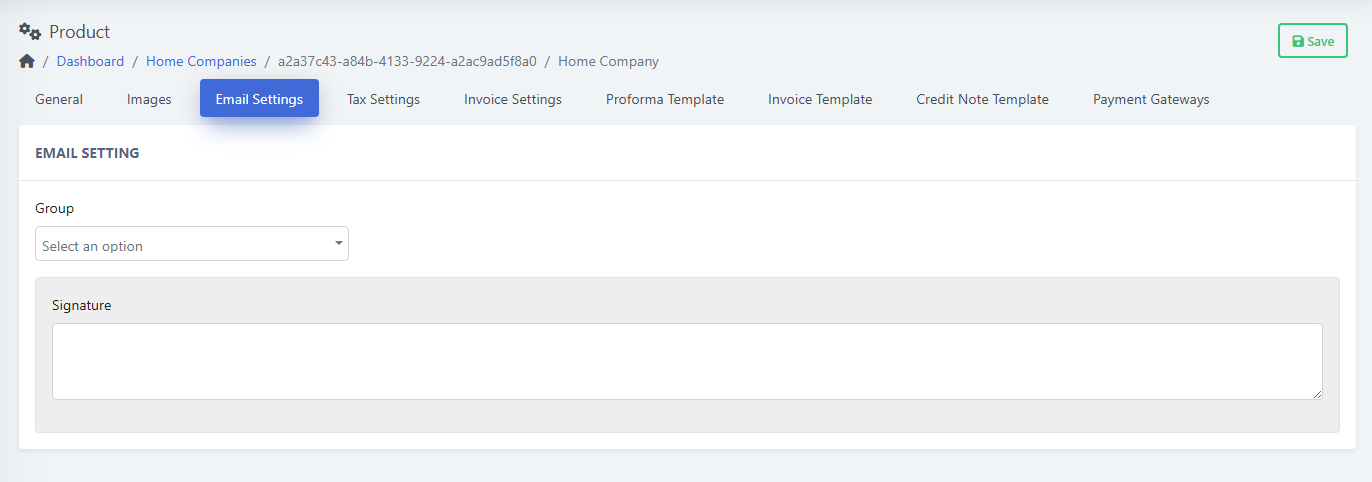
-
Group — choose the email group this company uses (for templates/routing).
-
Signature — footer appended to outgoing emails (support info, legal note).
-
Click Save.
Tax Settings
(Screenshot: Tax Settings tab)

European Tax Information
-
Local Tax ID Name / Local Tax ID (e.g., NIP, VAT, etc.)
-
EU VAT ID Name / EU VAT ID
-
Registration Number Name / Registration Number
Country-Specific Tax Information
-
United States: US EIN, US State Tax ID, US Entity Type
-
Canada: CA Business Number, CA GST/HST Number, CA PST/QST Number, CA Entity Type
Tax Rates
-
Tax 1/2/3 Name and Rate (%) — define up to three stacked taxes.
-
Click Save.
Invoice Settings
(Screenshot: Invoice Settings tab)

Numbering
-
Proforma / Invoice / Credit Note Number Format — use tokens such as
{YEAR},{MONTH},{DAY},{NUMBER}. -
Next … Number — starting counter (e.g.,
1). -
… Number Reset — how often to reset numbering (e.g., Never, yearly).
Item Texts
-
Balance Credit Purchase Item Name/Description — wording shown when adding balance.
-
Refund Item Name/Description — wording shown on credit/refunds.
Customization
-
PDF Font (e.g., DejaVu Sans for multilingual).
-
Paper Size (A4 or Letter).
-
Pay To Text — payment instructions.
-
Invoice Footer Text — legal notes, company disclaimer.
-
Click Save.
Proforma Template
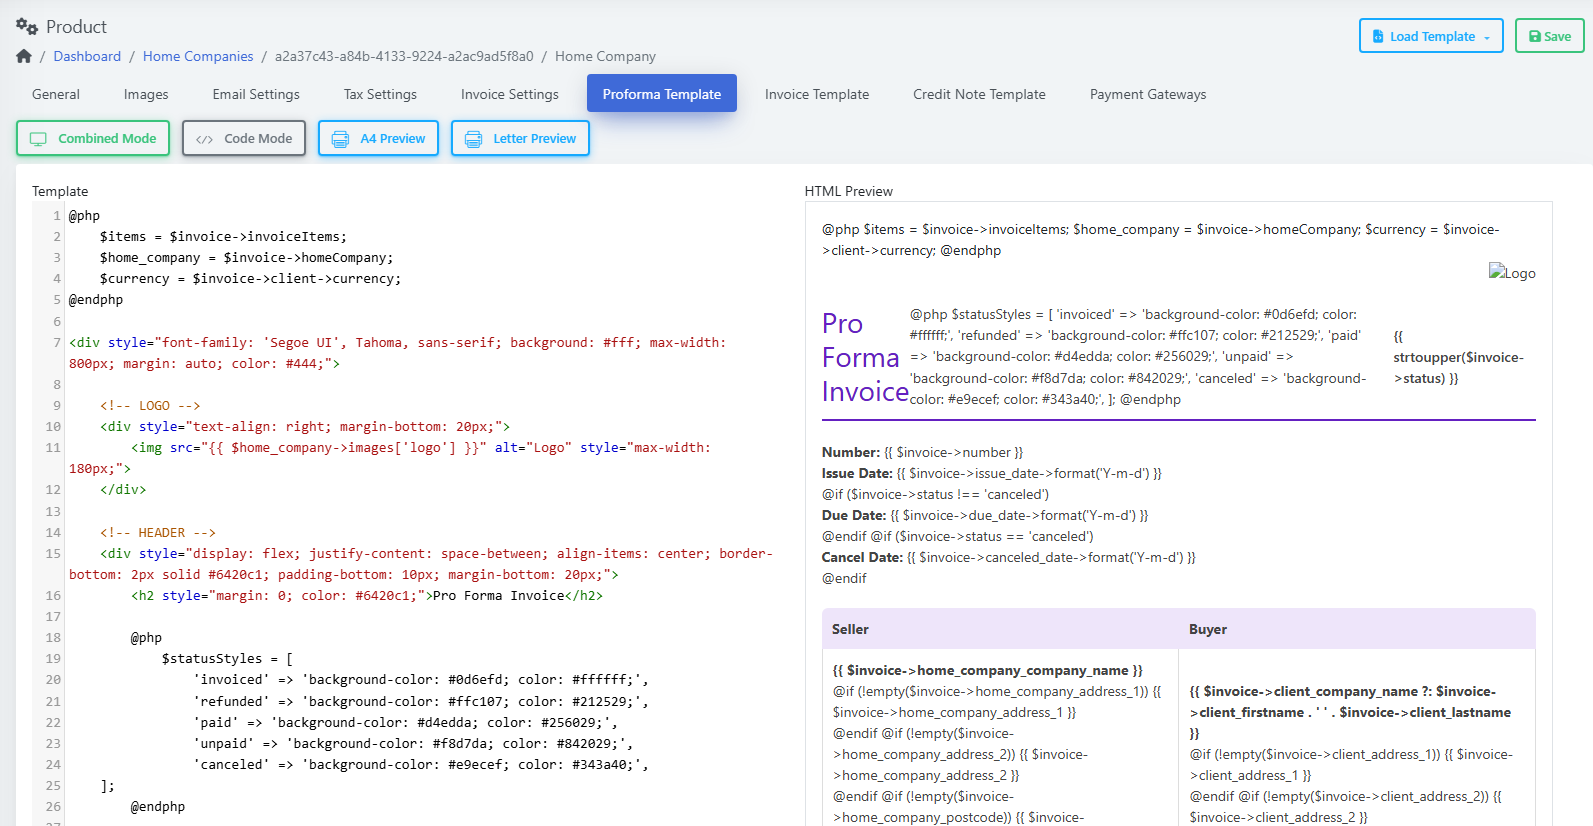
-
Works like the Invoice/Credit Note Template editors below.
-
Edit the HTML/Blade content; preview and Save.
Invoice Template
(Screenshot: Invoice Template editor with live preview)

-
Modes: Combined, Code Mode; Previews: A4 / Letter.
-
Left pane: template code (Blade + HTML/CSS).
-
Right pane: HTML Preview.
-
Variables available (examples):
-
$invoice,$invoice->invoiceItems,$invoice->client,$invoice->homeCompany, etc.
-
-
Keep your styles simple for nice PDFs. Save after edits.
Credit Note Template
(Screenshot: Credit Note Template editor with live preview)
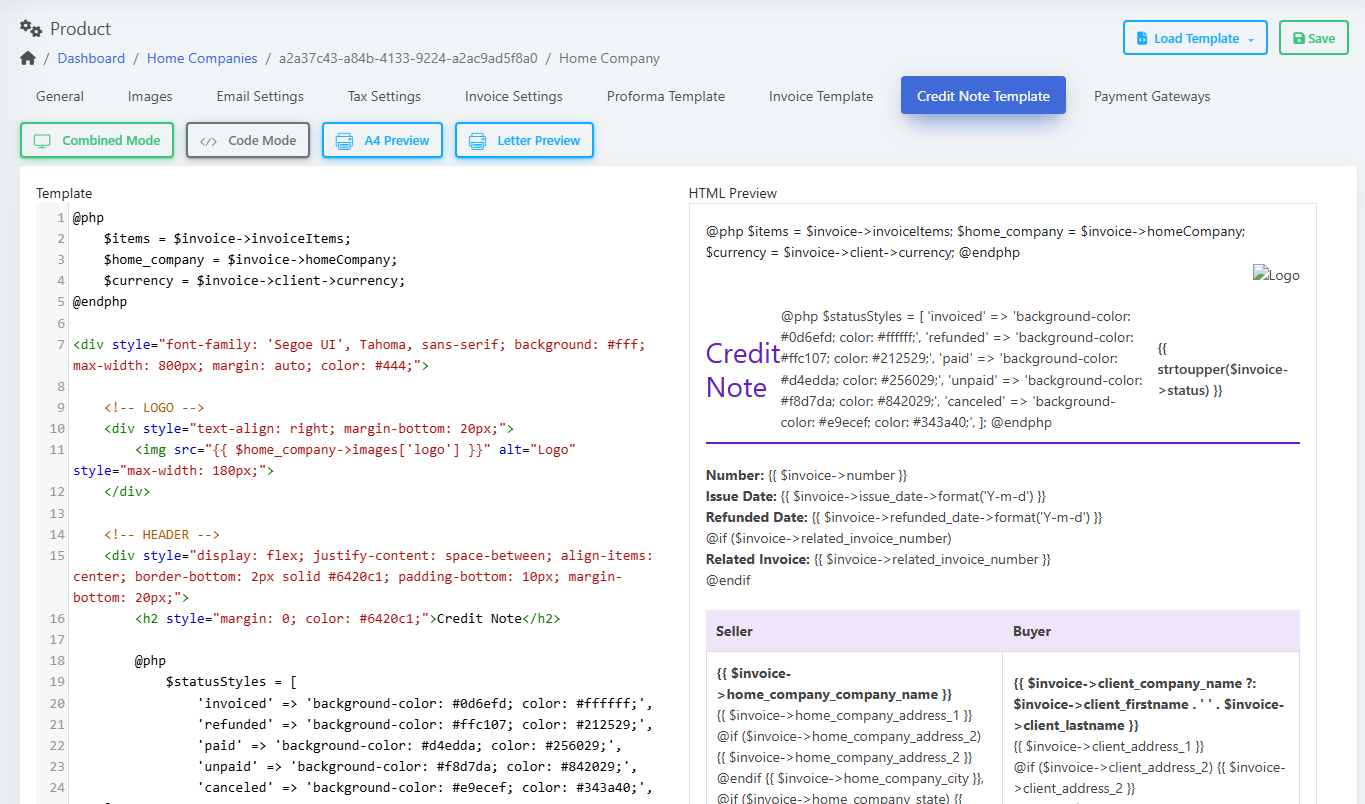
-
Same tools as Invoice Template; shows “Credit Note” preview.
-
Save after edits.
Payment Gateways
(Screenshot: Payment Gateways tab — empty table with + Create)
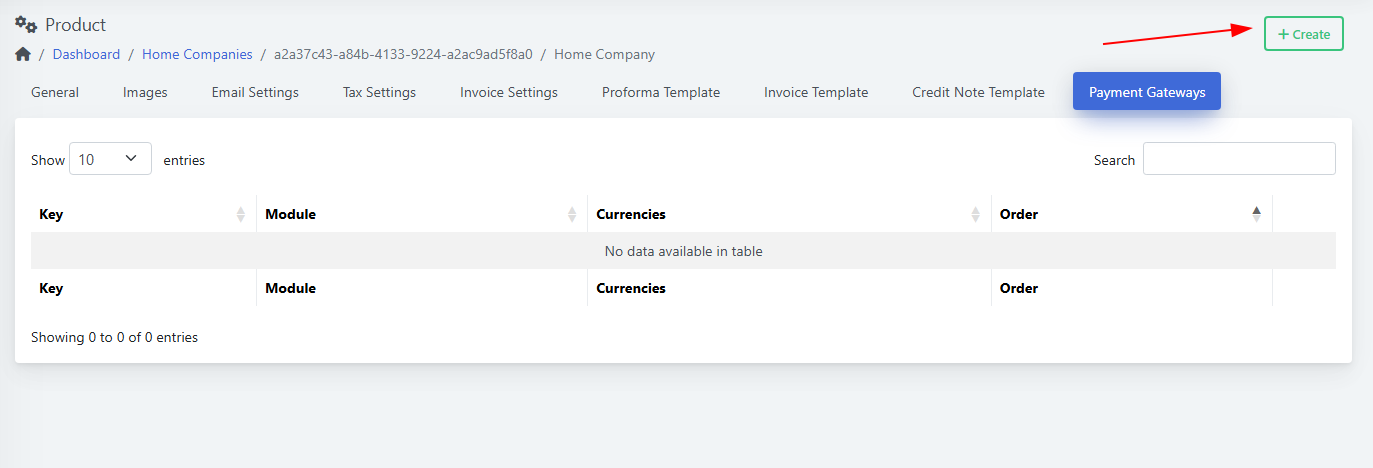
Add a Gateway
-
Click + Create.
(Screenshot: Create Payment Gateway modal)
-
Fill Key (internal ID, e.g.,
stripe_main). -
Pick Module:
-
PUQ Przelewy24 (active)
-
PUQ Stripe (active)
-
PUQ PayPal (active)
-
PUQ Bank Transfer (active)
-
-
Click Save.
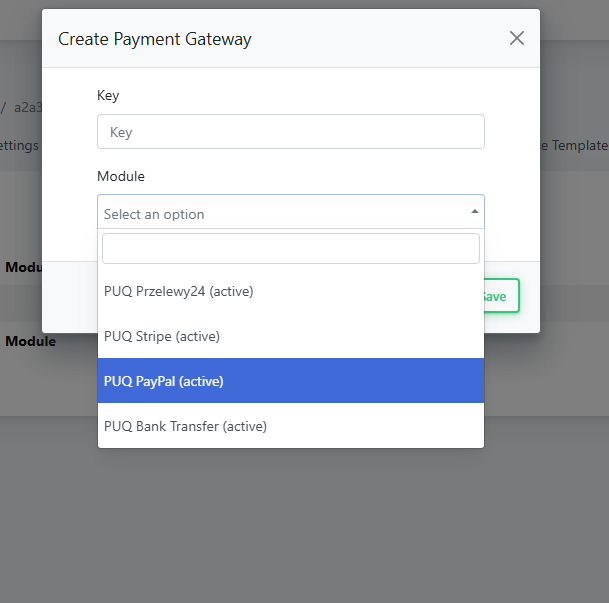
Configure the Gateway
(Screenshot: Payment Gateway detail form)
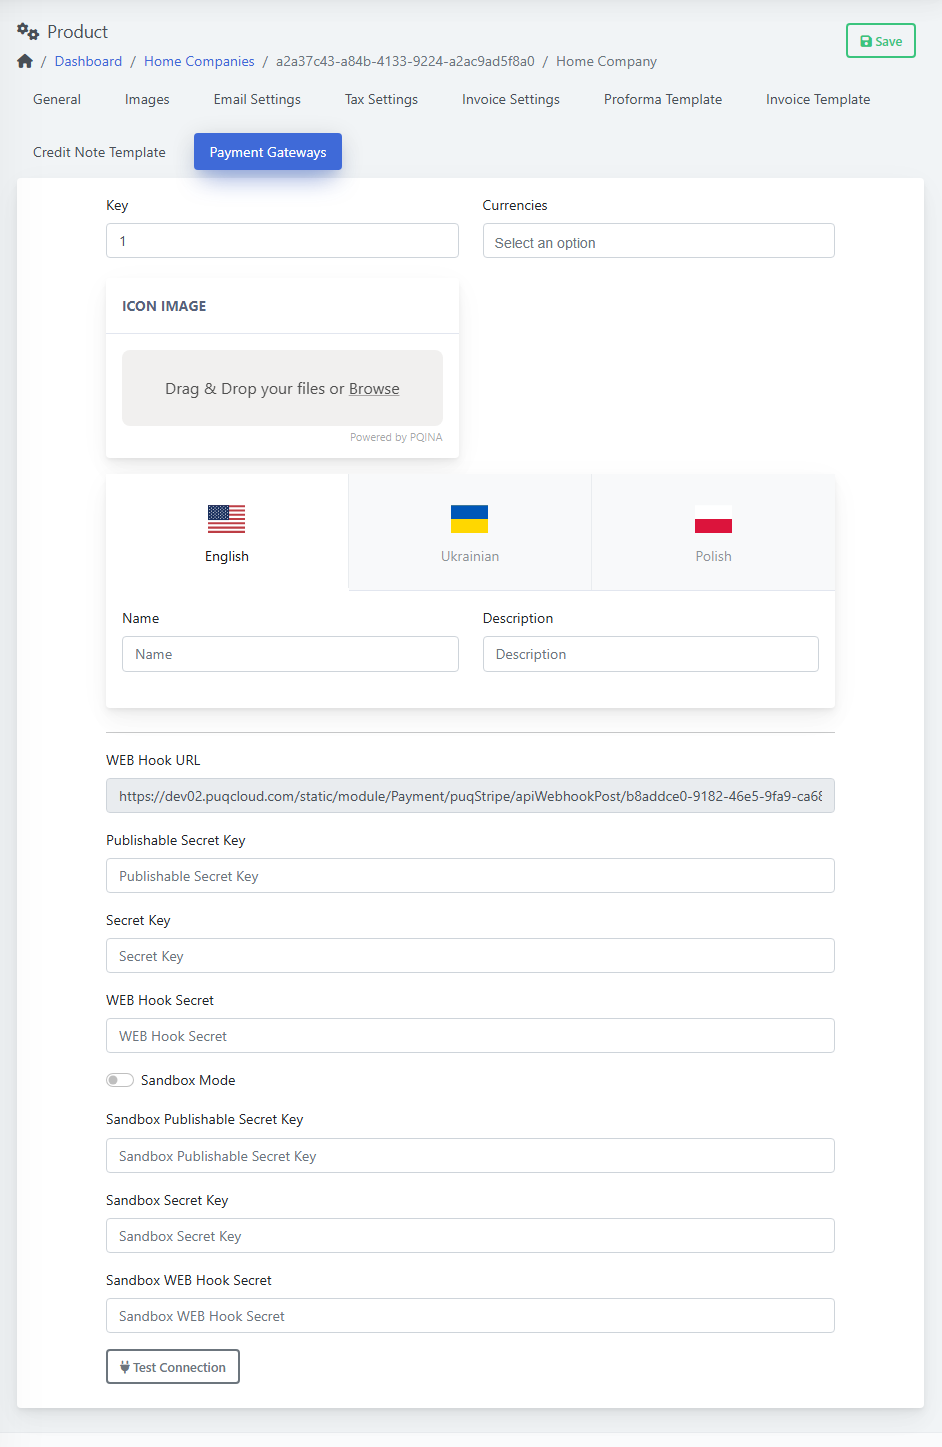
-
Key — internal ID.
-
Currencies — choose supported currencies.
-
Icon Image — optional logo for checkout.
-
Multilingual Name and Description (English / Ukrainian / Polish).
-
Module fields (example: Stripe):
-
WEB Hook URL (paste into Stripe dashboard).
-
Publishable Key, Secret Key, WEB Hook Secret.
-
Sandbox Mode toggle + sandbox keys.
-
Test Connection — verify credentials.
-
-
Click Save.
4) Make a company Default (or change it)
-
Open the company → General tab.
-
Toggle Default to Yes.
-
Save.
The Default Home Company will be used on new billing documents unless a module or workflow specifies otherwise.
5) Manage the list
-
Edit (yellow pencil) — change details.
-
Delete (red trash) — remove a company you no longer need.
-
Tip: do not delete a company that still appears on historical invoices.
-
-
Search — filter by name.
Best Practices
-
Numbering: include
{YEAR}in formats to avoid duplicates across years (e.g.,INV-{YEAR}-{NUMBER}). -
Logos: upload a high-resolution PNG with transparent background.
-
Taxes: set the correct country section (US or CA) and fill local VAT/GST fields to keep invoices compliant.
-
Backups: before editing templates, export or copy the current code.
Troubleshooting
-
Gateway test fails: recheck the keys, ensure you used the live or sandbox pair to match the Sandbox Mode setting.
-
Wrong logo/text on documents: verify you edited the correct Home Company and that it’s set as Default.
-
Numbers jumping: confirm the Next … Number and the Reset policy; avoid changing formats mid-year.
Create and manage Tax Rules
PUQcloud Panel
Order Now | Download | FAQ
This guide shows you how to set up and maintain Tax Rules for different countries and regions in the PUQcloud Panel. Use these rules to automatically apply the correct taxes on invoices based on the client type and location.
Overview
How matching works
The system reads rules from top to bottom. The first matching rule is applied. Keep your most specific rules (e.g., province/state) above more general ones.
Before You Start
-
Make sure you have at least one Home Company configured (Settings → Finance → Home Companies).
-
Know your target tax rates (GST/HST/PST/VAT, etc.).
-
Decide which client types the rule should apply to:
-
Private Client (individual)
-
Company Without TAX ID
-
Company With TAX ID
-
Always verify rates with your accountant or the official tax authority.
Quick Start: Generate Preset Rules
You can auto-create a starting set of rules and then fine‑tune them.
Create Canadian Rules
-
Go to Finance → Tax Rules.
-
Click Create Canadian Rules.
-
Select your Home Company and Save.
-
Review the generated rules and adjust rates as needed.
(Screenshot reference: “Create Canadian Rules” modal)
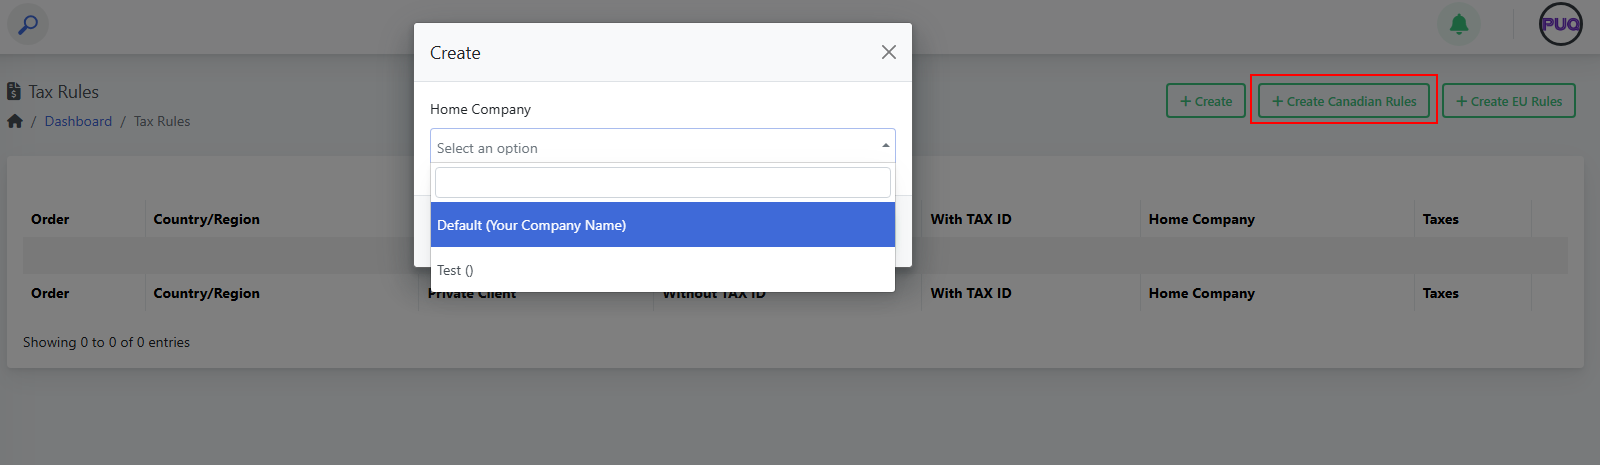
Create EU Rules
-
Go to Finance → Tax Rules.
-
Click Create EU Rules.
-
Select your Home Company and Save.
-
Review the generated rules and adjust rates as needed.
(Screenshot reference: “Create EU Rules” modal)

Note: Presets are a convenience. You are responsible for validating the final rates.
Create a Tax Rule Manually
-
Open Finance → Tax Rules. (See: List view)

-
Click Create. (See: “Create” modal)

-
Fill the fields:
-
Country and State/Region (optional).
-
Turn on the client‑type toggles the rule should apply to:
Private Client, Company Without TAX ID, Company With TAX ID.
(Use Individual TAX Rate if the rule should tax individuals.) -
Enter up to three taxes (name + percent). Example:
-
Tax 1 Name:
VAT— Tax 1 Rate:23.000 -
Tax 2 Name:
PST— Tax 2 Rate:7.000(if applicable) -
Tax 3 Name:
GST— Tax 3 Rate:5.000(if applicable)
-
-
Choose Home Company.
-
-
Click Save. Your rule appears in the list. (See: List after creating a rule)

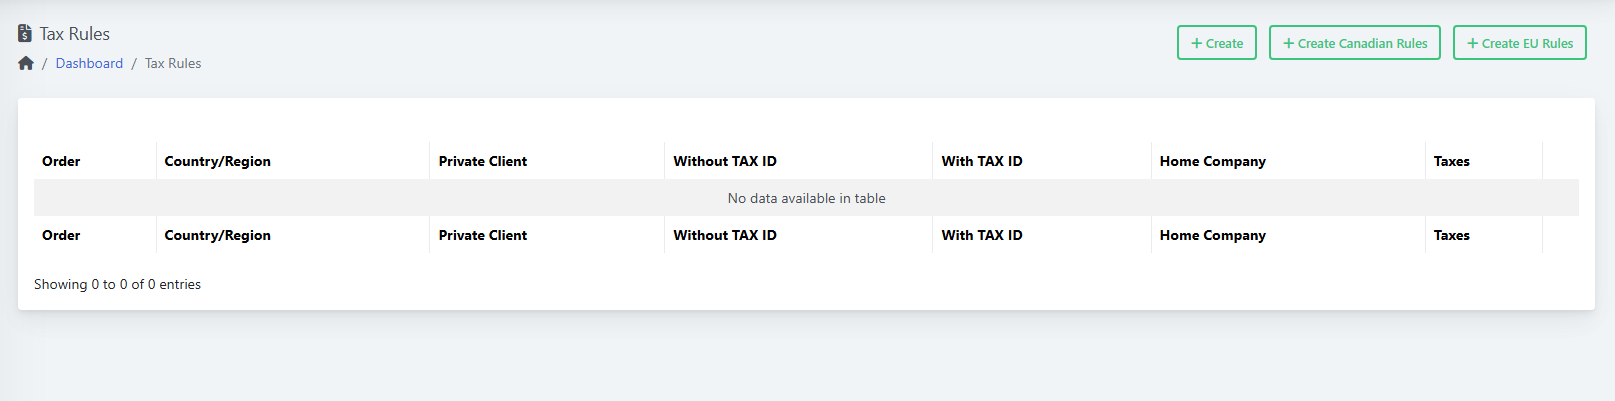
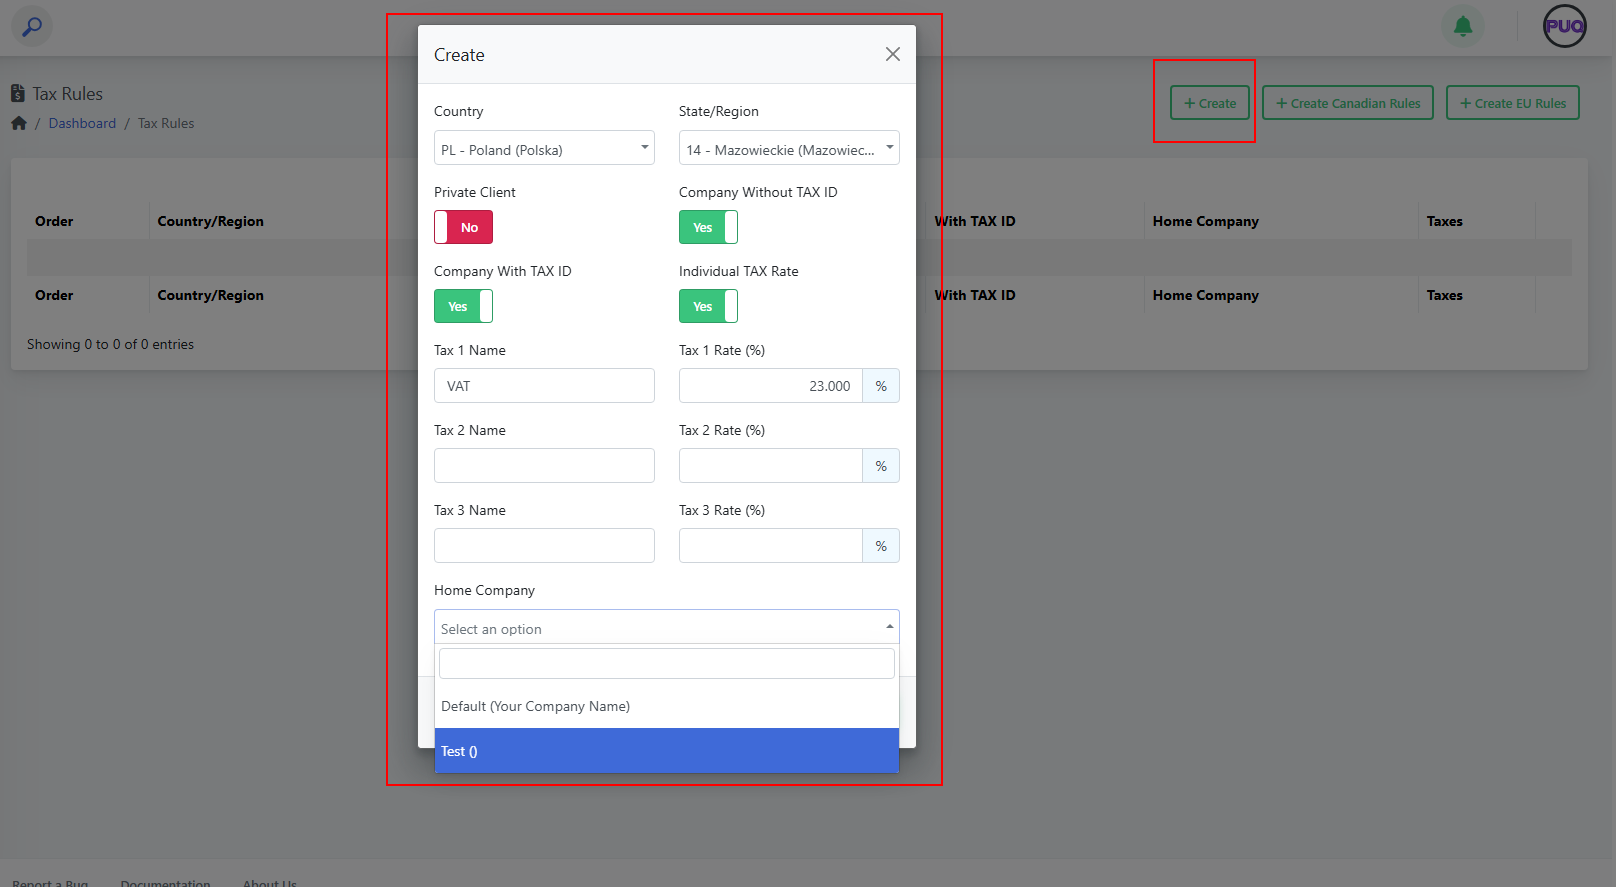
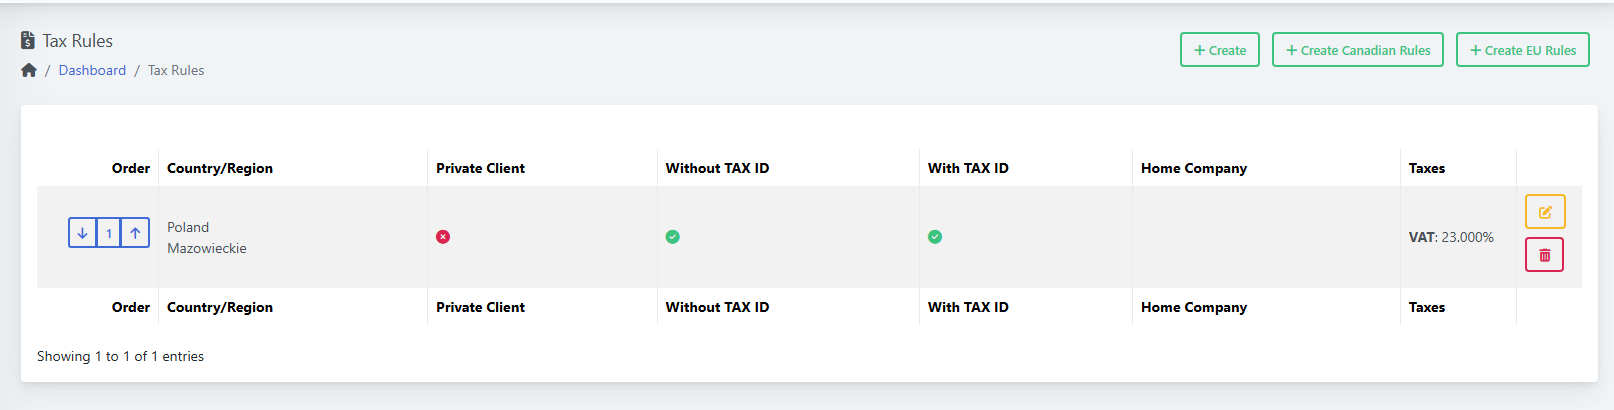
Edit a Rule
-
In Finance → Tax Rules, click the Edit icon on the desired row.
-
Change any fields (country/region, toggles, tax names/rates, home company).
-
Click Save.
(Screenshot reference: “Edit” modal)
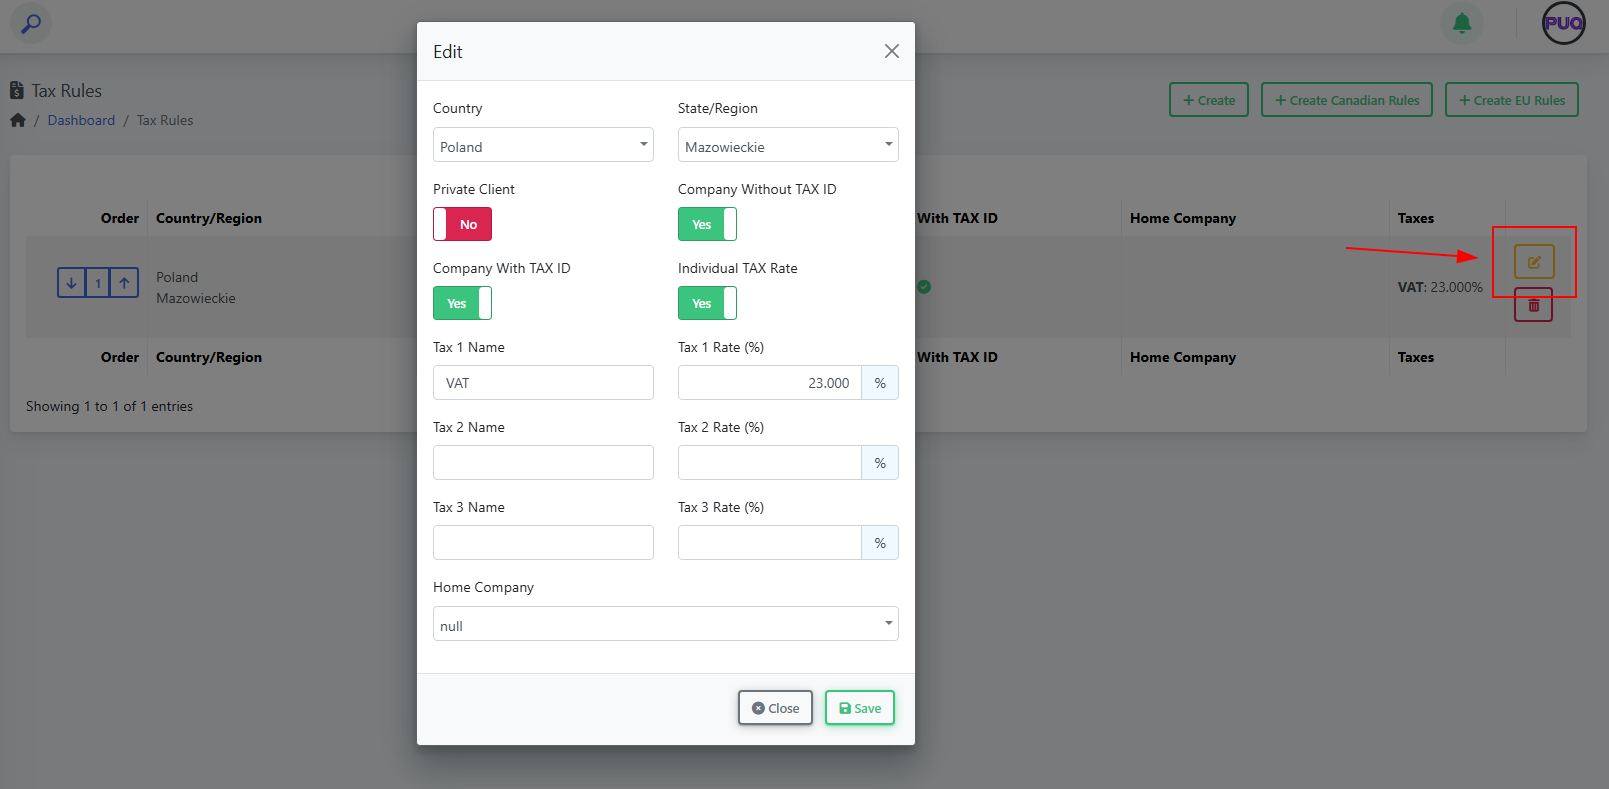
Delete a Rule
-
In Finance → Tax Rules, click the Delete (trash) icon on the row.
-
Confirm the deletion.
Deleting a rule does not change past invoices; it only affects new invoices going forward.
Change Rule Order (Priority)
-
In Finance → Tax Rules, use the up/down arrows in the Order column.
-
Place specific rules (e.g., province/state) above general country-wide rules.
Field Reference
| Field | Type | What it controls | Example |
|---|---|---|---|
| Country | Dropdown | The country the rule applies to. | Poland |
| State/Region | Dropdown | Optional region/province/state inside the country. | Mazowieckie |
| Private Client | Toggle | Apply this rule to individuals. | On |
| Company Without TAX ID | Toggle | Apply when client is a company without a valid tax ID. | On |
| Company With TAX ID | Toggle | Apply when client is a company with a valid tax ID. | On |
| Individual TAX Rate | Toggle | Enable taxation for individuals per this rule. | On |
| Tax 1 Name / Rate (%) | Text / Number | First tax component name and percentage. | VAT / 23.000 |
| Tax 2 Name / Rate (%) | Text / Number | Second tax component (if needed). | PST / 7.000 |
| Tax 3 Name / Rate (%) | Text / Number | Third tax component (if needed). | GST / 5.000 |
| Home Company | Dropdown | Which Home Company owns/uses this rule. | Default (Your Company Name) |
Example: Poland → Mazowieckie (VAT 23%)
-
Create a rule.
-
Country: Poland; State/Region: Mazowieckie.
-
Toggles: Private Client = Off (if you only tax businesses), Company Without TAX ID = On, Company With TAX ID = On.
-
Tax 1 Name: VAT; Tax 1 Rate: 23.000.
-
Select Home Company.
-
Save. (See: List after creating a rule)

Tips & Good Practices
-
Keep a country-wide rule at the bottom and region‑specific rules above it.
-
Use clear tax names: VAT, GST, PST, HST.
-
Review rules after tax law changes or when you expand to new regions.
-
For multi‑company setups, double‑check the Home Company on each rule.
Troubleshooting
-
My client is taxed incorrectly
-
Check rule order (a broader rule may be matched first).
-
Verify the client’s country/region and tax ID status.
-
Confirm the toggles (Private/With ID/Without ID) match your intent.
-
Ensure tax rates are numeric (e.g.,
23.000).
-
-
I don’t see my Home Company
-
Create it in Home Companies and then return to Tax Rules.
-
Screenshot References
-
List view (empty) — overall layout and action buttons (Create, Create Canadian Rules, Create EU Rules).
-
Create modal — full form with toggles and tax fields.
-
Create Canadian Rules modal — select Home Company.
-
Create EU Rules modal — select Home Company.
-
List view (after creating) — shows Poland/Mazowieckie, indicators and VAT 23.000%.
-
Edit modal — modify existing rule fields.
Create and Manage a Product
PUQcloud Panel
Order Now | Download | FAQ
This guide explains how to create, configure, and maintain Products in the PUQcloud Panel, including pricing, attributes, options, and module settings.
Overview
A Product is what your customers buy. Prices, options, and the provisioning module all live under the product.
Products List
From Products → Products you’ll see: Icon, Key, Visible, Active, Stock, Services, and actions (Edit, Delete). Use Search to filter.
(Screenshot reference: Products list view)
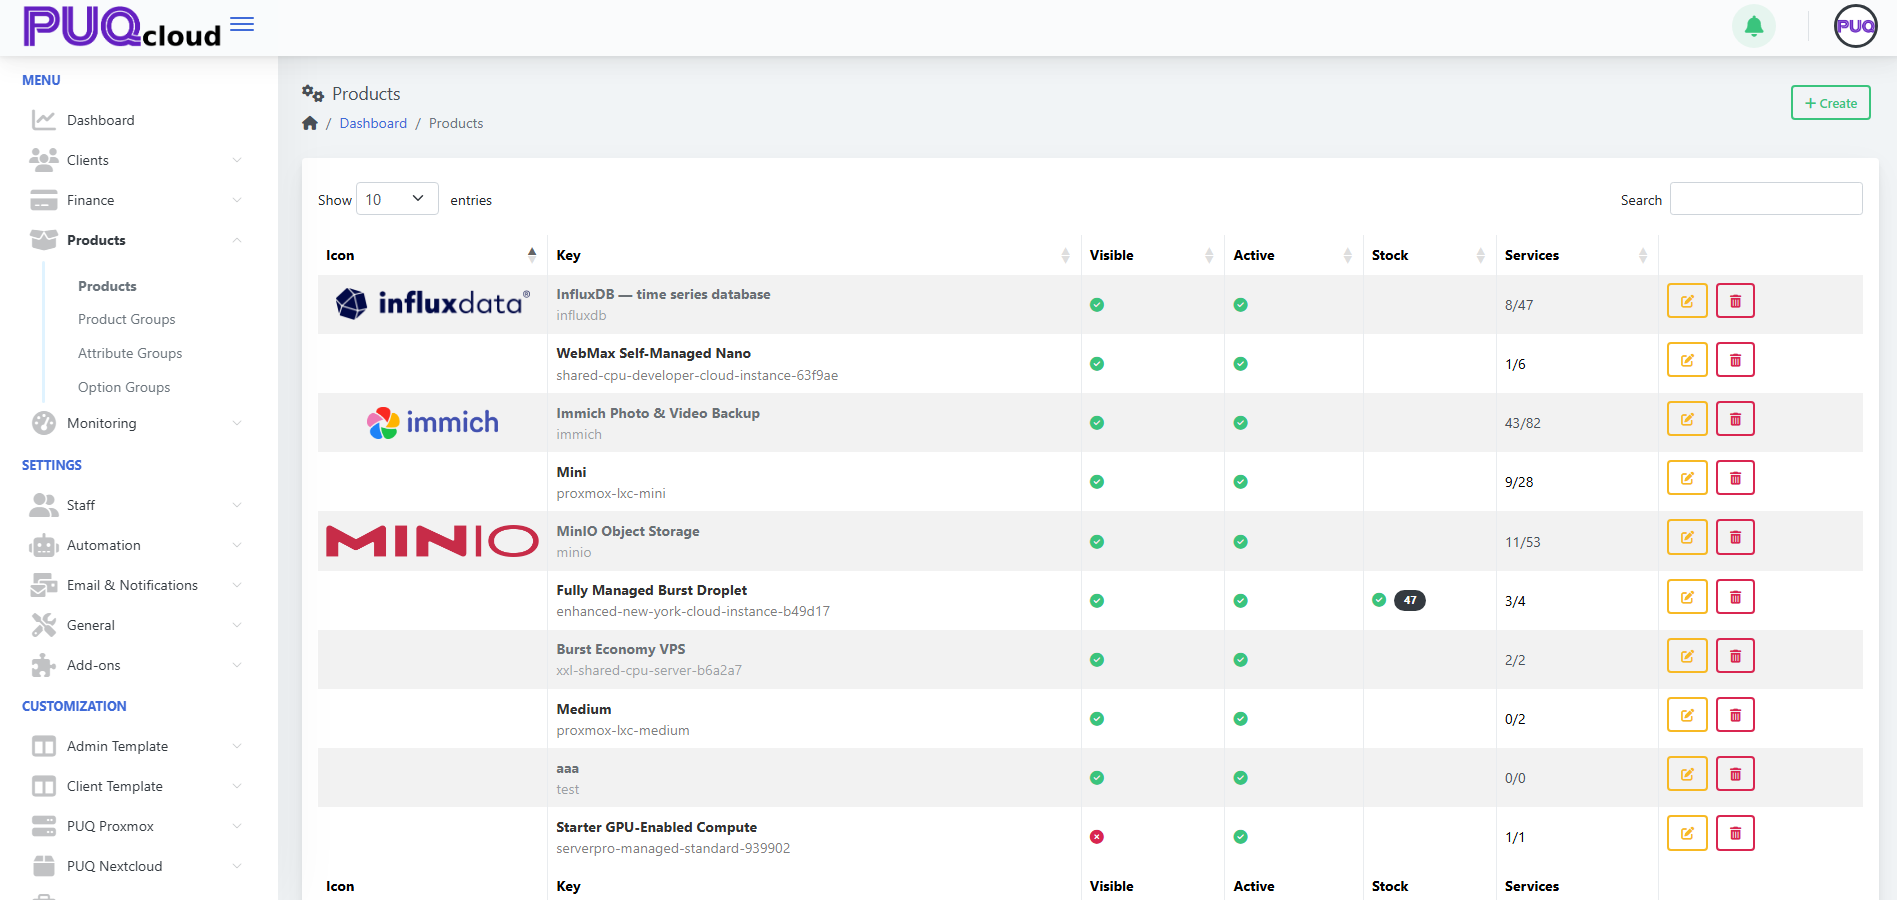
Actions
-
+ Create — start a new product.
-
Edit — open the product tabs (General, Images, Pricing, Attributes, Options, Module).
-
Delete — remove the product (does not remove existing services already provisioned).
Create a Product
-
Click + Create.
-
Enter a unique Key (e.g.,
influxdb). -
Click Save — the product opens on the General tab for further setup.
(Screenshots: Create Product modal → Product General tab)
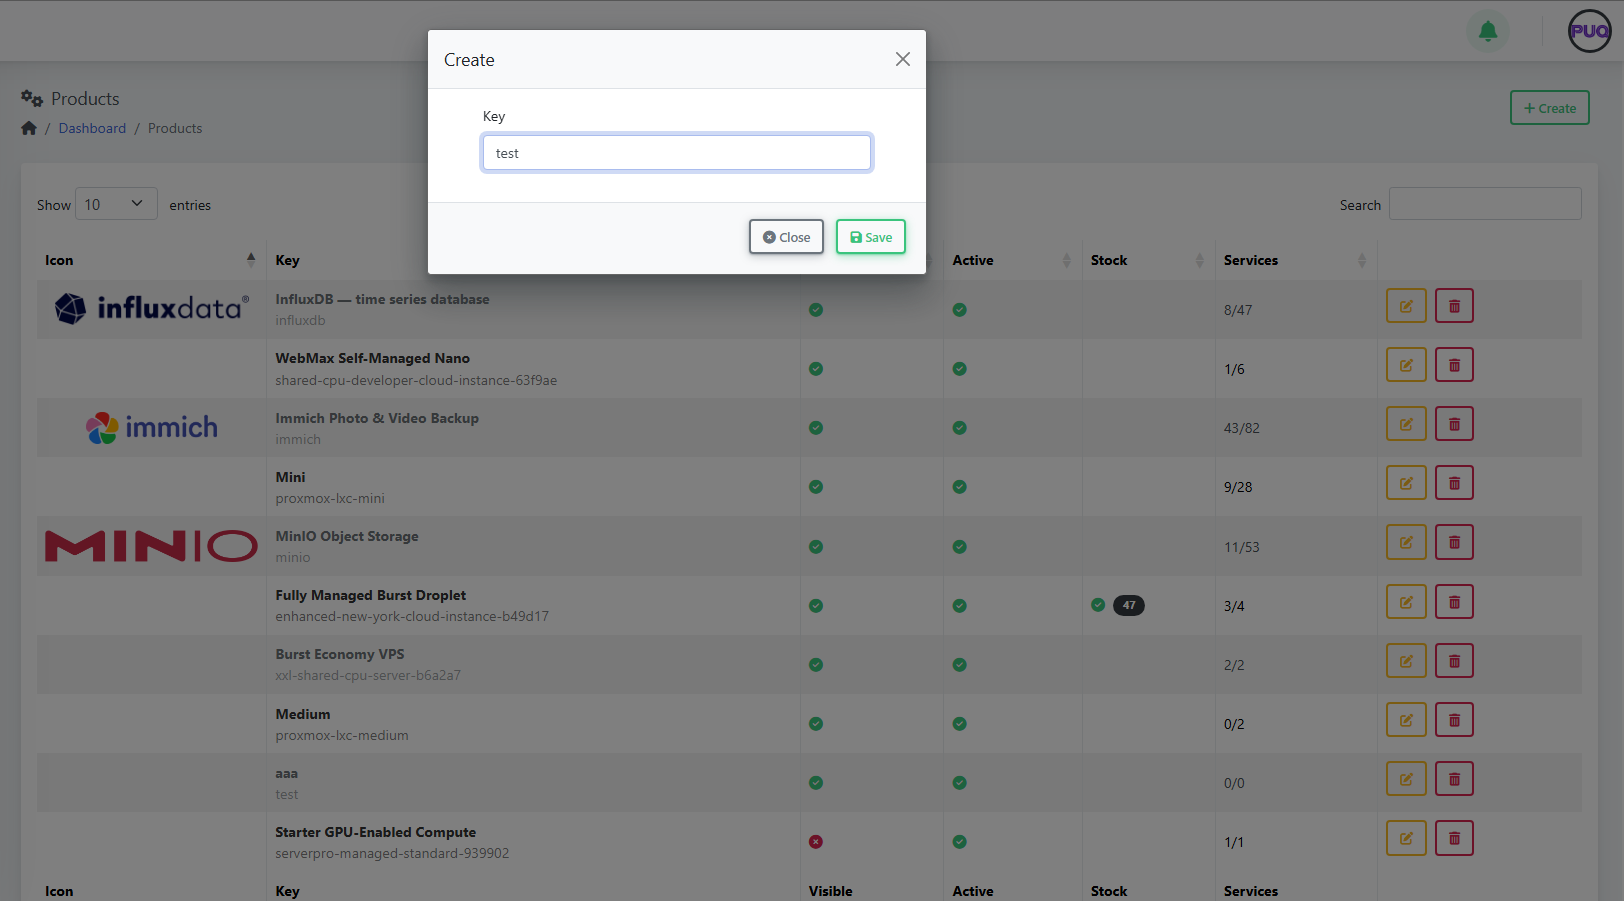
Configure the Product
Use the tabs across the top to complete setup.
1) General
Fields you’ll see:
-
Key — internal identifier (read-only after creation).
-
Hourly Billing — enable if the product can be charged hourly.
-
Allow Idle — allow an "idle" price tier.
-
Convert Price — auto-convert base currency rates to other currencies.
-
Cancellation Delay / Termination Delay (Hours) — grace windows before cancel/terminate executes.
-
Stock Control — enable and set quantity to track stock.
-
Hidden — hide from storefront/catalog.
-
Retired — prevent new purchases while keeping existing services.
-
Localized content — Name, Short Description, Description per language.
-
Notes — internal notes for admins.
Click Save.
(Screenshot reference: Product → General tab)
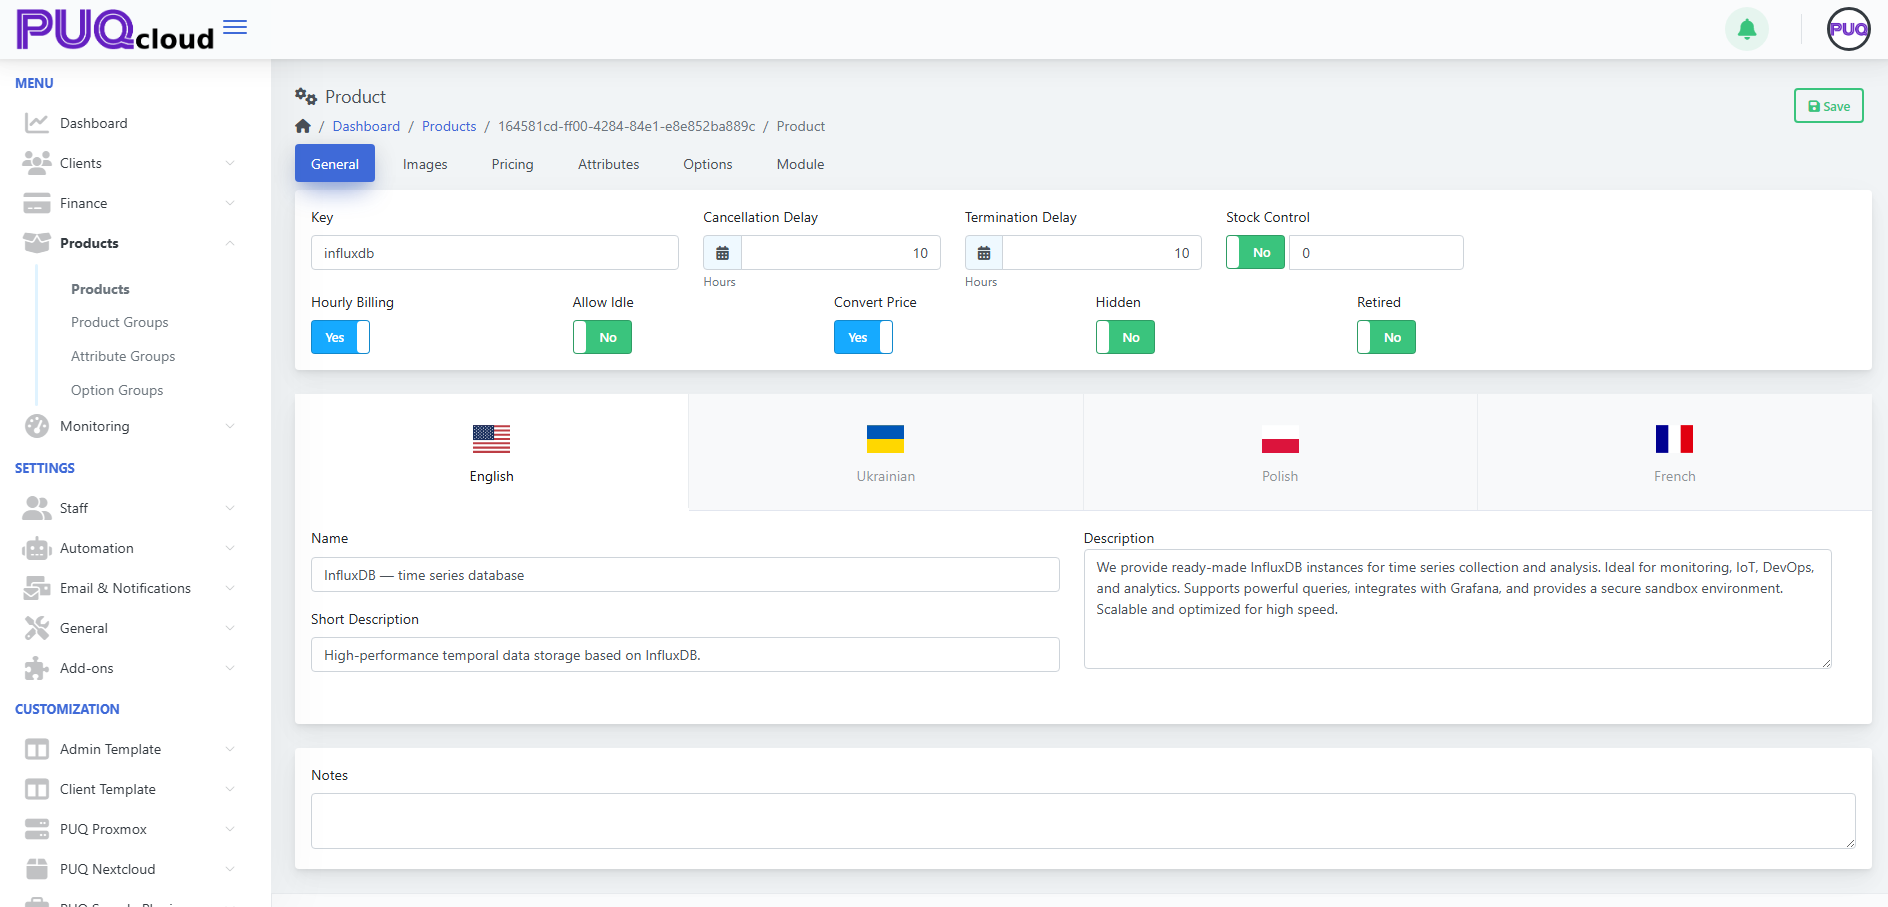
2) Images
-
Icon image — small logo shown in listings.
-
Background image — larger visual used on product pages/cards.
Drag & drop or click to upload, then Save.
(Screenshot reference: Product → Images tab)
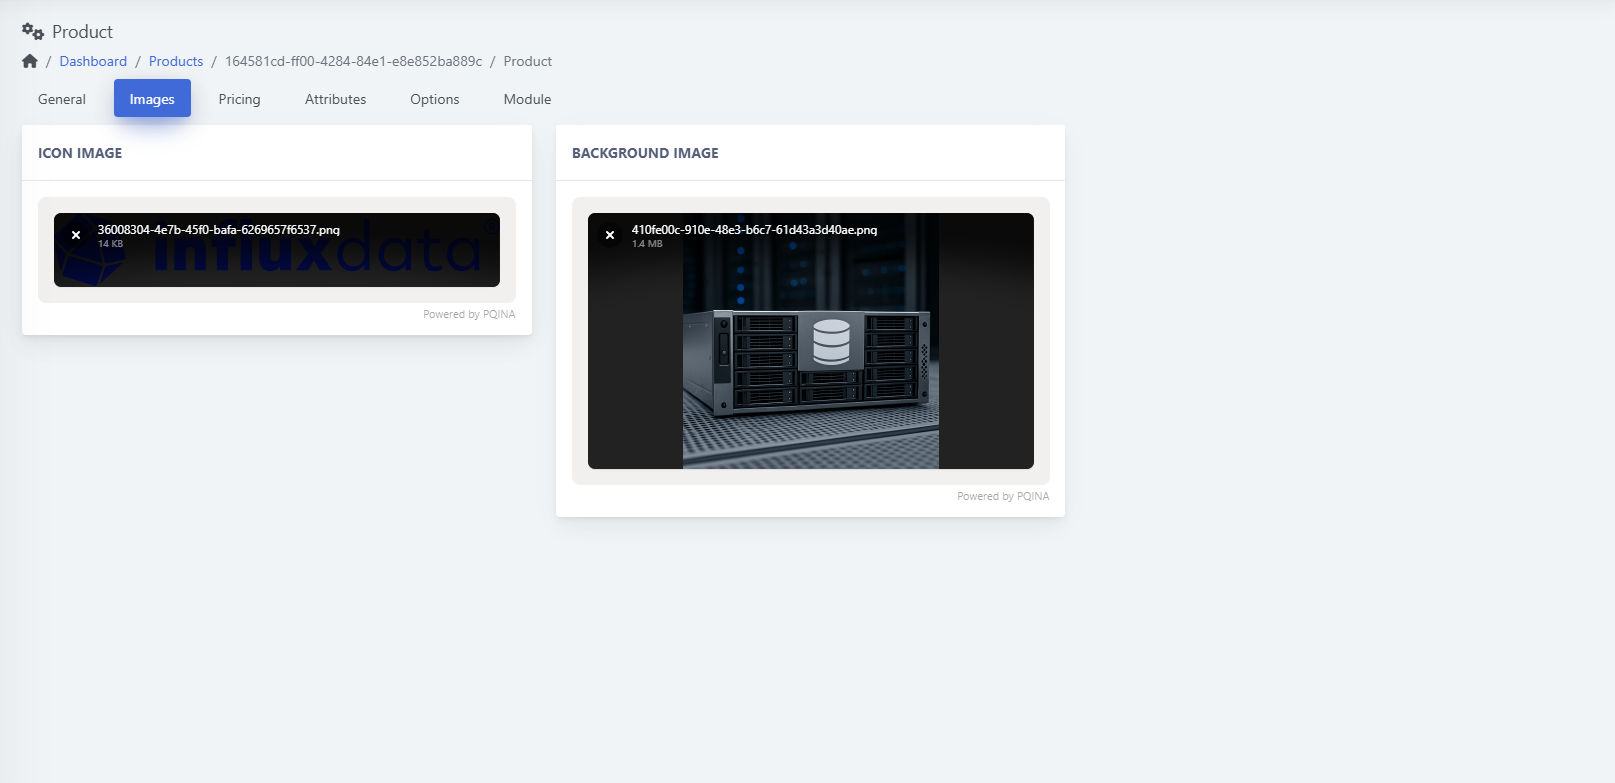
3) Pricing
The table shows Period, Currency, Setup, Base, Idle, Switch down, Switch up, Uninstall with Edit/Delete actions.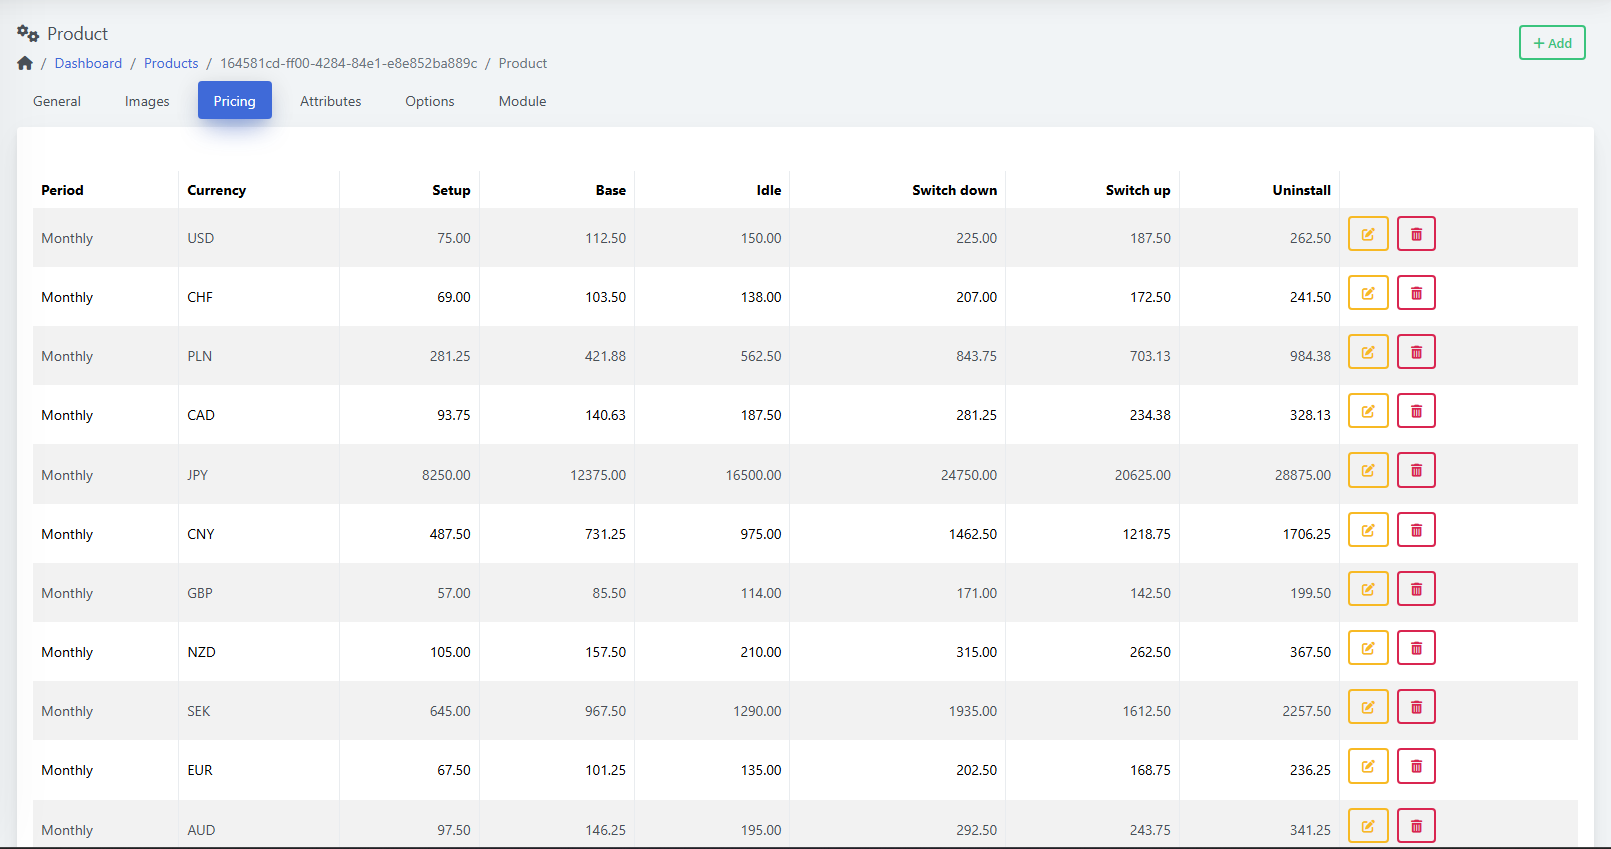
Add a price
-
Click + Add.
-
Choose Currency and Period (One‑Time, Daily, Weekly, Bi‑weekly, Monthly, etc.).
-
Enter amounts as needed (Setup, Base, Idle, Switch up/down, Uninstall).
-
Save.

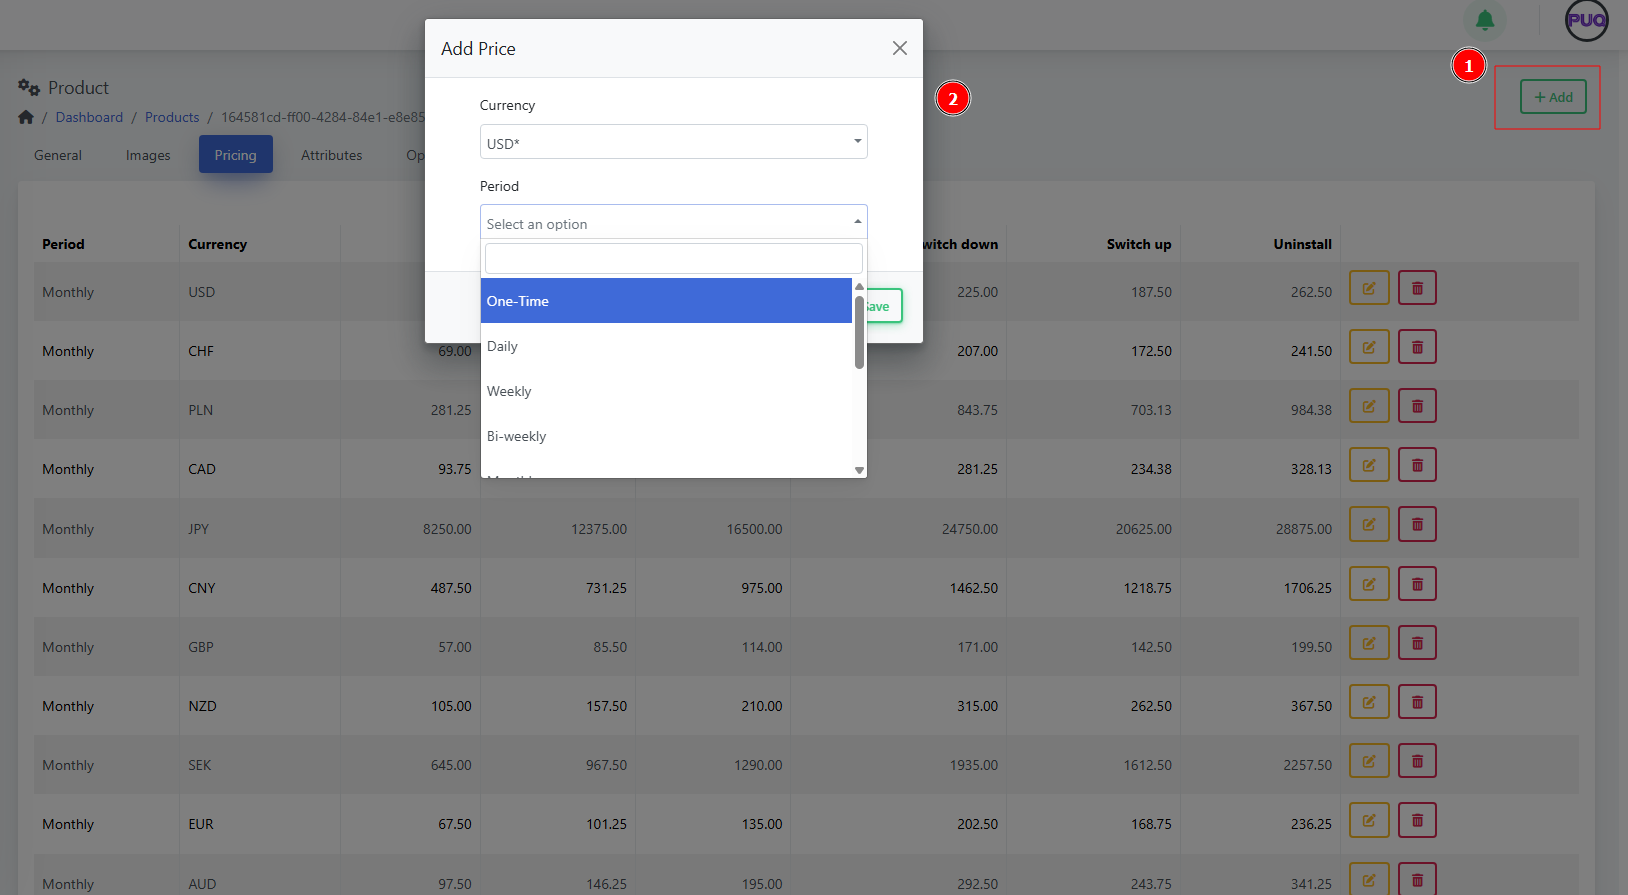
Edit a price
-
Click the Edit icon on a row, adjust amounts, Save.

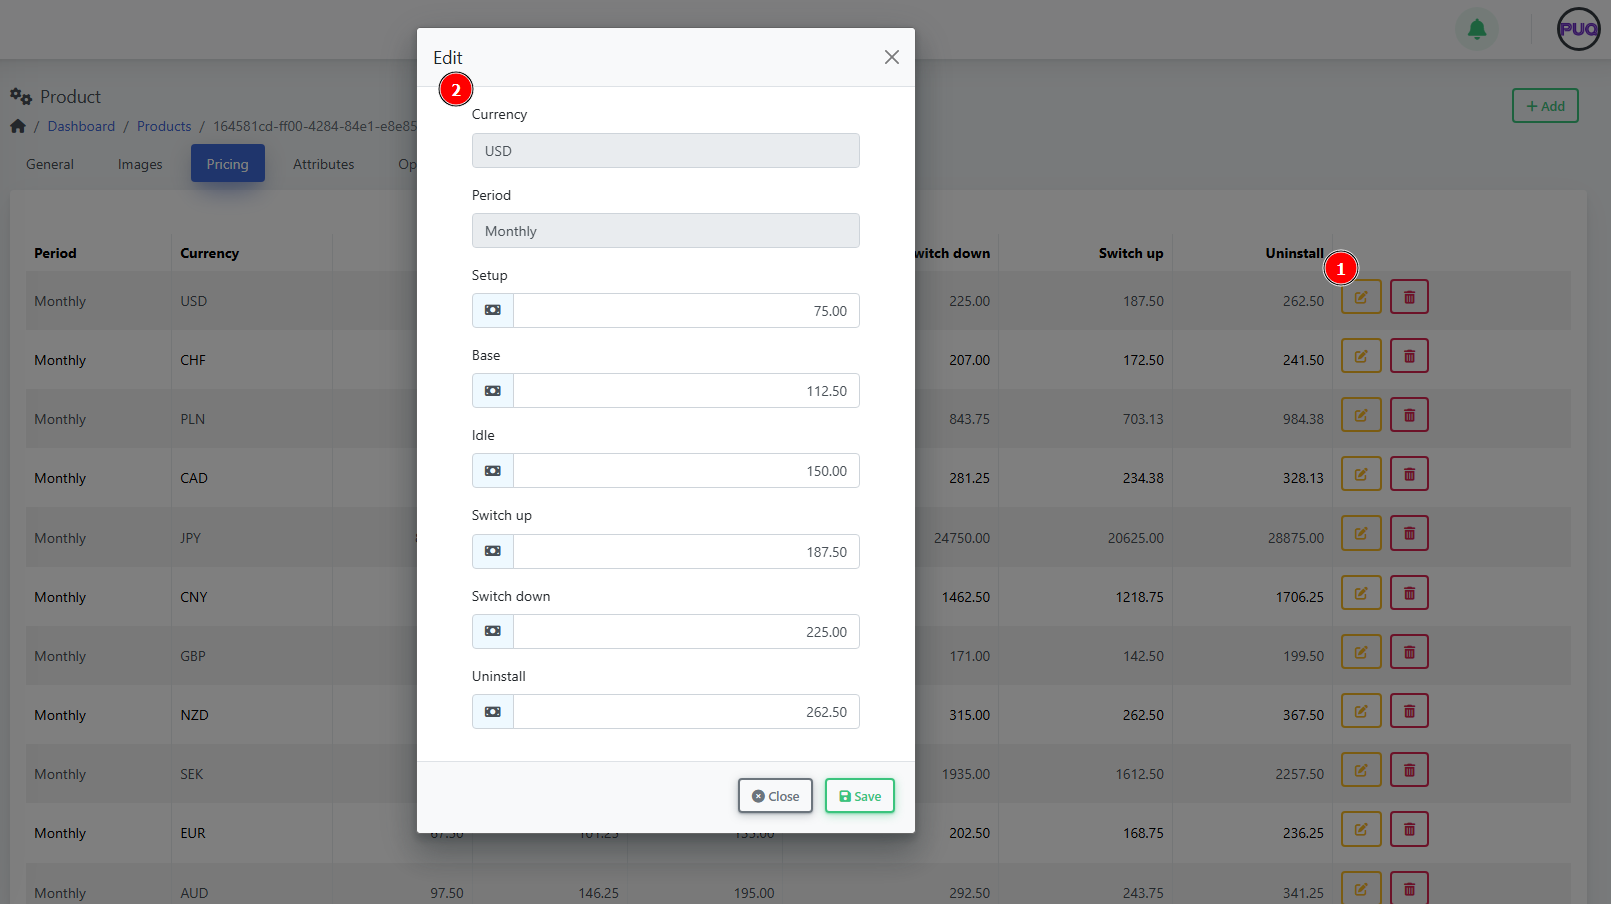
4) Attributes
Attach predefined attributes that describe or parameterize the product (often used by modules or displayed to customers).

Add an attribute
-
Open Attributes and click + Add Attribute.
-
Pick an item from the dropdown list (e.g.,
proxmox-lxc-rootfs-raid10). -
Save.
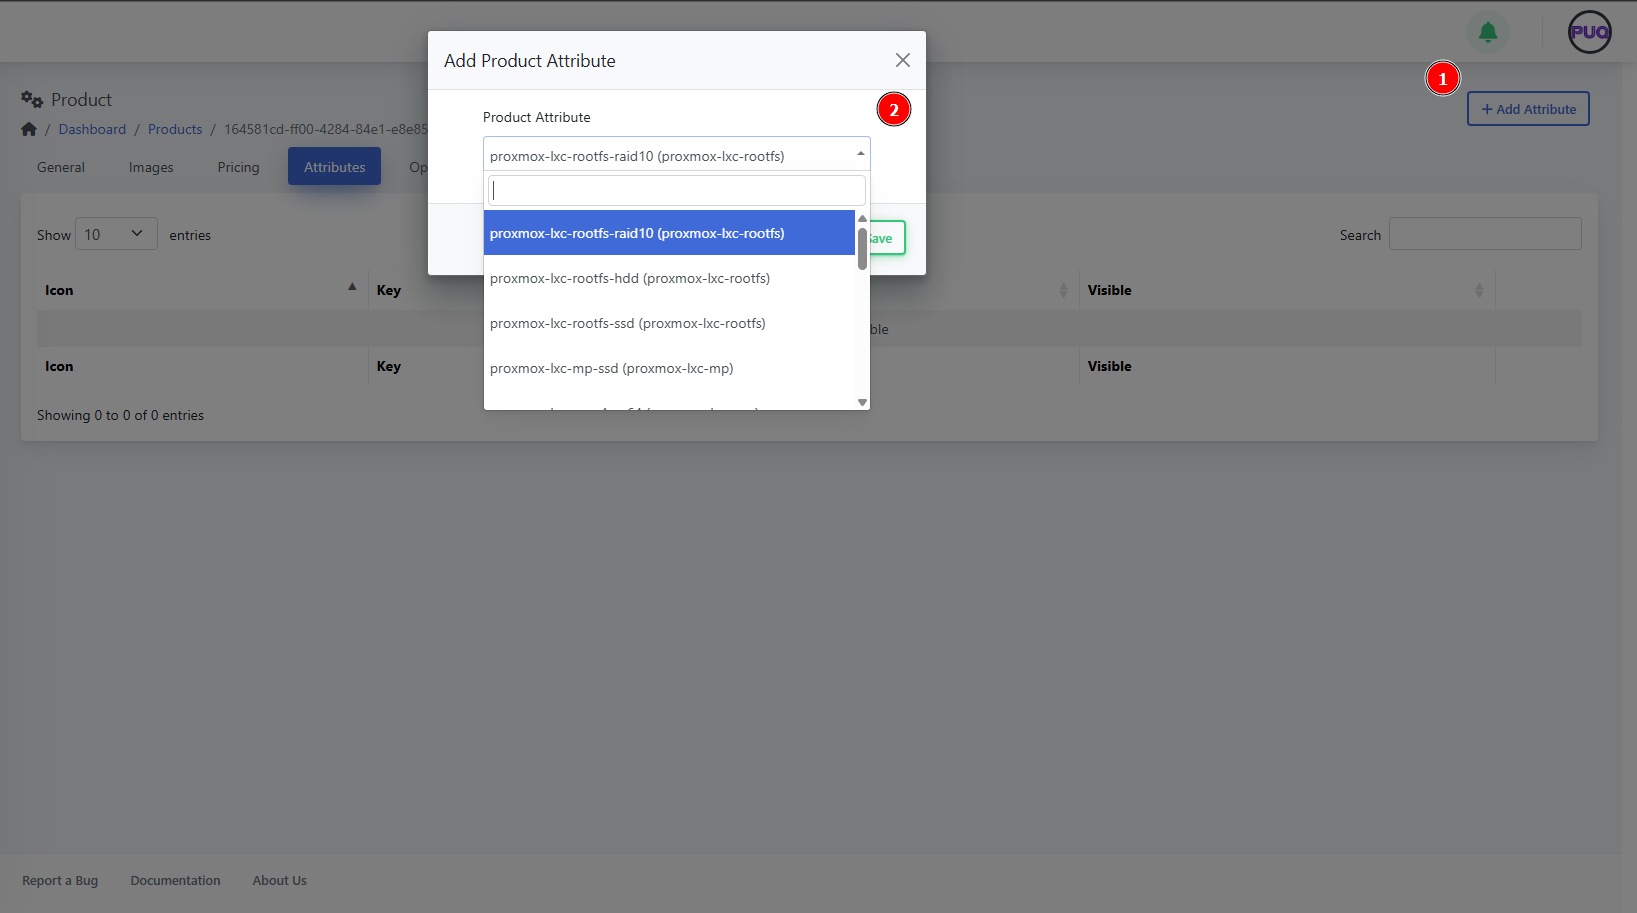
5) Options
Link option groups like CPU, RAM, Disk to let customers configure variants during order.
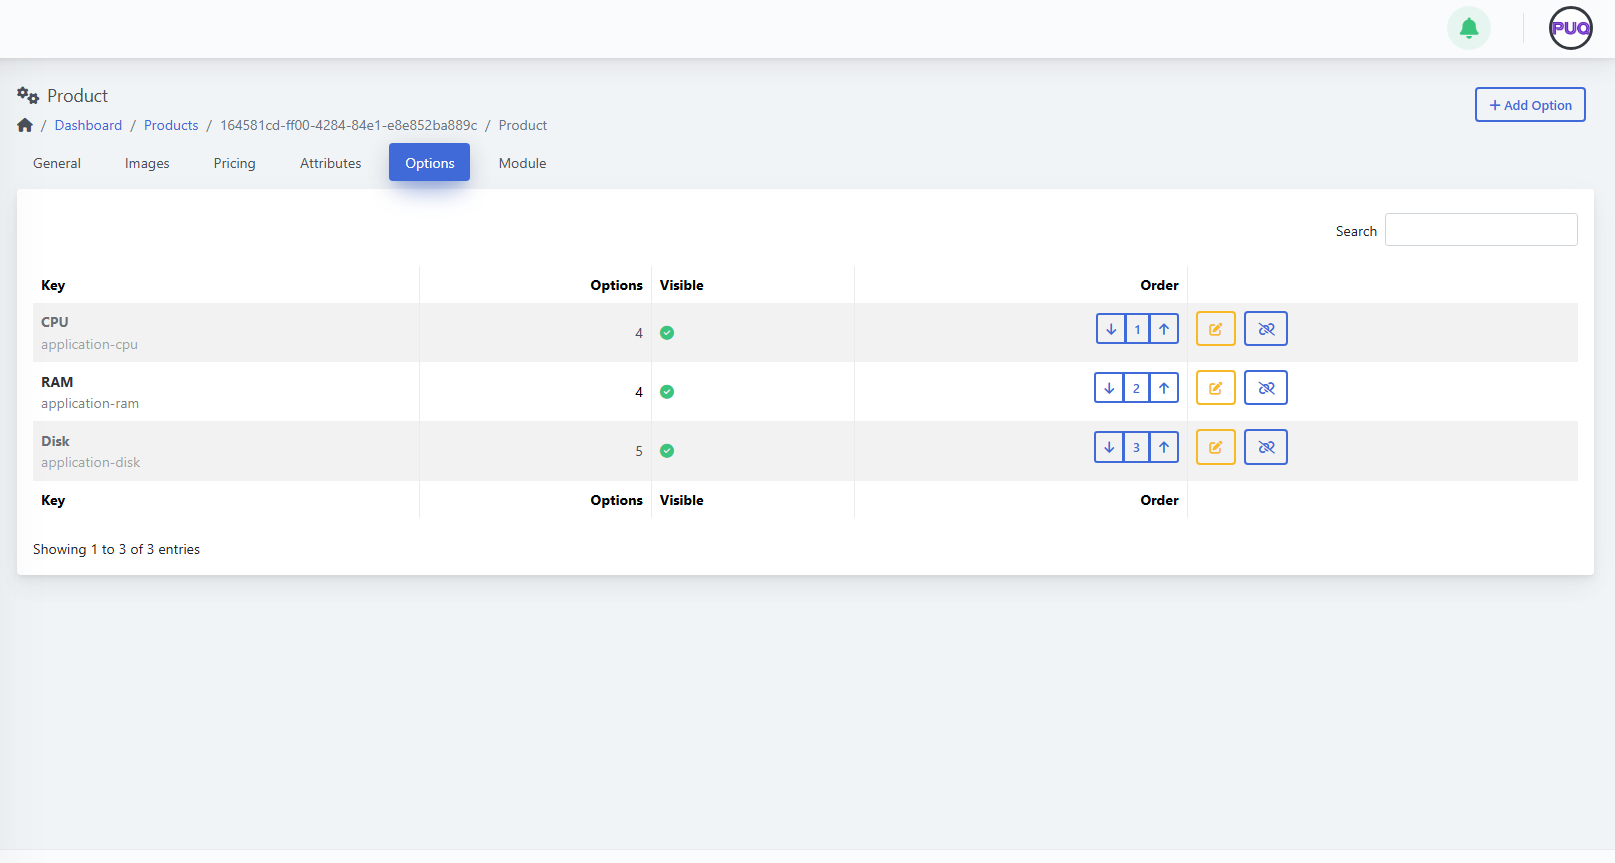
Add an option group
-
Open Options and click + Add Option.
-
Select a group (e.g., Firewall, Location, Additional Disk) and Save.
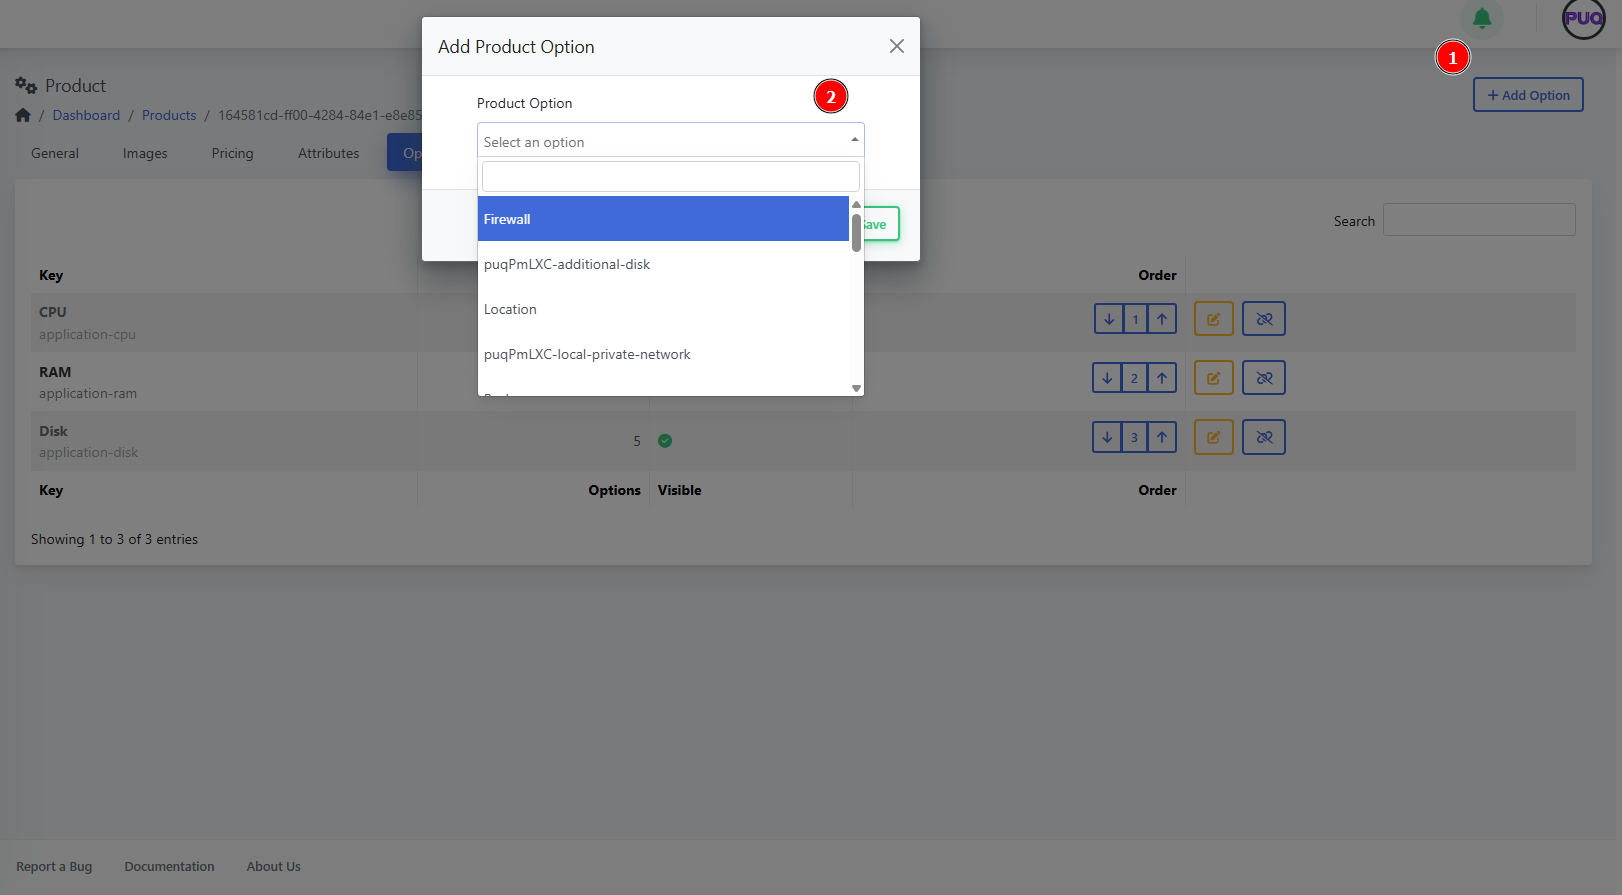
Manage option groups
-
Order — use the up/down arrows to change display order.
-
Edit — open the option group editor.
-
Hide/Show — toggle visibility for this product.
-
Unlink — detach the group from this product (confirm in the dialog).
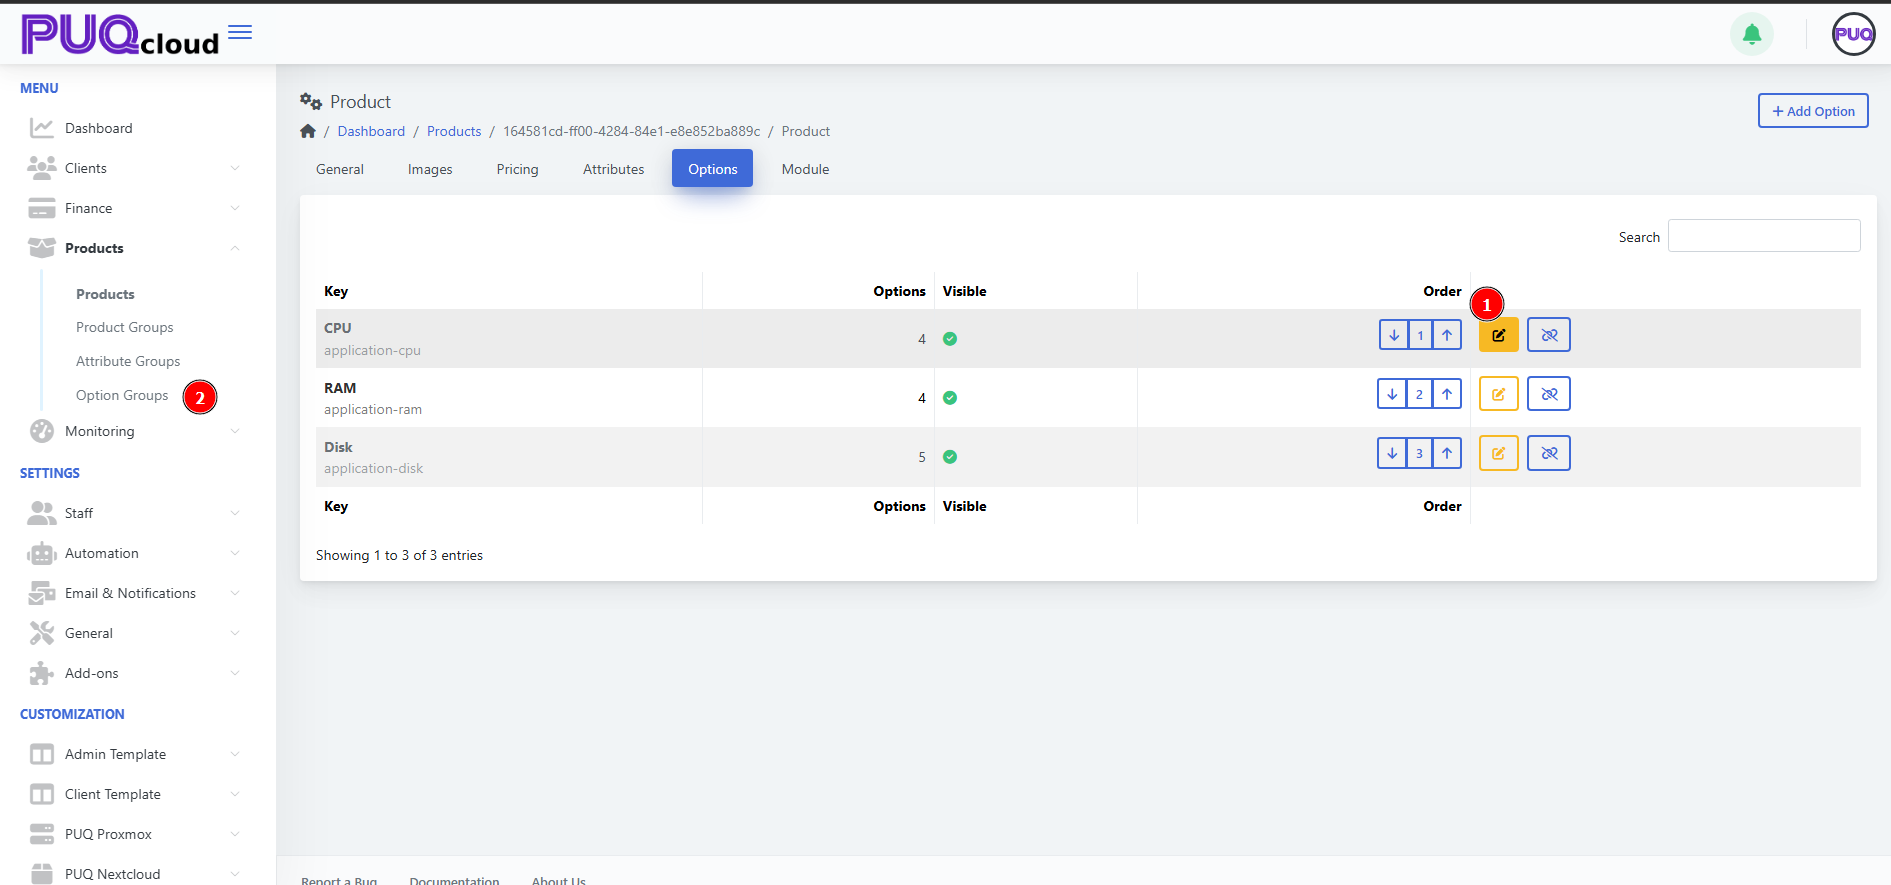
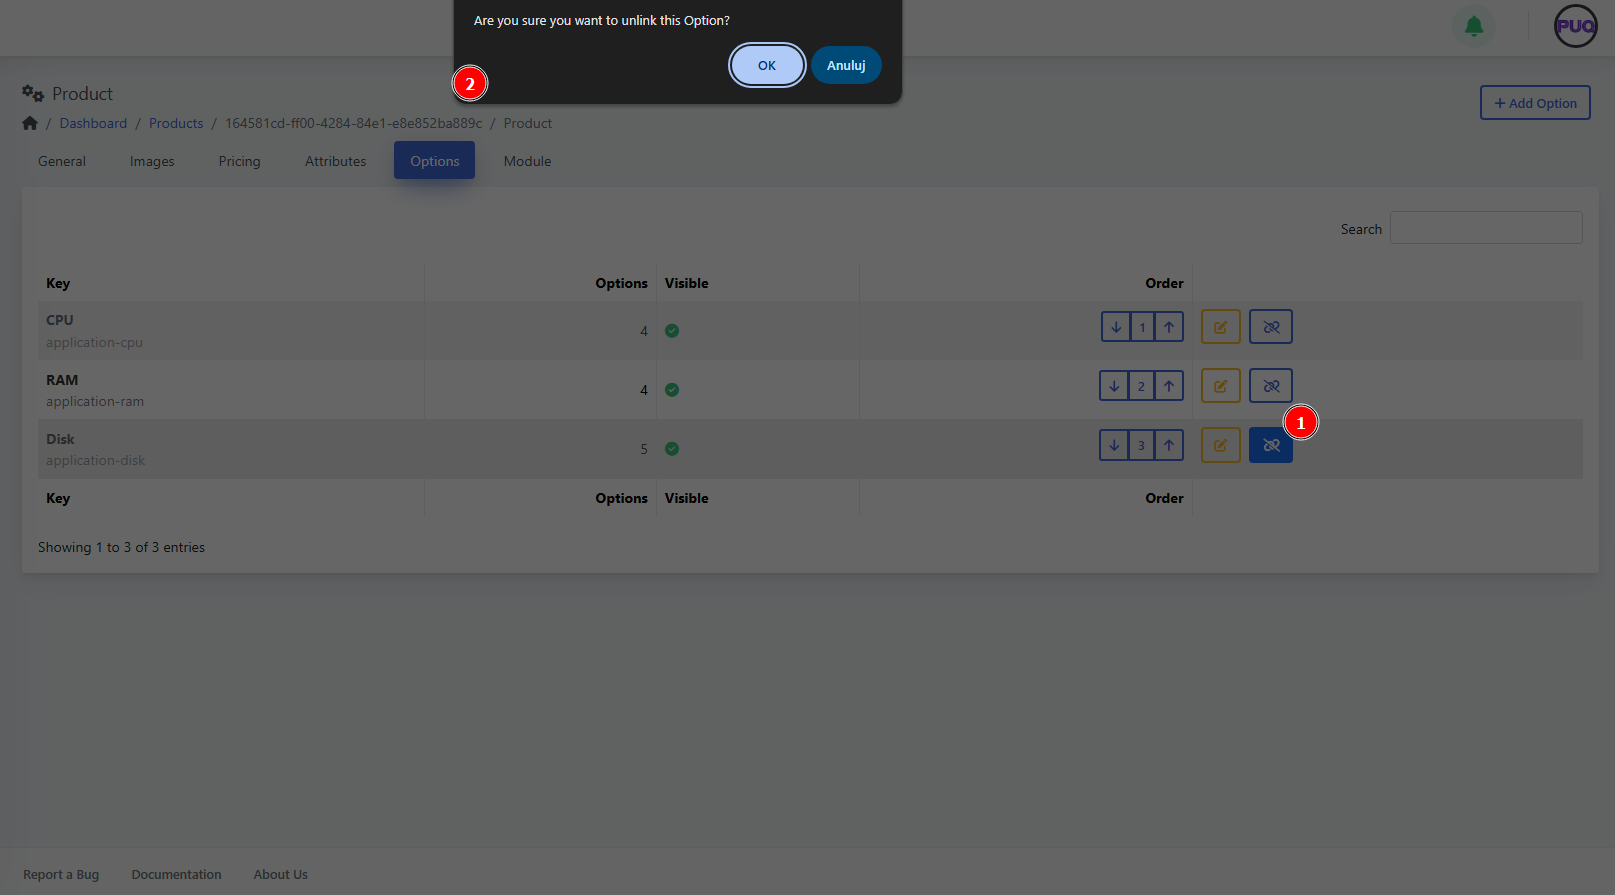
6) Module
Choose the provisioning module and fill in any required fields. Each module exposes its own parameters.
-
Go to Module.
-
Pick the Module from the dropdown (e.g., PUQ Sample Product (active)).
-
Complete the module fields.
-
Click Save.
(Screenshot reference: Module tab)
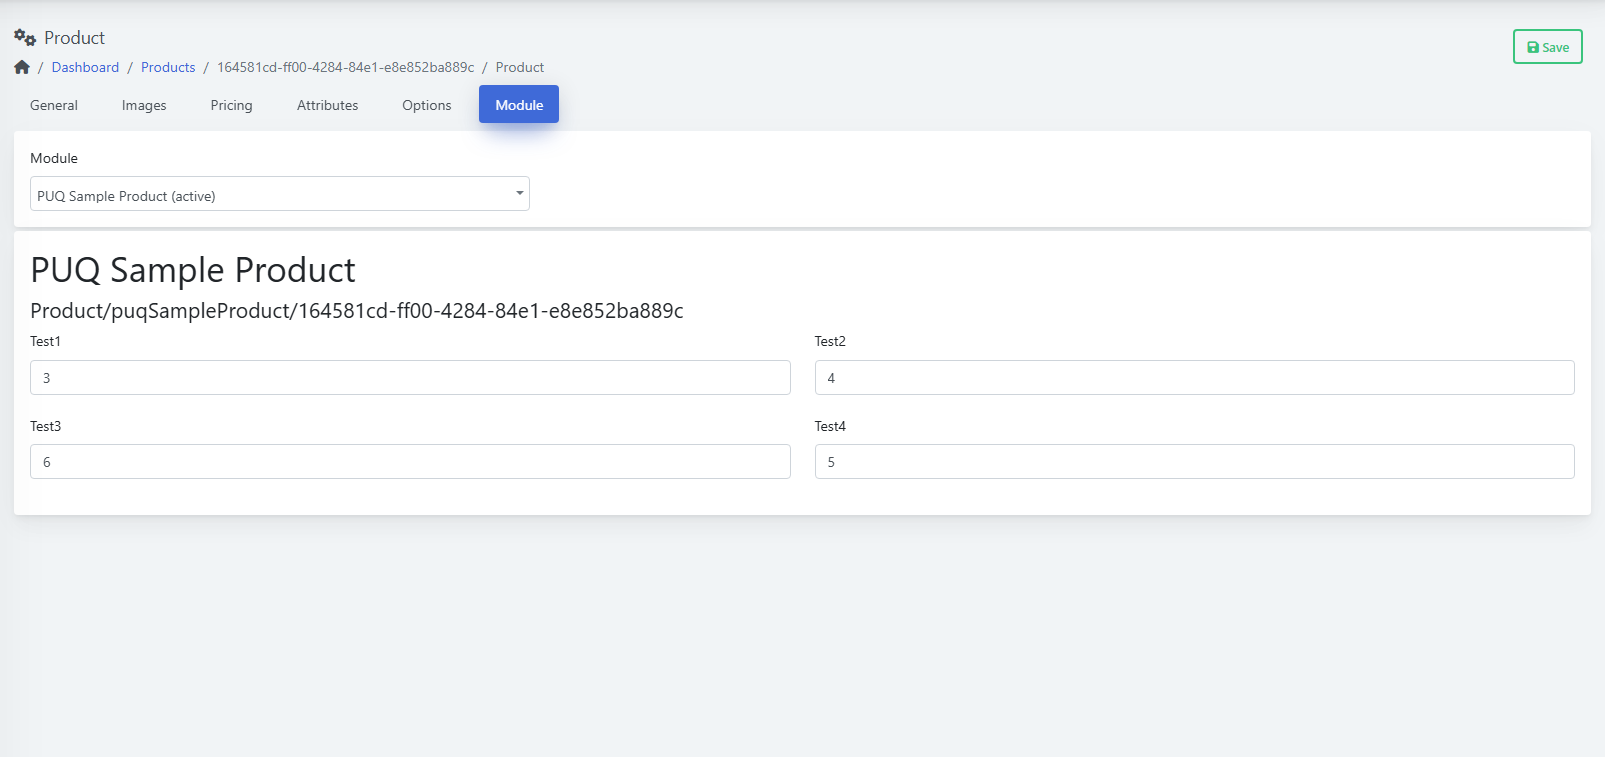
Manage Visibility & Lifecycle
Best Practices
Troubleshooting
-
Product not visible on site → Check Hidden and Retired toggles; ensure at least one Price exists.
-
Options missing at checkout → Verify the groups are linked and visible for this product.
-
Provisioning fails → Confirm Module is selected and all required fields are filled; review module logs.
-
Wrong currency shown → Check the Pricing table and Convert Price setting.
Create and Manage Product Groups
PUQcloud Panel
Order Now | Download | FAQ
Product Groups let you organize related products (e.g., Mini/Medium/Advanced plans) into a single category with shared visuals and templates.
Overview
Groups control how products are displayed on the storefront (list/order/manage templates) and provide a place to order items and manage visibility.
Product Groups List
You’ll see: Icon, Key, Visible, Products (count), Order controls (down / index / up), and actions (Edit, Delete). Use Search to filter.
(Screenshot reference: Product Groups list)
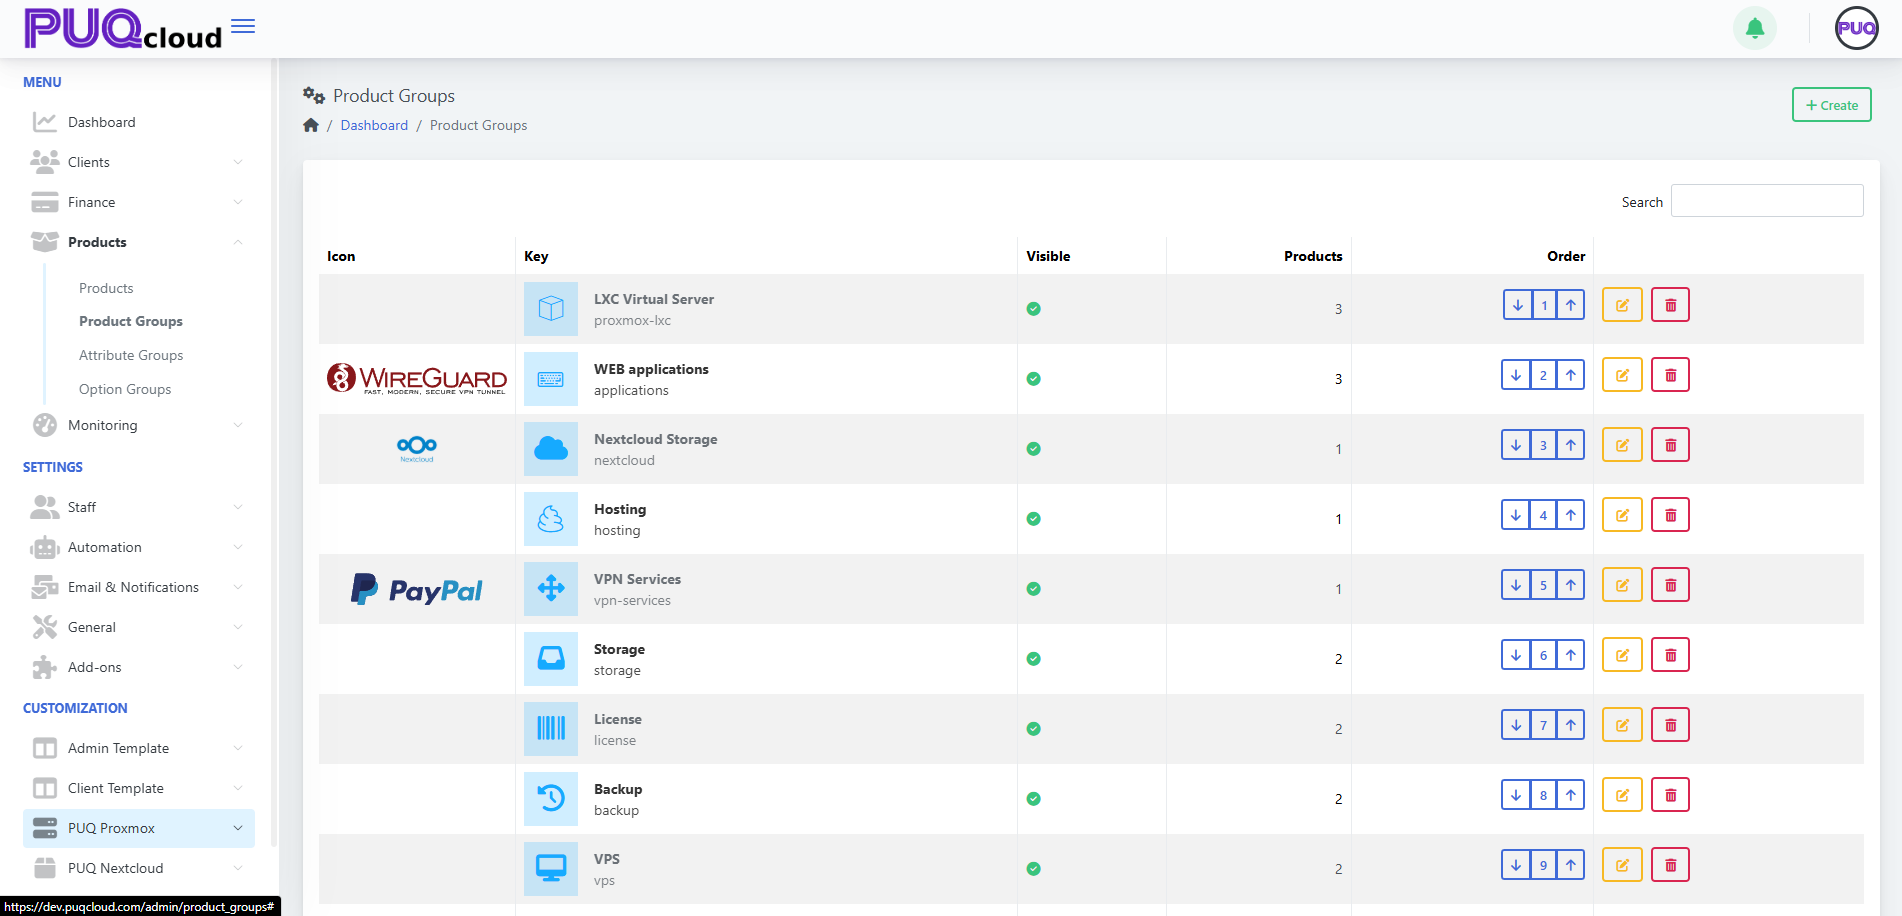
Actions
-
+ Create — add a new group. (Screenshot: Create Group modal)

-
Order — use arrows to arrange groups on the storefront.
-
Edit — open tabs General / Images / Products.
-
Delete — remove the group (does not delete products).
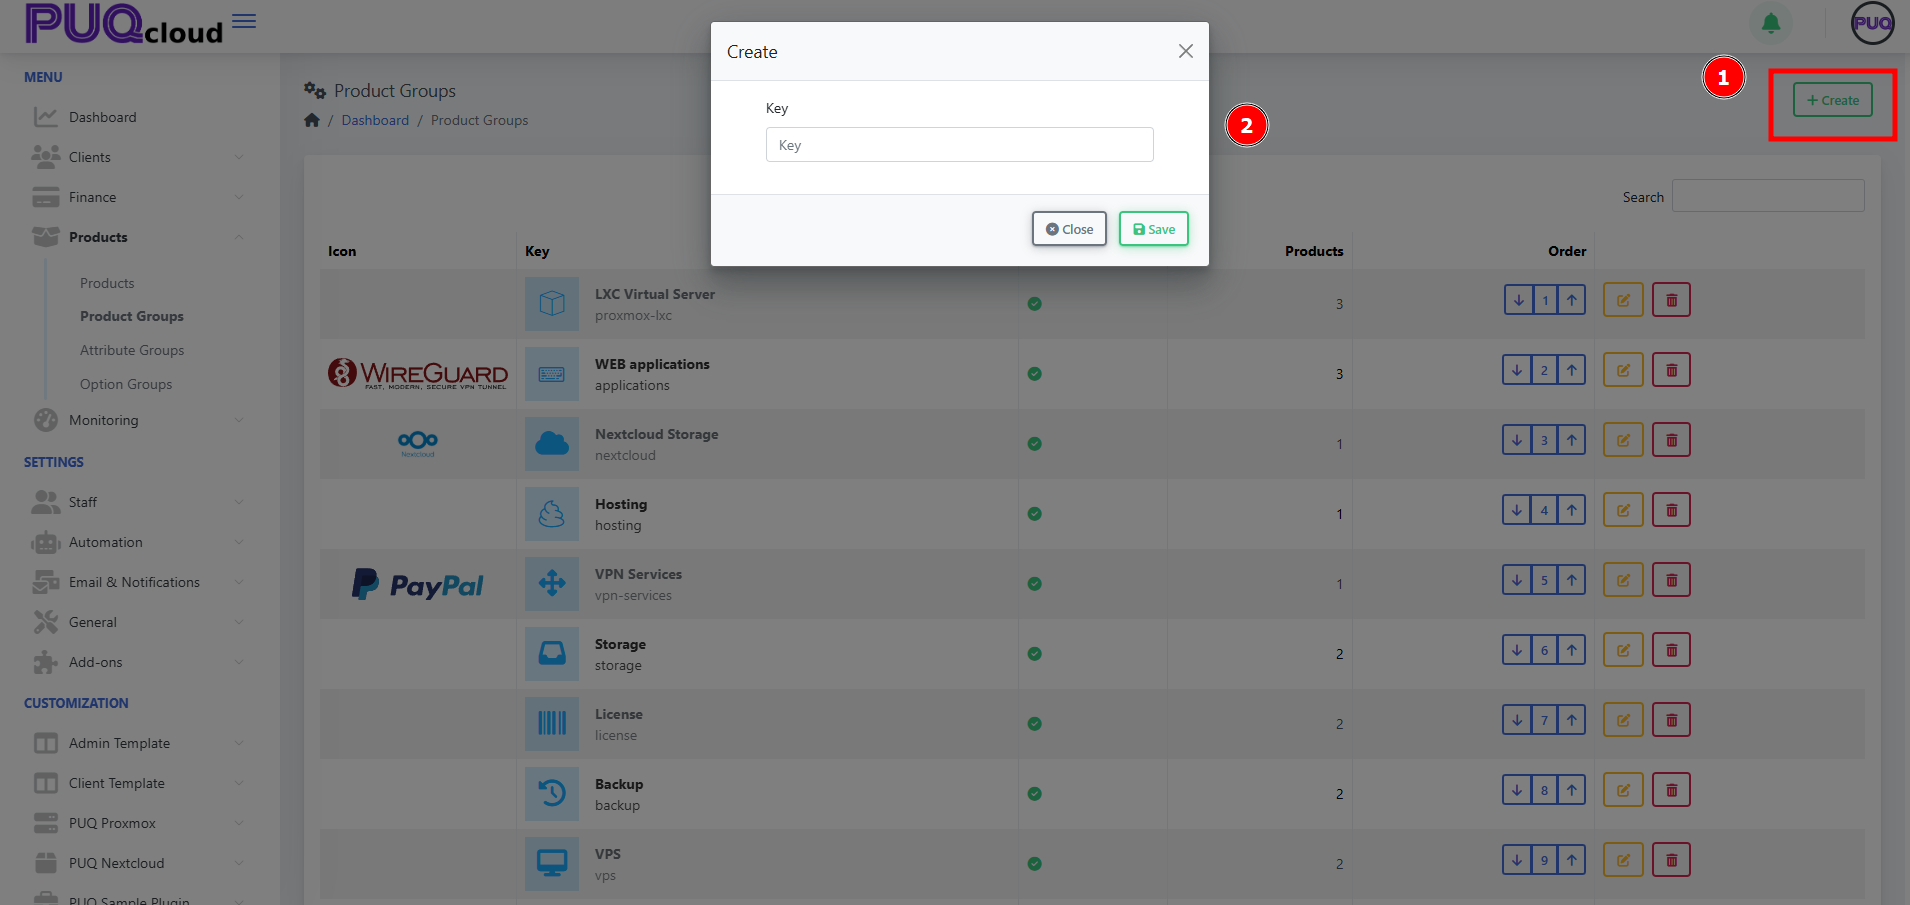
Create a Product Group
-
Click + Create.
-
Enter a unique Key (e.g.,
proxmox-lxc). -
Click Save. The group opens on the General tab.
(Screenshots: Create modal → General tab)
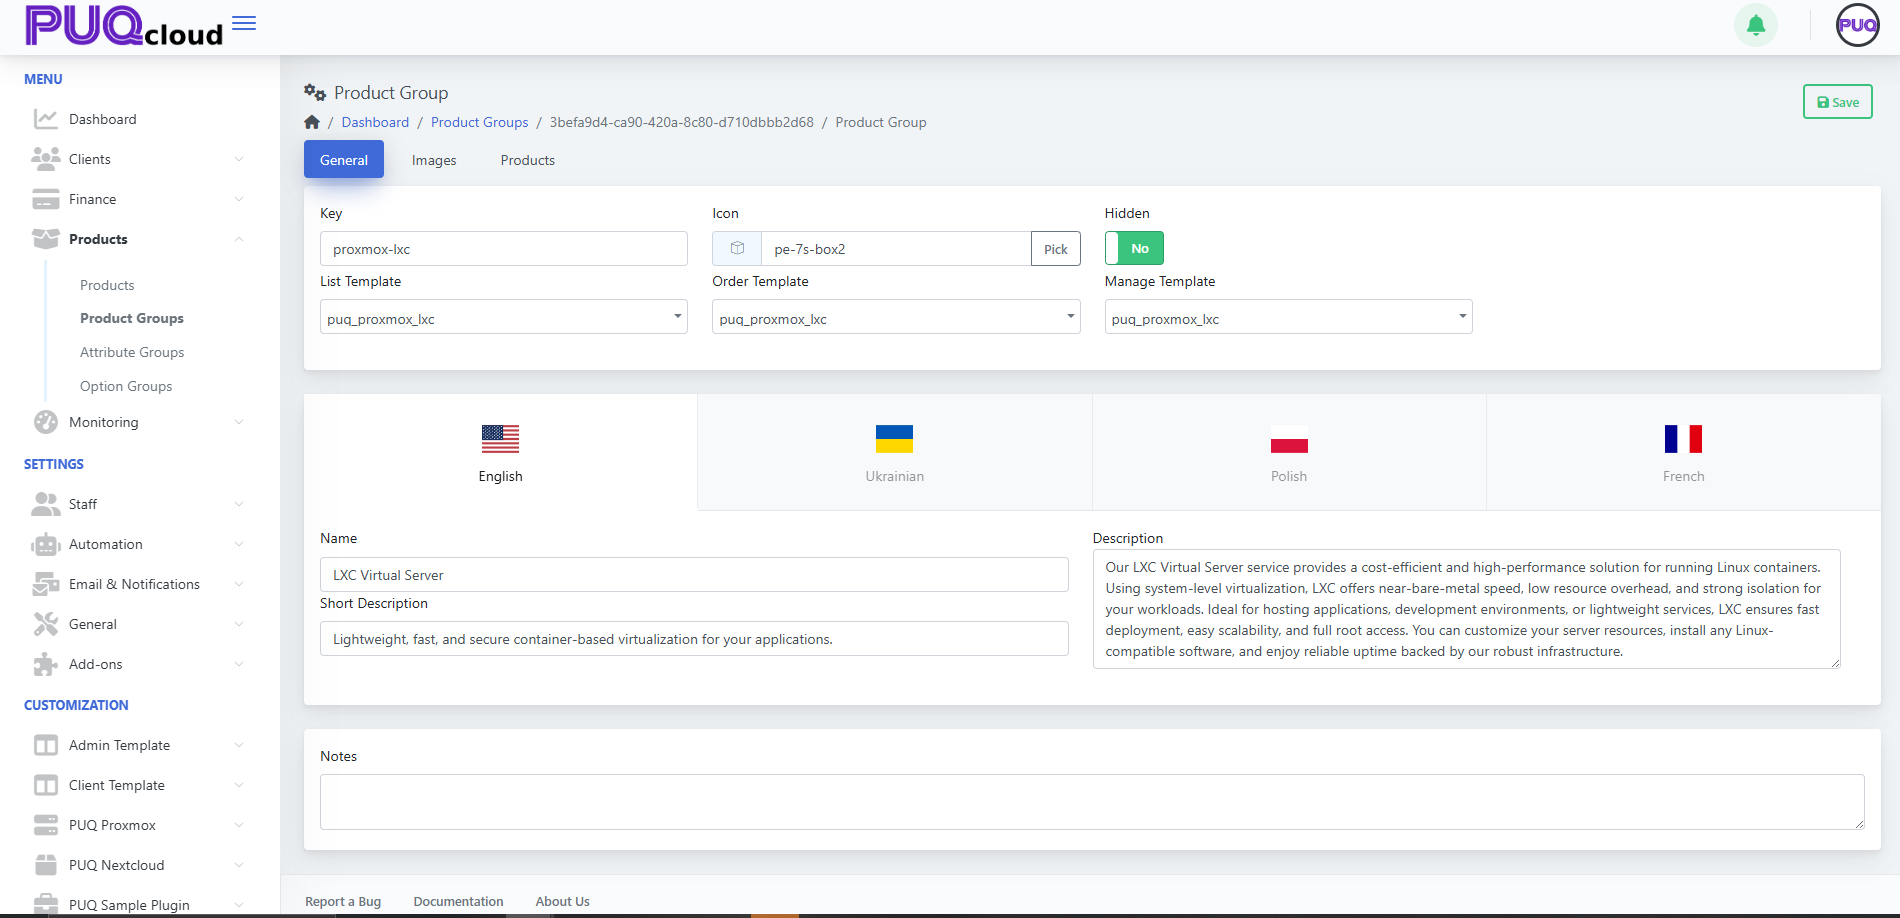
Configure the Group
General tab
-
Key — internal identifier (read‑only after creation).
-
Icon — choose an icon from your set (Pick).
-
Hidden — hide/show the group from storefront.
-
Templates
-
List Template — how the group appears on the catalog page.
-
Order Template — layout for the order page of products in this group.
-
Manage Template — layout for the client’s service management page.
-
-
Localized content — Name, Short Description, Description per language.
-
Notes — internal, visible to admins only.
Click Save.
Images tab
Upload visuals that represent the group:
-
Icon Image — small logo used in lists/cards.
-
Background Image — large banner-style image.
Drag & drop or Browse, then Save.
(Screenshot: Images tab)
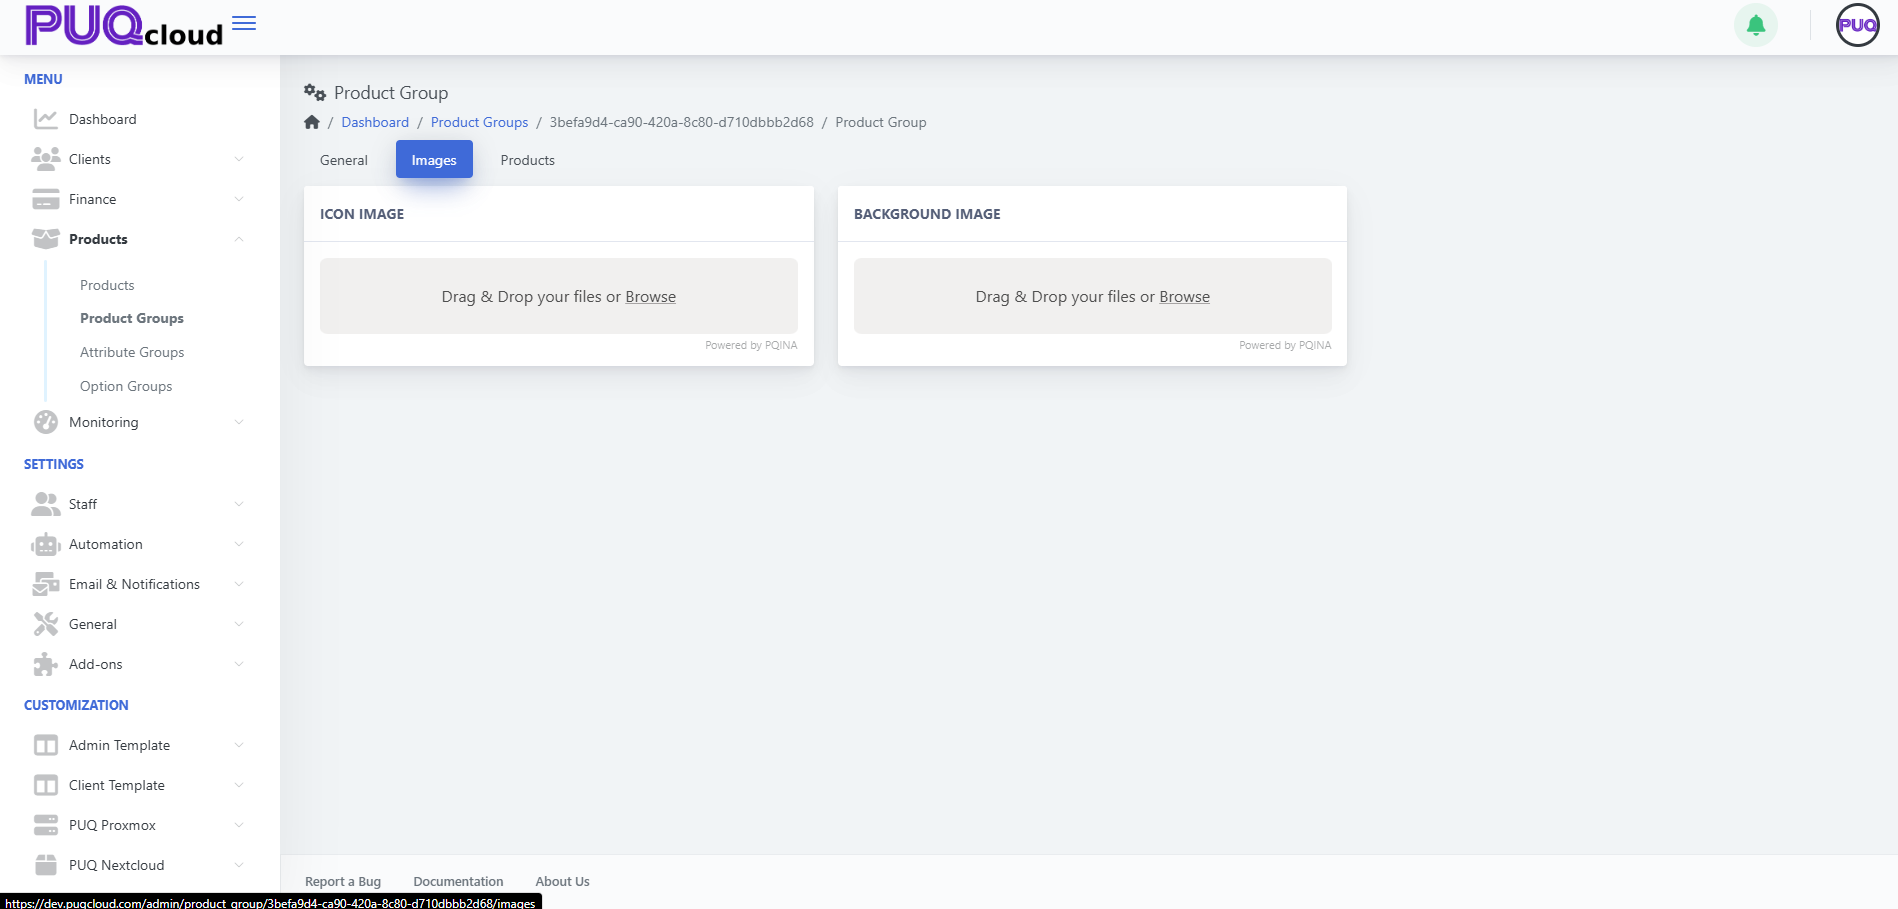
Add & Manage Products in the Group
Open the Products tab. (Screenshot: Products tab)
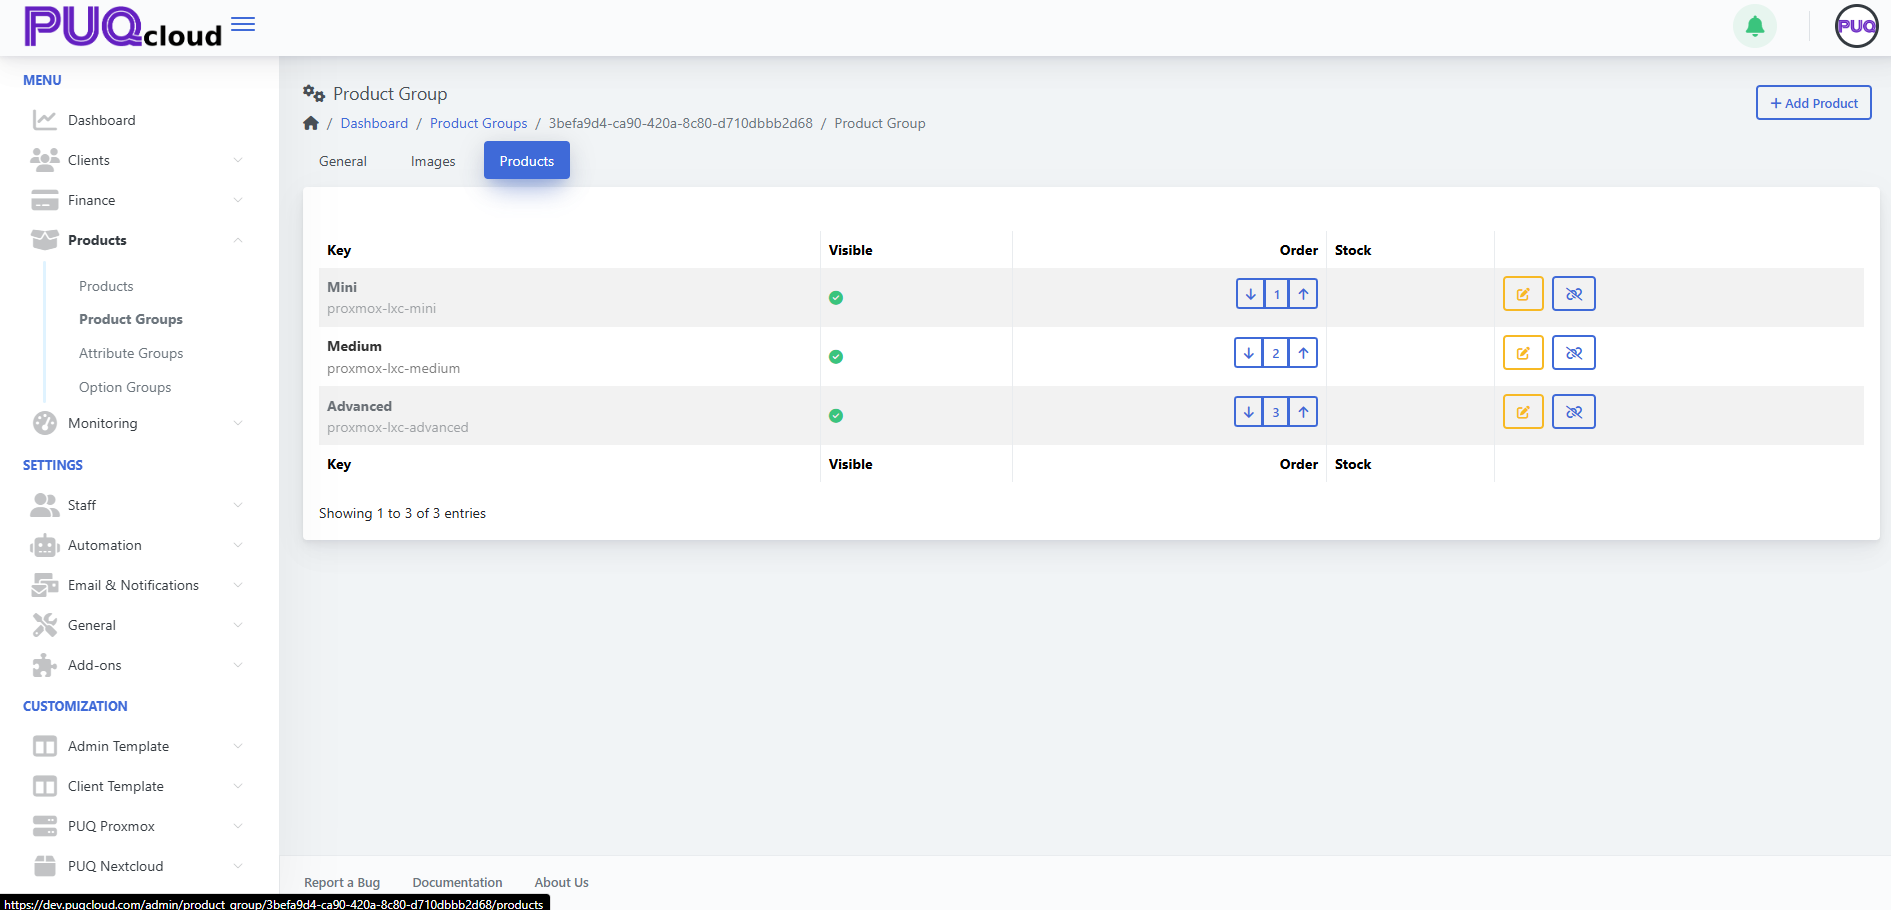
Add products
-
Click + Add Product.
-
Select one or more existing products to link to this group.
-
Save.
Manage items
-
Visible — the green check indicates the product is visible inside this group.
-
Order — use arrows to set the display order (e.g., Mini = 1, Medium = 2, Advanced = 3).
-
Edit — open the product for editing in a new view.
-
Hide/Show — toggle product visibility in this group (without altering the product’s global status).
-
Unlink — detach the product from the group (confirmation dialog).
Tip: Keep a clear progression (e.g., Mini → Medium → Advanced) and ensure at least one visible product exists per group.
Best Practices
Troubleshooting
-
Group doesn’t appear in catalog → Turn Hidden = Off; verify that the group contains at least one visible product.
-
Product not showing under the group → Ensure it’s linked and visible in the Products tab; also check the product’s own Hidden/Active flags.
-
Wrong page layout → Confirm List/Order/Manage Templates are correct for this group.
-
Unexpected order → Use the arrow controls in both Group list (for groups) and Products tab (for items) to correct ordering.
Screenshot References
-
Product Groups list — overview of groups with counts, visibility and order.
-
Create Group modal — single Key field.
-
General tab — Key, Icon, Hidden, Templates, localized fields.
-
Images tab — Icon Image and Background Image uploaders.
-
Products tab — list with Visible, Order, Edit, Hide/Show, Unlink.
Create and Manage an Attribute Group
PUQcloud Panel
Order Now | Download | FAQ
Product Attribute Groups are collections of attributes (e.g., IPv4, IPv6, 10 Gbps) you can later attach to products. They help standardize feature flags and technical capabilities across multiple products.
Overview
A Product Attribute is a single capability/flag (e.g., IPv6). An Attribute Group is a labeled collection of such attributes.
Attribute Groups List
The list shows Icon, Key, Visible, and Attributes (count) with actions Edit and Delete. Use Search to filter.
(Screenshot reference: Attribute Groups list)
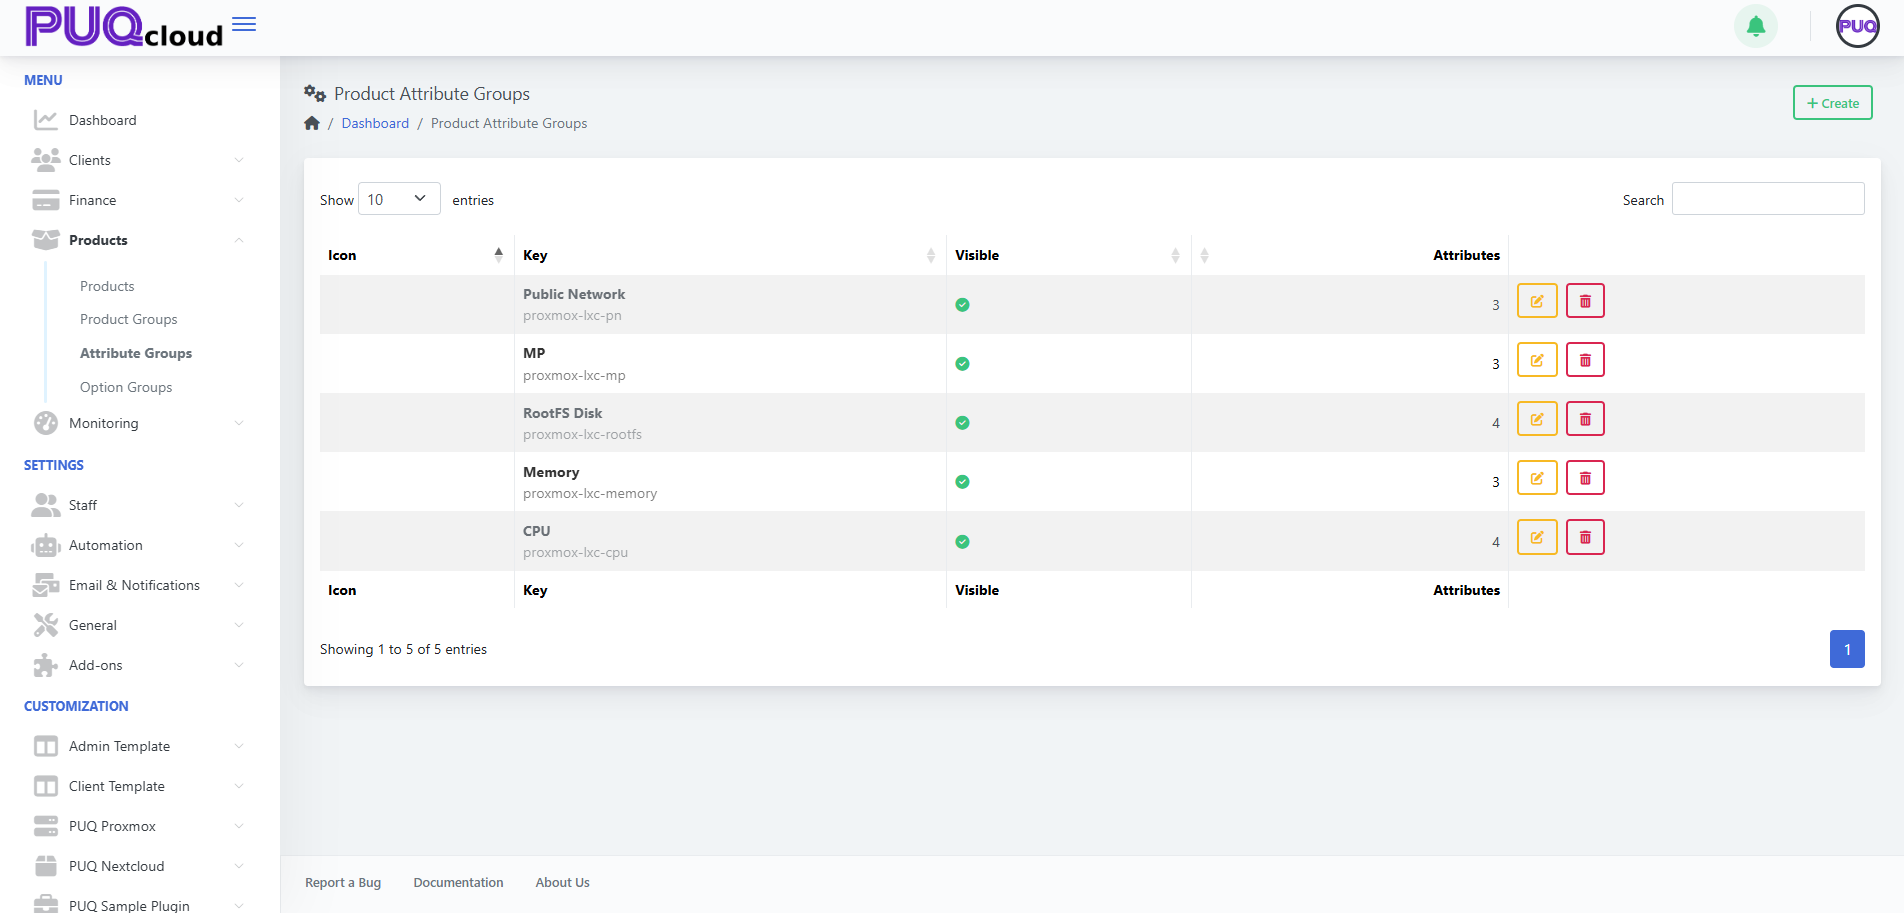
Actions
-
+ Create — add a new attribute group. (Screenshot: Create Group modal)

-
Edit — open tabs General / Images / Attributes.
-
Delete — remove the group (does not remove attributes already linked to products).
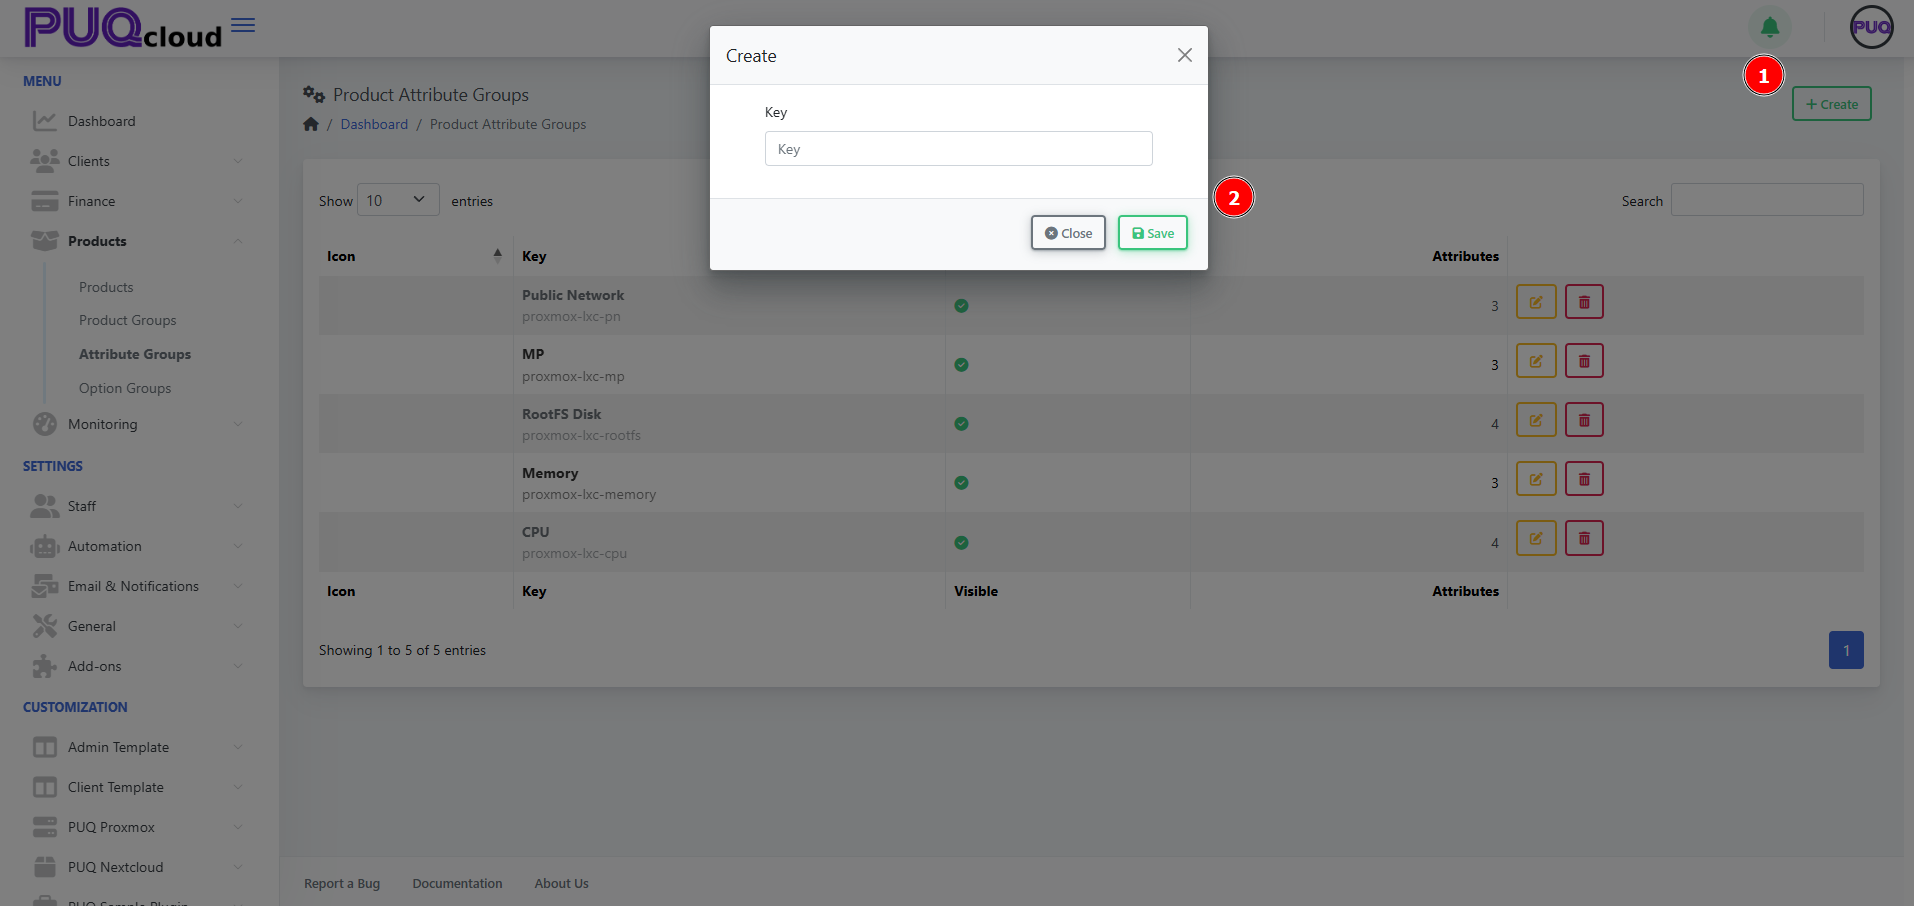
Create an Attribute Group
-
Click + Create.
-
Enter a unique Key (e.g.,
proxmox-lxc-pn) and Save.
Configure the Group
Use the tabs across the top.
General tab
-
Key — internal identifier (read‑only after creation).
-
Hidden — hide/show the entire group from selection lists.
-
Localized content — Name, Short Description, and Description per language.
-
Notes — internal notes for admins.
Click Save.
(Screenshot: Attribute Group → General tab)

Images tab
Upload visuals representing the group:
-
Icon Image — small logo used in lists/cards.
-
Background Image — larger banner image.
Drag & drop files or Browse, then Save.
(Screenshot: Attribute Group → Images tab)
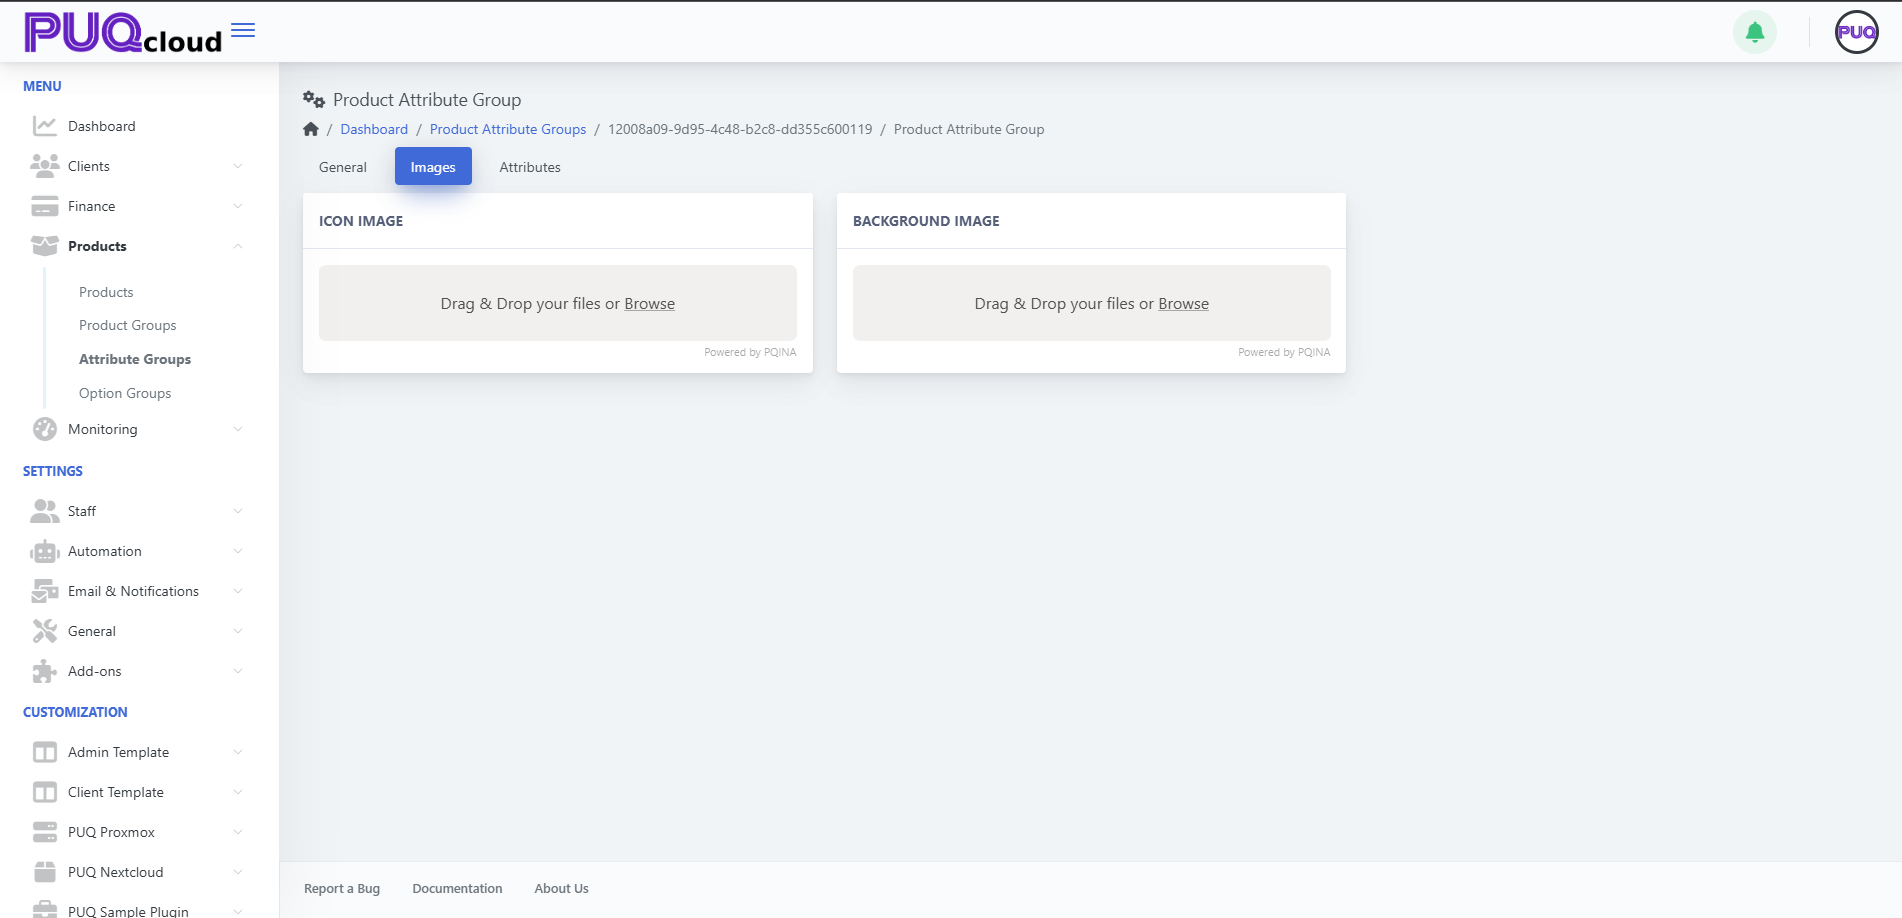
Attributes tab (inside the group)
Add and manage the individual attributes that belong to this group.
You’ll see columns Key and Visible with actions Edit and Delete for each attribute.
Add an attribute
-
Click + Create (top‑right while on the group).
-
Fill out the attribute details (e.g., Key
proxmox-lxc-pn-ipv6, NameIPv6). -
Set Visible as needed and Save.
Edit / Delete
-
Use the Edit (pencil) or Delete (trash) on a row.
(Screenshot: Attribute Group → Attributes tab showing IPv4, IPv6, 10 Gbps)
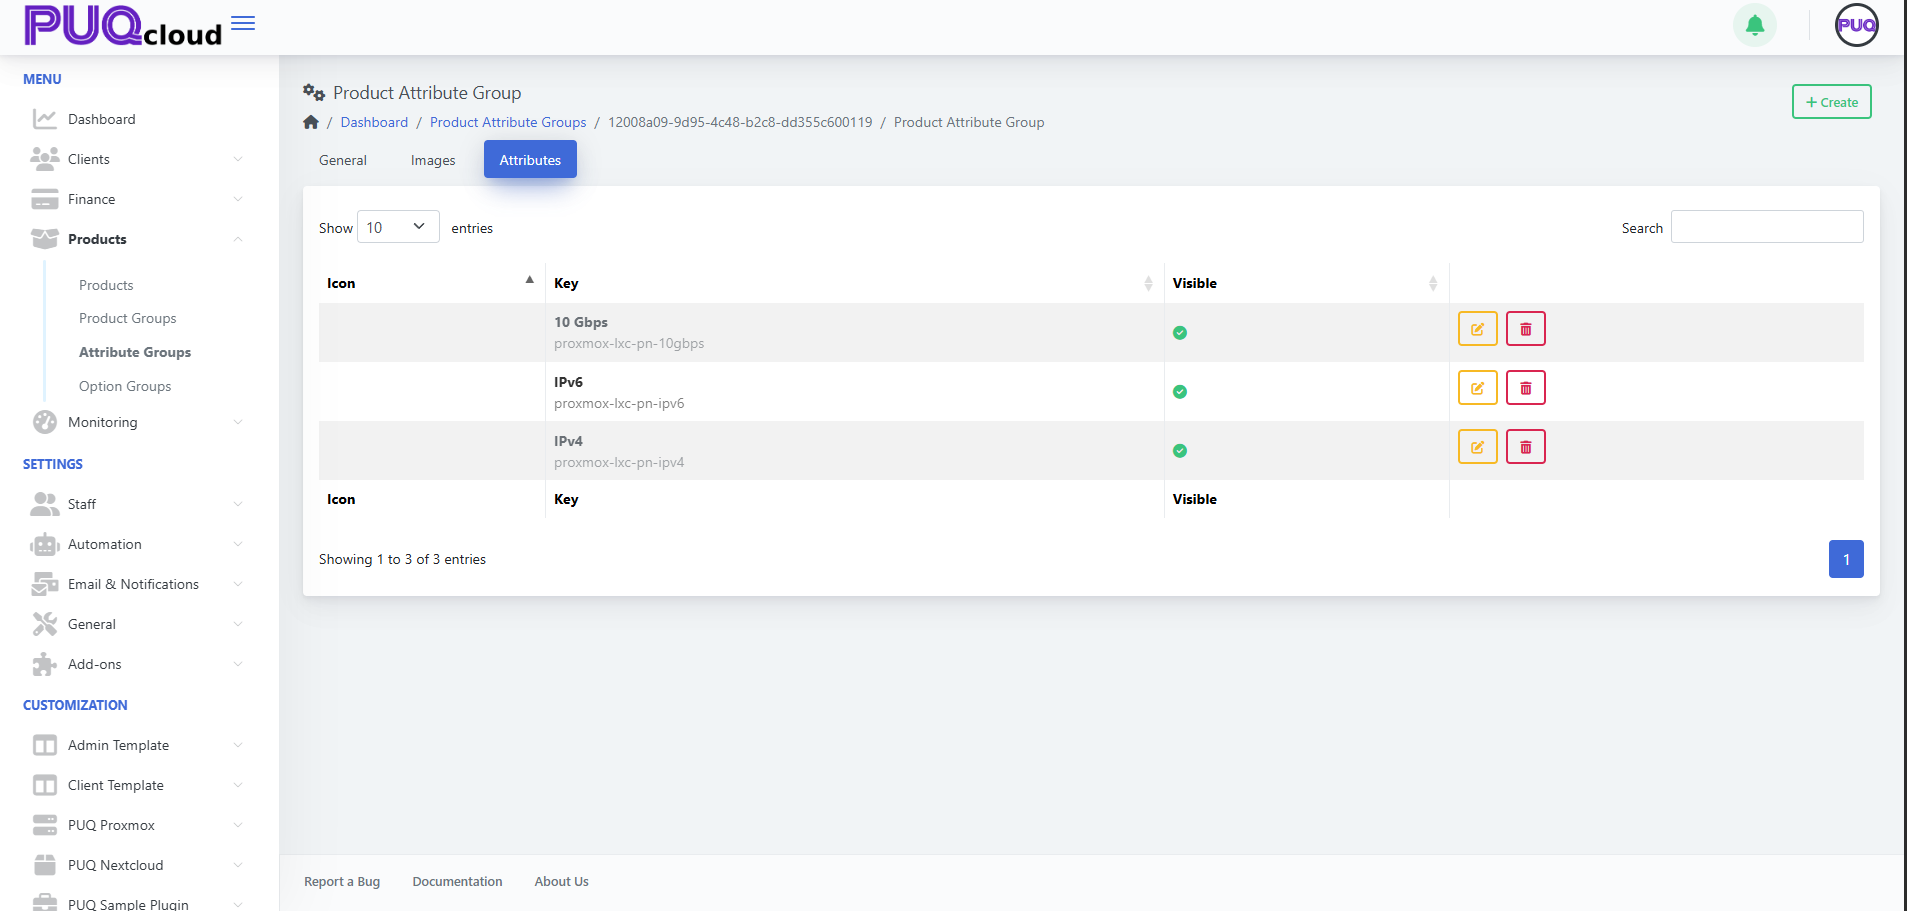
Using Attributes in Products
Once your attributes exist, attach them to products.
-
Open Products → Products, select a product.
-
Go to the product’s Attributes tab.
-
Click + Add Attribute and pick from available attributes (they are organized by their groups).
-
Save the product.
Tip: Consistent keys (e.g., proxmox-lxc-pn-ipv4) make it easier for modules/automation to reference attributes programmatically.
Best Practices
-
Plan the taxonomy: create groups by domain (e.g., Networking, Storage, CPU features).
-
Keep keys stable: avoid renaming keys after products reference them.
-
Localize names/descriptions so storefronts are consistent across languages.
-
Use visibility to stage new attributes before making them selectable.
Troubleshooting
-
Attribute not selectable on a product → Ensure the attribute exists, is Visible, and you’re on the product’s Attributes tab.
-
Old attribute still appears → It may be linked on products; unlink from those products before deletion.
-
Module fails expecting a flag → Verify the attribute Key matches what the module/integration expects (case‑sensitive).
Screenshot References
-
Attribute Groups list page.
-
Create Attribute Group modal.
-
Attribute Group → General tab.
-
Attribute Group → Images tab.
-
Attribute Group → Attributes tab with items (IPv4, IPv6, 10 Gbps).
Create and Manage Product Option Groups
PUQcloud Panel
Order Now | Download | FAQ
Why Option Groups?
Option Groups let you package reusable choices (like Firewall levels, CPU tiers, RAM sizes) and attach them to many products at once. You get consistent naming, pricing, and ordering — and one place to update them.
Step-by-step, with pro tips
1) Create the Group
-
Go to Products → Option Groups → + Create.
Screenshot list view.
Screenshot “Create Option Group” modal

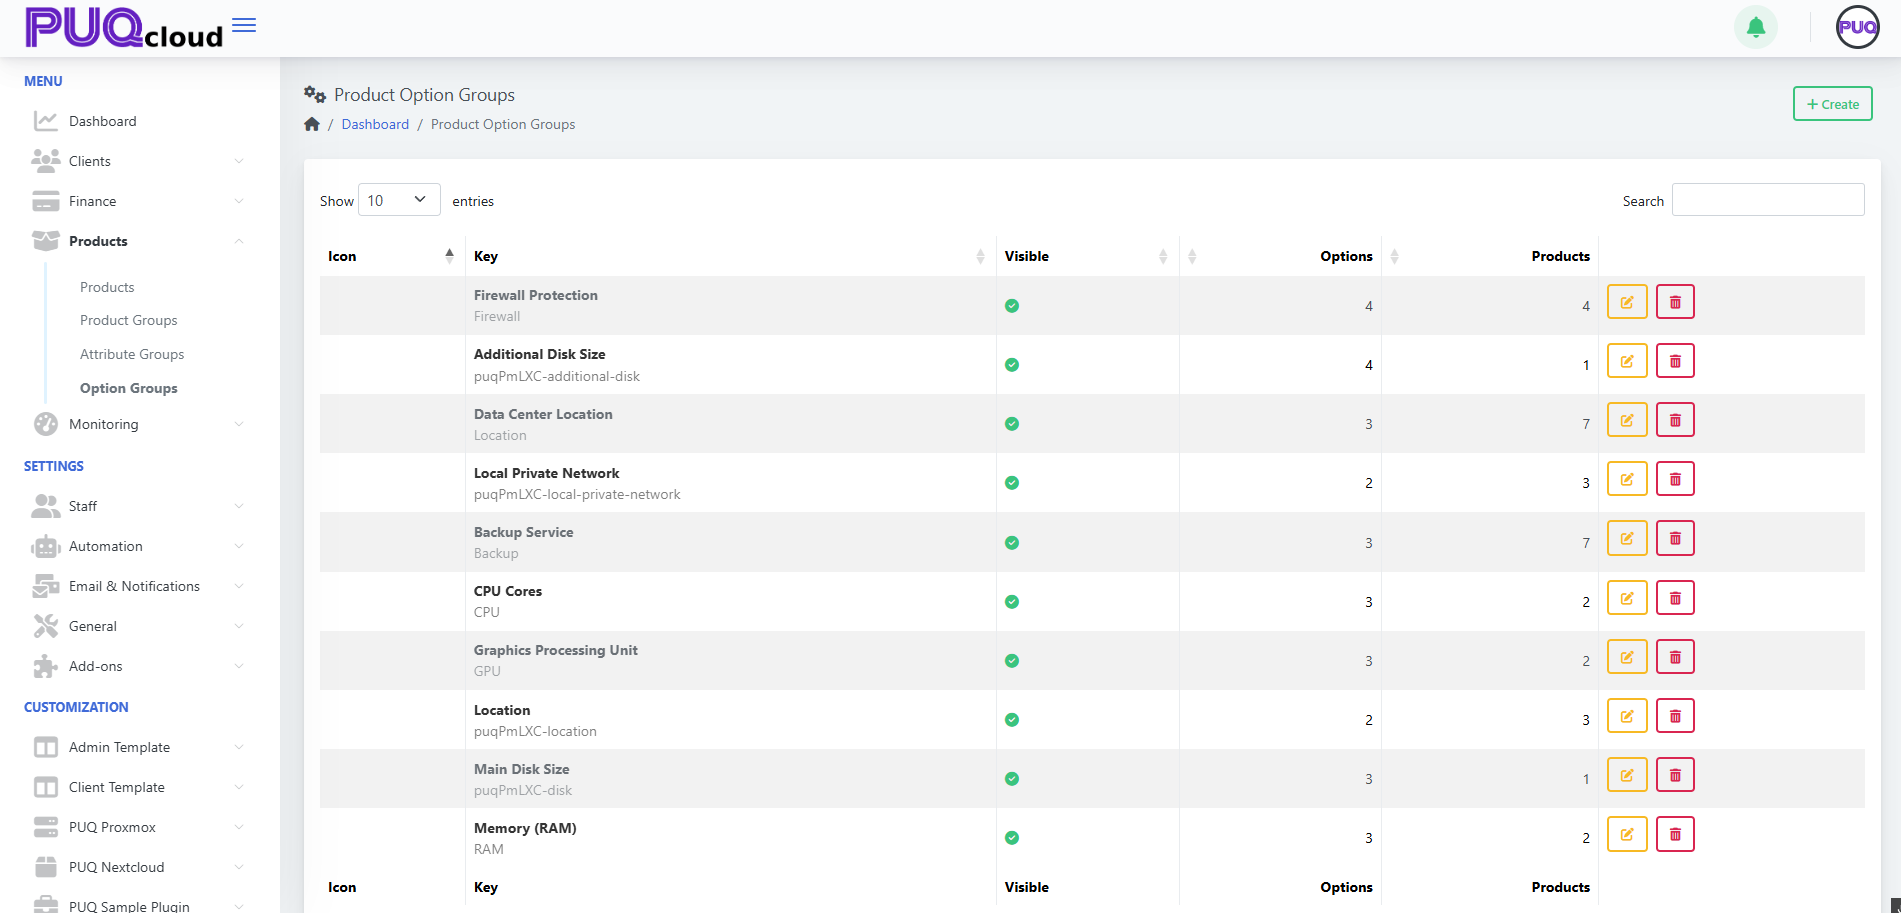
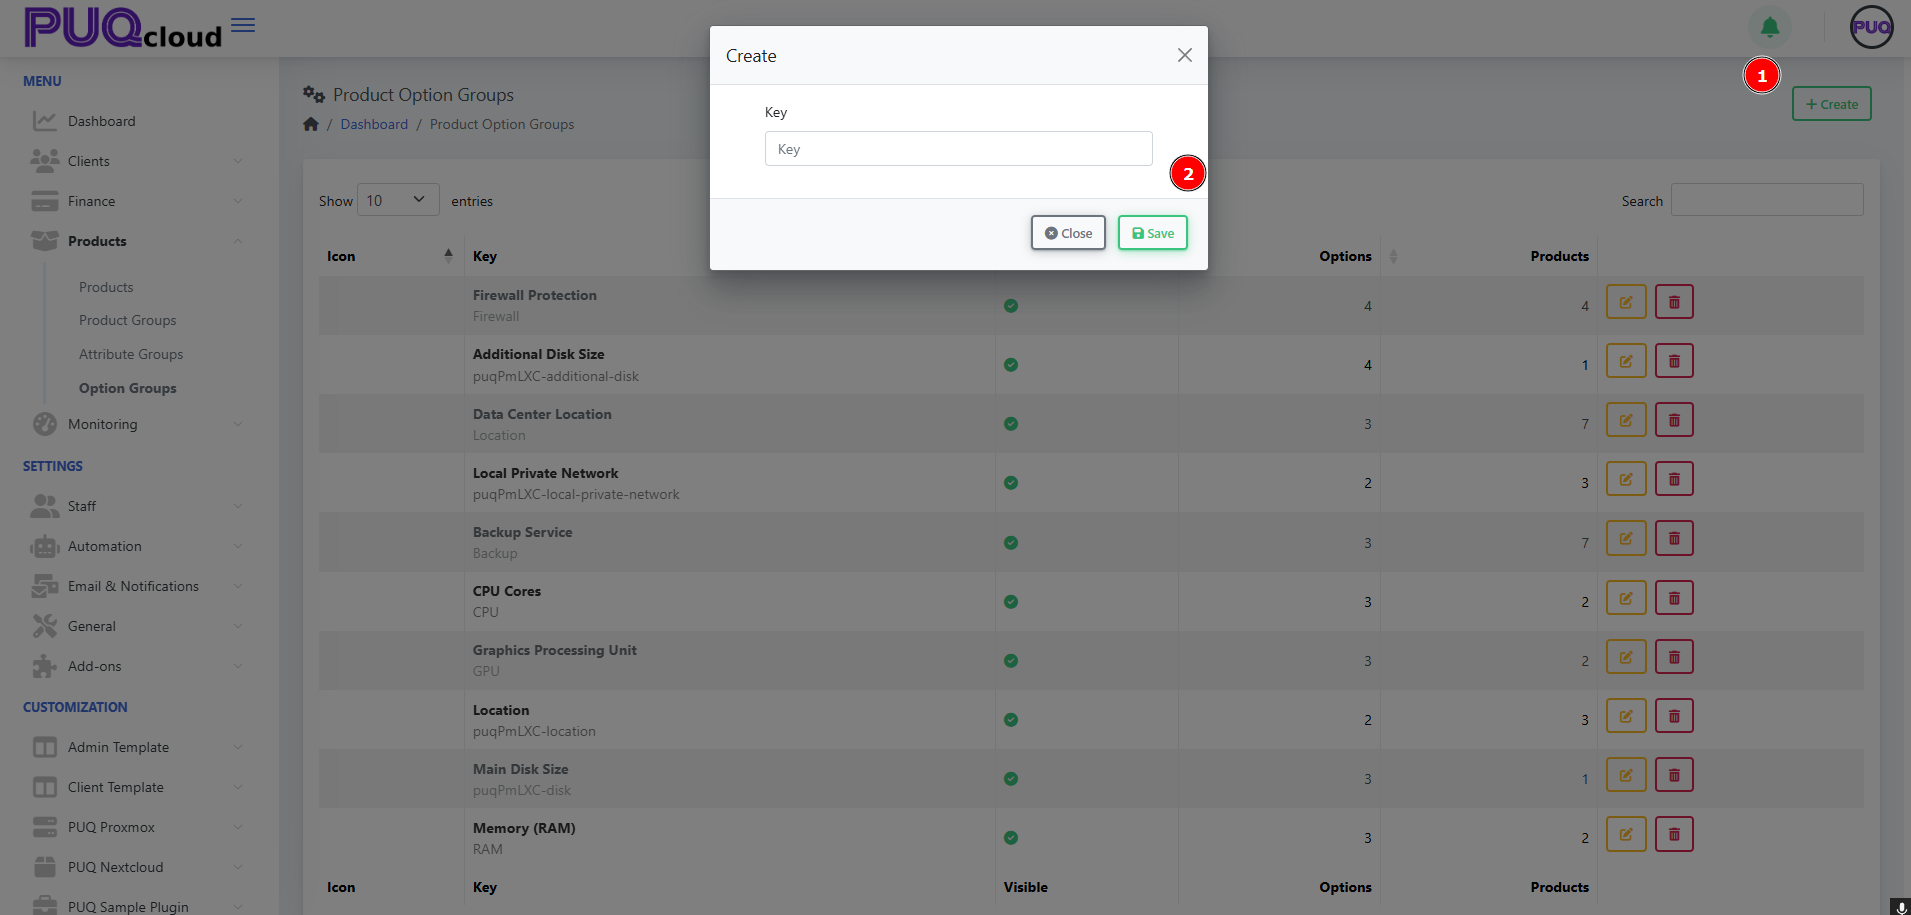
Naming rule of thumb
-
Key: machine-friendly & permanent (e.g.,
Firewall,CPU,puqPmLXC-disk). -
Name: client-facing & translatable (e.g., “Firewall Protection”).
-
Avoid spaces in Key; use hyphens or camelCase for consistency.
2) Set General Properties
Open the group and configure:
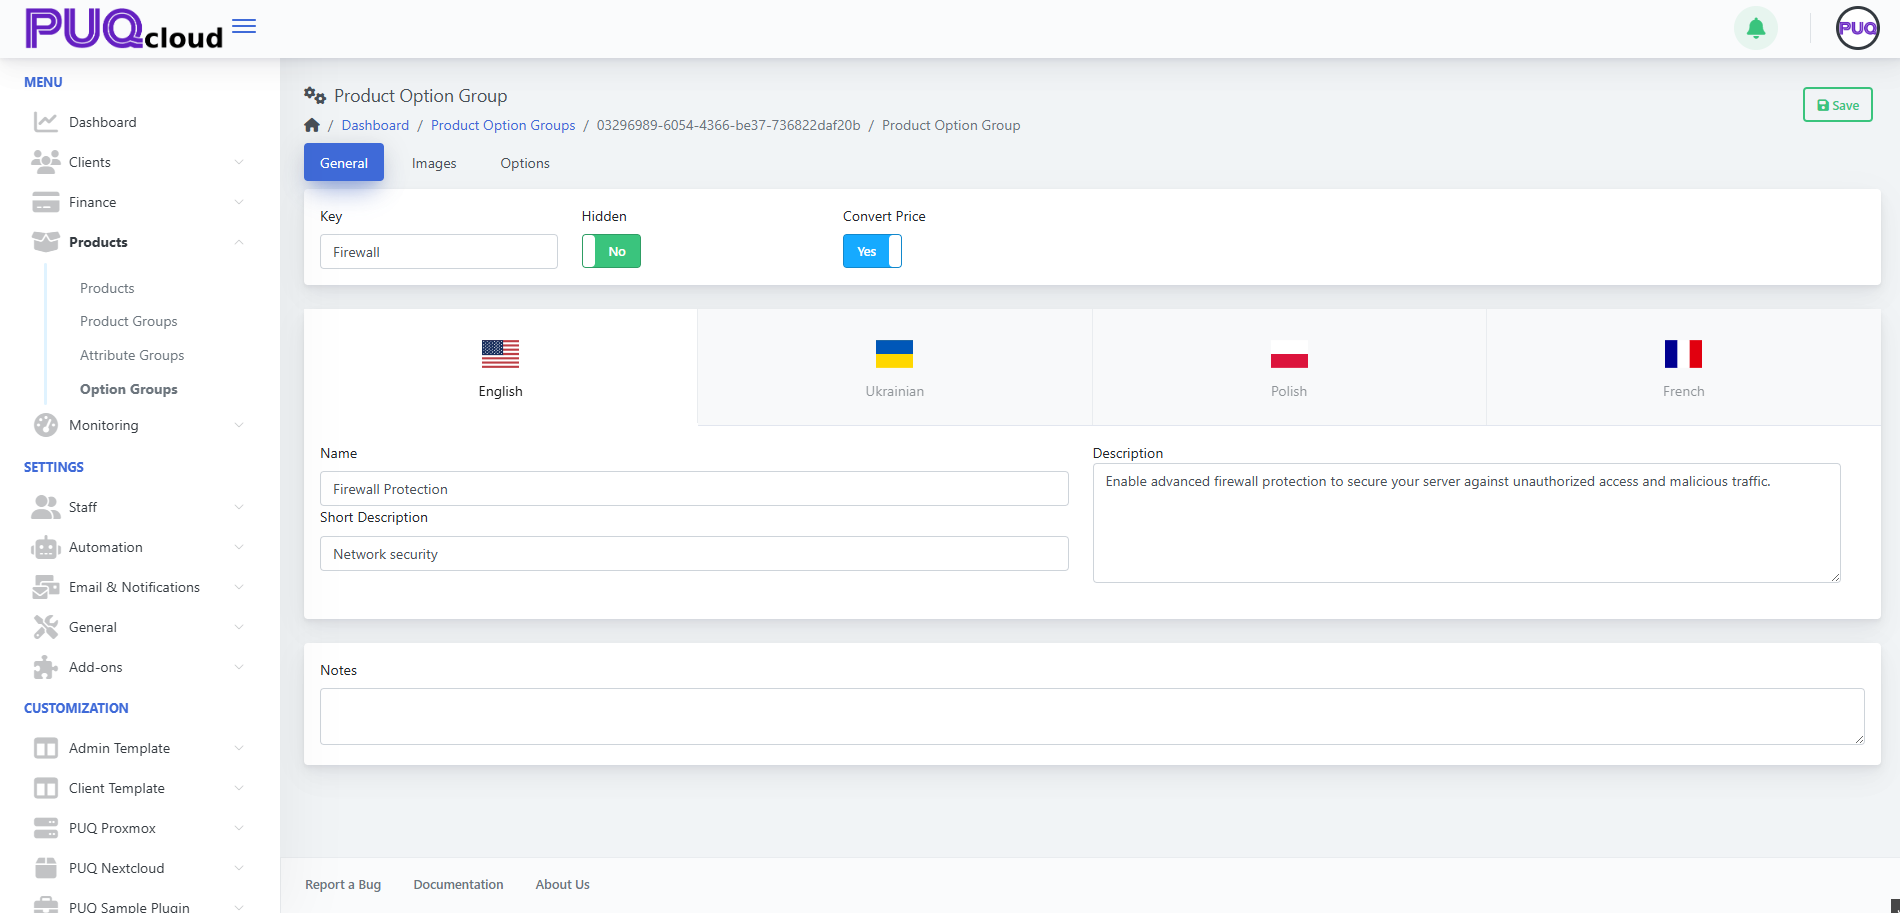
Pro tip: Put upgrade logic in the Description (“Level 2 adds IP reputation filter”), so clients know what changes between levels.
3) Add Visuals (optional, but nice)
Add an Icon for quick recognition and a Background for storefront cards.
Screenshot Images tab
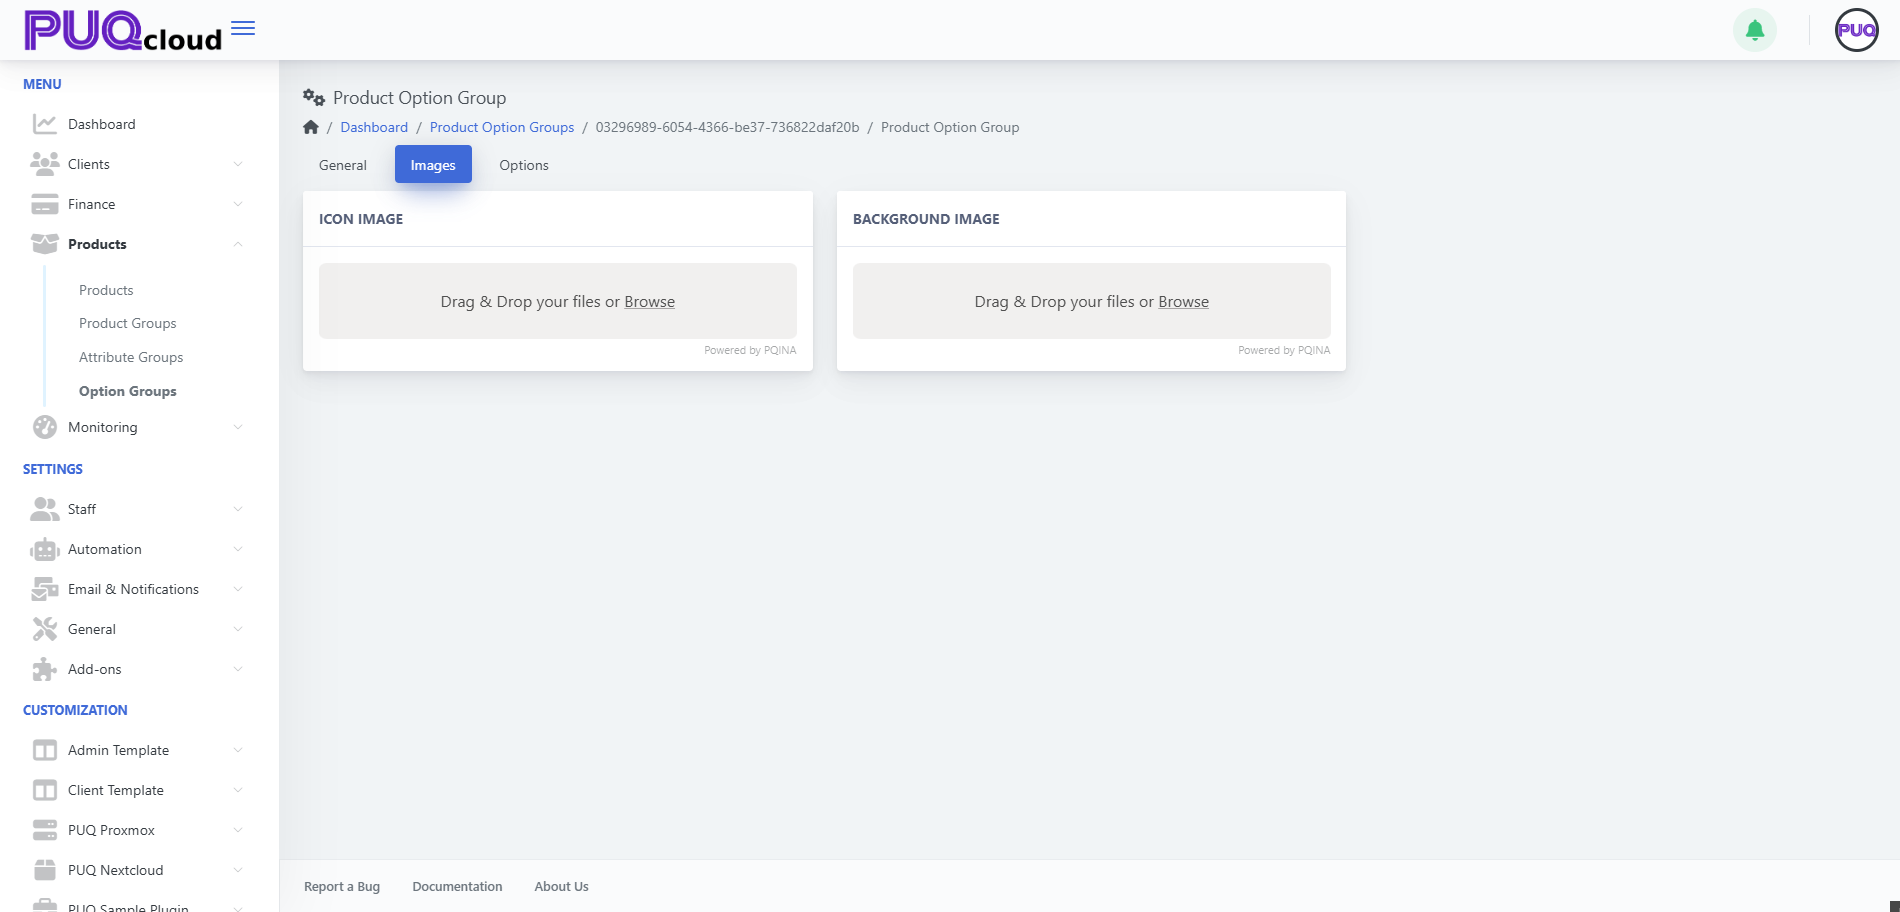
Branding tip: Use neutral, product-agnostic icons so this group can be reused across offerings.
4) Add Options (the items clients actually choose)
Go to Options → + Create and add each selectable item (e.g., Firewall level 0/1/2/3).
Screenshot Options list with order controls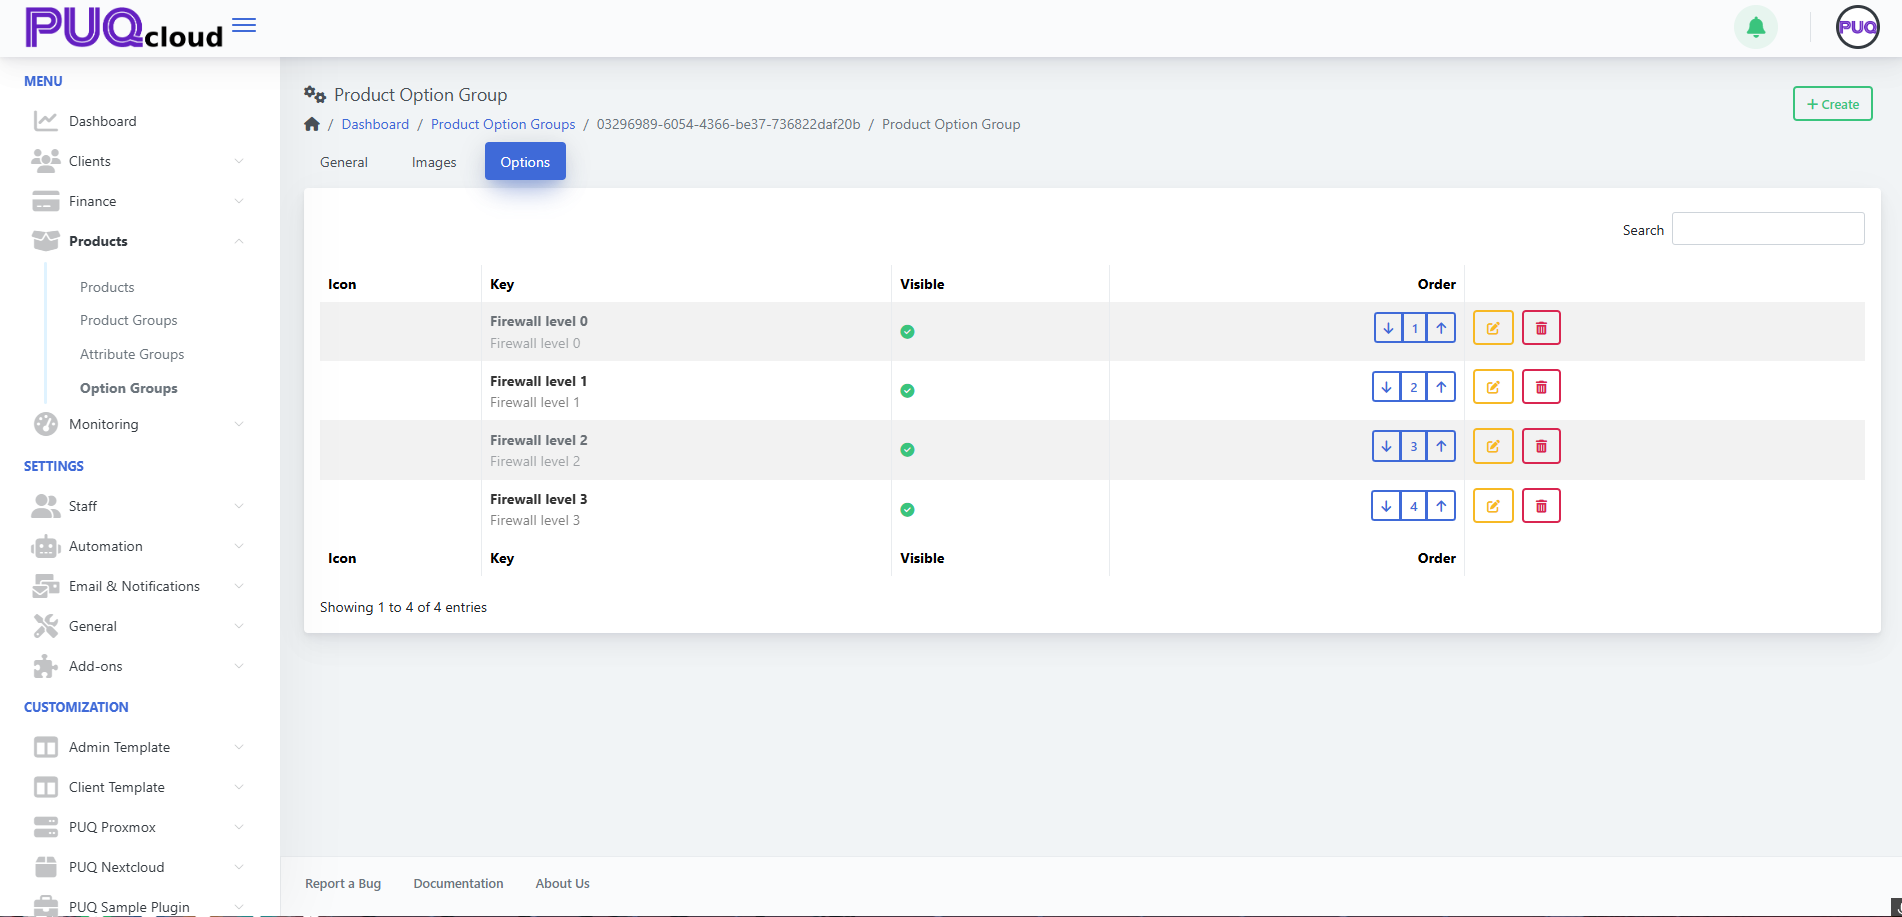
Screenshot “Create Option” modal
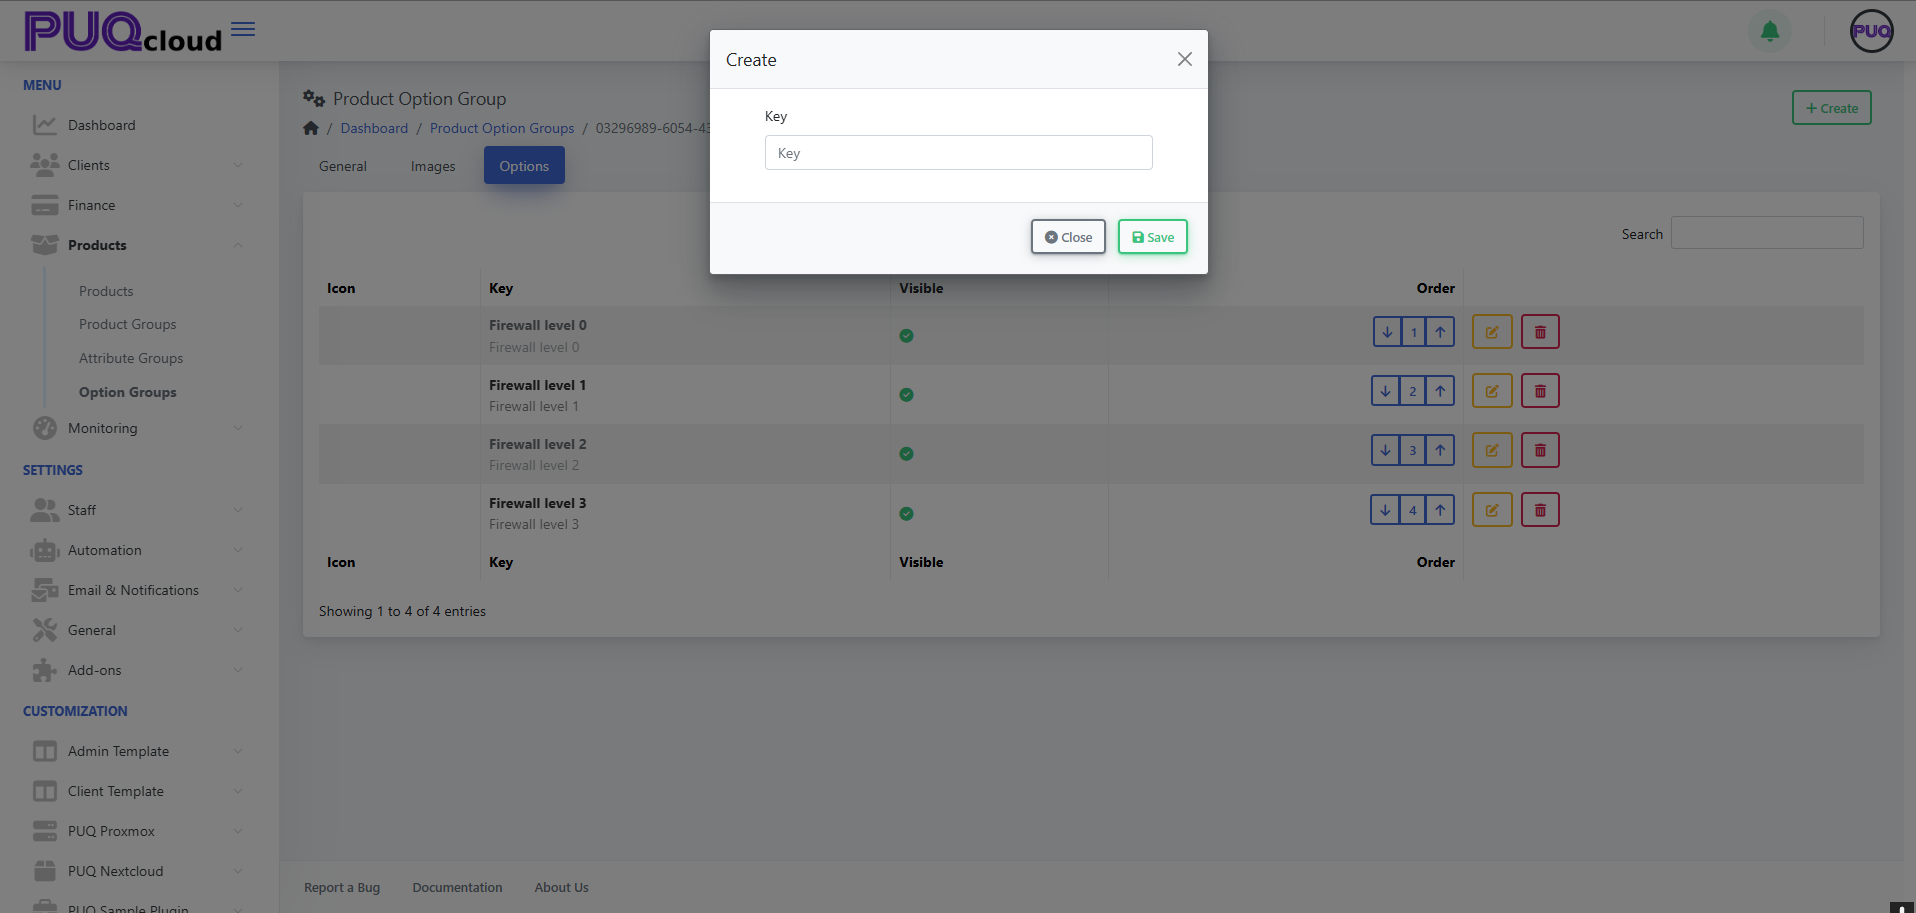
-
Keep Key short (e.g.,
firewall-level-1). -
Use the order arrows to arrange from lowest → highest tier.
-
Toggle Visible to quickly remove an option from the storefront without deleting it.
UX tip: List from “basic → advanced”. Clients upgrade more confidently when progression is obvious.
5) Edit an Option & Add Prices
Click Edit on an option:
-
Fill Key, optional Value (if your module reads a value), Hidden, Notes.
-
Upload Icon/Background for this option (optional).
-
Localize Name, Short Description, Description.
Screenshot Edit Option page
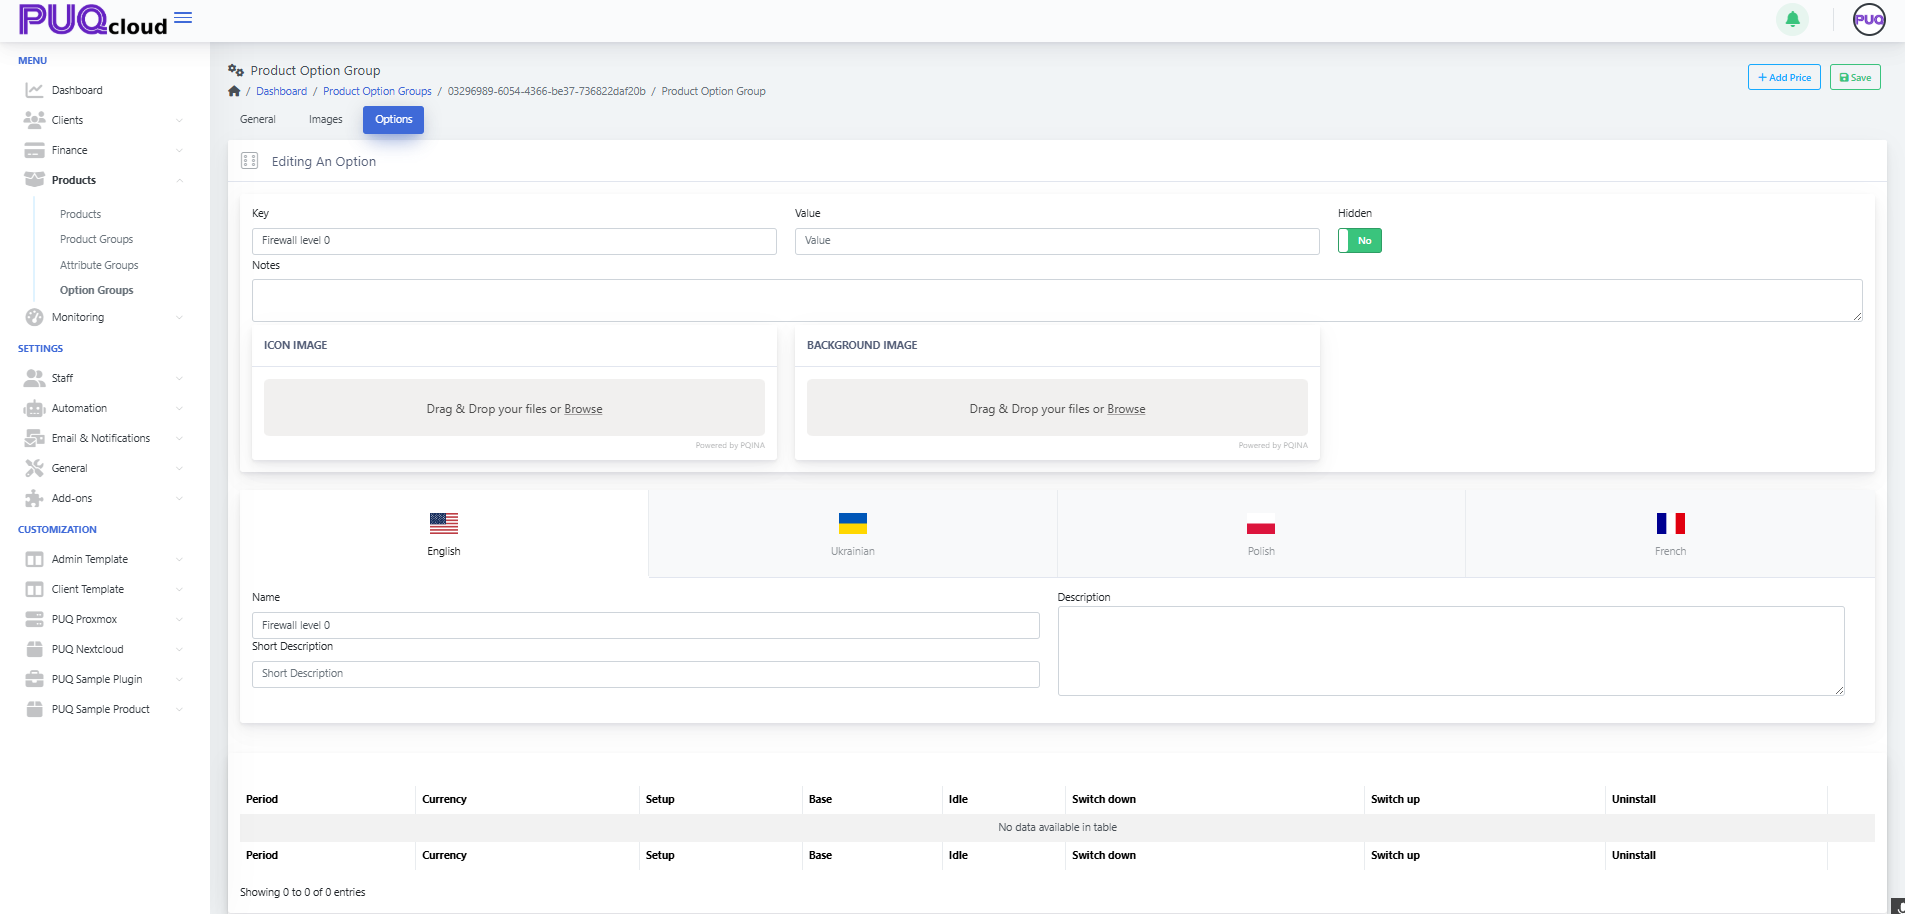
Now add a price row:
-
Click + Add Price → choose Currency & Period (One-time, Daily, Monthly, etc.).
-
Fill Setup, Base (recurring), Idle (if billed when idle), Switch up/down (upgrade/downgrade delta), Uninstall (one-time removal fee).
Screenshot “Add Price” modal
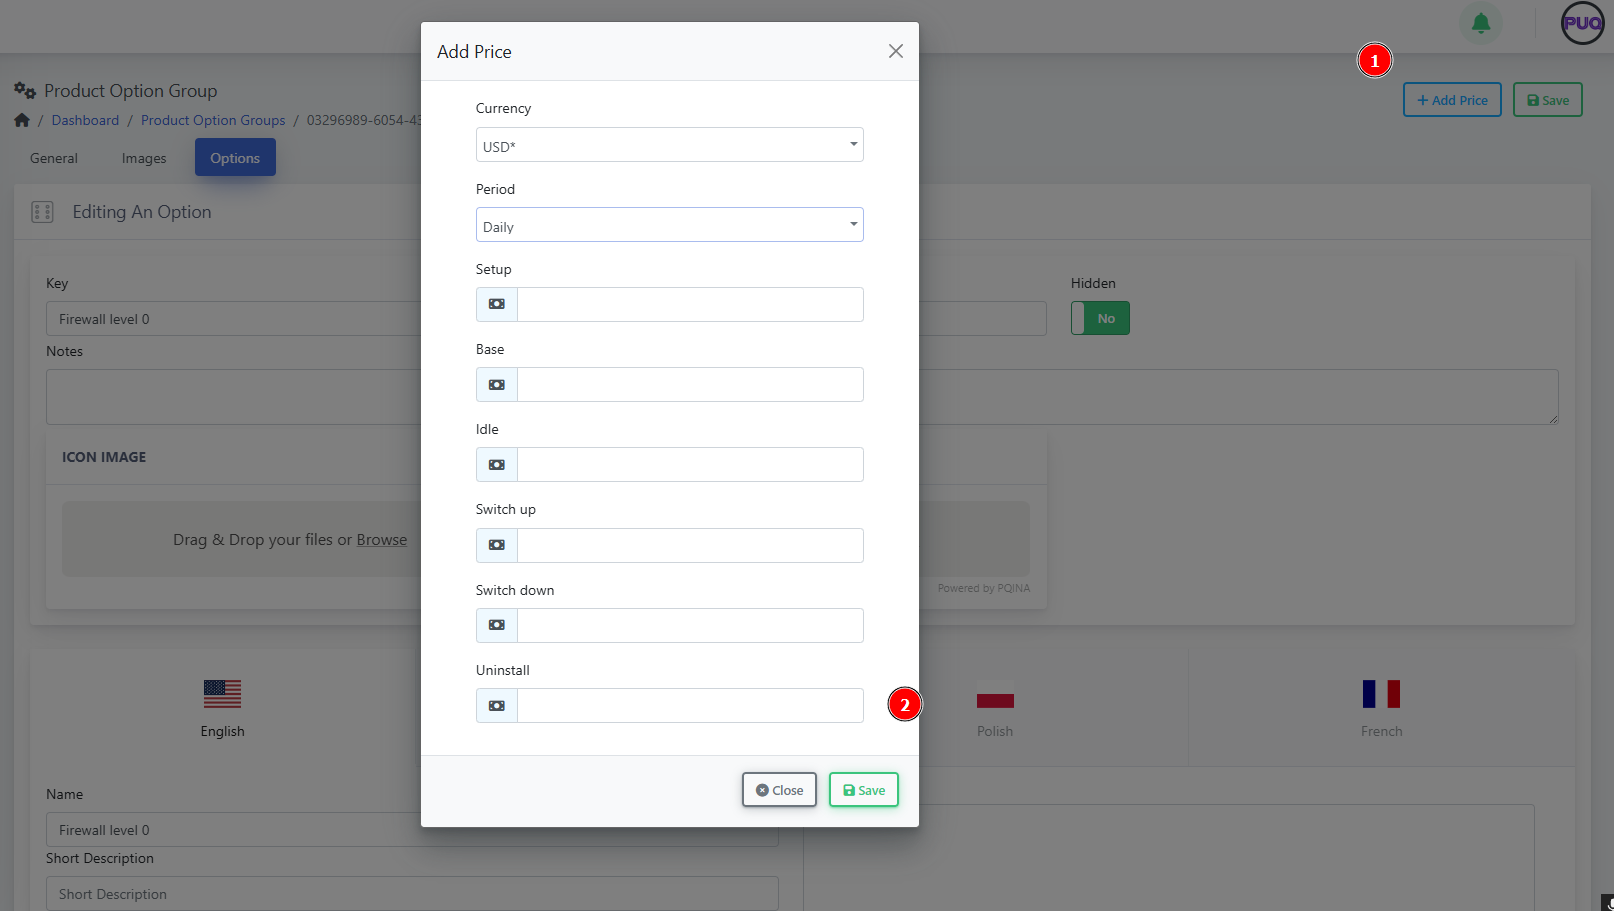
Pricing tip: Only add price rows you actually need. If an option is informational, leave pricing blank.
Example: “Firewall Protection” (ready-to-copy model)
Group Key: Firewall
Options (ordered):
-
Firewall level 0 — baseline filtering
-
Firewall level 1 — adds IP reputation lists
-
Firewall level 2 — + geo-blocking
-
Firewall level 3 — + L7 rules & rate limiting
Minimal price matrix idea
-
Level 0: Base 0.00 (included)
-
Level 1: Base 3.00 (Monthly)
-
Level 2: Base 6.00 (Monthly)
-
Level 3: Base 9.00 (Monthly)
(Use Convert Price = Yes for multi-currency catalogs.)
Attaching the Group to Products
-
Open a Product → Options tab → link your Option Group.
-
Save and preview the product order page to verify order, visibility, and prices.
Governance tip: Reuse one Firewall group across multiple products; update once, benefit everywhere.
Quality checks (2-minute audit)
-
✅ Group is Visible and option order makes sense.
-
✅ Each option has localized Name (and descriptions where needed).
-
✅ Price rows exist only where you charge.
-
✅ Group is attached to every relevant product.
-
✅ Upgrade paths are clear (level numbers or size increments).
Troubleshooting & gotchas
-
Group doesn’t show on the product: It isn’t attached on the product’s Options tab.
-
Wrong currency on price: Add a row per currency or enable Convert Price.
-
Client can’t see an option: The option is Hidden or priced for a period the product doesn’t use.
-
Reordering doesn’t reflect on storefront: Refresh cache and verify product still points to the same group.
Maintenance playbook
-
Use Notes to record internal logic (e.g., “Level 2 requires WAF module v2.1+”).
-
When deprecating, switch an option to Hidden first, then remove after migrations.
-
Version your groups with a suffix only when schema changes (e.g.,
Firewall-v2).
Check and manage Task Queue
PUQcloud Panel
Order Now | Download | FAQ
Overview
In PUQcloud Panel, many system operations are processed in the background, allowing multiple tasks to run simultaneously without affecting overall performance.
This background job system ensures that resource-intensive operations — such as permission checks, automated provisioning, or notifications — are executed efficiently and asynchronously.
The Task Queue section gives administrators full visibility and control over these background jobs.
It allows monitoring, filtering, and inspection of all automated system tasks.
Navigation Path
Dashboard → Monitoring → Task Queue
Key Features
| Feature | Description |
|---|---|
| Background Execution | Multiple jobs run in parallel without slowing down the panel or user sessions. |
| Job List | Displays all queued, running, or completed background tasks. |
| Status Indicators | Each job shows a colored label: Pending, Processing, or Completed. |
| Queue Info | Indicates which queue the job belongs to (e.g., System, Default, etc.). |
| Dates | Displays job creation, start, and completion timestamps. |
| Filter Range | Allows selection of specific date/time intervals to refine results. |
| Task Detail View | Shows raw input and output data for each job. |
Using the Task Queue
1. Access the Task Queue
You will see a list of recent system jobs.
Each entry contains:
-
Job Name
-
Queue
-
Dates
-
Status
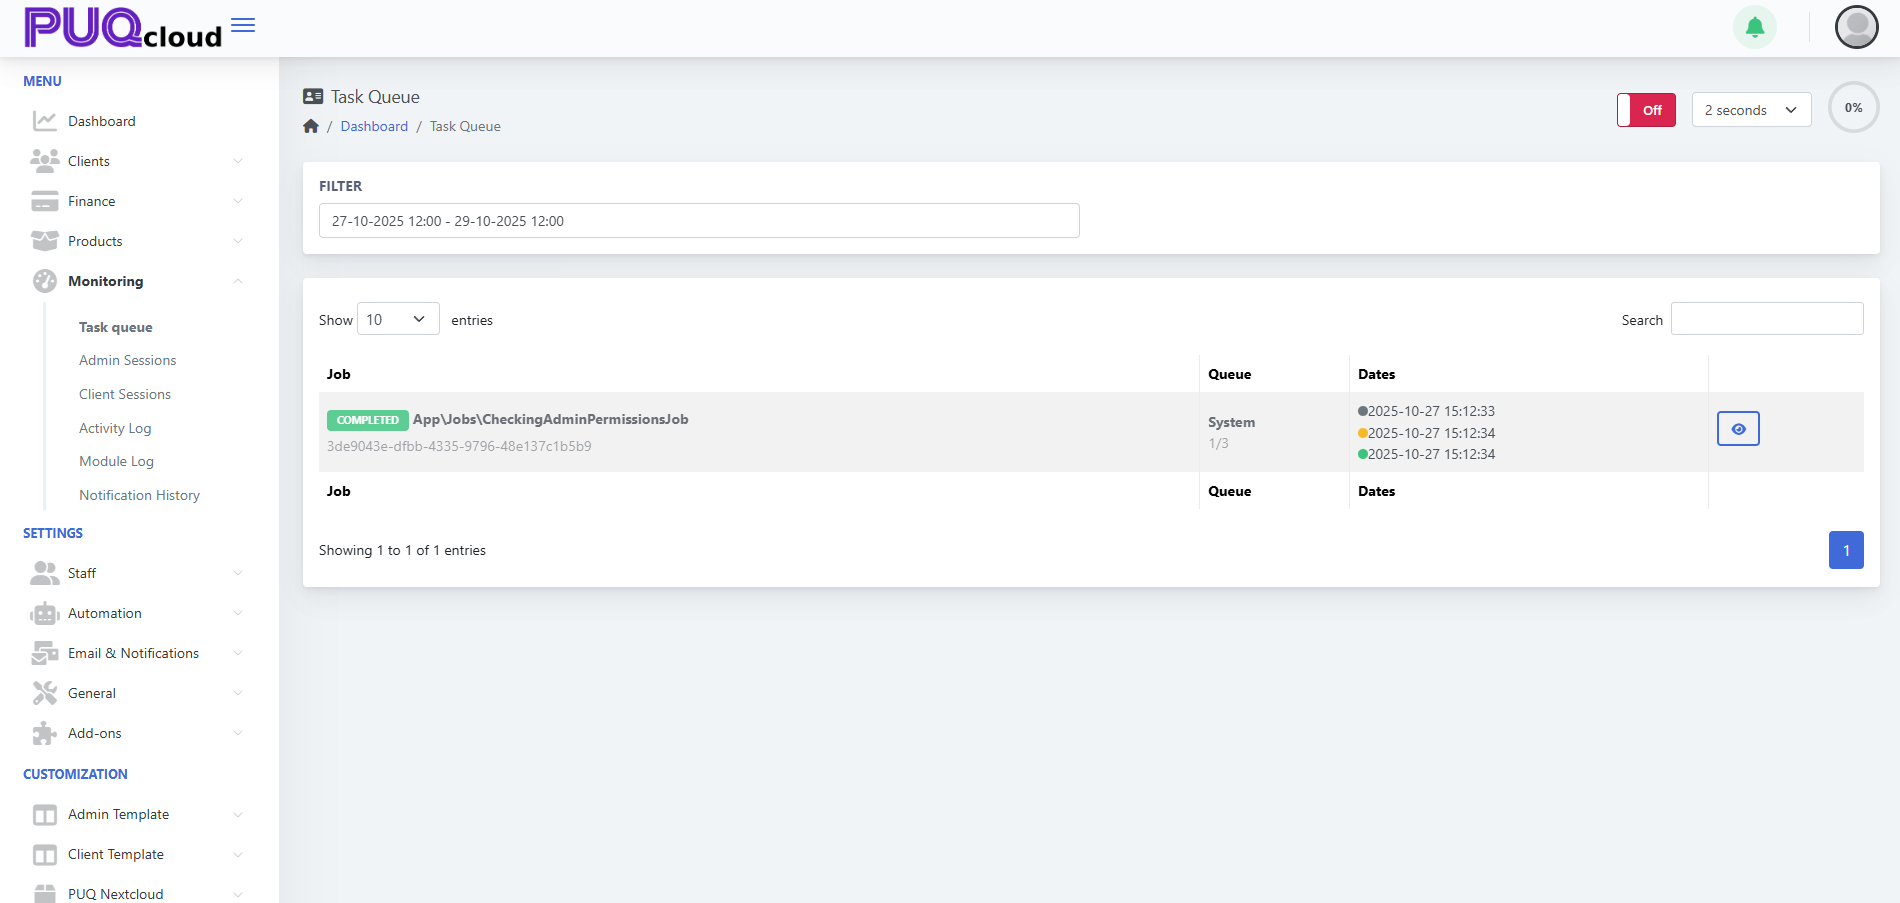
2. Filter by Date and Time
Use the Filter field to narrow down results.
Click the date range bar and select a start and end date/time using the popup calendar.
After choosing the range, click Apply.
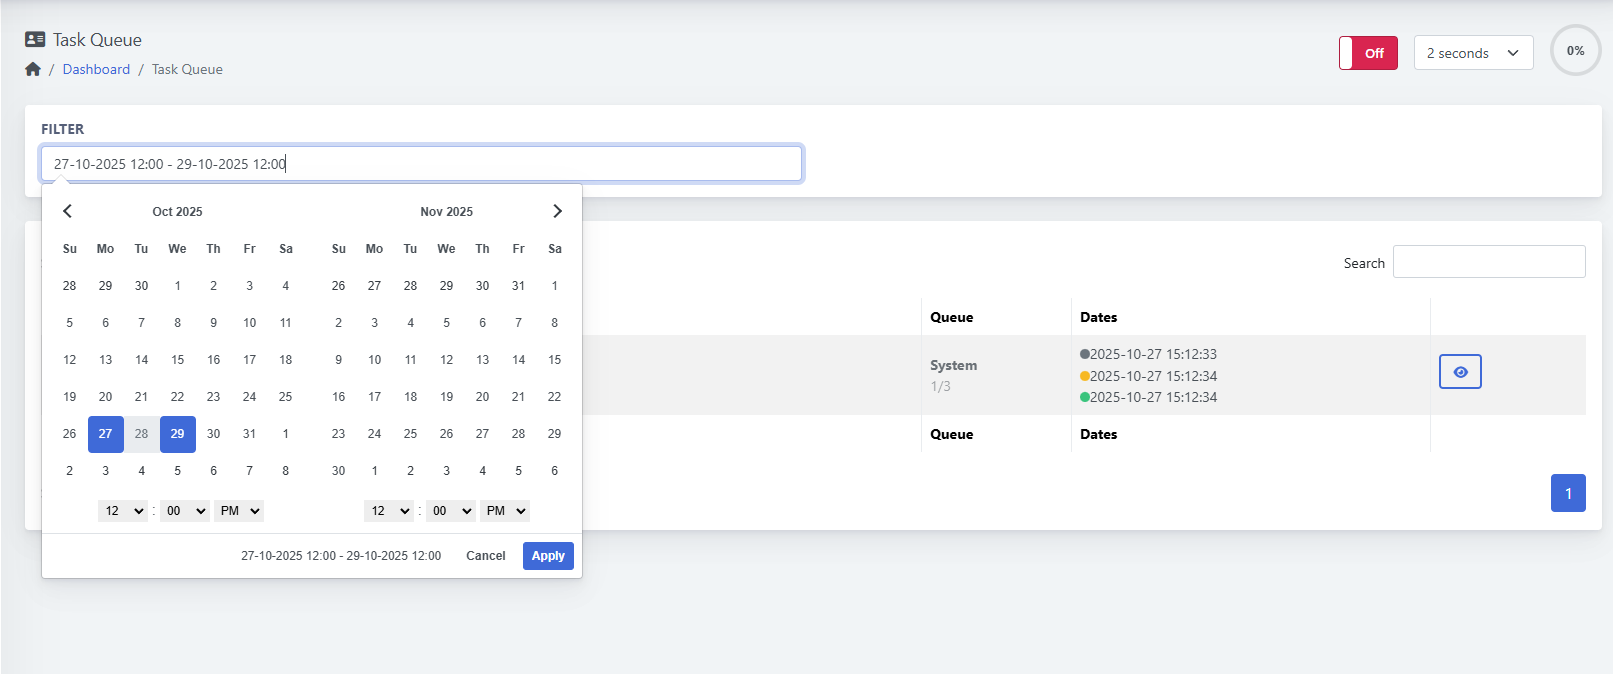
3. View Task Details
To inspect a specific job:
-
Click the eye icon next to the job.
-
A popup window will display Input Data and Output Data.
This information helps identify job parameters and verify successful completion.
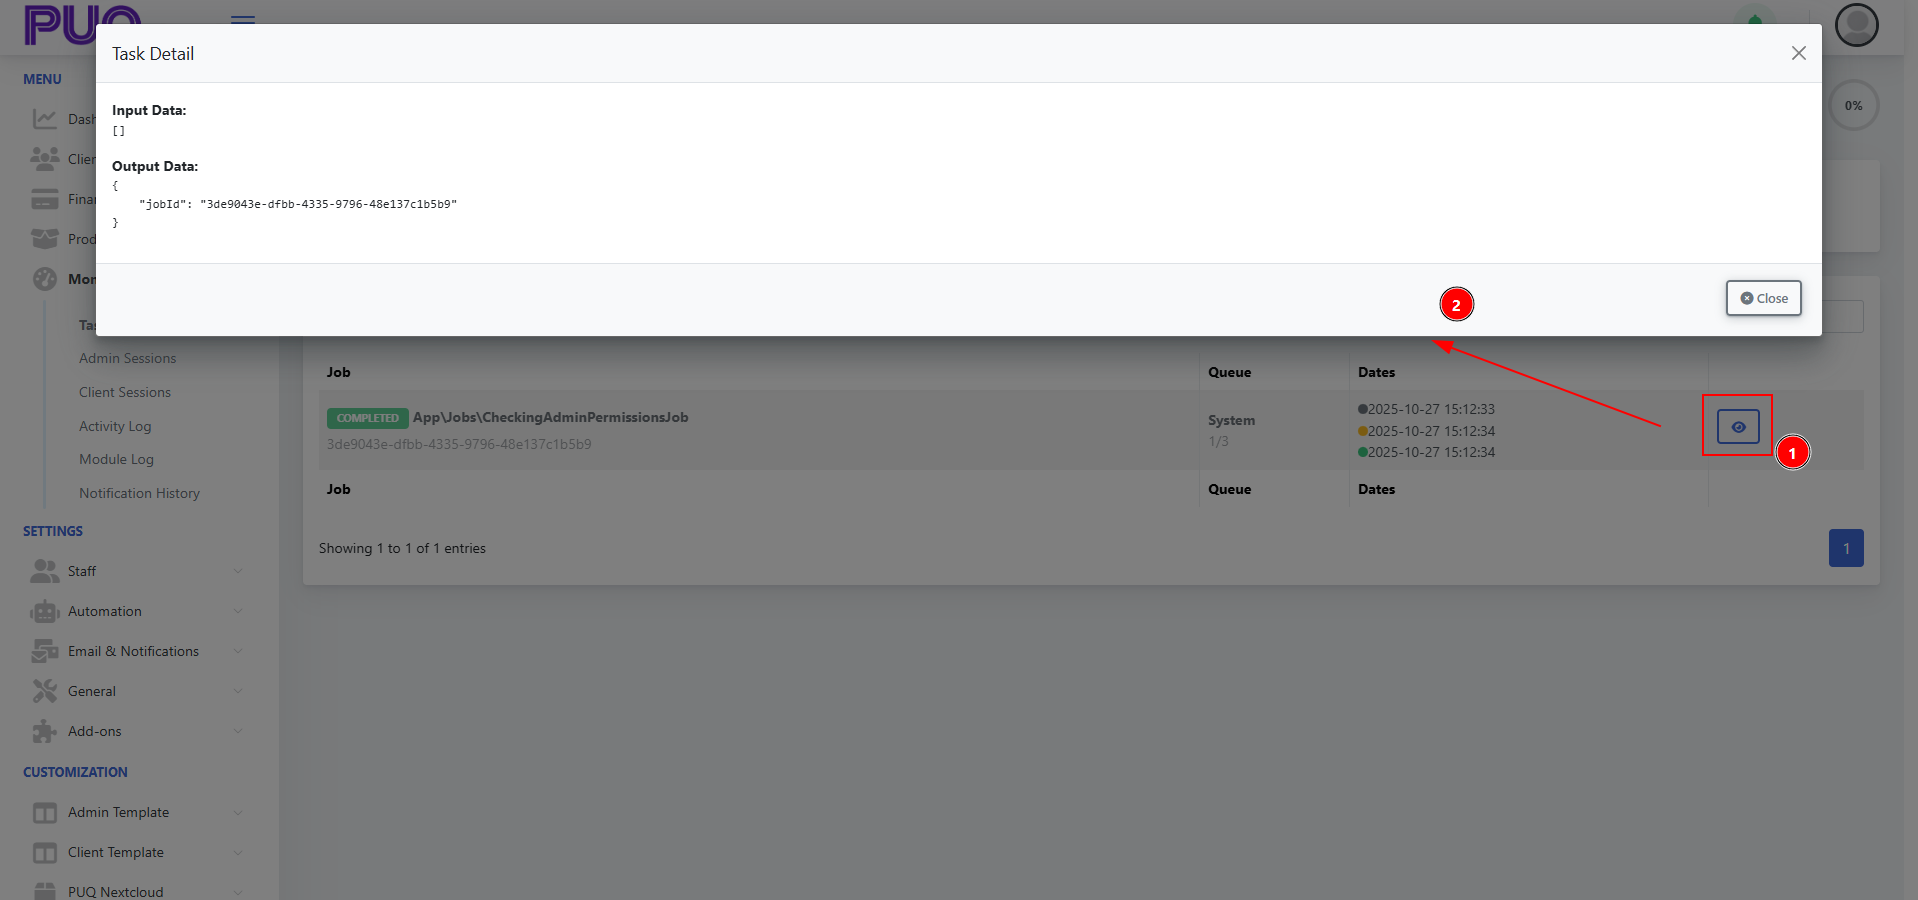
Status Colors
| Color | Meaning |
|---|---|
| 🟡 Processing | Task is currently being executed. |
| ⚫ Queued | Task is waiting to start. |
| 🟢 Completed | Task has finished successfully. |
| 🔴 Failed | Task encountered an error during execution. |
Queue Controls
| Control | Description |
|---|---|
| Auto Refresh Interval | Located in the top right corner. Choose how often the list updates (e.g., every 2 seconds). |
| Switch (Off/On) | Enables or disables automatic refreshing. |
| Search Field | Quickly locate jobs by name or ID. |
Example Use Case
A system job such asApp\Jobs\CheckingAdminPermissionsJob
verifies admin permission configurations.
When completed, the Task Detail window shows output data like:
{
"jobId": "3de9043e-dfbb-4335-9796-48e137c1b5b9"
}Tips
-
PUQcloud automatically manages queues, ensuring high performance even when many jobs are running simultaneously.
-
Use short intervals (2–5 seconds) when debugging background tasks.
-
To reduce load, disable auto-refresh when not actively monitoring.
-
If a task fails, use the job ID from the output data to locate logs or related errors.
Check and manage Admin Sessions
PUQcloud Panel
Order Now | Download | FAQ
Overview
The Admin Sessions section in PUQcloud Panel allows system administrators to monitor all admin activities and requests executed through both web and API interfaces.
Each session is logged automatically, showing the admin user, IP address, accessed URL, and method type.
This monitoring tool helps maintain transparency, detect unusual activity, and ensure security compliance within your PUQcloud environment.
Just like the Task Queue, these operations run in the background, ensuring no performance impact on the system while recording all admin actions.
Navigation Path
Dashboard → Monitoring → Admin Sessions
Key Features
| Feature | Description |
|---|---|
| Complete Admin Logs | Tracks all admin operations across the web panel and API requests. |
| Background Tracking | Logs are recorded automatically without slowing down system performance. |
| Filter by Date Range | Focus on specific time periods for auditing or troubleshooting. |
| Auto Refresh Control | Choose how often session logs update automatically. |
| Search and Sorting | Quickly find specific admins, URLs, or IP addresses. |
| “Hide Me” Option | Exclude your own sessions from the view for cleaner analysis. |
Using the Admin Sessions Page
1. Access the Page
Go to
Dashboard → Monitoring → Admin Sessions
You will see a list of session entries, each containing:
-
Date and Time
-
Admin Name and Email
-
IP Address
-
Request Type (WEB/API, GET/POST)
-
Accessed URL
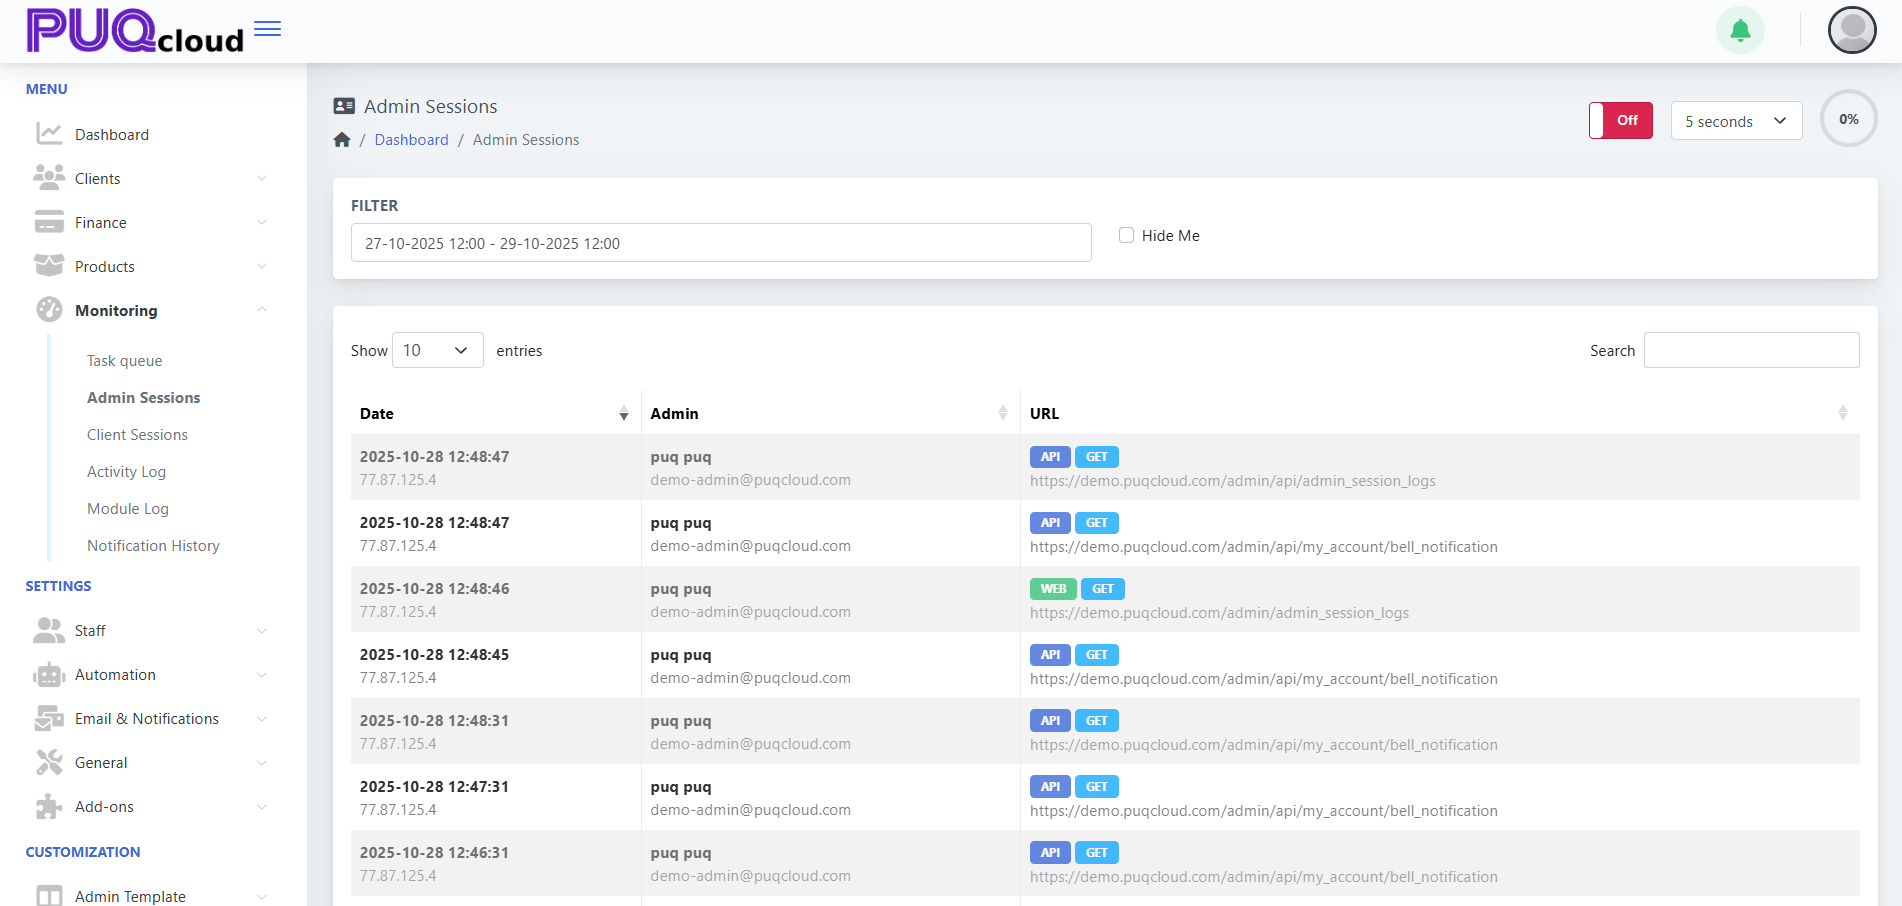
2. Filtering Sessions
Use the Filter field to select a time range.
Click inside the date field to open the calendar, choose a start and end date, and confirm with Apply.
This helps narrow the view to a specific investigation period.
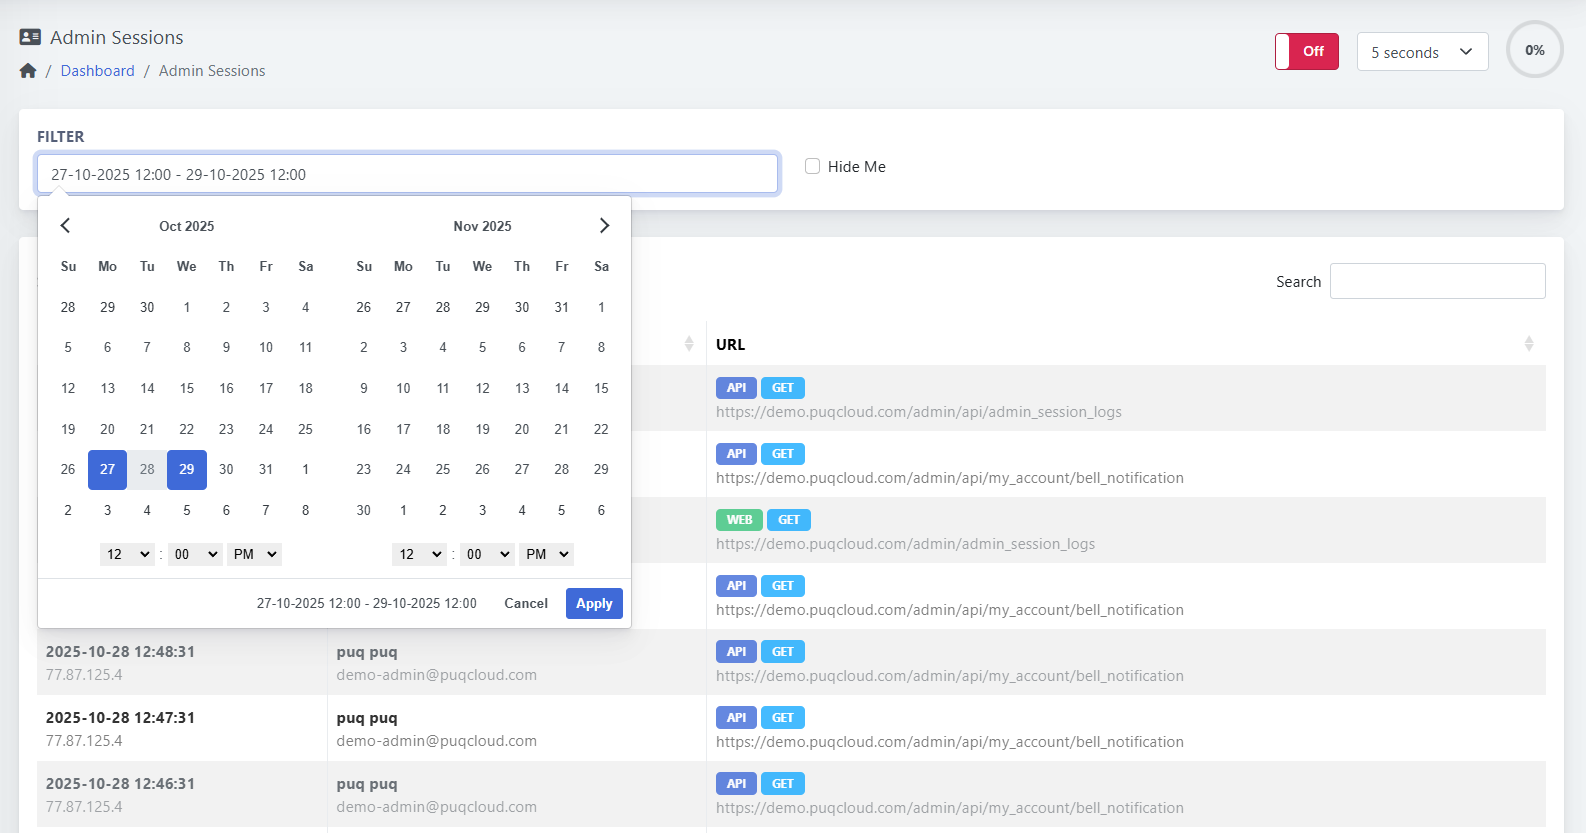
Columns Explained
| Column | Description |
|---|---|
| Date | Timestamp of when the admin made a request. |
| Admin | Name and email of the administrator. |
| IP Address | Logged IP address from which the request was made. |
| URL | Full path of the accessed page or API endpoint. |
| Type (WEB/API) | Indicates the source of the request. |
| Method (GET/POST) | Shows the HTTP method used. |
Status Labels
| Label | Meaning |
|---|---|
| 🟦 API | Request came through the system API. |
| 🟩 WEB | Request made through the web interface. |
| 🟢 GET | Data was fetched from the system. |
| 🟠 POST | Data was sent or modified. |
Queue Controls
| Control | Description |
|---|---|
| Auto Refresh Interval | Located in the top right. You can set refresh time (e.g., every 5 seconds). |
| Off/On Switch | Enables or disables automatic refreshing. |
| Search Box | Filter results by keyword (admin name, URL, IP). |
Example Use Case
An administrator wants to verify recent API requests:
By opening Monitoring → Admin Sessions, they can view every endpoint accessed, including timestamps, IP addresses, and request types.
Example entry:
2025-10-28 12:48:47 | puq puq | demo-admin@puqcloud.com
API GET → https://demo.puqcloud.com/admin/api/admin_session_logs
IP: 77.87.125.4
Tips
-
Enable short auto-refresh intervals (2–5 seconds) for real-time monitoring.
-
Use the Hide Me checkbox to exclude your own requests while observing other admins.
-
Combine date filtering with keyword search for precise audits.
-
API and web sessions are logged in one unified view for maximum traceability.
Check and manage Client Sessions
PUQcloud Panel
Order Now | Download | FAQ
Overview
The Client Sessions section in PUQcloud Panel provides full visibility into all user and client activities occurring in the system.
Each client’s interaction — whether via the web panel or API requests — is automatically logged in real time.
All session tracking runs in the background, so even with thousands of simultaneous connections, the system performance remains unaffected.
This feature is essential for security auditing, support troubleshooting, and usage monitoring.
Navigation Path
Dashboard → Monitoring → Client Sessions
Key Features
| Feature | Description |
|---|---|
| Complete Client Logs | Monitors every user’s actions through the Client Area and API. |
| Background Execution | Sessions are recorded asynchronously, ensuring no system slowdown. |
| Real-Time Tracking | Displays ongoing requests with instant refresh intervals. |
| Filter by Date Range | Analyze session activity for a specific period. |
| Auto Refresh Option | Set automatic updates every few seconds. |
| Detailed Metadata | Includes timestamp, IP, client name, user name, and accessed URL. |
Using the Client Sessions Page
1. Access the Page
You’ll see a list of recorded client activities including:
-
Date and Time
-
Client and User
-
IP Address
-
Request Source (WEB/API)
-
HTTP Method (GET/POST)
-
Full URL Accessed
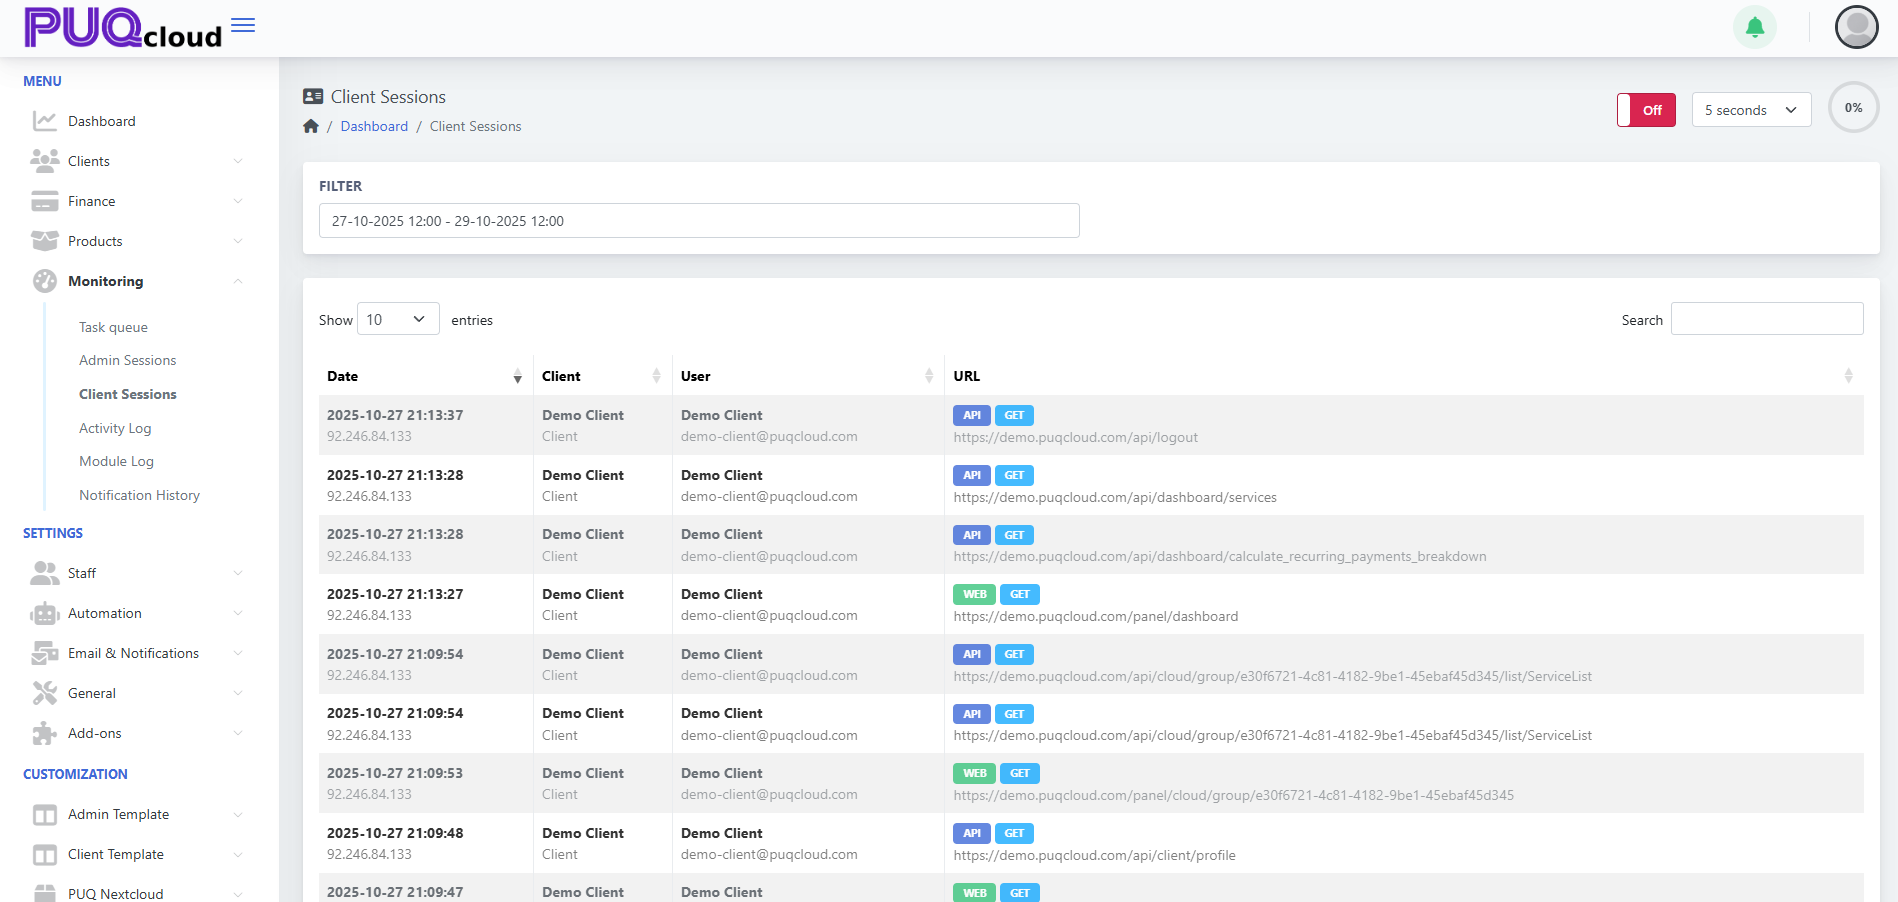
2. Filter by Date and Time
To narrow results, use the Filter field at the top.
Click the date range selector, choose your start and end times, then click Apply to confirm.
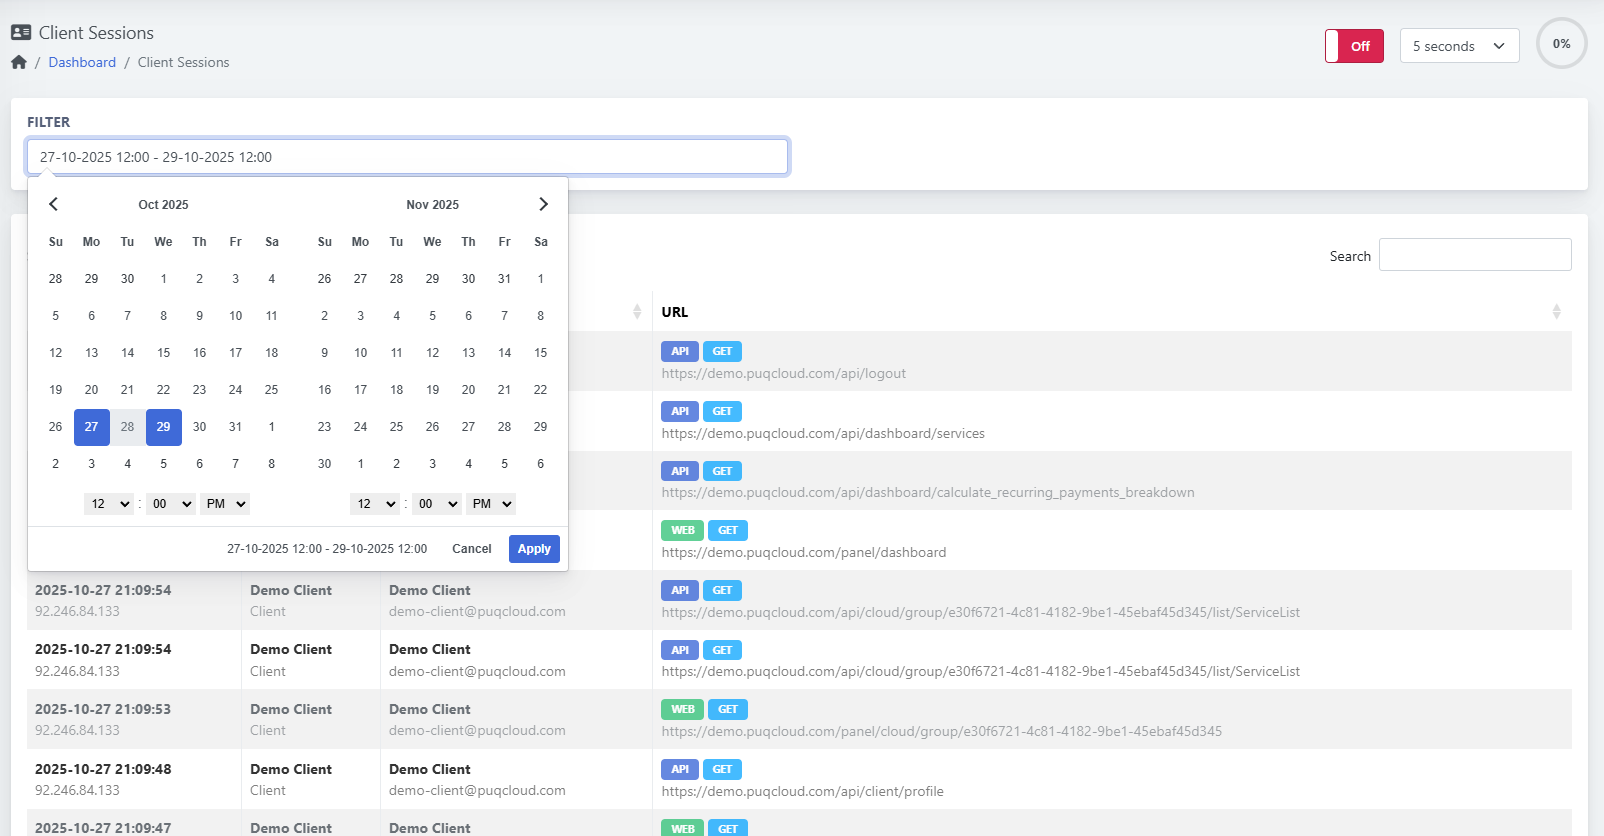
Columns Explained
| Column | Description |
|---|---|
| Date | When the request was made. |
| Client | Name of the organization or customer account. |
| User | Name and email of the user under that client. |
| IP Address | Source IP used during the session. |
| URL | Exact web or API endpoint accessed. |
| Type (WEB/API) | Indicates the request source. |
| Method (GET/POST) | HTTP action type (data retrieval or update). |
Status Labels
| Label | Meaning |
|---|---|
| 🟦 API | Request executed through system API. |
| 🟩 WEB | Request sent via client web interface. |
| 🟢 GET | Data retrieved from the system. |
| 🟠 POST | Data submitted or changed. |
Queue Controls
| Control | Description |
|---|---|
| Auto Refresh Interval | Located in the top-right corner. Select update frequency (e.g., every 5 seconds). |
| Off/On Switch | Turns automatic refreshing on or off. |
| Search Box | Quickly find sessions by client name, user, IP, or URL. |
Example Use Case
Support staff can use this section to trace a client’s recent activity.
For instance, you can identify when a client accessed their service list or triggered an API call.
Example entry:
2025-10-27 21:13:37 | Demo Client | demo-client@puqcloud.com
API GET → https://demo.puqcloud.com/api/logout
IP: 92.246.84.133
Tips
-
Use short refresh intervals (3–5 seconds) to watch active client activity in real time.
-
Combine date filters with keyword searches to quickly find suspicious or failed API calls.
-
Logs include both web panel navigation and API usage, providing full operational transparency.
-
Background tracking ensures stable system performance even with heavy usage.
Check and manage Activity Log
PUQcloud Panel
Order Now | Download | FAQ
Overview
The Activity Log section in PUQcloud Panel provides a centralized record of all important system and user actions.
Every event — whether triggered by an administrator, client, or automated background job — is logged here to ensure full transparency and accountability.
Activity tracking runs entirely in the background, meaning multiple operations can be recorded simultaneously without affecting system performance.
This allows administrators to trace actions, monitor transactions, and quickly investigate unusual activity.
Navigation Path
Dashboard → Monitoring → Activity Log
Key Features
| Feature | Description |
|---|---|
| Full Action History | Tracks all actions performed by users and system processes. |
| Performance-Safe Logging | Background operation ensures stable performance during heavy load. |
| Detailed Event Data | Each record includes time, initiator, action type, and description. |
| Filter by Date Range | Focus on specific periods to analyze system behavior. |
| Search Function | Quickly find specific actions or users. |
| Auto Refresh Option | Keep the log updated in real time for live monitoring. |
Using the Activity Log
1. Access the Activity Log
You’ll see a structured table displaying all recent system activities with columns for:
-
Date
-
Initializer (User or System)
-
Action
-
Description
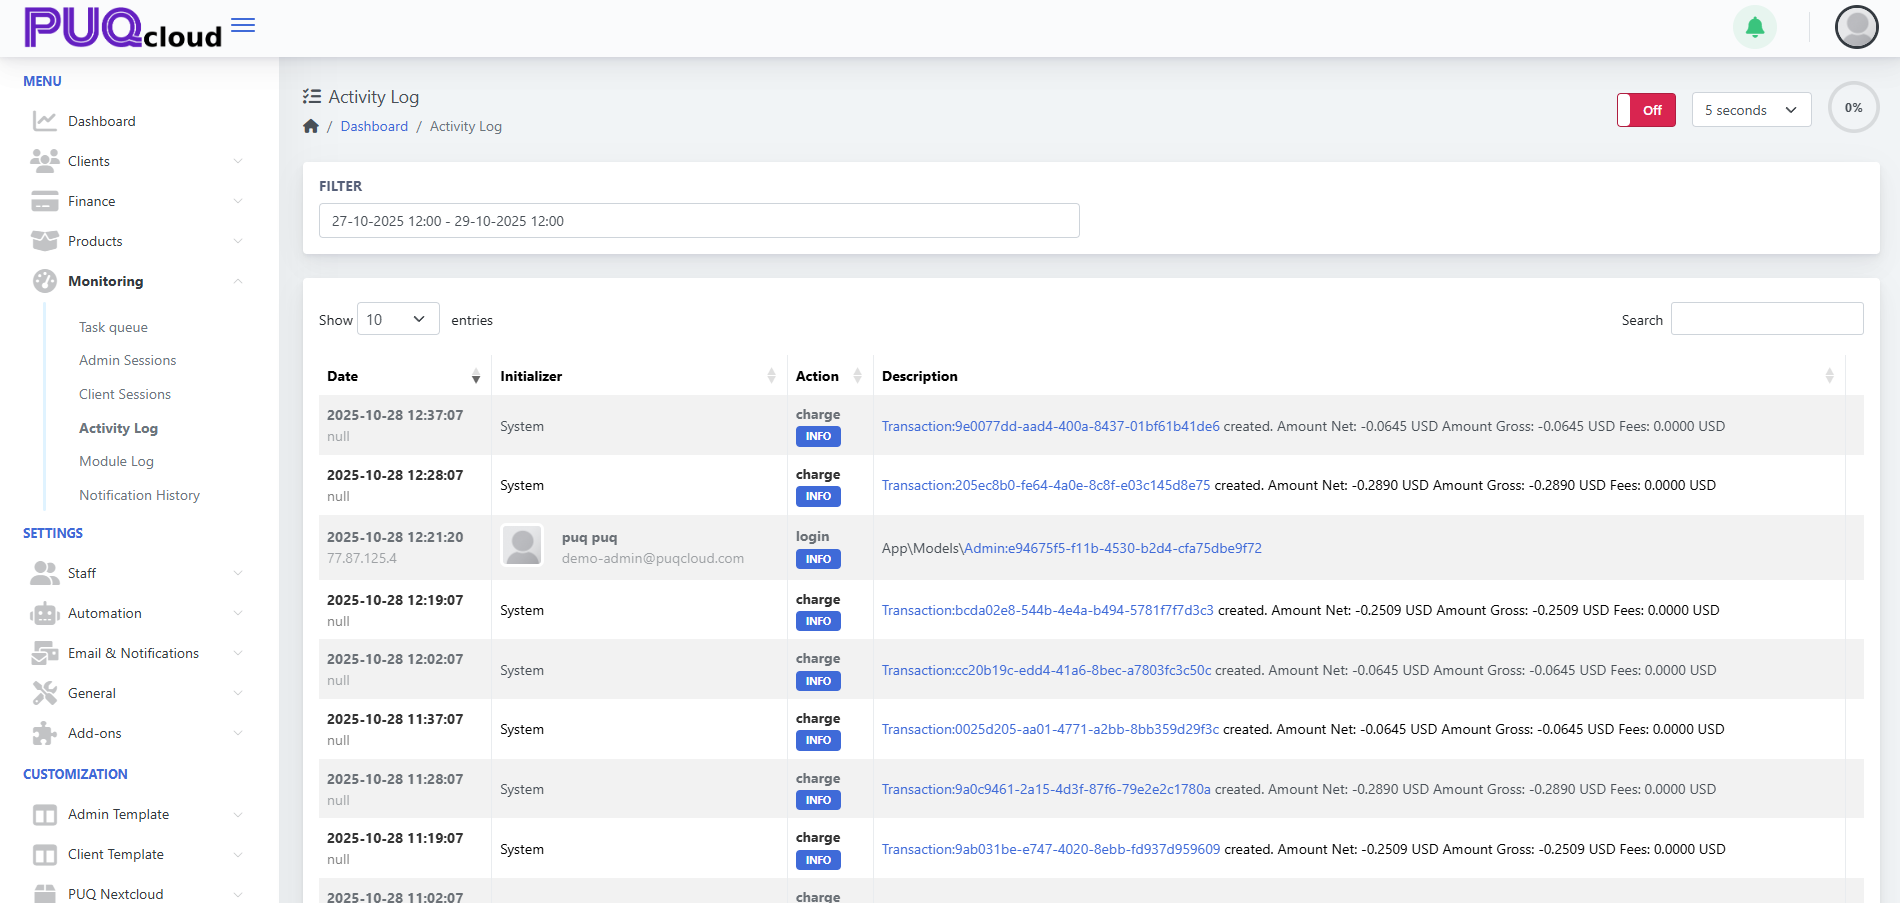
2. Filter by Date and Time
To focus on a specific time range, use the Filter field.
Click the input box to open the date/time selector, choose your preferred period, and click Apply.
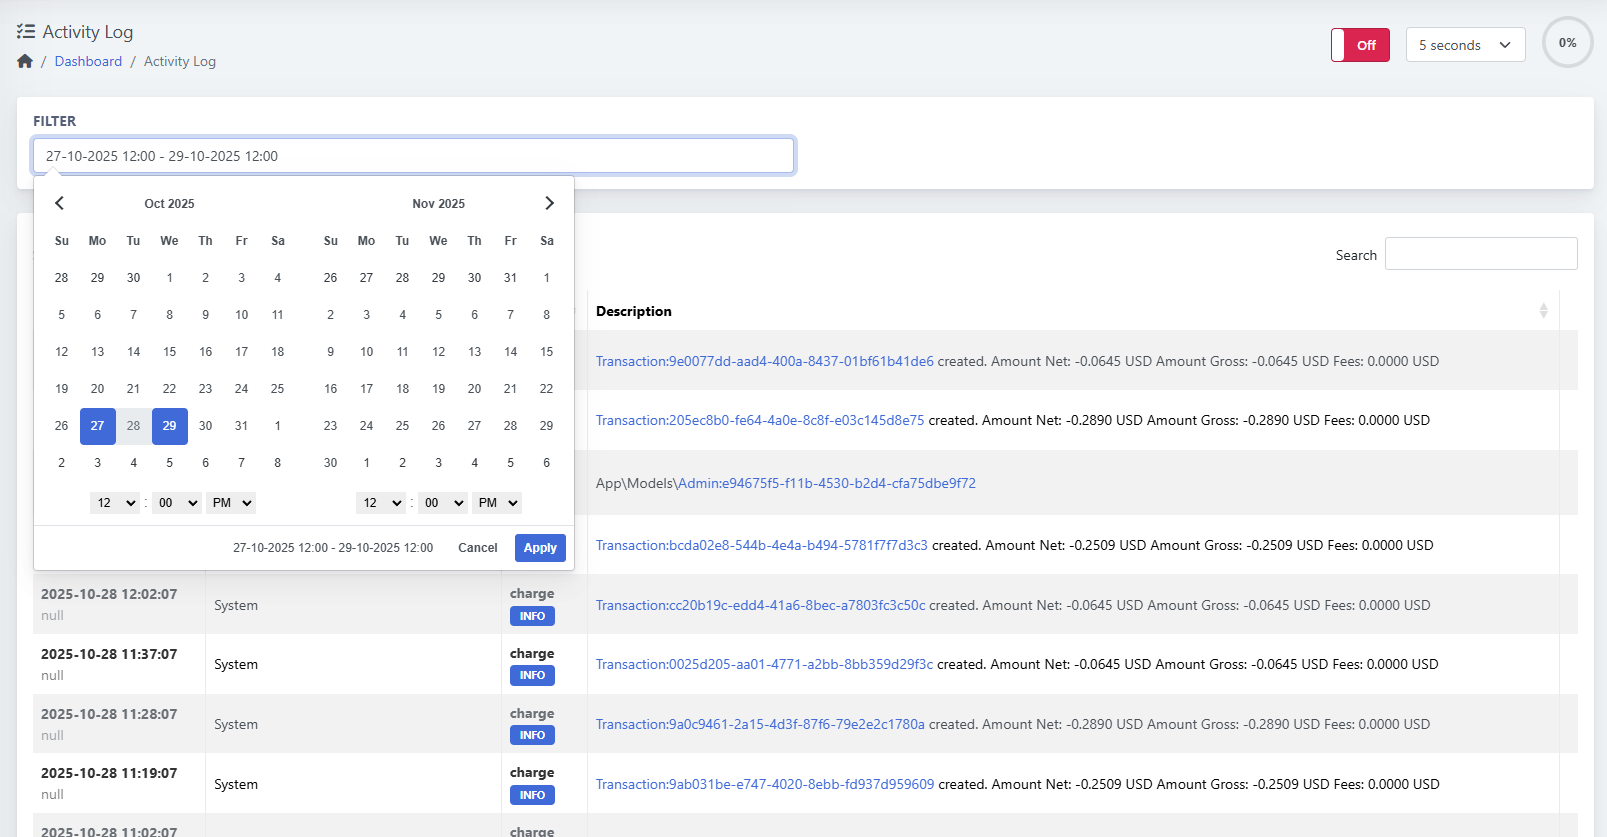
Columns Explained
| Column | Description |
|---|---|
| Date | Timestamp of when the action occurred. |
| Initializer | The actor who performed the action (e.g., system, admin, or client). |
| Action | The operation type (e.g., charge, login, create, update). |
| Description | Detailed log entry including affected model, transaction link, and related data. |
Action Types
| Label | Meaning |
|---|---|
| 🟦 INFO | Informational log (e.g., successful login, transaction created). |
| 🟧 WARNING | Indicates potential issue or unusual operation. |
| 🔴 ERROR | Operation failed or triggered an exception. |
Queue Controls
| Control | Description |
|---|---|
| Auto Refresh Interval | Located at the top right. Define how often logs refresh (e.g., every 5 seconds). |
| Off/On Switch | Enables or disables automatic refresh. |
| Search Box | Find actions by keyword, ID, or user. |
Example Use Case
An administrator wants to verify all automated billing actions executed by the system.
By filtering the Activity Log, they can view entries such as:
2025-10-28 12:37:07 | System | charge | Transaction:9e0077dd-aad4-400a-8437-01bf61b41de6 created.
Amount Net: -0.0645 USD Amount Gross: -0.0645 USD Fees: 0.0000 USD
This helps confirm that automated transactions ran correctly and without errors.
Tips
-
Use Activity Log as your primary audit trail for all background and user operations.
-
Combine it with Admin Sessions and Client Sessions for full transparency.
-
Use search filters to isolate suspicious events quickly.
-
Since logging runs asynchronously, you can safely enable real-time refresh during monitoring.
Check and manage Module Log
PUQcloud Panel
Order Now | Download | FAQ
Overview
The Module Log in PUQcloud Panel provides detailed records of all operations executed by modules — including API requests, SSH commands, and service actions.
It helps administrators debug, monitor, and audit communication between PUQcloud and external systems such as Proxmox, Nextcloud, and others.
All logging processes run in the background, allowing multiple modules to record events simultaneously without impacting performance.
This ensures that even heavy automation tasks remain fast and efficient.
Navigation Path
Dashboard → Monitoring → Module Log
Key Features
| Feature | Description |
|---|---|
| Detailed Module-Level Tracking | Records every request and response for each module. |
| Safe Background Execution | All logs are generated asynchronously to avoid slowing down the system. |
| Live Monitoring | Real-time updates every few seconds for active debugging. |
| Filter by Date and Time | Review specific activity ranges. |
| Search and Filter | Quickly locate logs by module name, action, or keyword. |
| Log Viewer | Inspect full request and response content for debugging. |
| Delete All Logs | Instantly clear old logs when troubleshooting is complete. |
Using the Module Log
1. Access the Page
You’ll see all module-related activity displayed in a structured table with columns for:
-
Date
-
Name (module name)
-
Action
-
Level
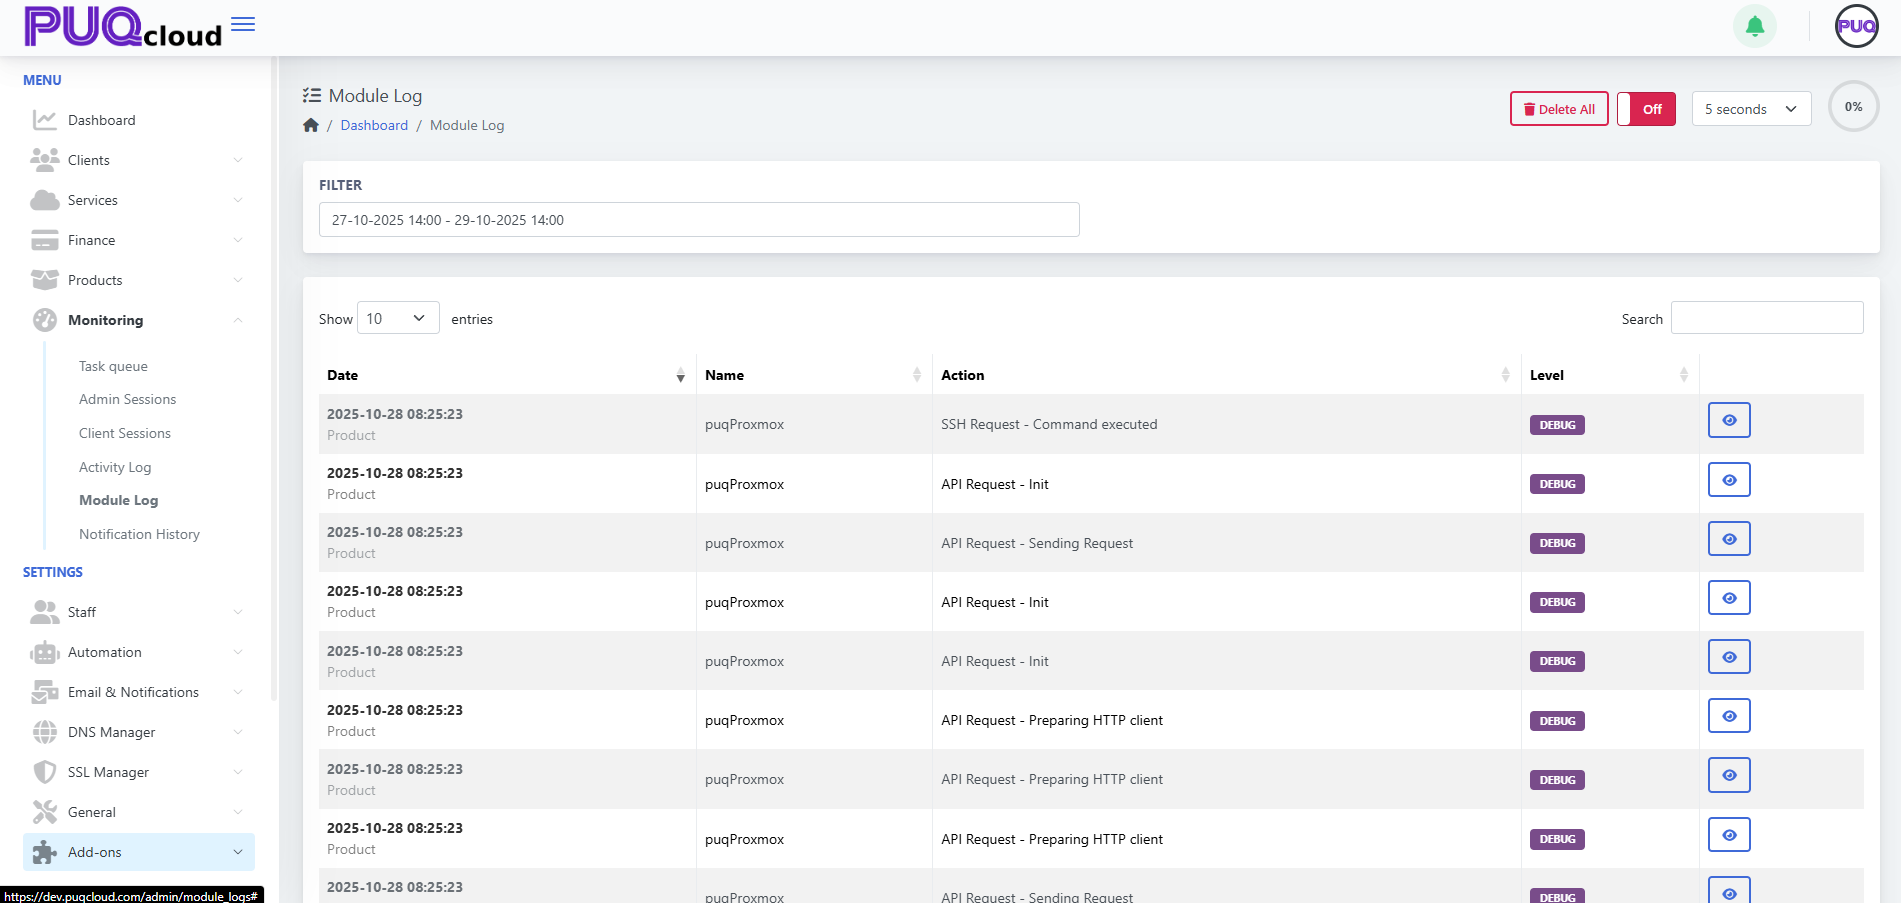
2. Filter by Date and Time
To focus on a specific period, use the Filter control at the top.
Select the desired start and end dates and times, then click Apply to reload the results.

3. View Log Details
Each record includes a “View” (👁️) icon on the right.
Click it to open the detailed log window showing:
-
Type and Module Name
-
Action Type
-
Log Level
-
Request Payload
-
Response Data
This view is essential for debugging API and SSH communication.
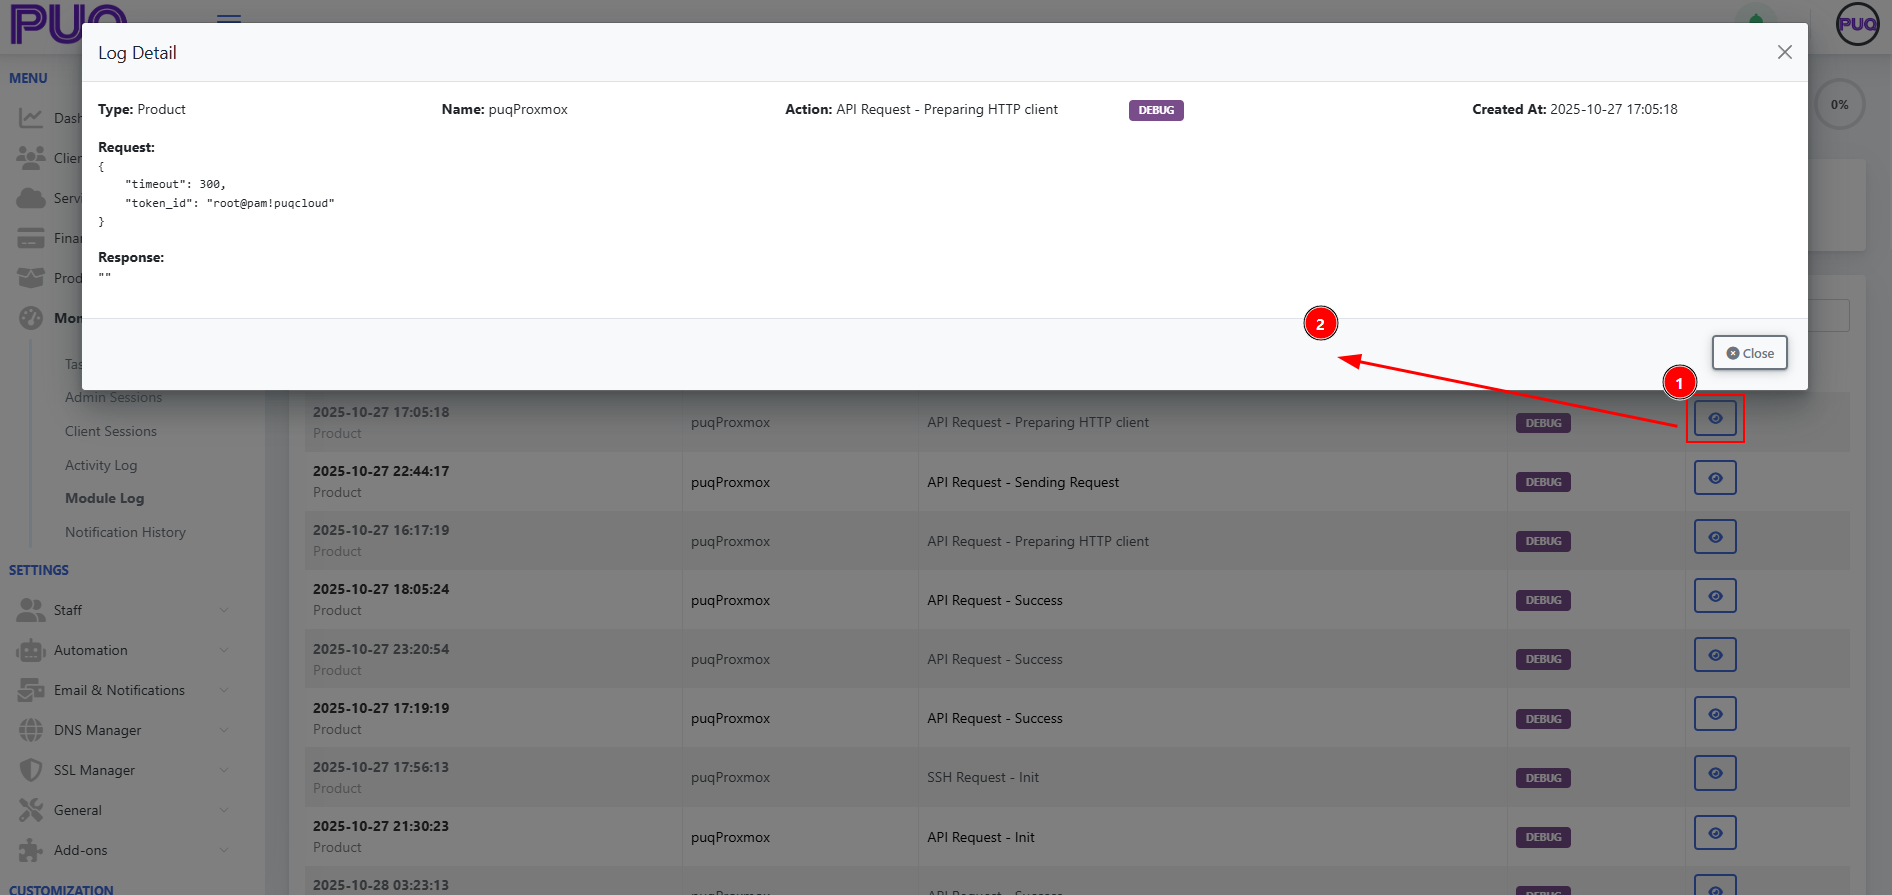
Columns Explained
| Column | Description |
|---|---|
| Date | Timestamp of the log entry. |
| Name | The name of the module (e.g., puqProxmox, puqNextcloud). |
| Action | Describes what operation was executed (API Request, SSH Command, etc.). |
| Level | Indicates the log type (Debug, Info, Warning, Error). |
Log Levels
| Level | Description |
|---|---|
| 🟣 DEBUG | Detailed technical data for developers and administrators. |
| 🟦 INFO | Informational events indicating normal operation. |
| 🟧 WARNING | Non-critical issue or irregular response. |
| 🔴 ERROR | Operation failed or received invalid data. |
Controls and Options
| Control | Description |
|---|---|
| Auto Refresh | Refresh interval (top-right) allows you to monitor logs in real time. |
| Off/On Switch | Enable or disable live updates. |
| Search Box | Quickly find logs by action or module name. |
| Delete All | Clears all logs at once — useful after debugging sessions. |
Example Use Case
While testing the puqProxmox module, the administrator can open Module Log to check the API and SSH calls executed during a provisioning process.
Example entry:
2025-10-28 08:25:23 | puqProxmox | API Request - Sending Request | DEBUG
By clicking the 👁️ icon, the admin can inspect both the request JSON and the response received from the external system.
Tips
-
Use DEBUG level logs for troubleshooting module integrations.
-
Regularly clear old logs to keep your workspace clean.
-
Combine with the Task Queue section to trace background automation steps.
-
Since logs are recorded asynchronously, there’s no performance degradation, even during heavy module execution.
Check and manage Notification History
PUQcloud Panel
Order Now | Download | FAQ
Create & Manage Administrators
PUQcloud Panel
Order Now | Download | FAQ
Use this quick, practical guide to add new admins, edit access, reset passwords, and keep your panel secure. Each step tells you exactly where to place your screenshots.
Open the Administrators page
Path: Settings → Staff → Admins
Here you’ll see the current admins list with Edit ✏️ and Delete 🗑️ actions.
Administrators list (with Edit/Delete).
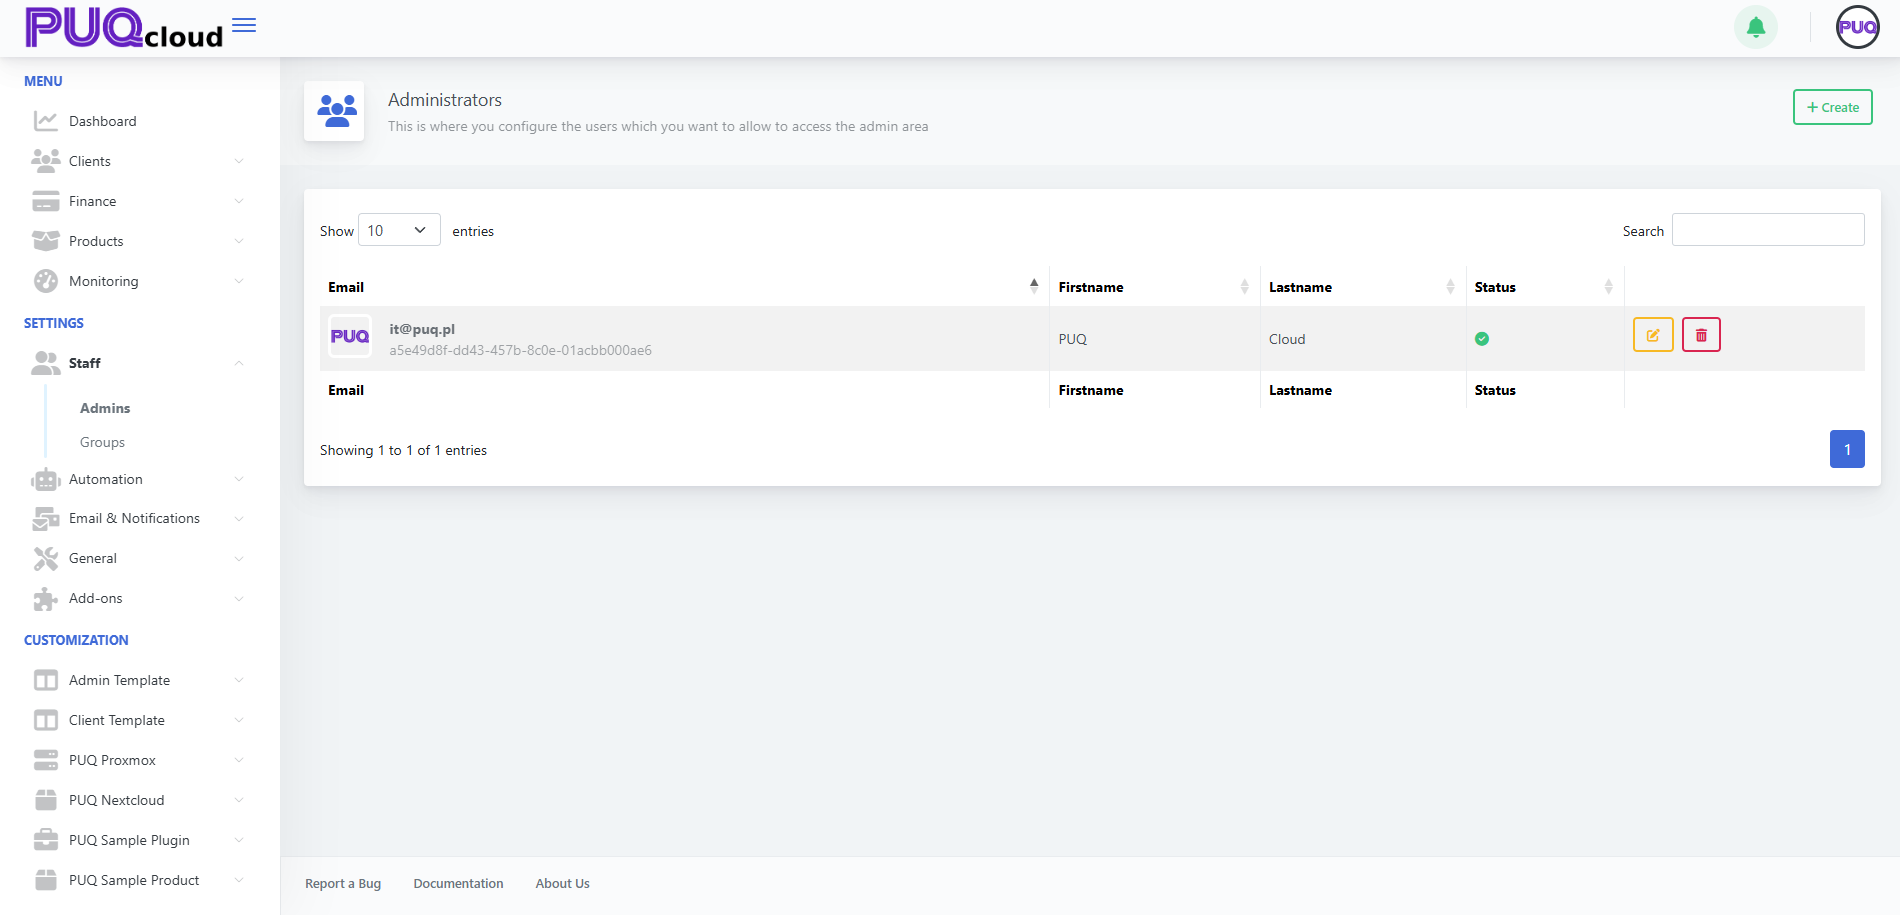
Create a new Administrator
-
Click + Create (top-right).
-
Fill in:
-
Email, Firstname, Lastname
-
Language (UI language for this admin)
-
Groups (permission set; e.g., Super Admin or your custom groups)
-
Password and Confirm password
-
-
Click Save.
“Create Administrator” modal (all fields)
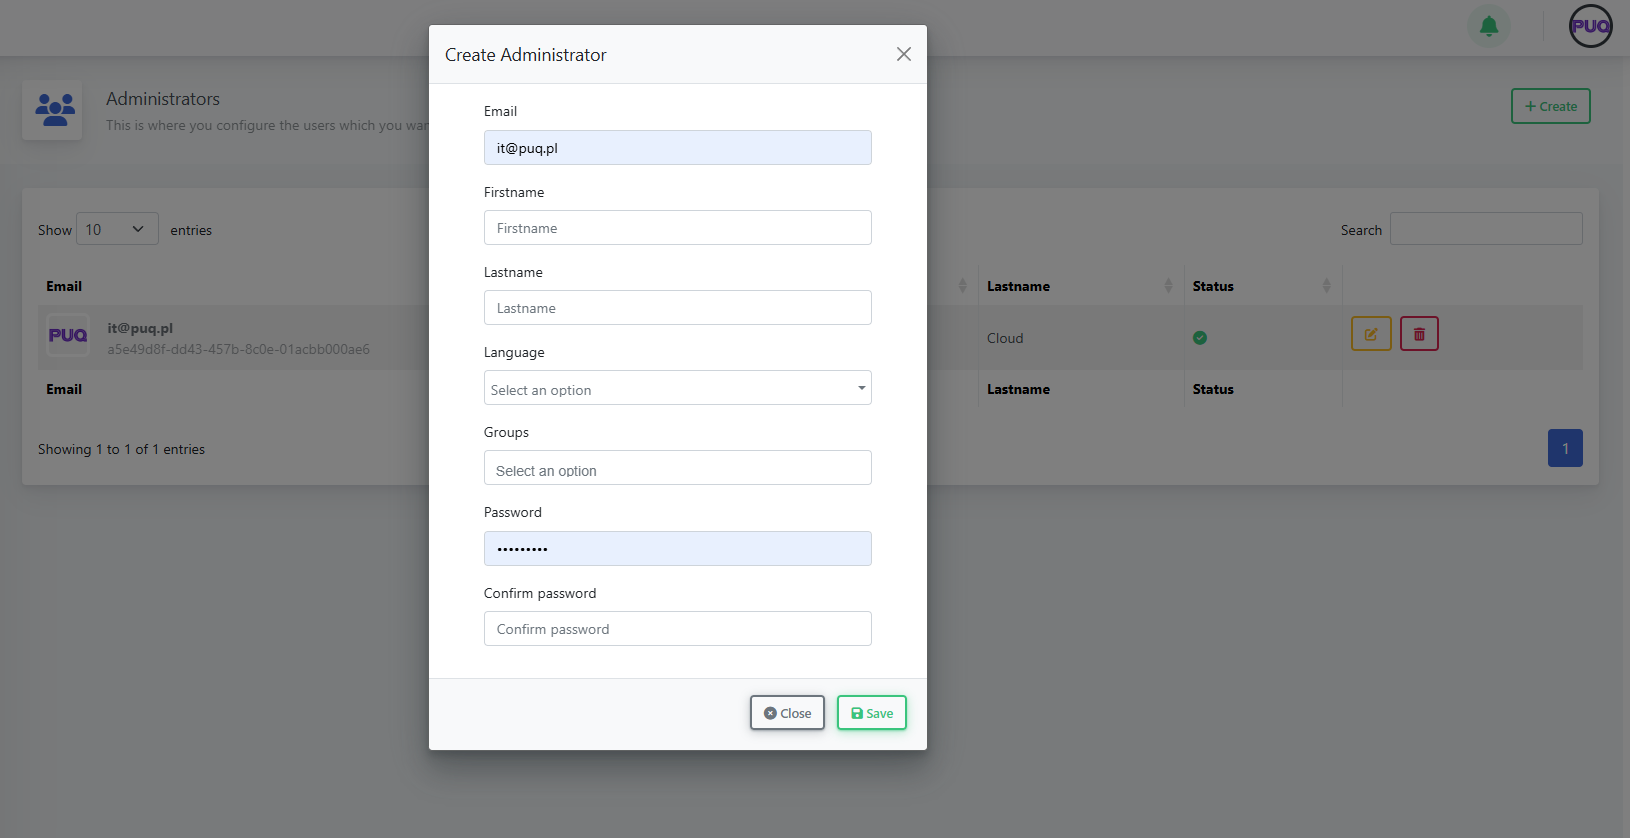
Notes
-
Use a unique, work email per person (no shared logins).
-
Assign the minimum necessary group (least privilege).
Edit an Administrator (status, groups, details)
From the list, click Edit:
-
Status: toggle Enabled/Disabled to grant or block access.
-
Groups: add/remove roles to change permissions.
-
Language, Phone Number, and Notes as needed.
-
Session IPs (right side): quick audit of recent logins.
Click Save when done.
Edit Administrator page (Status, Groups, Session IPs, Save)
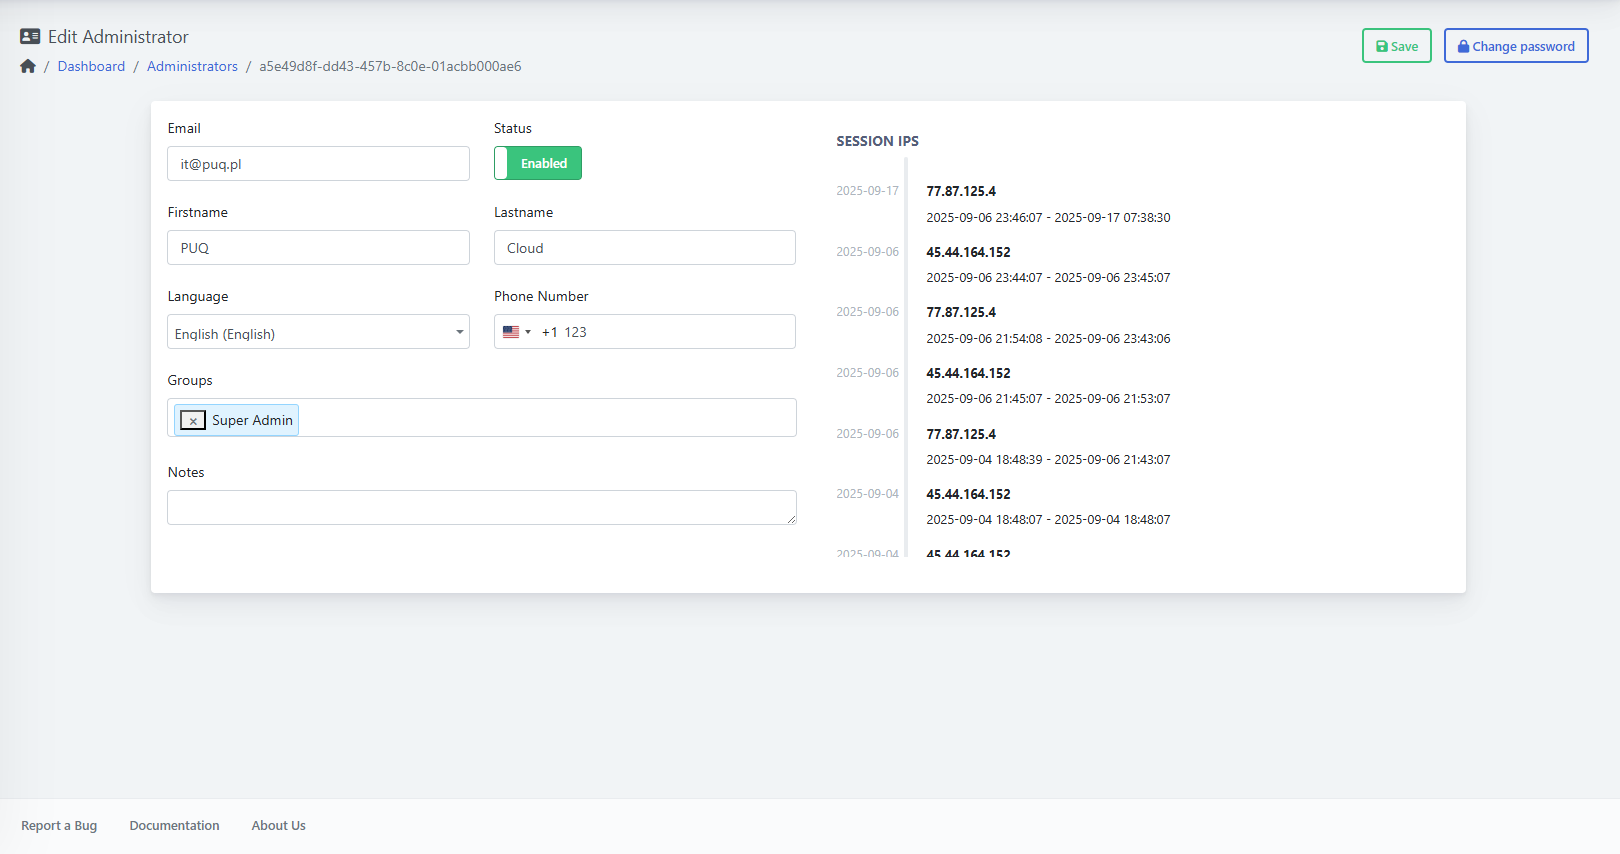
Change an Administrator’s Password
On the Edit page, click Change password (top-right), enter Password and Confirm, then Save.
“Change password” modal
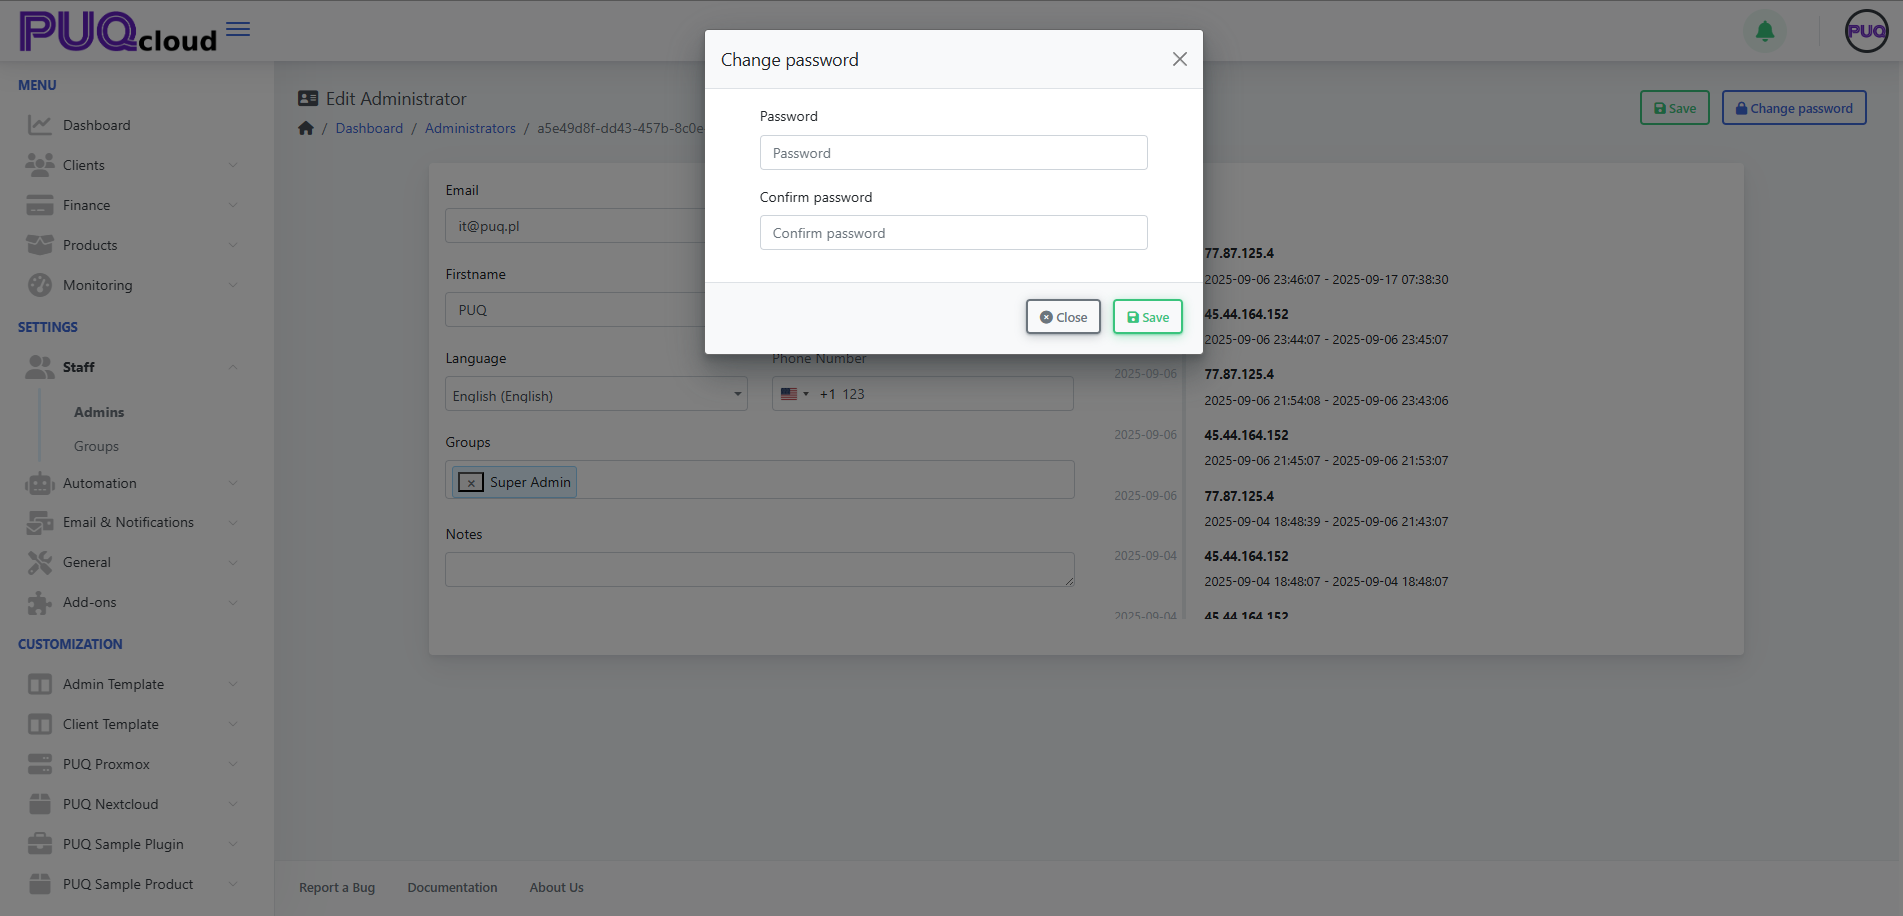
Tip: enforce strong passwords and ask the user to enable 2FA in their Client Area.
Delete an Administrator
On the Admins list, click the 🗑️ Delete button next to the user and confirm.
Best practice: never delete your last Super Admin. Create/assign another Super Admin first.
Groups & permissions (quick tips)
-
Define groups in Settings → Staff → Groups (e.g., Support, Finance, Ops).
-
Follow least privilege: grant only what the role needs.
-
Separate Finance vs Technical access when possible.
-
Review group membership regularly (monthly/quarterly).
Security checklist
-
One person = one account (no shared logins).
-
Require 2FA for all admins (set in the user’s Client Area).
-
Rotate passwords for high-privilege accounts.
-
Watch the Session IPs for unusual activity.
-
Immediately Disable or Delete ex-staff accounts.
Troubleshooting
-
“Save” is greyed out / error: check required fields, unique email, password match.
-
Can’t log in: ensure Status = Enabled; verify correct email.
-
Missing features: user likely lacks the right Group.
-
Password change fails: confirm both fields match and meet policy.
Create & Manage Administrator Groups
PUQcloud Panel
Order Now | Download | FAQ
Use this to build role-based access for your staff. I’ll also show where to place each screenshot.
Open Groups
Path: Settings → Staff → Groups
Here you can see all groups plus Edit ✏️ / Delete 🗑️.
Groups list (with action buttons).
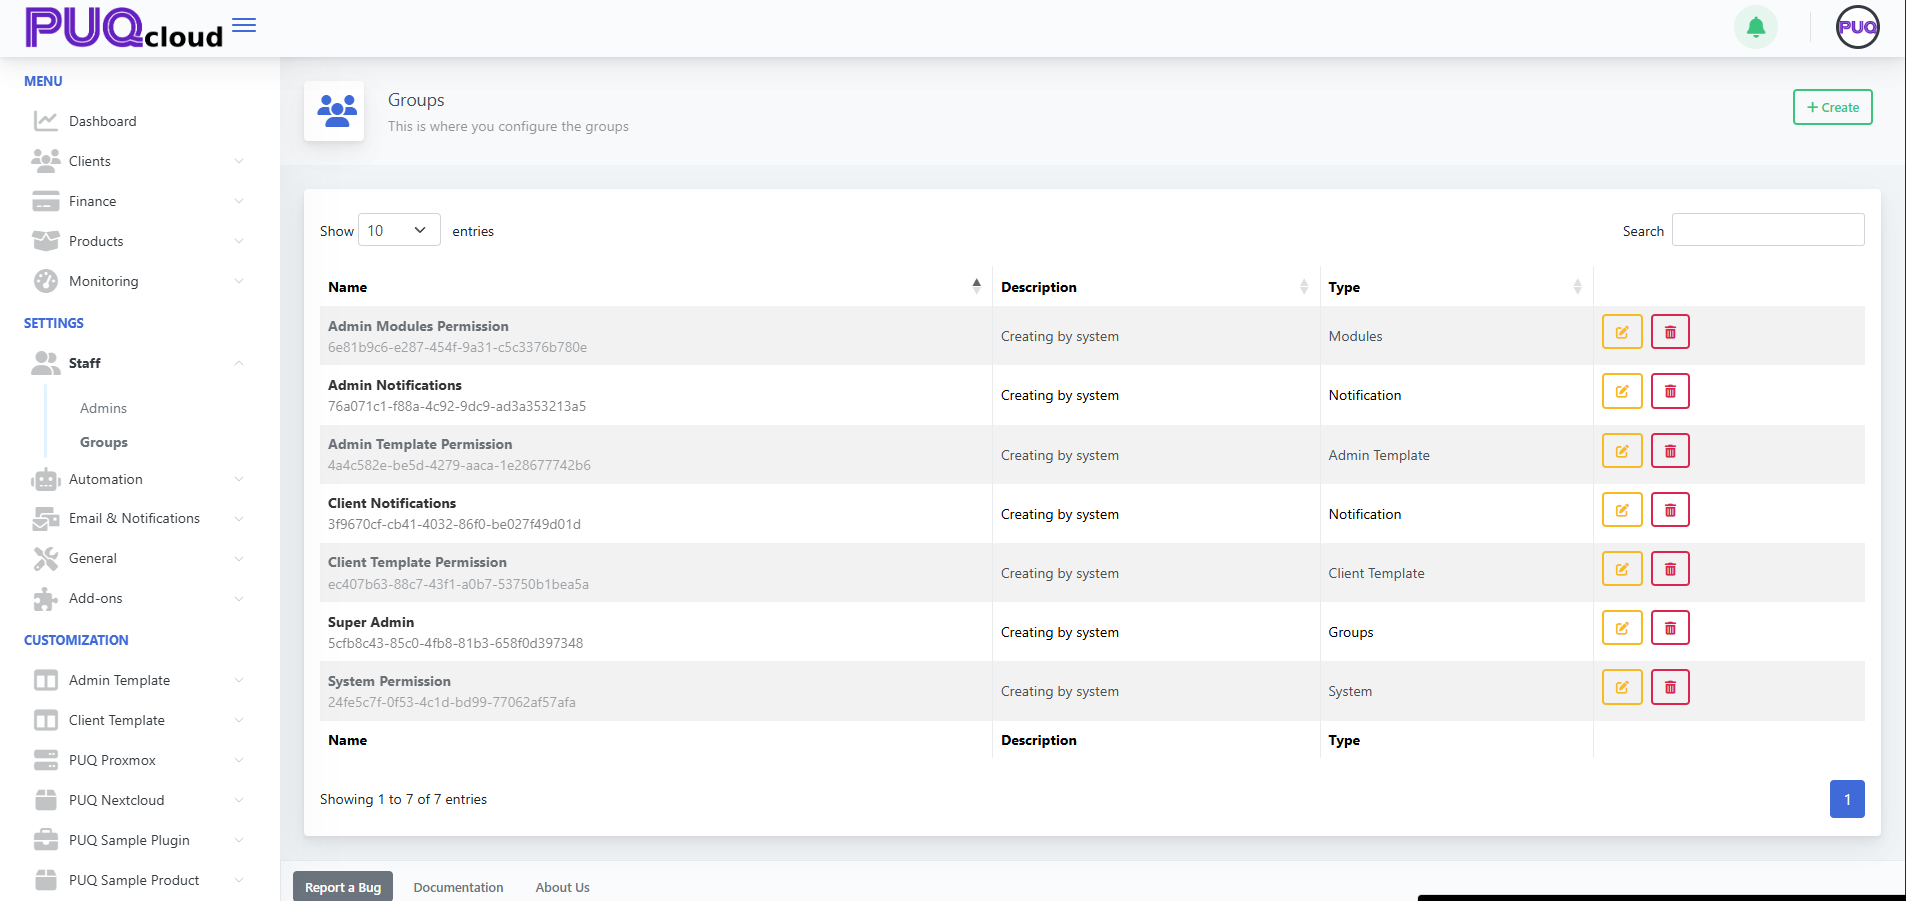
Create a Group (for Admins)
-
Click + Create (top-right).
-
Fill in:
-
Name — e.g., Support, Finance, Ops
-
Type — choose Groups (this is the correct type for administrator roles)
-
-
Save.
“Create Group” modal (Type dropdown visible).
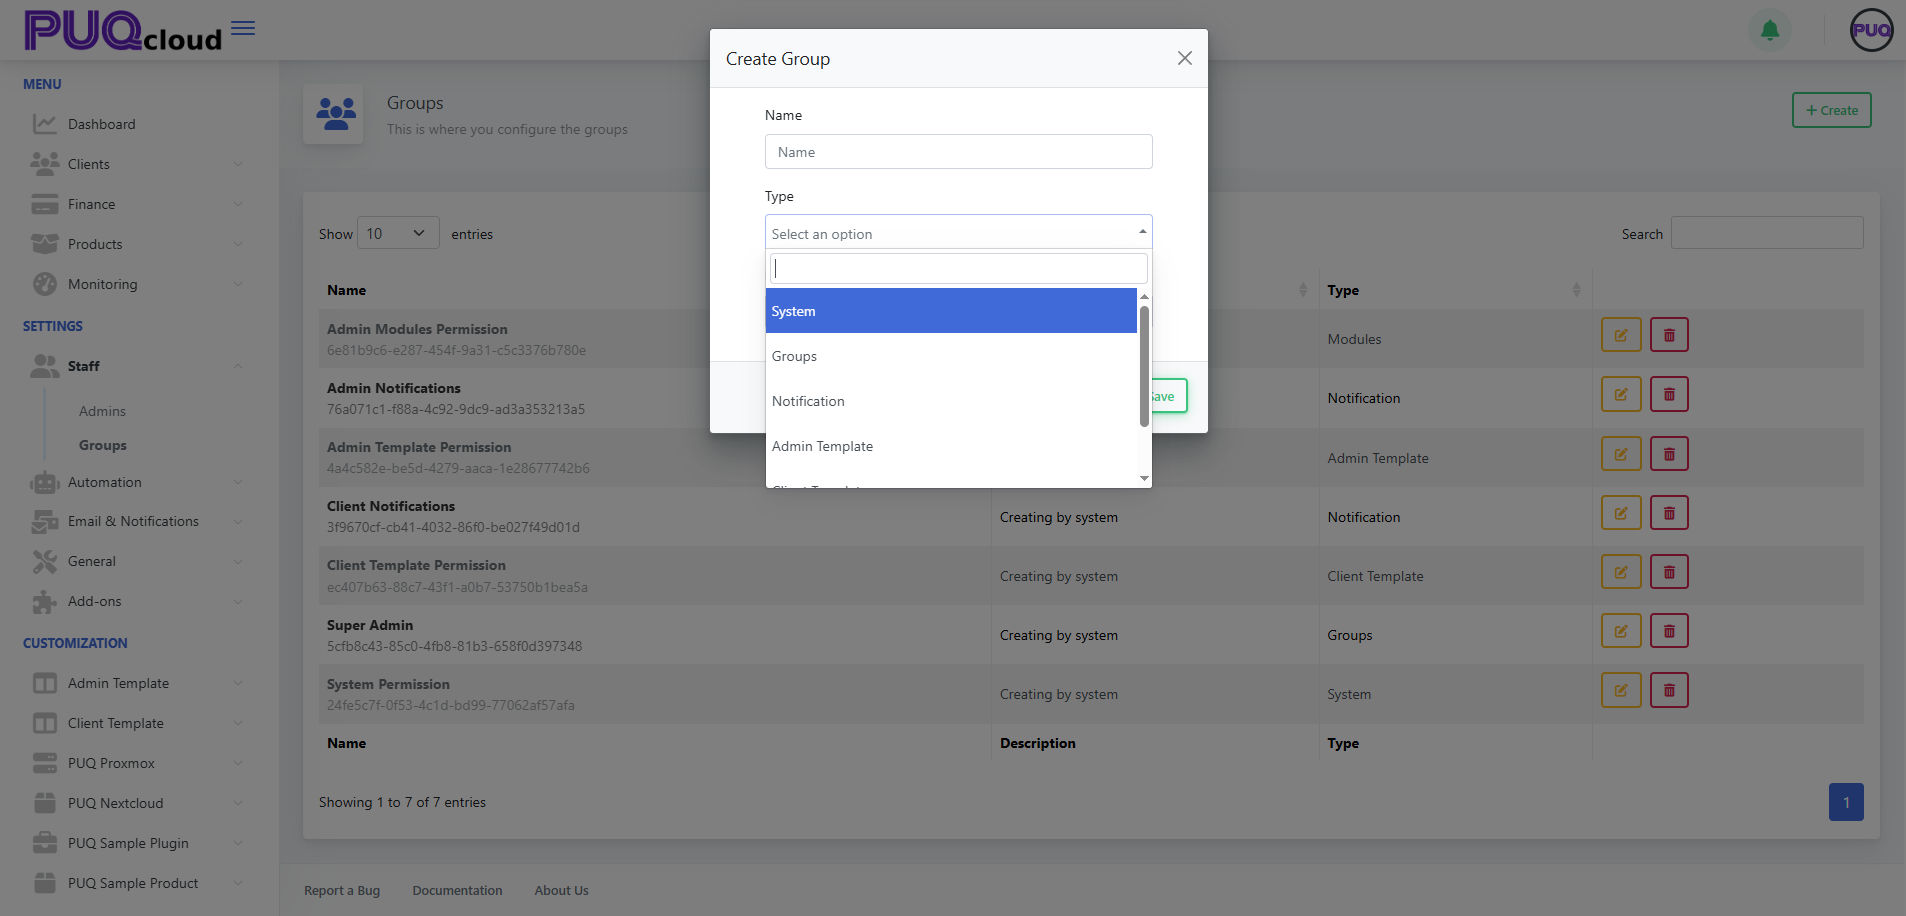
Other types (System, Notification, Admin/Client Template) are system/helper sets. For admin roles, use Groups.
Configure Permissions
After saving, you’re on the Edit Group page. Toggle capabilities the group should have, e.g.:
-
System Permission — system-level operations.
-
Admin Modules Permission — access to admin modules/features.
-
Admin Notifications — receive back-office alerts.
-
Client Notifications — receive client-side alerts (usually off for admins unless needed).
-
Admin Template Permission / Client Template Permission — manage templates.
Add a Description, then Save.
Edit Group with toggles (On/Off).
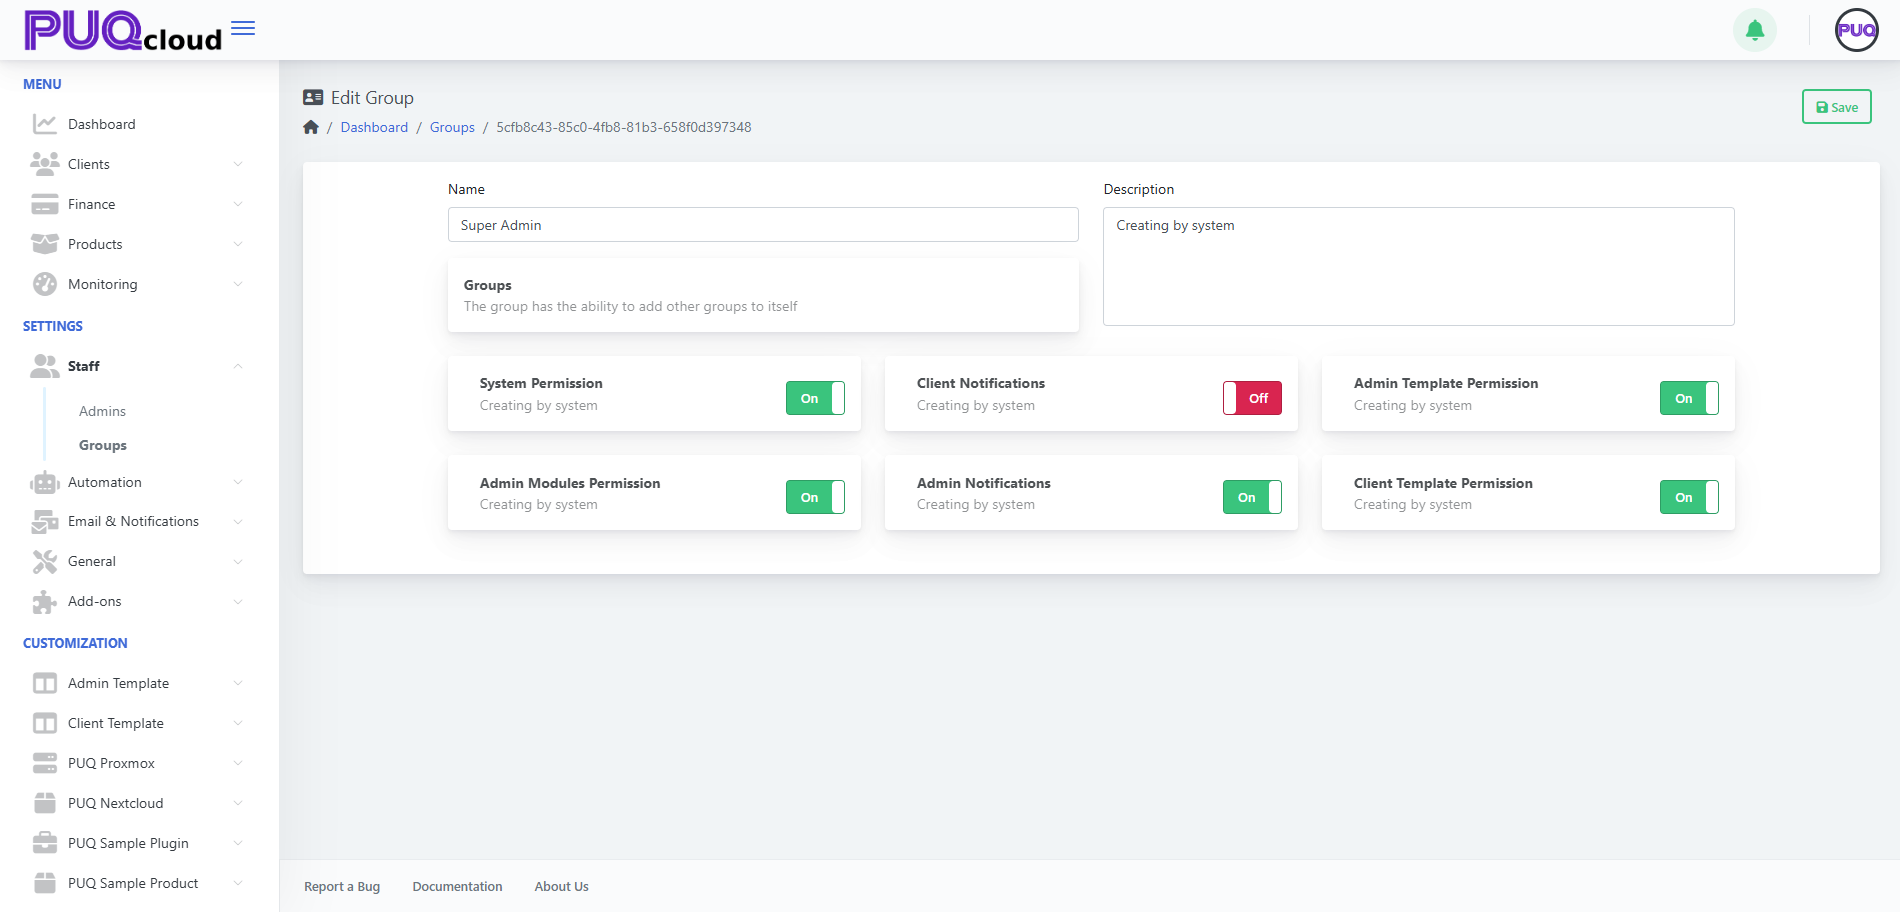
Assign the Group to Administrators
Path: Settings → Staff → Admins → Edit an admin → Groups field → add your group → Save.
(Use least-privilege: only the access they need.)
Edit / Delete a Group
-
From the Groups list, click ✏️ Edit to change toggles or rename/describe.
-
Click 🗑️ Delete to remove a group (only if no critical users rely on it).
Tips & Good Practice
-
Start with broad roles (Support, Finance, Ops), then refine toggles.
-
Keep Super Admin for a few trusted people only.
-
Review memberships monthly; remove access for ex-staff immediately.
-
Test new roles with a non-super-admin account before rollout.
Manage scheduler in the Admin Area
PUQcloud Panel
Order Now | Download | FAQ
Why Scheduler? So billing, cleanups, lifecycle actions, and Proxmox jobs run on time, automatically, and predictably.
Where is it?
Automation → Scheduler
 Scheduler overview (System tab) with task card UI (Last/Next Run, cron, On/Off, Save, Reset).
60-second UI tour
Every task card has 6 key parts:
-
Title + short description.
-
Last Run — when it last executed (great to spot stalls).
-
Next Run — when it will run next.
-
Cron expression — schedule in
* * * * *format. -
On/Off toggle — enable/disable instantly.
-
Save (disk) / Reset (↺) — apply or discard changes.
Rule #1: change cron → Save → confirm Next Run updates. If it didn’t, your change isn’t applied.
Tabs & what they’re for
1. System
Service/test tasks.
-
Keep Off in production unless you use them intentionally.

Scheduler overview (System tab) with task card UI (Last/Next Run, cron, On/Off, Save, Reset).
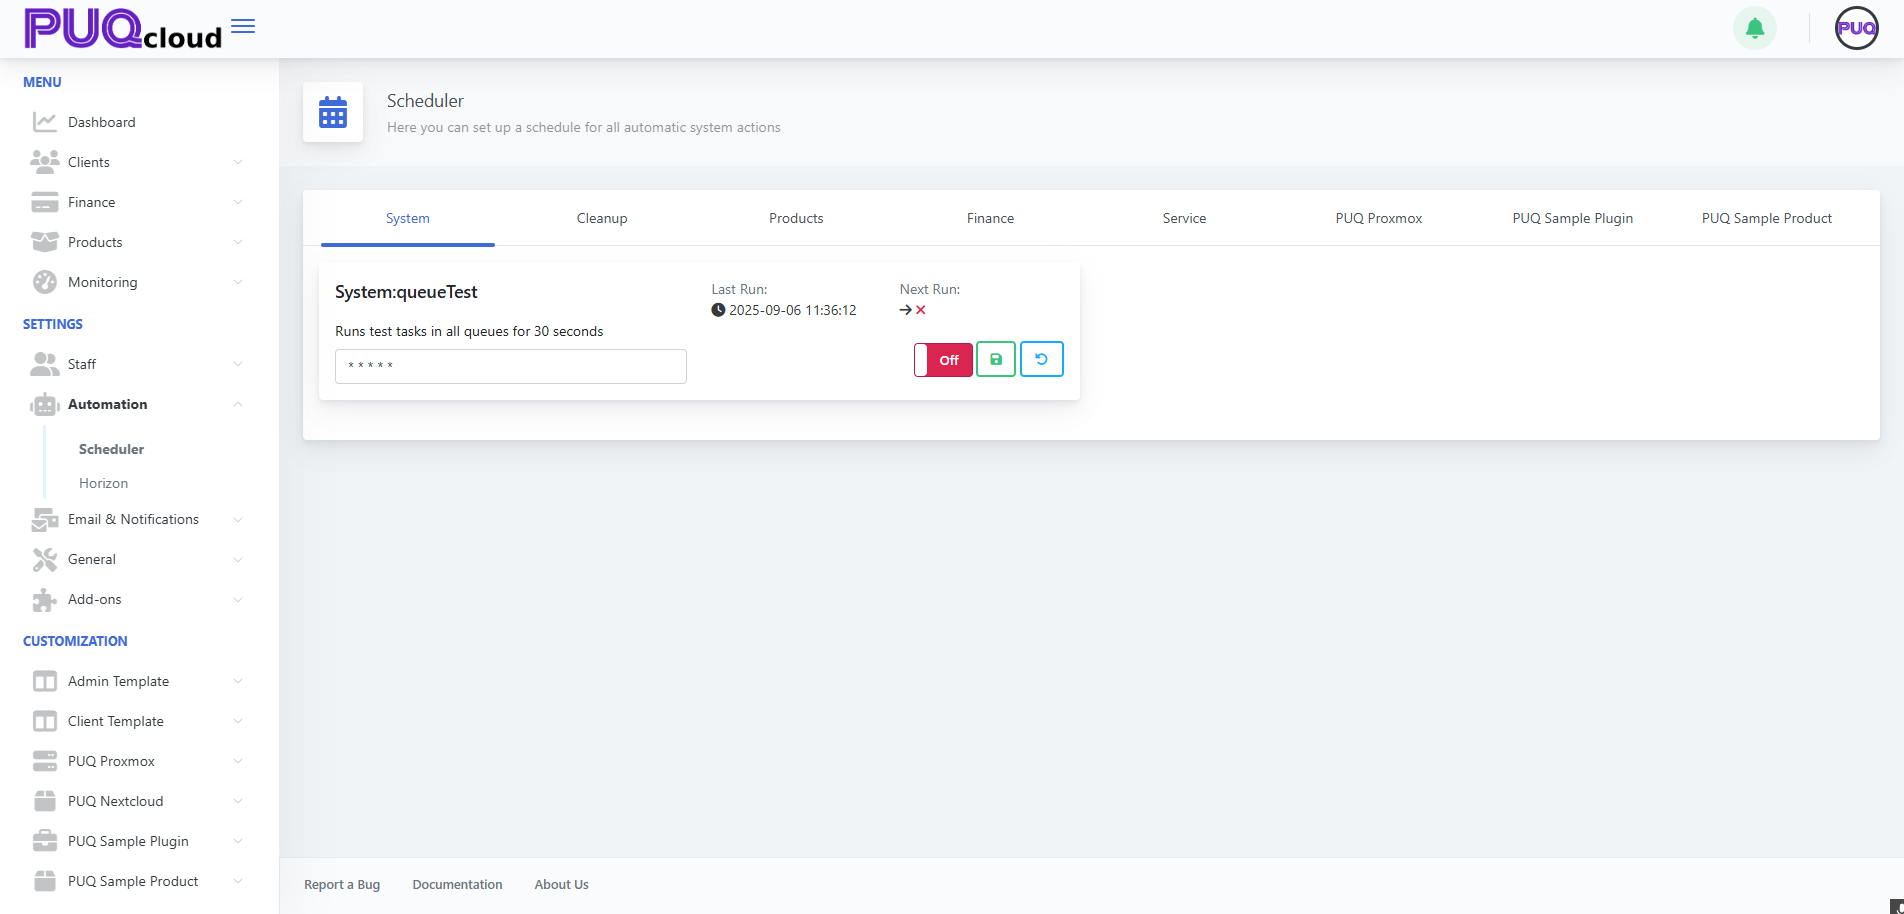
2. Cleanup
Housekeeping for logs, sessions, and “lost” queue jobs.
-
System:clearingLostTasks — converts
pending/processingtofailed/duplicate. -
System:Cleanup — clears logs/history by retention.
Suggested schedule:
-
LostTasks:
*/30 * * * * -
Cleanup:
0 3 * * *(daily at 03:00) Cleanup tab showing “System:clearingLostTasks” and “System:Cleanup” with example cron values.
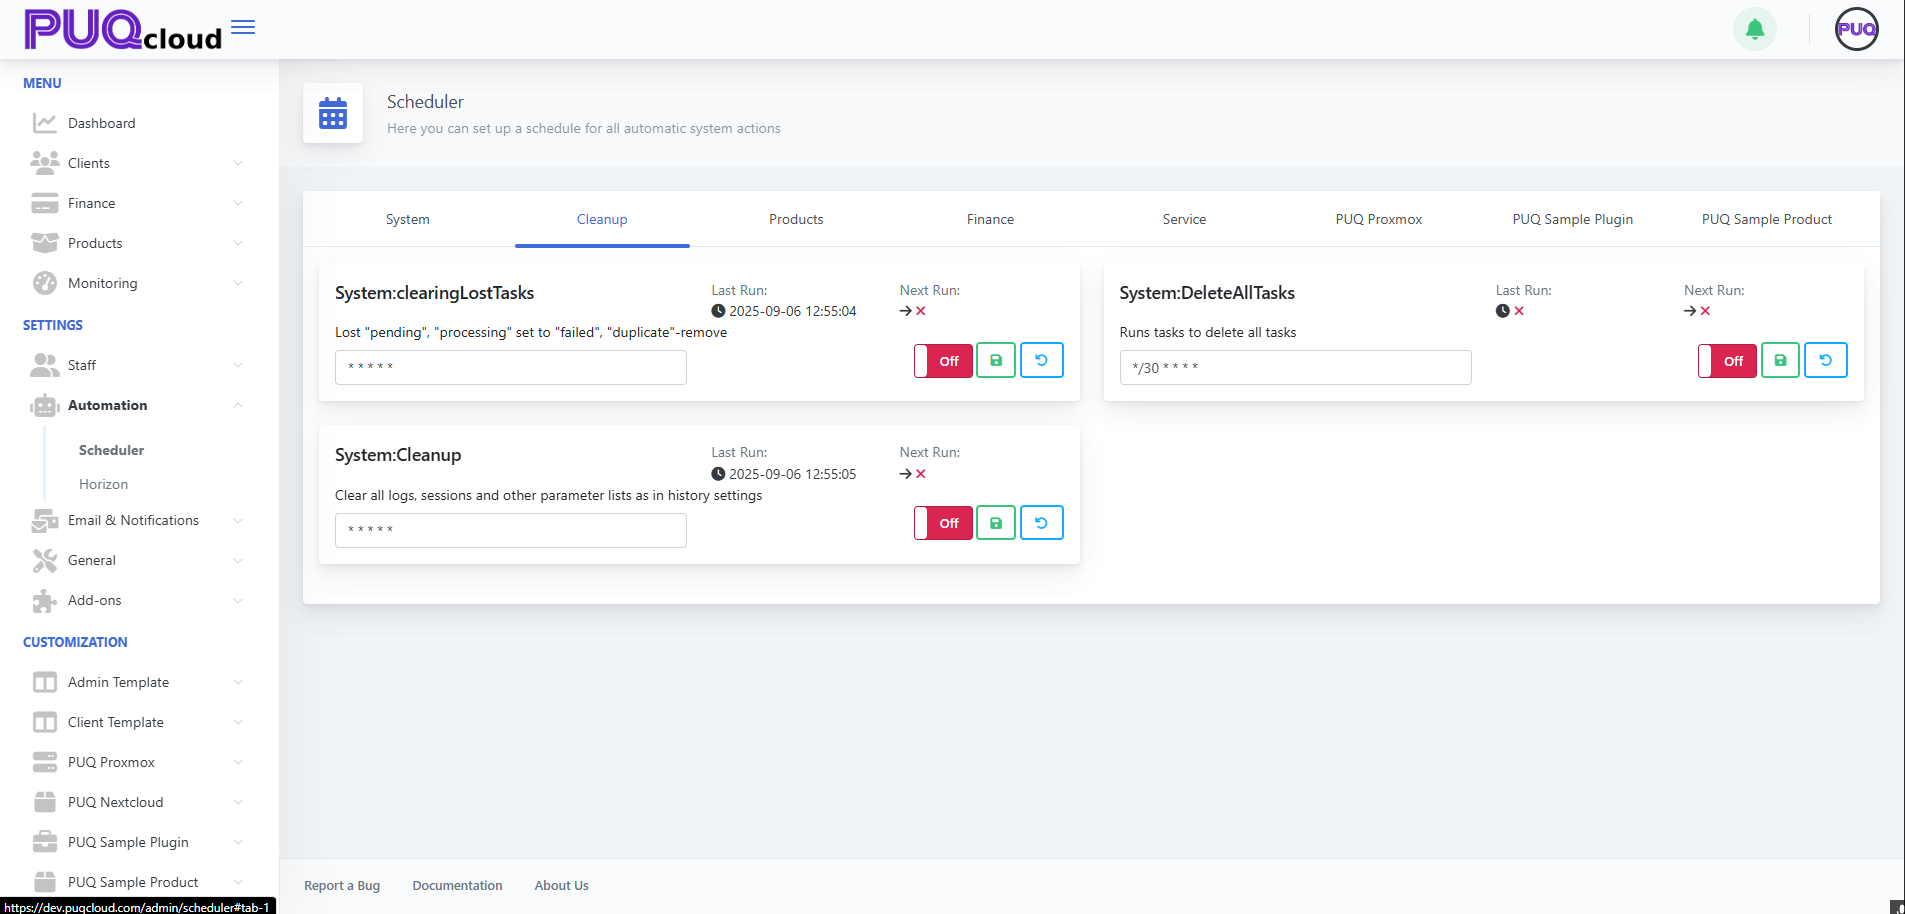
Tip: while debugging you can run them more often; switch back to the nightly window later.
3. Products
Bulk price conversions/recalculation.
-
Products:ConvertPrice — keeps prices aligned with currency rates.
Schedules that work: -
0 * * * *(hourly) or*/15 * * * *in volatile markets.
Products tab showing “Products:ConvertPrice” enabled with sample cron.
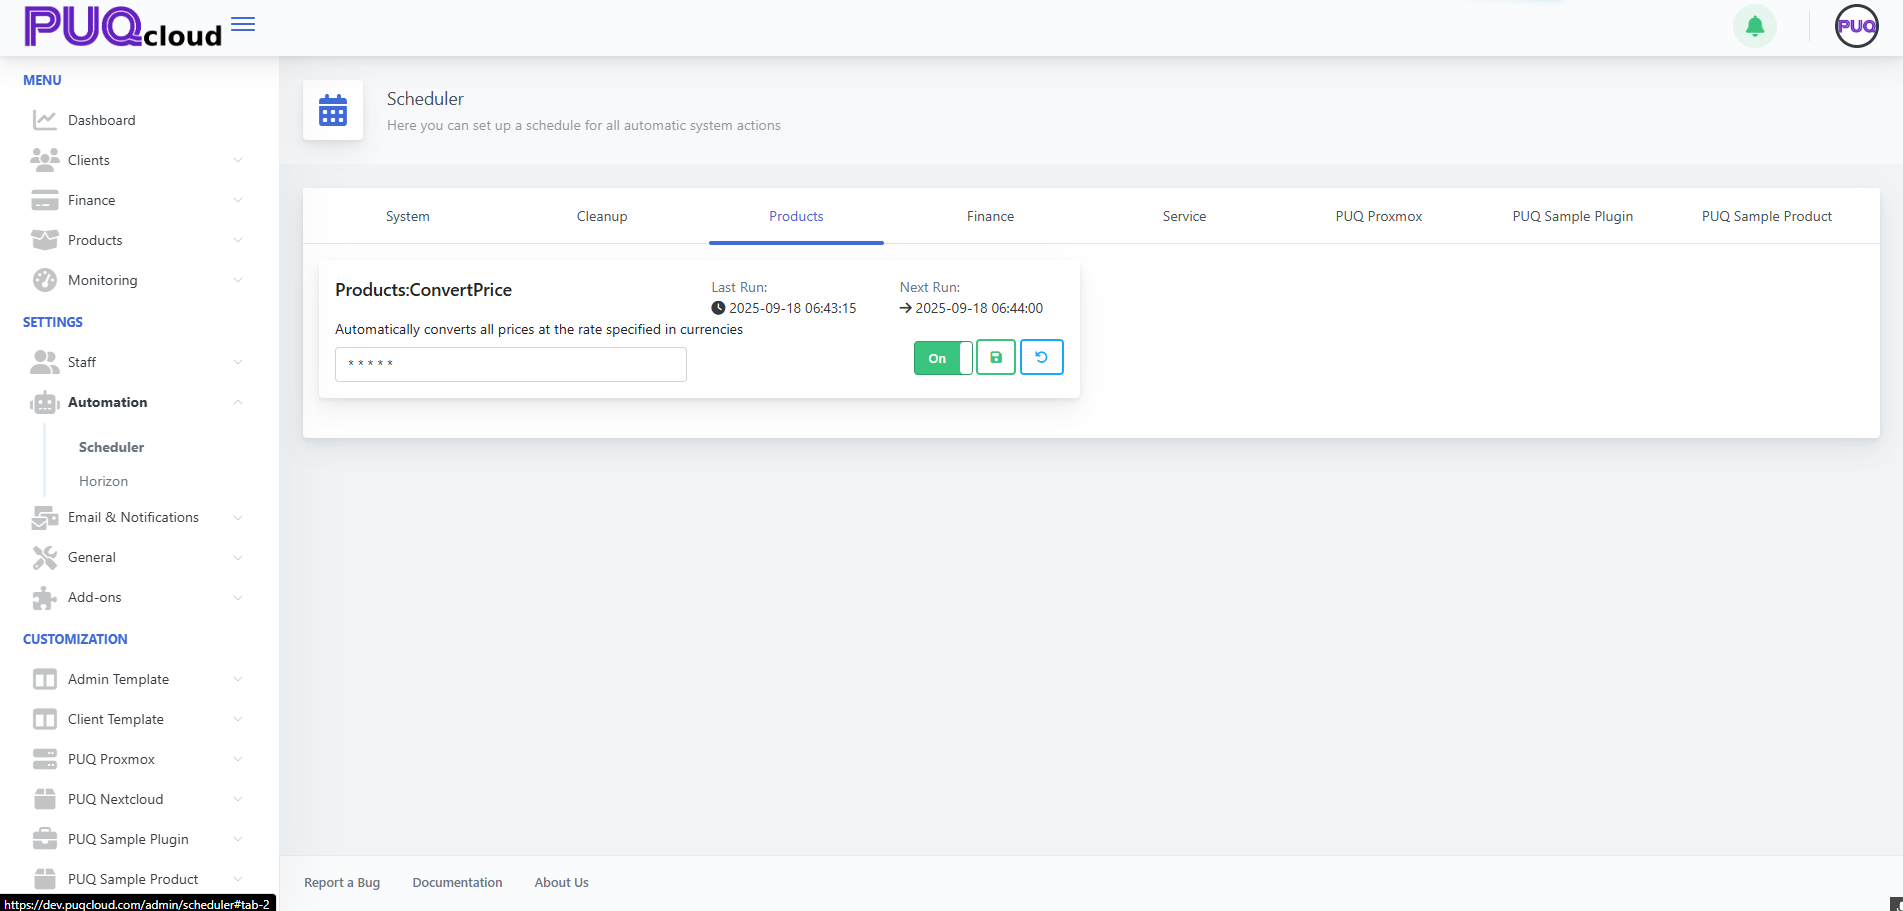
4. Finance
The billing heart: charges and transactions.
-
Finance:ChargeServices — charges active services and creates transactions.
Balanced options: -
*/10 * * * *— near-real-time customer experience. -
0 * * * *— lighter load, OK for hourly charging. Finance tab showing “Finance:ChargeServices” enabled with sample cron.
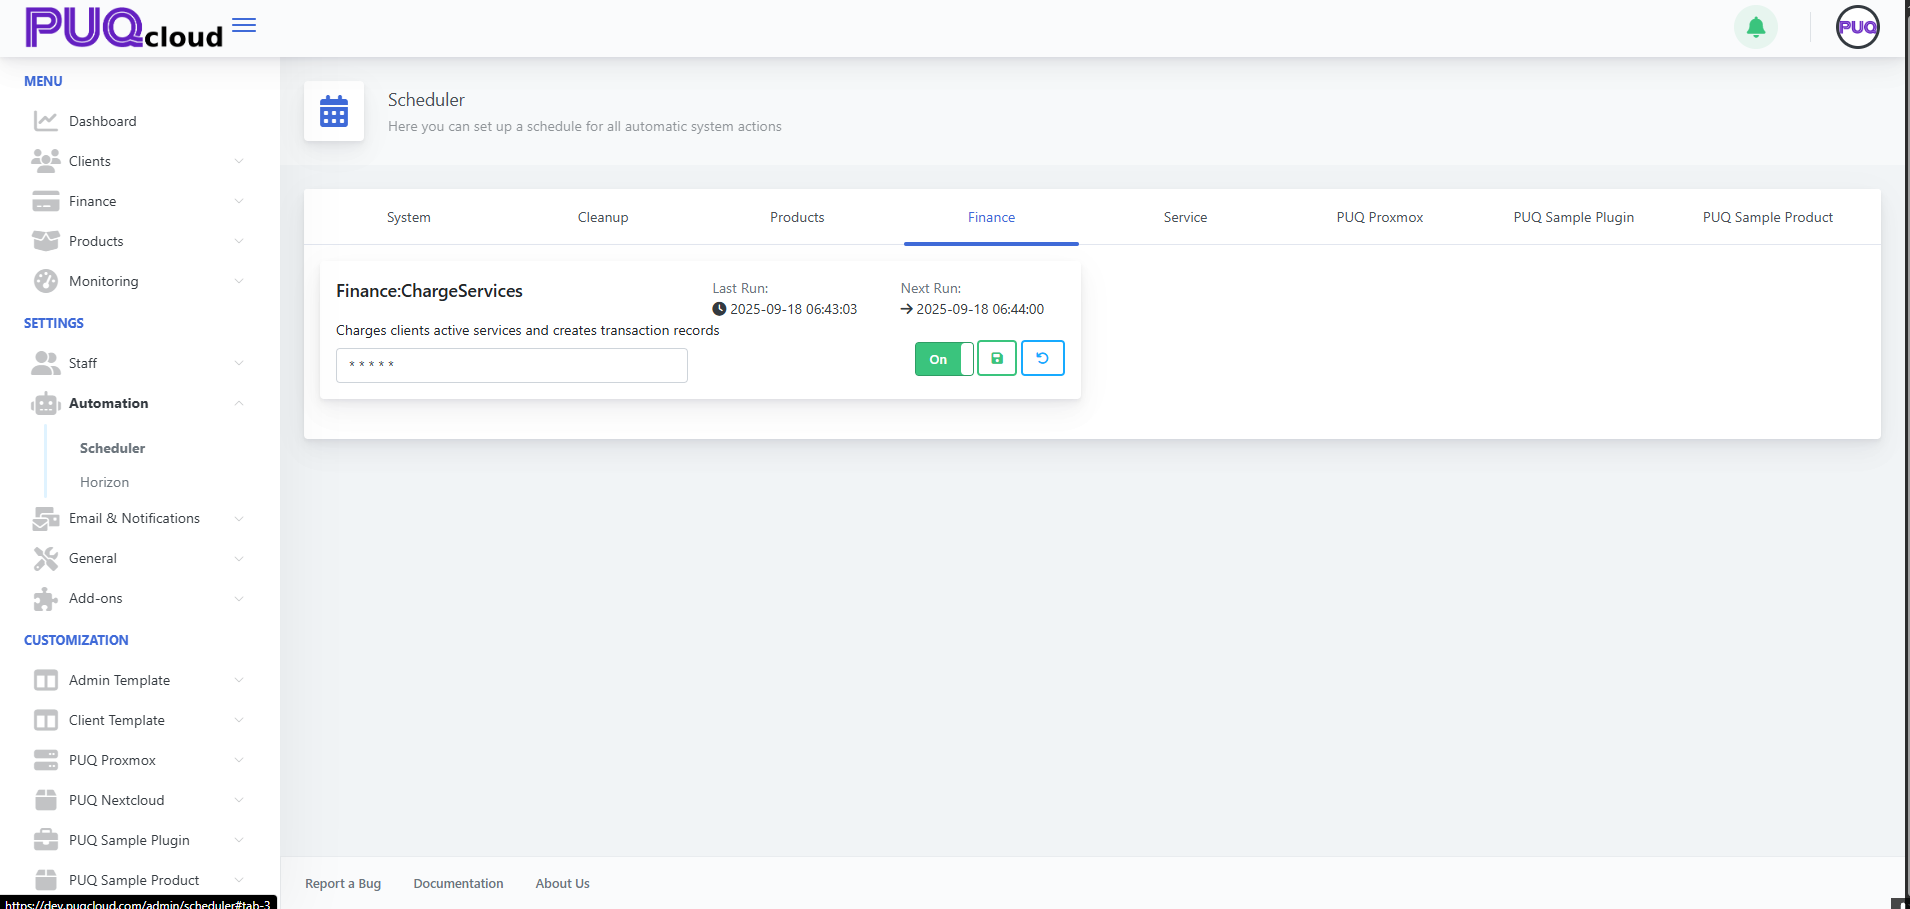
Pro tip: do faster cycles by day (*/10), slower at night if you manage cron externally with “day/night” profiles.
5. Service
Service lifecycle automation:
-
Service:CreateServices — create on sufficient funds.
-
Service:SuspendServices — suspend on debt.
-
Service:TerminationServices — terminate after grace.
-
Service:UnsuspendServices — restore after top-up.
-
Service:CancellationServices — process cancellations.
Recommended starter profile:
-
Create/Suspend/Unsuspend:
*/10 * * * * -
Cancellation:
*/30 * * * * -
Termination:
0 4 * * *(nightly) Service tab with lifecycle tasks (Create, Suspend, Unsuspend, Termination, Cancellation) and their toggles.
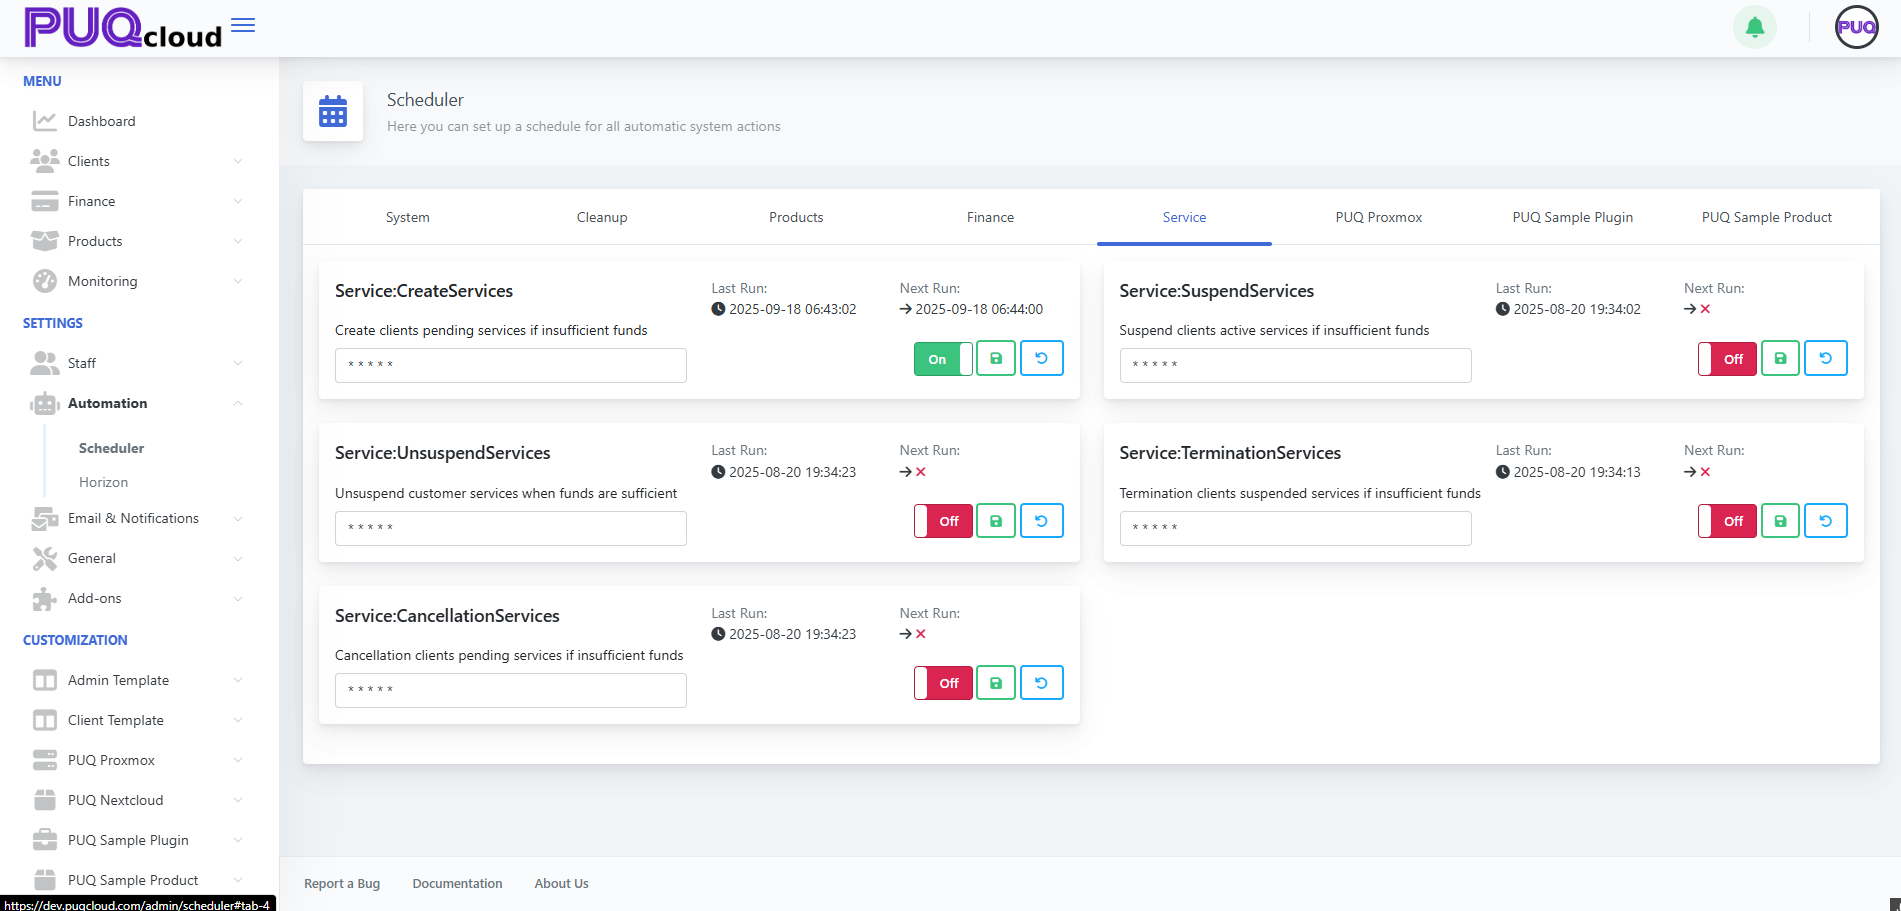
Safety: run terminations once per night to avoid heavy daytime I/O.
6. PUQ Proxmox
Cluster sync and backups.
-
puqProxmox:SyncClusters —
*/5 * * * *. -
puqProxmox:MakeBackups —
0 2 * * *(02:00 daily). PUQ Proxmox tab showing “puqProxmox:SyncClusters” and “puqProxmox:MakeBackups” with recommended schedules.

Practice: give backups a dedicated quiet window; watch storage I/O.
7. PUQ Sample Plugin / PUQ Sample Product
Demo tasks — keep Off in production.
 PUQ Sample Plugin tab showing “puqSamplePlugin:test” (demo task) in Off state.
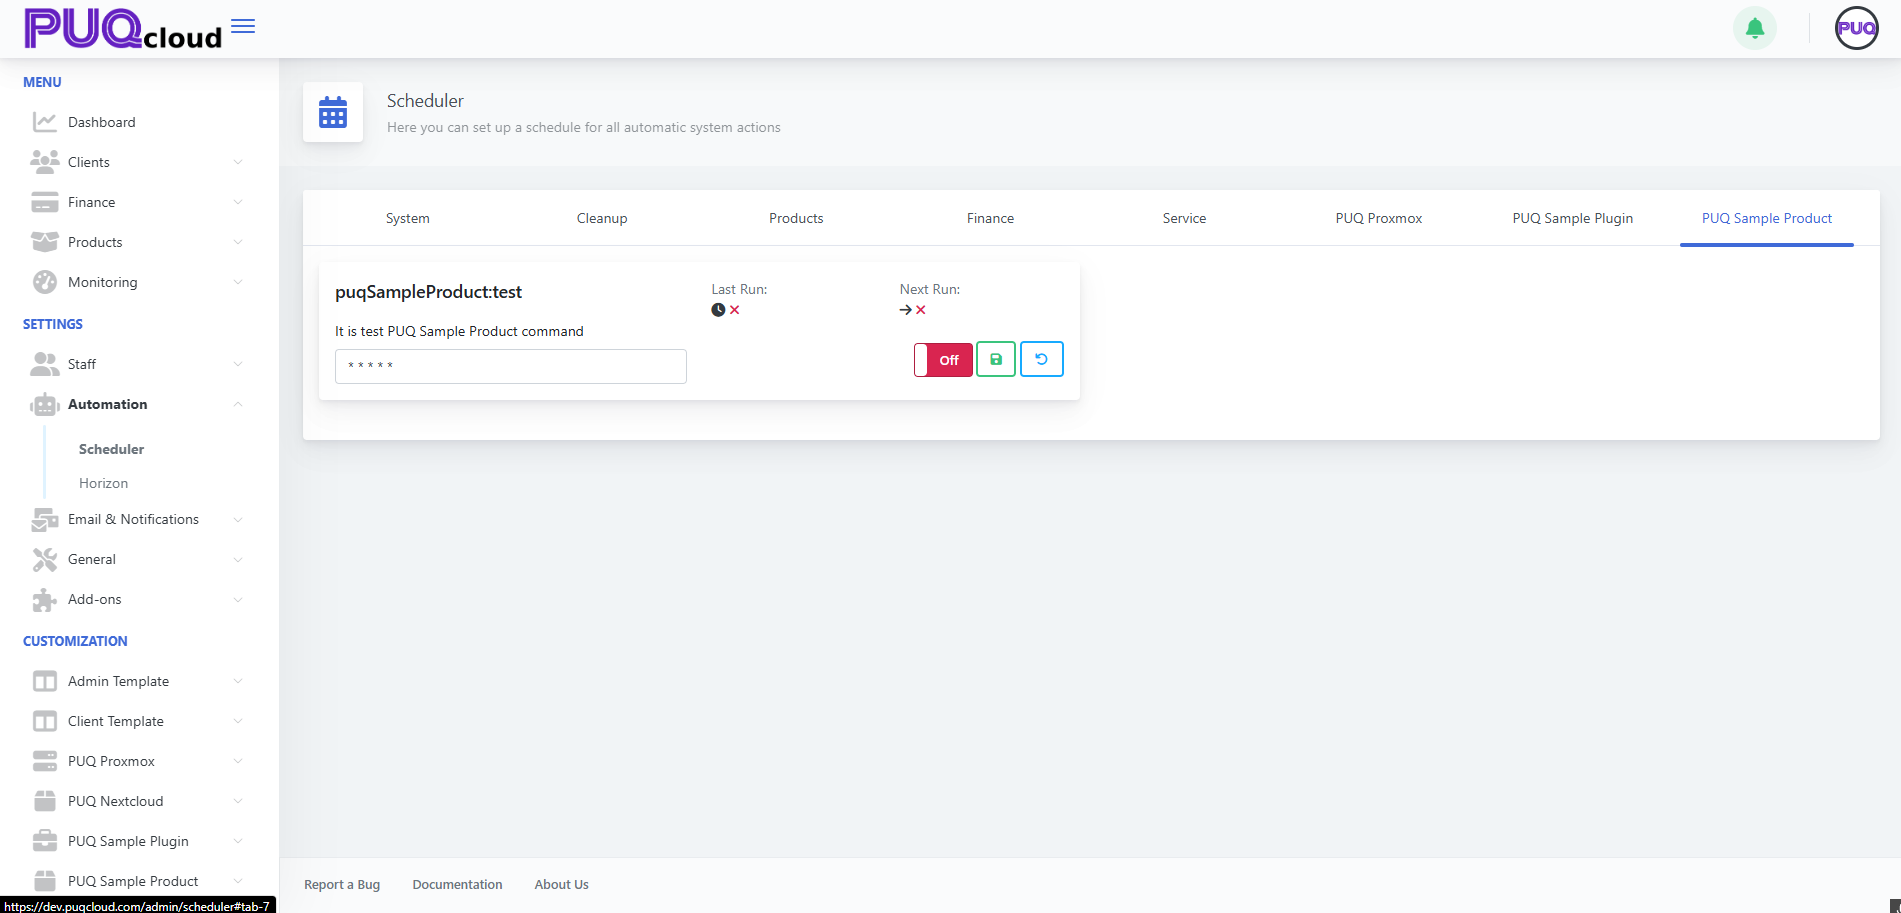 PUQ Sample Product tab showing “puqSampleProduct:test” (demo task) in Off state.
Cron cheat sheet (no pain)
| Expression | Meaning |
|---|---|
* * * * * |
Every minute |
*/5 * * * * |
Every 5 minutes |
*/10 * * * * |
Every 10 minutes |
0 * * * * |
At the start of every hour |
0 2 * * * |
Daily at 02:00 |
0 3 * * 1 |
Mondays at 03:00 |
*/30 8-20 * * 1-5 |
Every 30 min 08:00–20:00 on weekdays |
Note: Times follow the server’s timezone. If times look odd, verify the host TZ.
Ready-made profiles (copy/paste)
“Starter” (safe and effective)
-
Finance:
*/10 * * * * -
Service Create/Suspend/Unsuspend:
*/10 * * * * -
Service Cancellation:
*/30 * * * * -
Service Termination:
0 4 * * * -
Cleanup Lost:
*/30 * * * * -
Cleanup:
0 3 * * * -
Convert Price:
0 * * * * -
SyncClusters:
*/5 * * * * -
MakeBackups:
0 2 * * *
“Nightly heavy-lifting”
-
All heavy tasks (Termination/Cleanup/Backups) between 02:00–04:00.
-
Frequent light tasks during the day (Charge/Status/Sync).
Safe-change checklist
-
Environment — test on staging first.
-
Snapshot current crons — copy or take a screenshot for rollback.
-
Change cron → Save → confirm Next Run updated.
-
Monitor 24–48h: Last Run, billing effects, backups, system load.
-
If issues appear — Reset on the card (or revert cron) and Save.
Troubleshooting quick tree
A. Task doesn’t run
-
Toggle is Off? → turn On.
-
Next Run missing? → fix cron syntax and Save.
-
Workers/cron down? → restart your queue workers/system cron.
B. System load too high
-
Move heavy jobs to night (02:00–04:00).
-
Reduce frequency (
*/10→*/30,*/30→0 * * * *).
C. Data gets stale (prices/sync/status)
-
Increase frequency (hourly → every 15 or 10 minutes).
-
Check worker logs for task errors.
Micro-FAQ
-
Why is “Next Run” showing an X?
Task is Off or cron is invalid. Enable and/or fix cron, then Save. -
Can I trigger a task now?
UI focuses on schedules. For ad-hoc runs, temporarily set the cron to the nearest minute, Save, then revert. -
How do I know it’s healthy?
Watch Last Run, see that service lifecycle events occur on time, finance entries are up-to-date, and backups are fresh.
Wrap-up
-
Define “day/night” profiles.
-
Heavy jobs at night; routine jobs every 5–15 minutes.
-
After any change: Save → check Next Run.
-
Use Last Run + worker logs as your health sensors.
Manage Notification Senders in the Admin Area
PUQcloud Panel
Order Now | Download | FAQ
Use this guide to add, edit, and configure the channels your system uses to send emails/alerts (PHP mailer, SMTP, Bell, etc.).
Open the Notification Senders page
-
In the Admin Area, go to Email & Notifications → Notification Senders.
-
You’ll see all existing senders with their Module (delivery method) and quick actions.
Notification Senders list with Edit/Delete actions.
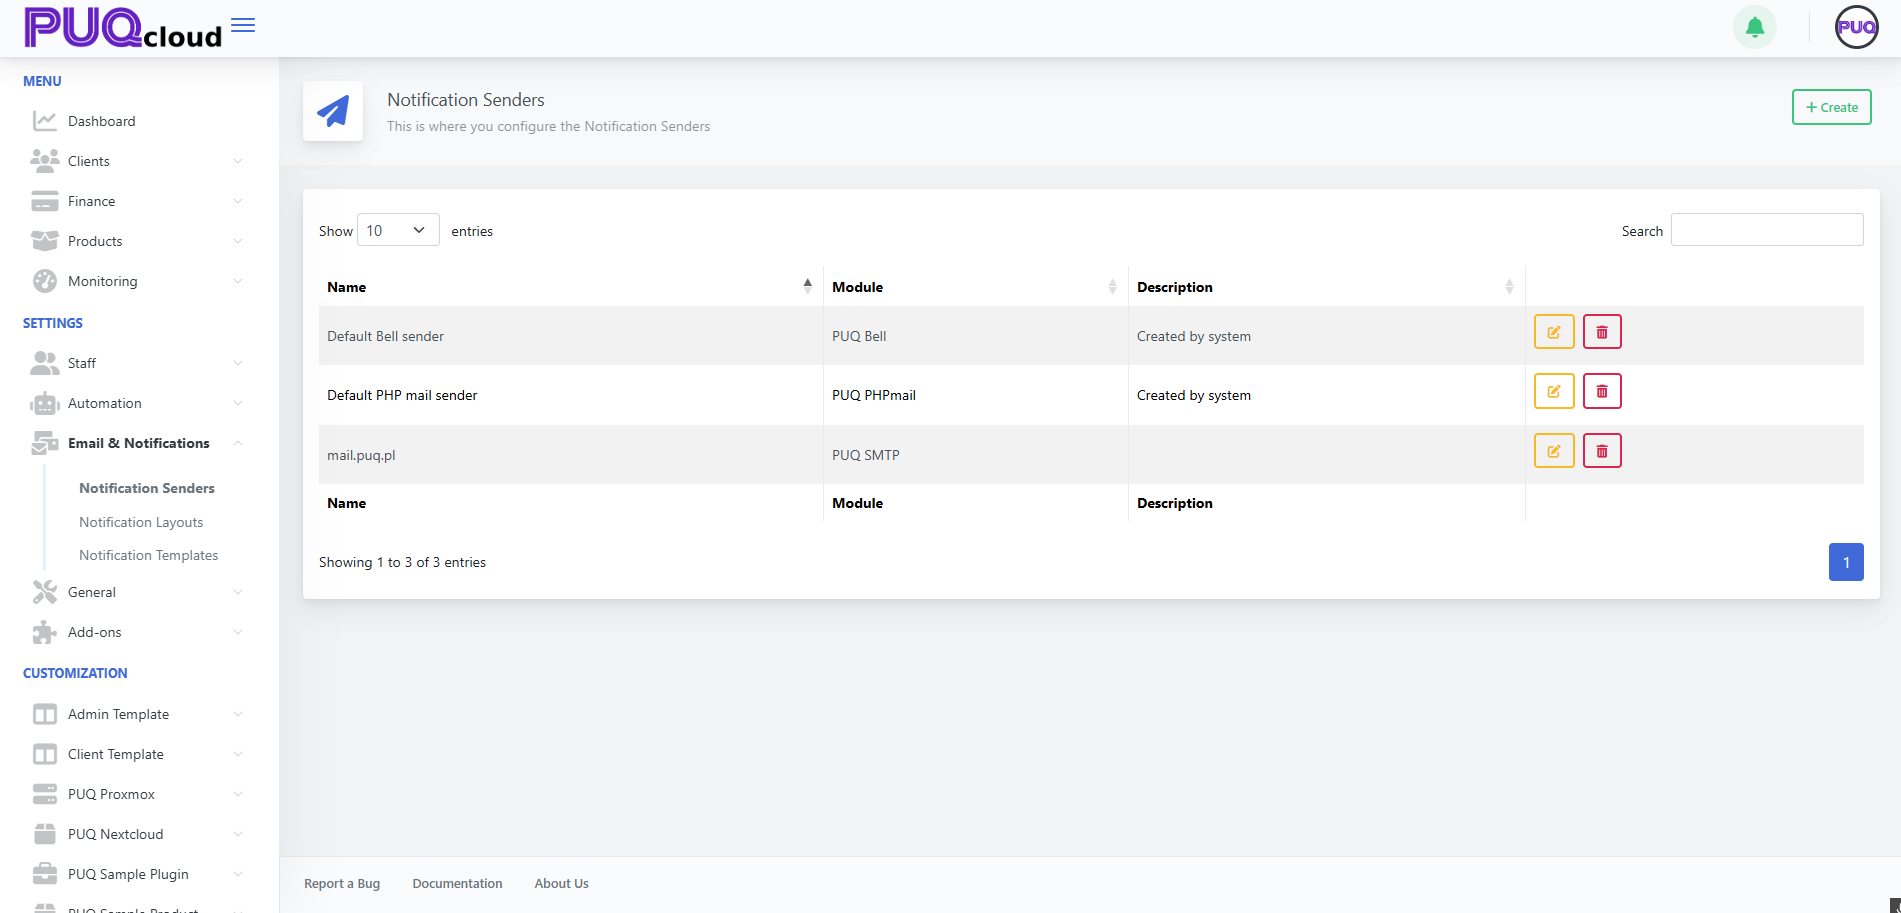
Understand sender types (Modules)
When creating a sender you’ll choose a Module:
-
PUQ PHPMailer — uses PHP mail; simple to set up, limited deliverability controls.
-
PUQ SMTP — sends through your mail server (recommended for deliverability).
-
PUQ Bell — internal “bell”/in-app notifications (no email).
Create a new sender
-
Click + Create (top-right).
-
In the modal, fill Name (e.g., “Support SMTP”) and choose a Module.
“Create Notification Sender” modal with Module dropdown.
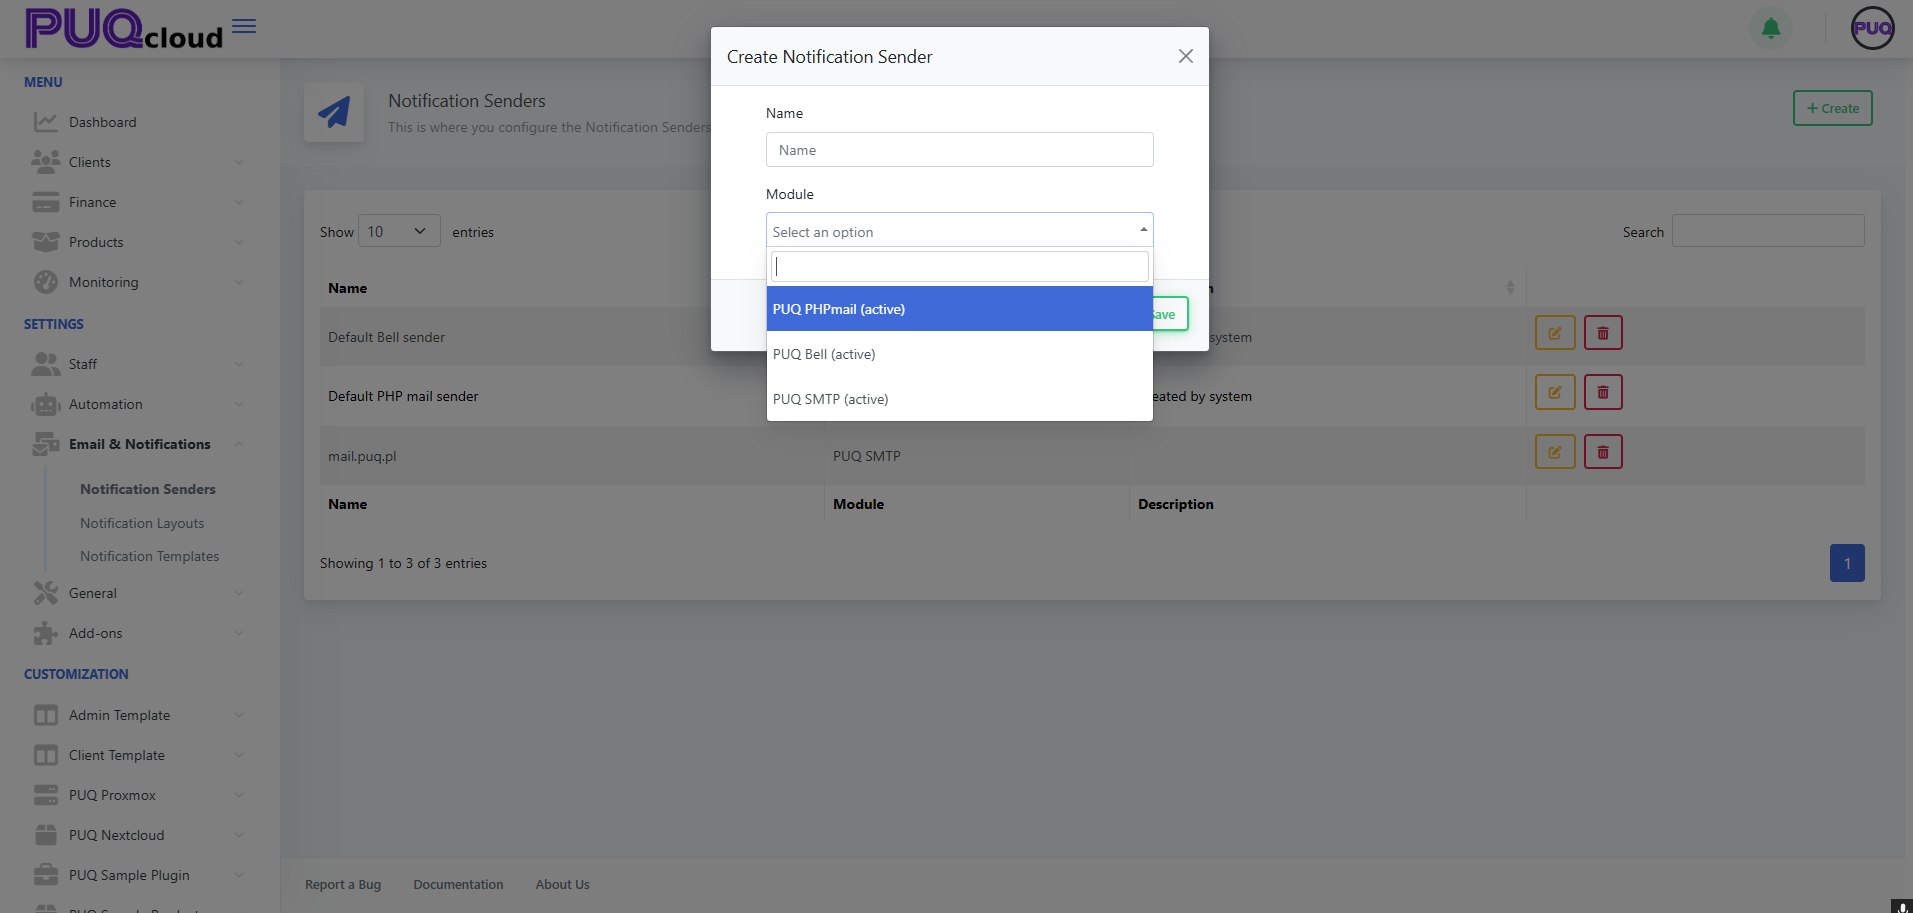
Tip: Create one sender per use case (e.g., “System Alerts (SMTP)”, “Marketing (SMTP)”, “In-app Bell”).
Configure SMTP details (if you chose PUQ SMTP)
After saving the modal, you’ll land on the sender’s settings page. Fill the fields:
-
Name / Description — friendly label for admins.
-
Email — the “From” address (often must be a verified mailbox/domain).
-
Sender Name — the “From name” (e.g., “PUQ Cloud”).
-
Server — SMTP host (e.g.,
mail.example.com). -
Port — usually 465 (SSL) or 587 (TLS).
-
Encryption — SSL/TLS/None per your provider.
-
Username / Password — mailbox credentials.
Click Test Connection to verify, then Save.
SMTP sender edit form with Test Connection button.

Deliverability tips
• Use a dedicated subdomain (e.g., mail.example.com).
• Set up SPF, DKIM, and DMARC where you host DNS.
• Match the Email domain with the authenticated SMTP domain.
Edit or remove a sender
-
From the list, click ✏️ Edit to update any field and Save.
-
Click 🗑️ Delete to remove a sender (you’ll be asked to confirm).
Heads-up: If a sender is referenced by a Notification Template or workflow, update those to the new sender before deleting.
Best practices
-
Maintain at least one SMTP sender for production.
-
Keep separate senders for transactional vs marketing mail.
-
Periodically Test Connection after password/host changes.
-
Restrict who can edit senders via Admin Groups/Roles.
Troubleshooting checklist
-
❌ Test Connection fails → verify host/port/encryption; check firewall blocks.
-
📬 Emails land in spam → fix SPF/DKIM/DMARC; use consistent “From” domain; warm up IP if applicable.
-
🔐 Auth errors → re-enter username/password; confirm app-passwords if using Google/Microsoft; ensure 2FA policies allow SMTP.
That’s it! Your Notification Senders are now set up and ready to power templates and automated notifications.
Manage Notification Layouts in the Admin Area
PUQcloud Panel
Order Now | Download | FAQ
Below is a compact, step-by-step guide to creating and customizing the HTML wrappers (“layouts”) that your notification templates use. You’ll: find the section, add a layout, and tailor the HTML/CSS with live preview and multi-language tabs.
Open Notification Layouts
-
Go to Email & Notifications → Notification Layouts.
-
You’ll see the built-in Admin Default Layout and Client Default Layout.
What you can do here
-
✏️ Edit an existing layout.
-
🗑️ Delete a custom layout (system layouts are protected).
-
+ Create a new layout.
Notification Layouts list with built-in Admin/Client entries.
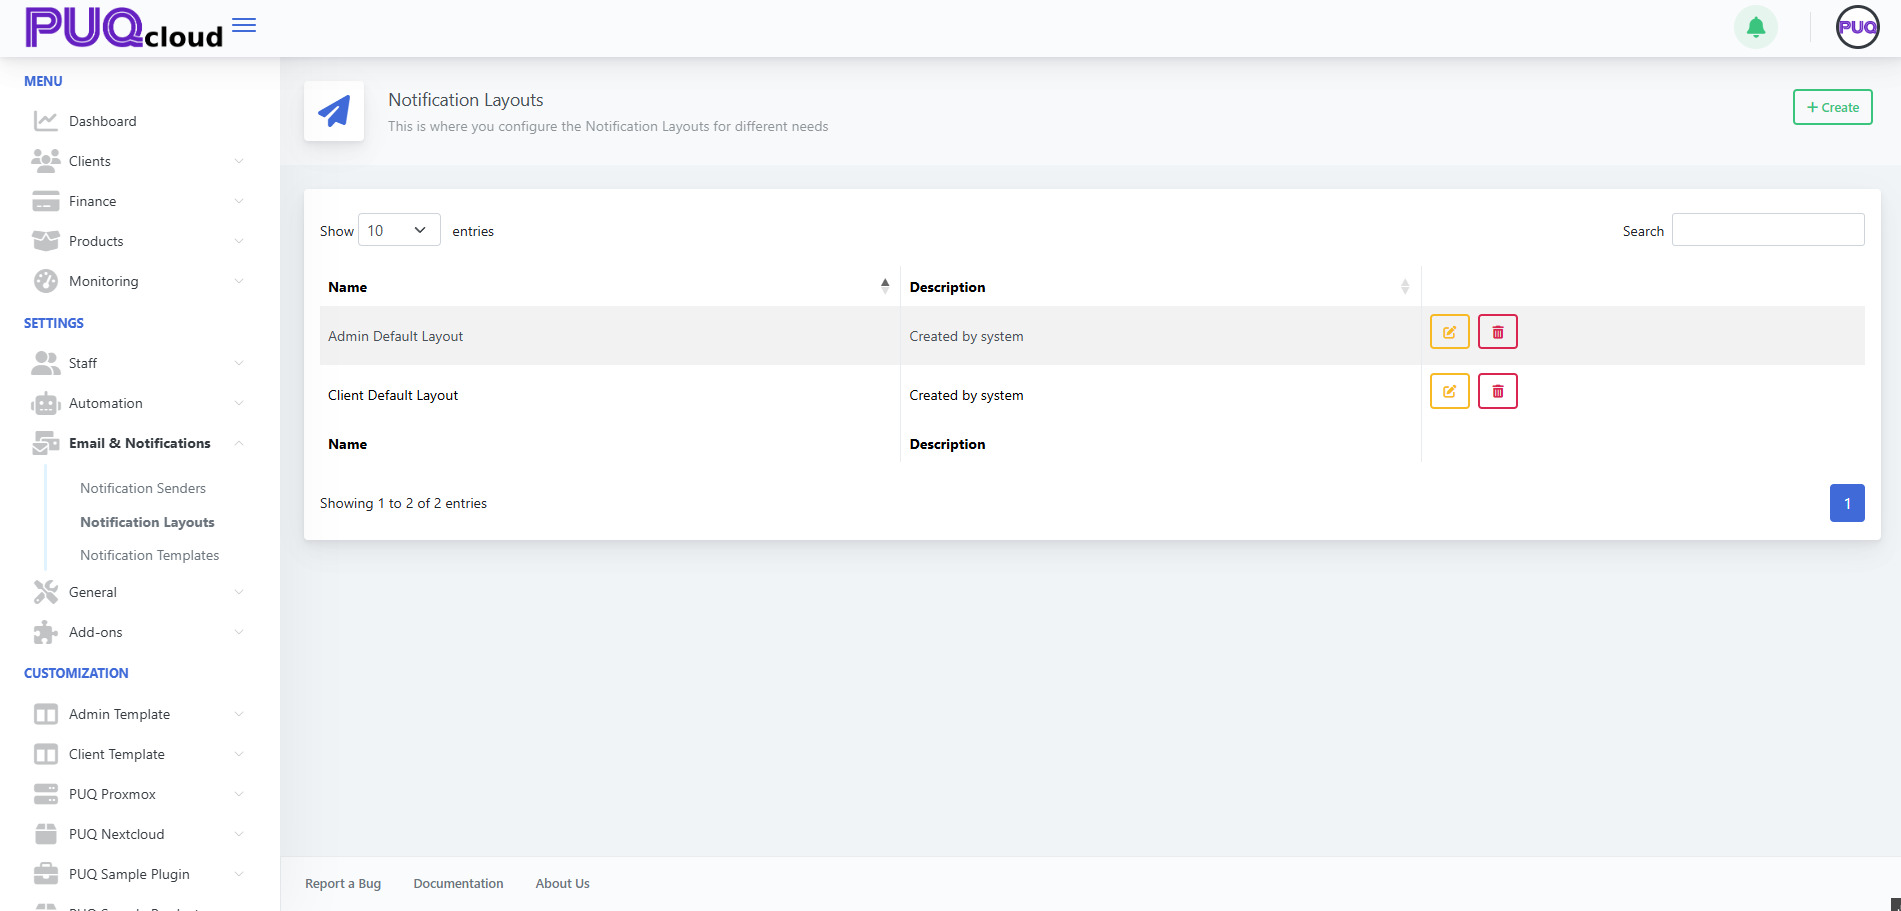
Create a new layout
-
Click ➕ Create (top-right).
-
Give the layout a Name (e.g., “Marketing Layout”).
-
Click Save.
“Create Notification Layout” modal (Name).
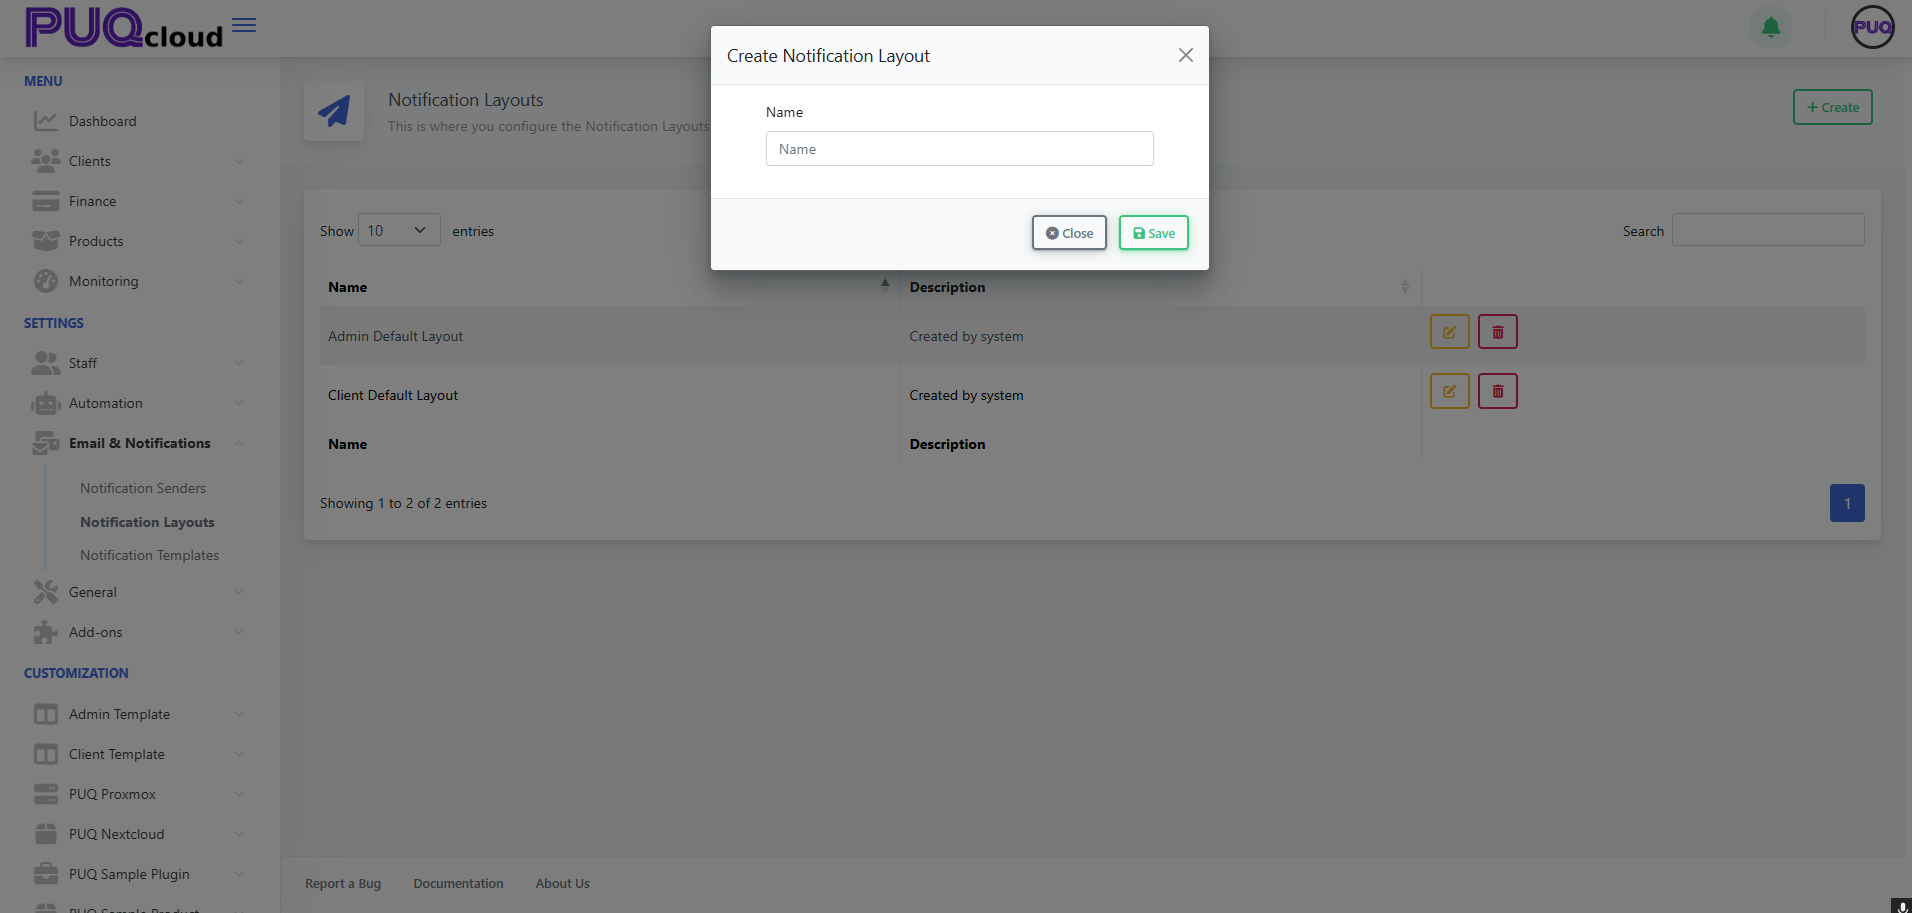
Edit a layout (HTML/CSS + preview)
Open a layout (e.g., Admin Default Layout). The editor provides:
-
Multi-language tabs across the top (🇺🇸 English, 🇺🇦 Ukrainian, 🇵🇱 Polish, 🇫🇷 French).
-
A code editor (left) for your HTML/CSS wrapper.
-
A live HTML preview (right) showing how variables render.
Key variables/partials you’ll use
-
{{ $title }}– Notification/title string. -
{!! $content !!}– The body that each specific notification template injects. -
{{ $locale }}– Current language code (often used on the<html lang="">tag). -
Optional:
{{ $signature }}or{!! $signature !!}if your layout includes a signature partial (depends on your installation).
Tip: Your layout is the frame. Individual notification templates only inject their own content into {!! $content !!}. Keep shared branding, header, footer, fonts, and styling in the layout.
“Edit Notification Layout” (Admin Default) with code editor and live preview.
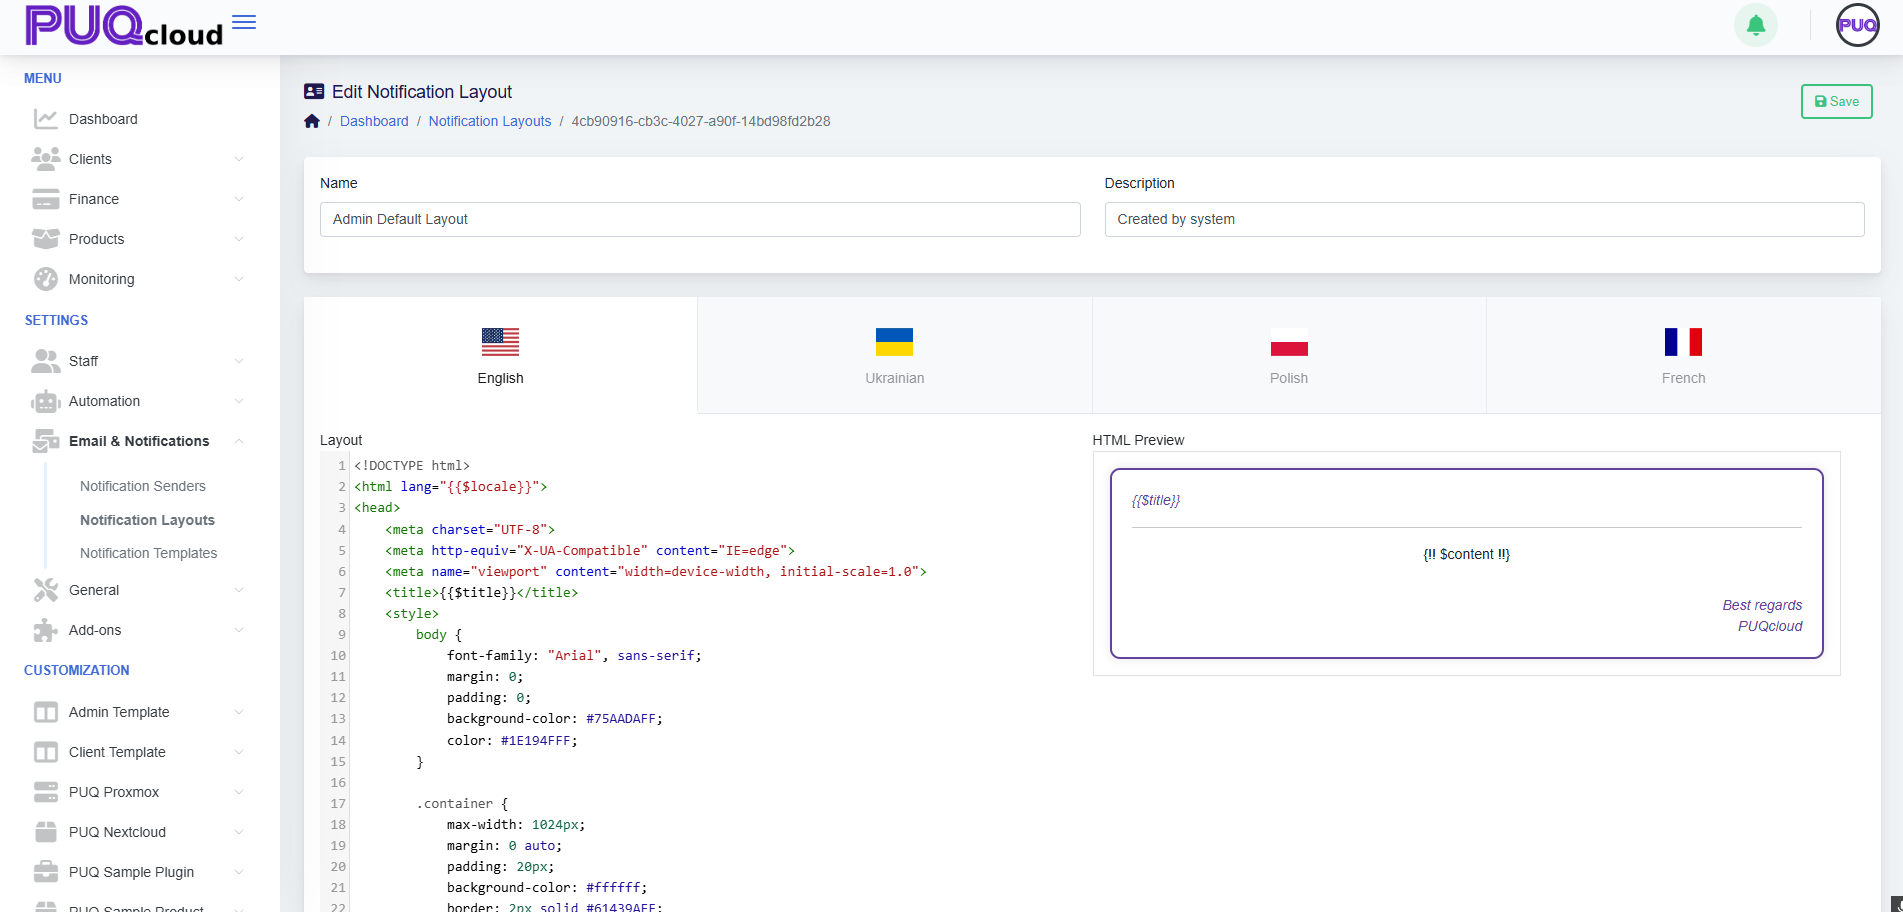
Style a client-facing layout
For the Client Default Layout, you might include:
-
A branded header with gradient background.
-
A CTA button (e.g., “Visit Client Area”).
-
A footer with company signature.
Best practice: Keep fonts, spacing, and colors consistent with your website, and ensure the CTA is visible in both light/dark email clients.
“Edit Notification Layout” (Client Default) with branded CTA preview.
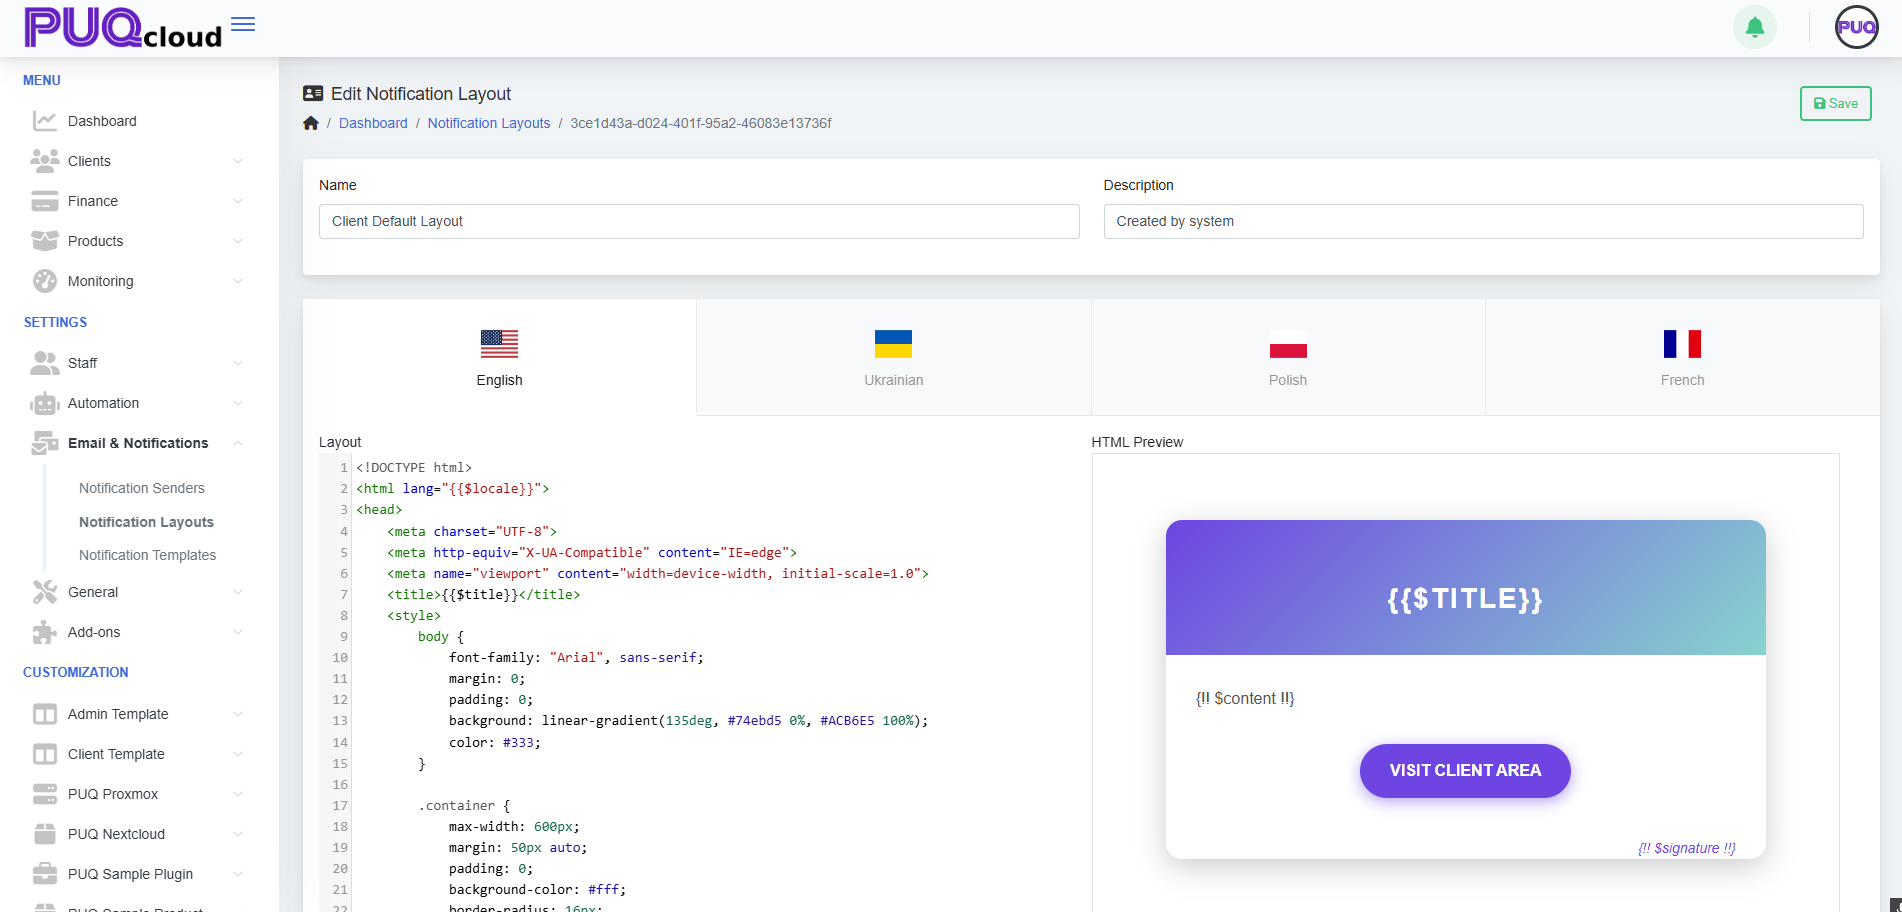
Apply layouts to your notification templates
-
Each notification template (e.g., “Invoice Paid”, “Password Reset”) can reference one of your layouts.
-
Use the Client Default Layout for customer-facing emails and Admin Default Layout for staff/internal alerts.
If your system allows choosing the layout inside each template: open Email & Notifications → Notification Templates, pick the template, and select the layout from the dropdown. (If not present, your installation may assign layouts automatically by scope—Client vs Admin.)
Test before you go live
-
Use Notification Senders (SMTP/PHPMail/Bell) to ensure delivery works.
-
Send a real test for each language tab you changed.
-
Check the email in a few clients (Gmail, Outlook, Apple Mail) and on mobile.
Tips & safeguards
-
Do not remove
{!! $content !!}— your template body inserts here. -
Keep inline styles where possible; many email clients strip external CSS.
-
Avoid heavy JS (email clients ignore it).
-
Dark mode: test contrast (buttons and text).
-
Language tabs: update all languages to avoid fallback mismatches.
-
Versioning: copy your HTML to a snippet file or Git before big edits.
Quick Troubleshooting
-
Broken layout? Revert to the default layout or restore your last working HTML.
-
Variables not rendering? Ensure you used the correct blade/templating syntax (
{{ }}for escaped,{!! !!}for raw HTML). -
Images blocked? Host images over HTTPS and add
alttext; consider base64 for critical icons.
That’s it! Your notifications are now consistent, branded, and ready to ship.
Manage Notification Templates (Admin Area)
PUQcloud Panel
Order Now | Download | FAQ
Here’s a clear, step-by-step guide to managing Notification Templates in the Admin Area.
Open the Templates list
-
Go to Email & Notifications → Notification Templates.
-
This page lists all built-in (“SYSTEM”) and any custom templates, grouped by category (Staff/Client – Operational/Administrative).
-
Use the Search box to filter by name and the ✏️ Edit button to customize a template.
Notification Templates list with categories and edit actions.
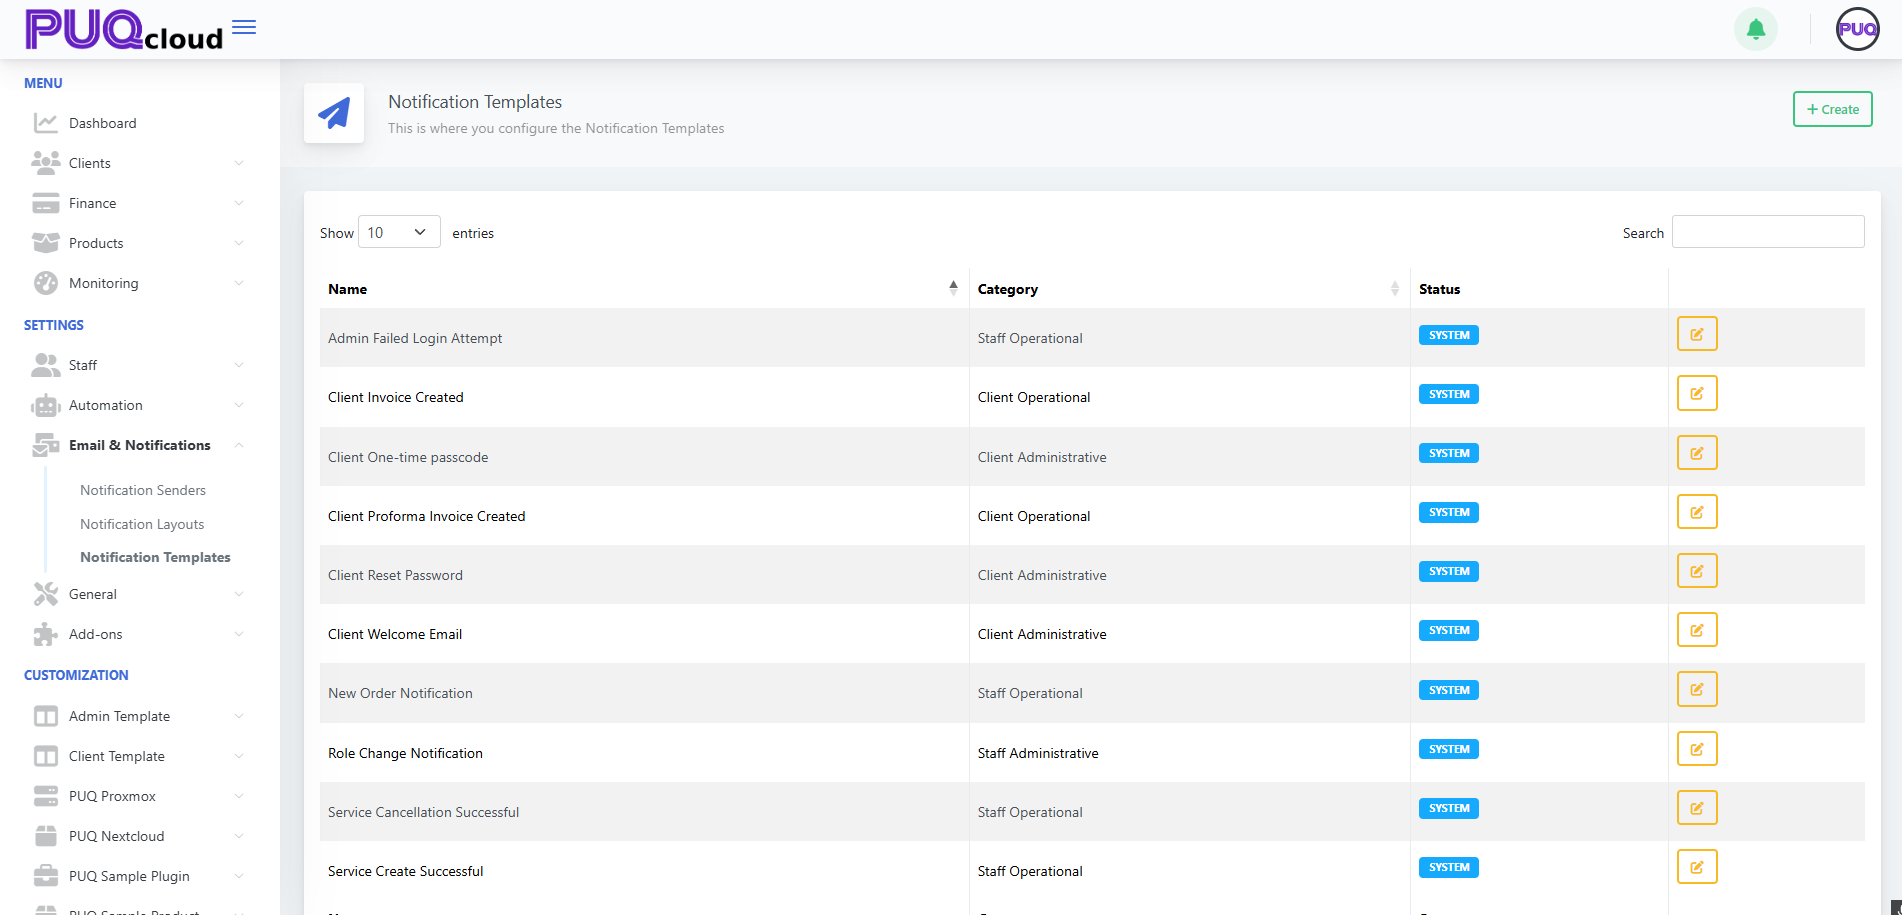
Create a new template
-
Click + Create (top-right).
-
Enter a Name.
-
Pick a Category:
-
Staff Administrative
-
Staff Operational
-
Client Administrative
-
Client Operational
-
-
Click Save.
Tip: Categories help route who receives the message and where it shows up in the UI.
“Create Notification Template” modal (Category).
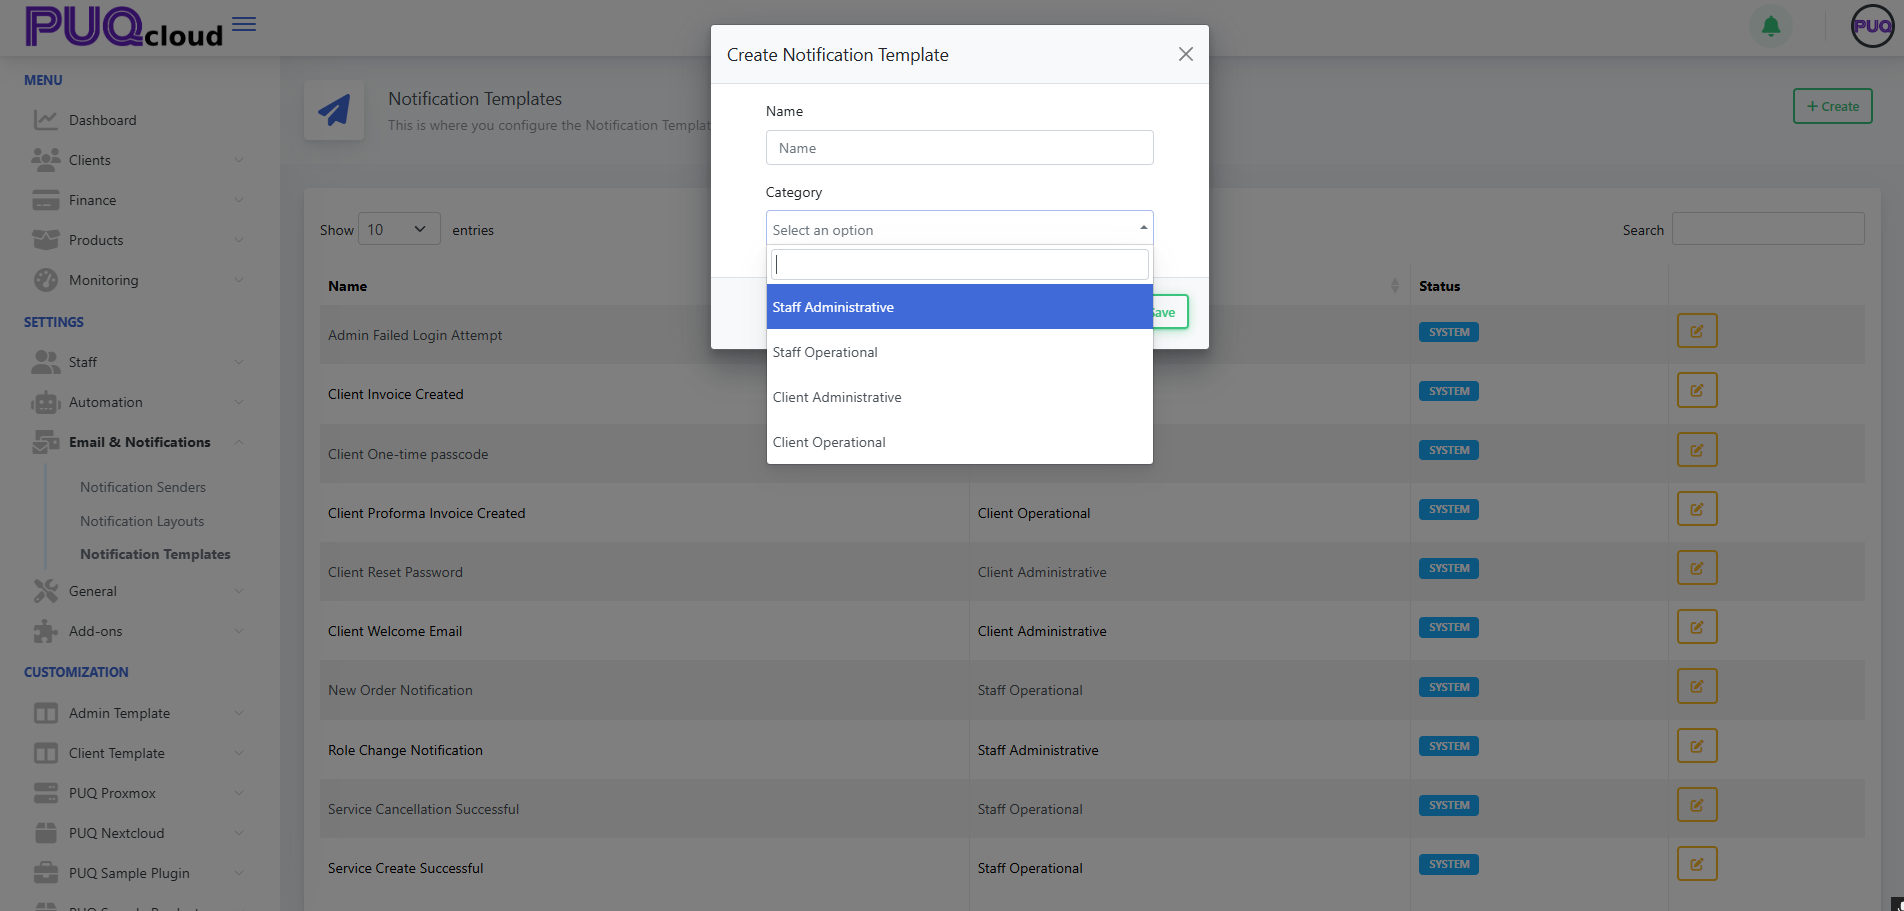
Edit a template (content & languages)
When you edit a template you’ll see:
-
Language tabs (EN/UA/PL/FR): maintain localized versions for each language you support.
-
Subject: the email subject line for that language.
-
Text Mini: a short/plain snippet (great for SMS/push or the top of text-only emails).
-
HTML Preview: a live preview of the HTML you’re composing on the left.
Changes are independent per language; remember to save after editing each language if you switch tabs.
Edit Notification Template: language tabs, Subject, Text Mini, live preview.
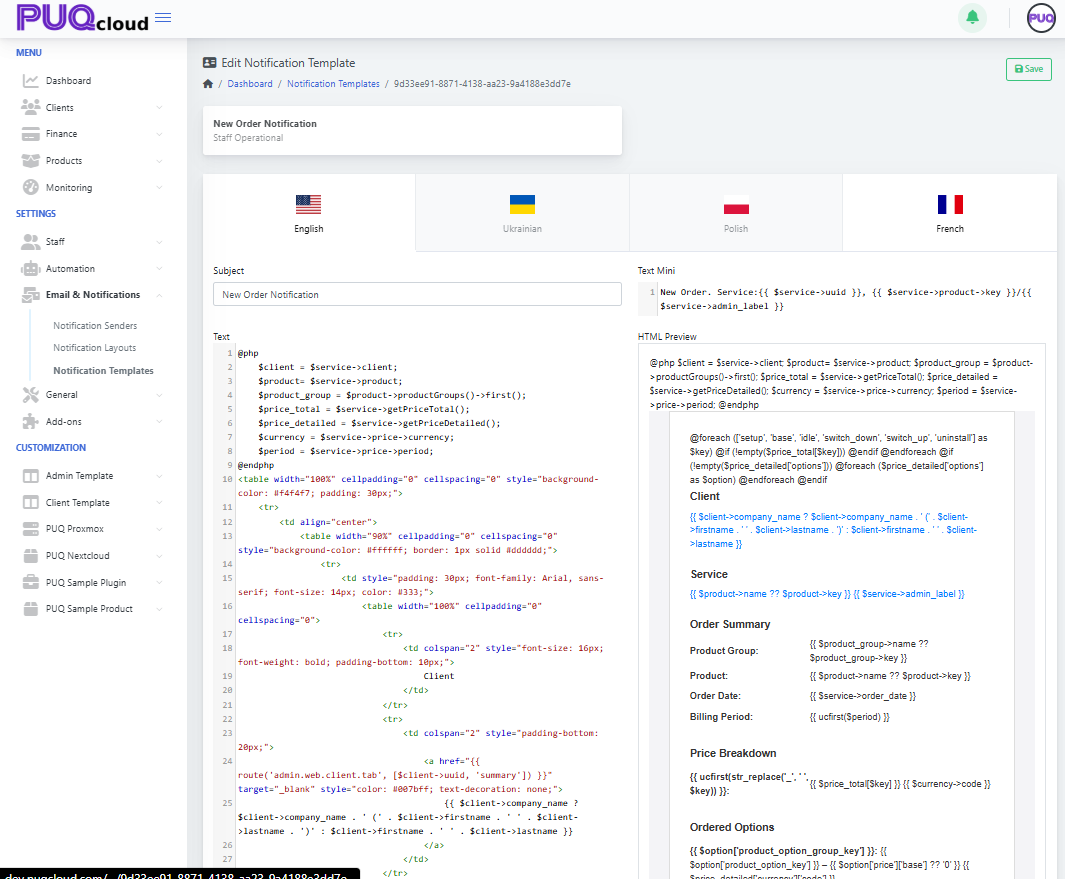
Write the message (variables & logic)
-
The editor supports template variables and light blade-style syntax. Common objects include:
-
$client(e.g.,$client->company_name,$client->firstname) -
$service(e.g.,$service->uuid,$service->price,$service->product) -
$product,$price_detail,$currency,$period, etc., depending on the event
-
-
Use control structures (
@if,@foreach) to conditionally render parts of the email.
Examples you’ll often see:
{{ $service->uuid }}
{{ $client->firstname }} {{ $client->lastname }}
@foreach($price_detailed['options'] ?? [] as $option)
{{ $option['name'] }} — {{ $option['price'] }}
@endforeach
-
Keep Text Mini short and human-readable; reserve full markup for the HTML body.
-
Watch the HTML Preview on the right to validate your structure and data placeholders.
Best practices
-
Clone behavior: Editing a SYSTEM template effectively overrides it (your changes become the active version); you can always re-apply defaults later by copying from a fresh environment.
-
Keep it accessible: Use semantic HTML and inline styles; avoid images for critical info.
-
Localization parity: Ensure every language tab has at least a basic subject/body.
-
Personalization: Prefer
$client->firstnameover generic “Dear Customer”. -
Links & safety: Use absolute URLs and include a clear call to action (e.g., “Visit Client Area”).
-
Testing: Trigger the real event (e.g., create a proforma invoice) in a sandbox account to see the final message flowing through your selected Notification Sender (SMTP/PHPMail/Bell).
Troubleshooting
-
Variables show blank: That variable isn’t available for the event. Inspect other defaults for that event to see which fields are used.
-
Rendering issues: Check unclosed tags and preview; simplify nested tables if needed.
-
Wrong language sent: Confirm the client’s preferred language and that the localized version exists.
Related setup (optional but recommended)
-
Configure Email & Notifications → Notification Senders (SMTP, PHPMail, Bell) so mail actually goes out.
-
Adjust Notification Layouts if you want a shared header/footer or branding that wraps your templates.
That’s it—you’re ready to create polished, localized notifications that fit your brand and workflows.
DNS Manager — Server Groups
PUQcloud Panel
Order Now | Download | FAQ
1) What Server Groups are for
A Server Group is a logical pool of one or more DNS servers that act together as the authoritative nameservers for the zones you assign to the group.
You define the public NS hostnames for the group (what registrars and resolvers will see), and you attach real DNS servers to the group (PowerDNS or HestiaCP via PUQcloud modules). Any Zone linked to this group will be created/updated on all servers in the group.
Path: Settings → DNS Manager → Server Groups
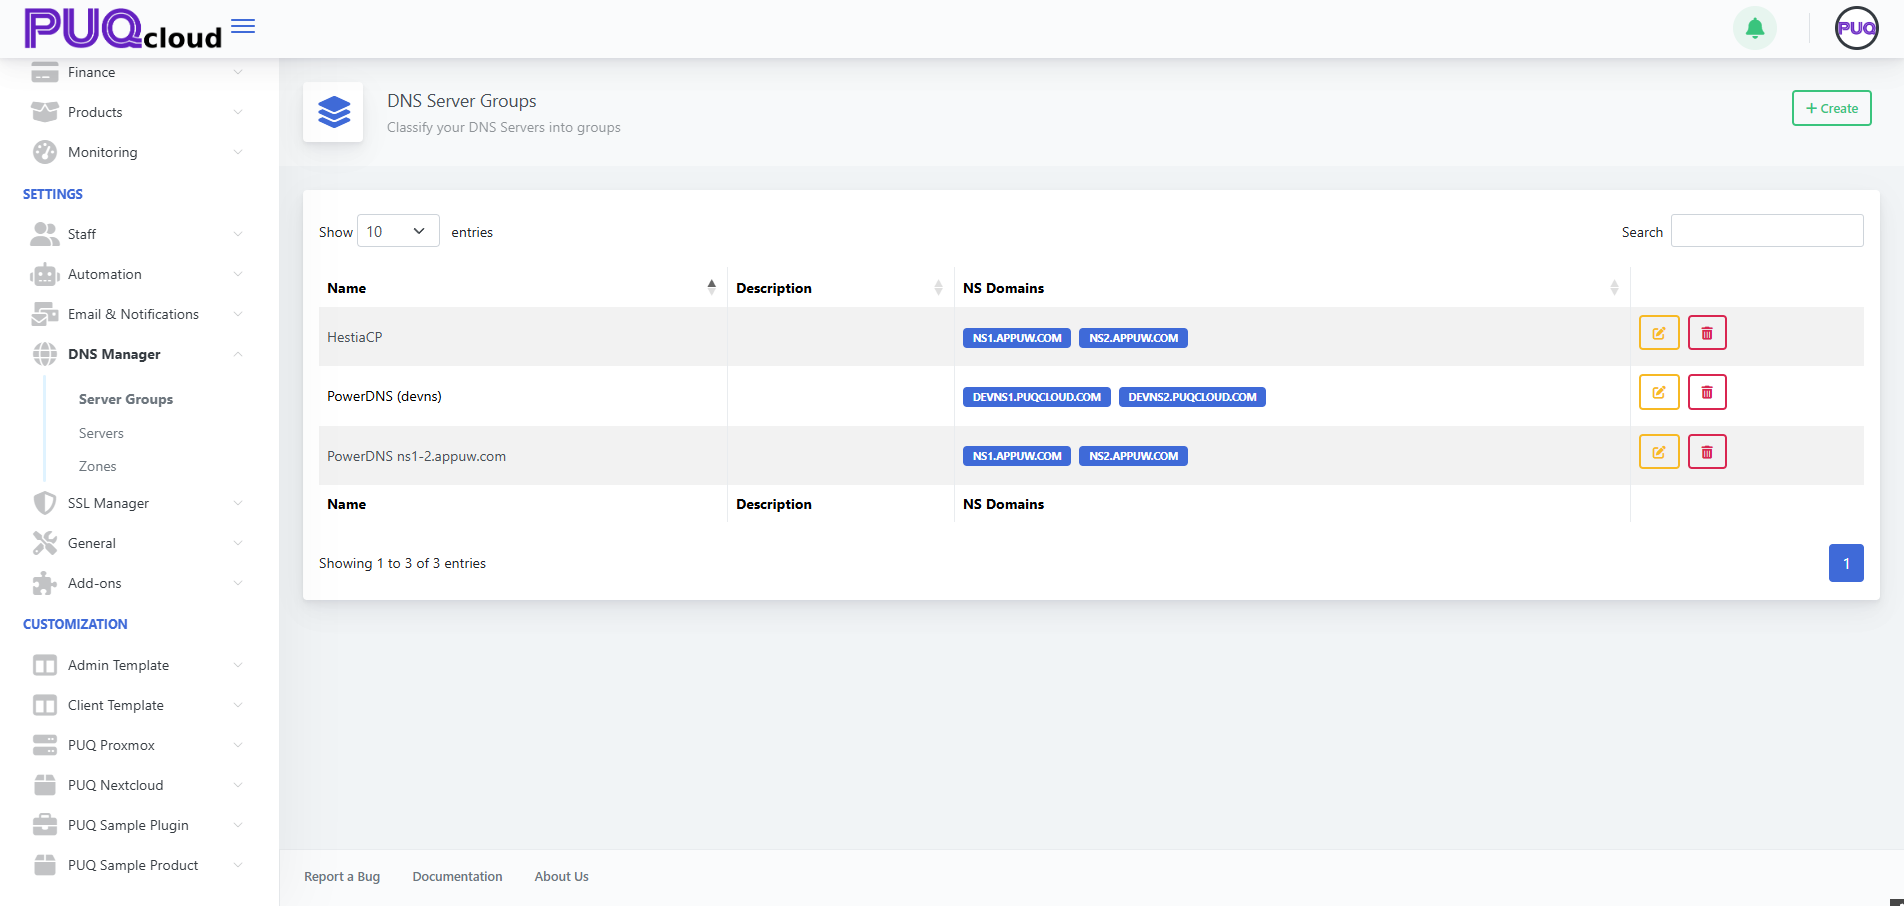
2) When you need groups
-
You operate two or more DNS servers for redundancy.
-
You separate production vs staging/tech DNS (e.g., ACME DNS-01 challenge zone).
-
You roll out multi-region authoritative DNS and want a single switch to move zones between clusters.
-
You’re migrating from one platform to another and need both pools side by side.
3) Supported modules (for servers you’ll attach)
-
PUQ PowerDNS — talks directly to PowerDNS HTTP API (typically port
8081). -
PUQ HestiaCP DNS — manages zones/records through HestiaCP API.
You can mix group types: one group may contain only PowerDNS nodes, another only HestiaCP, etc.
4) Before you start (prereqs)
-
Prepare your NS hostnames (e.g.,
ns1.example.com,ns2.example.com) and make sure they will resolve to the public IPs of your real DNS servers. -
Add your physical DNS servers in DNS Manager → Servers and verify them with Save and Test.
-
If these hostnames are used for domain delegation, update them at the registrar after you finish (or set glue records if needed).
5) Creating a Server Group — step by step
-
Go to Server Groups and click + Create.
-
Fill in Name and (optional) Description.
-
In NS Domains, enter the authoritative NS hostnames — one per line (e.g.,
ns1.appuw.com,ns2.appuw.com). -
Click Save.

6) Editing a Server Group (fields explained)
Open the group you just created.
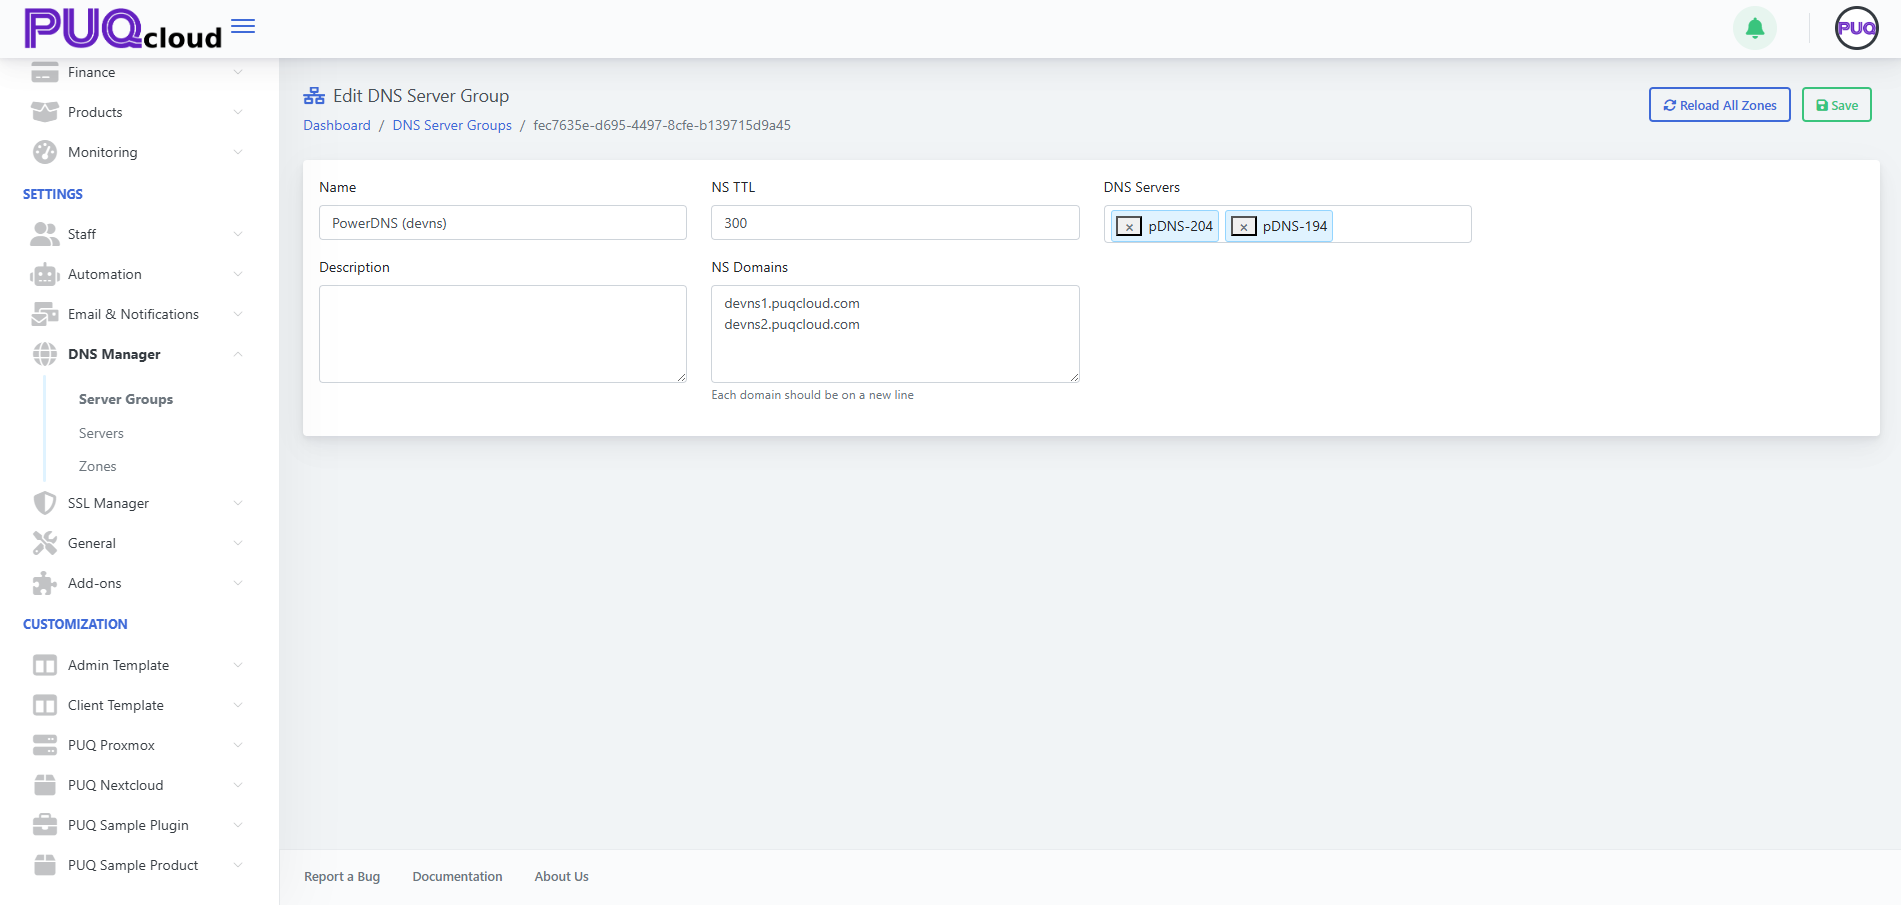
Fields
| Field | Purpose | Notes / Examples |
|---|---|---|
| Name | Friendly title of the group | e.g., PowerDNS (devns) |
| NS TTL | TTL for NS records this group advertises | 300–900 is typical; use 300 during migrations |
| NS Domains | The public authoritative NS hostnames for the group | ns1.appuw.com and ns2.appuw.com, each on a new line |
| DNS Servers | The real servers (from DNS Manager → Servers) to run this group | Select 2+ for redundancy; can be PowerDNS or HestiaCP nodes |
Actions
-
Reload All Zones — push/refresh every zone assigned to this group across all attached servers (useful after adding/removing a server).
-
Save — persist changes.
7) How groups, servers, and zones interact
-
A Zone belongs to exactly one Server Group.
-
A Server Group can contain multiple servers (recommended: at least two).
-
When you create/edit a zone, PUQcloud writes changes to all servers in the selected group.
-
Changing the group for a zone (via Zones → Move To) moves its management to the new server pool.
8) Typical patterns
A. ACME “Tech Zone” group (DNS-01 for SSL)
Create a group like PowerDNS (devns) with NS hostnames such as devns1.yourdomain.com and devns2.yourdomain.com, attach 2+ PowerDNS servers, and delegate these NS in the registry.
Use this group to host a technical zone (e.g., acme.yourdomain.com) where SSL Manager will place TXT records during issuance. In target zones you only set CNAME for _acme-challenge pointing into the tech zone; Let’s Encrypt follows the CNAME and validates TXT there.
B. Production authoritative DNS
Create a group PowerDNS ns1-2 with ns1.example.com and ns2.example.com, attach your production servers, and assign all public zones to this group.
C. Migration between platforms
Keep Group A (HestiaCP) and Group B (PowerDNS) simultaneously.
Import zones to Group B, test, then in Zones use Move To to switch each zone from A to B. Lower NS TTL before switching to reduce propagation delays.
9) Best practices
-
Always have ≥2 servers per group, ideally in different networks/regions.
-
Choose clear names:
PowerDNS ns1-2,PowerDNS (devns),HestiaCP-EU. -
Keep NS TTL low (300) during migrations or frequent changes.
-
After adding a server to a group, run Reload All Zones.
-
Ensure NS Domains here match the actual delegation at your registrar.
-
Secure server APIs (IP allowlist, HTTPS where applicable) and use distinct API keys.
10) Troubleshooting
| Symptom | Likely cause | Fix |
|---|---|---|
| Zones don’t appear on a new server | Server not attached to the group or not reloaded | Add it under DNS Servers, click Reload All Zones |
| Public NS answers are inconsistent | One node out of sync or offline | Check server health, run Reload All Zones, review logs |
| Registrar warns about NS mismatch | NS hostnames in group don’t match registry delegation | Align NS Domains here with registrar NS; wait for TTL |
| SSL DNS-01 fails | Tech group/zone mis-delegated or CNAME wrong | Verify tech zone delegation and _acme-challenge CNAME chain |
DNS Manager — Servers
PUQcloud Panel
Order Now | Download | FAQ
1) Purpose of this section
In Servers you connect your real DNS servers to PUQcloud. Then you attach these servers to Server Groups, and groups power your Zones (create/update records, reload zones, import/export).
Path: Settings → DNS Manager → Servers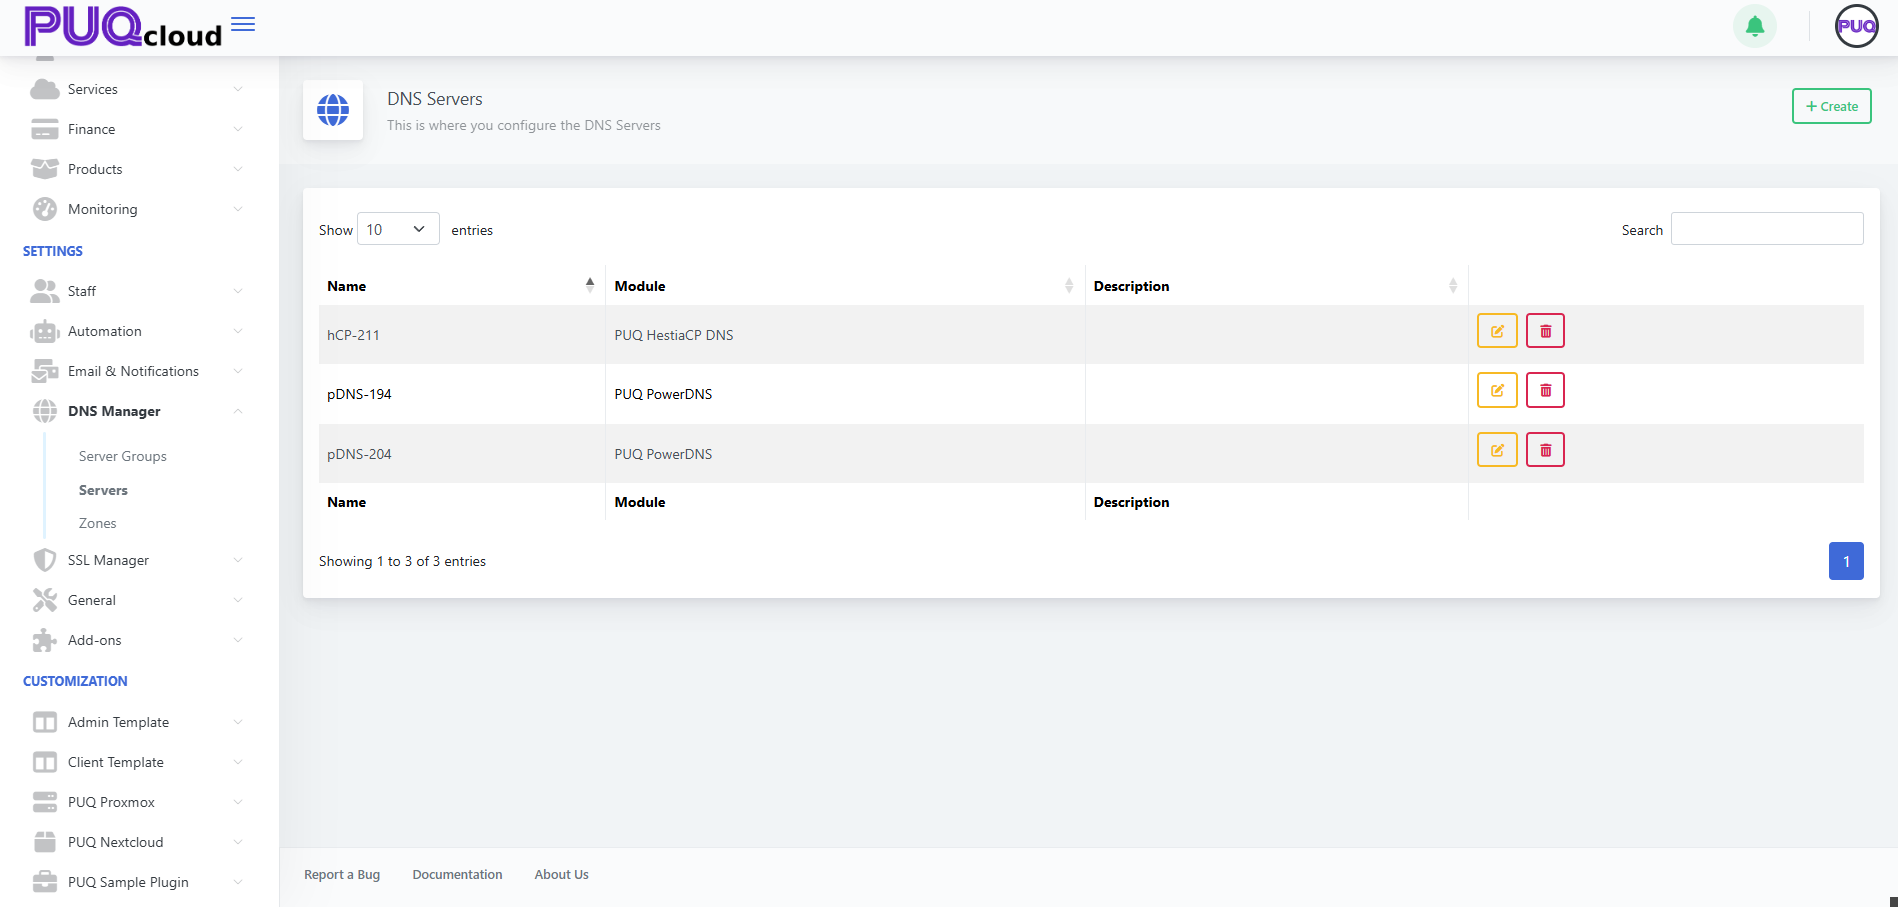
2) Supported modules
PUQcloud integrates via pluggable modules:
• PUQ PowerDNS
Direct integration with the PowerDNS HTTP API (typically port 8081). The panel creates/updates zones and records through the REST API and provides Save and Test to confirm connectivity and show the PowerDNS version.
Use when: you run your own PowerDNS authoritative servers and want fast, transparent automation (including ACME/SSL “tech zone” workflows).
• PUQ HestiaCP DNS
Manages zones/records via the HestiaCP API. Operations are performed under a HestiaCP user/API key you supply.
Use when: your DNS lives inside HestiaCP and you want to centralize control via PUQcloud.
You can run both modules side-by-side in different Server Groups (handy for migrations or prod/staging separation).
3) Create a server — step by step
-
Open Servers and click + Create.
-
Enter a Name (a friendly label).
-
Choose Module: PUQ PowerDNS or PUQ HestiaCP DNS.
-
Click Save — you’ll land on the edit page with connection fields.
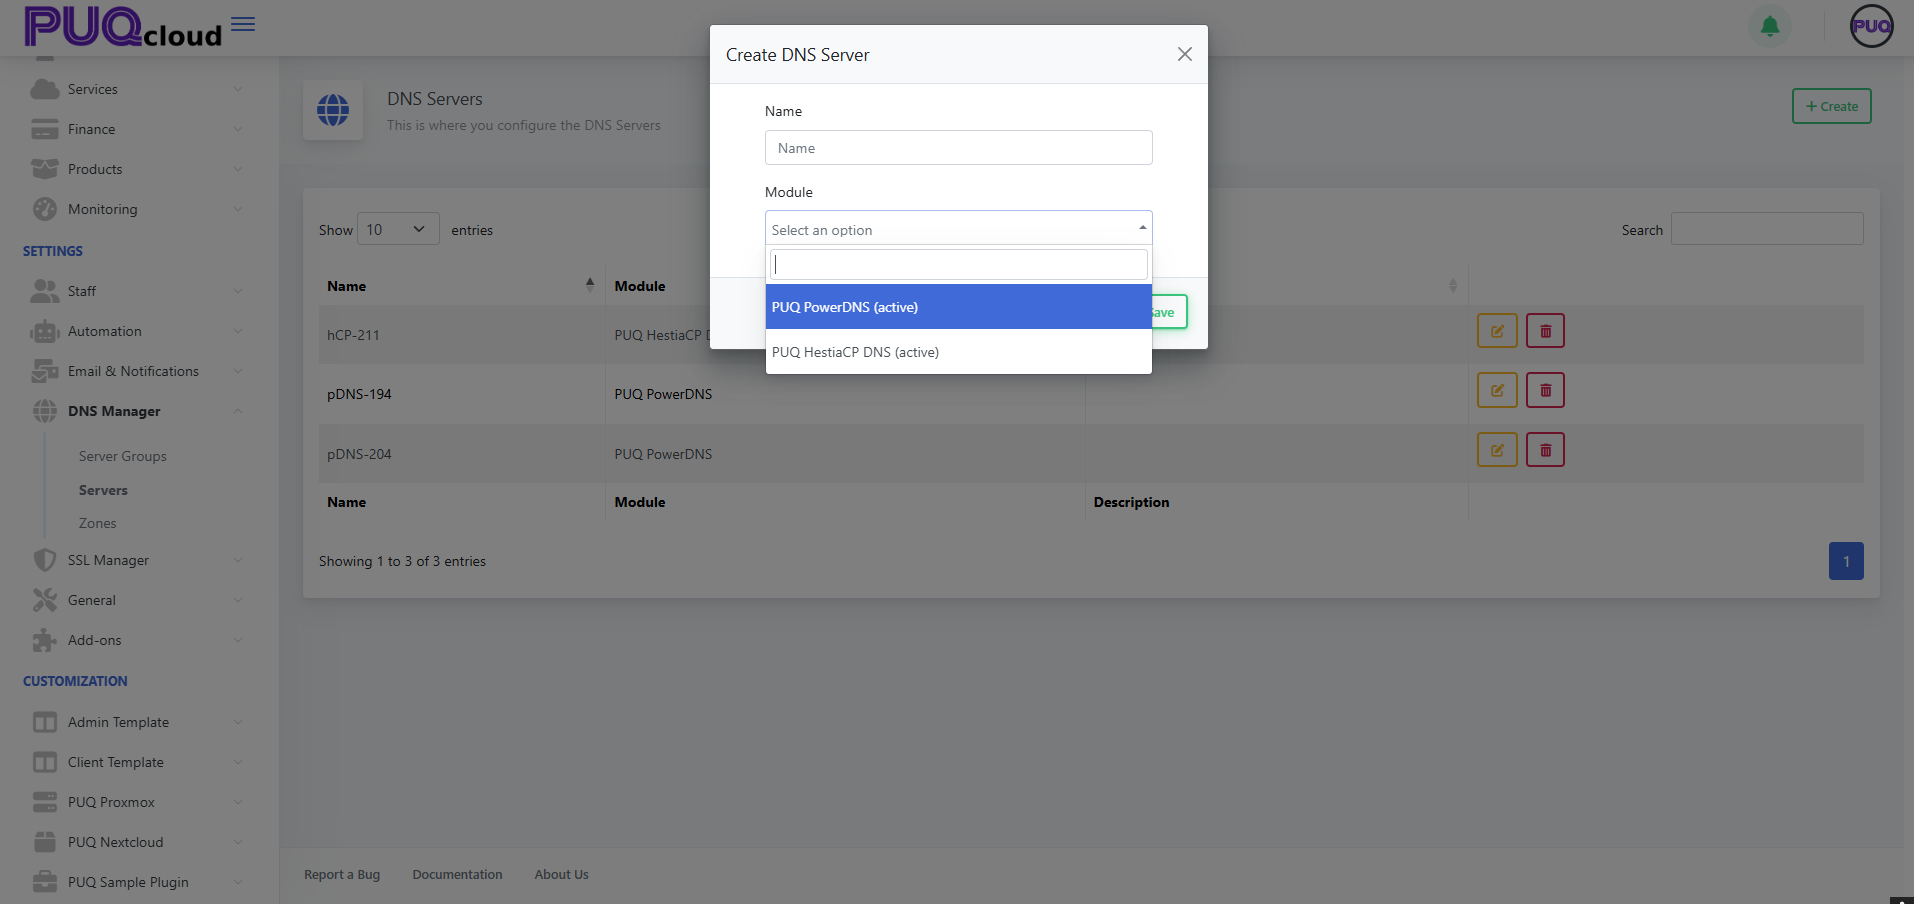
4) Configure PowerDNS (PUQ PowerDNS)
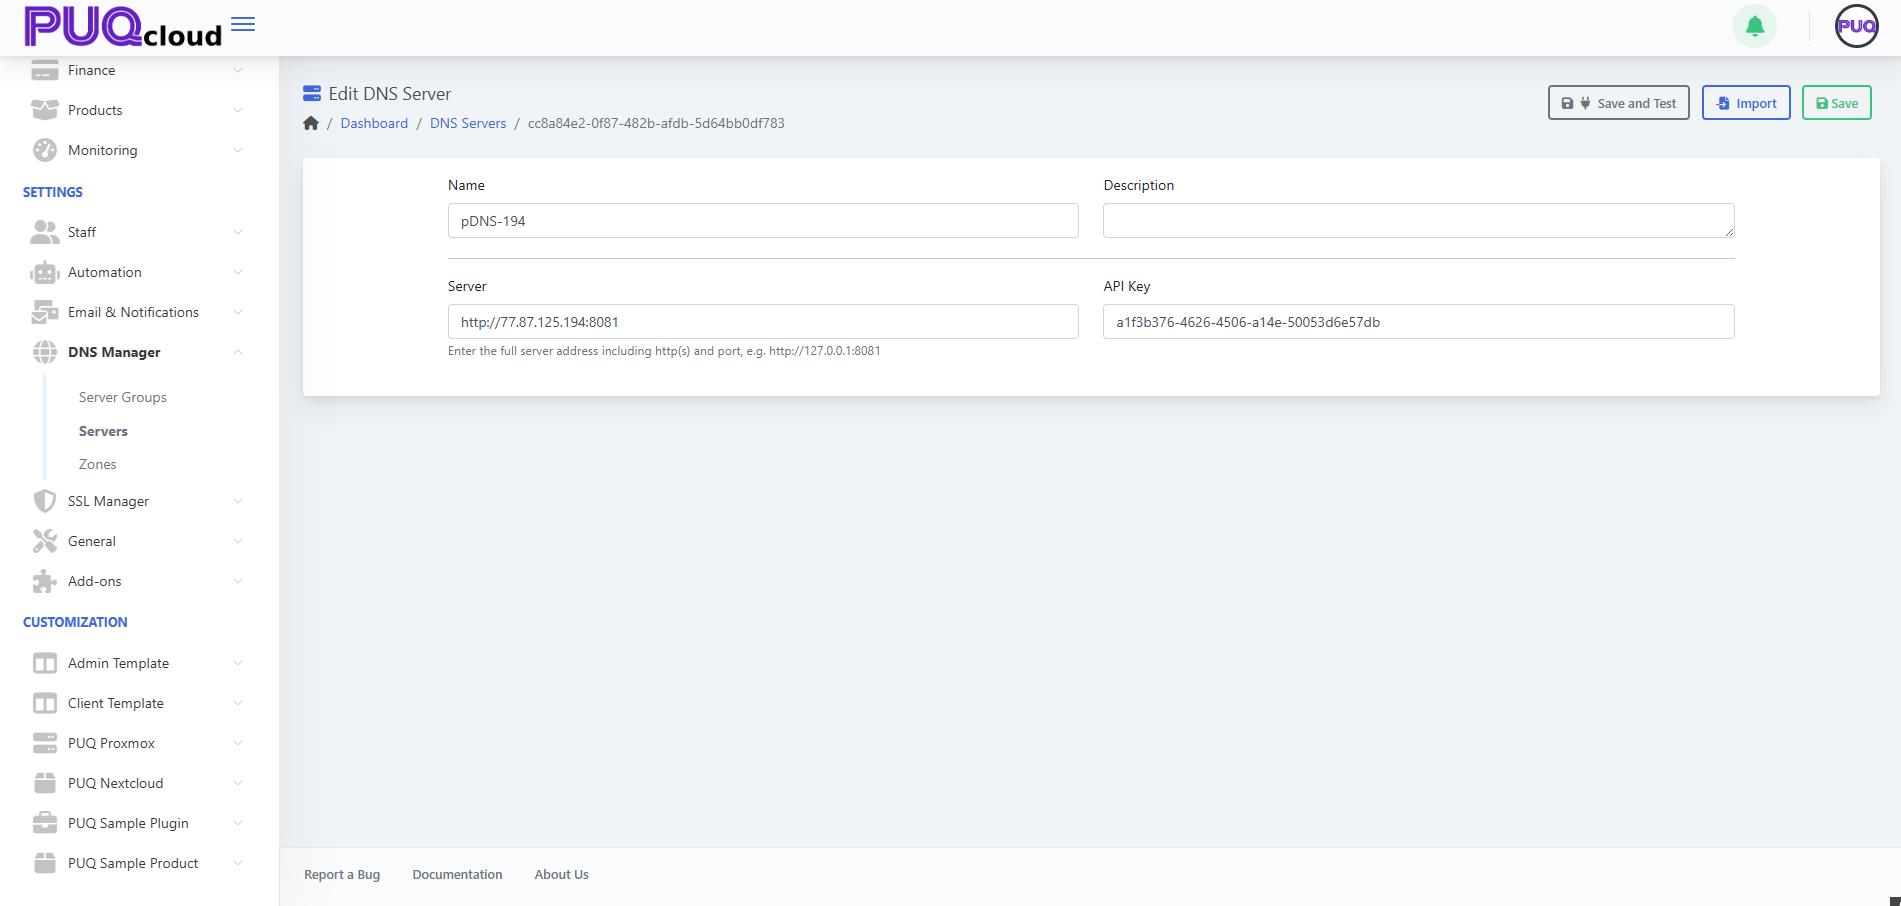
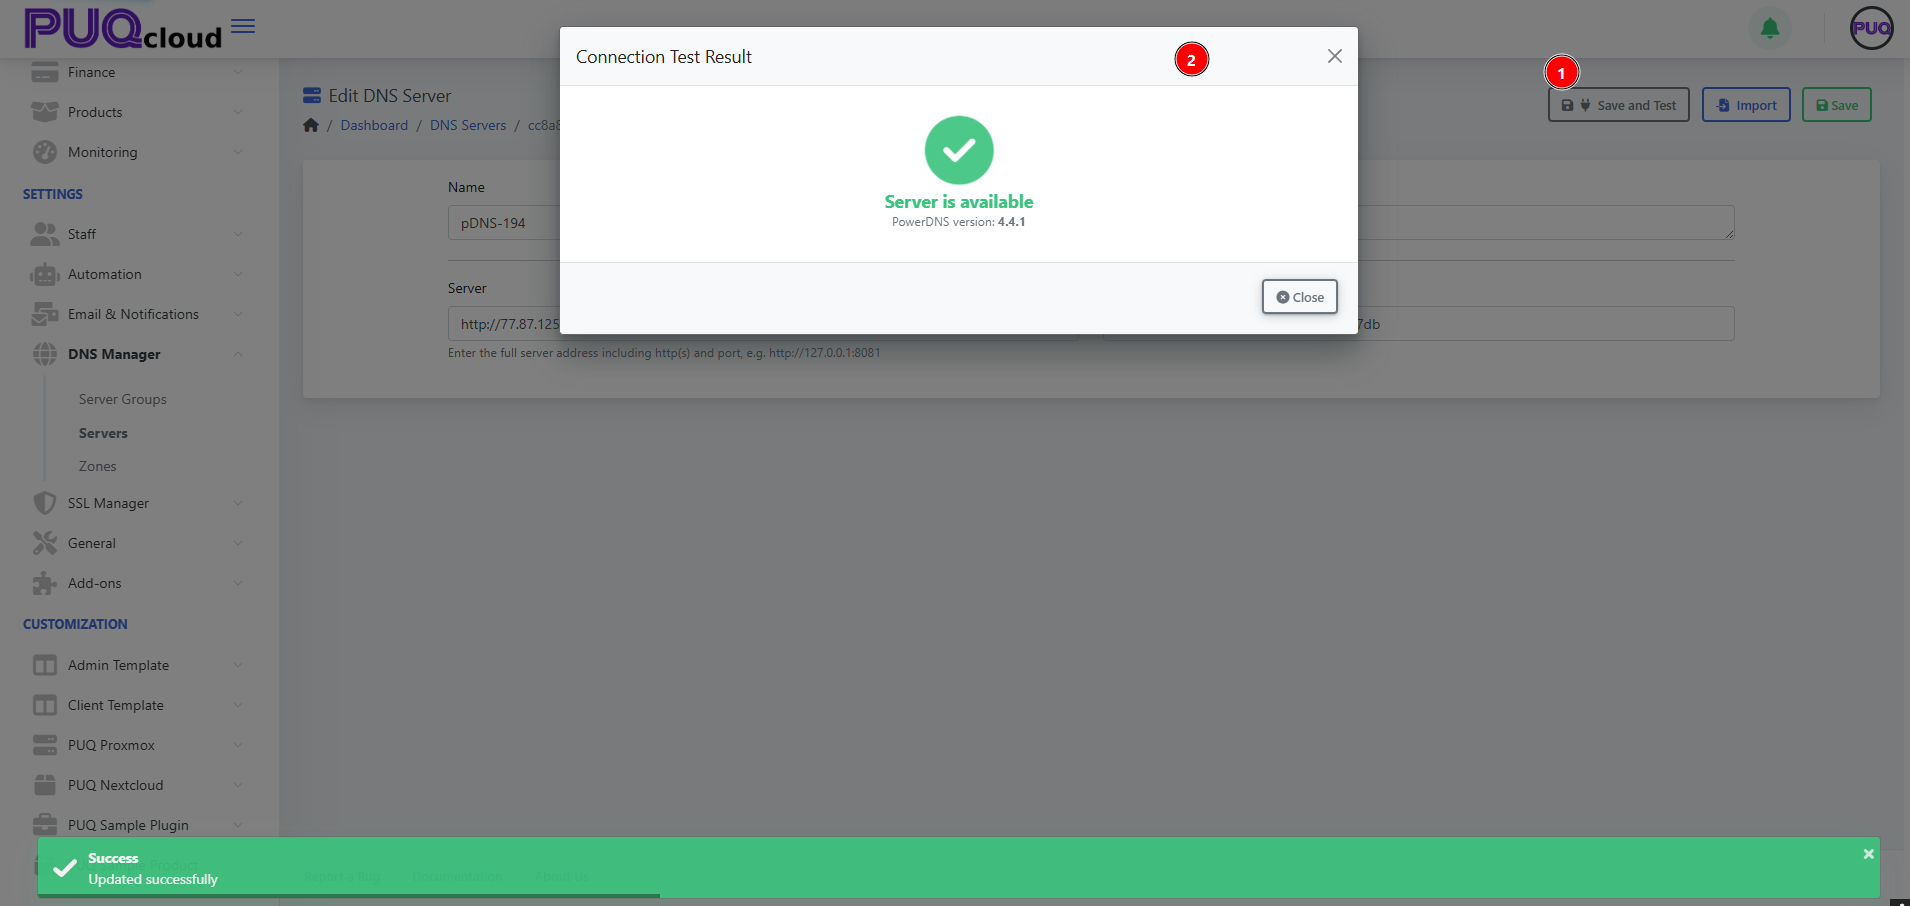
Fields
| Field | What to enter | Example / Tip |
|---|---|---|
| Name | Any friendly name | pDNS-194 |
| Description | Optional note | PowerDNS on dev node |
| Server | Full API URL incl. protocol & port | http://203.0.113.194:8081 or https://dns.example.com:8081 |
| API Key | PowerDNS API token (api-key= in config) |
Create a dedicated key for PUQcloud only |
Buttons
-
Save and Test — checks connectivity and displays the PowerDNS version.
-
Import — pulls existing zones from this server (useful on first attach).
-
Save — persists the settings.
Security tips
-
IP-restrict the PowerDNS API to your PUQcloud host.
-
Prefer HTTPS to the API, use a separate API Key with least privilege.
-
Watch PowerDNS logs during imports or bulk changes.
5) Configure HestiaCP (PUQ HestiaCP DNS)
After selecting PUQ HestiaCP DNS, the edit form shows the HestiaCP API connection fields (API URL + authentication parameters according to your HestiaCP setup — token or user/password).
Recommendations:
-
Create a dedicated HestiaCP user/API key for PUQcloud.
-
Confirm the API is enabled and reachable from the PUQcloud host.
-
After Save and Test, verify by creating a test zone under Zones.
6) Add the server to a group
Once the server tests OK, go to Settings → DNS Manager → Server Groups → Edit and add it under DNS Servers for the target group.
Then click Reload All Zones to deploy all group zones onto this newly attached node.
7) Typical scenarios
A. PowerDNS cluster for the ACME tech zone
-
Add 2+ PowerDNS servers (in Servers), test each with Save and Test.
-
Create a group PowerDNS (devns), set NS Domains (e.g.,
devns1.example.com,devns2.example.com), and attach both servers. -
Delegate those NS at your registrar.
-
Create the tech zone
acme.example.comin this group. -
In SSL Manager → Certificate Authorities, select this tech zone as DNS Zone. Done.
B. Migrating from HestiaCP to PowerDNS
-
Connect your PowerDNS servers.
-
Import zones from HestiaCP (use the Import button on PowerDNS or Zones → Export / Import).
-
Create a new Server Group for PowerDNS and Move To switch zones into it.
-
After validation, change domain delegation at the registrar to the new NS.
8) Best practices
-
Redundancy: attach at least two servers to each group (ideally different regions/ASNs).
-
Naming: keep labels clear —
pDNS-194,pDNS-204,hCP-211. -
Always run Save and Test after changing connection params.
-
Keep zone TTL 300–600s during active changes/migrations.
-
Lock down APIs by IP allowlists and use HTTPS where possible.
-
Export zones as backups before bulk operations.
9) Troubleshooting
| Symptom | Likely cause | Fix |
|---|---|---|
| Save and Test fails | Wrong URL/port/key or firewall blocks access | Verify http(s)://host:port, API key, and allow the PUQcloud IP |
| Zone import incomplete | API/user lacks permissions | Grant appropriate rights or use Zones → Import |
| Group zones don’t deploy to the new server | Server not added to Server Group | Add it, then Reload All Zones |
| Different answers from NS nodes | One node out of sync or offline | Check health/logs, Reload All Zones, restore connectivity |
DNS Manager — Zones
PUQcloud Panel
Order Now | Download | FAQ
1) What a Zone is and how it works
A DNS Zone is the set of DNS records for a domain (e.g., example.com) or a reverse domain (in-addr.arpa, ip6.arpa).
In PUQcloud, every zone is assigned to exactly one Server Group, and that group has one or more real DNS servers attached. As a result:
-
When you create or change records in Zones, PUQcloud writes those changes to all servers in the selected group.
-
Zone-level meta (e.g., Primary NS, NS Domains, SOA fields) is stored with the zone and deployed to the group’s servers.
Path: Settings → DNS Manager → Zones

2) The Zones list & actions
The list shows all zones, how many records each has, which Server Group it belongs to, the Primary NS (SOA MNAME), and the Admin Email (SOA RNAME).
Per-row actions:
-
Edit — open the zone editor
-
Delete — remove the zone
Top-right: + Create to add a new zone.
3) Create a zone
Click + Create and fill the form.

Field reference
| Field | Description | Tip |
|---|---|---|
| Name | Zone name. For forward zones use example.com. For reverse: IPv4 uses x.y.z.in-addr.arpa, IPv6 uses the …ip6.arpa nibble format. |
Use correct reverse notation. |
| DNS Server Group | Which group of servers will host this zone | Choose the group you prepared (e.g., PowerDNS ns1-2 or PowerDNS (devns) for the ACME tech zone). |
| SOA Admin Email | Email in SOA (RNAME, with a dot instead of @) |
Commonly hostmaster@domain.tld. |
| SOA TTL (seconds) | TTL for the SOA record | 3600 is a safe default. |
| SOA Refresh | Slave refresh interval | 86400 (24h) typical. |
| SOA Retry | Retry interval if refresh fails | 7200 (2h). |
| SOA Expire | When slaves consider zone expired | 1209600 (14 days). |
| SOA Minimum TTL | Negative caching (minimum TTL) | 3600. |
Click Save to create the zone.
4) Edit a zone
Opening a zone leads to Edit DNS Zone.

What you see
-
Name — zone name (read-only for some reverse templates).
-
DNS Server Group — which group serves this zone.
-
Primary NS — SOA MNAME (main NS).
-
NS Domains — authoritative nameserver hostnames shown as badges. These should match your actual registrar delegation.
-
SOA fields — TTL, Refresh, Retry, Expire, Minimum TTL.
-
Records table — the list of all records in this zone.
Top actions
-
+ Create Record — add A/AAAA/CNAME/TXT/MX/SRV/NS/PTR etc.
-
Reload Zone — force-sync this zone across all servers in the group.
-
Move To — move the zone to another Server Group (useful for migrations).
-
Export / Import — export to/import from a standard zone format (PowerDNS/BIND-compatible).
-
Save — save changes to the zone properties (record edits have their own save flow in the record modal).
5) Add records
Click + Create Record.

Common record types
-
A / AAAA — IPv4/IPv6 address mappings (e.g.,
www → 203.0.113.10). -
CNAME — alias (e.g.,
www → @orexample.com). -
TXT — free-form text (SPF, DKIM, ACME challenges).
-
MX — mail exchangers with priority.
-
SRV — service records (VoIP, LDAP, etc.).
-
NS — delegate sub-zones to other nameservers.
-
PTR — reverse mapping (IP to hostname) for reverse zones.
Examples (forward)
-
@→ A →203.0.113.10 -
www→ CNAME →@
Example (mail)
-
@→ MX (10) →mx1.example.com. -
@→ TXT →v=spf1 include:spf.example.net -all
Reverse example (PTR)
In 0.168.192.in-addr.arpa:
-
130→ PTR →host130.example.com.
6) ACME / SSL with a technical zone
For DNS-01 challenges, SSL Manager commonly uses a technical zone (e.g., acme.yourdomain.tld) hosted by a dedicated Server Group (e.g., PowerDNS (devns)). The workflow:
-
In the target zone (the zone for which you want a cert), create a CNAME:
_acme-challenge.yourdomain.tld → _acme-challenge.yourdomain.tld.acme.yourdomain.tld. -
During issuance, SSL Manager automatically creates/updates the TXT in the tech zone (via PowerDNS/Hestia modules).
-
The CA queries
_acme-challengeon the target zone, follows the CNAME into the tech zone, and reads the TXT. -
Once validated, the certificate becomes ACTIVE (see SSL Certificates guide).
Ensure the tech group’s NS Domains are really authoritative and are properly delegated at the registrar.
7) Export / Import
-
Export — download the zone in a PowerDNS/BIND-compatible format (great for backups and migrations).
-
Import — upload a zone file to quickly populate records. After import, verify records and click Reload Zone.
8) Best practices
-
Use TTL 300–600s while actively changing/migrating; raise later for stability.
-
Keep ≥2 NS in the serving group (prefer distinct regions/ASNs).
-
For ACME, keep a separate tech zone and separate group.
-
Always Export before bulk edits.
-
After changing a zone’s Server Group, use Move To and then Reload Zone.
-
Regularly verify delegation (
dig NS yourdomain.tld) and key records resolution from multiple locations.
9) Troubleshooting
| Symptom | Likely cause | Fix |
|---|---|---|
| Public resolvers can’t see your changes | Registrar delegation wrong or NS Domains don’t match real NS | Correct delegation, align NS Domains, wait for TTL |
| Different answers on NS1 vs NS2 | One node out of sync or offline | Reload Zone, check server health, review logs |
| ACME DNS-01 fails | Missing/wrong CNAME to tech zone; caching | Validate with dig, fix CNAME/TXT, wait for TTL |
| Zone import errors | Incompatible format or invalid entries | Fix offending lines, re-import |
SSL Manager - Certificate Authorities
PUQcloud Panel
Order Now | Download | FAQ
Overview
Certificate Authorities (CA) are provider profiles the panel uses to issue and renew SSL/TLS certificates via ACME. PUQcloud follows a simple rule: one module per CA.
Currently supported modules:
-
Let’s Encrypt (plus Let’s Encrypt Staging for safe testing)
-
ZeroSSL
Where to find it: Settings → SSL Manager → Certificate Authorities
What you can do here
-
Create and configure CA profiles (ACME account, technical DNS zone, timeouts).
-
Test connectivity to the CA (Save and Test) and see the CA directory endpoints.
-
Keep multiple profiles (e.g., Production vs Staging) and select them per-certificate.
Create a CA Profile (step-by-step)
-
Go to Settings → SSL Manager → Certificate Authorities and click + Create.
-
Enter Name and choose Module = PUQ ACME (active) → Save.
-
Click Edit on the new CA profile and fill in the fields (see the Field Reference below).
-
Click Save and Test. A modal should show API is available plus a dump of ACME directory endpoints.
-
Click Save.
Field Reference (when & why)
| Field | What it is | When / Why |
|---|---|---|
| Name | Internal display name | Use meaningful names like LE PROD, LE STAGING, ZeroSSL. |
| Description | Short profile note | Note target usage: “production issuance”, “sandbox”, or project scope. |
| Certificate Authority | Selected CA directory | Use Let’s Encrypt Staging for tests, Let’s Encrypt or ZeroSSL for production. |
| Email address for the ACME account | Email used to register/manage the ACME account | Required. Prefer a shared ops mailbox (e.g., it@company.tld) for continuity. |
| EAB Key ID / EAB HMAC Key | External Account Binding | Needed by some providers/plans (e.g., ZeroSSL). Leave empty if not required. |
| DNS Zone | Technical zone where TXT records are actually created | Example: acme.puqcloud.com. The target domain’s _acme-challenge will CNAME to this zone. |
| Allow wildcard certificates | Allows *.domain |
Enable if you plan wildcard issuance (DNS-01 only). |
| DNS Record TTL (seconds) | TTL for created DNS records | 30–60 speeds up DCV; raise slightly if your DNS is slow to propagate. |
| API Timeout (seconds) | Max wait for ACME API responses | Increase (e.g., 20–30) on flaky networks/CI bursts. |
| Save and Test (button) | Connectivity check | Opens a modal with API is available and the list of ACME endpoints. Investigate if it fails. |
Provider specifics
Let’s Encrypt (incl. Staging)
-
Uses DNS-01 via a technical zone:
-
On the target domain you create a CNAME for
_acme-challenge.domainpointing into your technical zone (e.g.,_acme-challenge.domain CNAME <token>.acme.puqcloud.com). -
Let’s Encrypt queries
_acme-challengeon the target domain, follows the CNAME into the tech zone, and reads the TXT value there.
-
-
Let’s Encrypt Staging is ideal for testing without spending production rate limits.
-
Wildcards (
*.domain) require DNS-01 and the Allow wildcard flag.
ZeroSSL
-
Supports account API keys so that issued certificates appear in your ZeroSSL account.
-
If you don’t provide keys, the system will create temporary keys per certificate automatically.
-
With a paid ZeroSSL plan (~$12/month), generate API keys and add them to PUQcloud so all certs are visible/manageable in your ZeroSSL panel.
Good practices
-
Start with Let’s Encrypt Staging to validate your flow, then enable Let’s Encrypt (production).
-
Keep DNS TTL low (30–60s) in the CA profile to speed up challenges.
-
For ZeroSSL at scale, use account keys for visibility and auditing.
Migration cheat-sheet (e.g., from Let’s Encrypt to ZeroSSL)
-
Create a new CA profile (add EAB/API keys if required by your ZeroSSL plan).
-
Save and Test to confirm directory endpoints.
-
Check/update your technical DNS zone if it differs from previous setup.
-
Issue a test cert on a non-critical domain to validate DCV.
-
For new certs, select the new CA in the creation form. For existing certs, you cannot “switch issuer”; issue a new certificate under the new CA and deploy it.
-
Verify Days Remaining / Auto Renew behavior on new certs (and, with ZeroSSL keys, that issues appear in the ZeroSSL account).
Troubleshooting
-
“Save and Test” doesn’t show “API is available”
-
Check selected CA, network access, EAB keys (if required), and API Timeout.
-
-
LE DNS validation fails
-
Confirm the CNAME is correct and already resolves to the tech zone; wait for TTL.
-
-
Wildcard fails
-
Ensure Allow wildcard is enabled and you are using DNS-01.
-
-
ZeroSSL certificates don’t show in the ZeroSSL dashboard
-
Add account API keys to the CA profile (temporary per-certificate keys don’t link certs to your account).
-
Related
-
SSL Certificates — issuance workflow (Draft → CSR → Pending (CNAME) → Active), auto-renew, metadata.
-
DNS Manager — managing your technical zone and verifying
_acme-challengerecords. -
Email & Notifications — reminders for expiry and operational alerts.
SSL Manager - SSL Certificates
PUQcloud Panel
Order Now | Download | FAQ
Overview
The SSL Certificates section is your single place to issue, renew, import, and store SSL/TLS certificates.
Each certificate page is split into two columns:
-
Left column — generated by the panel and identical for all certificates (fields, statuses, PEM blocks, metadata).
-
Right column — module-specific, driven by the selected CA module (PUQ ACME). It may show provider-specific hints or controls.
Where to find it: Settings → SSL Manager → SSL Certificates
What you can do
-
Create a certificate (set the domain, choose a CA profile, add SANs/aliases).
-
Generate a CSR and a private key.
-
Complete domain control validation (DNS-01 via CNAME → tech zone).
-
Enable Auto-renewal and track Days Remaining.
-
View/copy Certificate / Private Key / CSR (PEM).
-
Change status (Draft → Active via standard actions).
-
Delete certificates.
-
(Optionally) Import existing certificates.
The private key is encrypted in the database and visible only on the certificate’s page.
Certificates list
The list shows:
-
Domain, Certificate Authority (PUQ ACME)
-
Status (e.g., ACTIVE, “X DAYS”, “AUTO RENEW: 7”)
-
Actions: Edit / Delete
-
+ Create to add a new certificate
Create a certificate (step-by-step)
-
Click + Create in SSL Certificates.
-
Fill in:
-
Domain — primary domain (CN).
-
Certificate Authority — select a CA profile (e.g., Let’s Encrypt / ZeroSSL).
-
Aliases — SAN domains, one per line (optional).
-
-
Click Save — this only saves form data (no keys or certificate yet).
-
Click Generate CSR:
-
The system creates the CSR and Private Key (they do not exist before this step).
-
The private key is encrypted in DB; it is only visible on this page.
-
-
Status switches to Pending. The panel shows instructions to create a CNAME for
_acme-challenge.<domain>pointing into your tech zone (e.g.,acme.puqcloud.com). -
Once the CNAME resolves, issuance starts automatically. When finished, the card turns Active and shows all metadata/PEMs.
Certificate page — left column fields
Top block (editable in Draft)
-
Certificate Status (Draft toggle) — draft state.
-
Auto Renew Days — how many days before expiry to auto-renew (typically
7). -
Days Remaining — remaining days until expiry (LE defaults are ~90 days from issue).
-
Email (ACME account email) and Agree to Terms of Service — required by the CA policy.
Domain & Organization
-
Domain — CN.
-
Aliases (SANs) — additional domains/subdomains, one per line.
-
Wildcard —
*.domain(works with DNS-01 and “Allow wildcard” enabled in the CA profile). -
Email (contact) — certificate contact (may differ from ACME account email, if present).
-
Organization / Organizational Unit / Country / State / Locality — subject fields (as required by policy).
CA / Crypto / Metadata
Actions
-
Generate CSR — create CSR + private key (mandatory before issuance).
-
Change Status — service actions.
-
Save — persist form changes (no CA interaction).
In Draft, the upper part of the left column is editable; after issuance, many fields become read-only.
Workflow: statuses & transitions
-
Draft
-
Edit primary fields (domain, SANs, email, ToS, auto-renew threshold).
-
Save only stores data; no key/CSR is created.
-
-
Generate CSR
-
Creates CSR and Private Key (encrypted; visible only on this page).
-
Crypto fields/PEM blocks appear.
-
-
Pending (CNAME → tech zone)
-
The panel displays the exact CNAME instruction for
_acme-challenge.<domain>→ into your tech zone. -
As soon as the CNAME resolves, the panel continues issuance (DNS-01).
-
-
Active
-
Certificate is issued; Certificate PEM is available; a success panel shows “Certificate is active!”.
-
Days Remaining and Auto Renew operate; crypto/metadata are filled.
-
-
Expired / Error / Revoked
-
Expired — reissue/renew required.
-
Error — check logs/CA setup/DNS path.
-
Revoked — revoked per CA policy.
-
Auto-renewal
-
Controlled by Auto Renew Days (e.g.,
7). -
The panel tracks Days Remaining and triggers renewal ahead of expiry.
-
For LE/ZeroSSL via DNS-01, ensure your CNAME and tech zone remain intact.
Importing an existing certificate (if used)
-
Open SSL Certificates → + Import (or equivalent).
-
Paste CRT / Private Key / CA Bundle in PEM.
-
Save and verify validity/expiry.
-
Configure Auto Renew manually if needed (imports are usually not tied to ACME).
Key security
-
The private key is created at Generate CSR, encrypted in the database, and never shown outside this certificate page.
-
Visibility follows your role-based access.
-
Export a secure copy and store it in your organization’s secret vault.
Troubleshooting
| Symptom | Likely cause | Fix |
|---|---|---|
| Stuck in Pending | CNAME not resolving / wrong target | Verify _acme-challenge.<domain> name and target in tech zone; wait for TTL. |
| Issuance doesn’t start | CSR not generated | Click Generate CSR, then follow CNAME steps. |
| No “Certificate is active!” after CNAME | DCV incomplete / CA error | Check logs; ensure the tech zone is publicly resolvable. |
| Auto-renew doesn’t trigger | Bad Auto Renew Days or broken CNAME | Use a sensible threshold (e.g., 7) and verify CNAME/tech zone. |
| PEM mismatch on import | Key/cert pair doesn’t match | Import the correct pair or reissue. |
Related
Manage General on Admin Area
PUQcloud Panel
Order Now | Download | FAQ
The General page centralizes platform-wide defaults and housekeeping rules. It’s organized into four tabs:
-
Time Based – how long to keep logs and histories
-
Finance – billing and balance limits
-
Client – customer-facing timeouts
-
Social – your company’s social/profile links
Time Based (log retention)
Use this tab to control how long different histories are kept before cleanup jobs remove them.
-
Admin Session Log History – days to keep admin login/session logs.
-
Client Session Log History – days to keep client session logs.
-
Activity Log History – days to keep system activity logs (actions, events).
-
Module Log History – days to keep module-specific logs.
-
Notification History – days to keep notification entries.
-
Completed Task Queue History – days to keep completed queue items.
-
Task Queue History – days to keep all queue task records.
-
User Verification Code Lifetime – minutes a verification code remains valid.
Tips
-
Shorter values reduce storage usage and improve log queries.
-
Keep compliance needs in mind (audit requirements) before trimming aggressively.
General › Time Based tab with retention fields.
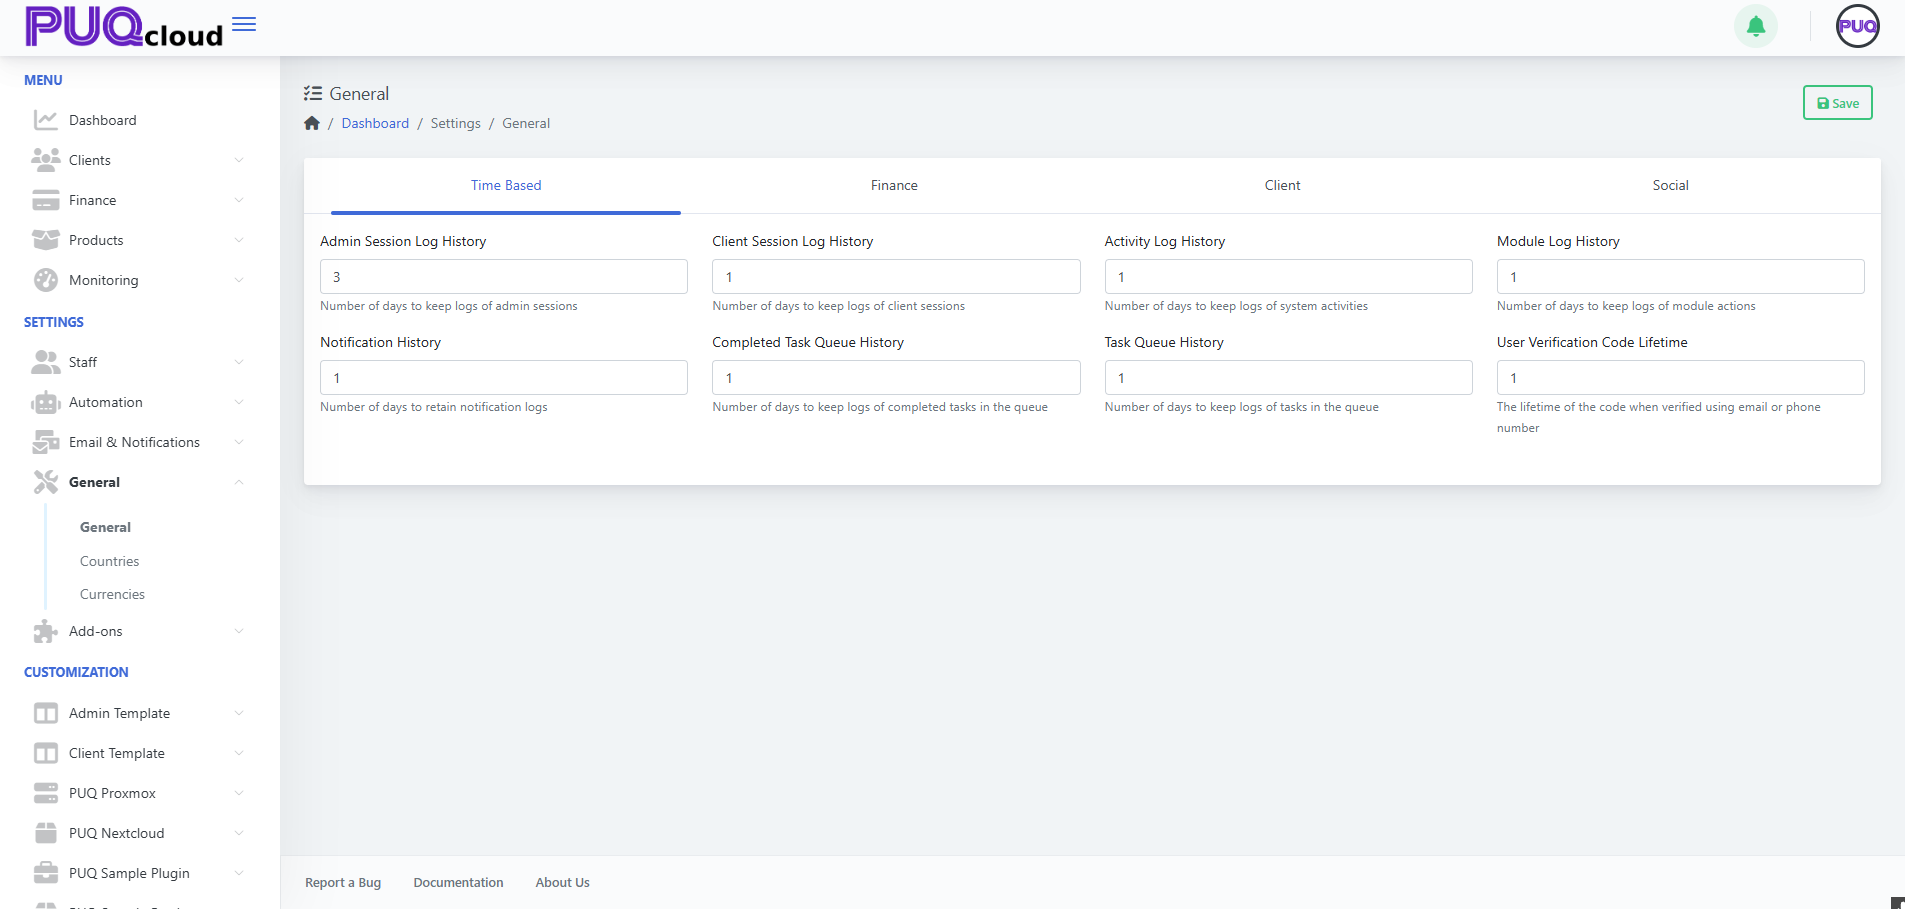
Finance (billing defaults & limits)
Define monetary guardrails and invoice behavior.
-
Default Invoice Due Days – number of days after issue date when invoices are due.
-
Minimum Add Funds Amount – smallest wallet/top-up amount allowed.
-
Maximum Add Funds Amount – largest single top-up amount allowed.
-
Maximum Client Balance – hard ceiling for a client’s total wallet balance.
Best practices
-
Align Default Invoice Due Days with your dunning/collections process.
-
Set realistic Min/Max Add Funds to reduce micro-payments and risk.
-
Use Max Client Balance to avoid accounting or AML headaches.
General › Finance tab with invoice and balance limits.
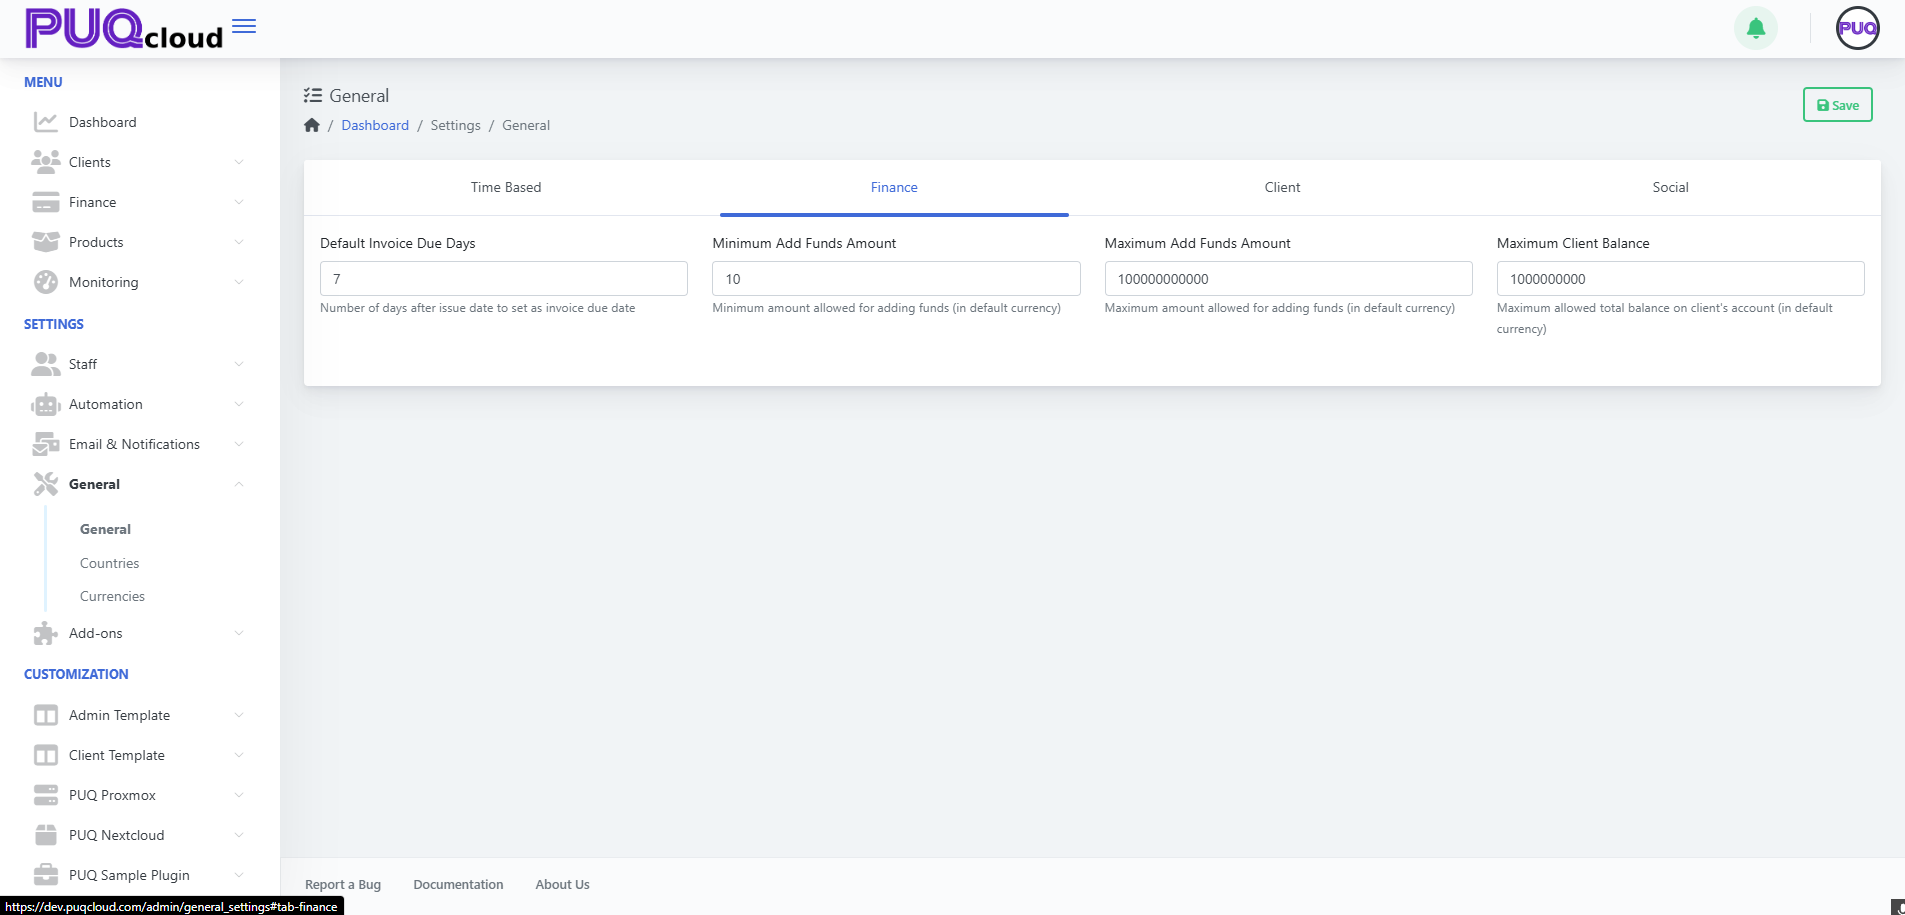
Client (customer timeouts)
A small but important setting for customer security & UX.
-
Reset Password URL Expire (minutes) – how long a password-reset link remains valid after it’s issued.
Guidance
-
30–120 minutes is common; lower values are more secure, higher values are more forgiving.
General › Client tab with reset link expiry.
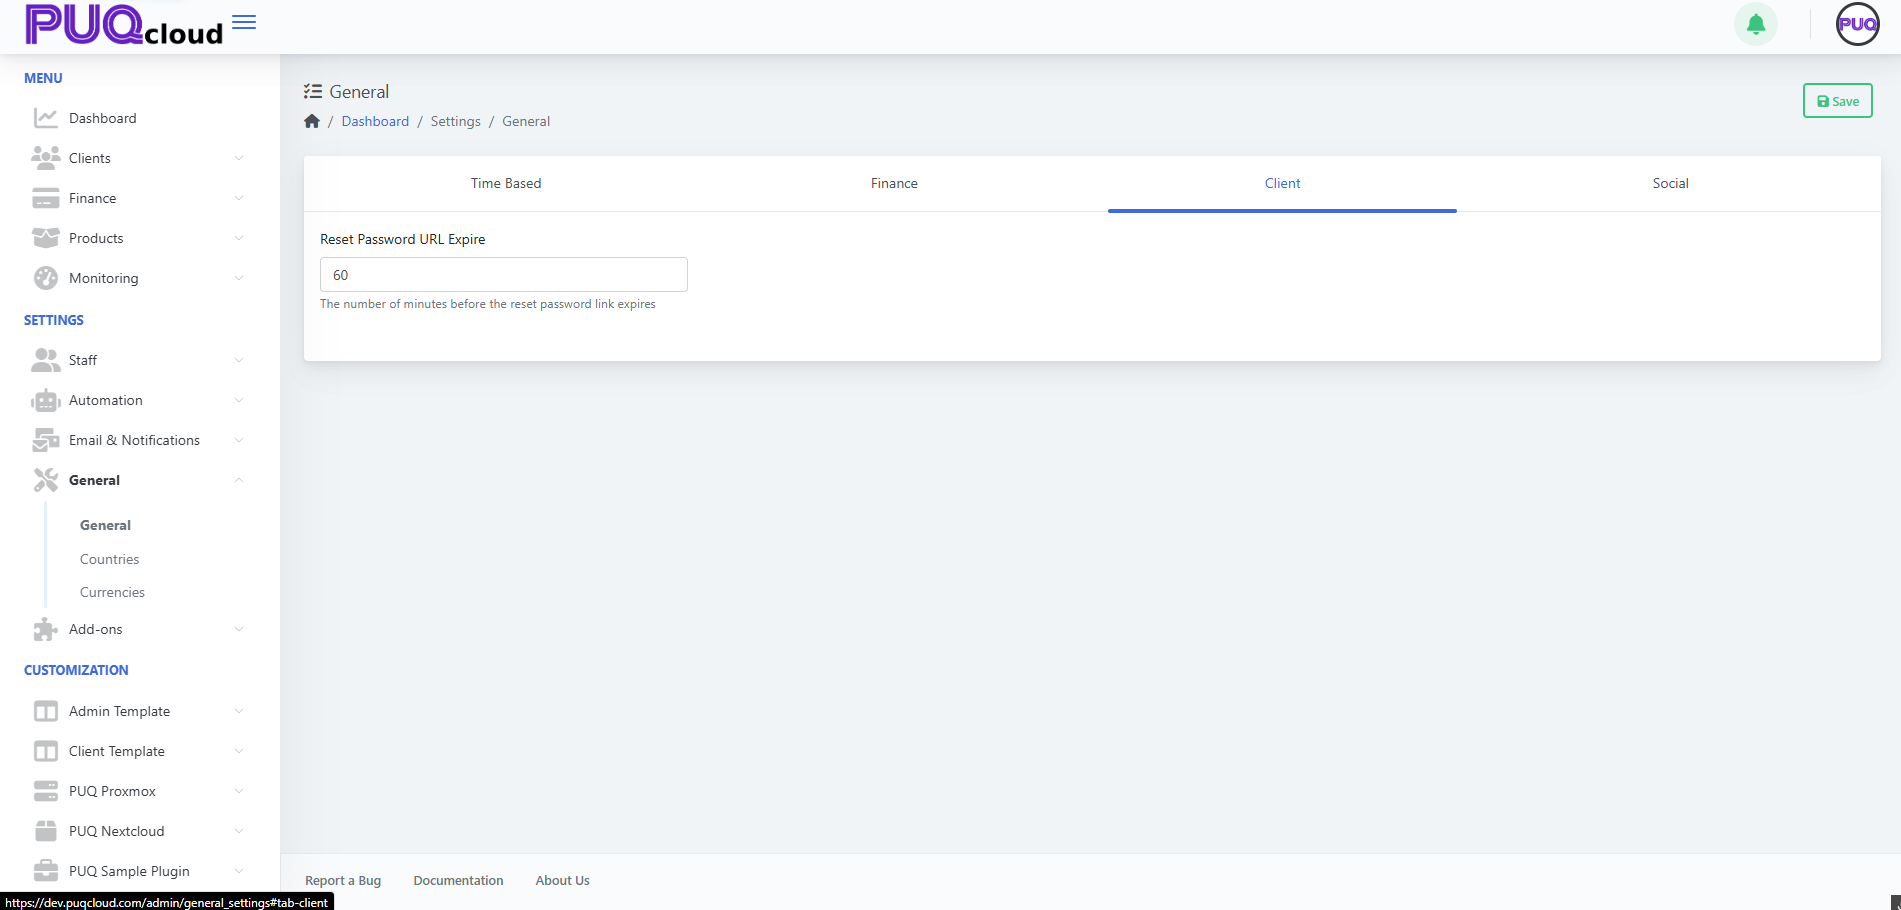
Social (brand & contact presence)
Store the official social/profile identifiers used across notifications and the client portal. Fields include:
-
Facebook, YouTube, LinkedIn, WhatsApp, Telegram, Twitter (X), Viber, Discord, Reddit, Vimeo, GitHub, Flickr, Skype, Bitbucket, Gitter, Slack.
Usage
-
Enter full URLs where applicable; for chat apps, follow the placeholder notes (e.g., WhatsApp in full international format, Discord invite URL path).
-
These can be pulled into notification templates or shown in the client area footer/headers, depending on your theme.
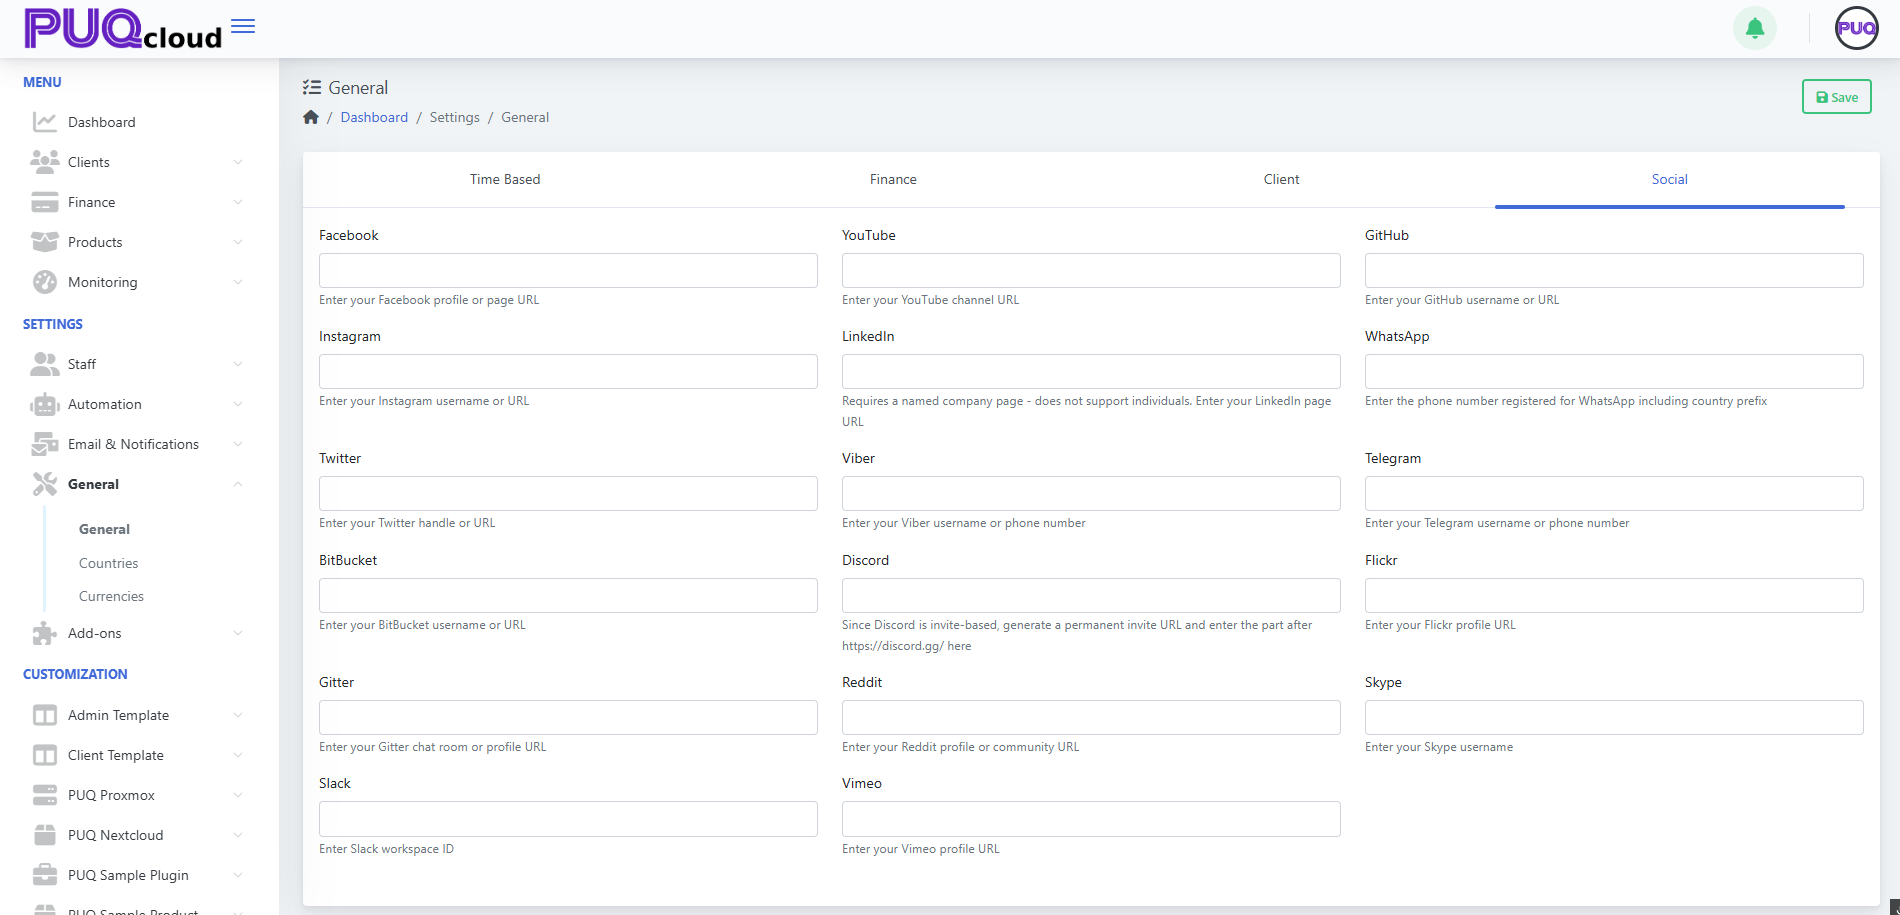
Workflow summary
-
Go to Dashboard → Settings → General.
-
Work through each tab (Time Based → Finance → Client → Social).
-
Click Save (top-right).
-
If you reduced retention periods, confirm your Scheduler/Cleanup tasks are enabled (so old data is actually purged).
-
Review notification templates/layouts if you plan to surface your social links there.
Quick defaults (safe starting points)
-
Admin/Activity/Module logs: 7–30 days
-
Client/Task queues: 7–14 days
-
Verification code lifetime: 10–30 minutes
-
Invoice due days: 7–14 days
-
Min/Max add funds: set to your business model (e.g., 10 / 10,000)
-
Max client balance: large enough for typical prepayments, but not unlimited
Сheck Countries in the Admin Area
PUQcloud Panel
Order Now | Download | FAQ
Follow these steps to review country records and their regions.
Go to Countries
Countries list with search, pagination, and “Regions (eye)” action.

View a country’s regions
-
In the Regions column, click the eye button for the country you want to inspect.
Regions modal listing Region Name, Native Name, and Code (with Close button).
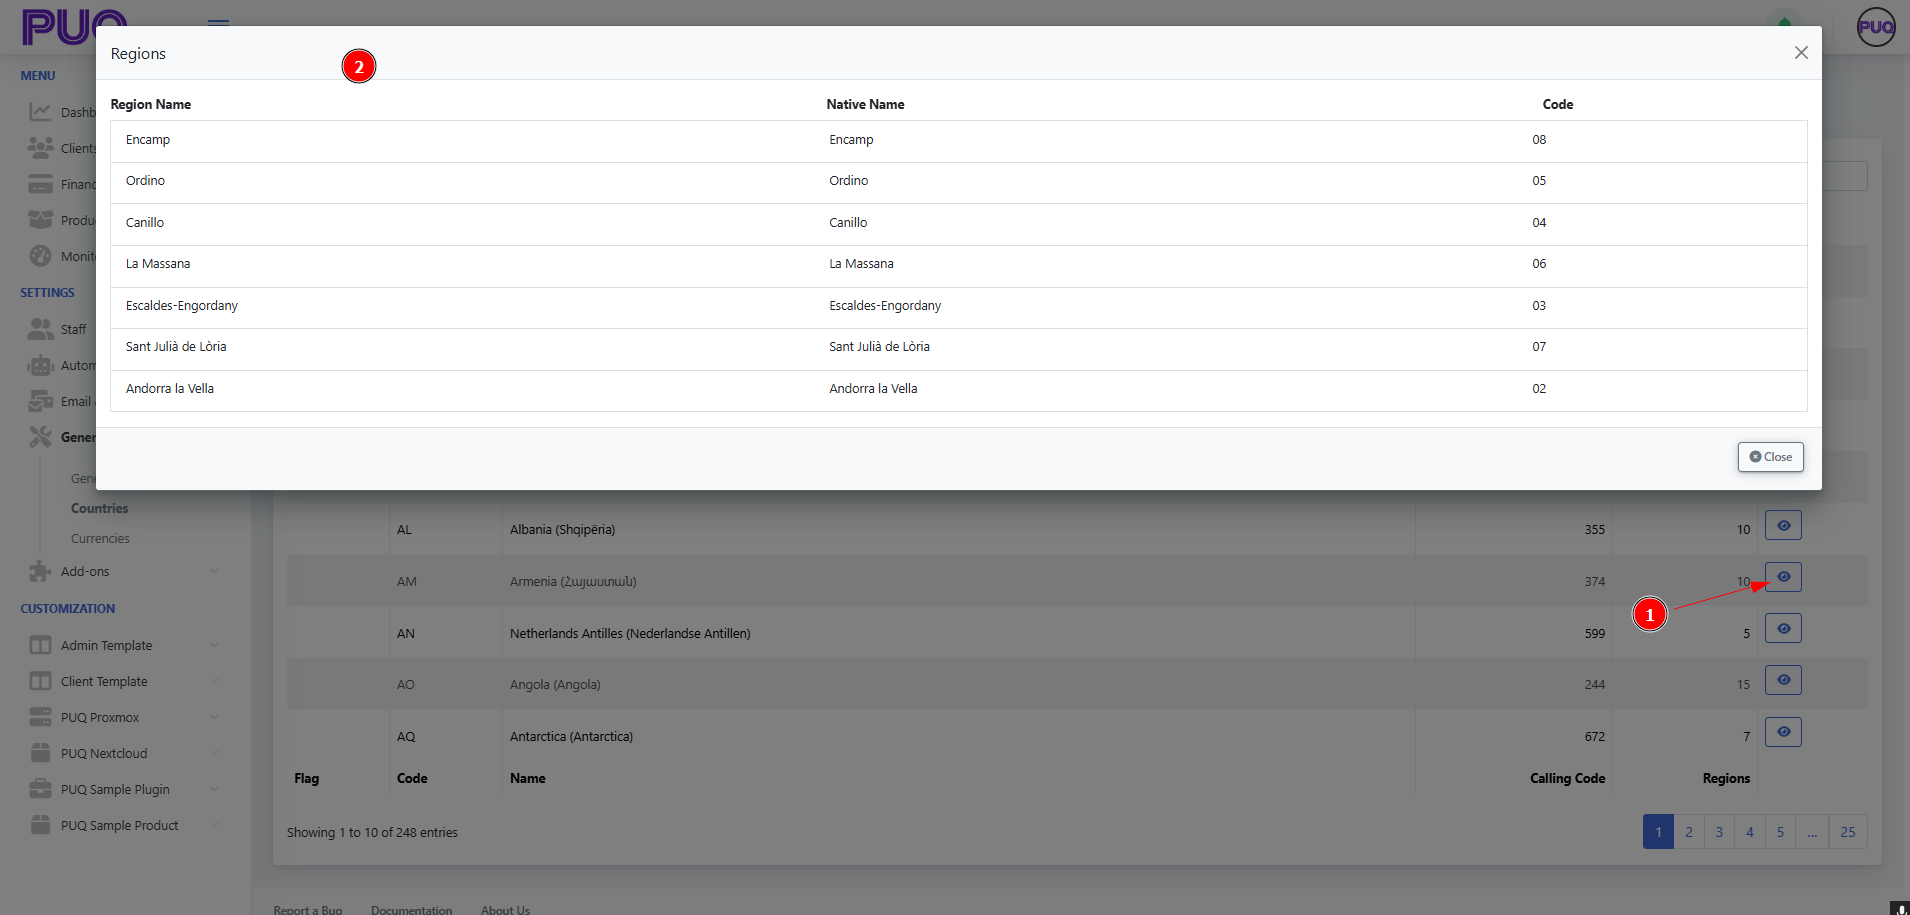
Tips
-
Click column headers to sort (e.g., by Code or Calling Code).
-
The Regions modal is read-only; use the Close button to return to the list.
Create and manage Currencies in the Admin Area
PUQcloud Panel
Order Now | Download | FAQ
Where to find it
-
In the left menu go to Settings → General → Currencies.
Currencies list with search, paging, and row actions (Edit/Delete).
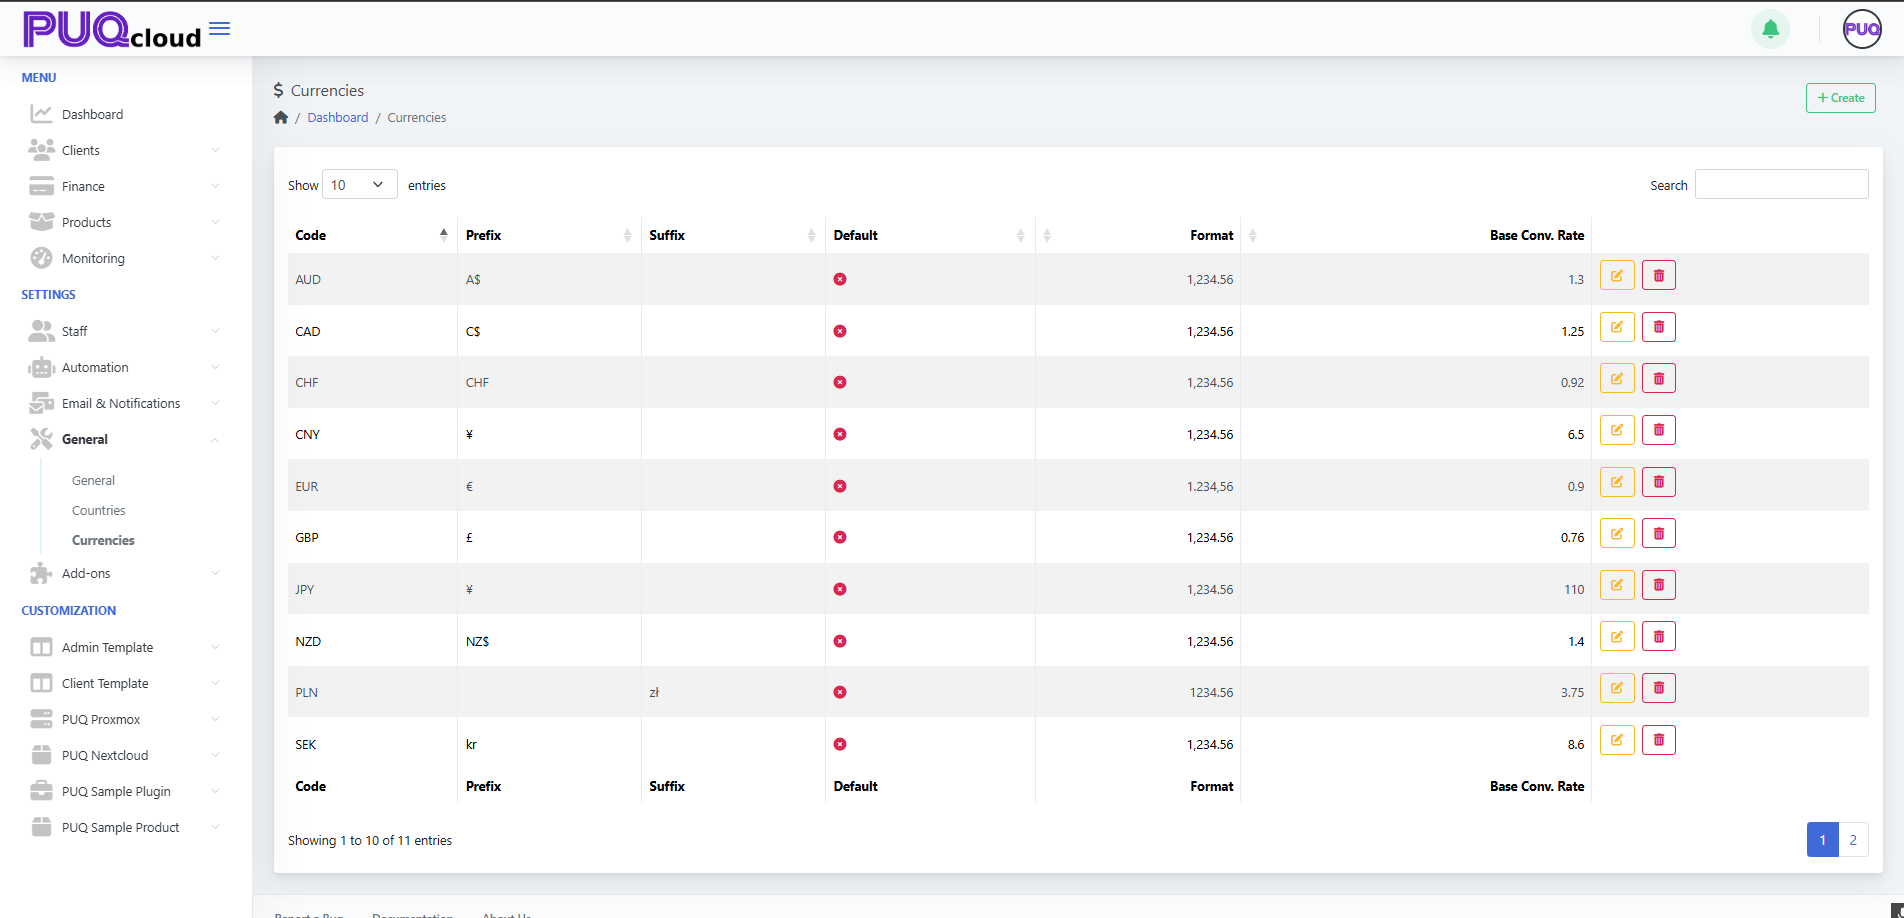
Create a new currency
-
Click + Create (top-right of the page).
-
In the Create modal, fill in:
-
Code – the ISO currency code (e.g.,
USD,EUR,JPY). -
Prefix – symbol shown before the amount (e.g.,
$,CHF). -
Suffix – symbol shown after the amount (e.g.,
złfor PLN). -
Exchange Rate – base conversion rate against your system’s base currency.
-
Format – choose the number formatting style (thousand/decimal separators).
-
Default – tick if this should become the system default currency.
-
-
Click Save.
Notes
-
You can use either a sign (e.g.,
€) or a short text (e.g.,NZ$) for prefix/suffix. -
The Exchange Rate is relative to your base currency (the one you treat as “1.00”).
“Create Currency” modal with all fields (Code, Prefix, Suffix, Exchange Rate, Format, Default).
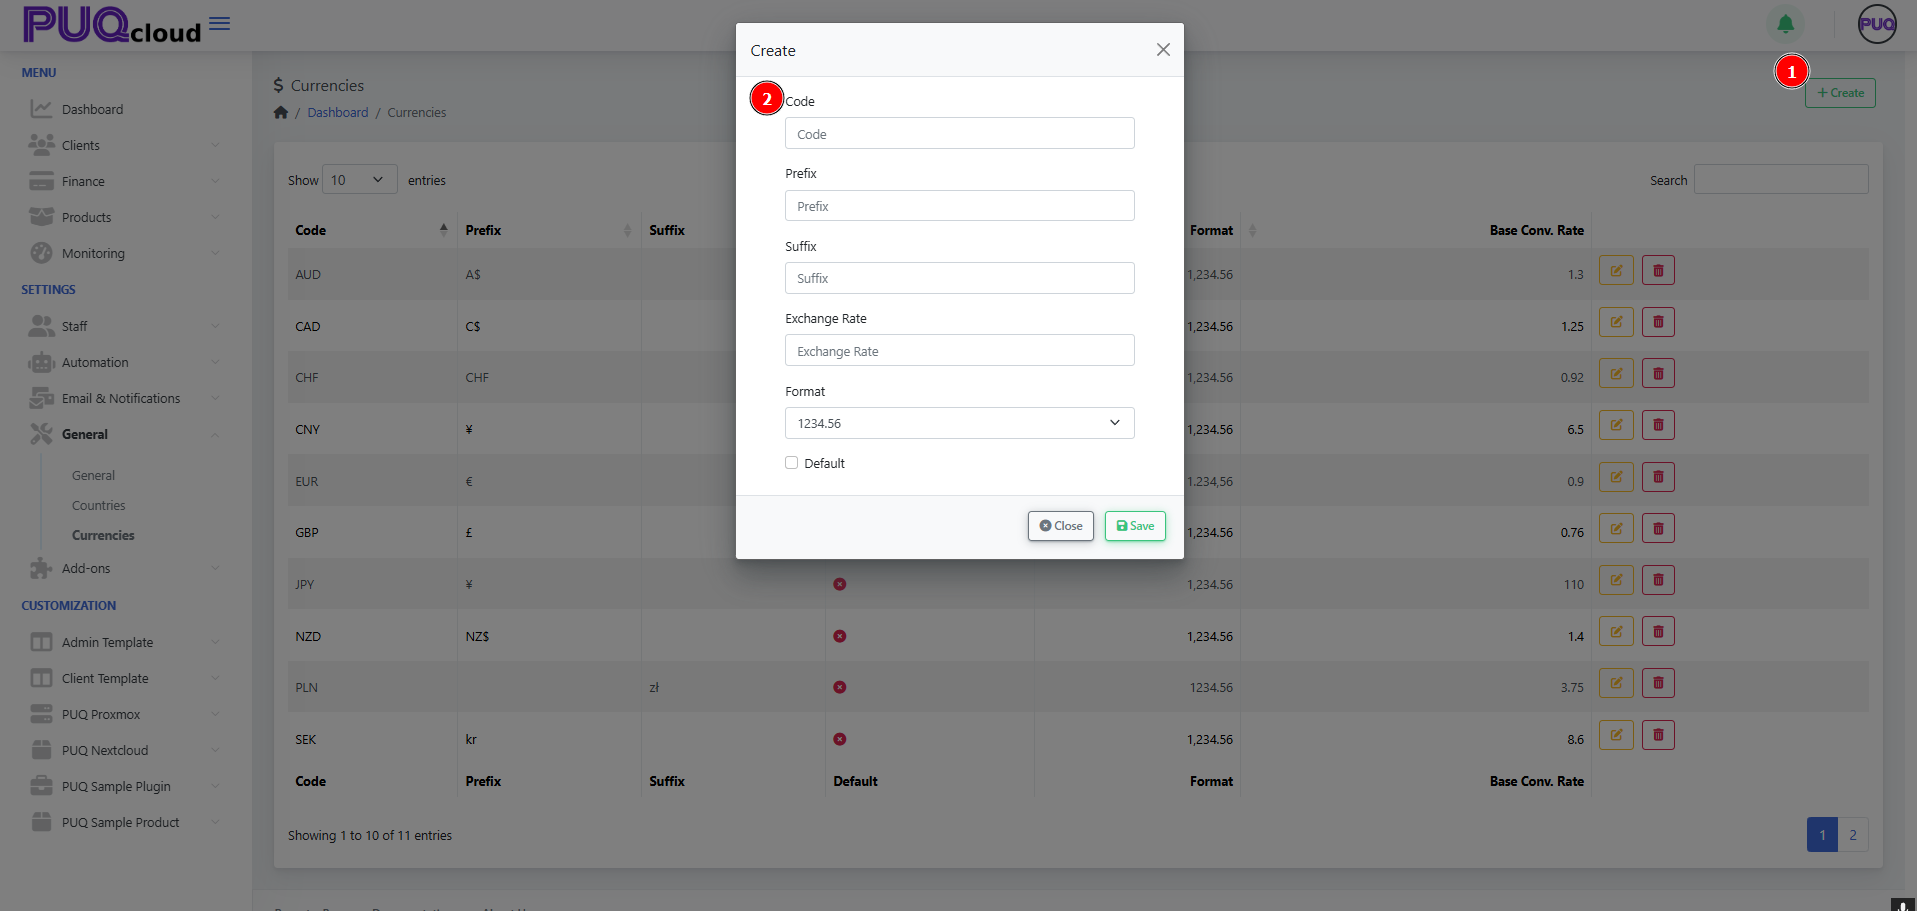
Edit an existing currency
-
In the list, click the pencil icon for the currency you want to change.
-
Update Code, Prefix, Suffix, Exchange Rate, Format, or toggle Default.
-
Click Save to apply changes.
Tips
-
Use Format to enforce consistent display (e.g.,
1,234.56vs1.234,56). -
When you change Exchange Rate, all derived conversions will use the new rate going forward.
“Edit Currency” modal opened from the row (rate/format/default shown).
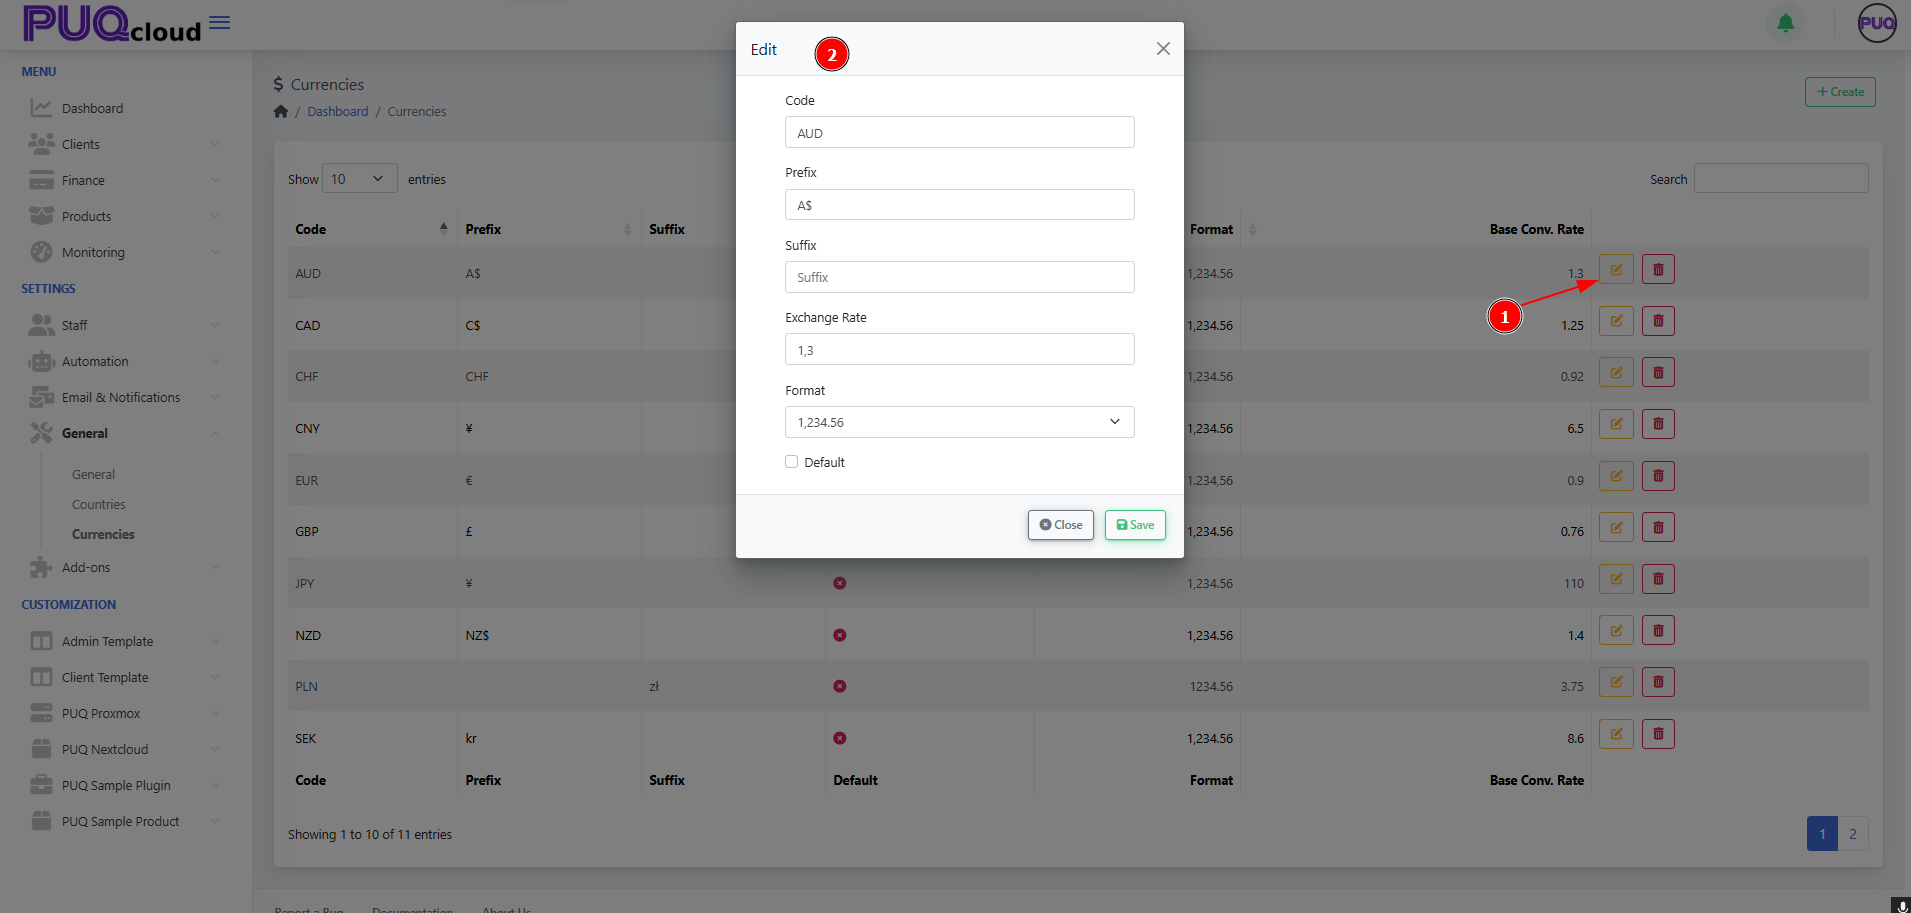
Delete a currency
-
Click the trash icon on the currency row you wish to remove, then confirm.
(You cannot delete a currency that is currently set as Default; switch default first.)
Search, sort, and paginate
-
Search (top-right) filters by code or symbols.
-
Click column headers to sort (e.g., by Code).
-
Use page controls at the bottom to navigate through the list.
Best practices
-
Keep one clear Default currency at all times.
-
Review Exchange Rates regularly or automate updates if available elsewhere.
-
Prefer ISO codes for clarity (
USD,EUR,GBP, etc.). -
Use Prefix/Suffix consistently across your currencies (e.g.,
$as prefix,złas suffix).
That’s it—you can now add, edit, remove, and format currencies in the Admin Area with confidence.
How to use Client Area in PUQcloud Panel
Manage the Client Area Dashboard
PUQcloud Panel
Order Now | Download | FAQ
Overview
Your Client-Area Dashboard is the command centre for balances, services, and quick actions (funds, invoices, security). This guide shows what each block means and how to use it daily — with exact spots to drop your screenshots.
Get Oriented
Open the client area. You’ll see:
-
Balance strip (top): current Balance, Credit, and a Add Funds button.
-
Left menu: service families (Storage, LXC, Hosting, VPN, etc.) with counters.
-
Main canvas: cards for Services + Recurring Cost Breakdown.
Full Dashboard overview.
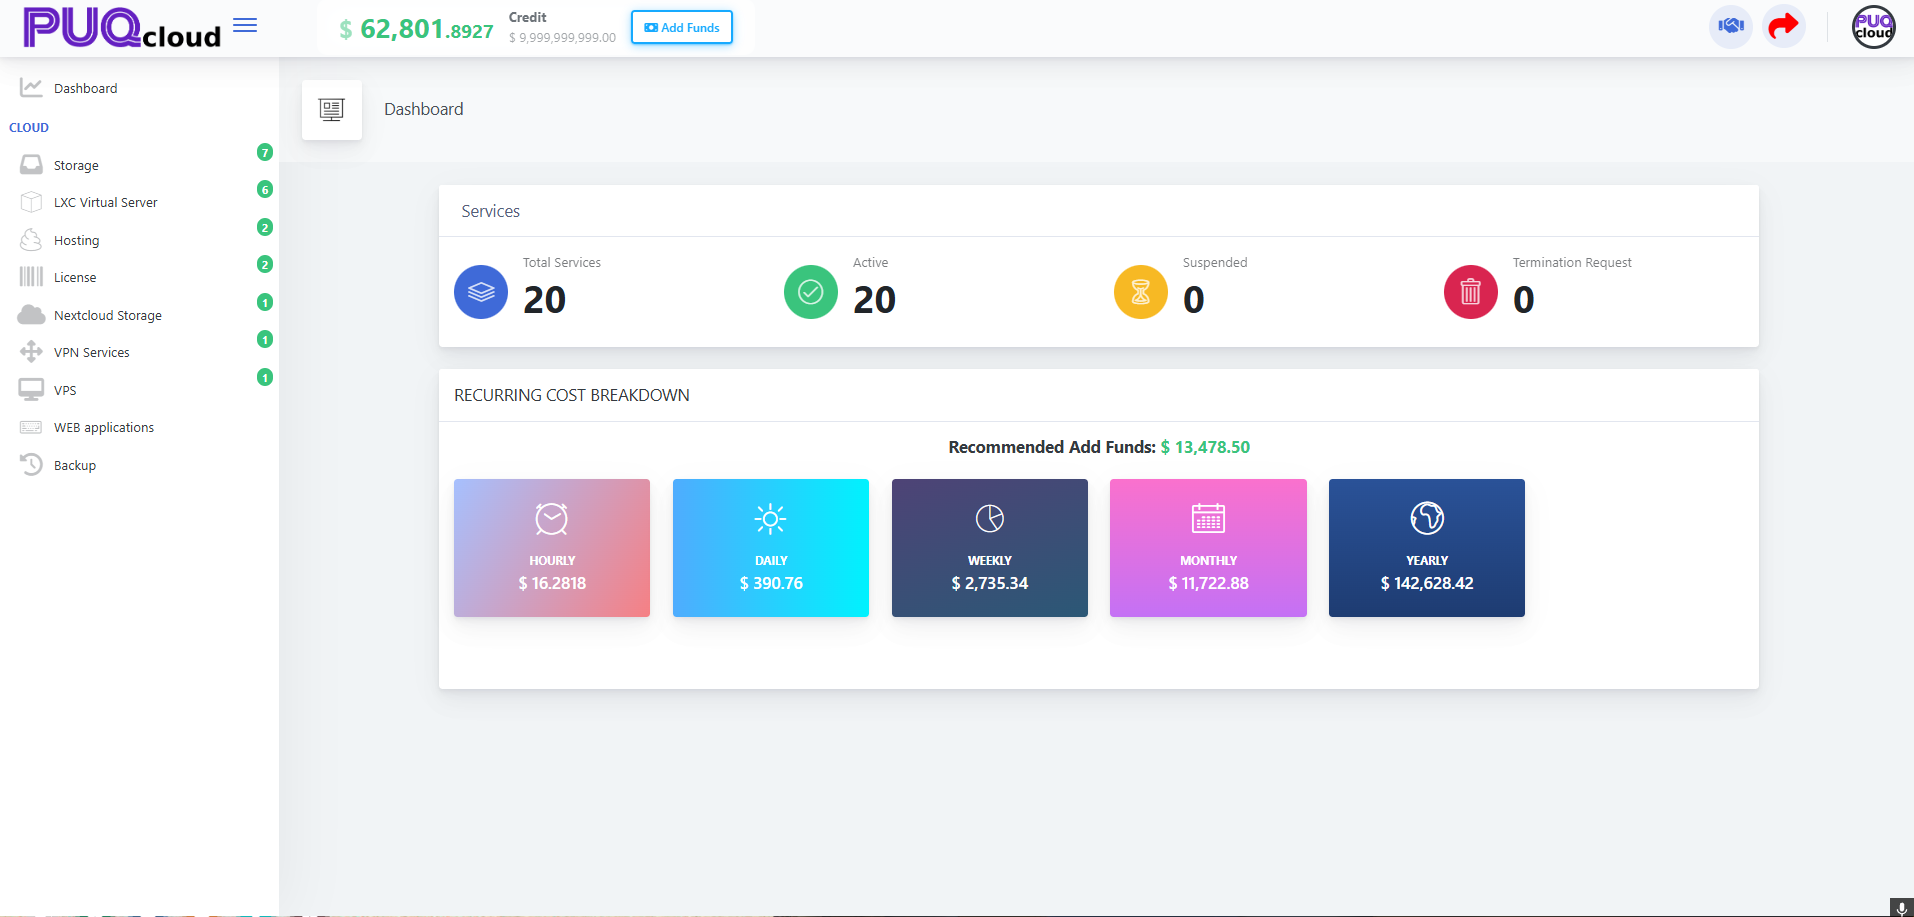
Services Summary
At the top of the canvas you’ll find four counters:
-
Total Services — everything you own
-
Active — running and billable
-
Suspended — paused due to payment or policy
-
Termination Request — pending cancellations
Click any card to jump to the filtered services list (where applicable).
Recurring Cost Breakdown
Below the counters are your Hourly / Daily / Weekly / Monthly / Yearly spend estimates and the Recommended Add Funds amount.
Use it to:
-
Forecast top-ups before renewals
-
Spot anomalies (e.g., a spike in Hourly vs. Monthly)
Account & Security Menu
Top-right avatar opens quick actions:
-
My Account (profile & company details)
-
Change Password
-
Verification Center
-
Two-Factor Authentication (enable 2FA)
-
Logout
Account dropdown.
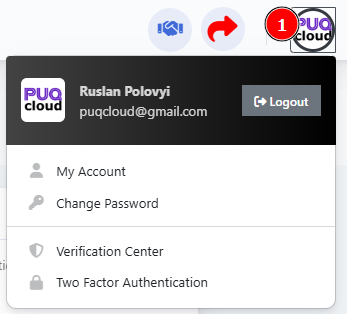
Best practice: enable 2FA immediately and complete Verification Center to lift payment/security limits.
Company Hub (Profile • Invoices • Transactions)
From My Account, open your company tile to reach:
-
Profile — legal details, addresses, tax IDs
-
Invoices — download/print invoices & credit notes
-
Transactions — all top-ups, payments, refunds
Company tile with Profile / Invoices / Transactions.
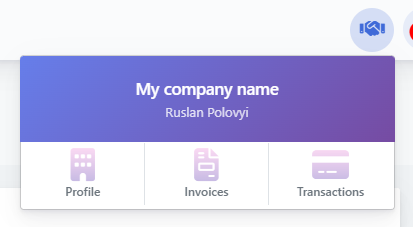
Add Funds (Top-Up)
From the top strip click Add Funds to open the payment screen.
Steps:
-
Review the Recommended amount banner.
-
Enter net amount and currency.
-
Check Taxes breakdown (VAT, etc.).
-
Confirm Balance after top-up.
-
Click Top Up Now.
Add Funds page.
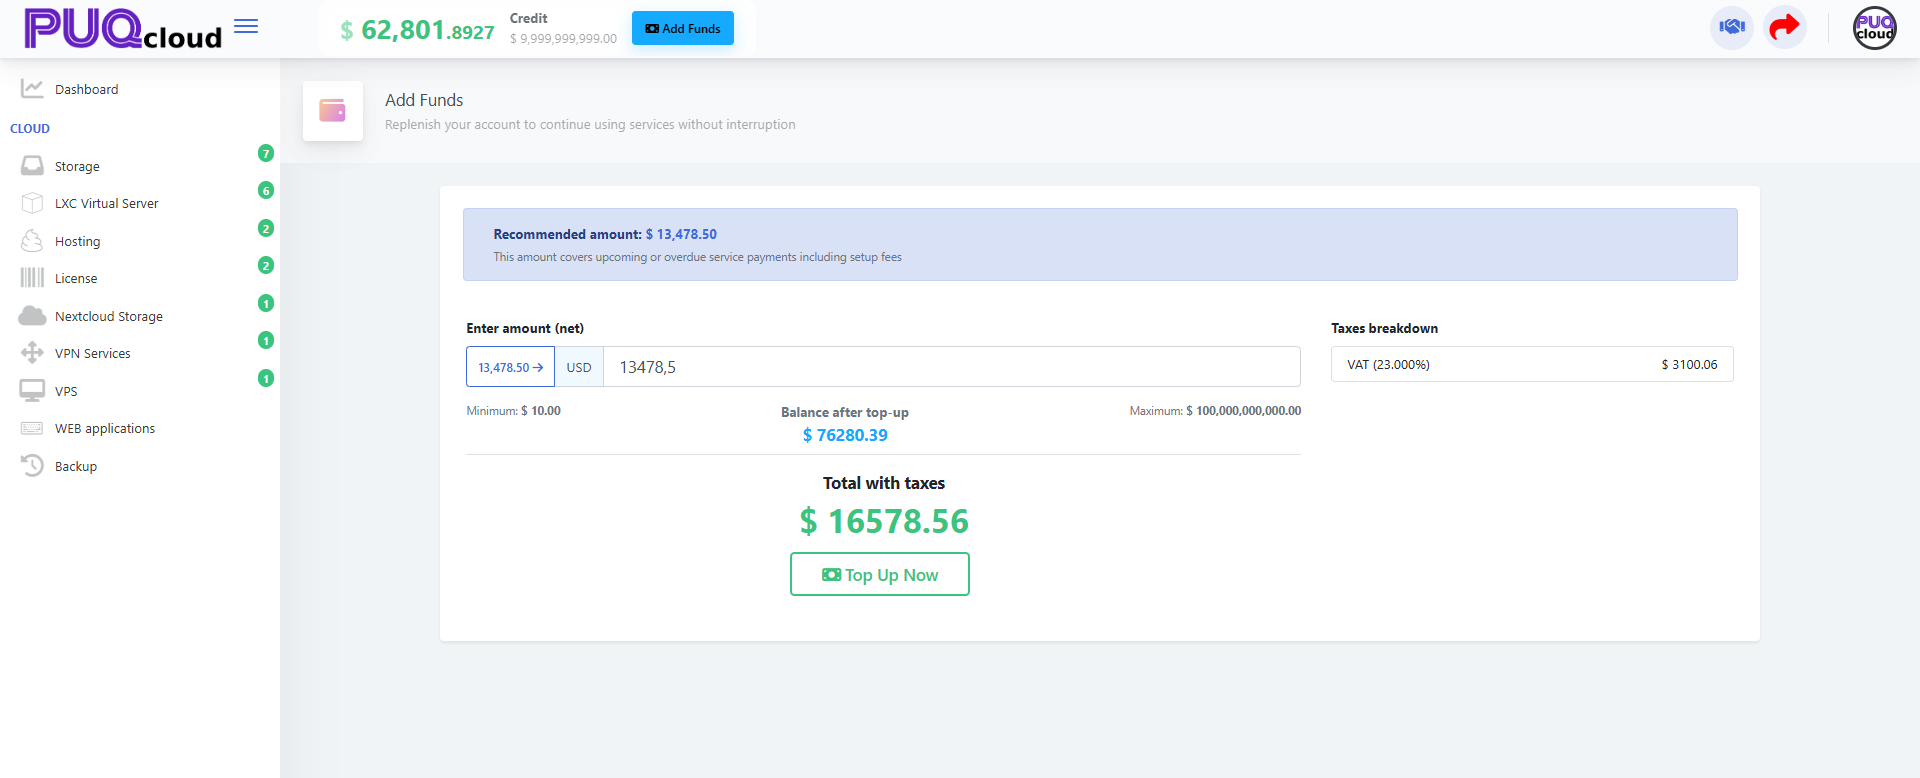
Tip: If you sell in multiple currencies, keep one primary currency for predictability; taxes depend on your profile’s country/region.
Daily Workflow (5 minutes)
-
Open dashboard → check Active vs Suspended.
-
Scan Recurring Cost Breakdown → compare to yesterday.
-
If Recommended Add Funds > your comfort buffer, Top Up.
-
Open Invoices if any new charges posted.
-
Review Transactions for failed/duplicate payments.
-
Security sweep: confirm 2FA is still active for all users.
Troubleshooting
-
Costs look too high → open services list and verify no unintended upgrades.
-
Top-up rejected → finish Verification Center and confirm billing info.
-
Taxes seem wrong → check company Tax ID and country in Profile.
-
See “Suspended” → settle outstanding invoices or contact support.
Manage Your Profile in the Client Area
PUQcloud Panel
Order Now | Download | FAQ
Overview
Keep your Profile correct to ensure proper taxes, legal invoice details, and contact emails. This guide shows how to open the Profile screen, what every field means, and the safest way to update it — with exact places to insert your screenshots.
Open the Profile screen
-
On the Dashboard, click your Company widget in the top-right.
-
Choose Profile.
Company dropdown (marker 1 → open menu, marker 2 → Profile).
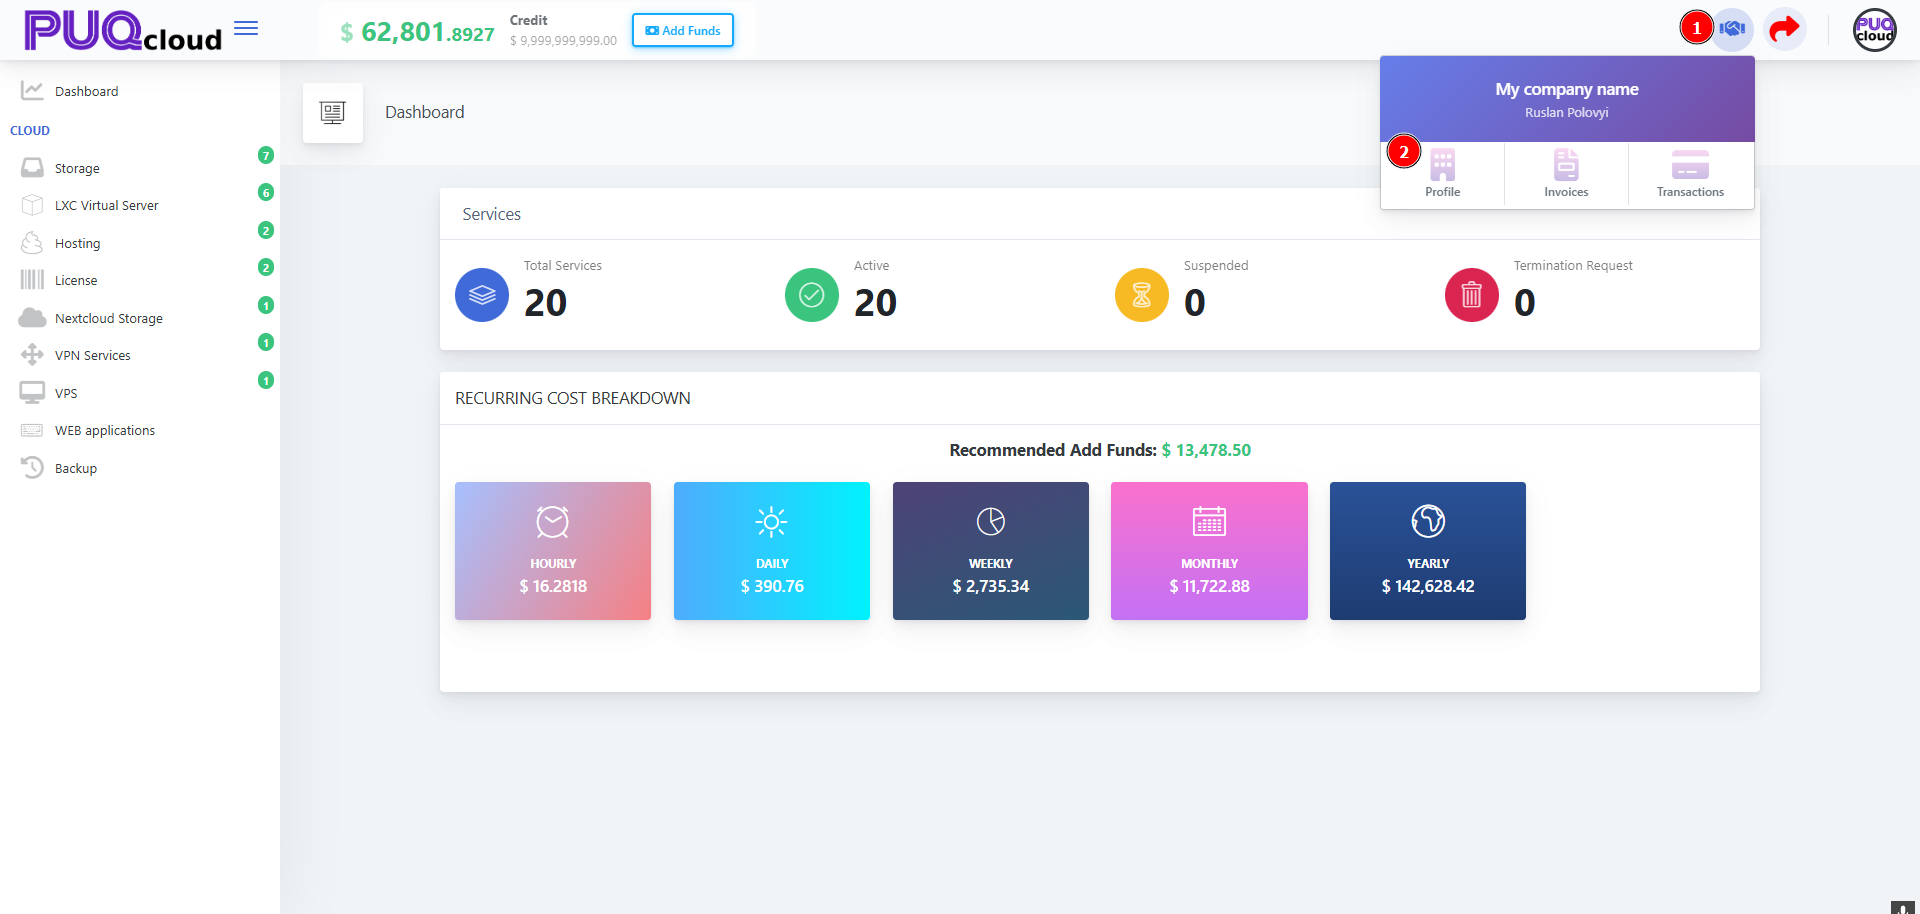
Edit your details
You’ll land on Client Profile. Update the fields below and press Save (top-right).
Client Profile form (full page).
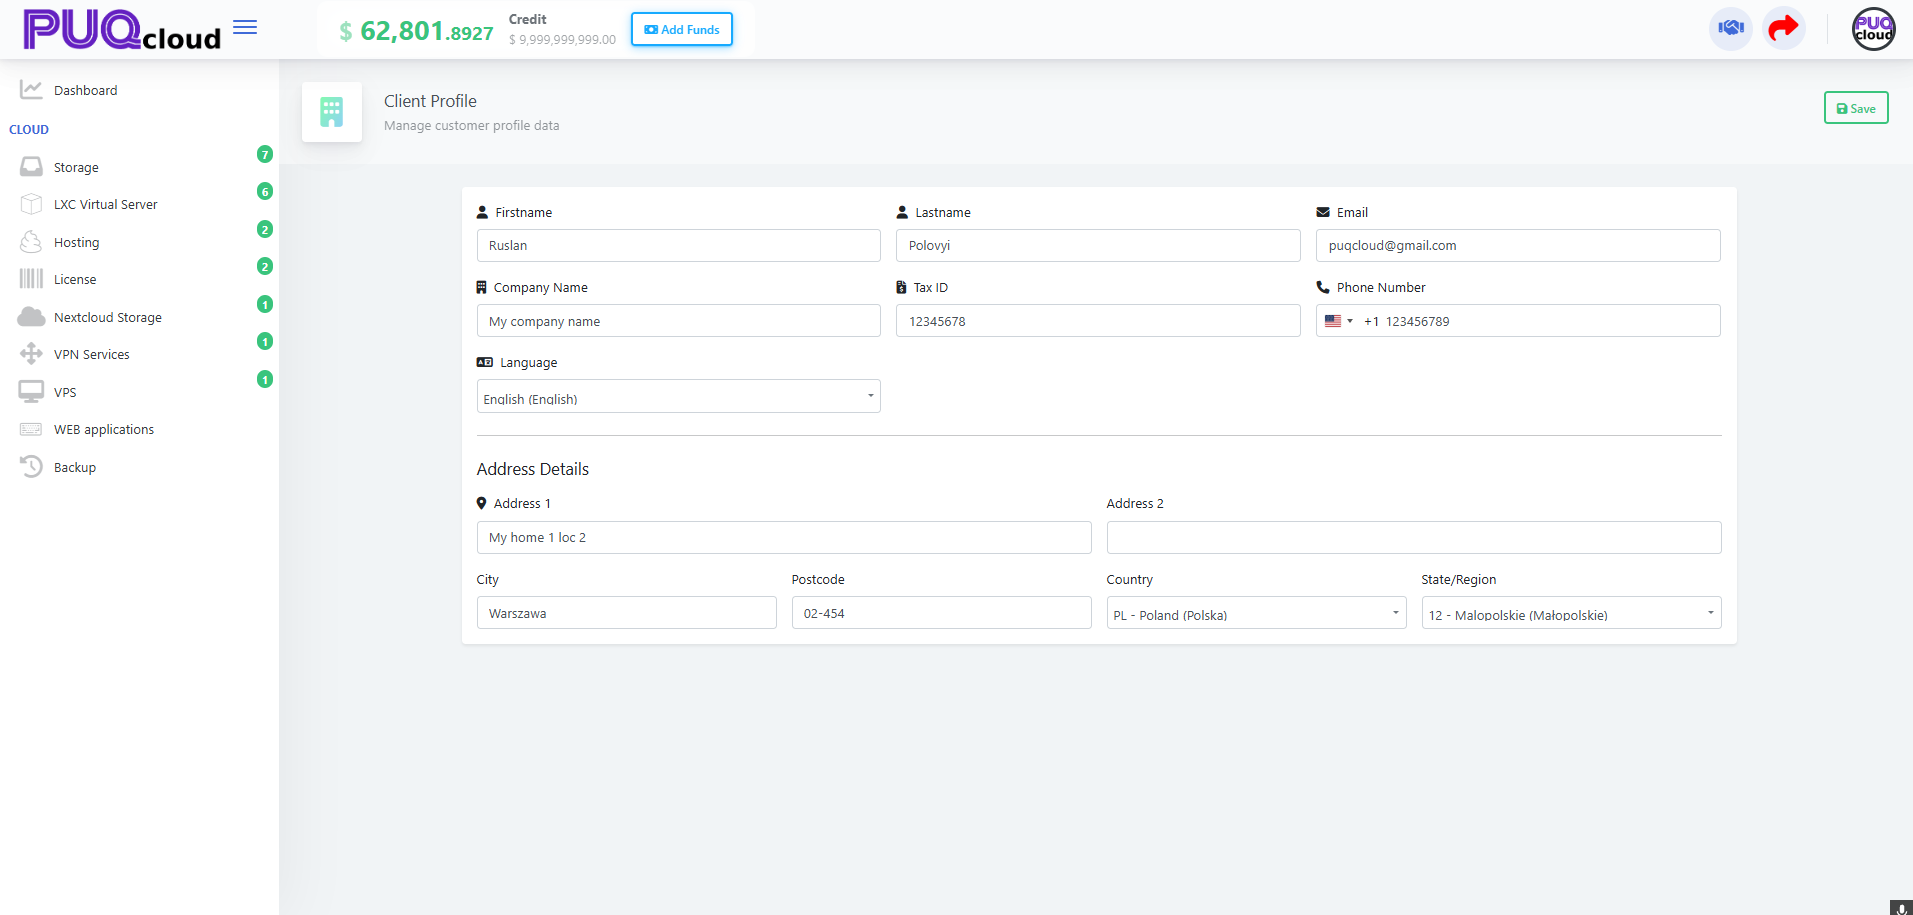
What each field is for
-
Firstname / Lastname — Account owner name shown on invoices/receipts.
-
Email — Where invoices, payment receipts and alerts are sent.
-
Company Name — Legal entity name printed on invoices.
-
Tax ID — VAT/GST/Tax number. Required for correct tax calculation.
-
Phone Number — Include country code (e.g., +1, +48).
-
Language — UI language and (if enabled) document language.
-
Address 1/2, City, Postcode, Country, State/Region — Legal billing address used for taxes.
Tip: If you’re not a company, leave Company Name empty and Tax ID blank — you’ll be treated as a private individual where applicable.
Best practices (1-minute checklist)
-
Company vs Individual: Fill Company Name and Tax ID only if you’re a business.
-
Tax ID format: Use your country’s official format (e.g., PL VAT:
PL1234567890). -
Country & State: Must match your real billing address — taxes depend on it.
-
Phone: Add the country code; avoid spaces/symbols if validation fails.
-
Save: Click Save before leaving, then reload the Invoices page to confirm the header shows your new details.
When to update your profile
-
You see wrong VAT/GST on an invoice
-
Your company renamed, moved address, or changed tax number
-
You want the portal in another Language
-
Your Email for billing changed
Troubleshooting
-
“My invoice has the wrong tax.” → Recheck Country/State and Tax ID in Profile, then regenerate or request a corrected document.
-
Phone won’t save. → Include international format
+<country code><number>. -
Language saved but UI didn’t change. → Refresh the page or log out/in; some sections cache language.
-
Tax ID rejected. → Remove extra spaces, add country prefix if required (e.g.,
PL,DE,CAnumbers vary).
Manage Invoices in the Client Area
PUQcloud Panel
Order Now | Download | FAQ
Overview
This guide shows how to find, read, pay, and download your invoices (including proforma, invoice, and credit note) in the Client Area. Each step tells you exactly where to place your screenshots.
Open Invoices
-
From the top-right Company widget, open the dropdown.
-
Click Invoices.
Company dropdown (1 → open menu, 2 → Invoices).

Understand the Invoices List
On the Invoices page you’ll see a table with:
-
Type/Status: PROFORMA / INVOICE / CREDIT NOTE and UNPAID / PAID / REFUNDED
-
Number, Issue Date, Due Date, Total
-
Actions: Pay Now, PDF, Details
Invoices list (full table).

Quick actions
-
Pay Now: pay any UNPAID proforma/invoice.
-
PDF: download the official document.
-
Details: open the invoice view.
Invoices list with “Details” highlighted (marker 1).

View & Pay an Invoice (Proforma / Unpaid)
Opening Details shows the invoice summary:
-
Tax, Net, Gross, Due
-
Issue/Due/Paid/Refunded dates
-
Description and line totals
-
Top-right actions: Back to Invoices, Pay Now, PDF
To pay an UNPAID invoice, click Pay Now and complete the payment.
Unpaid PROFORMA invoice view (shows Pay Now and amounts).
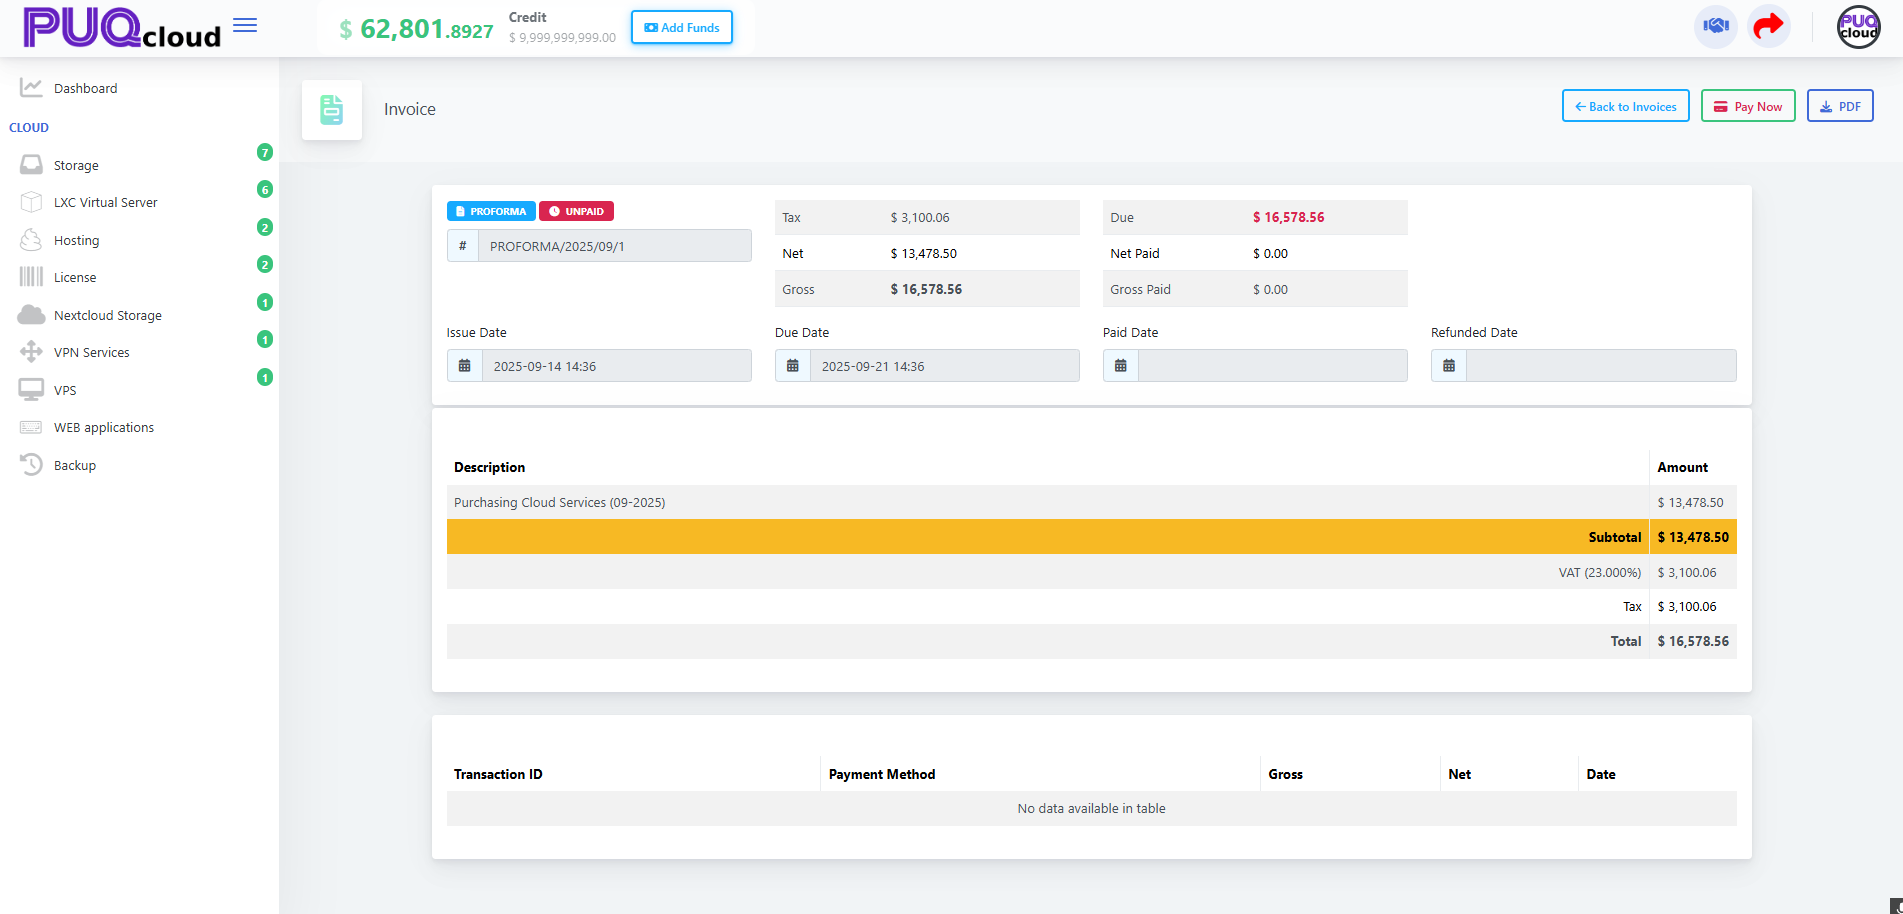
Confirm a Paid Invoice & Payment Record
For PAID invoices you’ll see:
-
Due = $0.00
-
Paid Date filled
-
A Transactions section with the Payment Method, Gross/Net/Tax, and Transaction ID (useful for reconciliation).
Paid INVOICE view with transaction table (Stripe example).
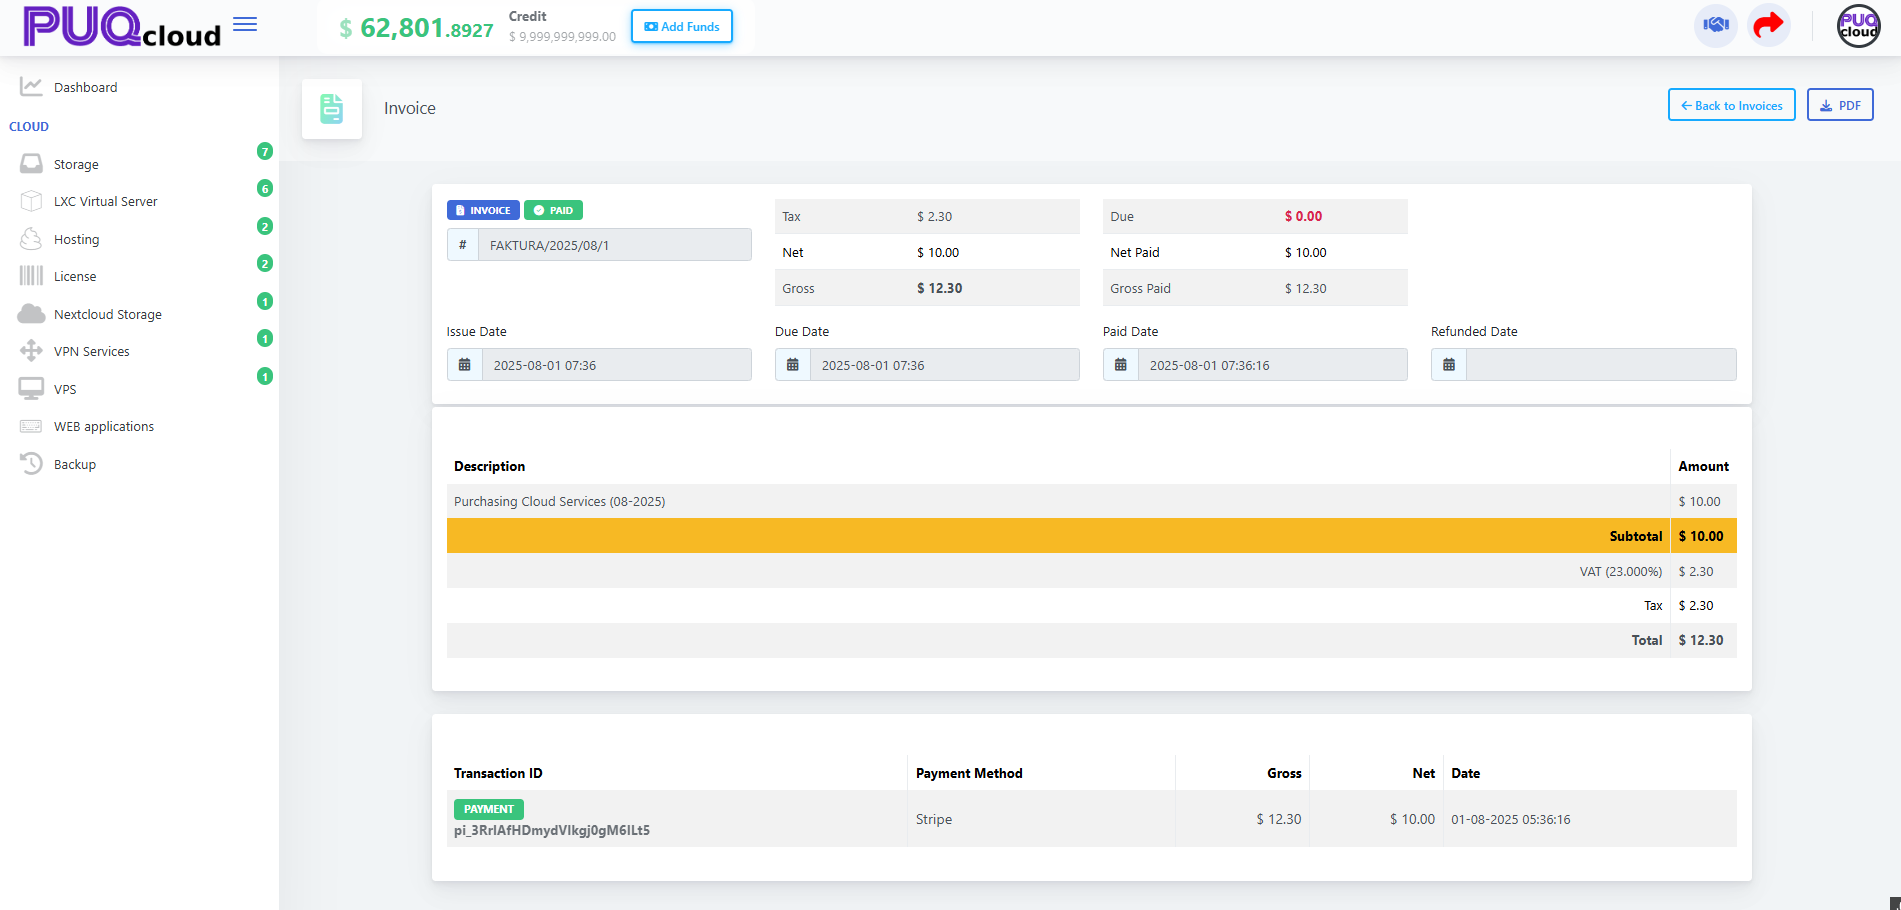
Exporting PDFs (for accounting)
From either the list or the invoice view, click PDF to download/print the document for your books.
Tip: Keep Profile (company name, Tax ID, address) up to date so the invoice PDF has correct legal details.
Searching & Sorting
-
Use the Search box to filter by number or text.
-
Click table headers (e.g., Issue Date, Due Date) to sort.
-
Use the Show 10 dropdown to change page size.
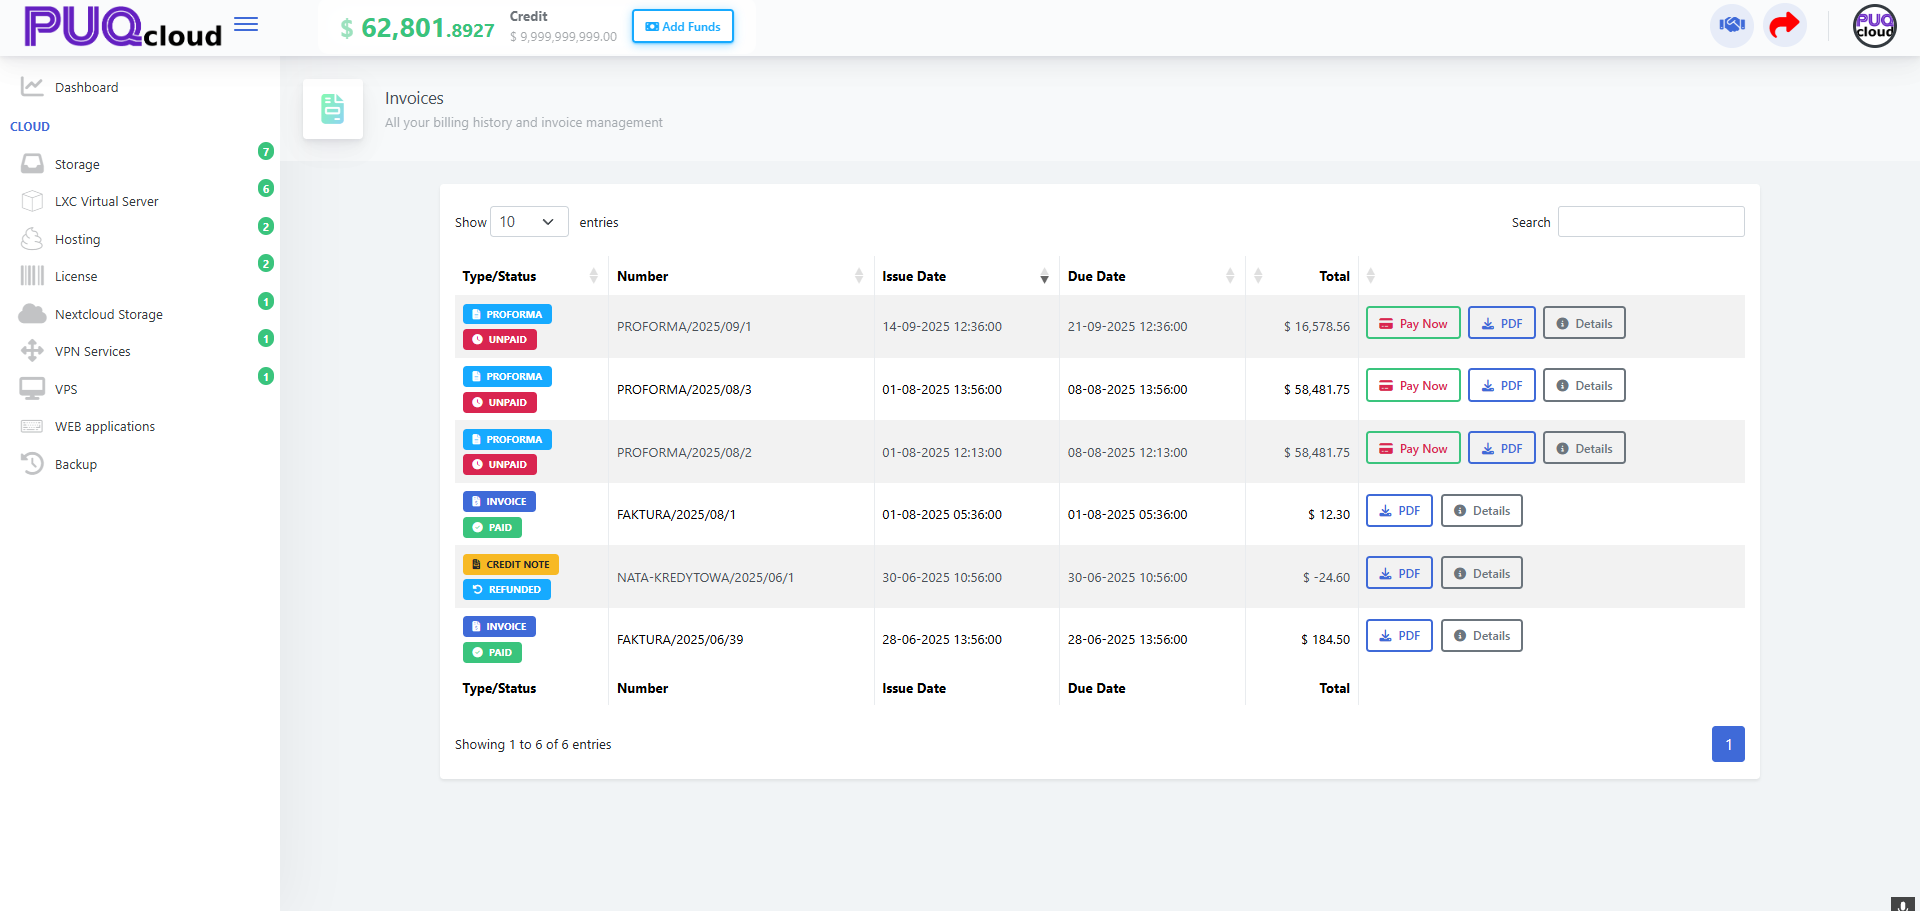
Credit Notes & Refunds
-
CREDIT NOTE entries show refunds/adjustments.
-
Open Details to see amounts and download the PDF for your records.
Troubleshooting
-
Wrong tax/country on invoice? Update Company → Profile (Tax ID, country, address).
-
Payment failed? Try another method or check the Verification Center in your account menu.
-
Need an invoice reissued? Contact support with the Invoice Number.
Check Transactions in the Client Area
PUQcloud Panel
Order Now | Download | FAQ
Overview
The Transactions page shows every balance movement on your account: top-ups, service charges, refunds, adjustments. Here’s how to open it, read it, and quickly find what you need — with exact spots to place your screenshots.
Open the Transactions page
-
On the Dashboard, click the company widget at the top-right.
-
Choose Transactions.
Company dropdown (1 open menu → 2 Transactions).

Read the Transactions table
On the Transactions page you’ll see a ledger-style list with these columns:
-
Transaction ID — a payment identifier (for card/Stripe/etc.). If it shows No Transaction ID, it’s usually a system CHARGE (usage/recurring fee).
-
Gross / Net — amount including/excluding tax (negative numbers = charge; positive = credit/refund).
-
Balance — your account balance after this entry posted.
-
Description — what the entry is for (service key, action, notes).
-
Period — the time window the charge covers (e.g., the specific hour for hourly billing).
-
Date — when the entry was recorded.
Transactions list (full table with CHARGE rows).
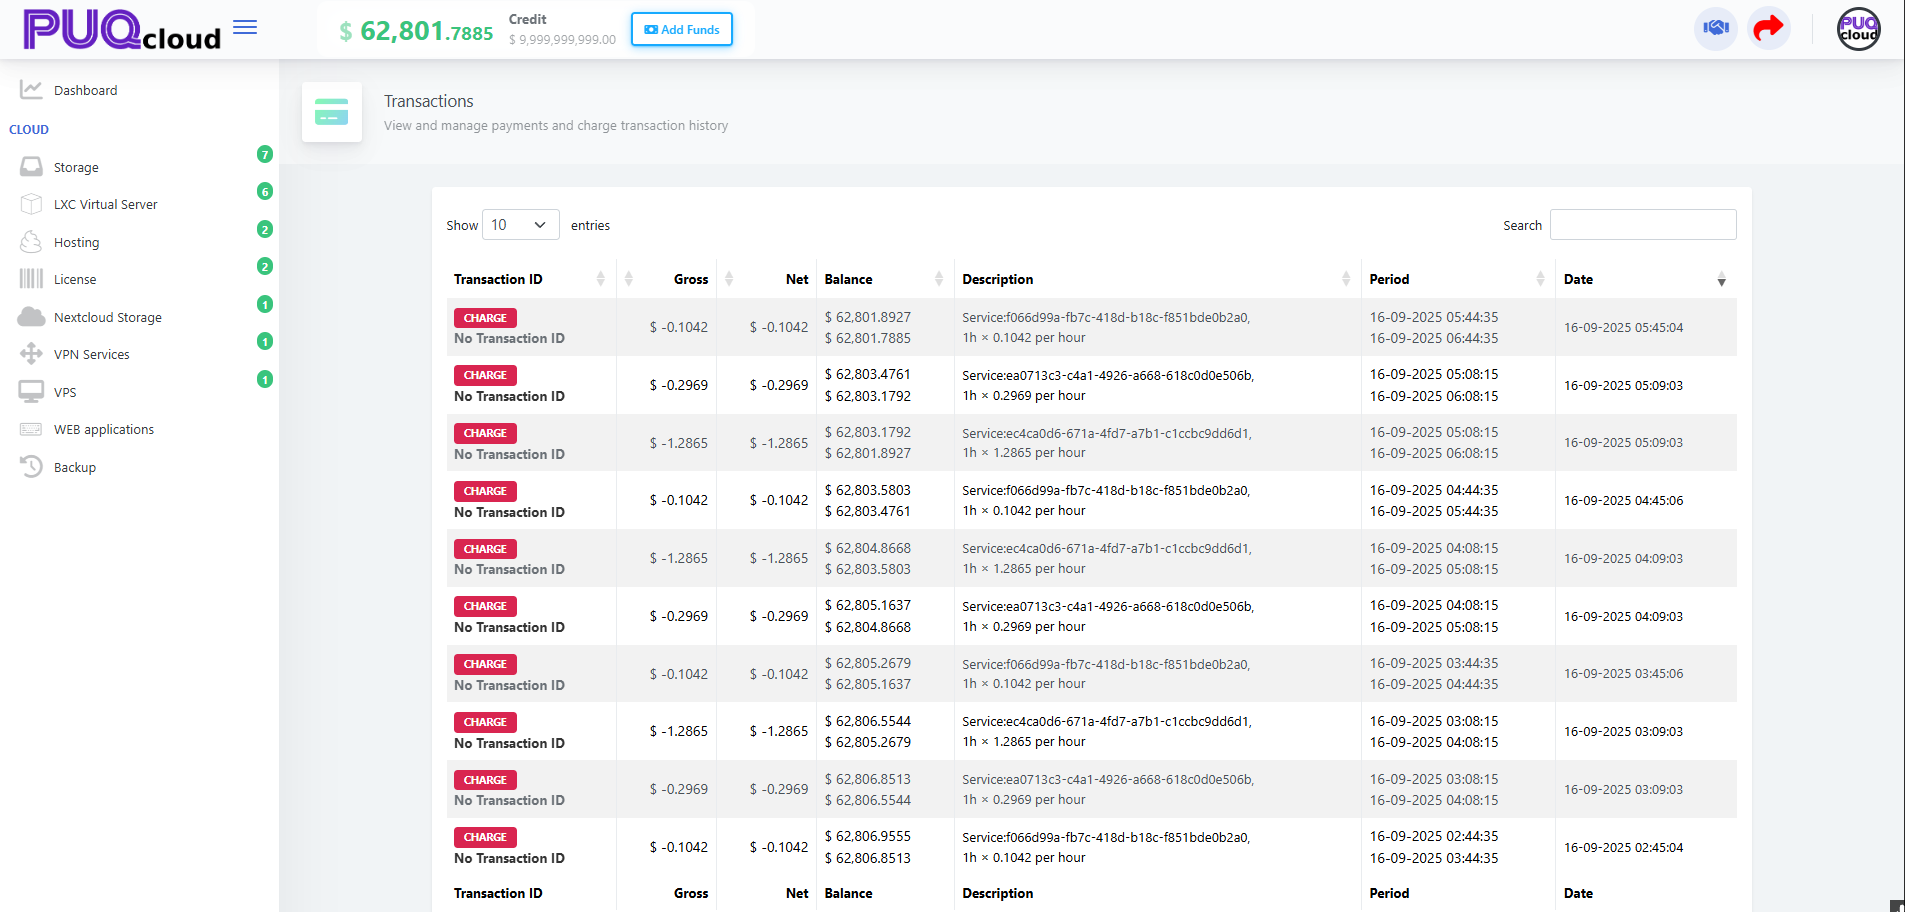
Tip: To verify a top-up, look for a Transaction ID and a positive amount; the Balance column will jump up on that row.
Find a specific entry fast
-
Use the Search box (top-right) to filter by Transaction ID, amount, or service key from the Description.
-
Change Show 10 to see more rows on one page.
-
Use the table headers to sort (e.g., by Date) if enabled in your setup.
Reconcile with invoices
-
A service CHARGE here should correspond to items that later appear on your Proforma/Invoice totals.
-
To review the document: open Company → Invoices, then match by date/amount.
-
If a payment was made, the Transactions entry will show a Transaction ID and the invoice should show Paid.
Common checks & quick fixes
-
“My top-up isn’t visible.” Filter by today’s Date; confirm payment success in your bank/processor.
-
“Numbers look off.” Compare Gross vs Net and check your Profile tax settings (country/Tax ID).
-
“What was this charge?” Read the Description + Period to see which service and which window were billed.
-
Still unclear? Copy the Transaction ID (if present) and share it with support.
Account & Security: manage profile, password, verification, and 2FA
PUQcloud Panel
Order Now | Download | FAQ
Open the account menu
-
On the dashboard, click your company/avatar in the top-right.
-
You’ll see: My Account, Change Password, Verification Center, Two Factor Authentication.
Account dropdown (markers 1 & 2).
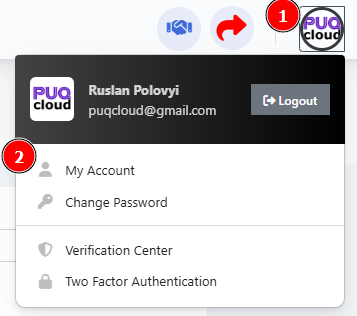
My Account — contact details
On My Account, update:
-
Email, First name / Last name
-
Language (UI language)
-
Phone Number (with country code, e.g., +48 …)
-
Confirm changes with Existing Password → Save
My Account page (form).
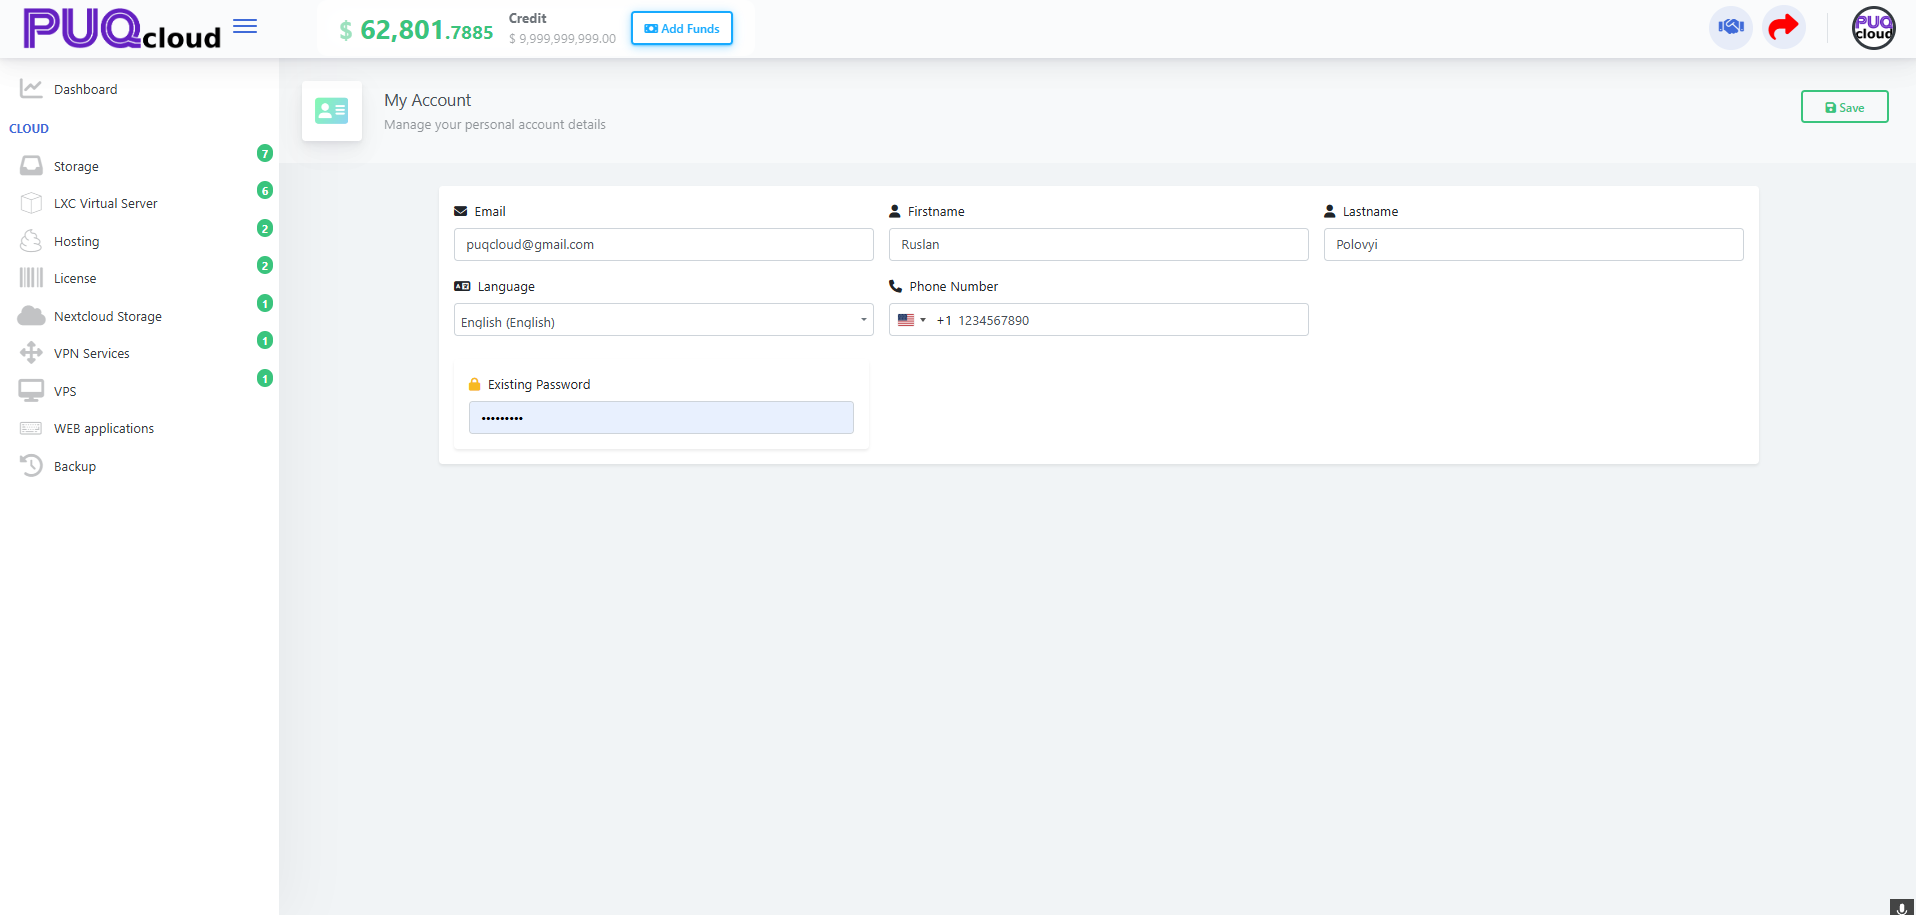
Tip: After changing email, check your inbox for service confirmations.
Change Password
“Change Password” menu item.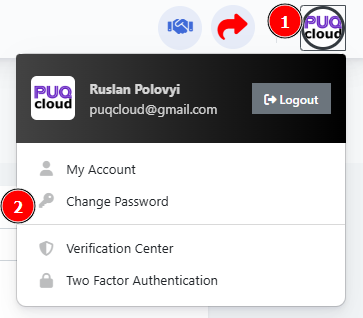
Change Password form (errors/strength bar example).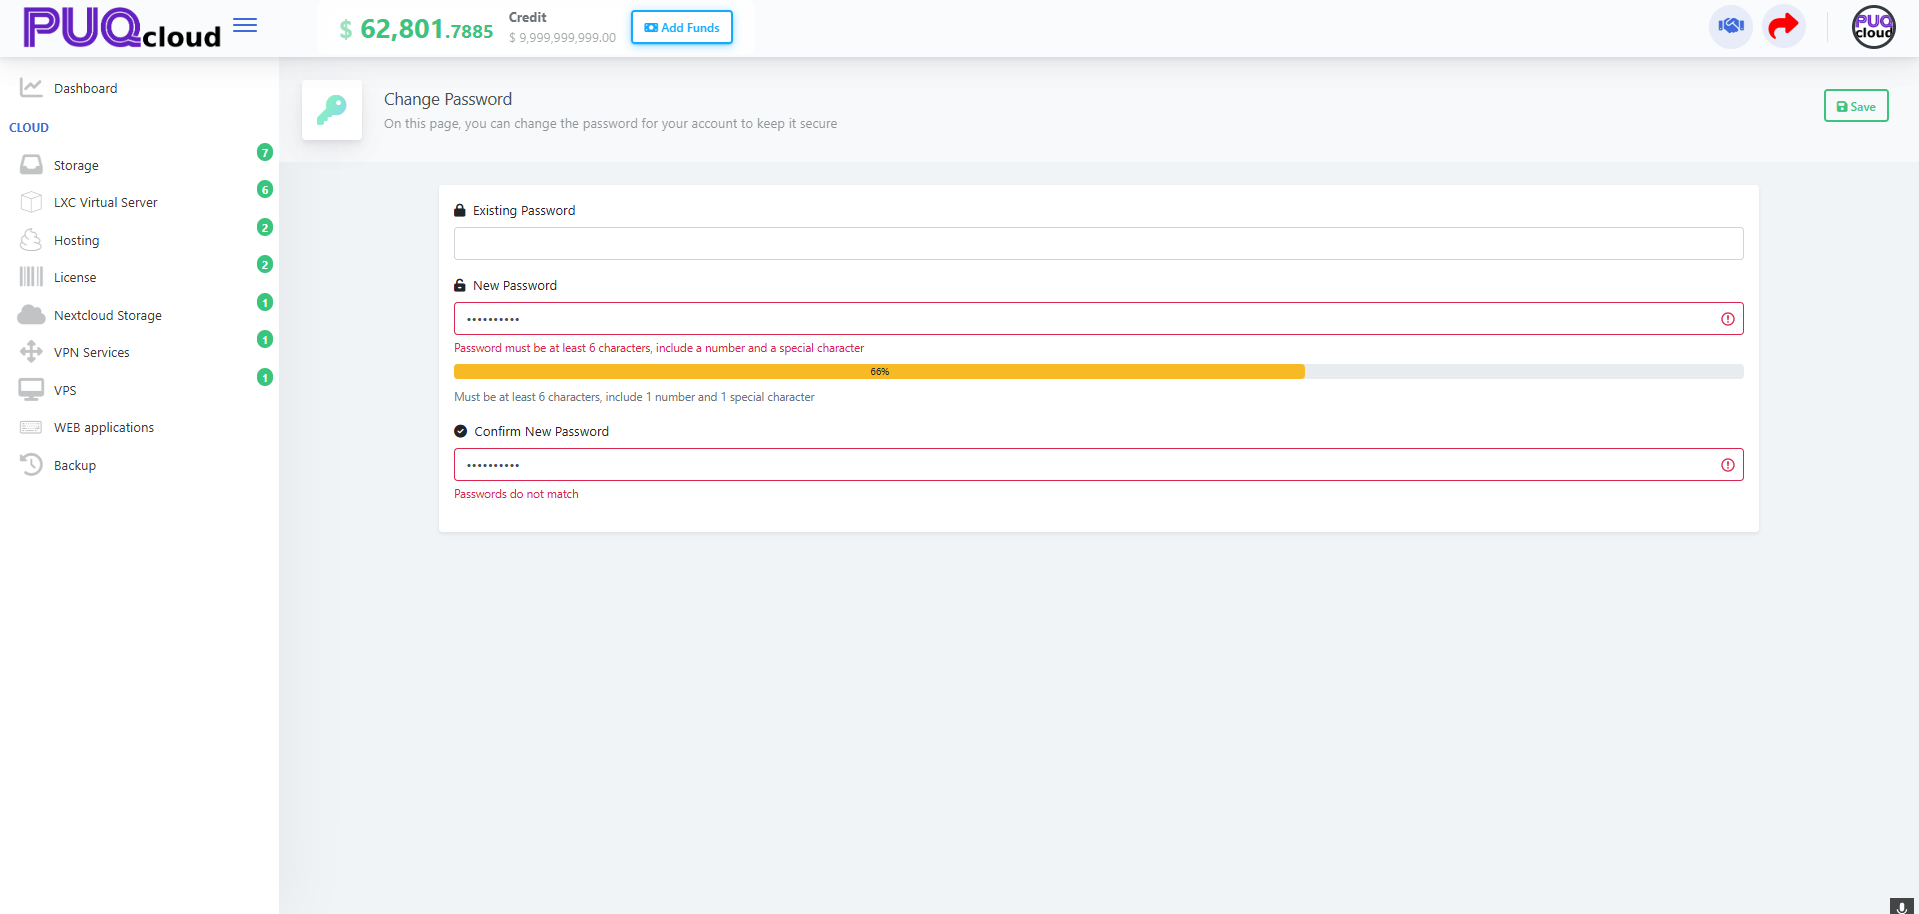
If you see “Passwords do not match,” the New and Confirm fields differ.
Verification Center — verification methods
Manage verification methods (email, TOTP app, etc.). Columns show:
-
Value, Verified, Default, Last Used At.
-
Star button = set as Default.
-
Bin icon = Delete a method.
“Verification Center” menu item.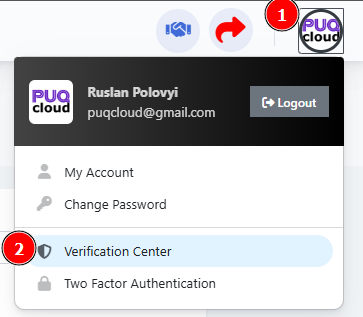
Verification Center list (Email + Authenticator App).
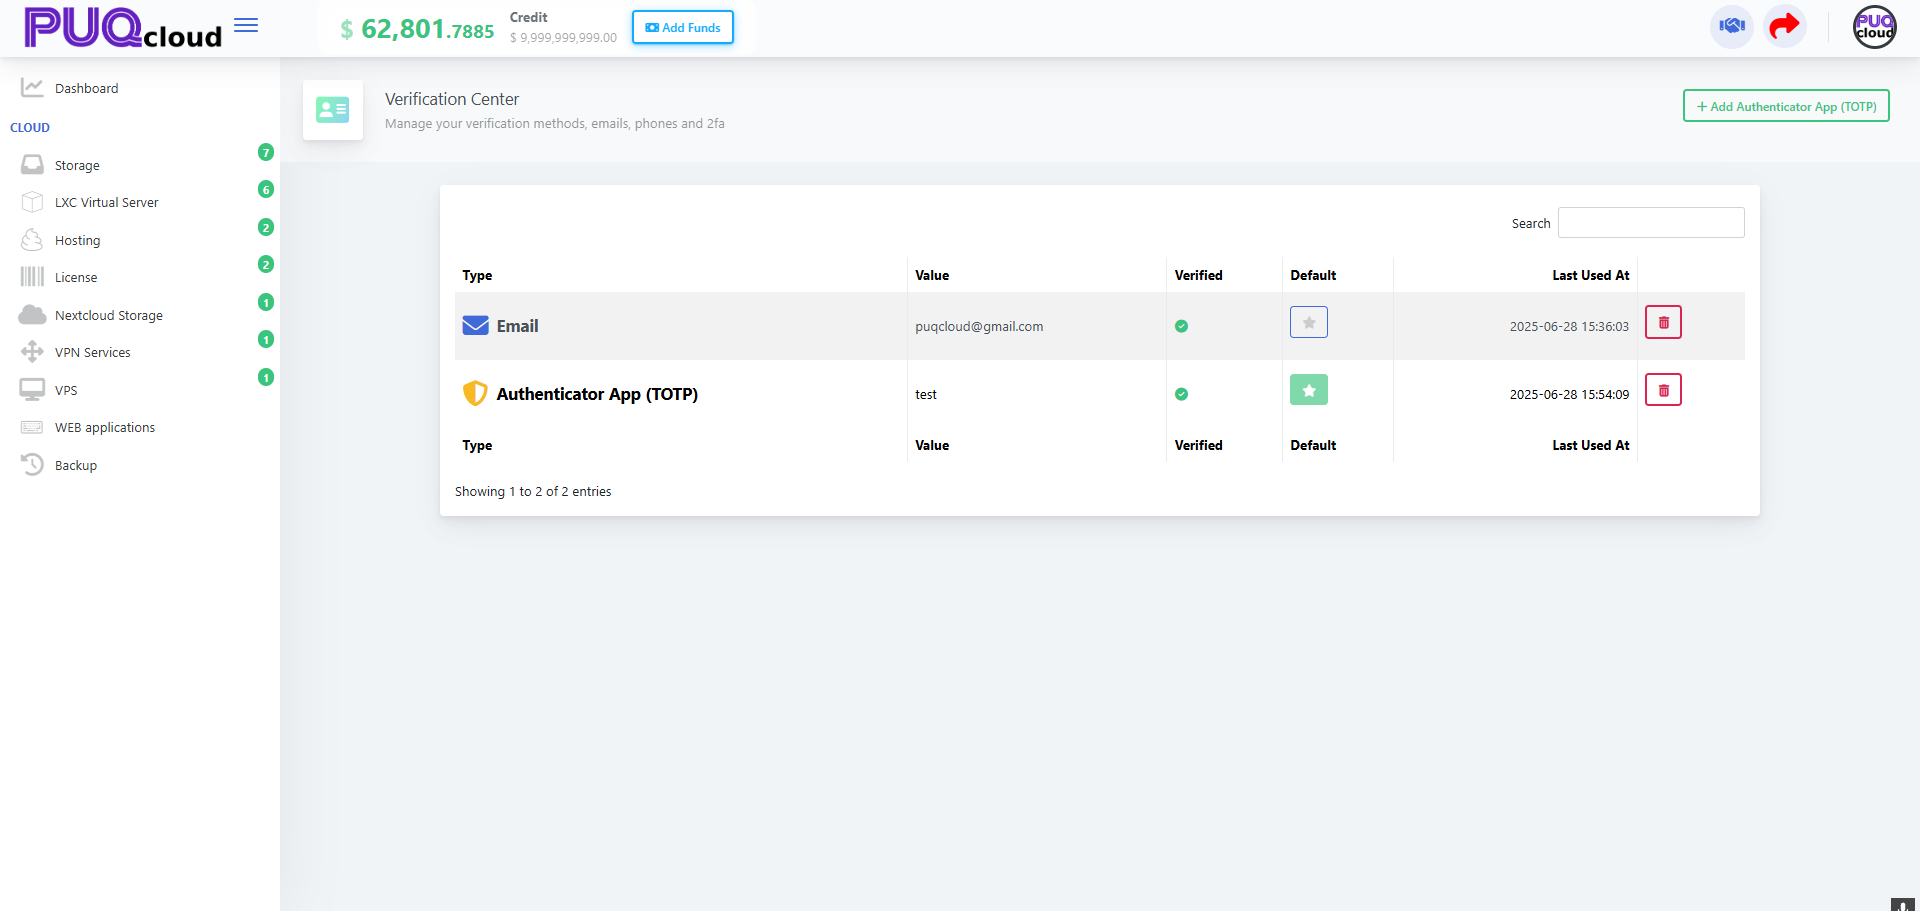
Recommendation: keep at least two methods (Email + TOTP) so you don’t get locked out.
Add a TOTP Authenticator (Google Authenticator / Duo)
-
On Verification Center, click Add Authenticator App (TOTP).
-
Scan the QR code in your app or enter the secret manually.
-
Enter the 6-digit code, give a Device Name → Save.
QR-code modal with code input.
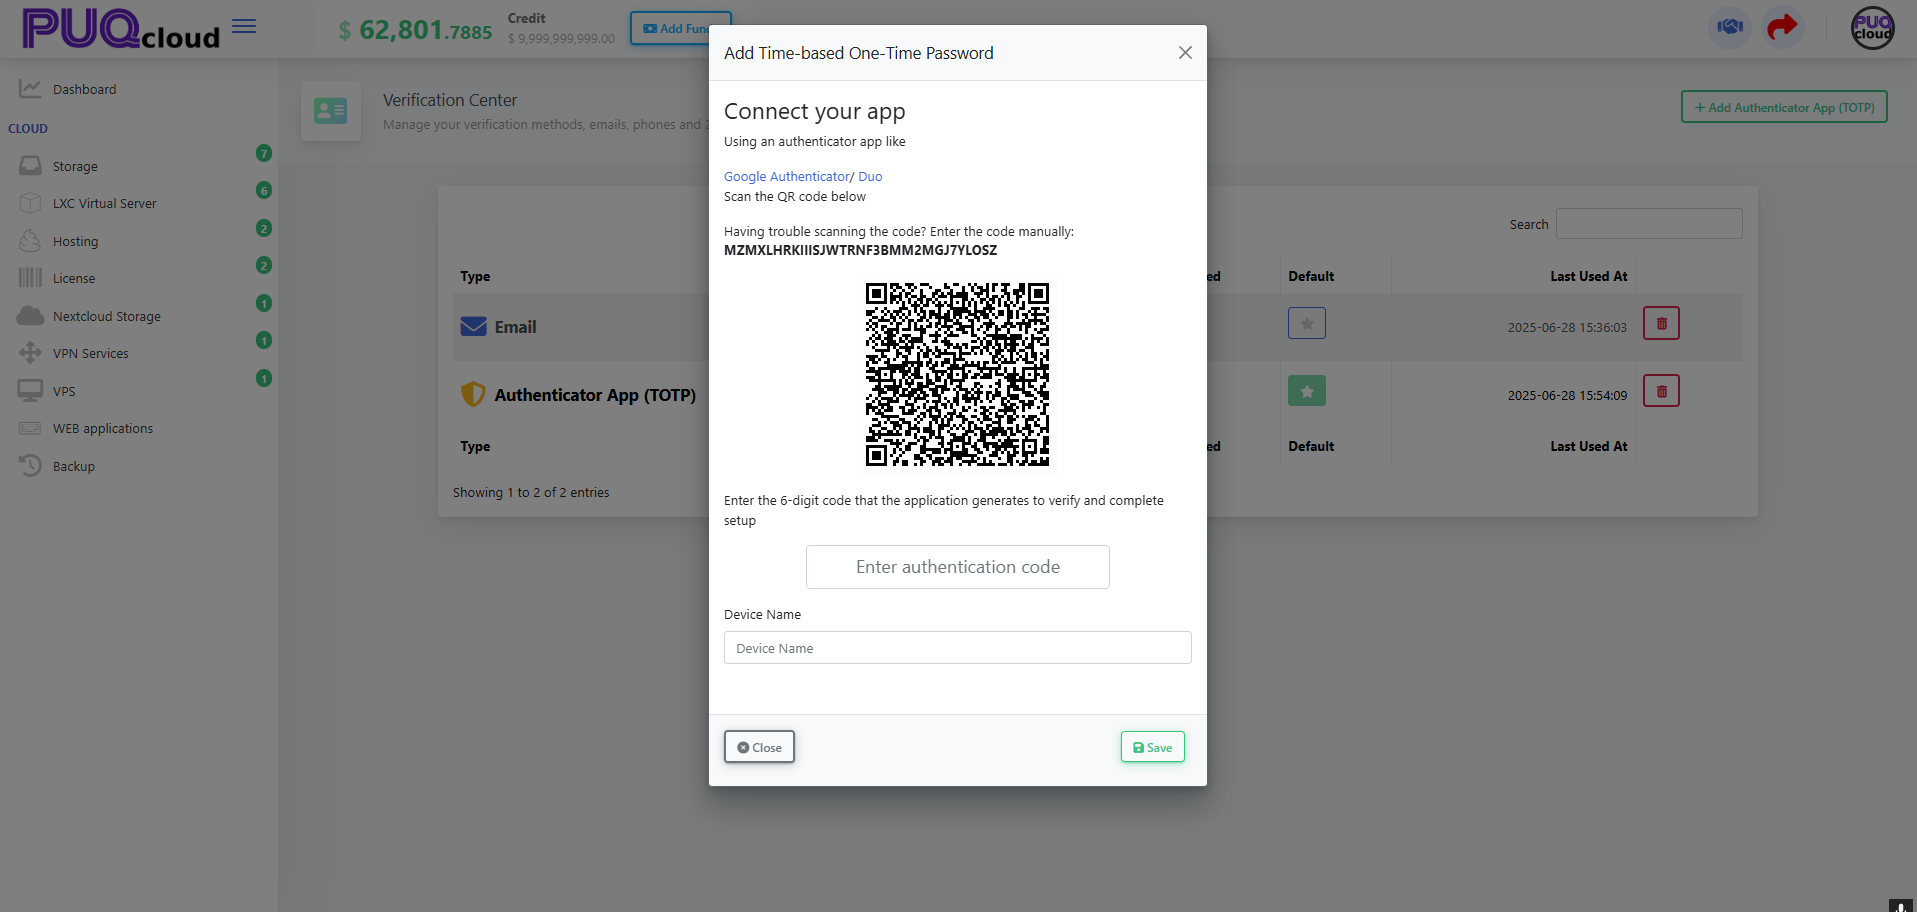
Two-Factor Authentication (2FA)
Enable 2FA
“Two Factor Authentication” menu item.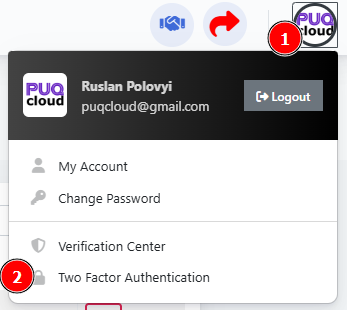
2FA page (Disabled state, Enable 2FA button).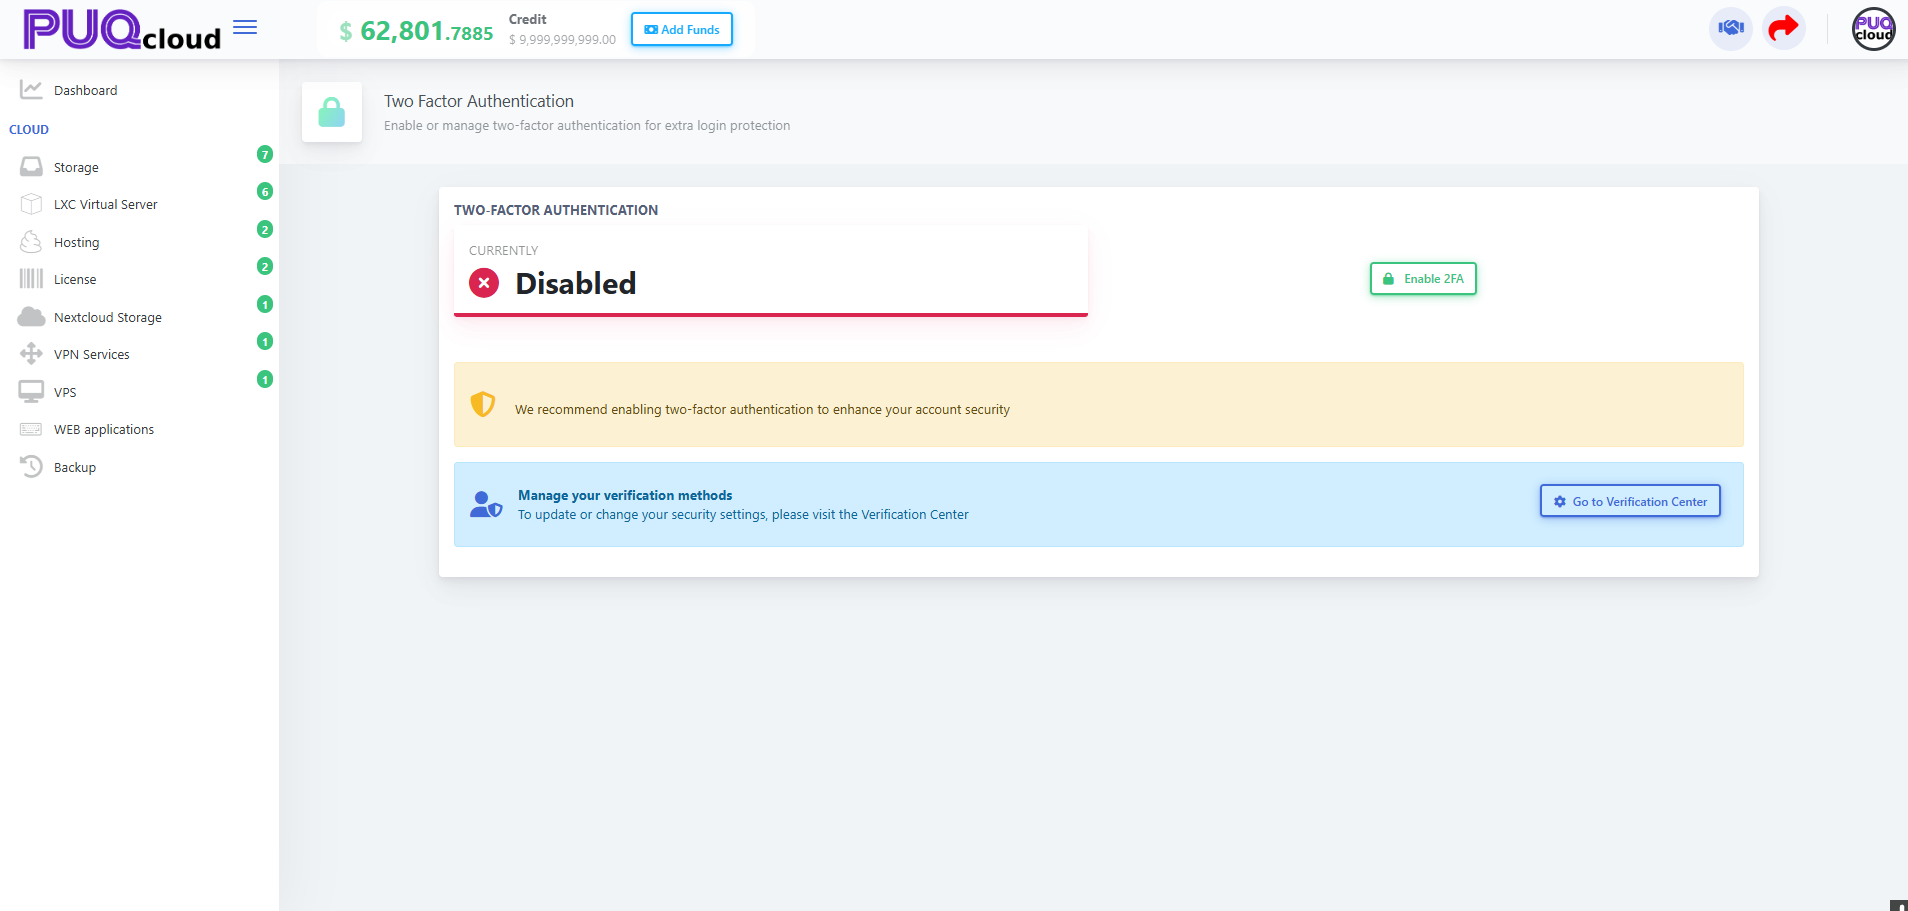
Enable 2FA confirmation modal (code entry).
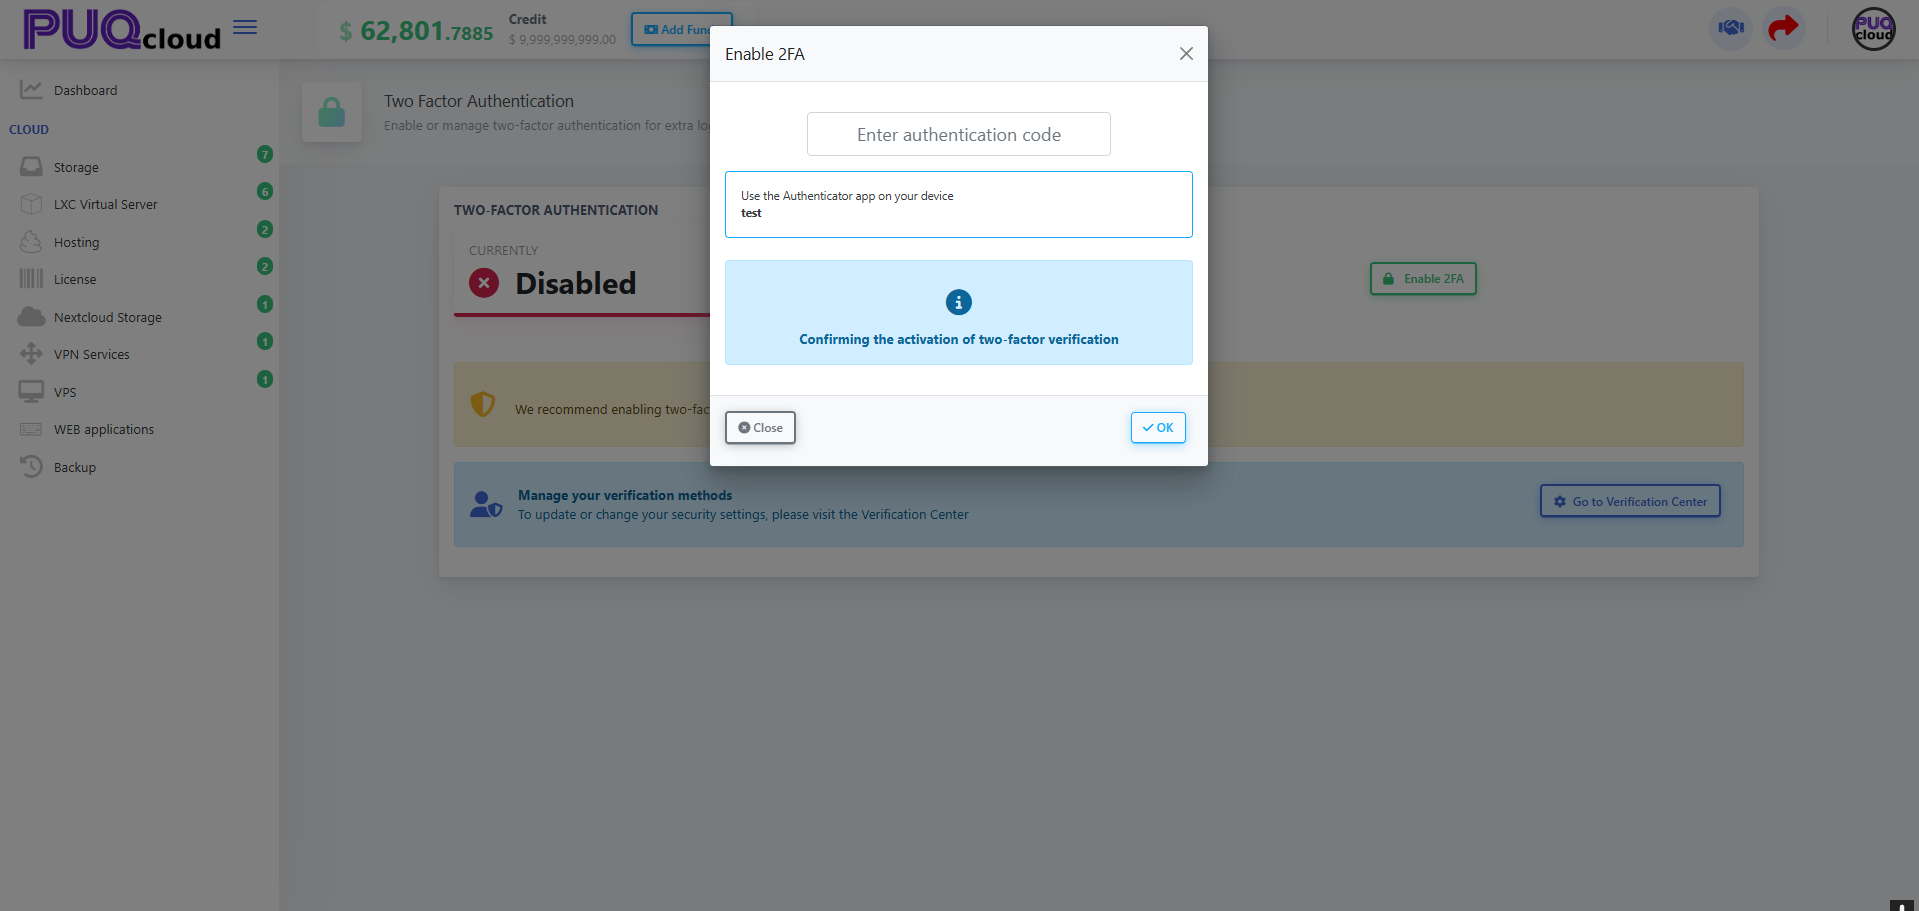
If “Enable 2FA” is disabled or missing, first add a TOTP method in Verification Center (see Section 5).
Security quick checklist
-
Turn 2FA on and set Authenticator App as Default.
-
Keep your email current (codes/alerts go there).
-
Use a long, unique password; don’t reuse it elsewhere.
-
Always keep two verification methods on file.
Troubleshooting
-
Code not accepted: ensure your phone time is correct (TOTP is time-based).
-
Can’t enable 2FA: add a TOTP method in Verification Center first.
-
Phone won’t save: use + format.
-
Lost TOTP device: use your alternate method (email) or contact support for removal after identity verification.