Create and manage Clients
PUQcloud Panel
Order Now | Download | FAQ
Overview
This guide shows administrators how to create new clients and manage existing ones in PUQcloud Panel. You’ll learn where to find client records, how to add a client, attach users and addresses, and how to handle services, invoices, and transactions.
Key Features
-
Centralized client directory with search, sort, and status badges.
-
Full client profile: personal/company info, language, currency, tax ID, credit limit, admin notes.
-
Addresses management: billing/shipping, multiple entries, default flags.
-
Users & permissions: associate users to the client and grant granular rights.
-
Services lifecycle: add, view status (ACTIVE/COMPLETED/ERROR), open product actions.
-
Finance tools: create invoices and manual transactions for charges/credits.
Before You Begin
-
You must be logged in as an administrator.
-
Ensure you know your home company tax settings and available products & prices.
Navigation
Create a New Client
-
Click + Create (top-right on the client list).
-
Fill the Client/User Information fields:
-
Email and Password
-
Firstname, Lastname
-
Company Name (optional for individuals)
-
Tax ID (if applicable)
-
Phone Number (with country code)
-
Language, Currency
-
Status (New/Active/etc.)
-
-
Fill the Billing Address: Address 1/2, City, Postcode, Country, State/Region.
-
Click Save.
(screenshot: Create a New Client form)

Tips
-
Language affects the UI for the client’s users.
-
Currency determines invoice currency defaults.
-
Use an accurate Tax ID (e.g., GST/HST/QST/VAT formats) for correct tax handling.
Client Record – Tabs & What They Do
After saving, you’ll land on the client’s page with these tabs: Summary, Profile, Users, Services, Invoices, Transactions.
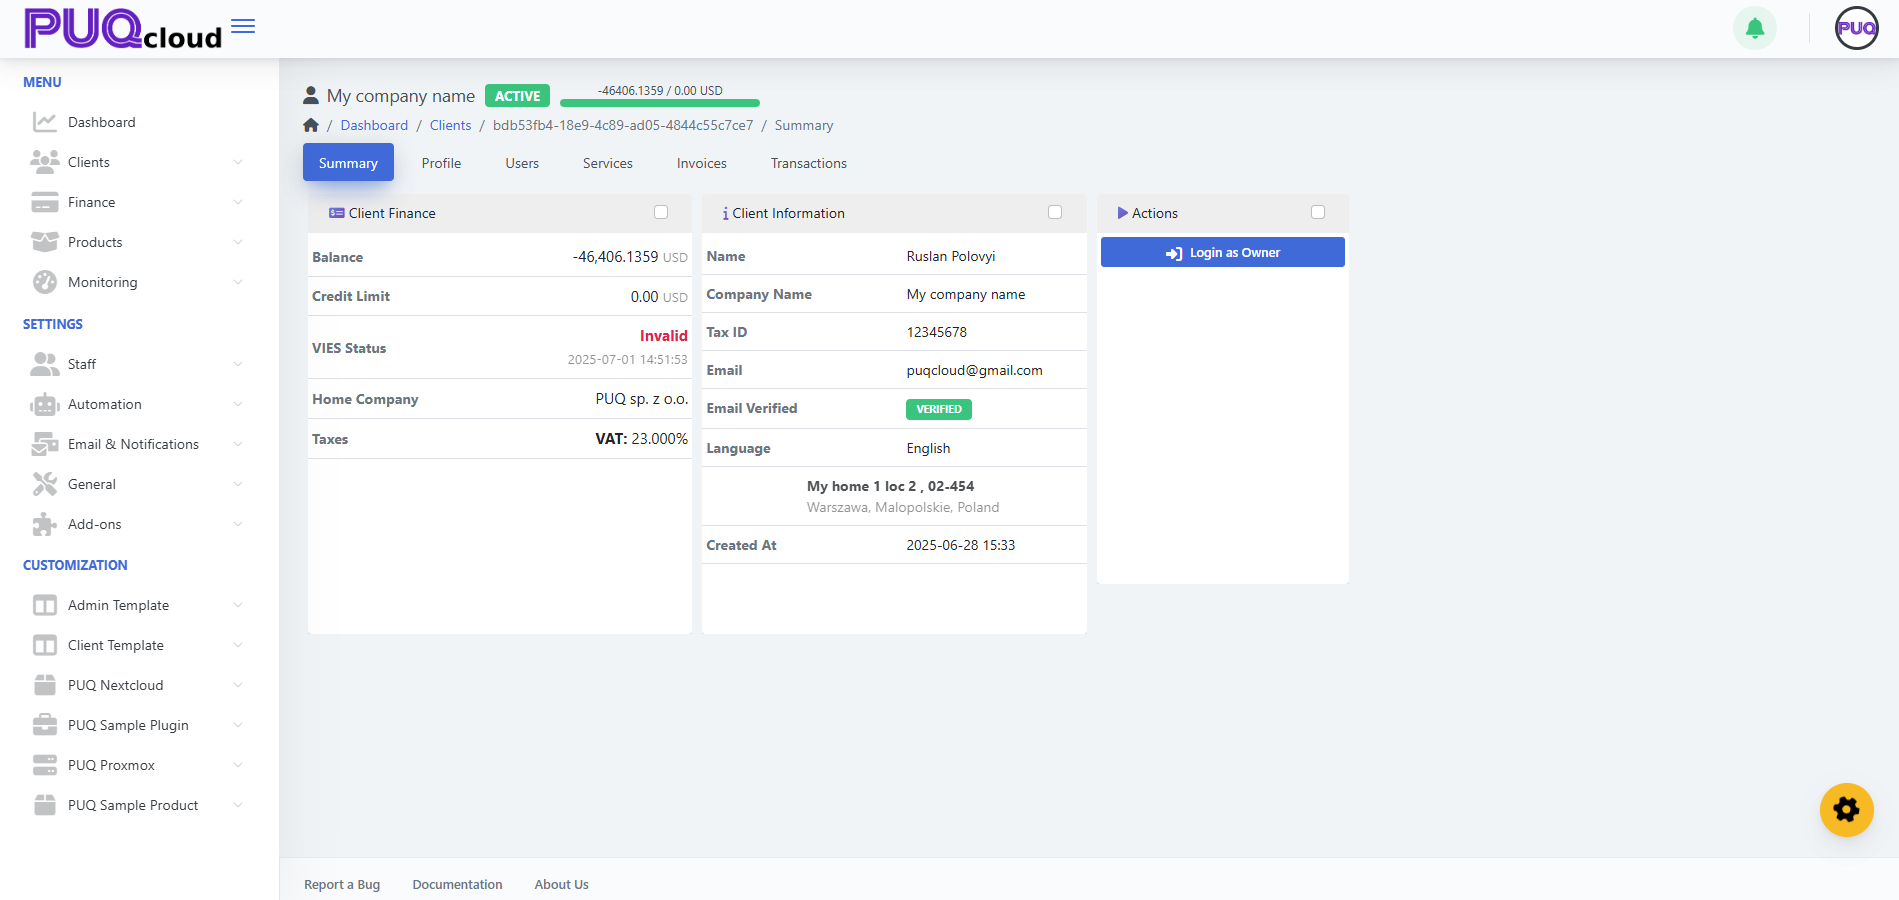
Summary
-
Quick view of Client Finance (Balance, Credit Limit, VIES/Tax status) and Client Information (name, company, email, language, main address, created at).
-
Actions card: Login as Owner.
screenshot: Client → Summary tab
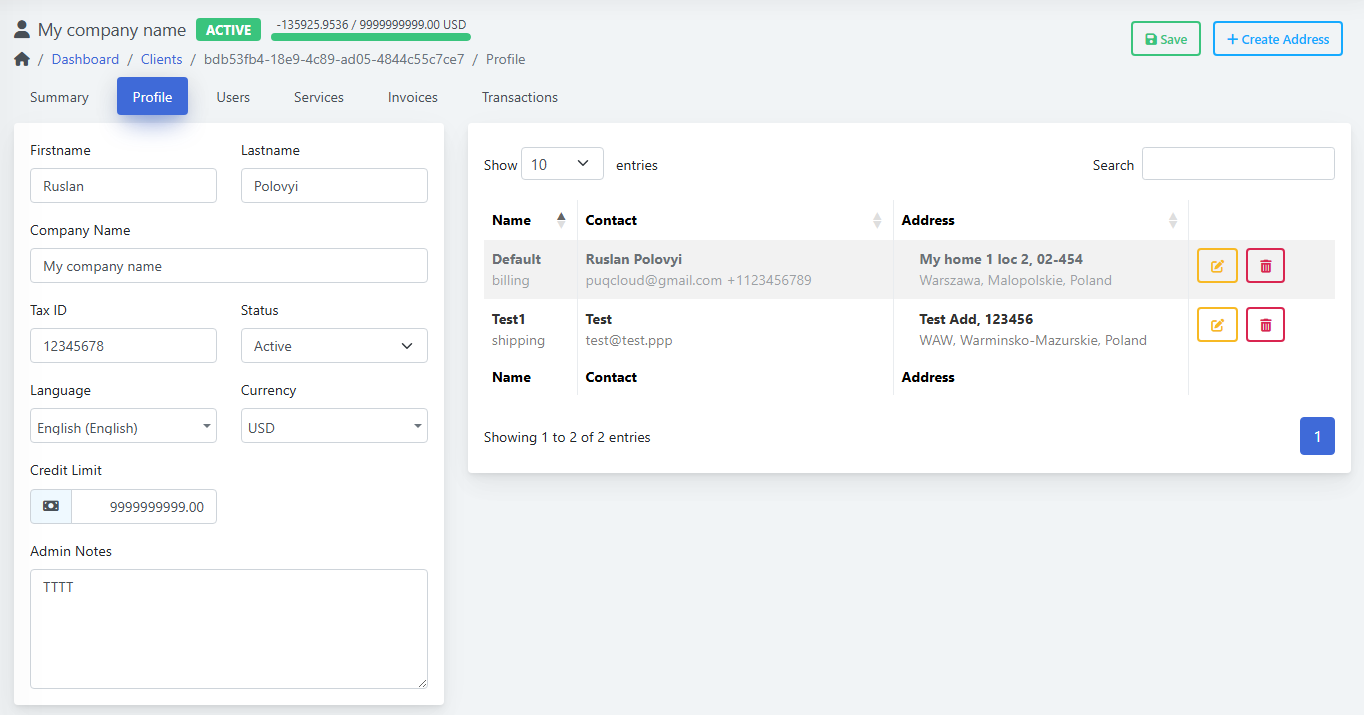
Profile
-
Update Firstname/Lastname, Company, Tax ID, Status, Language, Currency, Credit Limit, Admin Notes.
-
Right side shows the Addresses table with labels like Default (billing) or shipping; use the yellow Edit and red Delete buttons.
-
Click + Create Address to add a new address.
(screenshot: Client → Profile tab)
(screenshot: Create Address modal (Type, Name, Contact, Phone, Email, Address, Country, State/Region))

Address Types
-
Billing (used on invoices)
-
Shipping (for service deliveries/records)
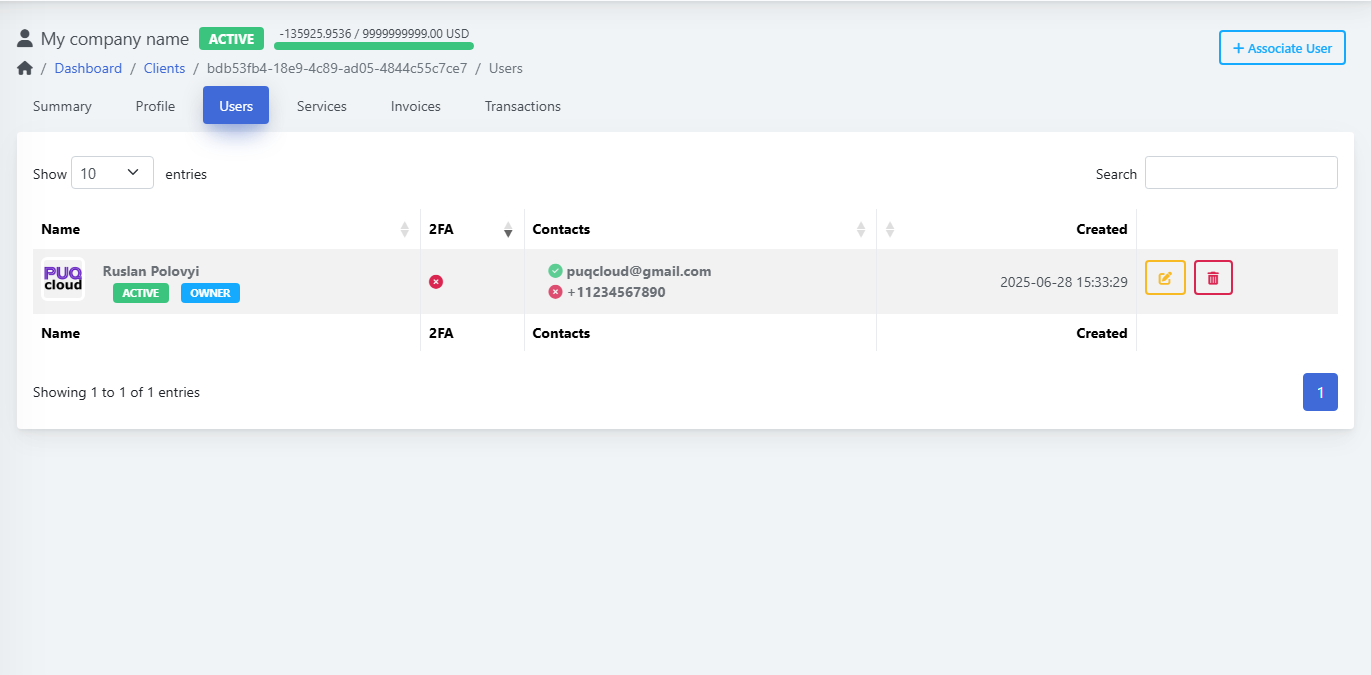
Users
-
See associated users, 2FA status, contact info, and created date.
-
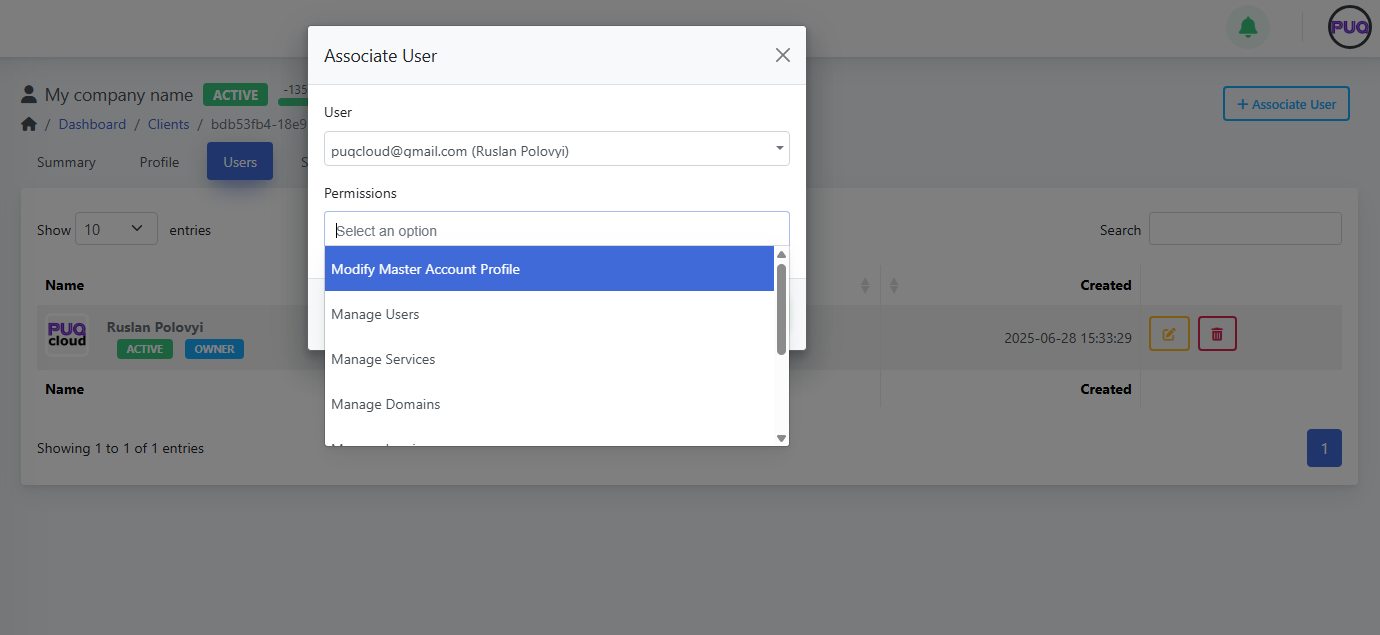
Click + Associate User to link an existing user account.
-
Choose Permissions such as: Modify Master Account Profile, Manage Users, Manage Services, Manage Domains, etc.
-
Use Edit/Delete to maintain user links.
(Screenshot: Client → Users tab)
(Screenshot: Associate User modal with permissions list)
Services
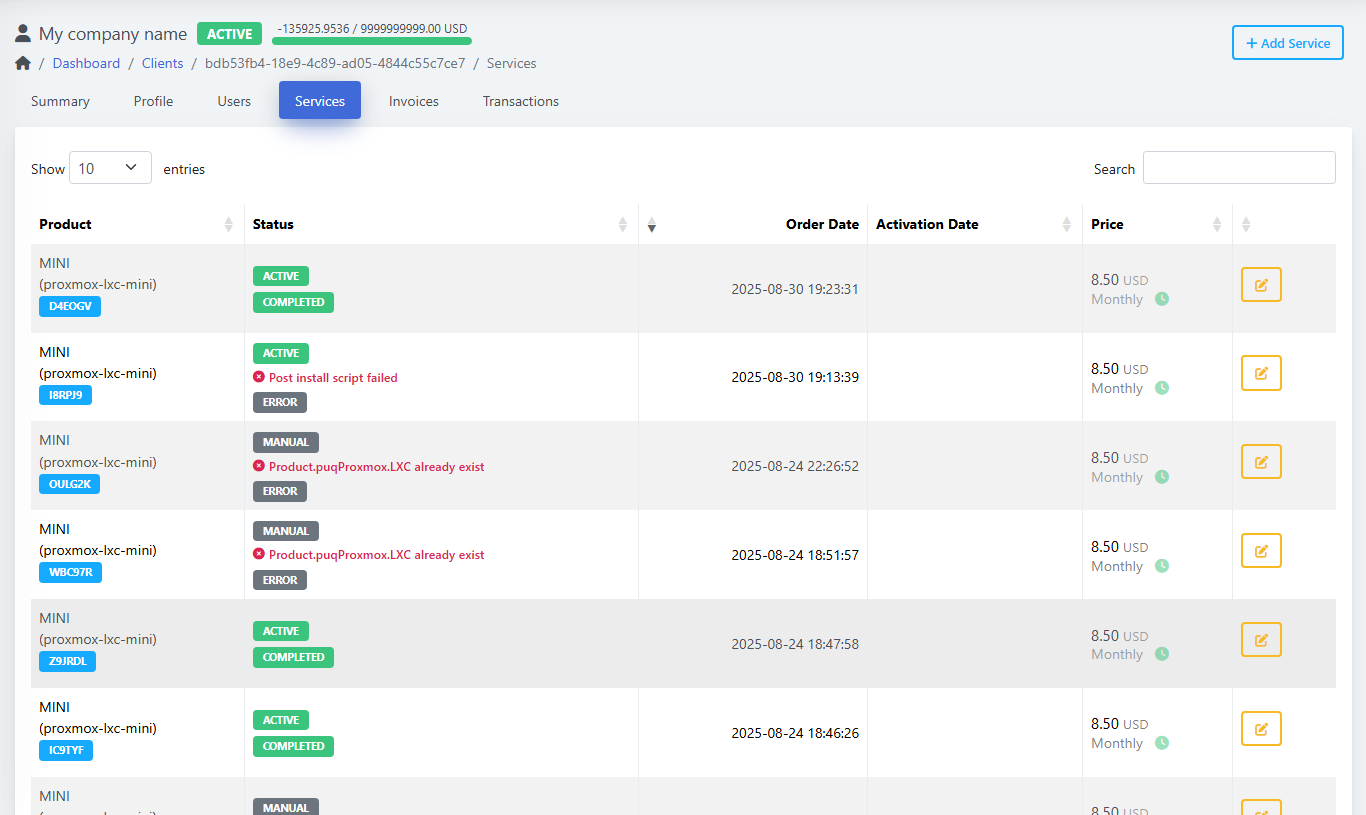
-
View all services with status badges (e.g., ACTIVE, COMPLETED, ERROR).
-
See Order Date, Activation Date, and Price.
-
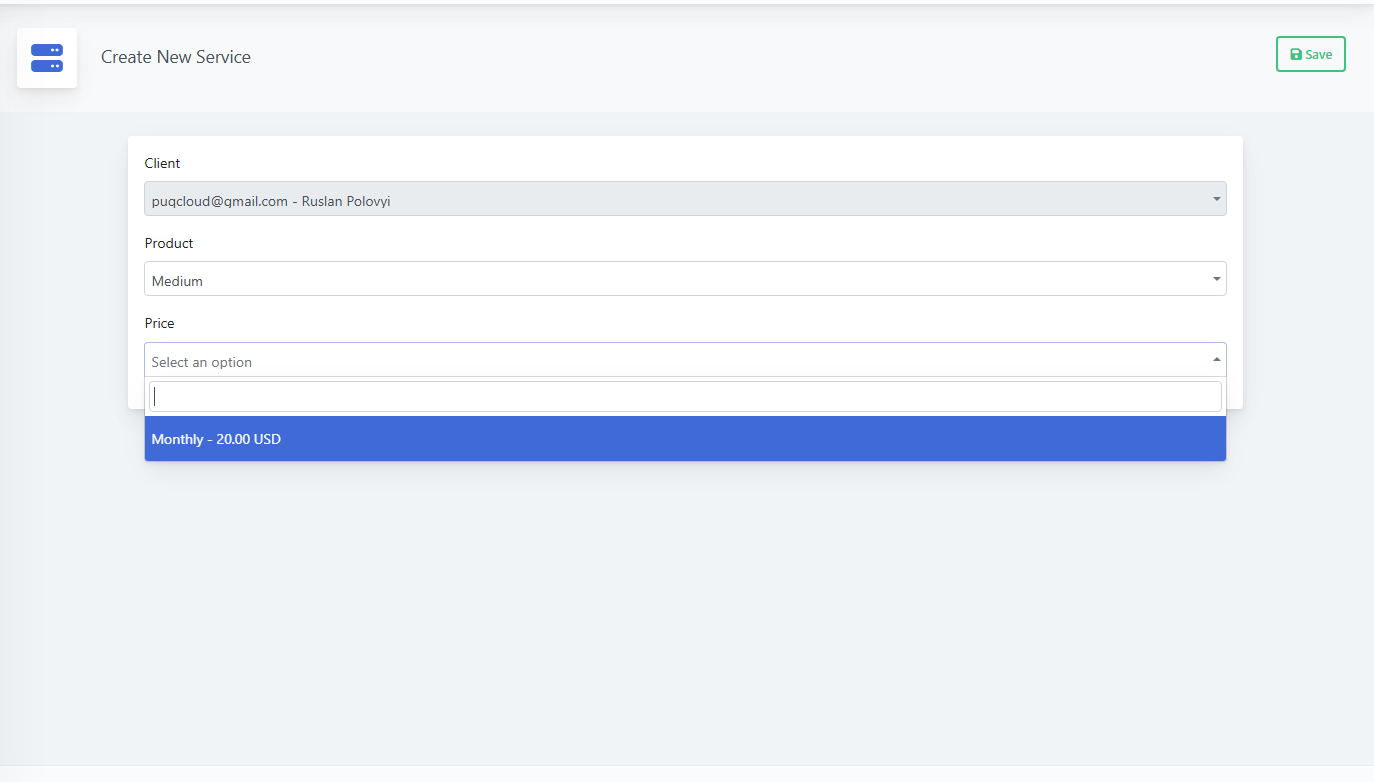
Click + Add Service to provision a product for this client:
-
Select Product
-
Choose Price (e.g., Monthly – 20.00 USD)
-
Click Save
-
(Screenshot: Services list)
(Screenshot: Create New Service form)
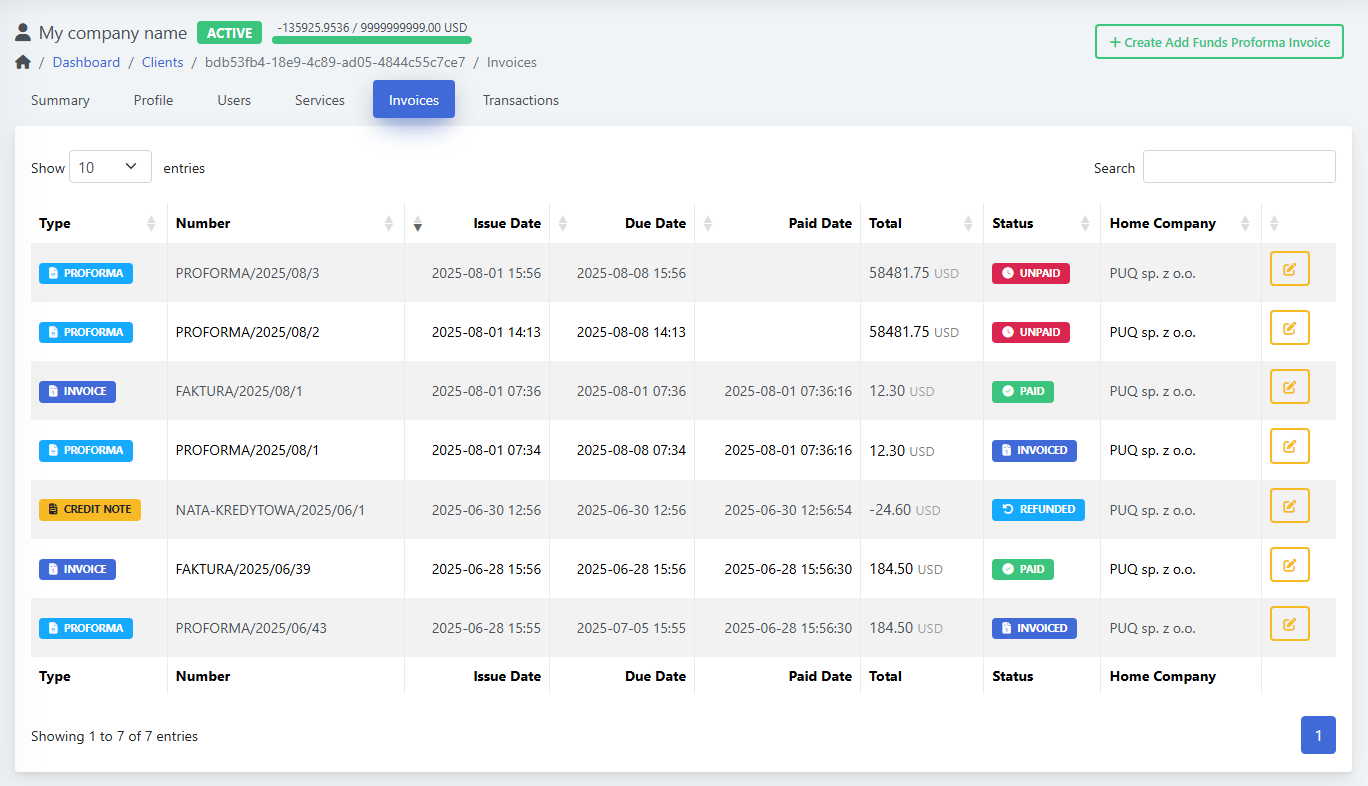
Invoices
-
List shows Type (PROFORMA/INVOICE/CREDIT NOTE), Number, Issue/Due/Paid Dates, Total, Status (UNPAID/PAID/INVOICED/REFUNDED), and Home Company.
-
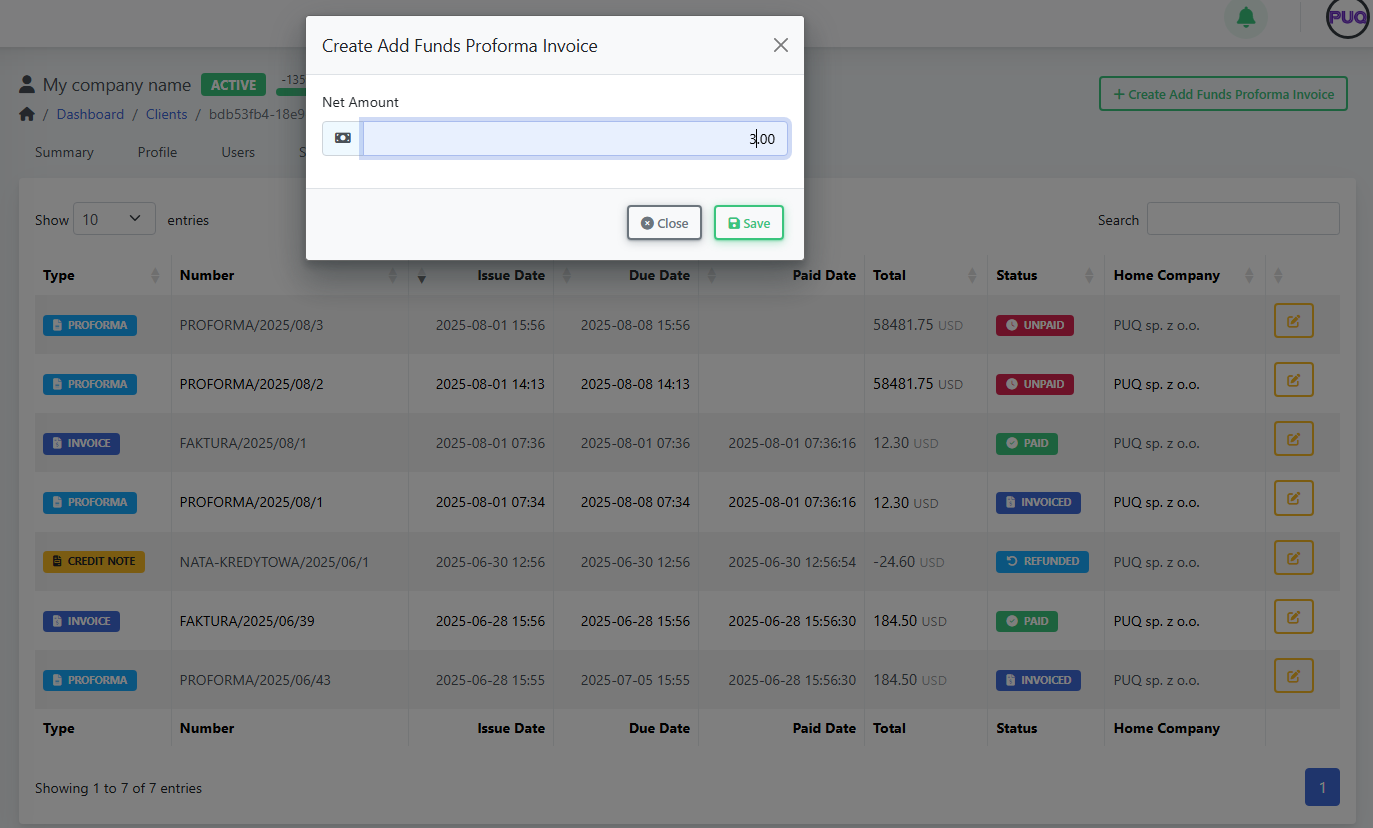
Create Add Funds Proforma Invoice: opens a modal where you set Net Amount to top up client funds.
(Screenshot: Invoices list)
(Screenshot: Create Add Funds Proforma Invoice modal)
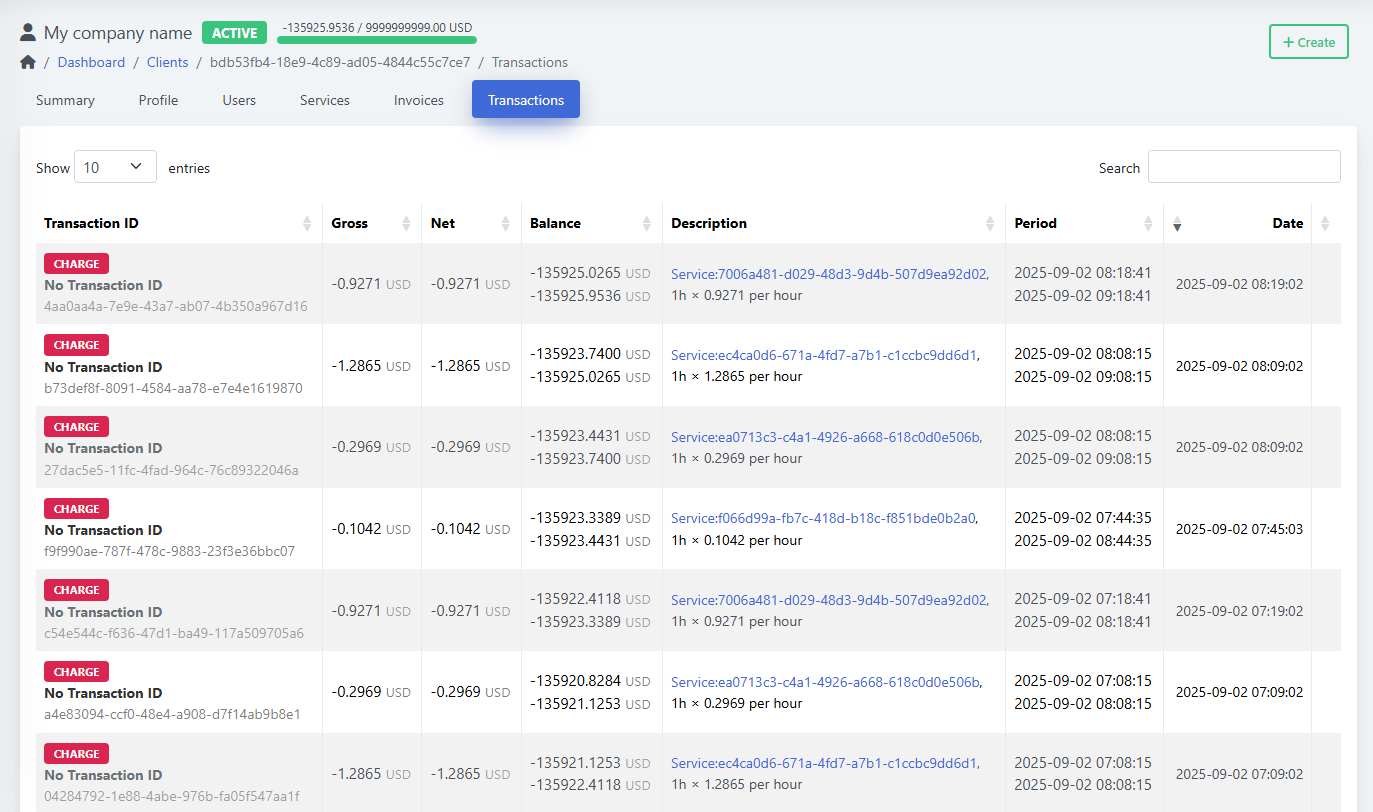
Transactions
-
Ledger of Gross, Net, Balance, Description (usually linked to a service), Period, and Date.
-
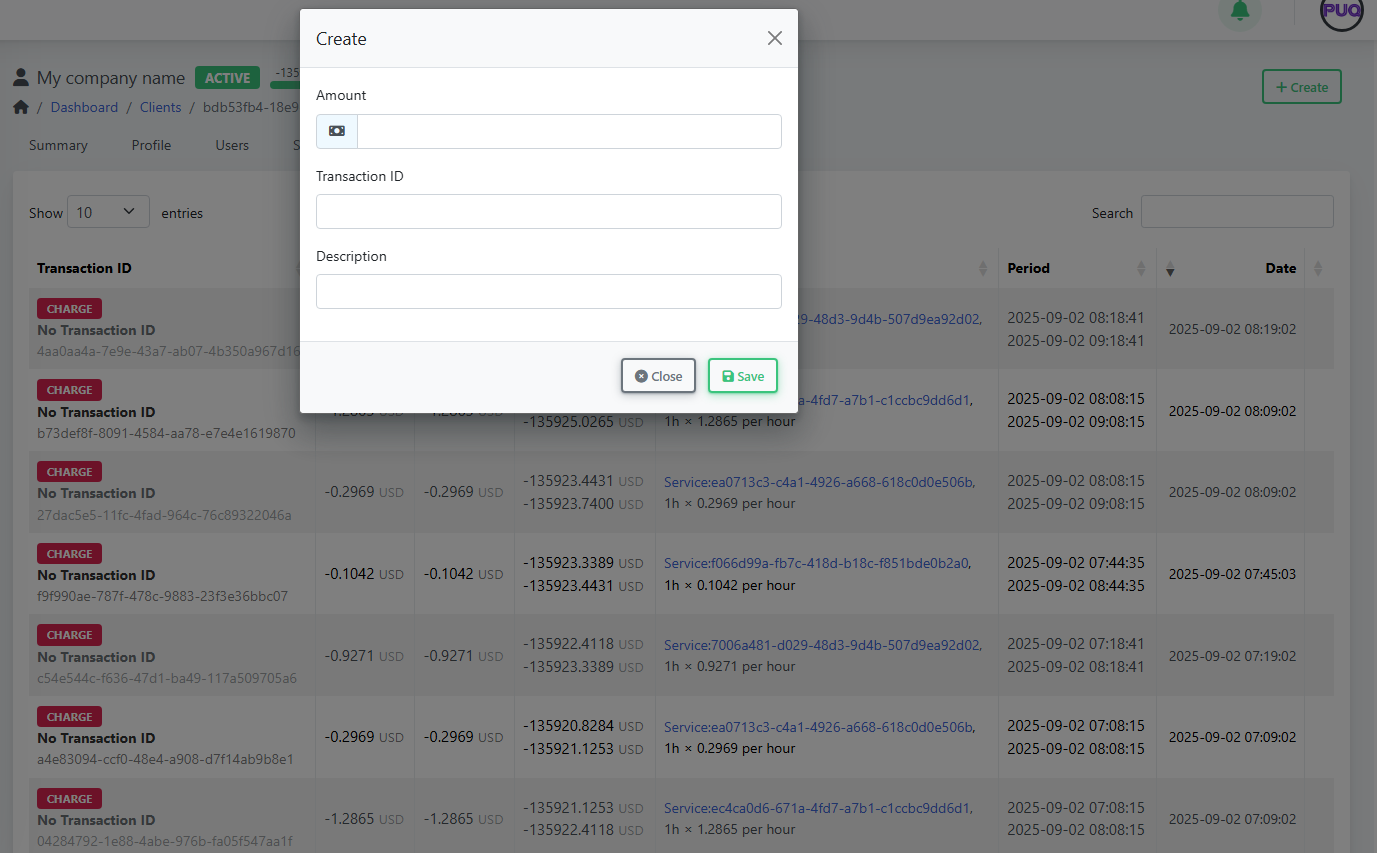
Click Create to add a manual transaction (charge or credit): set Amount, Transaction ID (optional), and Description, then Save.
(Screenshot: Transactions list)
(Screenshot: Transactions → Create modal)
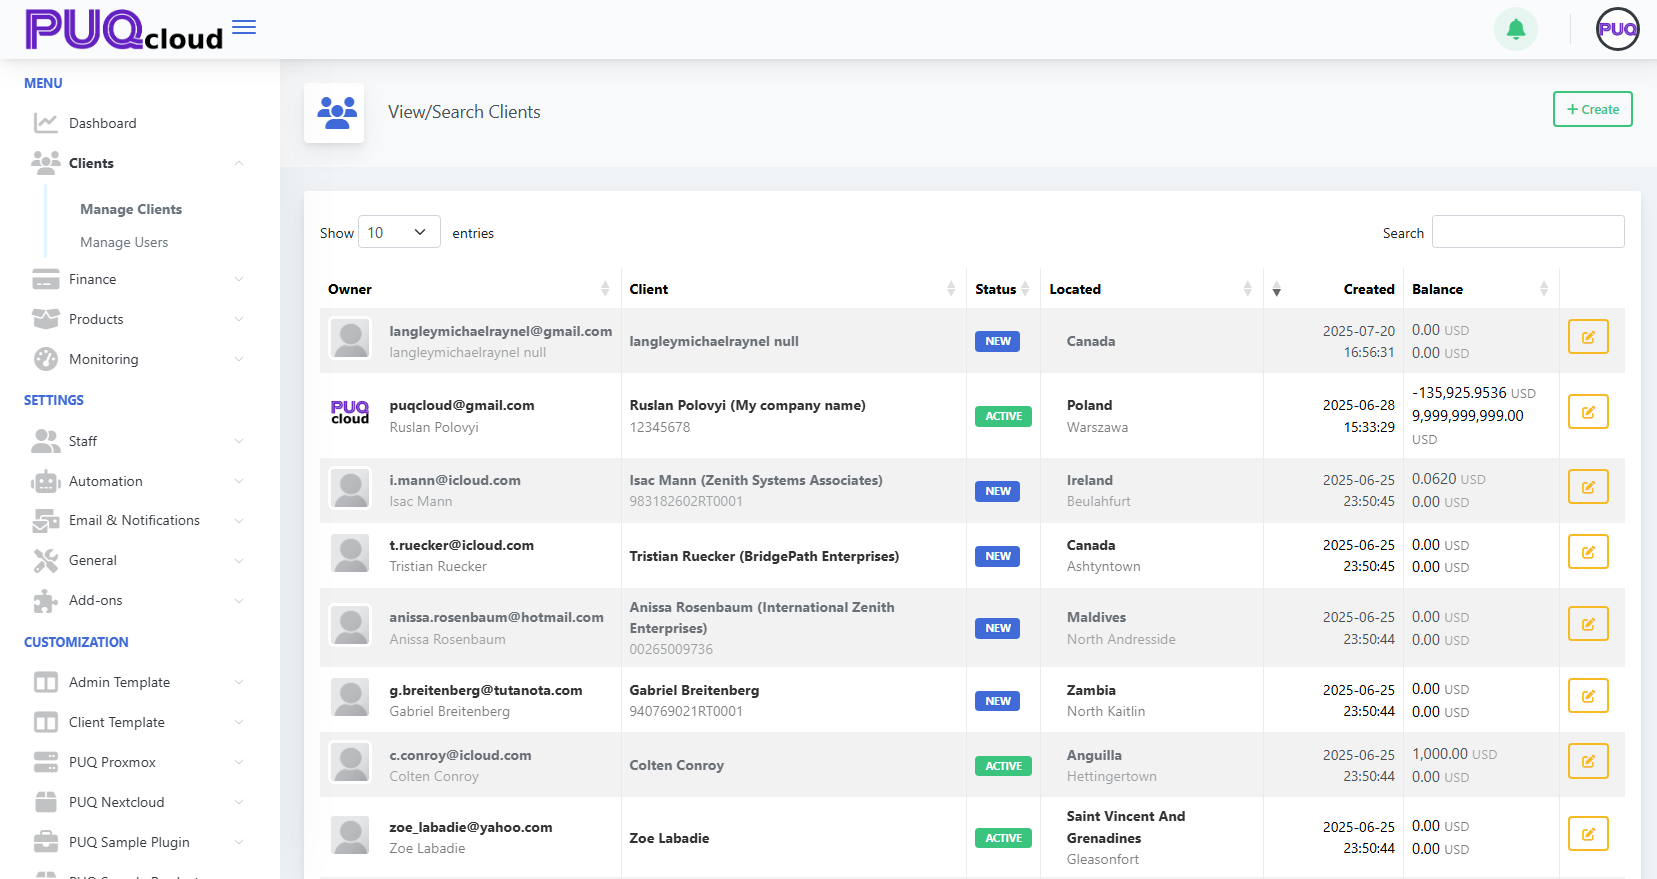
Search, Filter, and Sort Clients
-
Use the Search box on the client list to filter by name, email, or company.
-
Click column headers to sort (e.g., by Created date or Balance).
-
Status badges (NEW, ACTIVE) help you visually triage records.
Editing & Lifecycle
-
Change Status (e.g., New → Active) from the Profile tab.
-
Update Tax ID or Language/Currency any time; new settings apply to future invoices.
-
Maintain Credit Limit to control spending and alerting.
-
Keep Admin Notes for internal context (billing agreements, support history, etc.).
Best Practices
-
Keep addresses current—billing address prints on invoices.
-
Use Users & permissions to grant least-privilege access.
-
Prefer Add Funds Proforma for prepayments; reconcile via Transactions.
-
Review Services after order to confirm status (look for ERROR badges and fix product-side issues).
Troubleshooting
-
Invoice in wrong currency → Check client Currency in Profile before creating invoices.
-
Taxes not applying as expected → Verify Home Company tax rules and client Tax ID.
-
User cannot see services → Revisit Users → permissions (grant Manage Services).
-
Provisioning error on service → Open service details and review the last error note; re-run or fix product configuration.
Shortcuts
-
Clients → Manage Clients: quick search and open profile.
-
On Summary, use Login as Owner to replicate the customer view for support.
You’re done!
You can now add clients, attach their users and addresses, create services, and manage billing—everything from one place in PUQcloud Panel.