# PUQVPNCP WHMCS module
# Description
### PUQVPNCP module **[WHMCS](https://puqcloud.com/link.php?id=77)**
##### [Order now](https://puqcloud.com/whmcs-module-puqvpncp.php) | [Download](https://download.puqcloud.com/WHMCS/servers/PUQ_WHMCS-PUQVPNCP/) | [COMMUNITY](https://community.puqcloud.com/) | [PUQVPNCP](https://puqvpncp.com/)
## PUQVPNCP WHMCS module
The PUQVPNCP WHMCS module is a provisioning module that integrates WHMCS with PUQVPNCP panels, enabling service providers to offer multi-protocol VPN accounts (WireGuard, OpenVPN, IKEv2) to their customers. The module automates the full lifecycle of VPN client management through the PUQVPNCP REST API.
- - - - - -
## Main features
- **Automatic VPN client provisioning** — creates the client on the chosen PUQVPNCP panel on service activation
- **Account lifecycle management** — create, suspend, unsuspend, terminate and change-package operations
- **Multi-protocol support** — WireGuard, OpenVPN and IKEv2, with protocol availability detected automatically
- **Configuration delivery** — WireGuard `.conf` + QR code, OpenVPN `.ovpn` profile and IKEv2 profile, all with Copy/Download buttons in the client area
- **Per-client bandwidth limits** — configure download/upload caps (Mbit/s) per product; `0` means unlimited
- **Speed tiers in one click** — auto-create WHMCS Configurable Options for download/upload speed (Unlimited → 1000 Mbit/s); customers pick their tier at checkout and upgrade/downgrade anytime, with the new speed applied automatically
- **Welcome email with configs** — optionally email the client their connection details, WireGuard config and QR code the instant the account is provisioned; admins can re-send on demand
- **Flexible network selection** — pick one or more VPN networks per product; the module iterates them at provisioning time and uses the first one with a free IP
- **Traffic statistics** — monthly chart (download/upload per day) with totals, powered by the panel API
- **One-time self-service link (OTL)** — generate a single-use URL that hands the customer every protocol config, QR code and credential on a page that opens only once
- **Admin insight** — service admin tab shows API connection status, remote client state, bandwidth and resolved location
- **License verification** — built-in license system with online/offline verification and admin alerts
- - - - - -
## System requirements
| Requirement | Minimum |
|---|
| WHMCS | 9.x or higher |
| PHP | 8.2 or higher |
| PUQVPNCP panel | current |
| ionCube Loader | v13 or newer (v14, v15) |
- - - - - -
## Links
- **Product page:** [https://puqcloud.com/whmcs-module-puqvpncp.php](https://puqcloud.com/whmcs-module-puqvpncp.php)
- **PUQVPNCP panel:** [https://puqvpncp.com/](https://puqvpncp.com/)
- **Documentation:** [https://doc.puq.info/books/puqvpncp-whmcs-module](https://doc.puq.info/books/puqvpncp-whmcs-module)
- **Support:** [https://puqcloud.com/submitticket.php](https://puqcloud.com/submitticket.php?step=2&deptid=1)
- **Community:** [https://community.puqcloud.com/](https://community.puqcloud.com/)
- - - - - -
## Screenshots
### Client area — Home screen
*01-description-client-area.png*
### Client area — Traffic statistics
*02-description-traffic-stats.png*
### Admin area — Product information
*03-description-admin-area.png*# Changelog
### PUQVPNCP module **[WHMCS](https://puqcloud.com/link.php?id=77)**
##### [Order now](https://puqcloud.com/whmcs-module-puqvpncp.php) | [Download](https://download.puqcloud.com/WHMCS/servers/PUQ_WHMCS-PUQVPNCP/) | [COMMUNITY](https://community.puqcloud.com/) | [PUQVPNCP](https://puqvpncp.com/)
- - - - - -
## v1.2 — 22-06-2026
Speed tiers via Configurable Options, an automated welcome email with connection configs, a clearer One-Time Link, and a cleaner client-area overview.
### Configurable Options — speed presets
- **One-click creator** — a **Create speed presets** button on the product Module Settings tab builds the WHMCS Configurable Options for **Download limit (Mbit/s)** and **Upload limit (Mbit/s)**, adds the presets (Unlimited, 10, 25, 50, 100, 250, 500, 1000 Mbit/s) priced at `0` in every currency, and links the group to the product. Idempotent — safe to click repeatedly.
- **Per-order speed** — the customer's selected value overrides the product's default download/upload limit. Applied on provisioning and on every upgrade/downgrade (WHMCS calls change-package for configurable-option changes as well).
- Per-tier pricing can be set on the sub-options to charge for faster speeds.
### Welcome email
- Optional **welcome email** sent on provisioning, containing the connection details, full WireGuard config text and an inline QR code, plus a manage-service link.
- Selectable template — use any WHMCS Product/Service template or the bundled **PUQ VPNcp - Welcome**, with **Create if missing** / **Reset to default** buttons. The template is auto-created on first send if absent.
- **Resend welcome email** button on the admin service tab; works regardless of the per-product auto-send setting.
### One-Time Link
- The client-area One-Time Link now includes a description, an **Open link** button, and a notice stating it carries every protocol config, QR code and credential and can be opened only once.
### Client area
- The default WHMCS **Domain / Username / Server Name / IP Address / Visit Website** block is hidden on the service overview, as it is not relevant for VPN products.
### Maintenance
- Admin AJAX endpoints made POST-only; output-escaping fixes; minor edge-case corrections.
- - - - - -
## v1.1 18-06-2026
### Bug fixes
- **Client area blank page** — fixed output-buffer conflict in the AJAX controller: WHMCS buffered HTML was prepended to JSON responses, causing the client area to render nothing
- **VPN session list false-positive error** — the `/client/online` endpoint returning an empty list `[]` (no active sessions) was incorrectly treated as an API failure; now handled correctly
- **Smarty template security error** — replaced blocked `{$smarty.get.id}` superglobal access (disallowed by WHMCS Smarty security policy) with the safe `{$service->service_id}` in client area and traffic statistics templates
- **Wrong default API port** — HTTP connections to the PUQVPNCP panel were falling back to port 80 instead of the correct default 8098; fixed in all four code locations across three files
- **AJAX responses on inactive services** — AJAX requests for suspended or terminated services now return a proper JSON error response instead of an empty string, preventing JavaScript parse errors in the client area
- - - - - -
## v1.0 (2026)
- First release
- Multi-protocol VPN provisioning (WireGuard, OpenVPN, IKEv2)
- Lifecycle: create / suspend / unsuspend / terminate / change-package
- Per-client download and upload bandwidth caps
- Per-product VPN network selection via checkboxes — iterated at provisioning, first with free IP wins
- Client area: VPN client details, WireGuard config + QR, OpenVPN profile, IKEv2 profile, OTL generator
- Client area: monthly traffic chart with totals
- Admin service tab: API connection status, remote client state, bandwidth, selected networks
- License verification (online + offline cache)# Installation and Configuration Guide
Step-by-step instructions for installing, configuring and setting up the PUQVPNCP WHMCS module — panel preparation, WHMCS integration, server configuration, location routing and product configuration.
# Setup guide — PUQVPNCP panel
### PUQVPNCP module **[WHMCS](https://puqcloud.com/link.php?id=77)**
##### [Order now](https://puqcloud.com/whmcs-module-puqvpncp.php) | [Download](https://download.puqcloud.com/WHMCS/servers/PUQ_WHMCS-PUQVPNCP/) | [COMMUNITY](https://community.puqcloud.com/) | [PUQVPNCP](https://puqvpncp.com/)
Before you can connect WHMCS, you need a running PUQVPNCP panel, an **API token** that WHMCS will use for every operation, and at least one **VPN network** with the protocols you want to expose enabled. This page walks through both.
---
## 1. Panel reachability
- The panel must be reachable from the WHMCS server over the network.
- HTTPS is strongly recommended. If you use a self-signed certificate, remember that SSL verification is enabled when the **Secure** checkbox is ticked on the WHMCS server record — use a publicly trusted certificate, or place the panel behind a reverse-proxy with one.
---
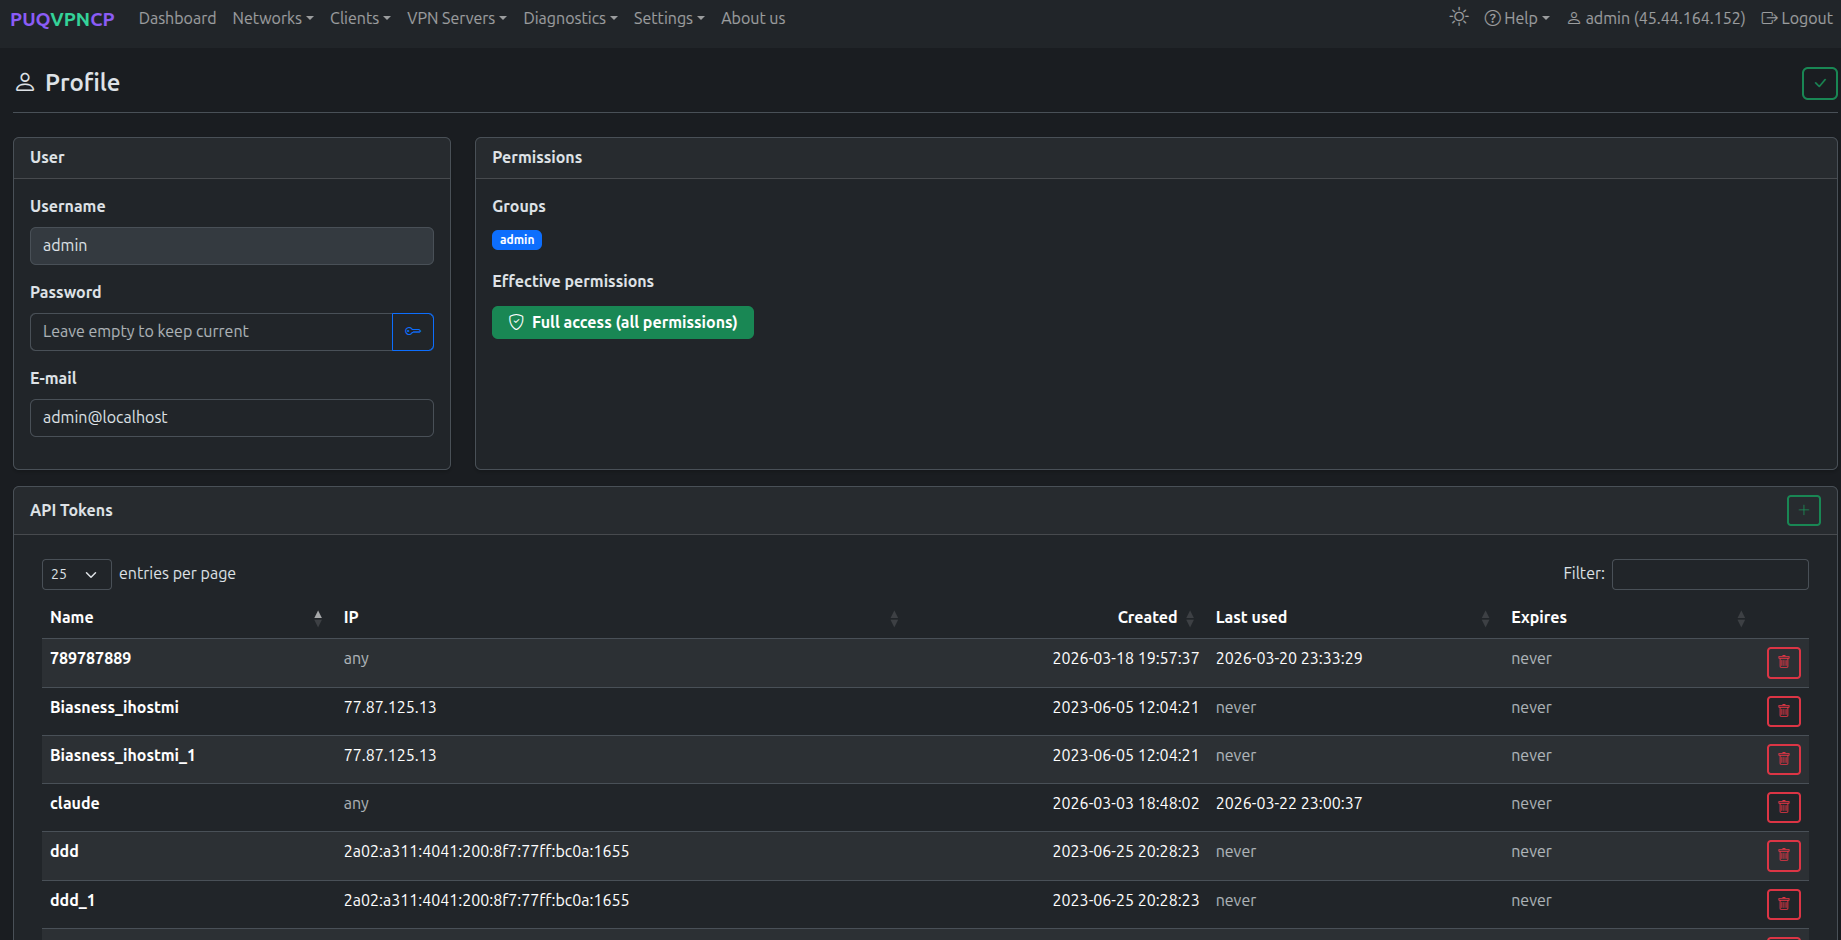
## 2. Issue an API token
The module authenticates to the panel with a **Bearer token** issued from the admin's profile page.
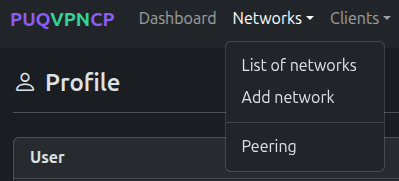
### Step 1 — Open Profile
Click your username in the top-right corner of the panel and select **Profile**.

*26-puqvpncp-profile-menu.png*
### Step 2 — Open the API Tokens section
Scroll down to the **API Tokens** card. Click the green **+** button on the right to create a new token.
*27-puqvpncp-profile-tokens.png*
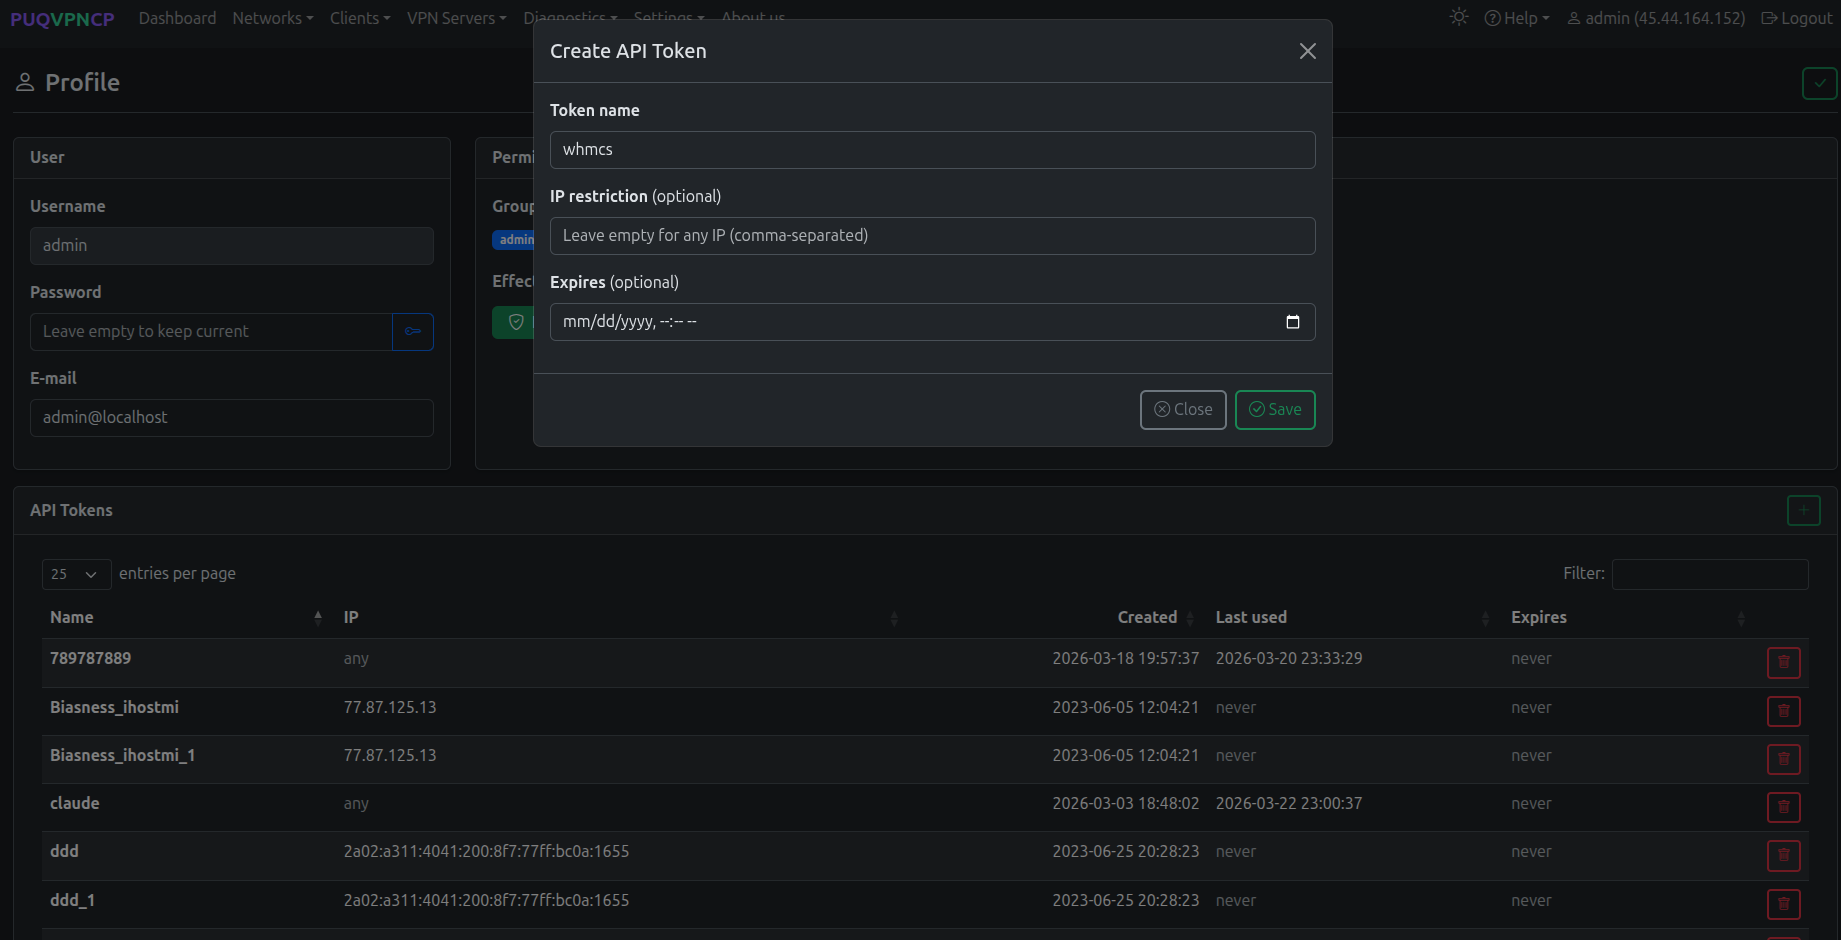
### Step 3 — Create the token
Fill in the modal:
- **Token name** — a label that identifies the consumer, e.g. `whmcs`.
- **IP restriction** *(optional)* — a comma-separated list of IPs allowed to use this token. Leave empty to accept the token from any IP, or set it to your WHMCS server's IP for tighter security.
- **Expires** *(optional)* — an expiration date. Leave empty for a non-expiring token.
Click **Save**.
*28-puqvpncp-token-create.png*
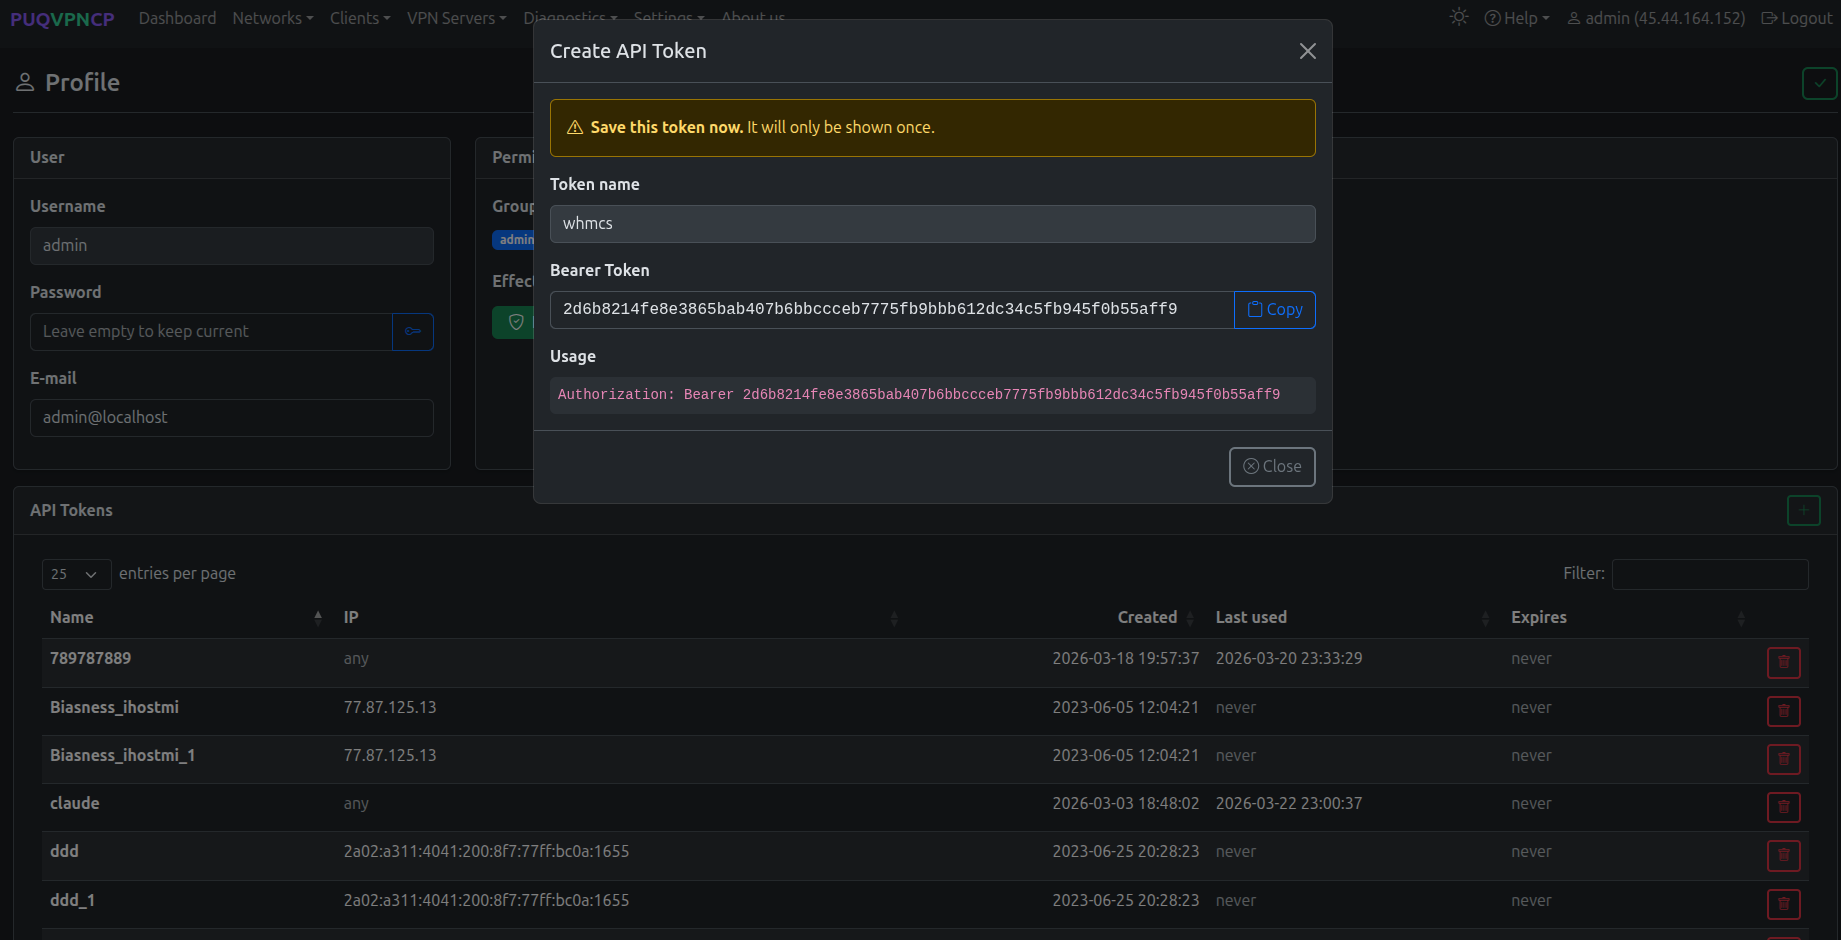
### Step 4 — Copy the Bearer token
The next dialog shows the **Bearer Token**. Click **Copy** and store it somewhere safe — **the token is shown only once and cannot be retrieved later**. If you lose it, delete the token and generate a new one.
*29-puqvpncp-token-bearer.png*
> The token grants the user's **effective permissions** — the `admin` group used in the screenshot has full access. For tighter control, create a dedicated user/permission group on the panel and issue a token for that user instead.
You will paste this token into the **Password** field of the WHMCS server record — see [Add server](05-add-server.md).
---
## 3. Create a VPN network
The module needs at least one VPN network on the panel. On the WHMCS product configuration page, every available network is listed as a tickable `server → network` pair.
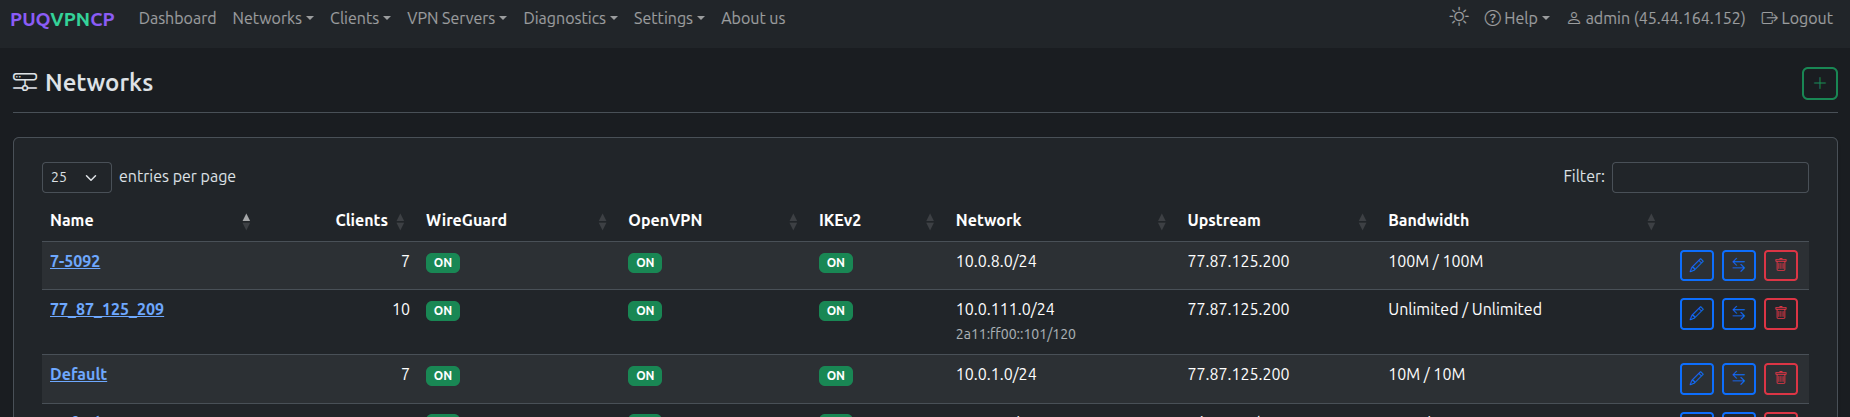
### Step 1 — Open the Networks list
In the top menu, open **Networks → List of networks**.
*30-puqvpncp-networks-menu.png*
The list shows every existing network with the status of WireGuard / OpenVPN / IKEv2, the IPv4 subnet, the upstream interface and the bandwidth caps.
*31-puqvpncp-networks-list.png*
### Step 2 — Add a network
Click the green **+** button in the top-right corner of the Networks page. Fill the **Create** form:
- **Name** — internal identifier of the network (used in the WHMCS product configuration).
- **Description** *(optional)* — human-readable note.
- **Subnet (IPv4 CIDR)** — VPN subnet that will be assigned to clients (e.g. `10.0.6.0/24`).
- **WireGuard IP / OpenVPN IP / IKEv2 IP** — gateway addresses for each protocol inside the subnet.
- **Upstream** — the host network interface used as the egress for this VPN network.
- **VPN Domain** *(optional)* — overrides the global VPN Domain in all client configs for this network.
- **DNS 1 / DNS 2** — DNS servers pushed to clients.
- **Bandwidth Download / Upload** — network-wide caps in Mbit/s (`0` = unlimited).
- **Disable NAT** — leave unchecked unless you route the VPN subnet upstream yourself.
Click the green **✓** in the top-right to save. Protocols (WireGuard / OpenVPN / IKEv2) are configured **after** the network is created.

*32-puqvpncp-network-create.png*
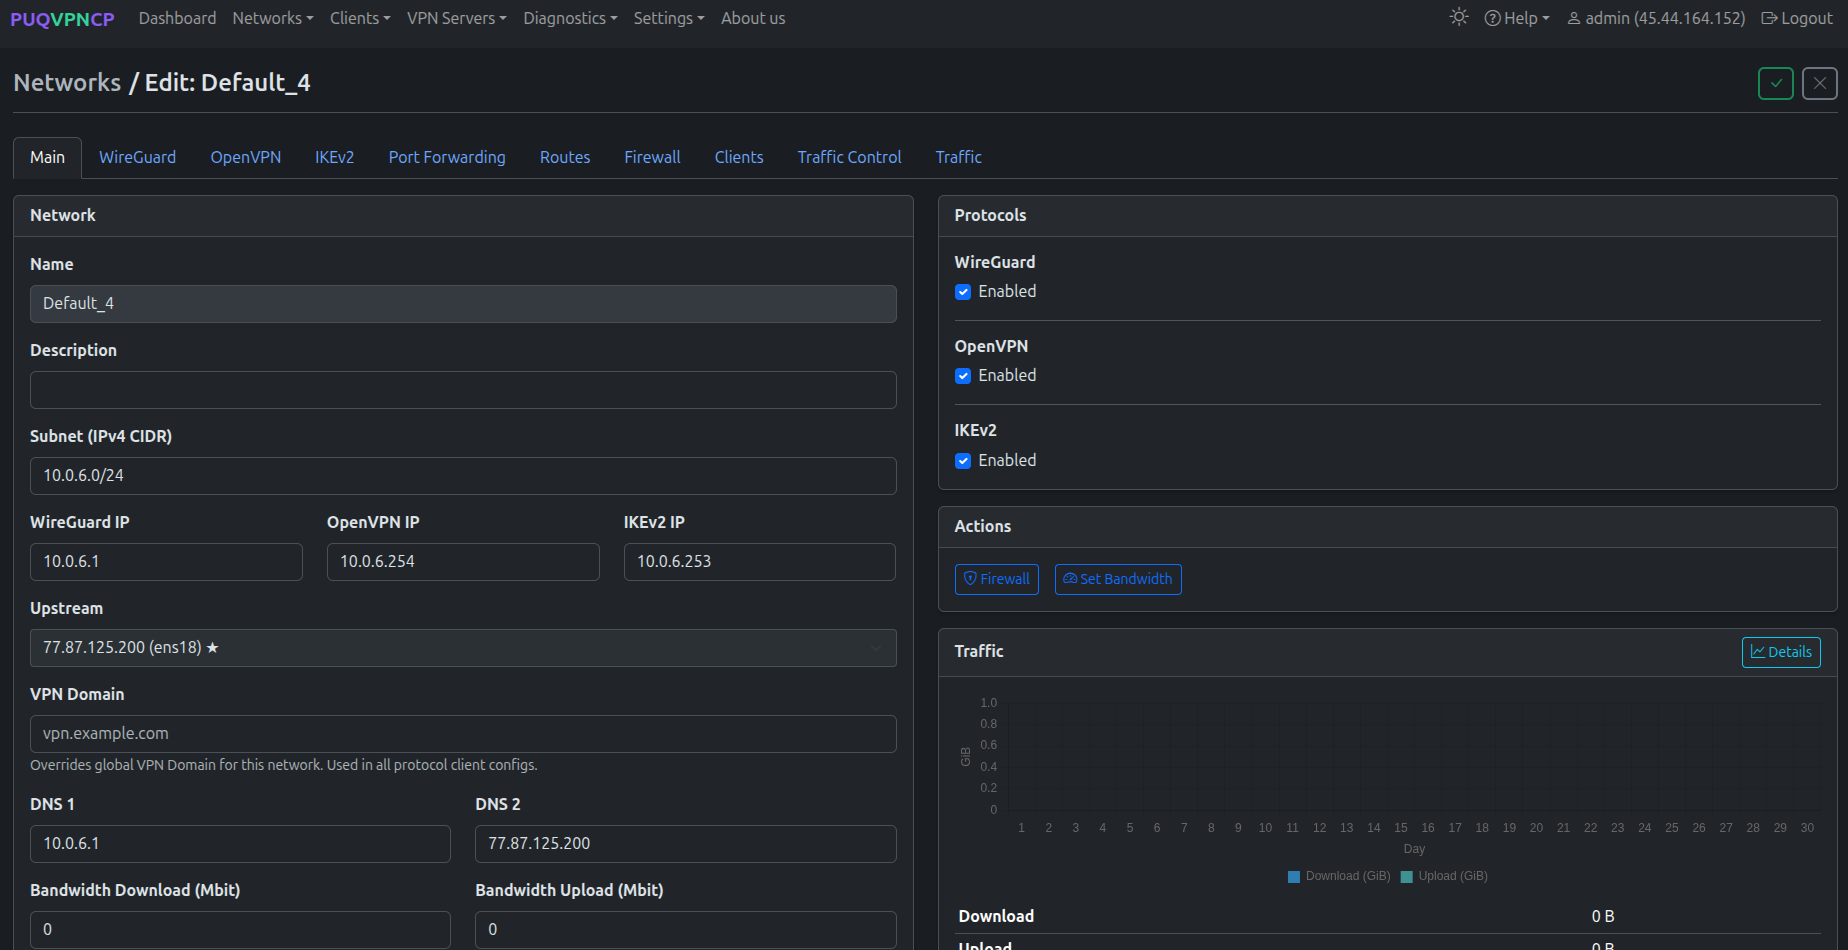
### Step 3 — Enable protocols on the network
After saving, you land on the network's **Edit** page with a row of tabs (Main / WireGuard / OpenVPN / IKEv2 / Port Forwarding / Routes / Firewall / Clients / Traffic Control / Traffic) and a **Protocols** card on the right.
Tick **Enabled** for every protocol you want to offer to customers via WHMCS. The WHMCS module reads this state from `GET /api/v1/network/{name}` — disabled protocols are hidden in the client area and shown greyed-out (with a tooltip) in the admin service tab.
*33-puqvpncp-network-edit-protocols.png*
Open each protocol-specific tab (**WireGuard**, **OpenVPN**, **IKEv2**) to fine-tune ports, ciphers, MTU and other parameters as needed. Defaults are sensible for most deployments.
---
## What's next
- Add the panel to WHMCS — see [Add server](05-add-server.md).
- Configure a WHMCS product backed by this panel — see [Product configuration](06-product-configuration.md).
# Add server (PUQVPNCP panel)
### PUQVPNCP module **[WHMCS](https://puqcloud.com/link.php?id=77)**
##### [Order now](https://puqcloud.com/whmcs-module-puqvpncp.php) | [Download](https://download.puqcloud.com/WHMCS/servers/PUQ_WHMCS-PUQVPNCP/) | [COMMUNITY](https://community.puqcloud.com/) | [PUQVPNCP](https://puqvpncp.com/)
## Add a PUQVPNCP panel to WHMCS
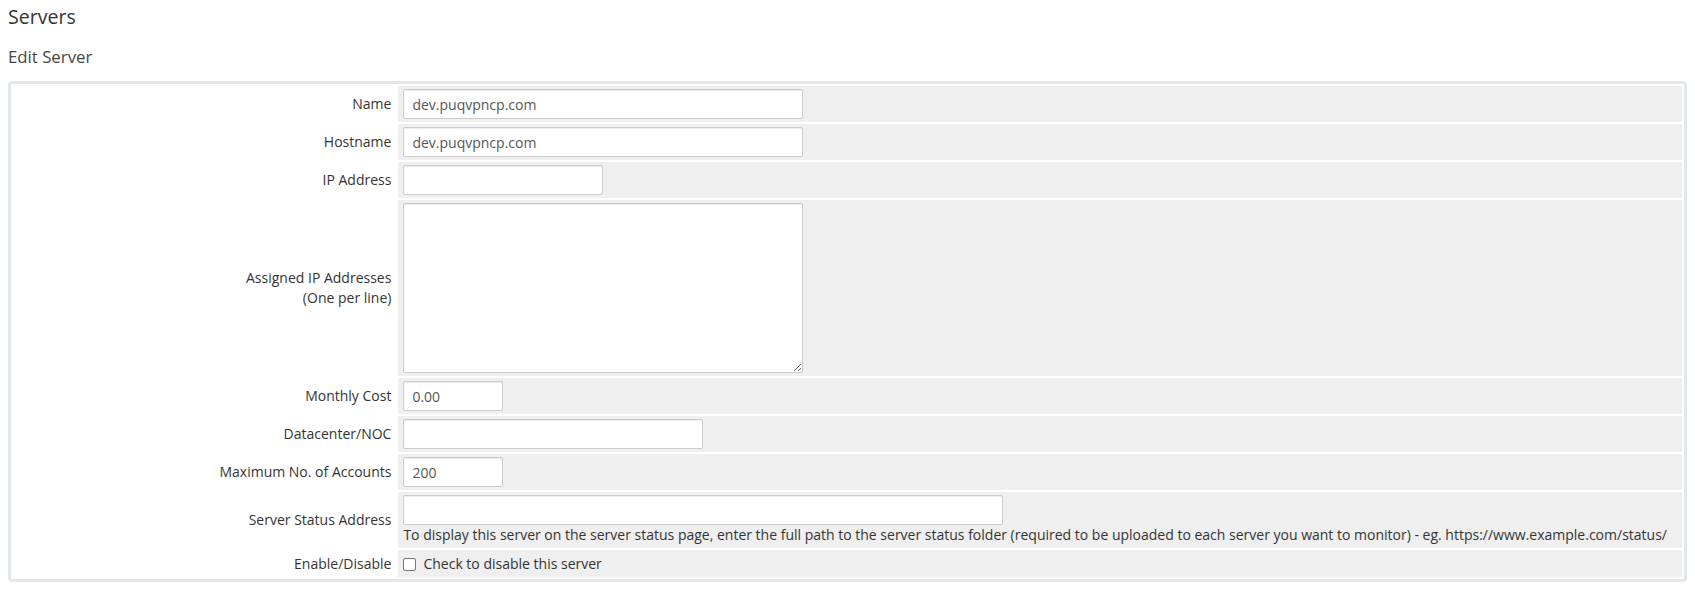
Navigate to **System Settings → Servers → Add New Server**.
---
### Step 1 — General settings
- **Name** — a descriptive label (e.g. `VPN Frankfurt`).
- **Hostname** — the panel's fully-qualified hostname (e.g. `vpn-fra.example.com`).
- **IP** — optional; used as fallback if hostname is empty.
- **Port** — leave empty for the default `80`/`443`, or enter a custom port.
- **Secure** — check when the panel is served over HTTPS (strongly recommended). SSL verification is enabled when this is checked.
*04-add-server-1.png*
---
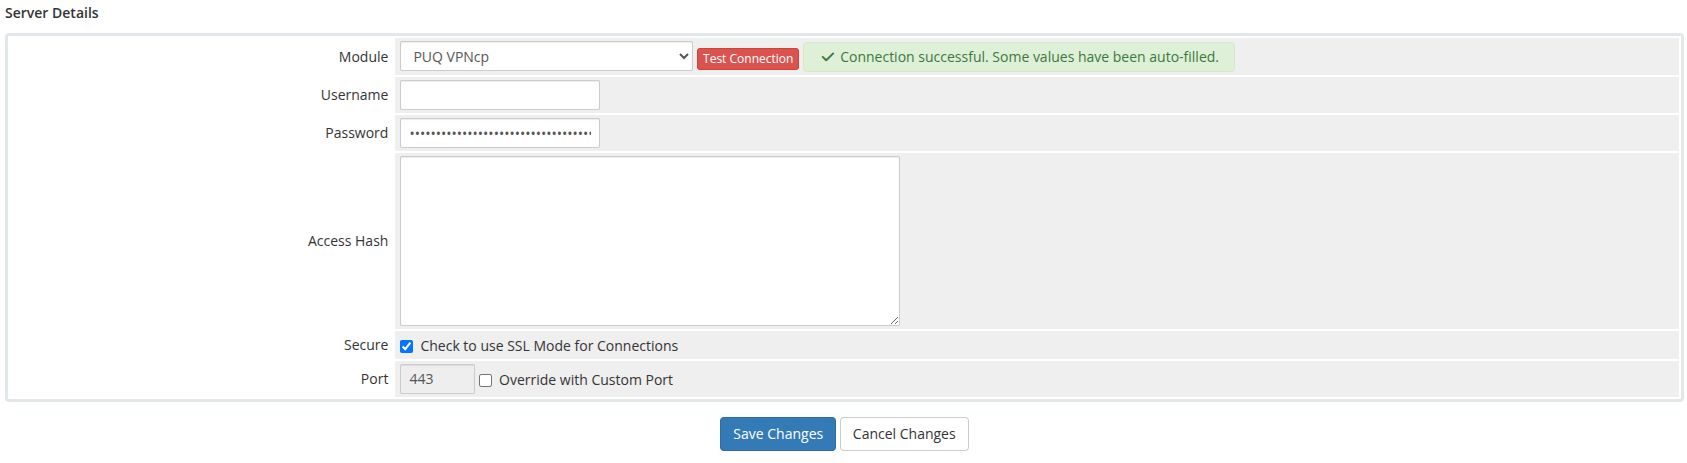
### Step 2 — Module settings
1. Server Details section, **Type** dropdown: select **puqVPNcp**.
2. Leave **Username** empty (not used).
3. Paste the panel's **API token** into the **Password** field — this is what the module sends as `Authorization: Bearer ` for every API call.
4. Click **Test connection** — it calls `/api/v1/system/status`, `/api/v1/license` and `/api/v1/network` and returns OK on success.
*05-add-server-2.png*
> **Important:** The API token must have permissions to manage clients, query networks and read system status.
---
### Step 3 — Assign to a server group
For multi-server deployments, add the server to a WHMCS **server group**. Products bound to that group will list networks from every reachable server in it on the **VPN Networks** tree of the product configuration page — pick which `server → network` pairs are allowed for that product.
# Product configuration
### PUQVPNCP module **[WHMCS](https://puqcloud.com/link.php?id=77)**
##### [Order now](https://puqcloud.com/whmcs-module-puqvpncp.php) | [Download](https://download.puqcloud.com/WHMCS/servers/PUQ_WHMCS-PUQVPNCP/) | [COMMUNITY](https://community.puqcloud.com/) | [PUQVPNCP](https://puqvpncp.com/)
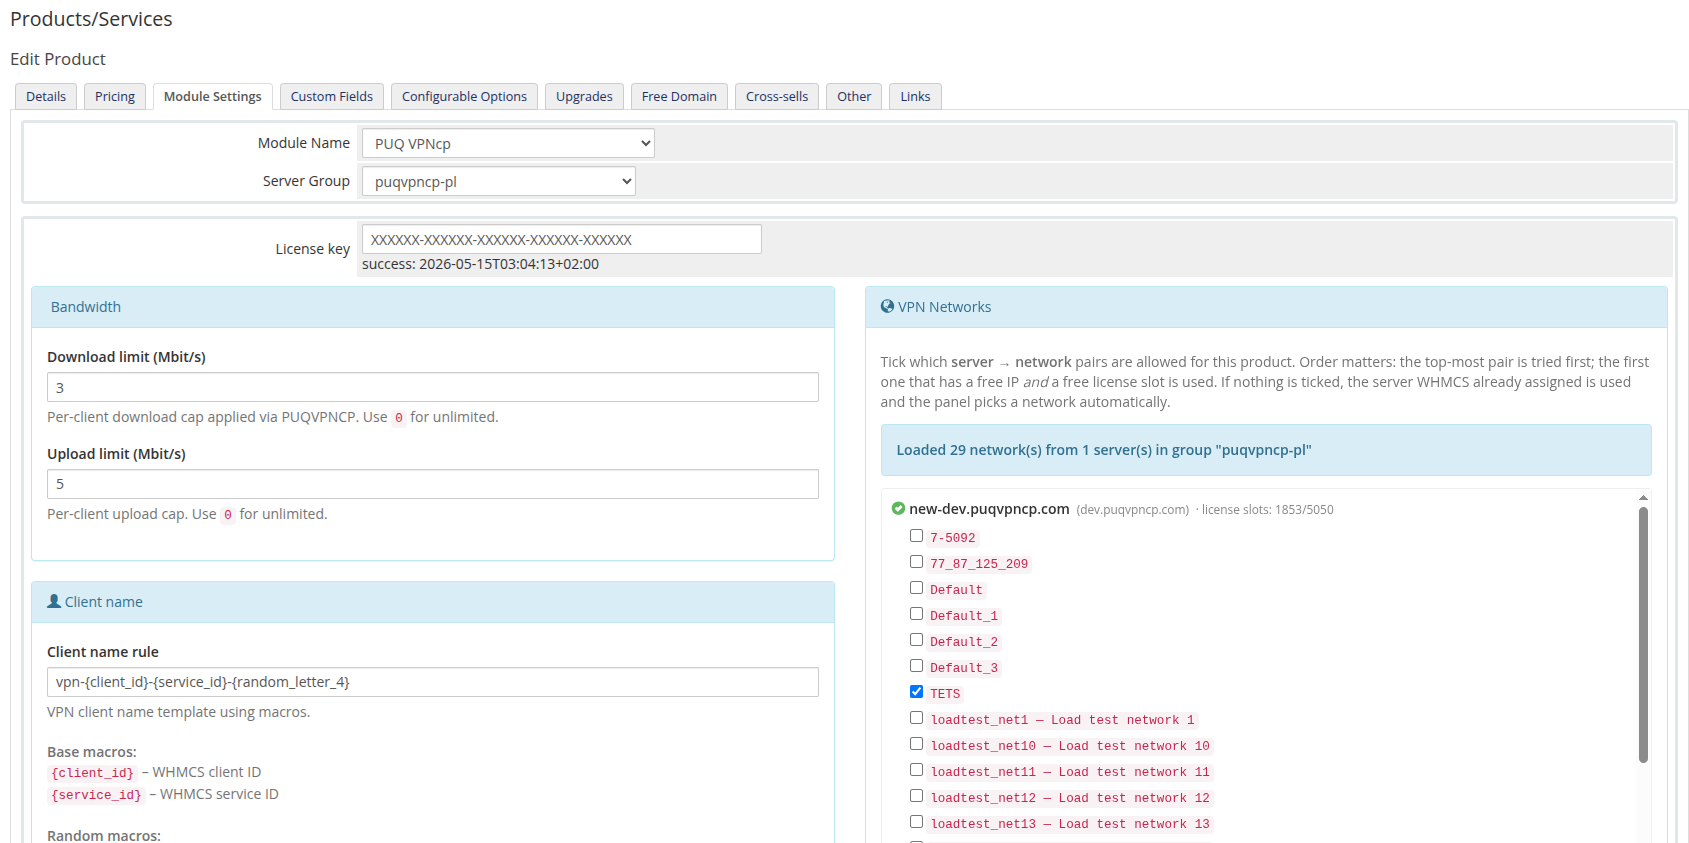
## Create the product
1. Navigate to **System Settings → Products/Services → Products/Services → Create a New Product**.
2. Product Type: **Other**. Give it a name (e.g. `VPN — 100 Mbit/s`).
3. On the **Module Settings** tab, pick **PUQ VPNcp** as the module and assign a server (or a server group).
After saving, the module injects a **PUQ VPNcp settings** panel below the standard module fields. All settings are persisted as JSON in `configoption24` of the product record.
*06-product-configuration.png*
---
## License key
Paste your licence key into the **License key** field. The status row underneath shows the result of the most recent verification (`success: ` or an error). The module re-checks the licence on every product page render and caches the result for the validity period encoded in the licence response.
---
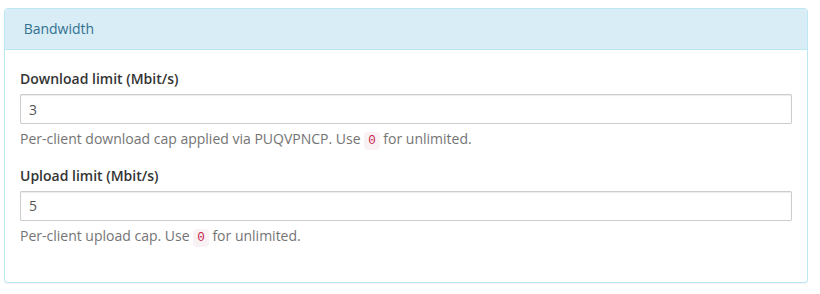
## Bandwidth
*07-product-config-bandwidth.png*
- **Download limit (Mbit/s)** — per-client download cap. `0` = unlimited.
- **Upload limit (Mbit/s)** — per-client upload cap. `0` = unlimited.
The module applies these via `PUT /api/v1/client/{name}` right after creating the client. The `POST /api/v1/client` create call does not accept bandwidth fields — the limits are always pushed through the follow-up update.
If the bandwidth update fails, the freshly created client is **rolled back** with `DELETE /api/v1/client/{name}` so billing never starts charging for an uncapped VPN.
---
## Client name
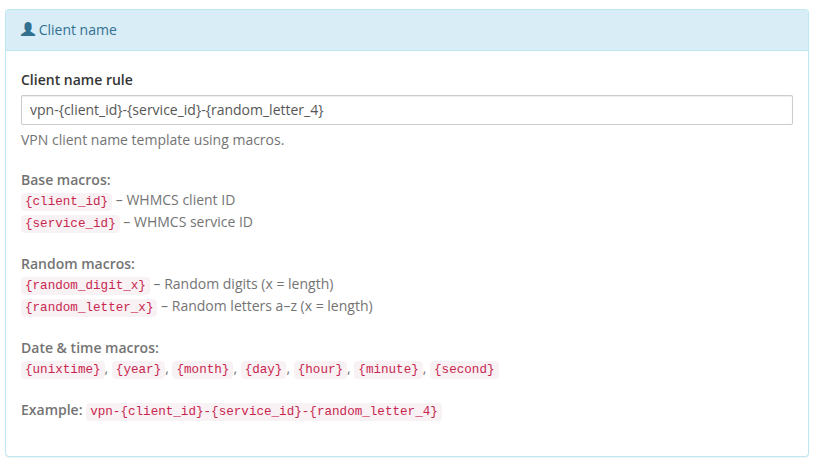
*08-product-config-client-name.png*
- **Client name rule** — template used to generate the VPN client identifier. Default: `vpn-{client_id}-{service_id}-{random_letter_4}`.
Available macros:
**Base macros**
- `{client_id}` — WHMCS client ID
- `{service_id}` — WHMCS service ID
**Random macros**
- `{random_digit_N}` — N random digits (e.g. `{random_digit_5}`)
- `{random_letter_N}` — N random lowercase letters
**Date & time macros**
- `{unixtime}`, `{year}`, `{month}`, `{day}`, `{hour}`, `{minute}`, `{second}`
If the generated name already exists in `tblhosting.username`, the module appends `-1`, `-2`, … until it finds a free one.
---
## Client Area
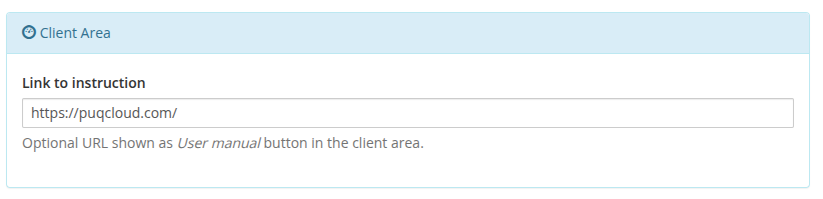
*09-product-config-client-area.png*
- **Link to instruction** — optional URL shown as a **User manual** button at the top of the client-area home screen. Leave empty to hide the button.
---
## Welcome Email
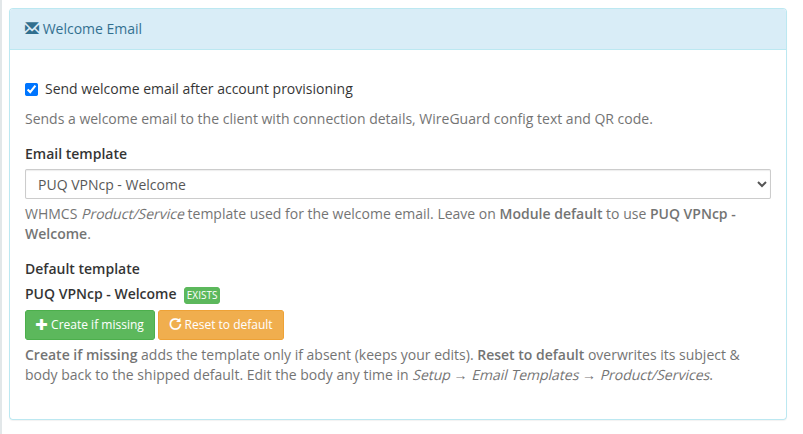
*34-product-config-welcome-email.png*
Send the customer everything they need to connect the moment their service goes live — automatically.
- **Send welcome email after account provisioning** — when ticked, the module emails the client right after the VPN account is created. The message includes the connection details, the full WireGuard config text and an inline QR code, plus a direct link to manage the service.
- **Email template** — which WHMCS *Product/Service* email template to send. Leave it on **Module default** to use the bundled **PUQ VPNcp - Welcome** template, or pick any of your own templates.
- **Default template** — a one-click manager for the bundled template:
- **Create if missing** — adds the **PUQ VPNcp - Welcome** template only if it does not exist yet (your edits are never overwritten). The badge shows **EXISTS** once it is in place.
- **Reset to default** — restores the shipped subject and body (use it if you edited the template and want to start over).
You can edit the template body any time in **Setup → Email Templates → Product/Services**. It supports these merge variables: `{$puq_client_name}`, `{$puq_vpn_ip}`, `{$puq_vpn_username}`, `{$puq_vpn_password}`, `{$puq_wg_config}`, `{$puq_wg_qr_html}`, `{$puq_service_url}`.
> The template is also auto-created on the first send if it is still missing, so the feature works even if you never touch the buttons.
---
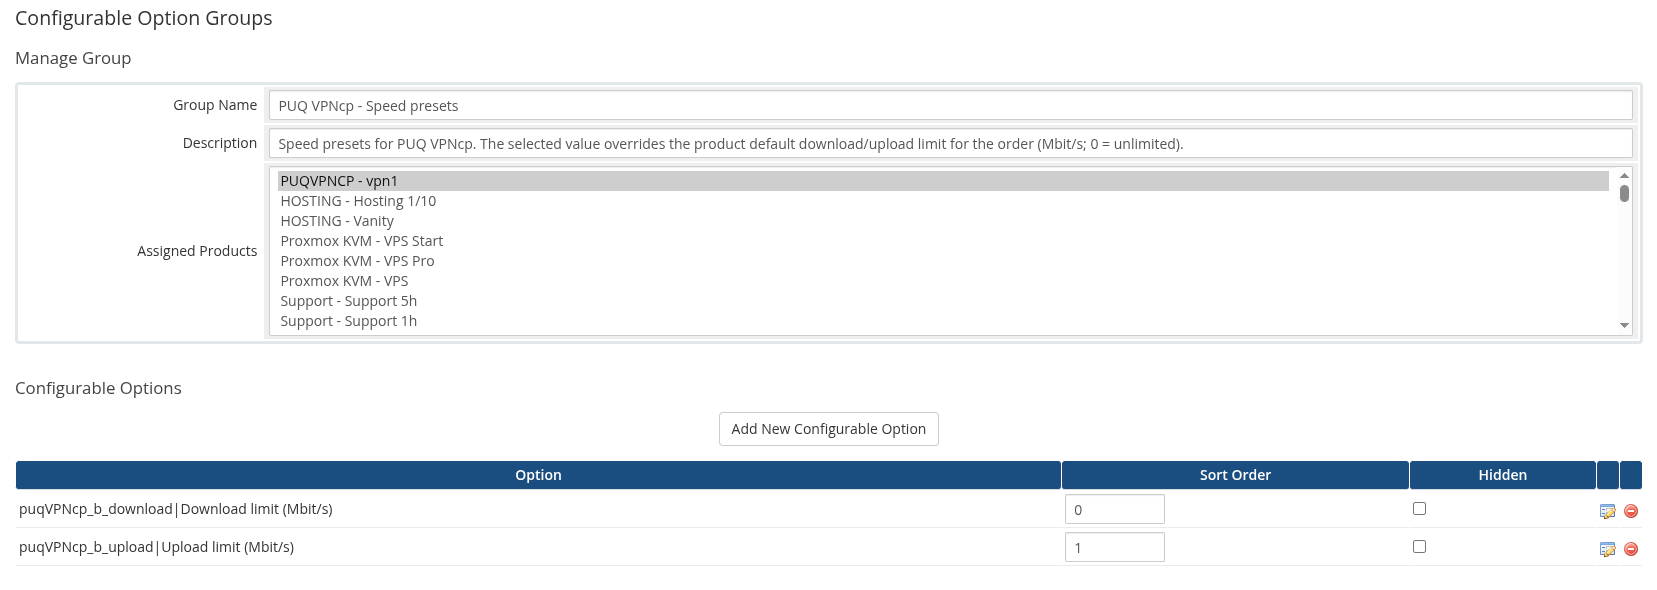
## Speed presets (Configurable Options)
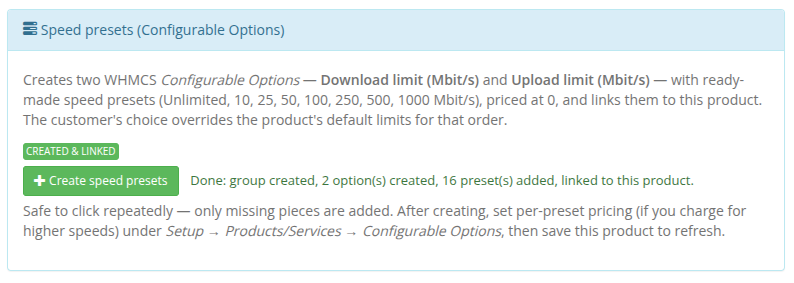
*35-product-config-speed-presets.png*
WHMCS **Configurable Options** let your customers choose their own download/upload speed at order time and change it later through an upgrade/downgrade — turning a single product into a whole speed-tier line-up. The module reads the selected values and applies them to the VPN client, overriding the product's default bandwidth.
Setting these up by hand is fiddly, so the module does it for you with **one button**.
### One-click creation
Click **Create speed presets** and the module instantly builds and links everything:
- a configurable-option group **PUQ VPNcp - Speed presets**;
- two dropdown options — **Download limit (Mbit/s)** and **Upload limit (Mbit/s)**;
- ready-made presets in each: **Unlimited, 10, 25, 50, 100, 250, 500, 1000 Mbit/s**, priced at `0` in every currency;
- a link from the group to the current product.
The button is **safe to click repeatedly** — only missing pieces are added, so your prices and edits are preserved. The status badge reflects the current state: *Not created yet* → *Created & linked*.
### What gets created
| Option Name | Type | Reads as | Preset sub-options (`value\|label`) |
|-------------|------|----------|--------------------------------------|
| `puqVPNcp_b_download\|Download limit (Mbit/s)` | Dropdown | per-client download cap (Mbit/s) | `0\|Unlimited`, `10\|10 Mbit/s`, `25\|25 Mbit/s`, `50\|50 Mbit/s`, `100\|100 Mbit/s`, `250\|250 Mbit/s`, `500\|500 Mbit/s`, `1000\|1000 Mbit/s` |
| `puqVPNcp_b_upload\|Upload limit (Mbit/s)` | Dropdown | per-client upload cap (Mbit/s) | same set as above |
The text before the `|` is the internal name the module matches on; the text after the `|` is what the customer sees. The sub-option value `0` means **Unlimited**.
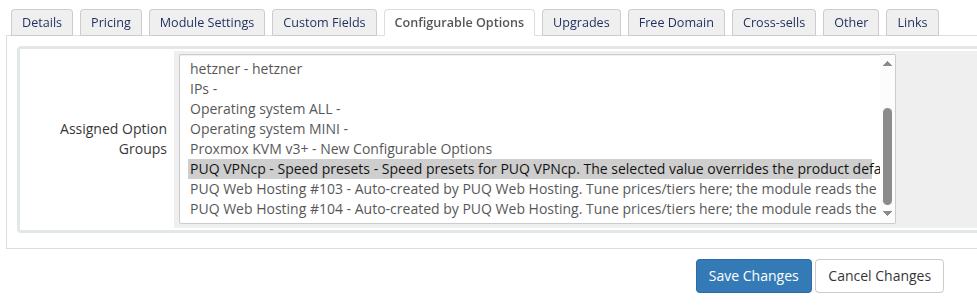
*36-configurable-options-assigned.png*
The group appears on the product's **Configurable Options** tab (already ticked under *Assigned Option Groups*) and under **System Settings → Products/Services → Configurable Options**.
*37-configurable-options-group.png*
### Pricing the tiers
By default every preset is free (`0.00`), so customers can switch speeds at no cost. To monetise faster tiers, open each option and set per-cycle pricing on the sub-options — for example charge more for `500 Mbit/s` than for `50 Mbit/s`.

*38-configurable-options-download.png*
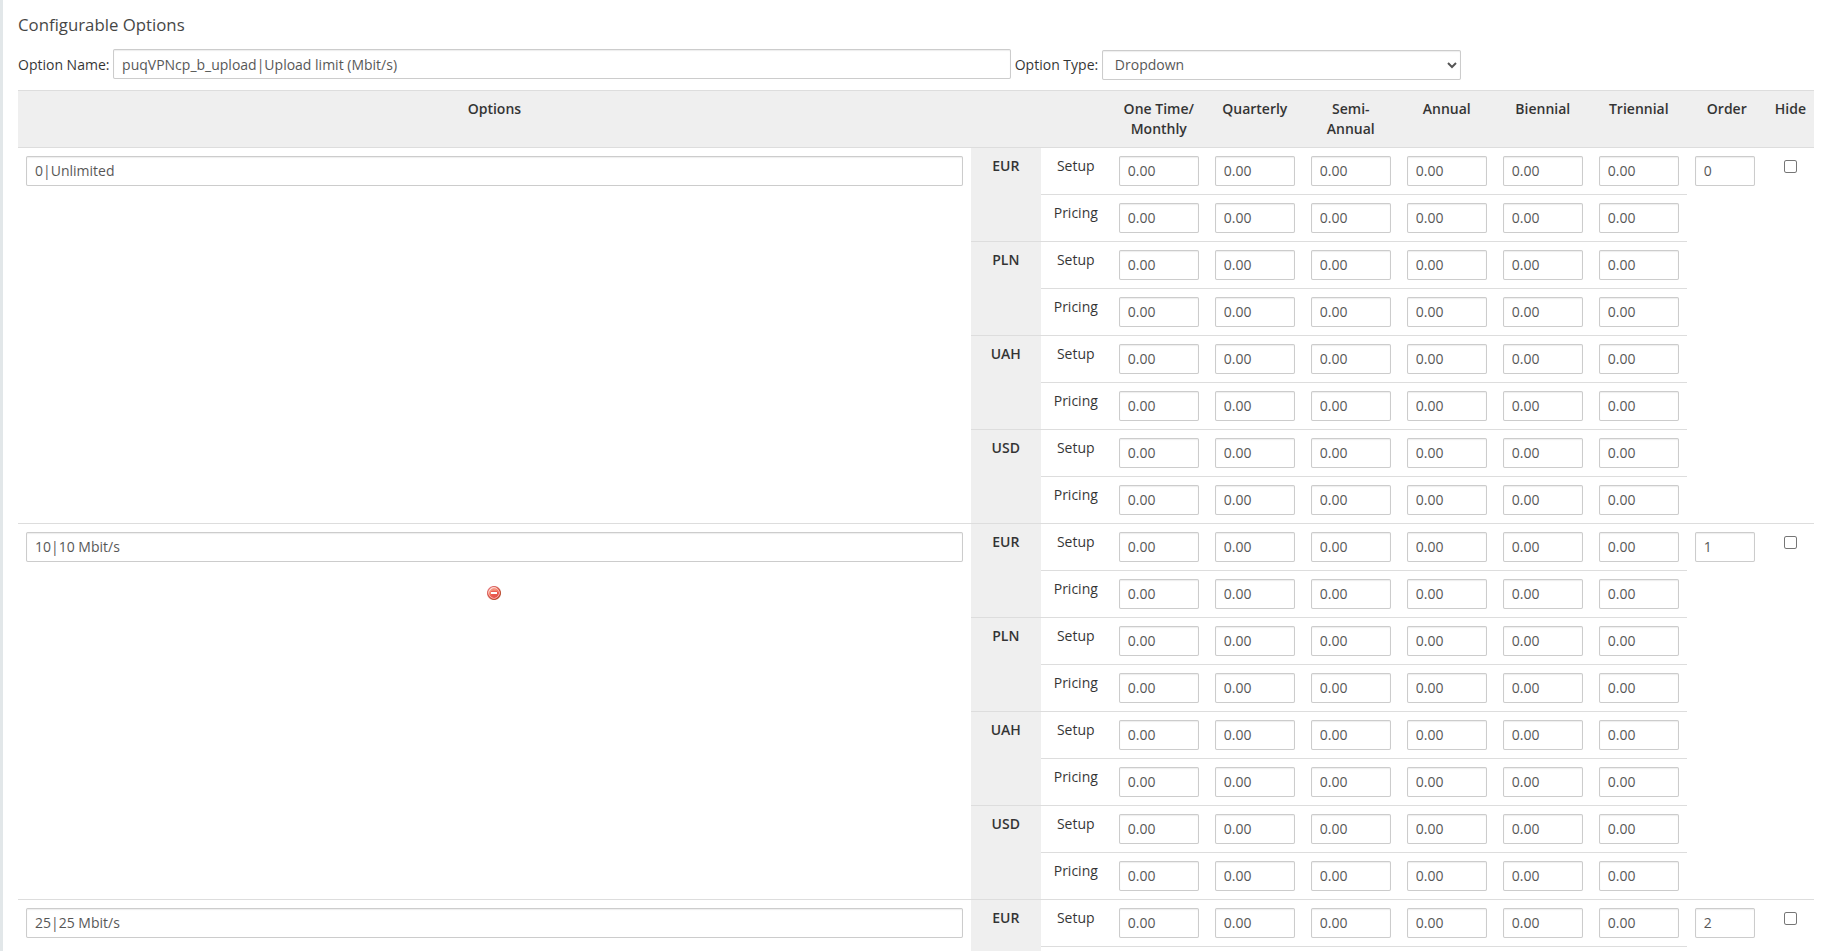
*39-configurable-options-upload.png*
After changing pricing, **save the product** to refresh the panel status.
### How the value is applied
| Priority | Source | When used |
|----------|--------|-----------|
| 1 (wins) | Configurable Option selection | whenever the option is assigned to the service (including `0` = unlimited) |
| 2 | Product **Bandwidth** default (Module Settings) | when no speed option is assigned |
On **provisioning** and on every **upgrade/downgrade** (WHMCS calls the module's change-package routine for configurable-option changes too), the module pushes the resolved `b_download` / `b_upload` to the panel via `PUT /api/v1/client/{name}`. So a customer who upgrades from *100 Mbit/s* to *500 Mbit/s* gets the new speed applied automatically, with no manual work for you.
> Adding the speed options is optional. Skip the button and every service simply uses the product's **Bandwidth** defaults.
---
## VPN Networks
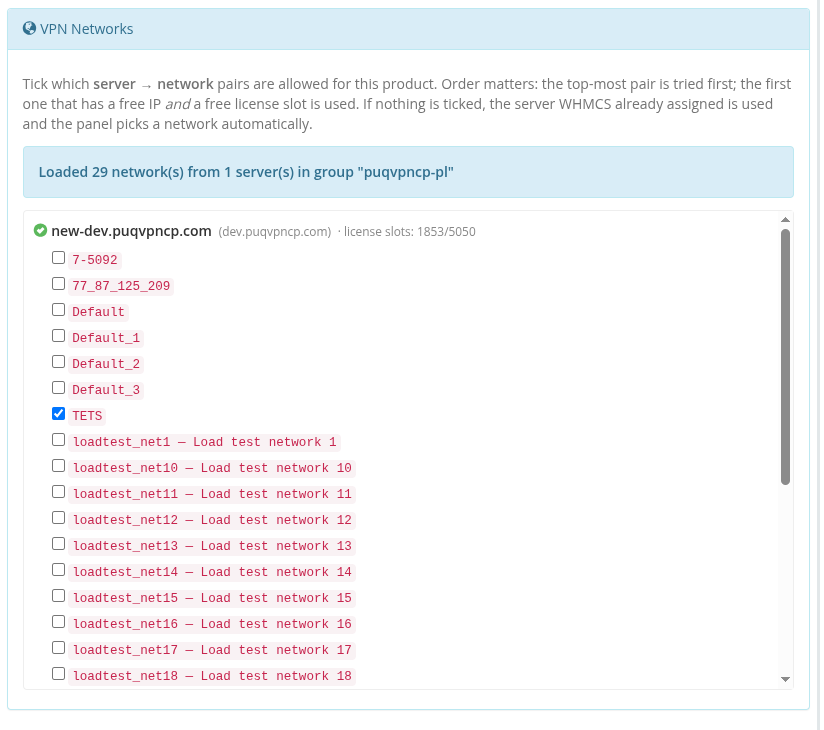
*10-product-config-vpn-networks.png*
On opening the product, the module contacts **every enabled `puqVPNcp` server in the product's server group** and calls `GET /api/v1/network` on each. The UI then shows a per-server tree — unreachable servers remain visible with their error so you can see exactly what went wrong. License-slot capacity (`used / total`) is displayed next to each reachable server.
Each checkbox is a **`server → network`** pair. Ticking the same network name on two different servers creates two independent pairs.
### How a server and network are picked at deploy time
1. The module reads all ticked pairs in the order they appear in the list (top to bottom).
2. For each pair it checks (a) free licence slots on that server (`count_accounts < count_accounts_available` from `GET /api/v1/system/status`) **and** (b) at least one free IP on the network (`GET /api/v1/network/{name}/available_ip`).
3. **The first pair that passes both checks wins.** The service is **reassigned** (`tblhosting.server` is updated) to the selected server, and the client is created on the selected network via `POST /api/v1/client`.
4. If nothing is ticked, `network_name` is omitted from the create call and the panel of the server WHMCS already picked decides automatically.
5. If ticks exist but none is deployable (every chosen server is out of slots or every chosen network is full), provisioning fails — nothing is silently created on a wrong network.
Because order matters, put your **preferred** pairs at the top.
If the whole group is unreachable a red banner appears at the top of the section; previously saved ticks are preserved through hidden inputs so your configuration is not lost when you re-save the product.
---
## Metric Billing (optional)

*11-product-config-metric-billing.png*
The module ships a WHMCS **Usage Billing** provider with two metrics:
- **Bandwidth Usage Download (GB)**
- **Bandwidth Usage Upload (GB)**
Enable the metrics on the product's **Pricing** tab to charge customers per GB of traffic. The provider pulls daily totals directly from the panel via `GET /api/v1/client/{name}/traffic/{Y}/{m}` and reports them in gigabytes for the current calendar month. No local accumulation table is used — values come live from the panel each time WHMCS runs the usage-billing cron.
# Client area
What your customers see after ordering a PUQVPNCP-backed service in WHMCS: the home screen with VPN client details and protocol configs, the traffic statistics page, and email notifications.
# Home screen
### PUQVPNCP module **[WHMCS](https://puqcloud.com/link.php?id=77)**
##### [Order now](https://puqcloud.com/whmcs-module-puqvpncp.php) | [Download](https://download.puqcloud.com/WHMCS/servers/PUQ_WHMCS-PUQVPNCP/) | [COMMUNITY](https://community.puqcloud.com/) | [PUQVPNCP](https://puqvpncp.com/)
The product details page is the **Information** tab — the module's main client-facing view. Everything on it is loaded dynamically from the PUQVPNCP panel via AJAX the moment the page opens.

*12-home-screen-connection.png*
---
## Sidebar
The module replaces the default *Information* sidebar entry with two of its own:
- **Information** — the page documented here.
- **Traffic statistics** — see [Traffic statistics](03-traffic-statistics.md).
*13-home-screen-sidebar.png*
---
## User manual
If a *Link to instruction* is set in the product configuration, a **User manual** button appears at the top of the page linking to that URL.
---
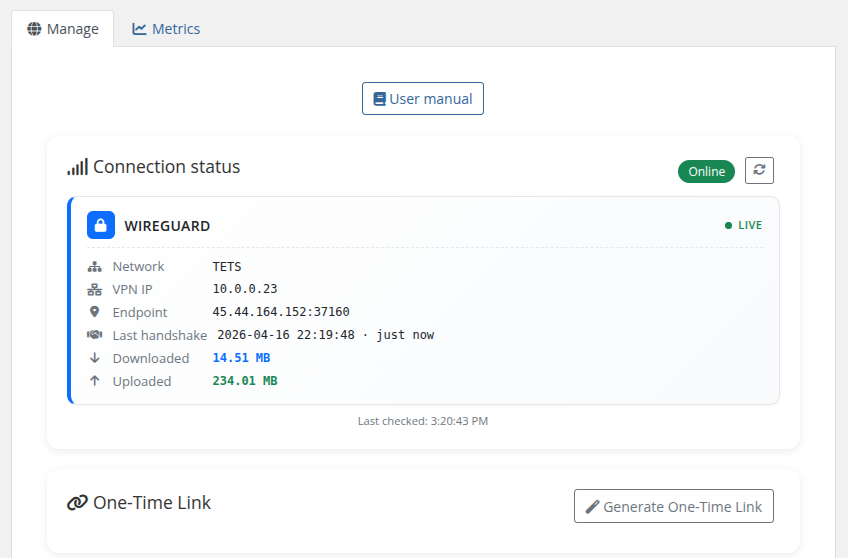
## Connection status
A live block at the top of the page that polls `/api/v1/client/online` every 5 seconds (paused while the browser tab is hidden) and shows one card per protocol the client is currently connected on:
- **WireGuard** — blue accent, lock icon
- **OpenVPN** — amber accent, shield icon
- **IKEv2** — purple accent, key icon
Each card shows: VPN IP, network, endpoint, last handshake (with relative time suffix) and downloaded/uploaded bytes (humanised B/KB/MB/GB). The header pill is **Online** (green) when at least one protocol reports a session, **Offline** (red) otherwise.
A manual **Refresh** button next to the badge forces an immediate fetch.
---
## One-Time Link (OTL)
The fastest way to get a customer connected on a new device: one secure link that carries **everything** — all protocol configurations, QR codes and credentials — on a page that opens **only once**.
The **Generate One-Time Link** button calls `POST /api/v1/client/{name}/otl` and returns a single-use URL. The card explains the feature up front, and once a link is generated it offers a read-only field with **Copy** and **Open link** buttons, plus a clear warning that the link reveals all connection data and stops working the moment it is opened.

*14-home-screen-otl.png*
> The link is single-use and expires immediately after the first visit — opening it consumes it. Anyone with the link sees the full connection data, so it should be shared only through a trusted channel. Need it again? Just generate a new one. The generate action is POST-only, so an accidental browser prefetch cannot burn the token.
---
## VPN Client
Static card with the panel's authoritative client record:
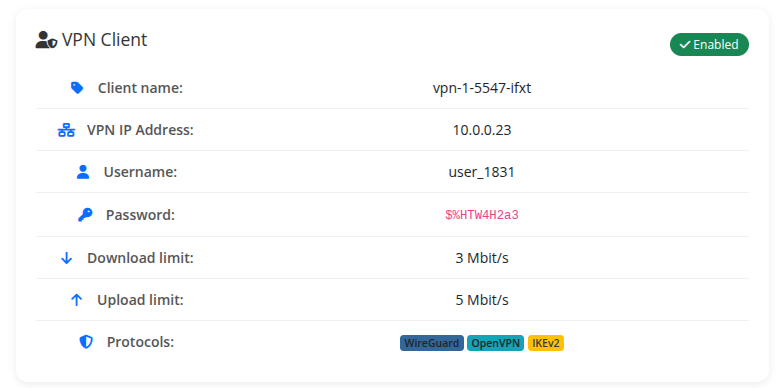
*15-home-screen-vpn-client.png*
- **Client name** — the identifier on the panel
- **VPN IP Address** — assigned IPv4
- **Username** — auth username (used by IKEv2 / OpenVPN)
- **Password** — auth password (shown as ``)
- **Download / Upload limit** — Mbit/s caps or *Unlimited*
- **Protocols** — coloured badges for WireGuard / OpenVPN / IKEv2; only protocols actually enabled on the client's network are shown
A status pill in the top-right reads **Enabled** (green) when the panel reports `status:enable`, **Disabled** (red) otherwise.
---
## WireGuard
Shown when WireGuard is enabled on the client's network:
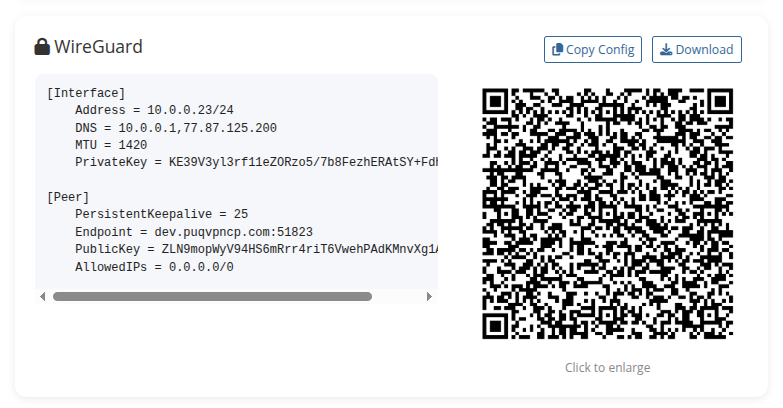
*16-home-screen-wireguard.png*
- `.conf` text in a monospace block with **Copy Config** and **Download** buttons
- QR code generated by the panel (click to enlarge in a lightbox; close with the × button or `Esc`)
---
## OpenVPN
Shown when OpenVPN is enabled on the client's network:
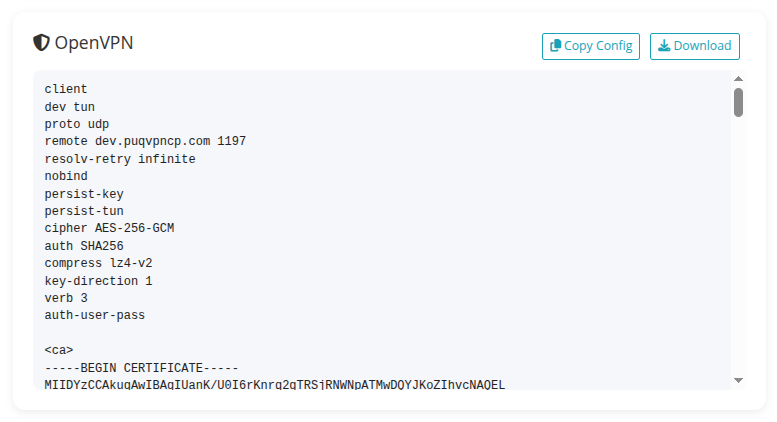
*17-home-screen-openvpn.png*
The full `.ovpn` profile text with **Copy Config** and **Download** buttons.
---
## IKEv2
Shown when IKEv2 is enabled on the client's network:
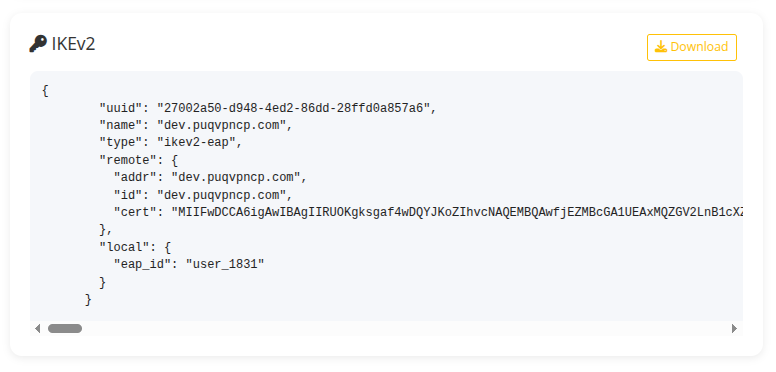
*18-home-screen-ikev2.png*
The IKEv2 profile (JSON) with a **Download** button.
---
## Traffic statistics
The **Traffic statistics** entry in the sidebar opens a separate page — see [Traffic statistics](03-traffic-statistics.md).
# Email notification
### PUQVPNCP module **[WHMCS](https://puqcloud.com/link.php?id=77)**
##### [Order now](https://puqcloud.com/whmcs-module-puqvpncp.php) | [Download](https://download.puqcloud.com/WHMCS/servers/PUQ_WHMCS-PUQVPNCP/) | [COMMUNITY](https://community.puqcloud.com/) | [PUQVPNCP](https://puqvpncp.com/)
The module can send a **welcome email** the moment a VPN account is provisioned, so the customer receives everything needed to connect without opening a ticket.
## What the welcome email contains
- Connection details — VPN client name, IP address, username and password
- The full **WireGuard configuration** text, ready to paste into a client
- An inline **QR code** for instant mobile import
- A button linking straight to the service management page
## Enabling it
Turn it on per product with **Send welcome email after account provisioning** on the *Module Settings* tab, and choose which template to send (the bundled **PUQ VPNcp - Welcome** by default). See [Welcome Email](../03-installation-and-configuration/06-product-configuration.md#welcome-email) for the full setup, including the one-click template creator and the available merge variables.
The template lives in **Setup → Email Templates → Product/Services** and can be edited freely. If it is missing when the first welcome email is due, the module creates it automatically.
## Resending on demand
An admin can re-send the welcome email at any time from the service's admin tab — see [Email notification (admin)](../05-admin-area/01-product-information.md#email-notification). This works even if the per-product auto-send option is disabled.
# Traffic statistics
### PUQVPNCP module **[WHMCS](https://puqcloud.com/link.php?id=77)**
##### [Order now](https://puqcloud.com/whmcs-module-puqvpncp.php) | [Download](https://download.puqcloud.com/WHMCS/servers/PUQ_WHMCS-PUQVPNCP/) | [COMMUNITY](https://community.puqcloud.com/) | [PUQVPNCP](https://puqvpncp.com/)
A dedicated page in the client area showing monthly traffic for the VPN client. Entered from the service sidebar via **Traffic statistics** (`action_m=traffic_statistics`).

*19-traffic-statistics.png*
## Controls
- **Year** / **Month** selectors — default to the current month. The Year dropdown lists the last four years.
- **Load** button — refetches data for the chosen period.
## Chart
A line chart rendered with Chart.js showing per-day:
- **Download** (blue line, filled area)
- **Upload** (green line, filled area)
All values are formatted with a human-readable `B / KB / MB / GB / TB` scale on hover and on the Y axis.
## Totals
Two cards below the chart show the aggregated total download (blue) and total upload (green) for the selected month.
## Data source
The page calls `GET /api/v1/client/{name}/traffic/{year}/{month}` on the PUQVPNCP panel every time **Load** is pressed. The module does not cache samples — values come live from the panel each render.
# Admin area
What the module exposes to WHMCS administrators: the service admin tab, the license alert on the homepage, and the product settings panel.
# Product information (admin service tab)
### PUQVPNCP module **[WHMCS](https://puqcloud.com/link.php?id=77)**
##### [Order now](https://puqcloud.com/whmcs-module-puqvpncp.php) | [Download](https://download.puqcloud.com/WHMCS/servers/PUQ_WHMCS-PUQVPNCP/) | [COMMUNITY](https://community.puqcloud.com/) | [PUQVPNCP](https://puqvpncp.com/)
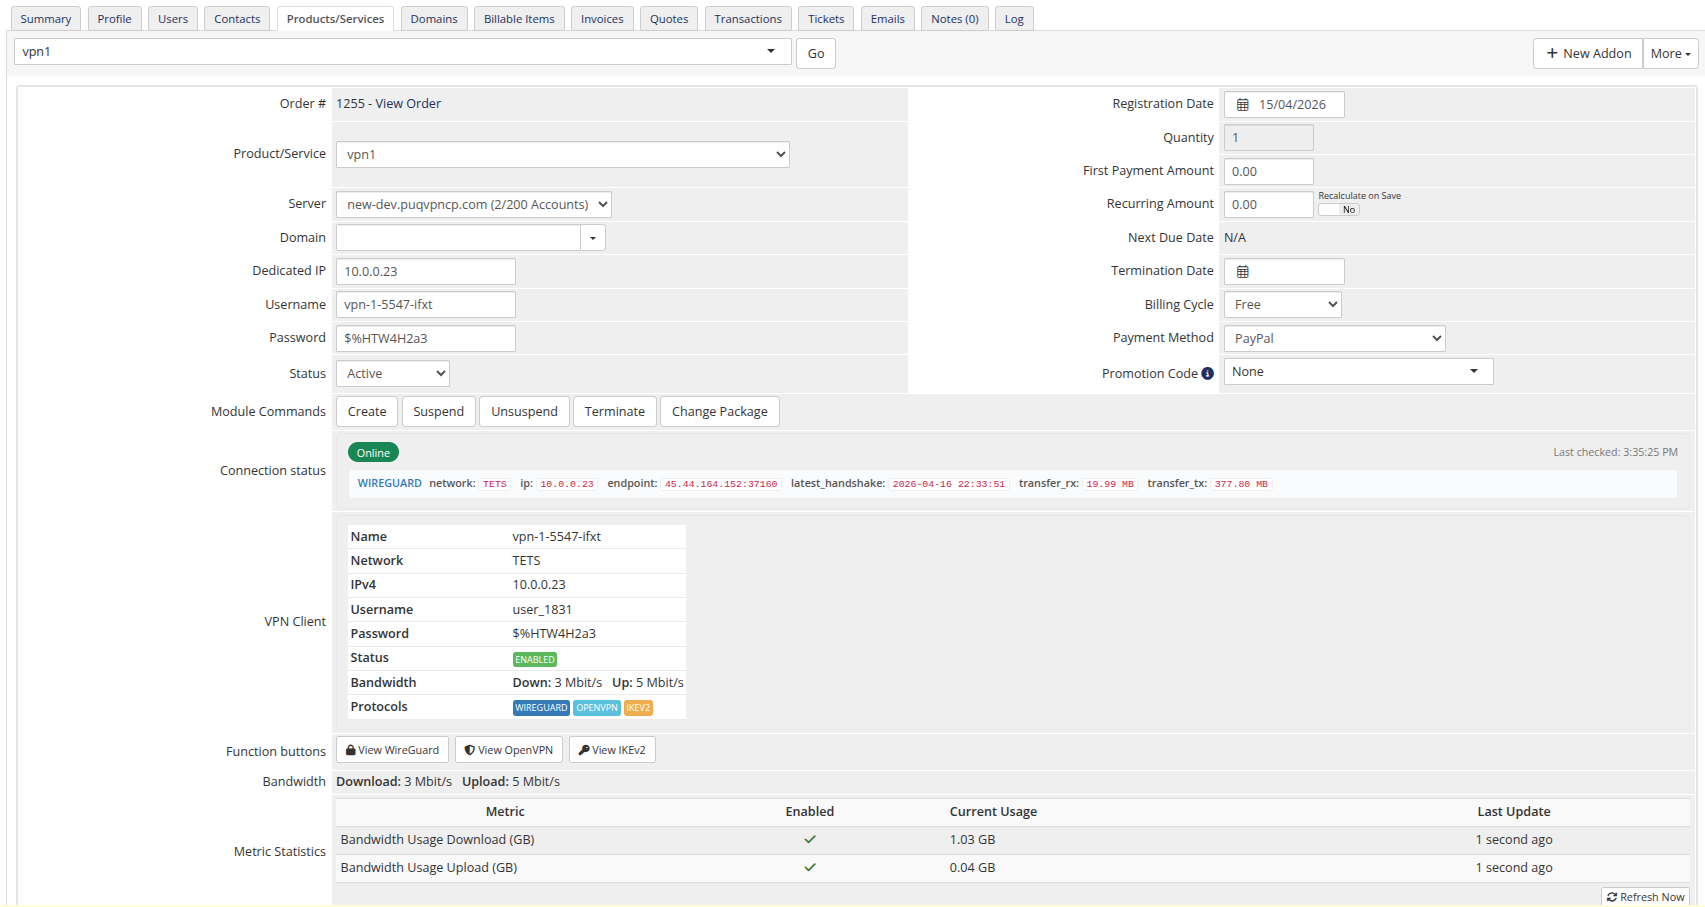
Open **Clients → View/Search Clients → (client) → Products/Services → (service)**. The module adds a set of fields to the standard admin service tab — all populated live from the PUQVPNCP panel via AJAX.
*20-product-information.png*
---
## License Verification
Shown only when the product's licence check fails — a red **errorbox** with the verification error. Fix the licence on the product configuration page and re-open the service.
---
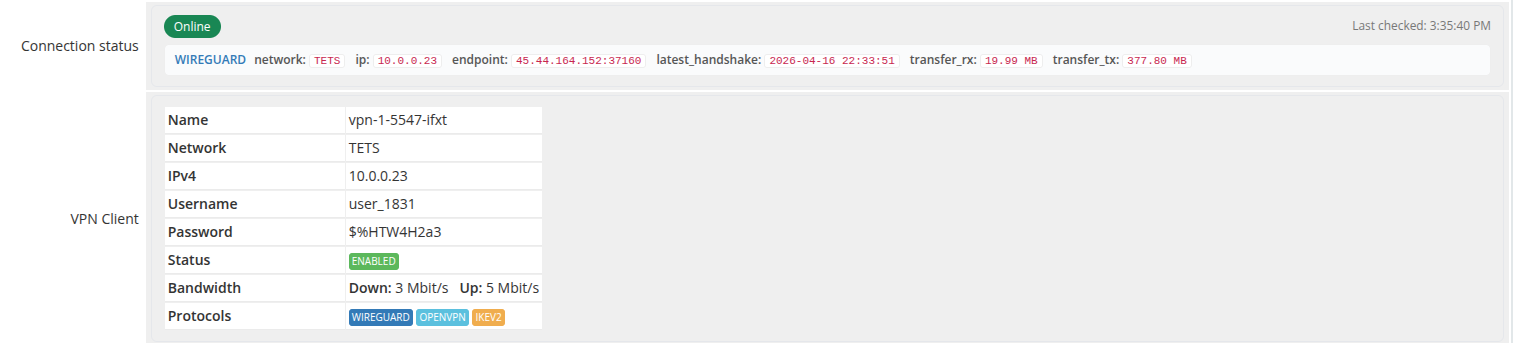
## Connection status
*21-product-info-status-client.png*
A live block at the top that polls `GET /api/v1/client/online` every 5 seconds and shows one row per protocol the client is currently connected on.
The header pill is **Online** (green) when at least one protocol reports a session, **Offline** (red) otherwise. *Last checked* timestamp updates after every poll.
Each protocol row exposes the raw fields the panel returns (network, IP, endpoint, last handshake, transferred bytes), formatted for readability — bytes are humanised, the latest handshake gets a relative-time chip.
---
## VPN Client
A table populated from `GET /api/v1/client/{name}` with the panel's authoritative client record:
- **Name** — identifier on the panel
- **Network** — VPN network the client is on
- **IPv4** — assigned VPN IP
- **Username** — auth username (used by IKEv2 / OpenVPN)
- **Password** — auth password
- **Status** — `Enabled` (green label) or `Disabled` (red)
- **Bandwidth** — current `Down: X Mbit/s · Up: Y Mbit/s` caps (or *Unlimited*)
- **Protocols** — coloured labels for WireGuard / OpenVPN / IKEv2; protocols disabled on the network are shown greyed-out and struck-through
---
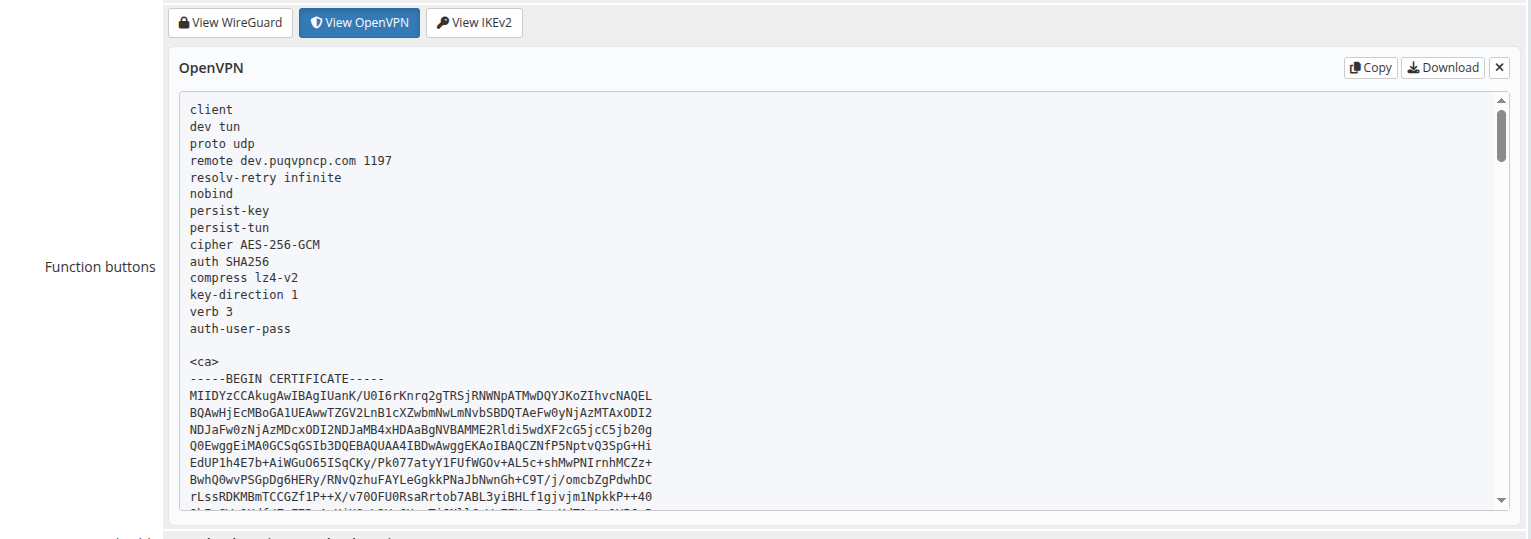
## Function buttons
Three buttons that fetch and inline-display the protocol configuration for the client. Buttons for protocols disabled on the network are greyed-out, marked `cursor:not-allowed`, and carry a tooltip explaining why they cannot be opened.
### View WireGuard

*22-product-info-wireguard.png*
Calls `GET /api/v1/client/{name}/config/text` and `/config/qr`. Shows the `.conf` text alongside the QR code (the layout collapses to full-width text when no QR is returned). **Copy** and **Download** buttons act on the visible config; **×** closes the panel.
### View OpenVPN
*23-product-info-openvpn.png*
Calls `GET /api/v1/client/{name}/openvpn/profile` and shows the full `.ovpn` file. The block uses 100 % width because no QR is rendered.
### View IKEv2
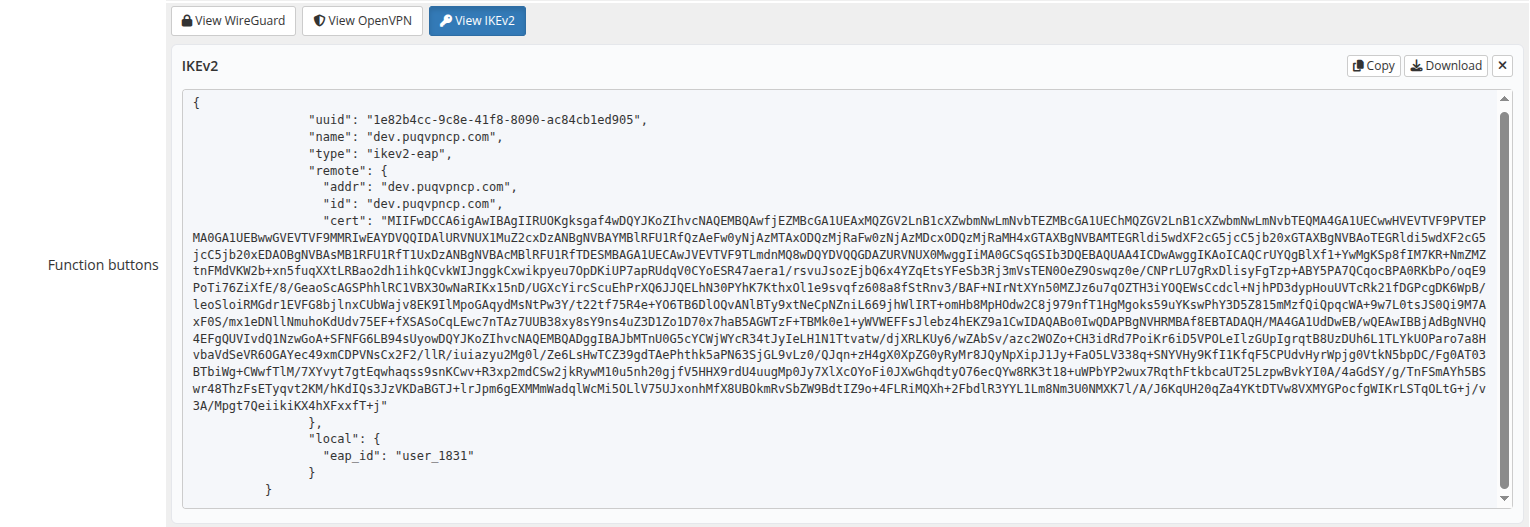
*24-product-info-ikev2.png*
Calls `GET /api/v1/client/{name}/ikev2/profile` and shows the IKEv2 profile (JSON). Long base64 certificate strings wrap inside the box and never expand it horizontally.
---
## Bandwidth

*25-product-info-bandwidth.png*
Read-only summary of the per-client caps configured on the product: **Download** and **Upload** in Mbit/s, or **Unlimited** when the value is `0`. To change them, edit the product's *Bandwidth* fields on the Module Settings tab.
---
## Email notification

*40-product-info-email-notification.png*
A **Resend welcome email** button that re-sends the welcome message — connection details, WireGuard config and QR code — to the client's registered email address on demand. Handy when a customer loses the original email or you onboard them manually.
It sends **regardless** of the product's auto-send setting, so you can leave automatic sending off and dispatch the email only when you choose. A confirmation prompt protects against accidental clicks; the result is shown inline.

*41-product-info-resend-success.png*
---
## Metric Statistics
WHMCS-rendered block (not part of the module's tab fields, shown when the product has Usage Billing metrics enabled). Lists the metric, its enabled state, current usage and last update time. Values come from the module's metric provider, which fetches monthly traffic totals from the panel via `GET /api/v1/client/{name}/traffic/{Y}/{m}` and reports them in gigabytes.
Click **Refresh Now** to re-poll the panel immediately.