# PUQVPNCP

# 00. Changelog

## v2.3.0 — September 2026

**Major release** — AmneziaWG anti-censorship stealth WireGuard protocol, strict protocol package validation, reactive multi-tab network interface, and expanded REST API.

- - - - - -

### AmneziaWG Protocol Support (Anti-Censorship &amp; DPI Bypass)

Full integration of AmneziaWG — a modified WireGuard protocol engineered to evade Deep Packet Inspection (DPI) and strict firewall censorship:

- **Stealth Obfuscation** — randomized magic headers (H1, H2, H3, H4) replace standard WireGuard packet headers, defeating protocol fingerprinting
- **Junk Packet Padding** — configurable junk packets (Jc count, Jmin/Jmax size range, S1/S2 sizes) injected during handshake to mask traffic patterns
- **Per-Network &amp; Global Defaults** — configure default obfuscation parameters globally, with optional per-network custom overrides
- **One-Click Client Provisioning** — generate AmneziaWG configs and QR codes directly from the client management interface
- **Dual-Stack &amp; Bandwidth Control** — supports IPv4/IPv6 dual-stack addressing and HTB bandwidth traffic shaping
- **Diagnostics &amp; Monitoring** — live `awg show` status, peer handshake inspection, and real-time bandwidth metrics

- - - - - -

### Protocol Package Validation &amp; Safety

Prevents enabling VPN protocols whose underlying system packages are not installed:

- **Environment Verification** — checks for `wireguard` / `wireguard-tools`, `amneziawg` / `amneziawg-tools`, `openvpn`, and `strongswan`
- **Network Form Guard** — network settings validate installed packages before allowing a protocol to be activated
- **API Error Mapping** — returns structured, field-mapped error messages highlighting the exact protocol input in the web UI

- - - - - -

### Reactive Multi-Tab Network Interface

Seamless AJAX experience when managing networks with multiple VPN protocols:

- **Dynamic Tabs** — toggling a protocol checkbox in the main settings tab instantly creates or removes the corresponding protocol tab in the DOM
- **Multi-Tab AJAX Update** — clicking Save commits the network settings and automatically reloads data across all active protocol tabs without a full page reload
- **Zero Page Disruption** — preserve user input and navigation state across tabs

- - - - - -

### REST API &amp; OpenAPI 3.0.3 Expansion

- **170+ REST API Endpoints** — full coverage for WireGuard, AmneziaWG, OpenVPN, IKEv2, firewall, DNS, and diagnostics
- **Full Swagger Documentation** — updated OpenAPI 3.0.3 schema with AmneziaWG parameters and response models

- - - - - -

- - - - - -

## v2.1.1 — March 2026

**Patch release** — client bandwidth fix and OpenVPN session stability improvements.

- - - - - -

### Client Bandwidth Fix

Fixed an issue where per-client bandwidth limits were ignored during client creation:

- **Root cause:** when a network had default bandwidth limits configured, they always overwrote client-specified values — even when the user explicitly set a custom bandwidth
- **Fix:** network bandwidth is now used only as a default when the client has no custom value (`0` / not specified). Client-specified bandwidth always takes priority
- **Impact:** custom per-client bandwidth limits now work correctly on creation

- - - - - -

### OpenVPN Session Stability

Client operations (add, edit, delete) no longer restart the OpenVPN server, preserving all active sessions:

- **Client Add** — generates certificates, updates CCD and password files without restarting OpenVPN (re-read on next client connect)
- **Client Edit** — updates CCD and password files only, no restart needed
- **Client Delete** — revokes certificate and updates CCD/password files, CRL is re-read automatically
- **Management socket** — added per-network OpenVPN management socket for targeted client disconnect
- **DisconnectAllProtocols** — new function that disconnects a specific client from WireGuard, OpenVPN, and IKEv2 simultaneously. Called when a client is disabled or deleted
- **Firewall ordering** — `WaitForOvpnInterface()` ensures tun interfaces are up before committing policy routing after any OpenVPN restart

- - - - - -

### Documentation

- **DNS page** — rewritten documentation with new screenshots for all three tabs (Settings, Records, Ad Blocking)

- - - - - -

- - - - - -

## v2.1.0 — March 2026

**Feature release** — DNS-based ad blocking for all VPN clients, plus stability improvements.

- - - - - -

### DNS Ad Blocking

Built-in ad and tracker blocking via bind9 Response Policy Zone (RPZ):

- **Block ads and trackers** for all VPN clients at the DNS level — no client-side software needed
- **4 built-in block lists** — Steven Black Unified (~130k domains), OISD Small (~70k), Pete Lowe (~3k), Hagezi Multi Pro (~170k)
- **Custom lists** — add any blocklist URL (supports hosts format, domain-per-line, wildcard, and adblock filter format)
- **Whitelist** — exclude specific domains from blocking (including all subdomains)
- **Auto-update** — block lists are refreshed automatically every 24 hours
- **Per-list toggle** — enable/disable individual lists without deleting them
- **Statistics** — total blocked domains count, per-list domain count, last update timestamp
- **Zero client configuration** — works automatically for all clients using the built-in DNS server
- **Separate RPZ zone** — ad blocking uses its own zone (`rpz.adblock`), independent of static DNS records

<table id="bkmrk-metric-value-default"><thead><tr><th>Metric</th><th>Value</th></tr></thead><tbody><tr><td>Default blocked domains</td><td>~130,000+</td></tr><tr><td>With all lists enabled</td><td>~250,000+</td></tr><tr><td>Update frequency</td><td>Every 24 hours</td></tr><tr><td>Supported formats</td><td>hosts, domain-per-line, wildcard, adblock filter</td></tr></tbody></table>

New API endpoints:

<table id="bkmrk-method-endpoint-desc"><thead><tr><th>Method</th><th>Endpoint</th><th>Description</th></tr></thead><tbody><tr><td>GET</td><td>`/dns/adblock`</td><td>Get ad blocking configuration</td></tr><tr><td>PUT</td><td>`/dns/adblock`</td><td>Enable/disable, toggle lists</td></tr><tr><td>POST</td><td>`/dns/adblock/update`</td><td>Force update block lists</td></tr><tr><td>POST</td><td>`/dns/adblock/lists`</td><td>Add custom block list</td></tr><tr><td>DELETE</td><td>`/dns/adblock/lists/{name}`</td><td>Delete custom list</td></tr><tr><td>GET</td><td>`/dns/adblock/whitelist`</td><td>List whitelisted domains</td></tr><tr><td>POST</td><td>`/dns/adblock/whitelist`</td><td>Add domain to whitelist</td></tr><tr><td>DELETE</td><td>`/dns/adblock/whitelist/{name}`</td><td>Remove from whitelist</td></tr></tbody></table>

- - - - - -

### DNS Page Redesign

The DNS configuration page now uses a **tabbed layout**:

- **Settings** tab — DNS server configuration (forwarders, TTL, ACL)
- **Records** tab — static DNS records (RPZ overrides)
- **Ad Blocking** tab — enable/disable, manage block lists and whitelist

- - - - - -

### OpenVPN Startup Fix

Fixed a race condition where OpenVPN clients could lose internet connectivity after server restart:

- **Root cause:** policy routing rules were committed before OpenVPN tunnel interfaces were fully initialized
- **Fix:** replaced fixed 500ms delay with a polling loop (up to 10 seconds) that waits for all OpenVPN `tun` interfaces to appear before committing firewall and routing rules
- **Impact:** eliminates intermittent "no internet" issues for OpenVPN clients after system restart

- - - - - -

### Other Improvements

- **Client creation simplified** — only `network_name` is required; `name`, `username`, `password`, and `ipv4` are auto-filled from suggested data
- **Client fields renamed** — `allowed_IPs` / `allowed_IPs_ipv6` replaced with cleaner `ipv4` / `ipv6` field names (backward-compatible migration)
- **OpenAPI documentation** — 8 new endpoints documented for DNS ad blocking (156+ total)

- - - - - -

- - - - - -

## v2.0.0 — March 2026

**Major release** — complete rewrite with new architecture, third VPN protocol, and dozens of new features.

- - - - - -

### New Architecture: Network → Client → Protocol

The core data model has been redesigned from the ground up:

- **Networks** replace the old per-server configuration — each network has its own subnet, protocol settings, firewall, bandwidth limits, and upstream
- **Clients** belong to a network and inherit its settings — one client, one IP address, all protocols
- **Protocols** are configured per-network: enable or disable WireGuard, OpenVPN, and IKEv2 independently for each network

This architecture allows running multiple isolated VPN networks on a single server, each with completely different configurations.

- - - - - -

### OpenVPN Support

PUQVPNCP now supports **three VPN protocols simultaneously**:

<table id="bkmrk-protocol-new-in-v2.0"><thead><tr><th>Protocol</th><th>New in v2.0</th></tr></thead><tbody><tr><td>WireGuard</td><td>Updated — now per-network</td></tr><tr><td>**OpenVPN**</td><td>**New** — full support with PKI, certificates, custom config</td></tr><tr><td>IKEv2/IPsec</td><td>Updated — now per-network</td></tr></tbody></table>

OpenVPN features include:

- TLS/SSL security with configurable cipher suites
- Built-in certificate management (Root CA, Server, Client certificates)
- Custom server and client configuration directives
- Connection logging and real-time status
- Certificate revocation and renewal
- Automatic `.ovpn` configuration file generation

- - - - - -

### Upstream WireGuard Tunnels

Route network traffic through external WireGuard VPN servers:

- **Import configuration** — paste a standard WireGuard `.conf` file to create an upstream
- **Per-network routing** — assign different upstreams to different networks
- **Geographic IP rotation** — clients appear from different countries depending on their network
- **Multi-hop privacy** — add an extra encryption layer between your server and the internet
- **System upstreams** — view and manage all WireGuard tunnel interfaces on the system

- - - - - -

### Diagnostics &amp; Environment Integrity

New real-time diagnostics system for monitoring server health:

- **VPN Protocol Status** — WireGuard interfaces, OpenVPN processes, strongSwan IKE SAs
- **DNS &amp; Monitoring** — bind9 status, rsyslog, telegraf, InfluxDB connectivity
- **Network Configuration** — per-network checks: interfaces up, routes configured, firewall chains loaded, traffic control active
- **Integrity Check** — verifies that all system-level configurations match the panel's expected state
- **Real-time logs** — view system and VPN service logs directly from the web interface

- - - - - -

### Per-Network Firewall

Each network now has its own firewall chain set:

- **Filter rules** — control traffic flow within and between networks
- **NAT rules** — source/destination NAT per network
- **DNAT rules** — port forwarding to specific clients
- **Mangle rules** — packet marking for advanced routing and QoS
- **ipset integration** — automatic IP sets per network for high-performance matching
- **Global settings** — client isolation and peering rules at the system level

- - - - - -

### Role-Based Access Control (RBAC)

Fine-grained permission system replacing the old single-admin model:

- **Permission Groups** — create custom groups with granular access (36+ permissions)
- **Multi-user** — multiple administrators with different access levels
- **Default groups**: `admin` (full access), `operator` (all except system settings), `viewer` (read-only)
- **API Tokens** — create tokens with IP restrictions, expiration dates, and user association
- **Session security** — IP-pinned sessions with configurable timeout

- - - - - -

### Traffic Control &amp; Bandwidth

Per-network and per-client bandwidth management:

- **Network-level limits** — set download/upload bandwidth caps for the entire network
- **Client-level limits** — override per-client with individual bandwidth settings
- **Traffic classes** — `tc` (Linux Traffic Control) integration for precise QoS
- **Real-time stats** — view live throughput, drops, overlimits per client
- **Daily breakdown** — traffic statistics aggregated by day with network/client granularity

- - - - - -

### Network Peering

Allow communication between VPN networks on the same server:

- **Pair-based peering** — select which networks can communicate with each other
- **Automatic routing** — firewall and routing rules are generated automatically
- **Apply/revert** — review changes before applying, revert if needed
- **Isolation by default** — networks are fully isolated unless peering is explicitly configured

- - - - - -

### One-Time Links (OTL)

Self-service configuration links for all three protocols:

- **WireGuard** — QR code + downloadable `.conf` file
- **OpenVPN** — downloadable `.ovpn` profile with embedded certificates
- **IKEv2** — downloadable `.mobileconfig` (iOS/macOS) or connection instructions
- **Configurable defaults** — set which protocols are shown, branding, expiration
- **Single-use or time-limited** — links expire after first use or a configured time

- - - - - -

### REST API Expansion

The API has been completely rewritten and expanded:

<table id="bkmrk-metric-v1.x-v2.0-end"><thead><tr><th>Metric</th><th>v1.x</th><th>v2.0</th></tr></thead><tbody><tr><td>Endpoints</td><td>~30</td><td>**148+**</td></tr><tr><td>Documentation</td><td>None</td><td>**OpenAPI 3.0**</td></tr><tr><td>Authentication</td><td>Single hash</td><td>**Bearer tokens + RBAC**</td></tr><tr><td>Swagger UI</td><td>No</td><td>**Yes** (`/api_docs`)</td></tr></tbody></table>

New API areas: Networks, Clients, OpenVPN, Upstreams, Peering, Firewall, Diagnostics, Permission Groups, System Users, Profile management.

- - - - - -

### UI &amp; Theme

- **Dark / Light / Auto** — full theme support with system preference detection
- **Bootstrap 5.3** — modern responsive design
- **AJAX everywhere** — all operations via REST API, no page reloads
- **DataTables** — sortable, searchable tables with responsive layout
- **Toastr notifications** — real-time feedback for all actions
- **Lightbox images** — click to enlarge screenshots in documentation

- - - - - -

### Other Improvements

- **Let's Encrypt auto-SSL** — automatic HTTPS certificate management
- **Port forwarding** — forward external ports to specific VPN clients
- **Custom routes** — push routes to clients per-network
- **Per-network DNS** — configure DNS servers per network
- **Backup to FTP** — automatic backup upload to remote FTP server
- **InfluxDB + Grafana** — export traffic metrics for external dashboards
- **Single binary** — ~34MB Go binary with all assets embedded, no runtime dependencies
- **Systemd integration** — clean service management with auto-restart

- - - - - -

### Migration from v1.x

PUQVPNCP v2.0 is a **ground-up rewrite** and is not directly upgradeable from v1.x. Key differences:

<table id="bkmrk-aspect-v1.x-v2.0-arc"><thead><tr><th>Aspect</th><th>v1.x</th><th>v2.0</th></tr></thead><tbody><tr><td>Architecture</td><td>Account → WireGuard Server</td><td>Network → Client → Protocol</td></tr><tr><td>Protocols</td><td>WireGuard + IKEv2</td><td>WireGuard + OpenVPN + IKEv2</td></tr><tr><td>Auth</td><td>Single admin + API hash</td><td>Multi-user + RBAC + API tokens</td></tr><tr><td>Firewall</td><td>Global rules</td><td>Per-network chains</td></tr><tr><td>API</td><td>~30 endpoints, no docs</td><td>148+ endpoints, OpenAPI 3.0</td></tr><tr><td>UI</td><td>jQuery + page reloads</td><td>Bootstrap 5 + AJAX</td></tr></tbody></table>

For migration assistance, see [Troubleshooting](20-troubleshooting.md) or contact [PUQ Support](https://puqcloud.com/submitticket.php).

- - - - - -# 01. Description

## Overview

**PUQVPNCP** is a comprehensive VPN server management panel that supports four VPN protocols simultaneously: **WireGuard**, **AmneziaWG**, **OpenVPN**, and **IKEv2/IPsec**. It provides a modern web interface for managing VPN networks, clients, firewall rules, traffic control, and monitoring — all from a single dashboard.

The panel is designed for VPN service providers, hosting companies, and system administrators who need to manage hundreds or thousands of VPN clients across multiple networks with fine-grained control over bandwidth, routing, and anti-censorship security.

- - - - - -

## Key Features

### Multi-Protocol Support

PUQVPNCP is unique in supporting **four VPN protocols at once** on the same server:

<table id="bkmrk-protocol-technology-"><thead><tr><th>Protocol</th><th>Technology</th><th>Best For</th></tr></thead><tbody><tr><td>**WireGuard**</td><td>Modern kernel-level VPN</td><td>Speed, low latency, mobile devices</td></tr><tr><td>**AmneziaWG**</td><td>Obfuscated WireGuard fork</td><td>Evading Deep Packet Inspection (DPI), strict censorship, ISP blocking</td></tr><tr><td>**OpenVPN**</td><td>Battle-tested SSL/TLS VPN</td><td>Compatibility, restrictive networks</td></tr><tr><td>**IKEv2/IPsec**</td><td>Native OS support (strongSwan)</td><td>iOS, macOS, Windows — native connection, no app required</td></tr></tbody></table>

Each client can connect via **any** enabled protocol using the **same IP address**. The panel automatically generates configuration files, QR codes, and certificates for each protocol.

### Network Architecture

```
                   +--------------------------------------+
                   |          PUQVPNCP Server             |
                   |                                      |
Internet <---------|  Network A (10.0.0.0/24)             |
                   |    |-- WireGuard  (wg51820)          |
                   |    |-- AmneziaWG  (awg51821)         |
                   |    |-- OpenVPN    (ovpn1197)         |
                   |    +-- IKEv2      (strongSwan)       |
                   |                                      |
Upstream VPN <-----|  Network B (10.100.1.0/24)           |
(wgup0)            |    |-- WireGuard  (wg51822)          |
                   |    |-- AmneziaWG  (awg51823)         |
                   |    |-- OpenVPN    (ovpn1198)         |
                   |    +-- IKEv2      (strongSwan)       |
                   |                                      |
                   |  Network C (10.100.2.0/24)           |
                   |    +-- ...                           |
                   +--------------------------------------+

```

- **Networks** define subnets, upstream routing, bandwidth limits, and protocol settings
- **Clients** belong to a network and inherit its configuration
- **Upstreams** allow routing network traffic through external WireGuard VPN servers

### Upstream Tunnels

Route client traffic through external WireGuard VPN servers for:

- **Geographic IP rotation** — clients appear from different countries
- **Multi-hop privacy** — add an extra encryption layer
- **ISP bypass** — route traffic through a clean IP when your server IP is blocked
- **Dedicated exit nodes** — separate business and personal traffic

### Per-Network Control

Each network operates independently with its own:

- Subnet (IPv4 and IPv6)
- VPN protocol settings and ports
- Bandwidth limits (download/upload per network and per client)
- Firewall rules (filter, NAT, DNAT, mangle)
- Traffic control classes
- Upstream (direct internet or WireGuard tunnel)
- Custom routes pushed to clients
- Port forwarding rules

### Security &amp; Access Control

- **Role-based access** — permission groups with 36+ granular permissions
- **Multi-user** — multiple administrators with different access levels
- **API tokens** — create tokens with IP restrictions and expiration dates
- **Session security** — IP-pinned sessions, login lockout protection
- **Automatic firewall** — per-network isolation via ipset, per-client mangle rules

### Operations

- **Traffic monitoring** — per-client and per-network traffic statistics with daily breakdown
- **Real-time bandwidth** — live traffic control with drops, overlimits, throughput
- **InfluxDB + Grafana** — export metrics for advanced dashboards
- **Backups** — automatic daily/hourly backups with FTP upload support
- **One-time links** — generate self-service configuration links for end users
- **REST API** — 170+ endpoints with full OpenAPI 3.0 documentation

- - - - - -

## Navigation

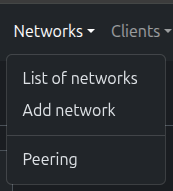
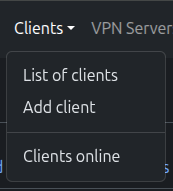
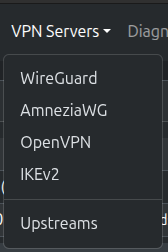
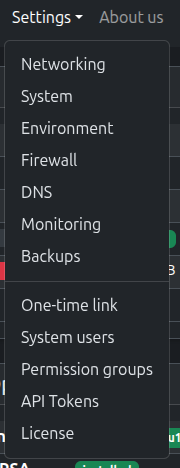
The web interface is organized into dropdown menus:

<table id="bkmrk-networks-clients-vpn"><thead><tr><th></th><th></th><th></th><th></th></tr></thead><tbody><tr><td>![Networks menu](https://doc.puq.info/uploads/images/gallery/2026-09/embedded-image-pvvdjoqf.png)</td><td>![Clients menu](https://doc.puq.info/uploads/images/gallery/2026-09/embedded-image-qrgo2t7q.png)</td><td>![VPN Servers menu](https://doc.puq.info/uploads/images/gallery/2026-09/embedded-image-ovwptpgv.png)</td><td>![Settings menu](https://doc.puq.info/uploads/images/gallery/2026-09/embedded-image-1do9xgy9.png)</td></tr><tr><td>*Networks*</td><td>*Clients*</td><td>*VPN Servers*</td><td>*Settings*</td></tr></tbody></table>

- **Networks** — list, add networks, and manage peering
- **Clients** — list, add clients, and view online connections
- **VPN Servers** — configure WireGuard, AmneziaWG, OpenVPN, IKEv2, and Upstreams
- **Settings** — networking, system, environment, firewall, DNS, monitoring, backups, OTL, users, permissions, API tokens, license

- - - - - -

## Technical Specifications

<table id="bkmrk-component-details-os"><thead><tr><th>Component</th><th>Details</th></tr></thead><tbody><tr><td>**OS**</td><td>Debian 12/13, Ubuntu 22.04+</td></tr><tr><td>**Protocols**</td><td>WireGuard, AmneziaWG, OpenVPN 2.6+, IKEv2 (strongSwan 6.x)</td></tr><tr><td>**Web Interface**</td><td>HTTPS with Let's Encrypt auto-SSL</td></tr><tr><td>**API**</td><td>REST API, 170+ endpoints, OpenAPI 3.0</td></tr><tr><td>**DNS**</td><td>Built-in bind9 DNS server</td></tr><tr><td>**Firewall**</td><td>iptables/ip6tables with ipset</td></tr><tr><td>**Monitoring**</td><td>rsyslog + telegraf + InfluxDB</td></tr><tr><td>**Themes**</td><td>Light / Dark / Auto (system)</td></tr><tr><td>**Max Clients**</td><td>16,383 per server (across all networks)</td></tr><tr><td>**Binary**</td><td>Single ~34MB Go binary, no runtime dependencies</td></tr></tbody></table>

- - - - - -

## Architecture Overview

```
+-----------------------------------------------------------------+
|                        Web Interface                            |
|                  (Bootstrap 5, jQuery, AJAX)                    |
+-----------------------------------------------------------------+
|                        REST API (Gin)                           |
|                   170+ endpoints, OpenAPI                       |
+-----------------------------------------------------------------+
|                       Core Engine (Go)                          |
|  +----------+ +-----------+ +---------+ +---------+ +---------+ |
|  |WireGuard | | AmneziaWG | | OpenVPN | | IKEv2   | |Firewall | |
|  |  (wg)    | |   (awg)   | |(openvpn)| |(strgSwn)| |(iptables)|
|  +----------+ +-----------+ +---------+ +---------+ +---------+ |
|  +----------+ +-----------+ +---------+ +---------+ +---------+ |
|  |Upstreams | |    DNS    | |   TC    | |Monitoring| |   OTL  | |
|  | (wgupN)  | |  (bind9)  | |  (tc)   | |(telegraf)| |(tokens)| |
|  +----------+ +-----------+ +---------+ +---------+ +---------+ |
+-----------------------------------------------------------------+
|                      Linux Kernel                               |
|   WireGuard / AmneziaWG module, Netfilter, TC, iproute2         |
+-----------------------------------------------------------------+

```

- - - - - -

## WHMCS Billing &amp; Provisioning Automation

Selling VPN services or hosting packages? PUQ Software provides an official provisioning module for WHMCS:

**[PUQVPNCP WHMCS Provisioning Module](https://puqcloud.com/whmcs-module-puqvpncp.php)**

### Key Capabilities:

- **Instant Automated Provisioning**: Automatically provisions client VPN accounts upon invoice payment.
- **Lifecycle Management**: Automated suspension on overdue invoices, unsuspension on payment, and termination on cancellation.
- **Bandwidth Shaping &amp; Traffic Quotas**: Synchronizes download/upload speed limits and traffic transfer limits directly from WHMCS product settings.
- **Client Area Self-Service**: Customers can view credentials, download WireGuard and OpenVPN configurations, generate obfuscated AmneziaWG profiles, and scan QR codes right from their WHMCS client portal.
- **Multi-Server &amp; Multi-Network**: Route client accounts to specific PUQVPNCP servers and networks based on WHMCS product configuration.

- - - - - -

## License

PUQVPNCP requires an active license. Licenses can be purchased at:

**[https://puqcloud.com/store/puqvpncp](https://puqcloud.com/store/puqvpncp)**

The license defines the maximum number of VPN clients and is validated periodically through the PUQ Cloud license server.

- - - - - -# 02. Installation

## System Requirements

<table id="bkmrk-requirement-minimum-"><thead><tr><th>Requirement</th><th>Minimum</th></tr></thead><tbody><tr><td>**OS**</td><td>Debian 12/13 or Ubuntu 22.04+ (amd64)</td></tr><tr><td>**CPU**</td><td>1 core (2+ recommended for 500+ clients)</td></tr><tr><td>**RAM**</td><td>512 MB (2+ GB recommended)</td></tr><tr><td>**Disk**</td><td>1 GB free space</td></tr><tr><td>**Network**</td><td>Public IPv4 address, root access</td></tr></tbody></table>

### Required Packages

The panel automatically manages its dependencies, but the following packages must be available in the system repositories:

<table id="bkmrk-category-packages-vp"><thead><tr><th>Category</th><th>Packages</th></tr></thead><tbody><tr><td>**VPN Protocols**</td><td>`wireguard`, `wireguard-tools`, `amneziawg-dkms`, `amneziawg-tools`, `openvpn`, `easy-rsa`, `strongswan`, `strongswan-pki`</td></tr><tr><td>**Network &amp; Firewall**</td><td>`iproute2`, `iptables`, `ipset`</td></tr><tr><td>**DNS**</td><td>`bind9`, `bind9-utils`</td></tr><tr><td>**Monitoring**</td><td>`rsyslog`, `telegraf`</td></tr><tr><td>**Security**</td><td>`openssl`</td></tr><tr><td>**Utilities**</td><td>`procps`, `uuid-runtime`, `bash`, `grep`, `gawk`</td></tr></tbody></table>

> **Note:** You can verify all dependencies after installation using **Settings &gt; Environment** page.

- - - - - -

## Installation

### Step 1: Download

Download the latest `.deb` package:

```bash
wget https://puqvpncp.com/download/puqvpncp_latest_amd64.deb

```

> All versions are available at: [https://puqvpncp.com/download/](https://puqvpncp.com/download/)

### Step 2: Install Dependencies

```bash
apt update && apt install -y wireguard wireguard-tools openvpn easy-rsa \
  strongswan strongswan-pki iproute2 iptables ipset \
  bind9 bind9-utils rsyslog telegraf openssl \
  procps uuid-runtime bash grep gawk

```

#### Optional: AmneziaWG (Anti-Censorship DPI Bypass)

To enable AmneziaWG, install the kernel module and tools for your distribution:

**Debian 12 (Bookworm):**

> On **Debian 12**, the Ubuntu 22.04 (`jammy`) PPA must be used because Debian 12 has `glibc 2.36`, whereas packages from `noble` require `libc6 >= 2.38`. The keyring is saved directly in `.asc` format without needing `gpg`:

```bash
apt-get update && apt-get install -y curl build-essential dkms linux-headers-$(uname -r)
mkdir -p /etc/apt/keyrings
curl -fsSL "https://keyserver.ubuntu.com/pks/lookup?op=get&search=0x75C9DD72C799870E310542E24166F2C257290828" -o /etc/apt/keyrings/amnezia.asc
echo "deb [signed-by=/etc/apt/keyrings/amnezia.asc] https://ppa.launchpadcontent.net/amnezia/ppa/ubuntu jammy main" > /etc/apt/sources.list.d/amnezia.list
apt-get update && apt-get install -y amneziawg-dkms amneziawg-tools
modprobe amneziawg

```

**Debian 13 (Trixie):**

> On **Debian 13**, use the Ubuntu 24.04 (`noble`) PPA:

```bash
apt-get update && apt-get install -y curl build-essential dkms linux-headers-$(uname -r)
mkdir -p /etc/apt/keyrings
curl -fsSL "https://keyserver.ubuntu.com/pks/lookup?op=get&search=0x75C9DD72C799870E310542E24166F2C257290828" -o /etc/apt/keyrings/amnezia.asc
echo "deb [signed-by=/etc/apt/keyrings/amnezia.asc] https://ppa.launchpadcontent.net/amnezia/ppa/ubuntu noble main" > /etc/apt/sources.list.d/amnezia.list
apt-get update && apt-get install -y amneziawg-dkms amneziawg-tools
modprobe amneziawg

```

**Ubuntu (22.04 / 24.04 LTS):**

```bash
add-apt-repository -y ppa:amnezia/ppa
apt-get update && apt-get install -y amneziawg-dkms amneziawg-tools
modprobe amneziawg

```

*Alternative on Ubuntu (without `add-apt-repository`):*

```bash
mkdir -p /etc/apt/keyrings
curl -fsSL "https://keyserver.ubuntu.com/pks/lookup?op=get&search=0x75C9DD72C799870E310542E24166F2C257290828" -o /etc/apt/keyrings/amnezia.asc
echo "deb [signed-by=/etc/apt/keyrings/amnezia.asc] https://ppa.launchpadcontent.net/amnezia/ppa/ubuntu $(. /etc/os-release && echo $VERSION_CODENAME) main" > /etc/apt/sources.list.d/amnezia.list
apt-get update && apt-get install -y amneziawg-dkms amneziawg-tools
modprobe amneziawg

```

**Verify AmneziaWG installation:**

```bash
dkms status            # Should output: amneziawg/..., ...: installed
lsmod | grep amneziawg # Should display loaded kernel module
awg --version          # Should display awg tools version

```

> **Tip:** If the kernel module failed to compile or after a kernel update, run:
> 
> ```bash
> apt-get install -y build-essential dkms linux-headers-$(uname -r) && dpkg-reconfigure amneziawg-dkms && modprobe amneziawg
> 
> ```

### Step 3: Install PUQVPNCP

```bash
dpkg -i puqvpncp_latest_amd64.deb

```

This will:

- Install the `puqvpncp` binary to `/usr/sbin/puqvpncp`
- Create the configuration directory `/etc/puqvpncp/`
- Create the data directory `/usr/local/puqvpncp/`
- Install and enable the `puqvpncp` systemd service

### Step 4: Start the Service

```bash
systemctl start puqvpncp

```

### Step 5: Access the Web Interface

Open your browser and navigate to:

```
http://<your-server-ip>:8098

```

Default credentials:

<table id="bkmrk-field-value-username"><thead><tr><th>Field</th><th>Value</th></tr></thead><tbody><tr><td>**Username**</td><td>`admin`</td></tr><tr><td>**Password**</td><td>`admin`</td></tr></tbody></table>

> **Important:** Change the default password immediately after first login via **Settings &gt; System Users**.

![Login page](https://doc.puq.info/uploads/images/gallery/2026-09/embedded-image-4yrxzkms.png)*Login page -- enter your username and password*

- - - - - -

## Configuration File

The main configuration file is located at `/etc/puqvpncp/puqvpncp.conf`. It is created automatically on first start with default values. Format: `Key=Value`, one per line. Lines starting with `#` are comments.

```ini
# The port on which the WWW server will be set up. (Default: 8098)
WebPort=8098

# The IPv4 or IPv6 on which the WWW server will be set up. (Default: 0.0.0.0)
WebIP=0.0.0.0

# The IPv4 or IPv6 address from which you can login to the web console.
# Supports multiple IPs delimited by comma. (Default: 0.0.0.0)
AllowedWebIP=0.0.0.0

# Directory for log files (Default: /var/log/puqvpncp/)
LogDir=/var/log/puqvpncp/

# Directory for data files (Default: /usr/local/puqvpncp/)
DataDir=/usr/local/puqvpncp/

# SSL certificate support Let's Encrypt yes/no (Default: no)
# If this option is enabled, then the panel is accessible on the standard port 443.
# The port in the non-ssl protocol is not serviced
LetsEncrypSSL=no

# Domain for SSL certificate generation
# Be sure to check that the domain resolves the IP address of this server
Domain=

# Remove tabs in the Wireguard client configuration.
# Sometimes necessary to support non-official Wireguard clients.
DeleteTabsFromConfig=no

# Session timeout in minutes (Default: 720)
SessionTimeout=720

# Log level: INFO, WARN, ERROR, DEBUG (Default: INFO)
LogLevel=INFO

# Trusted proxy IPs (comma-separated). Leave empty for default Gin behavior.
# Set to 'none' to trust no proxies.
TrustedProxies=

# HTTP request timeout in seconds (Default: 30)
HttpTimeout=30

```

<table id="bkmrk-parameter-default-de"><thead><tr><th>Parameter</th><th>Default</th><th>Description</th></tr></thead><tbody><tr><td>**WebPort**</td><td>`8098`</td><td>Web interface port. Ignored when `LetsEncrypSSL=yes` (uses 443)</td></tr><tr><td>**WebIP**</td><td>`0.0.0.0`</td><td>Listen address (IPv4 or IPv6)</td></tr><tr><td>**AllowedWebIP**</td><td>`0.0.0.0`</td><td>Restrict access to specific IPs (comma-separated). `0.0.0.0` = allow all</td></tr><tr><td>**LogDir**</td><td>`/var/log/puqvpncp/`</td><td>Log files directory</td></tr><tr><td>**DataDir**</td><td>`/usr/local/puqvpncp/`</td><td>Application data directory (networks, clients, configs)</td></tr><tr><td>**LetsEncrypSSL**</td><td>`no`</td><td>Enable Let's Encrypt SSL (`yes`/`no`). Requires `Domain` to be set</td></tr><tr><td>**Domain**</td><td>(empty)</td><td>Domain for SSL certificate. Must resolve to this server's IP</td></tr><tr><td>**DeleteTabsFromConfig**</td><td>`no`</td><td>Remove tabs from WireGuard client configs (for non-official clients)</td></tr><tr><td>**SessionTimeout**</td><td>`720`</td><td>Web session timeout in minutes (12 hours)</td></tr><tr><td>**LogLevel**</td><td>`INFO`</td><td>Logging verbosity: `DEBUG`, `INFO`, `WARN`, `ERROR`</td></tr><tr><td>**TrustedProxies**</td><td>(empty)</td><td>Comma-separated proxy IPs. `none` = trust no proxies</td></tr><tr><td>**HttpTimeout**</td><td>`30`</td><td>HTTP request timeout in seconds</td></tr></tbody></table>

> After enabling `LetsEncrypSSL=yes` and setting `Domain`, restart the service. The web interface switches to port **443** (HTTPS) and obtains a certificate automatically.

- - - - - -

## Update

### Step 1: Download the New Version

```bash
wget https://puqvpncp.com/download/puqvpncp_latest_amd64.deb

```

### Step 2: Stop the Service

```bash
systemctl stop puqvpncp

```

> **Important:** The service must be stopped before updating. The binary cannot be overwritten while it is running.

### Step 3: Install the Update

```bash
dpkg -i puqvpncp_latest_amd64.deb

```

### Step 4: Start the Service

```bash
systemctl start puqvpncp

```

Your configuration and data are preserved during updates.

- - - - - -

## Uninstallation

```bash
systemctl stop puqvpncp
apt remove puqvpncp

```

> **Note:** Uninstalling the package does **not** remove your configuration (`/etc/puqvpncp/`) or data (`/usr/local/puqvpncp/`). Remove them manually if needed.

- - - - - -# 03. Initial Setup

After installing PUQVPNCP, follow these steps to configure the server for production use.

## Step 1: Activate the License

1. Navigate to **Settings &gt; License**
2. Enter your license key
3. Click **Save**

![License page](https://doc.puq.info/uploads/images/gallery/2026-09/embedded-image-joq1jx6s.png)*License page — enter your license key*

After activation, the license status will show **Valid** with the expiration date.

![License valid](https://doc.puq.info/uploads/images/gallery/2026-09/embedded-image-knaasd6y.png)*License activated successfully*

> **Purchase a license:** [https://puqcloud.com/store/puqvpncp](https://puqcloud.com/store/puqvpncp)

- - - - - -

## Step 2: System Configuration

Navigate to **Settings &gt; System** to configure the core settings.

![System configuration](https://doc.puq.info/uploads/images/gallery/2026-09/embedded-image-zim0e4hf.png)*System configuration page*

### General Settings

<table id="bkmrk-setting-description-"><thead><tr><th>Setting</th><th>Description</th><th>Default</th></tr></thead><tbody><tr><td>**Traffic collection (min)**</td><td>How often traffic counters are read from iptables</td><td>1</td></tr><tr><td>**Traffic history (months)**</td><td>How long traffic data is retained</td><td>2</td></tr><tr><td>**Max bandwidth (Mbit/s)**</td><td>Global server bandwidth limit for TC</td><td>10000</td></tr><tr><td>**WG handshake uptime (s)**</td><td>Client considered offline after this many seconds without a WireGuard handshake</td><td>180</td></tr><tr><td>**AWG handshake uptime (s)**</td><td>Client considered offline after this many seconds without an AmneziaWG handshake</td><td>180</td></tr></tbody></table>

### VPN Domain

Set the **VPN Domain** field (e.g., `vpn.example.com`) to use a domain name instead of IP in client configurations. This way, if you change your server IP, clients will not need to be reconfigured.

> **Tip:** Point your domain's A record to the server IP before setting this field.

### Security

<table id="bkmrk-setting-description--0"><thead><tr><th>Setting</th><th>Description</th></tr></thead><tbody><tr><td>**Redirect URL**</td><td>URL to redirect unauthorized web access attempts</td></tr><tr><td>**Max login attempts**</td><td>Lock the account after N failed attempts (0 = disabled)</td></tr><tr><td>**Lockout time (min)**</td><td>How long the account is locked</td></tr><tr><td>**robots.txt**</td><td>Content for `/robots.txt` (blocks search engines by default)</td></tr></tbody></table>

### Panel

<table id="bkmrk-setting-description--1"><thead><tr><th>Setting</th><th>Description</th></tr></thead><tbody><tr><td>**Panel title**</td><td>Browser tab title</td></tr><tr><td>**Default theme**</td><td>Auto (system) / Light / Dark</td></tr><tr><td>**Maintenance mode**</td><td>Block all pages except login</td></tr></tbody></table>

- - - - - -

## Step 3: Enable SSL (Let's Encrypt)

1. Ensure your domain points to the server IP (DNS A record)
2. Go to **Settings &gt; System**
3. In the **SSL / Let's Encrypt** section, set: 
    - **Enabled** = `Yes`
    - **Domain** = your domain (e.g., `vpn.example.com`)
    - **Email** = your email for Let's Encrypt notifications
4. Click **Save** and then **Reload**

After reload, the web interface will be available on `https://your-domain.com` (port 443).

- - - - - -

## Step 4: Configure Networking

Navigate to **Settings &gt; Networking** to manage server network interfaces and routes.

![Networking interfaces](https://doc.puq.info/uploads/images/gallery/2026-09/embedded-image-t0hqo3vr.png)*Network interfaces list*

> **Danger Zone.** Incorrect network configuration may make the server unreachable. After applying changes you will have **45 seconds to confirm**. If not confirmed, the previous configuration will be restored automatically.

### Adding an Interface

Click the **+** button to add a new interface (alias or VLAN).

![Add interface](https://doc.puq.info/uploads/images/gallery/2026-09/embedded-image-9j7cp7qn.png)*Add network interface dialog*

### Applying Configuration

After making changes, click **Apply**. A confirmation dialog warns about the 45-second timeout:

![Apply confirmation](https://doc.puq.info/uploads/images/gallery/2026-09/embedded-image-meda0cuq.png)*Apply configuration confirmation — 45-second safety timeout*

Once applied, you must confirm within the timeout or changes will be reverted:

![Apply countdown](https://doc.puq.info/uploads/images/gallery/2026-09/embedded-image-rfilingt.png)*Configuration applied — confirm within 45 seconds or changes will be reverted*

### Routes

Switch to the **Routes** tab to view the current routing table.

![Routes table](https://doc.puq.info/uploads/images/gallery/2026-09/embedded-image-nhiepo2f.png)*System routing table (live)*

- - - - - -

## Step 5: Environment Check

Navigate to **Settings &gt; Environment** to verify all required packages are installed.

![Environment check](https://doc.puq.info/uploads/images/gallery/2026-09/embedded-image-y8bczyfd.png)*Environment check — VPN protocols section*

The page shows:

- **VPN Protocols** — wireguard, amneziawg, amneziawg-tools, openvpn, easy-rsa, strongswan
- **Network &amp; Firewall** — iproute2, iptables, ipset
- **DNS** — bind9, bind9-utils
- **Monitoring** — rsyslog, telegraf
- **Security** — openssl
- **System Utilities** — procps, uuid-runtime, bash, grep, gawk

![Environment check — DNS, Monitoring, Security](https://doc.puq.info/uploads/images/gallery/2026-09/embedded-image-hsgbyexb.png)*Environment check — DNS, Monitoring, and Security sections*

Missing packages are highlighted and can be installed using the copy button.

- - - - - -

## Step 6: Configure Firewall

Navigate to **Settings &gt; Firewall** to set up global firewall policies.

![Firewall settings](https://doc.puq.info/uploads/images/gallery/2026-09/embedded-image-8y3brs54.png)*Firewall settings — global policies*

<table id="bkmrk-setting-description--2"><thead><tr><th>Setting</th><th>Description</th></tr></thead><tbody><tr><td>**Forwarding (NAT)**</td><td>Enable/Disable NAT for VPN clients</td></tr><tr><td>**INPUT policy**</td><td>Default action for incoming packets</td></tr><tr><td>**FORWARD policy**</td><td>Default action for forwarded packets</td></tr><tr><td>**OUTPUT policy**</td><td>Default action for outgoing packets</td></tr></tbody></table>

> **Important:** Keep **Forwarding (NAT)** enabled for VPN clients to access the internet.

- - - - - -

## Step 7: Configure DNS

Navigate to **Settings &gt; DNS** to configure the built-in bind9 DNS server.

![DNS configuration](https://doc.puq.info/uploads/images/gallery/2026-09/embedded-image-tzhv3yqi.png)*DNS server configuration*

Set the **Forwarders** field to upstream DNS servers (e.g., `8.8.8.8, 8.8.4.4`). This allows VPN clients to use the server as their DNS resolver.

- - - - - -

## Next Steps

After completing the initial setup:

1. **[Create a Network](05-networks.md)** — define your first VPN network with a subnet
2. **[Add Clients](06-clients.md)** — create VPN client accounts
3. **[Configure VPN Protocols](07-wireguard.md)** — set up WireGuard, [AmneziaWG](22-amneziawg.md), OpenVPN, or IKEv2

- - - - - -# 04. Dashboard

The Dashboard is the main landing page after login. It provides a complete overview of the server status, VPN protocols, and services.

![Dashboard overview](https://doc.puq.info/uploads/images/gallery/2026-09/embedded-image-gpweygbb.png)*PUQVPNCP v2.3 Dashboard — Server info, system status, 4 VPN protocols (WireGuard, AmneziaWG, OpenVPN, IKEv2), and services*

- - - - - -

## Server Information

![Server information card](https://doc.puq.info/uploads/images/gallery/2026-09/embedded-image-wkb4rdmm.png)*Server information card*

<table id="bkmrk-field-description-ho"><thead><tr><th>Field</th><th>Description</th></tr></thead><tbody><tr><td>**Hostname**</td><td>Server FQDN</td></tr><tr><td>**OS**</td><td>Operating system and architecture</td></tr><tr><td>**CPU**</td><td>Processor model and thread count</td></tr><tr><td>**CPU Load**</td><td>1 / 5 / 15 minute load averages</td></tr><tr><td>**Memory**</td><td>Used / total with percentage bar</td></tr><tr><td>**Timezone**</td><td>Server timezone</td></tr></tbody></table>

- - - - - -

## PUQVPNCP Status

![PUQVPNCP status card](https://doc.puq.info/uploads/images/gallery/2026-09/embedded-image-ebmnhqjq.png)*PUQVPNCP status card*

<table id="bkmrk-field-description-st"><thead><tr><th>Field</th><th>Description</th></tr></thead><tbody><tr><td>**Status**</td><td>`OK` = fully loaded, `Loading` = starting up</td></tr><tr><td>**Version**</td><td>Current software version</td></tr><tr><td>**Networks**</td><td>Total number of configured networks</td></tr><tr><td>**Clients**</td><td>Active clients / license limit</td></tr><tr><td>**License**</td><td>Validity status and expiration date</td></tr></tbody></table>

Quick action buttons:

- **License** — go to the license management page
- **Reload** — reload all VPN configurations (equivalent to system restart)

- - - - - -

## VPN Protocols

![VPN protocol cards](https://doc.puq.info/uploads/images/gallery/2026-09/embedded-image-6alntiqh.png)*Four VPN protocol status cards: WireGuard, AmneziaWG, OpenVPN, IKEv2*

Each protocol card displays:

<table id="bkmrk-field-description-ve"><thead><tr><th>Field</th><th>Description</th></tr></thead><tbody><tr><td>**Version / Package**</td><td>Installed package version (`wireguard`, `amneziawg`, `openvpn`, `strongswan`)</td></tr><tr><td>**Enabled**</td><td>ON/OFF operational status</td></tr><tr><td>**Encryption / Obfuscation**</td><td>Cryptographic cipher or obfuscation mode (e.g., Curve25519, DPI Bypass)</td></tr><tr><td>**Networks**</td><td>Number of networks with this protocol enabled</td></tr><tr><td>**Clients**</td><td>Total clients configured across those networks</td></tr><tr><td>**Online**</td><td>Currently connected active peers/sessions</td></tr></tbody></table>

Click **Configure** on any card to go directly to that protocol's global settings page.

- - - - - -

## Services

![Services details](https://doc.puq.info/uploads/images/gallery/2026-09/embedded-image-yfsu0bi1.png)*Service cards with detailed configuration info*

### Firewall

- iptables and iproute2 versions
- IPv4/IPv6 forwarding status

### DNS Server

- bind9 version and running PID
- Configured forwarders

### Monitoring

- Logging, remote syslog, InfluxDB, and metrics status

### Backups

- Hourly/daily backup schedule
- FTP backup status
- Total backup count

- - - - - -# 05. Networks

Networks are the core organizational unit in PUQVPNCP. Each network defines a VPN subnet with its own protocol settings, firewall rules, bandwidth limits, and upstream routing.

## Networks List

Navigate to **Networks &gt; List of networks** to see all configured networks.

![Networks list](https://doc.puq.info/uploads/images/gallery/2026-09/embedded-image-ix8pzebj.png)*Networks list — shows protocols, IP, upstream, and bandwidth for each network*

The table displays:

<table id="bkmrk-column-description-n"><thead><tr><th>Column</th><th>Description</th></tr></thead><tbody><tr><td>**Name**</td><td>Network identifier</td></tr><tr><td>**Clients**</td><td>Number of client accounts</td></tr><tr><td>**WireGuard / OpenVPN / IKEv2**</td><td>Protocol enabled status (ON/OFF)</td></tr><tr><td>**Network**</td><td>Subnet CIDR</td></tr><tr><td>**IP**</td><td>Server IP for the network</td></tr><tr><td>**Upstream**</td><td>Internet exit point (direct IP or WireGuard tunnel)</td></tr><tr><td>**Bandwidth**</td><td>Download/Upload limits in Mbit</td></tr></tbody></table>

- - - - - -

## Creating a Network

Navigate to **Networks &gt; Add network** or click the **+** button.

![Create network](https://doc.puq.info/uploads/images/gallery/2026-09/embedded-image-ilytxnv0.png)*Create a new network*

### Required Fields

<table id="bkmrk-field-description-ex"><thead><tr><th>Field</th><th>Description</th><th>Example</th></tr></thead><tbody><tr><td>**Name**</td><td>Unique network name (alphanumeric + underscore)</td><td>`office_vpn`</td></tr><tr><td>**Subnet (IPv4 CIDR)**</td><td>Network subnet</td><td>`10.0.0.0/24`</td></tr><tr><td>**WireGuard IP**</td><td>Server IP for WireGuard interface</td><td>`10.0.0.1`</td></tr><tr><td>**OpenVPN IP**</td><td>Server IP for OpenVPN interface</td><td>`10.0.0.254`</td></tr><tr><td>**IKEv2 IP**</td><td>Server IP for IKEv2</td><td>`10.0.0.253`</td></tr></tbody></table>

### Optional Fields

<table id="bkmrk-field-description-de"><thead><tr><th>Field</th><th>Description</th></tr></thead><tbody><tr><td>**Description**</td><td>Free-text description</td></tr><tr><td>**Upstream**</td><td>Select internet exit: server IP (direct) or WireGuard upstream tunnel</td></tr><tr><td>**VPN Domain**</td><td>Override the global VPN domain for this network</td></tr><tr><td>**DNS 1 / DNS 2**</td><td>DNS servers pushed to VPN clients</td></tr><tr><td>**Bandwidth Download / Upload**</td><td>Network-wide bandwidth limit (Mbit, 0 = unlimited)</td></tr><tr><td>**Disable NAT**</td><td>Disable SNAT for this network (for bridged setups)</td></tr><tr><td>**Client-to-Client**</td><td>Allow clients within the same network to communicate</td></tr><tr><td>**IPv6**</td><td>Enable IPv6 dual-stack</td></tr></tbody></table>

> **Note:** VPN protocols (WireGuard, AmneziaWG, OpenVPN, IKEv2) can be enabled after creating the network.

- - - - - -

## Editing a Network

Click the edit button on any network to open the tabbed editor.

### Main Tab

![Network edit — Main](https://doc.puq.info/uploads/images/gallery/2026-09/embedded-image-2efqspck.png)*Network edit — Main tab with protocols, actions, and traffic overview*

![Network Protocols Card](https://doc.puq.info/uploads/images/gallery/2026-09/embedded-image-xlsdmfn9.png)*Protocols selector — WireGuard, AmneziaWG, OpenVPN, IKEv2*

The Main tab shows:

- **Network settings** (left) — all fields from creation, plus the Upstream selector
- **Protocols** (right) — checkboxes to enable/disable WireGuard, AmneziaWG, OpenVPN, IKEv2
- **Actions** — Firewall and Set Bandwidth buttons
- **Traffic** — monthly traffic chart with download/upload totals

### WireGuard Tab

![Network edit — WireGuard](https://doc.puq.info/uploads/images/gallery/2026-09/embedded-image-tqedhygh.png)*Network edit — WireGuard tab*

<table id="bkmrk-field-description-li"><thead><tr><th>Field</th><th>Description</th></tr></thead><tbody><tr><td>**Listen Port**</td><td>WireGuard UDP port for this network</td></tr><tr><td>**Allowed IPs**</td><td>Allowed IPs for peers (empty = use global `0.0.0.0/0`)</td></tr><tr><td>**MTU**</td><td>Tunnel MTU (0 = use global setting)</td></tr><tr><td>**Persistent Keepalive**</td><td>Keepalive interval in seconds (0 = use global)</td></tr><tr><td>**Interface**</td><td>Auto-generated WireGuard interface name (e.g., `wg51823`)</td></tr><tr><td>**Policy Routing**</td><td>Mark/Table values and CONNMARK rules (auto-configured)</td></tr><tr><td>**Private / Public Key**</td><td>WireGuard key pair. Can be regenerated or derived.</td></tr></tbody></table>

### AmneziaWG Tab

![Network edit — AmneziaWG](https://doc.puq.info/uploads/images/gallery/2026-09/embedded-image-h8pnfn5i.png)*Network edit — AmneziaWG tab with obfuscation parameters and interface info*

<table id="bkmrk-field-description-li-0"><thead><tr><th>Field</th><th>Description</th></tr></thead><tbody><tr><td>**Listen Port**</td><td>AmneziaWG UDP port for this network</td></tr><tr><td>**Allowed IPs**</td><td>Allowed IPs for peers (empty = use global `0.0.0.0/0`)</td></tr><tr><td>**MTU**</td><td>Tunnel MTU (0 = use global setting)</td></tr><tr><td>**Persistent Keepalive**</td><td>Keepalive interval in seconds (0 = use global)</td></tr><tr><td>**Interface**</td><td>Auto-generated AmneziaWG interface name (e.g., `awg51821`)</td></tr><tr><td>**Magic Headers (H1–H4)**</td><td>Custom or randomized packet headers to bypass DPI</td></tr><tr><td>**Junk Packet Controls**</td><td>Jc count, Jmin/Jmax size range, and S1/S2 junk sizes</td></tr><tr><td>**Private / Public Key**</td><td>Key pair for AmneziaWG encryption</td></tr></tbody></table>

### OpenVPN Tab

![Network edit — OpenVPN](https://doc.puq.info/uploads/images/gallery/2026-09/embedded-image-gvv7fp4j.png)*Network edit — OpenVPN tab*

<table id="bkmrk-field-description-po"><thead><tr><th>Field</th><th>Description</th></tr></thead><tbody><tr><td>**Port**</td><td>OpenVPN port for this network</td></tr><tr><td>**Protocol**</td><td>UDP or TCP</td></tr><tr><td>**Interface**</td><td>Auto-generated interface name (e.g., `ovpn1197`)</td></tr><tr><td>**Policy Routing**</td><td>Mark/Table and CONNMARK (auto-configured)</td></tr><tr><td>**Client Push**</td><td>Full or split tunnel, DNS settings</td></tr><tr><td>**Per-Network Overrides**</td><td>Cipher, Auth Digest, Compression, MTU, MSS Fix</td></tr></tbody></table>

### IKEv2 Tab

![Network edit — IKEv2](https://doc.puq.info/uploads/images/gallery/2026-09/embedded-image-vixezjpb.png)*Network edit — IKEv2 tab*

<table id="bkmrk-field-description-en"><thead><tr><th>Field</th><th>Description</th></tr></thead><tbody><tr><td>**Enabled**</td><td>IKEv2 enabled for this network</td></tr><tr><td>**Ports**</td><td>500 / 4500 UDP (standard IPsec)</td></tr><tr><td>**Per-Network Overrides**</td><td>ESP, IKE proposals, lifetimes, DPD settings</td></tr></tbody></table>

### Port Forwarding Tab

![Port forwarding](https://doc.puq.info/uploads/images/gallery/2026-09/embedded-image-uxan4evj.png)*Network edit — Port Forwarding tab*

Create DNAT rules to forward external ports to specific VPN clients. Each rule maps an external port to a client IP and destination port.

### Routes Tab

![Custom routes](https://doc.puq.info/uploads/images/gallery/2026-09/embedded-image-fuay4ptv.png)*Network edit — Routes tab*

Define custom routes that are pushed to VPN clients. Each route specifies a destination CIDR and description. Useful for split-tunnel configurations.

### Firewall Tab

![Network firewall](https://doc.puq.info/uploads/images/gallery/2026-09/embedded-image-w0uzvhm9.png)*Network edit — Firewall tab*

Per-network firewall rules organized by type:

- **Filter Rules** — traffic logging and filtering
- **NAT Rules** — SNAT rules (auto-generated for upstream)
- **DNAT Rules** — port forwarding rules (auto-generated from Port Forwarding tab)
- **Mangle Rules** — traffic marking for TC and policy routing (auto-generated)

![Mangle rules](https://doc.puq.info/uploads/images/gallery/2026-09/embedded-image-sukv7sci.png)*Network edit — Mangle rules for traffic control*

### Clients Tab

![Network clients](https://doc.puq.info/uploads/images/gallery/2026-09/embedded-image-tklbdeis.png)*Network edit — Clients tab*

Lists all clients in this network with their name, username, IP, status, and bandwidth.

### Traffic Control Tab

![Traffic control](https://doc.puq.info/uploads/images/gallery/2026-09/embedded-image-u2igckll.png)*Network edit — Traffic Control tab (upload classes)*

Real-time traffic control statistics showing TC classes for each client and direction:

- **Interfaces** — WireGuard, AmneziaWG, OpenVPN, and upstream interfaces
- **Per-client rows** — Handle, Direction, Rate, Bytes, Packets, Drops, Overlimits, Throughput

![Traffic control download](https://doc.puq.info/uploads/images/gallery/2026-09/embedded-image-qajh05wj.png)*Traffic Control — download classes*

### Traffic Tab

![Network traffic](https://doc.puq.info/uploads/images/gallery/2026-09/embedded-image-ndyqvil3.png)*Network edit — Traffic tab with monthly chart and daily breakdown*

Monthly traffic statistics with:

- **Traffic Chart** — daily download/upload bar chart
- **Period selector** — year and month
- **Download / Upload / Total** — aggregated numbers
- **Daily Breakdown** — per-day traffic table

- - - - - -# 06. Clients

Clients are VPN accounts assigned to a network. Each client gets a unique IP address, WireGuard keys, OpenVPN certificate, and IKEv2 credentials — and can connect via **any** protocol enabled on their network.

> \[!TIP\] **Automating Client Management with WHMCS**: Instead of manually creating and managing clients, you can automate account provisioning, suspension, cancellation, and configuration delivery using the official **[PUQVPNCP WHMCS Provisioning Module](https://puqcloud.com/whmcs-module-puqvpncp.php)**.

## Clients List

Navigate to **Clients &gt; List of clients**.

![Clients list](https://doc.puq.info/uploads/images/gallery/2026-09/embedded-image-g8jh9lzo.png)*Clients list with name, username, network, IP, status, and bandwidth*

<table id="bkmrk-column-description-n"><thead><tr><th>Column</th><th>Description</th></tr></thead><tbody><tr><td>**Name**</td><td>Client identifier</td></tr><tr><td>**Username**</td><td>VPN login username (for OpenVPN/IKEv2)</td></tr><tr><td>**Network**</td><td>The network the client belongs to</td></tr><tr><td>**IP**</td><td>Assigned IPv4 address (and IPv6 if enabled)</td></tr><tr><td>**Status**</td><td>Enable/Disable</td></tr><tr><td>**Bandwidth**</td><td>Download / Upload limits</td></tr></tbody></table>

- - - - - -

## Adding a Client

Navigate to **Clients &gt; Add client** or click the **+** button.

![Add client](https://doc.puq.info/uploads/images/gallery/2026-09/embedded-image-uocbuty3.png)*Add a new client*

<table id="bkmrk-field-description-na"><thead><tr><th>Field</th><th>Description</th></tr></thead><tbody><tr><td>**Name**</td><td>Unique client name</td></tr><tr><td>**Username**</td><td>Login for OpenVPN and IKEv2 authentication</td></tr><tr><td>**Password**</td><td>Auto-generated or custom. Click the key icon to generate.</td></tr><tr><td>**Status**</td><td>Enable or Disable the account</td></tr><tr><td>**Bandwidth Download / Upload (Mbit)**</td><td>Per-client speed limit (0 = use network default)</td></tr><tr><td>**Network**</td><td>Select the target network</td></tr><tr><td>**IP Address**</td><td>Select from available IPs in the subnet</td></tr></tbody></table>

- - - - - -

## Editing a Client

Click edit on any client to open the tabbed editor.

### Main Tab

![Client edit — Main](https://doc.puq.info/uploads/images/gallery/2026-09/embedded-image-ysebrhww.png)*Client edit — Main tab with traffic control and statistics*

The Main tab shows:

- **Client settings** (left) — name, username, password, status, bandwidth
- **Network &amp; IP** (right) — network link and assigned IP
- **Traffic Control** (right) — real-time TC classes per interface and direction
- **Traffic Statistics** (right) — monthly chart with download/upload

![Network &amp; IP card](https://doc.puq.info/uploads/images/gallery/2026-09/embedded-image-y4l3jcdy.png)*Network &amp; IP card — shows the assigned network and IP address*

![Client bandwidth and TC classids](https://doc.puq.info/uploads/images/gallery/2026-09/embedded-image-aytrtwkx.png)*Bandwidth settings with TC class identifiers*

The **TC** line below bandwidth fields shows the traffic control class IDs used for this client (e.g., `TC: 1:4111 / 1:6111` for download IPv4/IPv6).

### Traffic Control Card

![Traffic control card](https://doc.puq.info/uploads/images/gallery/2026-09/embedded-image-pw8js4oc.png)*Real-time traffic control with bandwidth graph*

The Traffic Control card provides:

- **Per-direction stats** — Upload/Download for IPv4/IPv6 on each interface
- **Live bandwidth graph** — real-time download, upload, and limit lines
- **Current speed** — current download and upload rates
- **Drops and overlimits** — highlighted in red/yellow when bandwidth is exceeded

### Traffic Statistics

![Traffic statistics](https://doc.puq.info/uploads/images/gallery/2026-09/embedded-image-xg5iwayx.png)*Monthly traffic statistics*

### One-Time Link

From the Main tab, click **Create** in the One-Time Link section to generate a self-service configuration URL.

![OTL created](https://doc.puq.info/uploads/images/gallery/2026-09/embedded-image-jeda9jgj.png)*One-time link generated successfully*

The link allows the end user to download their VPN configuration files, QR codes, and credentials without admin panel access. See [One-Time Links](14-one-time-links.md) for details.

### WireGuard Tab

![Client WireGuard](https://doc.puq.info/uploads/images/gallery/2026-09/embedded-image-ry1jfwlo.png)*Client edit — WireGuard tab*

Displays:

- **WireGuard Keys** — private/public key pair (regeneratable)
- **WireGuard Peer Info** — allowed IPs, endpoint, last handshake, transfer stats
- **QR Code** — scannable QR code for mobile client apps
- **Config Text** — full WireGuard configuration for copy/paste

### AmneziaWG Tab

![Client AmneziaWG](https://doc.puq.info/uploads/images/gallery/2026-09/embedded-image-vs5wi2ir.png)*Client edit — AmneziaWG tab with keys and QR code*

Displays:

- **AmneziaWG Keys &amp; Obfuscation** — private/public key pair and obfuscation parameters (H1–H4, Jc, Jmin, Jmax, S1, S2)
- **AmneziaWG Peer Info** — allowed IPs, endpoint, last handshake, transfer stats
- **QR Code** — scannable QR code for AmneziaWG mobile apps (iOS and Android)
- **Config Text &amp; Download** — full AmneziaWG `.conf` configuration file

### OpenVPN Tab

![Client OpenVPN](https://doc.puq.info/uploads/images/gallery/2026-09/embedded-image-hwobqofe.png)*Client edit — OpenVPN tab*

Displays:

- **Certificate Status** — Issued / Revoked with regeneration option
- **OpenVPN Credentials** — Username and password
- **OpenVPN Profile (.ovpn)** — full configuration file with embedded certificates, downloadable

### IKEv2 Tab

![Client IKEv2](https://doc.puq.info/uploads/images/gallery/2026-09/embedded-image-8wgh2hdq.png)*Client edit — IKEv2 tab*

Displays:

- **IKEv2 Credentials** — username and password
- **IKEv2 Profile (.sswan)** — strongSwan configuration file, downloadable

### Traffic Tab

![Client traffic](https://doc.puq.info/uploads/images/gallery/2026-09/embedded-image-qcn0zseo.png)*Client edit — Traffic tab with chart and daily breakdown*

Monthly traffic view with:

- Period selector (year/month)
- Traffic Chart (daily bars)
- Download / Upload / Total aggregates
- Daily Breakdown table

- - - - - -

## Clients Online

Navigate to **Clients &gt; Clients online** to see currently connected VPN users across all protocols.

The page shows a unified view of:

- WireGuard peers with recent handshakes
- AmneziaWG peers with recent handshakes
- OpenVPN connected sessions
- IKEv2 active SAs (security associations)

Each entry displays the client name, protocol, IP address, and connection duration.

- - - - - -# 07. WireGuard

## Overview

**WireGuard** is a modern, high-performance VPN protocol built into the Linux kernel. It is the fastest protocol supported by PUQVPNCP, offering:

- **Minimal overhead** — only ~60 bytes per packet
- **Quick connections** — sub-second handshake
- **Strong cryptography** — Curve25519, ChaCha20, Poly1305
- **Roaming support** — seamlessly switch between Wi-Fi and cellular

WireGuard is ideal for mobile devices, low-latency applications, and high-throughput scenarios.

> **Need Anti-Censorship or DPI Bypass?** If standard WireGuard packets are detected or throttled by deep packet inspection (DPI) firewalls, use **[AmneziaWG](22-amneziawg.md)** — a specialized WireGuard fork with header obfuscation and junk packet injection.

> **Requirement:** `wireguard` and `wireguard-tools` packages must be installed. Check via **Settings &gt; Environment**.

Navigate to **VPN Servers &gt; WireGuard** to access WireGuard management. The page has 5 tabs: Overview, Networks, Settings, Online, Client Profiles.

- - - - - -

## Overview Tab

![WireGuard overview](https://doc.puq.info/uploads/images/gallery/2026-09/embedded-image-rplsposq.png)*WireGuard overview — service status, summary, online connections*

The Overview tab shows:

<table id="bkmrk-card-description-ser"><thead><tr><th>Card</th><th>Description</th></tr></thead><tbody><tr><td>**Service Status**</td><td>Installed `wireguard` and `wireguard-tools` package versions</td></tr><tr><td>**Summary**</td><td>Total number of WireGuard networks and clients</td></tr><tr><td>**Online Connections**</td><td>Number of currently active WireGuard connections with a link to view all</td></tr></tbody></table>

- - - - - -

## Networks Tab

![WireGuard networks](https://doc.puq.info/uploads/images/gallery/2026-09/embedded-image-t98jldvy.png)*WireGuard networks — list of all WireGuard interfaces*

Shows all networks that have WireGuard enabled:

<table id="bkmrk-column-description-n"><thead><tr><th>Column</th><th>Description</th></tr></thead><tbody><tr><td>**Name**</td><td>Network name (link to network edit page)</td></tr><tr><td>**Clients**</td><td>Number of WireGuard clients in this network</td></tr><tr><td>**Interface**</td><td>WireGuard interface name (e.g., `wg51820`)</td></tr><tr><td>**Network**</td><td>Subnet assigned to this network</td></tr><tr><td>**Endpoint**</td><td>Server IP and UDP port for client connections</td></tr><tr><td>**Bandwidth**</td><td>Upload / download bandwidth limits</td></tr></tbody></table>

Each network has its own WireGuard interface with independent settings. See the [Networks](05-networks.md) page for per-network WireGuard configuration.

- - - - - -

## Settings Tab

![WireGuard settings](https://doc.puq.info/uploads/images/gallery/2026-09/embedded-image-ggc94wey.png)*WireGuard settings — client profile defaults*

Configure global defaults for WireGuard client profiles. These settings are applied to all WireGuard client configs unless overridden at the network level.

<table id="bkmrk-setting-description-"><thead><tr><th>Setting</th><th>Description</th><th>Default</th></tr></thead><tbody><tr><td>**MTU**</td><td>Tunnel MTU (0 = system default)</td><td>1420</td></tr><tr><td>**Persistent Keepalive (sec)**</td><td>Keepalive interval (0 = disabled)</td><td>25</td></tr><tr><td>**Allowed IPs**</td><td>Controls which traffic goes through VPN. Empty = full tunnel (`0.0.0.0/0`). Networks with custom routes use split-tunnel regardless of this setting</td><td>(empty)</td></tr></tbody></table>

Use the **Restore defaults** button to reset all settings to their original values.

- - - - - -

## Online Tab

![WireGuard online](https://doc.puq.info/uploads/images/gallery/2026-09/embedded-image-rf3ca7fz.png)*WireGuard online users — currently connected peers*

Shows all WireGuard peers with a recent handshake:

<table id="bkmrk-column-description-n-0"><thead><tr><th>Column</th><th>Description</th></tr></thead><tbody><tr><td>**Name**</td><td>Client name (link to client page)</td></tr><tr><td>**Status**</td><td>Enable/Disable</td></tr><tr><td>**Username**</td><td>System user who owns this client</td></tr><tr><td>**AllowedIPs**</td><td>Client's VPN IP address</td></tr><tr><td>**Endpoint**</td><td>Client's real IP address and port</td></tr><tr><td>**Handshake**</td><td>Last handshake timestamp</td></tr><tr><td>**Transfer RX/TX**</td><td>Bytes received / sent</td></tr><tr><td>**Bandwidth**</td><td>Configured bandwidth limit</td></tr><tr><td>**Server**</td><td>Network name</td></tr></tbody></table>

- - - - - -

## Client Profiles Tab

![WireGuard client profiles](https://doc.puq.info/uploads/images/gallery/2026-09/embedded-image-dqjjkmnv.png)*WireGuard client profiles — all clients across all networks*

Lists all WireGuard clients across all networks:

<table id="bkmrk-column-description-c"><thead><tr><th>Column</th><th>Description</th></tr></thead><tbody><tr><td>**Client Name**</td><td>Client name (link to client page)</td></tr><tr><td>**Username**</td><td>System user who owns this client</td></tr><tr><td>**Network**</td><td>Network this client belongs to</td></tr><tr><td>**Status**</td><td>Enable/Disable</td></tr><tr><td>**Keys**</td><td>Key status (Active = keys generated)</td></tr></tbody></table>

Each client row has buttons to edit the client and download the WireGuard configuration file.

- - - - - -

## Client Configuration

Each client automatically gets:

- A unique **WireGuard key pair** (regeneratable)
- A **configuration file** ready to import into any WireGuard client
- A **QR code** for scanning on mobile devices

Supported client platforms:

- **Windows** — official WireGuard app
- **macOS** — official WireGuard app or App Store
- **Linux** — `wg-quick` or NetworkManager
- **Android** — WireGuard app from Google Play
- **iOS** — WireGuard app from App Store
- **Mikrotik** — RouterOS 7+ native WireGuard

- - - - - -

## How It Works

```
Client App                    PUQVPNCP Server
----------                    ---------------
[WireGuard]  ---- UDP ----->  [wg51823 interface]
                                    |
                              iptables mangle (mark)
                                    |
                              policy routing (table)
                                    |
                              +-------------+
                              |  Upstream   |
                              | (direct or  |
                              |  wgupN)     |
                              +-------------+
                                    |
                              SNAT + forward
                                    |
                                Internet

```

1. Client connects to the WireGuard UDP port
2. Packets arrive on the network's WireGuard interface (e.g., `wg51823`)
3. iptables mangle rules mark the traffic for policy routing
4. Traffic is routed through the configured upstream (direct internet or WireGuard tunnel)
5. SNAT is applied for internet access

- - - - - -# 08. IKEv2

## Overview

**IKEv2/IPsec** is a standards-based VPN protocol with native support in most operating systems. PUQVPNCP uses **strongSwan** as the IKEv2 implementation.

Key advantages:

- **No app required** — built into iOS, macOS, Windows, Android, Linux
- **MOBIKE support** — seamless switching between Wi-Fi and cellular without reconnection
- **Strong security** — certificate-based authentication with modern ciphers
- **Automatic reconnection** — reconnects transparently after network changes

IKEv2 is the best choice when you want **zero-install VPN** for end users — they can configure it using only the native OS settings.

> **Requirement:** `strongswan` and `strongswan-pki` packages must be installed.

- - - - - -

## Global Settings

Navigate to **VPN Servers &gt; IKEv2** to configure global IKEv2 settings.

![IKEv2 settings](https://doc.puq.info/uploads/images/gallery/2026-09/embedded-image-gjtr7y02.png)*IKEv2 global settings*

<table id="bkmrk-setting-description-"><thead><tr><th>Setting</th><th>Description</th></tr></thead><tbody><tr><td>**Enabled**</td><td>Enable/disable IKEv2 globally</td></tr><tr><td>**Ports**</td><td>500 / 4500 UDP (standard IPsec ports)</td></tr></tbody></table>

### Advanced Settings

![IKEv2 advanced](https://doc.puq.info/uploads/images/gallery/2026-09/embedded-image-95h7mmn8.png)*IKEv2 advanced settings*

<table id="bkmrk-setting-description--0"><thead><tr><th>Setting</th><th>Description</th><th>Default</th></tr></thead><tbody><tr><td>**ESP**</td><td>ESP encryption proposals</td><td>`aes256gcm128-sha256`</td></tr><tr><td>**IKE**</td><td>IKE encryption proposals</td><td>`aes256-sha256-modp2048`</td></tr><tr><td>**IKE Lifetime (sec)**</td><td>IKE SA lifetime</td><td>86400</td></tr><tr><td>**Lifetime (sec)**</td><td>Child SA lifetime</td><td>3600</td></tr><tr><td>**DPD Delay**</td><td>Dead Peer Detection interval</td><td>30</td></tr><tr><td>**DPD Timeout**</td><td>DPD timeout</td><td>150</td></tr></tbody></table>

- - - - - -

## Certificates

IKEv2 uses X.509 certificates for server authentication. PUQVPNCP manages the full PKI chain.

### Root Certificate (CA)

![Root certificate](https://doc.puq.info/uploads/images/gallery/2026-09/embedded-image-xse2matx.png)*IKEv2 Root CA certificate*

The Root CA is created once and signs all server certificates. Clients must trust this CA.

### Server Certificate

![Server certificate](https://doc.puq.info/uploads/images/gallery/2026-09/embedded-image-kc7qug4t.png)*IKEv2 server certificate*

The server certificate is signed by the Root CA and presented to clients during the IKE handshake.

> **Important:** The server certificate's Subject Alternative Name (SAN) must match the VPN Domain or server IP.

### Import Certificate

![Import certificate](https://doc.puq.info/uploads/images/gallery/2026-09/embedded-image-zdok4zxr.png)*Import existing CA and server certificates*

If you have existing certificates from another strongSwan installation, you can import them instead of generating new ones.

- - - - - -

## DNS

![IKEv2 DNS](https://doc.puq.info/uploads/images/gallery/2026-09/embedded-image-v6jthlc6.png)*IKEv2 DNS configuration*

Configure DNS servers pushed to IKEv2 clients.

- - - - - -

## Status

![IKEv2 status](https://doc.puq.info/uploads/images/gallery/2026-09/embedded-image-pazkefkr.png)*IKEv2 service status*

Shows the strongSwan daemon status, starter and charon PIDs, and current active SAs.

- - - - - -

## Online Users

![IKEv2 online](https://doc.puq.info/uploads/images/gallery/2026-09/embedded-image-poltmmzd.png)*IKEv2 online users*

Lists all active IKEv2 security associations with:

- Client name and network
- Virtual IP assigned
- Remote (real) IP
- IKE and ESP proposals in use
- Connection duration

- - - - - -

## Client Profiles

![IKEv2 client profiles](https://doc.puq.info/uploads/images/gallery/2026-09/embedded-image-5jchdakx.png)*IKEv2 client profiles — all clients across all networks*

Lists all IKEv2 clients across all networks:

<table id="bkmrk-column-description-c"><thead><tr><th>Column</th><th>Description</th></tr></thead><tbody><tr><td>**Client Name**</td><td>Client name (link to client page)</td></tr><tr><td>**Username**</td><td>System user who owns this client</td></tr><tr><td>**Network**</td><td>Network this client belongs to</td></tr><tr><td>**Status**</td><td>Enable/Disable</td></tr></tbody></table>

Each client row has buttons to edit the client and download the `.sswan` configuration file.

- - - - - -

## Client Configuration

IKEv2 clients authenticate using **username/password** (EAP-MSCHAPv2) with server certificate validation.

### Configuration by Platform

<table id="bkmrk-platform-method-ios-"><thead><tr><th>Platform</th><th>Method</th></tr></thead><tbody><tr><td>**iOS**</td><td>Settings &gt; VPN &gt; Add Configuration &gt; IKEv2. Or import `.mobileconfig` profile</td></tr><tr><td>**macOS**</td><td>System Preferences &gt; Network &gt; + &gt; VPN &gt; IKEv2</td></tr><tr><td>**Windows**</td><td>Settings &gt; Network &gt; VPN &gt; Add VPN &gt; IKEv2</td></tr><tr><td>**Android**</td><td>Settings &gt; VPN &gt; + &gt; IKEv2/IPsec MSCHAPv2 (or use strongSwan app)</td></tr><tr><td>**Linux**</td><td>NetworkManager or `charon-cmd`</td></tr></tbody></table>

### Required Client Settings

<table id="bkmrk-field-value-server-y"><thead><tr><th>Field</th><th>Value</th></tr></thead><tbody><tr><td>**Server**</td><td>Your VPN domain or IP</td></tr><tr><td>**Remote ID**</td><td>Same as server (domain or IP)</td></tr><tr><td>**Authentication**</td><td>Username (EAP)</td></tr><tr><td>**Username / Password**</td><td>From client's IKEv2 tab</td></tr><tr><td>**CA Certificate**</td><td>The Root CA certificate (download from panel)</td></tr></tbody></table>

> **Tip:** Use **One-Time Links** to give users a downloadable `.sswan` profile that imports all settings automatically.

- - - - - -

## Per-Network Configuration

Each network can override the global IKEv2 settings:

- ESP and IKE proposals
- SA lifetimes
- DPD delay and timeout

See the IKEv2 tab in [Networks](05-networks.md) for details.

- - - - - -# 09. OpenVPN

## Overview

**OpenVPN** is a mature, widely-supported VPN protocol based on SSL/TLS. PUQVPNCP manages OpenVPN with full PKI (Easy-RSA) integration.

Key advantages:

- **Universal compatibility** — works on virtually every platform and device
- **TCP mode** — can bypass restrictive firewalls that block UDP
- **Highly configurable** — extensive cipher, compression, and routing options
- **Certificate-based** — each client gets a unique TLS certificate

OpenVPN is the best choice when you need **maximum compatibility** or when clients are behind restrictive firewalls that block WireGuard and IKEv2 traffic.

> **Requirement:** `openvpn` and `easy-rsa` packages must be installed.

Navigate to **VPN Servers &gt; OpenVPN** to access OpenVPN management. The page has 6 tabs: Overview, Certificates, Settings, Networks, Online, Client Profiles.

- - - - - -

## Overview Tab

![OpenVPN overview](https://doc.puq.info/uploads/images/gallery/2026-09/embedded-image-uowhgsht.png)*OpenVPN overview — service status, certificates, configuration, online connections*

The Overview tab shows:

<table id="bkmrk-card-description-ser"><thead><tr><th>Card</th><th>Description</th></tr></thead><tbody><tr><td>**Service Status**</td><td>Installed `openvpn` and `easy-rsa` package versions</td></tr><tr><td>**Certificate Status**</td><td>Status of CA, Server Certificate, DH Parameters, and TLS Auth Key (Valid/Missing)</td></tr><tr><td>**Configuration**</td><td>OpenVPN enabled/disabled, number of networks and clients</td></tr><tr><td>**Online Connections**</td><td>Number of currently active OpenVPN connections with a link to view all</td></tr></tbody></table>

- - - - - -

## Certificates Tab

Before OpenVPN can be enabled, you must generate all required certificates. The Certificates tab guides you through the PKI setup step by step.

### Step 1: Generate CA Certificate

![Certificates — initial setup](https://doc.puq.info/uploads/images/gallery/2026-09/embedded-image-jklje1hg.png)*Certificates tab — initial state, CA certificate form*

Fill in the CA Certificate fields:

<table id="bkmrk-field-description-ex"><thead><tr><th>Field</th><th>Description</th><th>Example</th></tr></thead><tbody><tr><td>**Common Name**</td><td>CA certificate name</td><td>`myserver.com CA`</td></tr><tr><td>**Organization**</td><td>Organization name</td><td>`myserver.com`</td></tr><tr><td>**Organizational Unit**</td><td>(optional) Department</td><td></td></tr><tr><td>**Locality**</td><td>(optional) City</td><td></td></tr><tr><td>**State / Province**</td><td>(optional) State</td><td></td></tr><tr><td>**Country**</td><td>(optional) Country code</td><td></td></tr></tbody></table>

Click **Generate CA Certificate** to create the root CA.

### Step 2: Generate Server Certificate and DH Parameters

![Certificates — CA generated](https://doc.puq.info/uploads/images/gallery/2026-09/embedded-image-vodifn1e.png)*Certificates tab — CA generated, generating server certificate*

After the CA is generated:

1. Click **Generate Server Certificate** — creates the server's TLS certificate signed by the CA
2. Click **Generate DH Parameters** — creates Diffie-Hellman parameters (takes ~1 minute)

![Certificates — DH generating](https://doc.puq.info/uploads/images/gallery/2026-09/embedded-image-d3401lb9.png)*Certificates tab — DH parameters generating*

### Step 3: Generate TLS Auth Key

![Certificates — generating TLS Auth](https://doc.puq.info/uploads/images/gallery/2026-09/embedded-image-umcrgsqj.png)*Certificates tab — generating TLS Auth key*

Click **Generate TLS Auth Key** to create the HMAC authentication key.

### Step 4: All Certificates Ready

![Certificates — all generated](https://doc.puq.info/uploads/images/gallery/2026-09/embedded-image-dqjkvfxo.png)*Certificates tab — all certificates and keys generated*

![Certificates — complete with details](https://doc.puq.info/uploads/images/gallery/2026-09/embedded-image-7gvcdcqn.png)*Certificates tab — all valid, certificate details panel*

Once all 4 components are generated (CA, Server, DH, TLS Auth), you can enable OpenVPN:

![Certificates — OpenVPN enabled](https://doc.puq.info/uploads/images/gallery/2026-09/embedded-image-unf9hewp.png)*Certificates tab — OpenVPN enabled*

Set **OpenVPN Enabled** to **YES** and save. The right panel shows the CA certificate details (issuer, validity dates, fingerprint).

- - - - - -

## Settings Tab

![OpenVPN settings](https://doc.puq.info/uploads/images/gallery/2026-09/embedded-image-famjfxty.png)*OpenVPN settings — connection and performance defaults*

Configure global defaults for OpenVPN. These settings are applied to all networks unless overridden at the network level.

### Connection

<table id="bkmrk-setting-description-"><thead><tr><th>Setting</th><th>Description</th><th>Default</th></tr></thead><tbody><tr><td>**Protocol**</td><td>UDP or TCP</td><td>udp</td></tr><tr><td>**Cipher**</td><td>Encryption cipher</td><td>AES-256-GCM</td></tr><tr><td>**Auth Digest**</td><td>HMAC authentication digest</td><td>SHA256</td></tr><tr><td>**TLS Cipher**</td><td>TLS cipher suite (optional)</td><td>(empty)</td></tr><tr><td>**Compression**</td><td>lz4-v2, lzo, or disabled</td><td>lz4-v2</td></tr><tr><td>**Port Start**</td><td>Starting port for network instances</td><td>1194</td></tr><tr><td>**Client-to-Client**</td><td>Allow clients to communicate directly</td><td>NO</td></tr><tr><td>**Duplicate CN**</td><td>Allow multiple connections with same certificate</td><td>NO</td></tr><tr><td>**Persist Key**</td><td>Keep keys across restarts</td><td>YES</td></tr><tr><td>**Persist Tun**</td><td>Keep tunnel device across restarts</td><td>YES</td></tr></tbody></table>

### Performance &amp; Limits

<table id="bkmrk-setting-description--0"><thead><tr><th>Setting</th><th>Description</th><th>Default</th></tr></thead><tbody><tr><td>**Keepalive (sec)**</td><td>Ping interval</td><td>10</td></tr><tr><td>**Keepalive Timeout (sec)**</td><td>Connection timeout</td><td>120</td></tr><tr><td>**Max Clients**</td><td>Maximum simultaneous clients per instance</td><td>100</td></tr><tr><td>**Verbosity**</td><td>Log verbosity level (0-11)</td><td>3</td></tr><tr><td>**MTU (tun-mtu)**</td><td>Tunnel MTU</td><td>1420</td></tr><tr><td>**MSS Fix**</td><td>Clamp MSS to avoid fragmentation (0 = disabled)</td><td>0</td></tr><tr><td>**Fragment**</td><td>Fragmentation size (0 = disabled)</td><td>0</td></tr></tbody></table>

Use the **Restore defaults** button to reset all settings to their original values.

- - - - - -

## Networks Tab

![OpenVPN networks](https://doc.puq.info/uploads/images/gallery/2026-09/embedded-image-szk2u5ys.png)*OpenVPN networks — list of all OpenVPN instances*

Shows all networks that have OpenVPN enabled:

<table id="bkmrk-column-description-n"><thead><tr><th>Column</th><th>Description</th></tr></thead><tbody><tr><td>**Name**</td><td>Network name (link to network edit page)</td></tr><tr><td>**Clients**</td><td>Number of OpenVPN clients in this network</td></tr><tr><td>**Port**</td><td>UDP/TCP port for this network's OpenVPN instance</td></tr><tr><td>**Proto**</td><td>Protocol (udp/tcp)</td></tr><tr><td>**Network**</td><td>Subnet assigned to this network</td></tr><tr><td>**Bandwidth**</td><td>Upload / download bandwidth limits</td></tr></tbody></table>

- - - - - -

## Online Tab

![OpenVPN online](https://doc.puq.info/uploads/images/gallery/2026-09/embedded-image-84cmrzva.png)*OpenVPN online users — currently connected clients*

Shows all active OpenVPN sessions:

<table id="bkmrk-column-description-n-0"><thead><tr><th>Column</th><th>Description</th></tr></thead><tbody><tr><td>**Name**</td><td>Client name (link to client page)</td></tr><tr><td>**Username**</td><td>System user who owns this client</td></tr><tr><td>**Virtual IP**</td><td>IP assigned inside the VPN tunnel</td></tr><tr><td>**Real IP**</td><td>Client's real IP address and port</td></tr><tr><td>**Bytes RX**</td><td>Bytes received from client</td></tr><tr><td>**Bytes TX**</td><td>Bytes sent to client</td></tr><tr><td>**Connected Since**</td><td>Connection start timestamp</td></tr><tr><td>**Network**</td><td>Network name</td></tr></tbody></table>

Each row has buttons to edit the client or disconnect the session.

- - - - - -

## Client Profiles Tab

![OpenVPN client profiles](https://doc.puq.info/uploads/images/gallery/2026-09/embedded-image-mrvvum1o.png)*OpenVPN client profiles — all clients across all networks*

Lists all OpenVPN clients across all networks:

<table id="bkmrk-column-description-c"><thead><tr><th>Column</th><th>Description</th></tr></thead><tbody><tr><td>**Client Name**</td><td>Client name (link to client page)</td></tr><tr><td>**Username**</td><td>System user who owns this client</td></tr><tr><td>**Network**</td><td>Network this client belongs to</td></tr><tr><td>**Status**</td><td>Enable/Disable</td></tr><tr><td>**Certificate**</td><td>Certificate status (Issued/Missing)</td></tr></tbody></table>

Each client row has buttons to edit the client and download the `.ovpn` configuration file.

- - - - - -

## Client Configuration

Each OpenVPN client automatically gets:

- A unique **X.509 client certificate** (issued by the PKI)
- A ready-to-use **`.ovpn` profile** with embedded certificates
- **Username/password** credentials for double authentication

The `.ovpn` profile contains everything needed to connect:

- Server address and port
- Encryption settings
- Embedded CA, client certificate, client key, and TLS-Auth key
- Authentication settings

### Supported Client Apps

<table id="bkmrk-platform-app-windows"><thead><tr><th>Platform</th><th>App</th></tr></thead><tbody><tr><td>**Windows**</td><td>OpenVPN GUI, OpenVPN Connect</td></tr><tr><td>**macOS**</td><td>Tunnelblick, OpenVPN Connect</td></tr><tr><td>**Linux**</td><td>`openvpn` CLI, NetworkManager</td></tr><tr><td>**Android**</td><td>OpenVPN Connect (Play Store)</td></tr><tr><td>**iOS**</td><td>OpenVPN Connect (App Store)</td></tr><tr><td>**Mikrotik**</td><td>RouterOS 7+ OVPN client</td></tr></tbody></table>

- - - - - -

## Per-Network Configuration

Each network has its own OpenVPN instance with:

- Unique port and protocol
- Separate interface (e.g., `ovpn1197`)
- Per-network overrides for cipher, auth, compression, MTU, MSS
- Policy routing with mark/table
- Client push settings (full/split tunnel, DNS)

See the OpenVPN tab in [Networks](05-networks.md) for details.

- - - - - -# 10. Upstreams (WireGuard Tunnels)

## Overview

**Upstreams** allow you to route VPN client traffic through external WireGuard VPN servers instead of the PUQVPNCP server's own internet connection. This creates a **multi-hop VPN chain**:

```
VPN Client ---> PUQVPNCP Server ---> WireGuard Upstream ---> Internet
                                       (wgupN)

```

Each upstream is a WireGuard tunnel to a remote VPN server. Networks can be individually assigned to different upstreams, giving you full control over which exit IP each group of clients uses.

- - - - - -

## Why Use Upstreams?

### 1. Geographic IP Rotation

Assign different networks to upstreams in different countries. Clients on "Network US" exit through a US server, clients on "Network EU" exit through a European server — all managed from a single PUQVPNCP instance.

```
                         +-- wgup0 (US server)  ---> US IP
                         |
Client ---> PUQVPNCP -----+-- wgup1 (EU server)  ---> EU IP
                         |
                         +-- direct (ens18)      ---> Server IP

```

### 2. Multi-Hop Privacy

Add an extra encryption layer between your server and the internet. Even if someone monitors your server's traffic, they see encrypted WireGuard traffic to the upstream, not the client's actual browsing.

### 3. ISP / IP Reputation Bypass

When your server's IP is blocked or blacklisted (e.g., by streaming services), route traffic through a clean upstream IP without migrating your entire infrastructure.

### 4. Dedicated Exit Nodes for Tenants

In a multi-tenant setup, give each customer their own exit IP:

<table id="bkmrk-network-upstream-exi"><thead><tr><th>Network</th><th>Upstream</th><th>Exit IP</th><th>Customer</th></tr></thead><tbody><tr><td>`corp_acme`</td><td>wgup0 (Frankfurt)</td><td>185.x.x.1</td><td>Acme Corp</td></tr><tr><td>`corp_globex`</td><td>wgup1 (London)</td><td>51.x.x.2</td><td>Globex Inc</td></tr><tr><td>`internal`</td><td>direct (ens18)</td><td>77.x.x.200</td><td>Internal</td></tr></tbody></table>

### 5. Load Distribution

Spread bandwidth across multiple upstream tunnels to avoid congestion on a single exit point.

### 6. Failover Planning

If your primary upstream goes down, simply reassign the network to a backup upstream. Client configurations don't change — only the server-side routing updates.

- - - - - -

## Upstreams Page

Navigate to **VPN Servers &gt; Upstreams** to manage system and WireGuard upstreams.

![Upstreams list](https://doc.puq.info/uploads/images/gallery/2026-09/embedded-image-uxcr86dc.png)*Upstreams page — System upstreams (server IPs) and WireGuard upstreams*

### System Upstreams

The top section shows all server IP addresses available as direct internet exits:

<table id="bkmrk-field-description-ip"><thead><tr><th>Field</th><th>Description</th></tr></thead><tbody><tr><td>**IP**</td><td>Server IP address</td></tr><tr><td>**Interface**</td><td>Network interface (e.g., `ens18`, `ens18:1`)</td></tr><tr><td>**Status**</td><td>UP / DOWN</td></tr><tr><td>**Primary**</td><td>Whether this IP is marked as primary</td></tr></tbody></table>

### WireGuard Upstreams

The bottom section shows configured WireGuard tunnels:

<table id="bkmrk-field-description-na"><thead><tr><th>Field</th><th>Description</th></tr></thead><tbody><tr><td>**Name**</td><td>Upstream identifier</td></tr><tr><td>**Endpoint**</td><td>Remote WireGuard server address:port</td></tr><tr><td>**Address**</td><td>Local tunnel IP (assigned by remote server)</td></tr><tr><td>**Interface**</td><td>Auto-generated interface name (`wgup0`, `wgup1`, ...)</td></tr><tr><td>**Status**</td><td>`connected` / `disconnected`</td></tr><tr><td>**Handshake**</td><td>Time since last successful handshake</td></tr><tr><td>**RX / TX**</td><td>Traffic through the tunnel</td></tr></tbody></table>

- - - - - -

## Creating an Upstream

Click the **+** button to add a new WireGuard upstream.

![Edit upstream](https://doc.puq.info/uploads/images/gallery/2026-09/embedded-image-e4tnonyl.png)*Edit WireGuard upstream configuration*

<table id="bkmrk-field-description-na-0"><thead><tr><th>Field</th><th>Description</th></tr></thead><tbody><tr><td>**Name**</td><td>Unique name for this upstream</td></tr><tr><td>**Description**</td><td>Optional description</td></tr><tr><td>**Endpoint**</td><td>Remote server address and port (e.g., `vpn.example.com:51820`)</td></tr><tr><td>**Tunnel Address**</td><td>Your local IP in the tunnel (e.g., `172.16.1.2/24`)</td></tr><tr><td>**DNS**</td><td>Optional DNS through the tunnel</td></tr><tr><td>**Private Key**</td><td>Your WireGuard private key. Click **Generate** to create a new key pair.</td></tr><tr><td>**Public Key (remote server)**</td><td>The remote server's public key</td></tr><tr><td>**Preshared Key**</td><td>Optional pre-shared key for extra security</td></tr><tr><td>**Allowed IPs**</td><td>Which traffic to route through the tunnel (usually `0.0.0.0/0`)</td></tr><tr><td>**MTU**</td><td>Tunnel MTU (default: 1340 for double-encapsulation)</td></tr><tr><td>**Keepalive**</td><td>Persistent keepalive interval (default: 25)</td></tr><tr><td>**Enabled (auto-connect)**</td><td>Automatically connect on service start</td></tr></tbody></table>

- - - - - -

## Importing a WireGuard Config

Click the **Import** button to paste an existing WireGuard `.conf` file.

![Import config](https://doc.puq.info/uploads/images/gallery/2026-09/embedded-image-2qkcut6t.png)*Import WireGuard configuration from a .conf file*

Paste the content of a standard WireGuard configuration file:

```ini
[Interface]
PrivateKey = ...
Address = 172.16.1.2/24

[Peer]
PublicKey = ...
Endpoint = vpn.example.com:51820
AllowedIPs = 0.0.0.0/0

```

The parser automatically extracts all fields and creates the upstream.

- - - - - -

## Assigning an Upstream to a Network

After creating an upstream, assign it to any network:

1. Go to **Networks &gt; Edit** your network
2. In the **Upstream** dropdown, select the WireGuard upstream
3. Click **Save** and **Reload**

The network's traffic will now be routed through the selected upstream tunnel.

![Network upstream selector](https://doc.puq.info/uploads/images/gallery/2026-09/embedded-image-cs5cygst.png)*Network edit — Upstream field showing a WireGuard upstream selection*

- - - - - -

## How It Works Internally

When a network uses a WireGuard upstream:

```
1. Client traffic arrives on VPN interface (wg51823, ovpn1197, etc.)
2. iptables mangle marks traffic with CONNMARK
3. Policy routing (ip rule + ip route) directs marked traffic to wgupN
4. SNAT replaces the source IP with the upstream tunnel IP
5. Traffic exits through the WireGuard upstream to the internet
6. Return traffic follows the same path back to the client

```

### Routing Chain

```
VPN Client (10.0.0.2)
    |
    ▼
WireGuard/OpenVPN/IKEv2 interface
    |
    ▼
iptables CONNMARK (set mark on wg/ovpn interface)
    |
    ▼
ip rule: fwmark → lookup table N
    |
    ▼
ip route: default via wgupN (in table N)
    |
    ▼
iptables SNAT: source → tunnel IP (172.16.1.2)
    |
    ▼
WireGuard upstream tunnel (wgupN)
    |
    ▼
Remote VPN server → Internet

```

> **Note:** The upstream tunnel uses a reduced MTU (1340 by default) to accommodate double encapsulation.

- - - - - -

## Practical Setup Example

### Scenario: Route office network through a US VPN server

**Step 1:** Get a WireGuard VPN account from a US provider (e.g., Mullvad, ProtonVPN, or your own server).

**Step 2:** In PUQVPNCP, go to **VPN Servers &gt; Upstreams**, click **Import**, paste the `.conf` file.

**Step 3:** Connect the upstream (click the **Play** button).

**Step 4:** Verify the upstream is connected (Status: `connected`, Handshake: recent).

**Step 5:** Go to **Networks**, edit your office network, select the new upstream in the **Upstream** dropdown.

**Step 6:** Save and Reload. All clients on that network now exit through the US IP.

- - - - - -

## Troubleshooting

<table id="bkmrk-issue-solution-upstr"><thead><tr><th>Issue</th><th>Solution</th></tr></thead><tbody><tr><td>Upstream shows `disconnected`</td><td>Check endpoint address, keys, and firewall on both sides</td></tr><tr><td>No handshake</td><td>Verify the remote server's public key and that UDP port is open</td></tr><tr><td>Clients have no internet</td><td>Check that Allowed IPs is `0.0.0.0/0` and SNAT is working</td></tr><tr><td>Slow speeds</td><td>Reduce MTU, check upstream bandwidth, ensure keepalive is set</td></tr></tbody></table>

- - - - - -# 11. Network Peering

## Overview

**Network Peering** allows VPN clients from different networks to communicate with each other. By default, networks are isolated — clients in Network A cannot reach clients in Network B. Peering rules create explicit exceptions.

- - - - - -

## Peering List

Navigate to **Networks &gt; Peering**.

![Peering list](https://doc.puq.info/uploads/images/gallery/2026-09/embedded-image-cqvyt0wa.png)*Network peering rules*

<table id="bkmrk-column-description-n"><thead><tr><th>Column</th><th>Description</th></tr></thead><tbody><tr><td>**Name**</td><td>Rule identifier</td></tr><tr><td>**Network A**</td><td>First network</td></tr><tr><td>**Network B**</td><td>Second network</td></tr><tr><td>**Bidirectional**</td><td>Whether traffic flows both ways</td></tr></tbody></table>

- - - - - -

## Adding a Peering Rule

Click the **+** button to create a new peering rule.

![Add peering](https://doc.puq.info/uploads/images/gallery/2026-09/embedded-image-solm3bsa.png)*Add a new peering rule*

<table id="bkmrk-field-description-na"><thead><tr><th>Field</th><th>Description</th></tr></thead><tbody><tr><td>**Name**</td><td>Rule name</td></tr><tr><td>**Network A**</td><td>First network</td></tr><tr><td>**Network B**</td><td>Second network</td></tr><tr><td>**Bidirectional**</td><td>If enabled, both networks can reach each other. If disabled, only A can reach B.</td></tr></tbody></table>

After adding a rule, the panel shows a warning to apply the firewall.

![Peering changed](https://doc.puq.info/uploads/images/gallery/2026-09/embedded-image-85n7cmfn.png)*Peering rules updated — 3 rules configured*

Click **Apply Firewall** to activate the new rules.

![Peering apply warning](https://doc.puq.info/uploads/images/gallery/2026-09/embedded-image-biqslawj.png)*Warning: Peering rules changed, click Apply Firewall to apply*

![Peering applying](https://doc.puq.info/uploads/images/gallery/2026-09/embedded-image-wc6xgxgl.png)*Applying firewall rules with countdown*

- - - - - -

## Use Cases

### Office-to-Office Communication

Connect clients from two office networks:

- `office_us` (10.0.1.0/24) ↔ `office_eu` (10.0.2.0/24)
- Bidirectional: Yes

### Server Access from VPN

Allow VPN clients to access a management network:

- `vpn_clients` (10.100.1.0/24) → `servers` (10.0.0.0/24)
- Bidirectional: No (clients access servers, but not vice versa)

### IoT Monitoring

Allow monitoring network to reach IoT devices:

- `monitoring` (10.0.3.0/24) → `iot_devices` (10.0.4.0/24)
- Bidirectional: No

- - - - - -

## How It Works

Peering rules create `iptables FORWARD` rules that allow traffic between the specified network subnets. Without peering, the default `auto_isolation_ipset` rule in Pre-Network Rules drops inter-network traffic.

- - - - - -# 12. Firewall

## Overview

PUQVPNCP manages the Linux firewall (`iptables` / `ip6tables`) with two layers:

1. **Global firewall** — server-wide policies, Pre-Network and Post-Network custom rules, ipset
2. **Per-network firewall** — auto-generated filter, NAT, DNAT, and mangle rules per network

- - - - - -

## Global Firewall

Navigate to **Settings &gt; Firewall**.

### Settings Tab

![Firewall settings](https://doc.puq.info/uploads/images/gallery/2026-09/embedded-image-psrrwubn.png)*Firewall settings — global policies*

<table id="bkmrk-setting-description-"><thead><tr><th>Setting</th><th>Description</th><th>Recommended</th></tr></thead><tbody><tr><td>**Forwarding (NAT)**</td><td>Enable SNAT for VPN clients</td><td>Enabled</td></tr><tr><td>**INPUT policy**</td><td>Default for incoming traffic</td><td>ACCEPT</td></tr><tr><td>**FORWARD policy**</td><td>Default for forwarded traffic</td><td>ACCEPT</td></tr><tr><td>**OUTPUT policy**</td><td>Default for outgoing traffic</td><td>ACCEPT</td></tr></tbody></table>

### Pre-Network Rules

![Pre-network rules](https://doc.puq.info/uploads/images/gallery/2026-09/embedded-image-a3rdurda.png)*Pre-Network rules — executed before per-network rules*

Pre-Network rules are applied **before** any per-network rules. Use them for:

- Allowing access to external services (monitoring, backups)
- Blocking specific IPs globally
- Custom INPUT rules for the server itself

![Add pre-network rule](https://doc.puq.info/uploads/images/gallery/2026-09/embedded-image-calvxc60.png)*Adding a custom pre-network rule*

<table id="bkmrk-field-description-na"><thead><tr><th>Field</th><th>Description</th></tr></thead><tbody><tr><td>**Name**</td><td>Rule identifier</td></tr><tr><td>**Chain**</td><td>INPUT, FORWARD, or OUTPUT</td></tr><tr><td>**Action**</td><td>ACCEPT, DROP, REJECT, LOG</td></tr><tr><td>**Protocol**</td><td>TCP, UDP, ICMP, or ANY</td></tr><tr><td>**Source IP / Dest IP**</td><td>IP addresses or CIDR ranges</td></tr><tr><td>**Source Port / Dest Port**</td><td>Port numbers (0 = any)</td></tr></tbody></table>

After adding rules, click **Apply Firewall** to activate.

![Rules changed](https://doc.puq.info/uploads/images/gallery/2026-09/embedded-image-9hprpfaj.png)*Rules modified — warning to apply*

![Applying](https://doc.puq.info/uploads/images/gallery/2026-09/embedded-image-cabigvuk.png)*Applying firewall rules*

### Post-Network Rules

![Post-network rules](https://doc.puq.info/uploads/images/gallery/2026-09/embedded-image-x5pskozj.png)*Post-Network rules — executed after per-network rules*

Same format as Pre-Network rules, but applied **after** per-network rules.

### ipset Tab

![ipset](https://doc.puq.info/uploads/images/gallery/2026-09/embedded-image-xcqkpx6c.png)*ipset — VPN network subnets for global isolation*

The `puq_vpn_nets` ipset contains all VPN network subnets and is used by the `auto_isolation_ipset` rule to prevent inter-network traffic (unless [Peering](11-peering.md) rules allow it).

- - - - - -

## Per-Network Firewall

Each network has its own firewall tab with auto-generated rules.

![Network firewall](https://doc.puq.info/uploads/images/gallery/2026-09/embedded-image-d9kul0e5.png)*Per-network firewall — Filter, NAT, DNAT rules*

### Rule Types

<table id="bkmrk-type-description-fil"><thead><tr><th>Type</th><th>Description</th></tr></thead><tbody><tr><td>**Filter Rules**</td><td>Traffic logging (auto\_log\_out/in) and custom filter rules</td></tr><tr><td>**NAT Rules**</td><td>SNAT for internet access (auto\_nat\_NETWORK → upstream IP)</td></tr><tr><td>**DNAT Rules**</td><td>Port forwarding rules (from Port Forwarding tab)</td></tr><tr><td>**Mangle Rules**</td><td>Traffic marking for TC bandwidth control and policy routing</td></tr></tbody></table>

![Mangle rules](https://doc.puq.info/uploads/images/gallery/2026-09/embedded-image-knseuavq.png)*Mangle rules — per-client traffic marks and CONNMARK for policy routing*

Mangle rules are fully auto-generated:

- `auto_mangle_dst_CLIENT` / `auto_mangle_src_CLIENT` — mark packets for traffic control
- `auto_wg_connmark` / `auto_ovpn_connmark` — CONNMARK on VPN interfaces for policy routing
- `auto_wg_restore_fwd` / `auto_wg_restore_local` — CONNMARK restore for return traffic

- - - - - -

## Rule Execution Order

```
1. Pre-Network Rules    (global, custom)
2. Per-Network Rules    (auto-generated per network)
   +-- Filter Rules     (logging, custom filters)
   +-- NAT Rules        (SNAT for upstream)
   +-- DNAT Rules       (port forwarding)
   +-- Mangle Rules     (TC marks, CONNMARK)
3. Post-Network Rules   (global, custom)
4. Global Policies      (INPUT/FORWARD/OUTPUT defaults)

```

- - - - - -# 13. DNS

## Overview

PUQVPNCP includes a built-in **bind9** DNS server that provides DNS resolution for all VPN clients. The DNS page is organized into three tabs: **Settings**, **Records**, and **Ad Blocking**.

> **Requirement:** `bind9` and `bind9-utils` packages must be installed.

- - - - - -

## Settings

The **Settings** tab controls the bind9 DNS server configuration.

![DNS Settings](https://doc.puq.info/uploads/images/gallery/2026-09/embedded-image-t9a76tqc.png)*DNS Settings tab — server configuration and ACL*

<table id="bkmrk-setting-description-"><thead><tr><th>Setting</th><th>Description</th></tr></thead><tbody><tr><td>**Enabled**</td><td>Enable or disable the bind9 DNS server</td></tr><tr><td>**Forwarder DNS 1**</td><td>Primary upstream DNS server for recursive queries</td></tr><tr><td>**Forwarder DNS 2**</td><td>Secondary upstream DNS server</td></tr><tr><td>**Max Cache TTL**</td><td>Maximum time (30–3600 seconds) DNS responses are cached</td></tr></tbody></table>

The **ACL** section at the bottom displays all IP addresses and subnets that are allowed to query this DNS server. This list is automatically generated from your VPN network configurations — it includes localhost, server IPs, and all VPN network subnets.

> **Tip:** Set the network's DNS 1 to the VPN gateway IP (e.g., `10.0.0.1`) so clients use this built-in resolver. This prevents DNS leaks and enables ad blocking.

Click the **checkmark button** in the top right to save changes.

- - - - - -

## Records

The **Records** tab manages custom DNS entries using bind9 Response Policy Zone (RPZ). These records override public DNS for all VPN clients.

![DNS Records](https://doc.puq.info/uploads/images/gallery/2026-09/embedded-image-acipvzqh.png)*DNS Records tab — RPZ overrides for VPN clients*

<table id="bkmrk-column-description-d"><thead><tr><th>Column</th><th>Description</th></tr></thead><tbody><tr><td>**Domain**</td><td>Full domain name (e.g., `puqcloud.com`, `internal.vpn`)</td></tr><tr><td>**Type**</td><td>Record type — **A** (IPv4), **AAAA** (IPv6), **CNAME**, etc.</td></tr><tr><td>**Value**</td><td>Target IP address or hostname</td></tr></tbody></table>

Click the **+** button to add a new record. Each record can be edited or deleted using the action buttons on the right.

**Use cases:**

- Block specific domains by pointing them to `0.0.0.0`
- Create internal DNS names for VPN resources (e.g., `wiki.vpn` → `10.0.0.5`)
- Override public DNS entries for split-horizon DNS

- - - - - -

## Ad Blocking

The **Ad Blocking** tab provides DNS-level ad and tracker blocking for all VPN clients. No client-side software is needed — it works automatically for any device connected to the VPN.

![DNS Ad Blocking](https://doc.puq.info/uploads/images/gallery/2026-09/embedded-image-hgspeobv.png)*Ad Blocking tab — enable/disable, block lists, whitelist*

### How It Works

When a VPN client requests a domain that is on a block list (e.g., `ads.google.com`), the DNS server responds with **NXDOMAIN** (domain does not exist) instead of the real IP address. This prevents ads, trackers, and malware from loading across all apps and browsers.

Ad blocking uses a **separate RPZ zone** (`rpz.adblock`) that is independent of your static DNS records in the Records tab.

### Configuration

<table id="bkmrk-setting-description--0"><thead><tr><th>Setting</th><th>Description</th></tr></thead><tbody><tr><td>**Ad Blocking**</td><td>Enable or disable ad blocking (YES/NO)</td></tr><tr><td>**Total Blocked**</td><td>Number of unique domains currently blocked</td></tr><tr><td>**Last Update**</td><td>Timestamp of the last block list update</td></tr></tbody></table>

- Click **Save** to apply the enable/disable setting
- Click **Update Now** to force an immediate download of all enabled block lists

### Block Lists

PUQVPNCP ships with 4 built-in block lists that cover ads, trackers, and malware domains:

<table id="bkmrk-list-description-dom"><thead><tr><th>List</th><th>Description</th><th>Domains</th></tr></thead><tbody><tr><td>**Steven Black Unified**</td><td>Ads, malware, fakenews — most popular community list</td><td>~82,000</td></tr><tr><td>**OISD Small**</td><td>Curated list with minimal false positives</td><td>~51,000</td></tr><tr><td>**Pete Lowe**</td><td>Only verified ad servers — very conservative</td><td>~3,500</td></tr><tr><td>**Hagezi Multi Pro**</td><td>Comprehensive, actively maintained</td><td>~183,000</td></tr></tbody></table>

Built-in lists are marked with a **builtin** badge. They cannot be deleted but can be toggled on/off using the checkbox.

With all lists enabled, approximately **320,000 unique domains** are blocked (after deduplication).

**Supported blocklist formats:**

- **Hosts format** — `0.0.0.0 domain.com` or `127.0.0.1 domain.com`
- **Domain-per-line** — one domain per line
- **Wildcard** — `*.domain.com`
- **Adblock filter** — `||domain.com^`

### Custom Lists

Click the **+** button in the Block Lists card to add a custom blocklist URL:

<table id="bkmrk-field-description-na"><thead><tr><th>Field</th><th>Description</th></tr></thead><tbody><tr><td>**Name**</td><td>Display name for the list</td></tr><tr><td>**URL**</td><td>HTTP/HTTPS URL to the blocklist file</td></tr><tr><td>**Enabled**</td><td>Whether the list is active</td></tr></tbody></table>

Custom lists can be deleted; built-in lists cannot.

### Whitelist

The **Whitelist** section allows you to exclude specific domains from blocking. When a domain is whitelisted, it and **all its subdomains** are excluded from ad blocking.

For example, whitelisting `example.com` will also unblock `sub.example.com`, `api.example.com`, etc.

Click the **+** button in the Whitelist card to add a domain.

### Auto-Update

Block lists are automatically refreshed **every 24 hours**. The **Last Update** timestamp and per-list domain counts are shown on the Ad Blocking tab.

To force an immediate update, click **Update Now**. This downloads all enabled lists, deduplicates domains, applies the whitelist, and reloads bind9.

- - - - - -

## API

DNS and ad blocking can be fully managed via the REST API:

<table id="bkmrk-method-endpoint-desc"><thead><tr><th>Method</th><th>Endpoint</th><th>Description</th></tr></thead><tbody><tr><td>`GET`</td><td>`/api/v1/dns`</td><td>Get DNS configuration</td></tr><tr><td>`PUT`</td><td>`/api/v1/dns`</td><td>Update DNS settings</td></tr><tr><td>`GET`</td><td>`/api/v1/dns/adblock`</td><td>Get ad blocking configuration and statistics</td></tr><tr><td>`PUT`</td><td>`/api/v1/dns/adblock`</td><td>Enable/disable ad blocking, toggle lists</td></tr><tr><td>`POST`</td><td>`/api/v1/dns/adblock/update`</td><td>Force update block lists</td></tr><tr><td>`POST`</td><td>`/api/v1/dns/adblock/lists`</td><td>Add custom block list</td></tr><tr><td>`DELETE`</td><td>`/api/v1/dns/adblock/lists/{name}`</td><td>Delete custom list</td></tr><tr><td>`GET`</td><td>`/api/v1/dns/adblock/whitelist`</td><td>List whitelisted domains</td></tr><tr><td>`POST`</td><td>`/api/v1/dns/adblock/whitelist`</td><td>Add domain to whitelist</td></tr><tr><td>`DELETE`</td><td>`/api/v1/dns/adblock/whitelist/{name}`</td><td>Remove domain from whitelist</td></tr></tbody></table>

See [API Reference](https://puqvpncp.com/api/) for full endpoint documentation with request/response examples.

- - - - - -# 14. One-Time Links

## Overview

**One-Time Links (OTL)** provide a self-service way for end users to download their VPN configuration files without accessing the admin panel. When a link is generated for a client, the user can:

- View VPN connection instructions
- Download WireGuard configuration and scan a QR code
- Download AmneziaWG obfuscated configuration and scan a QR code
- Download the OpenVPN `.ovpn` profile
- Download the IKEv2 `.sswan` profile
- See their credentials

Each link is a unique, cryptographically secure URL that can be used once or multiple times (configurable).

- - - - - -

## OTL Configuration

Navigate to **Settings &gt; One-time link**.

![OTL configuration](https://doc.puq.info/uploads/images/gallery/2026-09/embedded-image-2ebxvnfb.png)*One-Time Link configuration*

<table id="bkmrk-setting-description-"><thead><tr><th>Setting</th><th>Description</th></tr></thead><tbody><tr><td>**Enabled**</td><td>Enable/disable the OTL feature</td></tr><tr><td>**Expiration**</td><td>How long a link remains valid</td></tr><tr><td>**Max uses**</td><td>Number of times a link can be accessed (0 = unlimited)</td></tr></tbody></table>

### Protocol-Specific Configuration

Configure what is shown on the OTL page for each protocol:

![WireGuard OTL config](https://doc.puq.info/uploads/images/gallery/2026-09/embedded-image-i8ww9iga.png)*OTL WireGuard page configuration*

![AmneziaWG OTL config](https://doc.puq.info/uploads/images/gallery/2026-09/embedded-image-lq80ueoq.png)*OTL AmneziaWG page configuration*

![IKEv2 OTL config](https://doc.puq.info/uploads/images/gallery/2026-09/embedded-image-qeluuzxh.png)*OTL IKEv2 page configuration*

![OpenVPN OTL config](https://doc.puq.info/uploads/images/gallery/2026-09/embedded-image-7amkvj9v.png)*OTL OpenVPN page configuration*

- - - - - -

## Active Links

![OTL list](https://doc.puq.info/uploads/images/gallery/2026-09/embedded-image-l7mgsuso.png)*Active one-time links*

The list shows all generated links with their creation date, client, and usage count.

- - - - - -

## Generating a Link

Links can be generated from two places:

### From the Clients List

1. Go to **Clients &gt; List of clients**
2. Click the **OTL** button on any client row

### From the Client Edit Page

1. Open any client for editing
2. In the **One-Time Link** section, click **Create**

![OTL created](https://doc.puq.info/uploads/images/gallery/2026-09/embedded-image-qcaqhp2i.png)*One-time link created for a client*

Copy the URL and send it to the end user. They will see a branded page with their VPN configuration for all enabled protocols.

- - - - - -

## End User Experience

When the user opens the OTL URL, they see a clean, modern self-service interface with tabs for each enabled VPN protocol. The user can download client apps, configurations, credentials, and scan mobile QR codes.

### WireGuard

![WireGuard OTL Client View](https://doc.puq.info/uploads/images/gallery/2026-09/embedded-image-mmhbvwrj.png)*One-Time Link — WireGuard view with scannable QR code, config download, and official client links (Android, iOS, Windows, macOS)*

### AmneziaWG (Anti-Censorship)

![AmneziaWG OTL Client View](https://doc.puq.info/uploads/images/gallery/2026-09/embedded-image-bokmickq.png)*One-Time Link — AmneziaWG view with obfuscated parameters, QR code, and AmneziaWG client links*

### OpenVPN

![OpenVPN OTL Client View](https://doc.puq.info/uploads/images/gallery/2026-09/embedded-image-xokswywo.png)*One-Time Link — OpenVPN view with user credentials and downloadable profile*

### IKEv2

![IKEv2 OTL Client View](https://doc.puq.info/uploads/images/gallery/2026-09/embedded-image-9wo6pice.png)*One-Time Link — IKEv2 view with server hostname, credentials, Root CA certificate, `.sswan` profile, and strongSwan client links*

- - - - - -# 15. Monitoring

## Overview

PUQVPNCP provides comprehensive traffic monitoring:

- **Built-in traffic statistics** — per-client and per-network, stored in local JSON files
- **rsyslog integration** — iptables traffic logging via syslog
- **InfluxDB export** — push metrics to InfluxDB for Grafana dashboards
- **Prometheus-compatible metrics** — HTTP metrics endpoint

- - - - - -

## Configuration

Navigate to **Settings &gt; Monitoring**.

### Traffic Logging

![Monitoring config](https://doc.puq.info/uploads/images/gallery/2026-09/embedded-image-25igldmy.png)*Monitoring configuration — traffic logging*

<table id="bkmrk-setting-description-"><thead><tr><th>Setting</th><th>Description</th></tr></thead><tbody><tr><td>**Logging**</td><td>Enable iptables traffic logging via rsyslog</td></tr><tr><td>**Log format**</td><td>Log format template</td></tr></tbody></table>

### Remote Syslog

![Remote syslog](https://doc.puq.info/uploads/images/gallery/2026-09/embedded-image-z0gzlzrt.png)*Remote syslog configuration*

Forward traffic logs to a remote syslog server for centralized logging.

### InfluxDB

![InfluxDB config](https://doc.puq.info/uploads/images/gallery/2026-09/embedded-image-sqfeqd9b.png)*InfluxDB configuration*

<table id="bkmrk-setting-description--0"><thead><tr><th>Setting</th><th>Description</th></tr></thead><tbody><tr><td>**Enabled**</td><td>Enable InfluxDB export</td></tr><tr><td>**URL**</td><td>InfluxDB server URL (e.g., `https://idb01.example.com`)</td></tr><tr><td>**Token**</td><td>Authentication token</td></tr><tr><td>**Organization**</td><td>InfluxDB organization</td></tr><tr><td>**Bucket**</td><td>Target bucket</td></tr></tbody></table>

### Metrics Endpoint

![Metrics config](https://doc.puq.info/uploads/images/gallery/2026-09/embedded-image-dvomzygm.png)*Metrics endpoint configuration*

Enable a Prometheus-compatible HTTP metrics endpoint at `http://127.0.0.1:8098/metrics`.

- - - - - -

## Monitoring Status

![Monitoring status](https://doc.puq.info/uploads/images/gallery/2026-09/embedded-image-q7e8bzwj.png)*Monitoring services status*

Shows the current state of all monitoring components:

- rsyslog service status
- telegraf service status
- InfluxDB connection status
- Metrics endpoint status

After changing monitoring settings and clicking **Save**, the configuration is applied with a countdown:

![Monitoring applying](https://doc.puq.info/uploads/images/gallery/2026-09/embedded-image-blnusucj.png)*Applying monitoring configuration*

- - - - - -

## Grafana Integration

Connect Grafana to your InfluxDB instance to create custom VPN dashboards.

![Grafana dashboard](https://doc.puq.info/uploads/images/gallery/2026-09/embedded-image-yifxpuk8.png)*Example Grafana dashboard with VPN traffic metrics*

### Available Metrics

<table id="bkmrk-metric-description-c"><thead><tr><th>Metric</th><th>Description</th></tr></thead><tbody><tr><td>**client\_download\_bytes**</td><td>Per-client download traffic</td></tr><tr><td>**client\_upload\_bytes**</td><td>Per-client upload traffic</td></tr><tr><td>**network\_download\_bytes**</td><td>Per-network download traffic</td></tr><tr><td>**network\_upload\_bytes**</td><td>Per-network upload traffic</td></tr><tr><td>**online\_wireguard**</td><td>WireGuard online peer count</td></tr><tr><td>**online\_openvpn**</td><td>OpenVPN connected session count</td></tr><tr><td>**online\_ikev2**</td><td>IKEv2 active SA count</td></tr></tbody></table>

- - - - - -# 16. Backups

## Overview

PUQVPNCP provides automatic and manual backup/restore functionality with optional FTP upload for offsite storage.

- - - - - -

## Backup List

Navigate to **Settings &gt; Backups**.

![Backups list](https://doc.puq.info/uploads/images/gallery/2026-09/embedded-image-dhas9deo.png)*Backup list with create, restore, download, and delete actions*

Each backup includes:

- All network and client configurations
- WireGuard keys, OpenVPN certificates, IKEv2 certificates
- Firewall rules, DNS settings, system configuration
- Traffic statistics data
- User accounts, permissions, API tokens

### Actions

<table id="bkmrk-action-description-c"><thead><tr><th>Action</th><th>Description</th></tr></thead><tbody><tr><td>**Create**</td><td>Create a new backup immediately</td></tr><tr><td>**Restore**</td><td>Restore the server to the backup state</td></tr><tr><td>**Download**</td><td>Download the backup archive</td></tr><tr><td>**Delete**</td><td>Delete the backup file</td></tr><tr><td>**Upload**</td><td>Upload a backup file</td></tr></tbody></table>

- - - - - -

## Backup Configuration

![Backup config](https://doc.puq.info/uploads/images/gallery/2026-09/embedded-image-uioun9io.png)*Backup scheduler configuration*

### Automatic Backups

<table id="bkmrk-setting-description-"><thead><tr><th>Setting</th><th>Description</th></tr></thead><tbody><tr><td>**Hourly**</td><td>Enable/disable hourly backups</td></tr><tr><td>**Daily**</td><td>Enable/disable daily backups</td></tr><tr><td>**Daily time**</td><td>Time for daily backup (e.g., `14:45`)</td></tr><tr><td>**Max backups**</td><td>Maximum number of backups to keep (oldest are deleted)</td></tr></tbody></table>

### FTP Backup

<table id="bkmrk-setting-description--0"><thead><tr><th>Setting</th><th>Description</th></tr></thead><tbody><tr><td>**FTP Backup**</td><td>Enable/disable FTP upload after each backup</td></tr><tr><td>**FTP Server**</td><td>FTP server address</td></tr><tr><td>**FTP Port**</td><td>FTP port (default: 21)</td></tr><tr><td>**FTP Username**</td><td>FTP login</td></tr><tr><td>**FTP Password**</td><td>FTP password</td></tr><tr><td>**FTP Directory**</td><td>Remote directory for backups</td></tr></tbody></table>

> **Tip:** Use **Test FTP** button to verify the FTP connection before enabling automatic uploads.

- - - - - -

## Restoring a Backup

1. Go to **Settings &gt; Backups**
2. Click **Restore** on the desired backup
3. Confirm the restore operation
4. The system will reload automatically after restoration

> **Warning:** Restoring a backup overwrites all current configurations and data. Create a backup of the current state before restoring.

- - - - - -# 17. System Settings

## System Users

Navigate to **Settings &gt; System users**.

![Users list](https://doc.puq.info/uploads/images/gallery/2026-09/embedded-image-blavukwu.png)*System users list*

PUQVPNCP supports multiple administrator accounts with role-based access control.

### Adding a User

![Add user](https://doc.puq.info/uploads/images/gallery/2026-09/embedded-image-xhk8hopp.png)*Add a new system user*

<table id="bkmrk-field-description-us"><thead><tr><th>Field</th><th>Description</th></tr></thead><tbody><tr><td>**Username**</td><td>Unique login name</td></tr><tr><td>**Email**</td><td>User email</td></tr><tr><td>**Password**</td><td>Account password</td></tr><tr><td>**Groups**</td><td>Permission groups assigned to this user</td></tr></tbody></table>

### Editing a User

![Edit user](https://doc.puq.info/uploads/images/gallery/2026-09/embedded-image-wizm4amx.png)*Edit system user*

- - - - - -

## Permission Groups

Navigate to **Settings &gt; Permission groups**.

![Groups list](https://doc.puq.info/uploads/images/gallery/2026-09/embedded-image-hnlzr06p.png)*Permission groups list*

Permission groups define what actions a user can perform. PUQVPNCP includes 36+ granular permissions across 17 resource categories.

### Default Groups

<table id="bkmrk-group-access-level-a"><thead><tr><th>Group</th><th>Access Level</th></tr></thead><tbody><tr><td>**admin**</td><td>Full access to everything</td></tr><tr><td>**operator**</td><td>All operations except system settings</td></tr><tr><td>**viewer**</td><td>Read-only access to all pages</td></tr></tbody></table>

### Creating a Custom Group

![Add group](https://doc.puq.info/uploads/images/gallery/2026-09/embedded-image-jp7jquzw.png)*Create a new permission group*

![Edit group](https://doc.puq.info/uploads/images/gallery/2026-09/embedded-image-0ylv3tm2.png)*Edit permission group — select permissions by resource*

Permissions are organized by resource:

<table id="bkmrk-resource-permissions"><thead><tr><th>Resource</th><th>Permissions</th></tr></thead><tbody><tr><td>**system\_config**</td><td>read, write</td></tr><tr><td>**wireguard**</td><td>read, write</td></tr><tr><td>**amneziawg**</td><td>read, write</td></tr><tr><td>**network**</td><td>read, write</td></tr><tr><td>**client**</td><td>read, write</td></tr><tr><td>**peering**</td><td>read, write</td></tr><tr><td>**account**</td><td>read, write</td></tr><tr><td>**openvpn**</td><td>read, write</td></tr><tr><td>**ikev2**</td><td>read, write</td></tr><tr><td>**diagnostics**</td><td>read, write</td></tr><tr><td>**firewall**</td><td>read, write</td></tr><tr><td>**dns**</td><td>read, write</td></tr><tr><td>**otl**</td><td>read, write</td></tr><tr><td>**traffic (Monitoring)**</td><td>read, write</td></tr><tr><td>**backups**</td><td>read, write</td></tr><tr><td>**license**</td><td>read, write</td></tr><tr><td>**api\_tokens**</td><td>read, write</td></tr><tr><td>**system\_users**</td><td>read, write</td></tr><tr><td>**permission\_groups**</td><td>read, write</td></tr></tbody></table>

- - - - - -

## API Tokens

Navigate to **Settings &gt; API Tokens**.

![Tokens list](https://doc.puq.info/uploads/images/gallery/2026-09/embedded-image-tsod5rgj.png)*API tokens list*

API tokens provide programmatic access to the REST API without using session cookies.

### Creating a Token

![Create token](https://doc.puq.info/uploads/images/gallery/2026-09/embedded-image-rkg8eghu.png)*Create a new API token*

<table id="bkmrk-field-description-na"><thead><tr><th>Field</th><th>Description</th></tr></thead><tbody><tr><td>**Name**</td><td>Token description</td></tr><tr><td>**Username**</td><td>The user this token belongs to (inherits permissions)</td></tr><tr><td>**Allowed IP**</td><td>Restrict token to a specific IP (empty = any)</td></tr><tr><td>**Expires At**</td><td>Token expiration date (empty = never)</td></tr></tbody></table>

![Token created](https://doc.puq.info/uploads/images/gallery/2026-09/embedded-image-qwxkryqb.png)*Token created — copy the token now, it won't be shown again*

> **Important:** The token value is shown only once. Copy it immediately after creation.

### Usage

Include the token in the `Authorization` header:

```bash
curl -sk https://vpn.example.com/api/v1/system/status \
  -H "Authorization: Bearer YOUR_TOKEN_HERE"

```

- - - - - -

## Environment Check

Navigate to **Settings &gt; Environment**.

![Environment check](https://doc.puq.info/uploads/images/gallery/2026-09/embedded-image-xjtizsly.png)*Environment check — verify all required packages*

The Environment page scans for all required and optional system packages:

- **VPN Protocols** — wireguard, amneziawg, openvpn, easy-rsa, strongswan
- **Network &amp; Firewall** — iproute2, iptables, ipset
- **DNS** — bind9, bind9-utils
- **Monitoring** — rsyslog, telegraf
- **Security** — openssl
- **System Utilities** — procps, uuid-runtime, bash, grep, gawk
- **Network Configuration** — ifupdown2 (Debian) or netplan.io (Ubuntu)

![Environment bottom](https://doc.puq.info/uploads/images/gallery/2026-09/embedded-image-vsywdkfj.png)*Environment check — DNS, Monitoring, Security, System Utilities*

![Environment networking](https://doc.puq.info/uploads/images/gallery/2026-09/embedded-image-isplyoof.png)*Environment check — Network Configuration (ifupdown2 / netplan.io)*

Missing packages are highlighted and can be installed via the system package manager.

- - - - - -

## About Us &amp; Project Support

Navigate to **About us** in the top navigation bar.

![About Us and Support](https://doc.puq.info/uploads/images/gallery/2026-09/embedded-image-gxtvpugc.png)*About Us — licensing information, WHMCS provisioning module integration, and support links*

The About page displays project license limits (up to 50 VPN clients without license, unlimited with license from [puqcloud.com](https://puqcloud.com)), integration options including the official **[PUQVPNCP WHMCS Provisioning Module](https://puqcloud.com/whmcs-module-puqvpncp.php)**, and links to documentation and support.# 18. REST API

## Overview

PUQVPNCP provides a comprehensive REST API with **240+ endpoints** covering all panel functionality. The API uses JSON for requests and responses.

- - - - - -

## Authentication

All API endpoints require authentication via Bearer token:

```bash
curl -sk https://vpn.example.com/api/v1/system/status \
  -H "Authorization: Bearer YOUR_TOKEN_HERE"

```

Create API tokens in **Settings &gt; API Tokens**. See [System Settings](17-system-settings.md) for details.

- - - - - -

## Base URL

```
https://your-server.com/api/v1/

```

- - - - - -

## OpenAPI / Swagger Documentation

PUQVPNCP includes built-in interactive API documentation.

### Swagger UI

Navigate to the **API** page in the web interface to access Swagger UI.

![Swagger UI](https://doc.puq.info/uploads/images/gallery/2026-09/embedded-image-ogjq7el4.png)*Swagger UI — interactive API documentation*

![Swagger endpoints](https://doc.puq.info/uploads/images/gallery/2026-09/embedded-image-nh106d1d.png)*Swagger UI — endpoint groups*

### OpenAPI Spec

The OpenAPI 3.0 JSON specification is available at:

```
https://your-server.com/api/v1/openapi.json

```

This endpoint does not require authentication and can be imported into Postman, Insomnia, or any OpenAPI-compatible tool.

- - - - - -

## API Endpoint Groups

<table id="bkmrk-group-endpoints-desc"><thead><tr><th>Group</th><th>Endpoints</th><th>Description</th></tr></thead><tbody><tr><td>**System**</td><td>8</td><td>Status, info, reload, config, environment</td></tr><tr><td>**Networks**</td><td>11</td><td>CRUD + suggested data + keys regeneration</td></tr><tr><td>**Clients**</td><td>17</td><td>CRUD + online clients + config/QR per protocol</td></tr><tr><td>**Peering**</td><td>3</td><td>CRUD for peering rules</td></tr><tr><td>**WireGuard**</td><td>17</td><td>Server config + settings + keys + clients list</td></tr><tr><td>**AmneziaWG**</td><td>18</td><td>Server config, settings, client keys &amp; profiles, obfuscation parameters, magic headers, QR codes</td></tr><tr><td>**OpenVPN**</td><td>12</td><td>Server config + clients list</td></tr><tr><td>**IKEv2**</td><td>13</td><td>Server config + clients list</td></tr><tr><td>**Upstreams**</td><td>10</td><td>CRUD + connect/disconnect + import</td></tr><tr><td>**Firewall**</td><td>12</td><td>Settings + pre/post rules CRUD</td></tr><tr><td>**DNS**</td><td>2</td><td>Config GET/PUT</td></tr><tr><td>**One-Time Links**</td><td>12</td><td>Config + links CRUD per protocol</td></tr><tr><td>**Monitoring**</td><td>4</td><td>Config, status, metrics</td></tr><tr><td>**Backups**</td><td>9</td><td>List, create, restore, config, FTP</td></tr><tr><td>**License**</td><td>3</td><td>Save, delete, check</td></tr><tr><td>**API Tokens**</td><td>4</td><td>CRUD</td></tr><tr><td>**Permission Groups**</td><td>5</td><td>CRUD + registry</td></tr><tr><td>**System Users**</td><td>6</td><td>CRUD + profile</td></tr><tr><td>**Diagnostics**</td><td>5</td><td>Protocol logs (WG, AWG, OpenVPN, IKEv2, firewall, system), info, TC stats</td></tr></tbody></table>

- - - - - -

## Response Format

### Success Response

```json
{
  "result": "OK",
  "message": "Operation completed successfully",
  "data": { ... }
}

```

### Error Response

```json
{
  "result": "ERROR",
  "message": "Descriptive error message",
  "errors": {
    "field_name": "Validation error for this field"
  }
}

```

- - - - - -

## Common API Examples

### Get System Status

```bash
curl -sk https://vpn.example.com/api/v1/system/status \
  -H "Authorization: Bearer TOKEN"

```

### List All Networks

```bash
curl -sk https://vpn.example.com/api/v1/network \
  -H "Authorization: Bearer TOKEN"

```

### Create a Client

```bash
curl -sk -X POST https://vpn.example.com/api/v1/client \
  -H "Authorization: Bearer TOKEN" \
  -H "Content-Type: application/json" \
  -d '{
    "name": "new_client",
    "username": "user1",
    "password": "SecurePass123",
    "network": "office_vpn",
    "status": "Enable",
    "bandwidth_download": 10,
    "bandwidth_upload": 5
  }'

```

### Get Client WireGuard Config

```bash
curl -sk https://vpn.example.com/api/v1/client/new_client/wireguard \
  -H "Authorization: Bearer TOKEN"

```

### Get Client AmneziaWG Config

```bash
curl -sk https://vpn.example.com/api/v1/client/new_client/amneziawg/config \
  -H "Authorization: Bearer TOKEN"

```

### Reload System

```bash
curl -sk -X POST https://vpn.example.com/api/v1/system/reload \
  -H "Authorization: Bearer TOKEN"

```

- - - - - -

## Integration

The API enables integration with:

- **[Official WHMCS Provisioning Module](https://puqcloud.com/whmcs-module-puqvpncp.php)** — turnkey automated VPN sales and provisioning for web hosting providers (automatic account creation on payment, suspension on overdue invoices, bandwidth shaping, and self-service config/QR delivery in client portal)
- **Billing Systems** — full client lifecycle automation via REST endpoints (create, suspend, unsuspend, delete clients, adjust bandwidth limits, and fetch usage stats)
- **Monitoring Systems** — pull metrics and status via `/api/v1/metrics`
- **Custom Portals** — build your own user-facing VPN management interface
- **Automation Scripts** — batch client creation, network management, and configuration export

- - - - - -# 19. Use Cases

## 1. VPN Service Provider

**Goal:** Sell VPN subscriptions to end users with different speed tiers.

### Setup

<table id="bkmrk-network-subnet-bandw"><thead><tr><th>Network</th><th>Subnet</th><th>Bandwidth</th><th>Upstream</th></tr></thead><tbody><tr><td>`basic`</td><td>10.100.1.0/24</td><td>10/5 Mbit</td><td>Direct (server IP)</td></tr><tr><td>`premium`</td><td>10.100.2.0/24</td><td>100/50 Mbit</td><td>Direct (server IP)</td></tr><tr><td>`business`</td><td>10.100.3.0/24</td><td>Unlimited</td><td>WireGuard upstream (dedicated IP)</td></tr></tbody></table>

### How It Works

1. Create networks with different bandwidth limits
2. Use the official **[PUQVPNCP WHMCS Provisioning Module](https://puqcloud.com/whmcs-module-puqvpncp.php)** or custom REST API integration to automate client sales and provisioning
3. Send **One-Time Links** to customers so they can self-configure their devices
4. Monitor traffic via **InfluxDB + Grafana** dashboards

### Key Features Used

- Per-client bandwidth limits
- REST API for automation
- One-Time Links for self-service
- All 3 protocols for maximum device compatibility
- Traffic statistics for usage billing

- - - - - -

## 2. Multi-Country VPN with Upstream Tunnels

**Goal:** Offer VPN exits in multiple countries from a single server.

### Setup

```
PUQVPNCP Server (Frankfurt)
+-- Network "exit_us"   ---> Upstream wgup0 (New York)    ---> US IP
+-- Network "exit_uk"   ---> Upstream wgup1 (London)      ---> UK IP
+-- Network "exit_jp"   ---> Upstream wgup2 (Tokyo)       ---> JP IP
+-- Network "exit_de"   ---> Direct (ens18)               ---> DE IP

```

### How It Works

1. Rent cheap WireGuard VPN servers in target countries
2. Add them as **Upstreams** in PUQVPNCP (import their `.conf` files)
3. Create a network per country, assign each to its upstream
4. Clients choose their exit country by connecting to the appropriate network
5. One-Time Links can be generated per-network for easy distribution

### Key Features Used

- WireGuard Upstreams for geo-routing
- Per-network upstream assignment
- Network-level bandwidth control
- Multi-protocol support (same exit for WireGuard, AmneziaWG, OpenVPN, IKEv2 users)

- - - - - -

## 3. Corporate Remote Access

**Goal:** Provide secure remote access for employees to internal company resources.

### Setup

<table id="bkmrk-network-subnet-purpo"><thead><tr><th>Network</th><th>Subnet</th><th>Purpose</th></tr></thead><tbody><tr><td>`employees`</td><td>10.0.1.0/24</td><td>General employees — access email, intranet</td></tr><tr><td>`developers`</td><td>10.0.2.0/24</td><td>Developers — access staging servers</td></tr><tr><td>`admins`</td><td>10.0.3.0/24</td><td>IT admins — full infrastructure access</td></tr></tbody></table>

### Network Peering

<table id="bkmrk-rule-network-a-netwo"><thead><tr><th>Rule</th><th>Network A</th><th>Network B</th><th>Direction</th></tr></thead><tbody><tr><td>`dev_to_staging`</td><td>developers</td><td>staging\_net</td><td>Bidirectional</td></tr><tr><td>`admin_full`</td><td>admins</td><td>all\_servers</td><td>Bidirectional</td></tr></tbody></table>

### How It Works

1. Create separate networks per department with different access levels
2. Use **Network Peering** to control which departments can access which resources
3. Use **Custom Routes** to push only necessary subnets (split tunnel)
4. IKEv2 is ideal here — native on all employee devices, no app to install
5. **Permission Groups** allow the IT team to manage VPN without full admin access

### Key Features Used

- Network isolation with peering
- Split tunnel via custom routes
- IKEv2 for zero-install on employee devices
- Permission groups for delegated administration
- Per-client bandwidth to prevent abuse

- - - - - -

## 4. IoT Device Management

**Goal:** Securely connect remote IoT devices (cameras, sensors, POS terminals) back to a central network.

### Setup

<table id="bkmrk-network-subnet-clien"><thead><tr><th>Network</th><th>Subnet</th><th>Client-to-Client</th><th>Upstream</th></tr></thead><tbody><tr><td>`iot_cameras`</td><td>10.10.1.0/24</td><td>No</td><td>Direct</td></tr><tr><td>`iot_sensors`</td><td>10.10.2.0/24</td><td>No</td><td>Direct</td></tr><tr><td>`monitoring`</td><td>10.10.3.0/24</td><td>Yes</td><td>Direct</td></tr></tbody></table>

### How It Works

1. Each IoT device gets a WireGuard client with a static IP
2. **Client-to-Client** is disabled — devices cannot communicate with each other
3. The `monitoring` network peers with IoT networks for centralized monitoring
4. **Port Forwarding** rules expose specific device ports to the server's public IP
5. **Bandwidth limits** prevent devices from saturating the connection

### Key Features Used

- WireGuard for minimal overhead on constrained devices
- Port forwarding for remote access to specific devices
- Network isolation (no client-to-client)
- Peering for controlled cross-network access
- Bandwidth limits per device

- - - - - -

## 5. Hosting Provider — VPN as a Service

**Goal:** Offer managed VPN accounts to hosting customers, integrated with billing.

### Architecture

```
WHMCS / Billing ---> PUQVPNCP API ---> VPN Networks
                                          |
                    +---------------------+
                    |                     |
              Customer A              Customer B
              Network: acme_co        Network: globex_inc
              Clients: 50             Clients: 200
              Upstream: dedicated     Upstream: shared

```

### How It Works

1. Each customer gets a dedicated network with their own subnet
2. Use the official **[PUQVPNCP WHMCS Provisioning Module](https://puqcloud.com/whmcs-module-puqvpncp.php)** or direct REST API calls to: 
    - Create networks when a customer signs up
    - Add/remove clients based on subscription
    - Suspend clients on non-payment
    - Delete everything on cancellation
3. Customers receive **One-Time Links** for self-setup or download profiles directly from their WHMCS client area
4. **API Tokens** per customer allow limited self-management

### Turnkey WHMCS Integration

With the **[PUQVPNCP WHMCS Module](https://puqcloud.com/whmcs-module-puqvpncp.php)**, this entire workflow is 100% automated out of the box — including client account provisioning, suspension, quota enforcement, and config delivery (WireGuard, AmneziaWG, OpenVPN, IKEv2).

### Key Features Used

- Full REST API (170+ endpoints) for automation
- Per-network isolation for multi-tenancy
- One-Time Links for end-user self-service
- Upstream tunnels for dedicated exit IPs per customer
- Traffic monitoring for usage-based billing

- - - - - -

## 6. Privacy-Focused Multi-Hop VPN

**Goal:** Maximum privacy with double encryption and IP masking.

### Setup

```
User ---> PUQVPNCP (Entry Server) ---> Upstream wgup0 (Exit Server) ---> Internet
         WireGuard encrypted            WireGuard encrypted
         User sees Entry IP             Sites see Exit IP

```

### How It Works

1. PUQVPNCP acts as the **entry node** — users connect here
2. All traffic is forwarded through a WireGuard **upstream tunnel** to an exit node
3. The exit node has no knowledge of the original user's IP
4. Even if the entry server is compromised, traffic is encrypted to the exit
5. Different networks can use different exit nodes for variety

### Key Features Used

- WireGuard Upstreams for multi-hop
- Multiple upstreams for exit diversity
- All 4 protocols on the entry side for device compatibility
- No logging configuration for privacy

- - - - - -

## 7. Small Office / Home Office (SOHO)

**Goal:** Simple VPN for a small team (5-20 people) with shared file access.

### Setup

<table id="bkmrk-network-subnet-proto"><thead><tr><th>Network</th><th>Subnet</th><th>Protocols</th><th>Special</th></tr></thead><tbody><tr><td>`office`</td><td>10.0.0.0/24</td><td>WG + IKEv2</td><td>Client-to-Client: Yes</td></tr></tbody></table>

### How It Works

1. Single network with client-to-client enabled
2. Team members connect via **IKEv2** (no app needed) or **WireGuard** (better speed)
3. File sharing works directly between connected devices
4. **One-Time Links** sent to each team member for easy setup
5. The admin manages everything via the web panel with 2-3 permission groups

### Key Features Used

- Client-to-client communication
- IKEv2 for no-install setup
- One-Time Links for onboarding
- Simple permission model
- Built-in DNS for local hostname resolution

- - - - - -

## 8. Anti-Censorship &amp; DPI Bypass (AmneziaWG)

**Goal:** Bypass strict government or ISP Deep Packet Inspection (DPI) censorship systems that block standard WireGuard or OpenVPN protocols.

### Setup

1. Enable **AmneziaWG** in the network settings
2. Configure custom obfuscation parameters: 
    - **H1–H4** random packet headers
    - **Jc** (3–5 junk packets) with sizes **Jmin** (40) and **Jmax** (70)
    - **S1** (15) and **S2** (20) initiation and response junk
3. Generate **One-Time Links** for clients
4. Users scan the QR code or import `.conf` into official AmneziaWG client apps (Android, iOS, Windows, macOS)

### Key Features Used

- AmneziaWG kernel-level DPI bypass
- Custom per-network obfuscation parameters
- One-Time Links with direct AmneziaWG client download links
- Upstreams combined with AmneziaWG for external routing

- - - - - -

## Protocol Selection Guide

<table id="bkmrk-scenario-recommended"><thead><tr><th>Scenario</th><th>Recommended Protocol</th><th>Why</th></tr></thead><tbody><tr><td>**Mobile users**</td><td>WireGuard</td><td>Fast reconnection, battery efficient</td></tr><tr><td>**Strict censorship &amp; DPI**</td><td>AmneziaWG</td><td>Header obfuscation, junk packet injection to bypass ISP DPI firewalls</td></tr><tr><td>**Corporate BYOD**</td><td>IKEv2</td><td>Native on all OS, no app required</td></tr><tr><td>**Restrictive networks**</td><td>OpenVPN (TCP)</td><td>Works through firewalls, proxies</td></tr><tr><td>**IoT devices**</td><td>WireGuard</td><td>Minimal resource usage</td></tr><tr><td>**Maximum compatibility**</td><td>All four</td><td>Users choose what works for them</td></tr><tr><td>**Speed-critical**</td><td>WireGuard / AmneziaWG</td><td>Lowest latency, highest kernel-level throughput</td></tr><tr><td>**Legacy devices**</td><td>OpenVPN</td><td>Widest platform support</td></tr></tbody></table>

- - - - - -# 20. Troubleshooting

## Reset Admin Password

If you have lost access to the web panel or forgotten the admin password, you can reset it using the recovery mode.

### Step 1: Stop the Service

```bash
systemctl stop puqvpncp

```

### Step 2: Run Recovery

```bash
puqvpncp --recover

```

This will:

```
=== PUQVPNCP Recovery Mode ===
[OK] Admin group reset to full access (*)
[OK] Admin user: already in admin group
[OK] Admin password reset to 'admin' (password change will be required)

Recovery complete. Login as admin / admin.
You will be prompted to change the password on first login.

```

The recovery command performs the following:

- Resets the `admin` permission group to full access (`*`)
- If the `admin` user does not exist — creates it with password `admin`
- If the `admin` user exists — resets password to `admin` and ensures the user is in the `admin` group
- Sets the `ForcePasswordChange` flag — you will be prompted to change the password on first login
- Recreates default permission groups (`operator`, `viewer`) if they are missing

### Step 3: Start the Service

```bash
systemctl start puqvpncp

```

### Step 4: Login

Open the web panel and login with:

<table id="bkmrk-field-value-username"><thead><tr><th>Field</th><th>Value</th></tr></thead><tbody><tr><td>**Username**</td><td>`admin`</td></tr><tr><td>**Password**</td><td>`admin`</td></tr></tbody></table>

You will be prompted to set a new password immediately.

- - - - - -

## Service Won't Start

### Check the service status

```bash
systemctl status puqvpncp

```

### Check the logs

```bash
tail -100 /var/log/puqvpncp/puqvpncp.log

```

### Common causes

<table id="bkmrk-problem-solution-por"><thead><tr><th>Problem</th><th>Solution</th></tr></thead><tbody><tr><td>Port already in use</td><td>Check `WebPort` in `/etc/puqvpncp/puqvpncp.conf`, or stop the conflicting service</td></tr><tr><td>SSL certificate error</td><td>Verify that `Domain` resolves to this server's IP and port 443 is not in use</td></tr><tr><td>Permission denied</td><td>Ensure the binary is at `/usr/sbin/puqvpncp` and has execute permissions</td></tr><tr><td>Missing dependencies</td><td>Run **Settings &gt; Environment** check, or install missing packages manually</td></tr></tbody></table>

- - - - - -

## Web Panel Not Accessible

### Check if the service is running

```bash
systemctl is-active puqvpncp

```

### Check which port is in use

```bash
ss -tlnp | grep puqvpncp

```

### Common causes

<table id="bkmrk-problem-solution-fir"><thead><tr><th>Problem</th><th>Solution</th></tr></thead><tbody><tr><td>Firewall blocking the port</td><td>Allow the port: `iptables -I INPUT -p tcp --dport 8098 -j ACCEPT`</td></tr><tr><td>Wrong listen address</td><td>Check `WebIP` in `/etc/puqvpncp/puqvpncp.conf` (default: `0.0.0.0`)</td></tr><tr><td>IP restriction active</td><td>Check `AllowedWebIP` — set to `0.0.0.0` to allow all IPs</td></tr><tr><td>SSL enabled but accessing HTTP</td><td>With `LetsEncrypSSL=yes`, use `https://` on port 443, not HTTP</td></tr></tbody></table>

- - - - - -

## Binary Cannot Be Updated

If you get "Text file busy" error when trying to copy a new binary:

```bash
systemctl stop puqvpncp
cp puqvpncp /usr/sbin/puqvpncp
systemctl start puqvpncp

```

> The service **must** be stopped before replacing the binary. The running process locks the file.

- - - - - -

## WireGuard Interface Not Created

### Check if WireGuard kernel module is loaded

```bash
modprobe wireguard
lsmod | grep wireguard

```

### Check WireGuard tools

```bash
wg --version

```

If missing, install:

```bash
apt install wireguard wireguard-tools

```

- - - - - -

## AmneziaWG Interface Not Created or Module Not Loaded

### 1. Check DKMS status and kernel module

```bash
# Check DKMS compilation status
dkms status
# Should show: amneziawg/..., ...: installed

# Check if the kernel module is currently loaded
lsmod | grep amneziawg

# Try loading the module manually
modprobe amneziawg

```

### 2. Module build failed or missing (Debian / Ubuntu)

On **Debian**, DKMS compilation fails if `linux-headers-$(uname -r)` and build tools are missing. To fix:

```bash
# Install kernel headers and build tools for the running kernel
apt-get update && apt-get install -y curl build-essential dkms linux-headers-$(uname -r)

# Reconfigure and recompile the DKMS module
dpkg-reconfigure amneziawg-dkms

# Load the compiled module into the kernel
modprobe amneziawg

# Verify
lsmod | grep amneziawg

```

### 3. Dependency error on Debian 12: `Depends: libc6 (>= 2.38)`

If `apt-get install` fails with:

```
The following packages have unmet dependencies:
 amneziawg-tools : Depends: libc6 (>= 2.38) but 2.36-... is to be installed
E: Unable to correct problems, you have held broken packages.

```

**Cause:** Debian 12 (Bookworm) uses `glibc 2.36`. Ubuntu 24.04 (`noble`) was added instead of Ubuntu 22.04 (`jammy`).

**Solution:** Change `noble` to `jammy` in `/etc/apt/sources.list.d/amnezia.list`:

```bash
echo "deb [signed-by=/etc/apt/keyrings/amnezia.asc] https://ppa.launchpadcontent.net/amnezia/ppa/ubuntu jammy main" > /etc/apt/sources.list.d/amnezia.list
apt-get update && apt-get install -y amneziawg-dkms amneziawg-tools
modprobe amneziawg

```

### 4. Keyring error or `-bash: gpg: command not found`

If you encounter:

```
-bash: gpg: command not found
Error: Failed to parse keyring "/etc/apt/keyrings/amnezia.gpg"
The repository '... noble InRelease' is not signed.

```

**Cause:** Minimal Debian installations do not include `gpg`/`gnupg`.

**Solution:** Save the key in native ASCII `.asc` format directly without piping to `gpg`:

```bash
mkdir -p /etc/apt/keyrings
curl -fsSL "https://keyserver.ubuntu.com/pks/lookup?op=get&search=0x75C9DD72C799870E310542E24166F2C257290828" -o /etc/apt/keyrings/amnezia.asc

```

### 5. Repository setup by Debian version

**Debian 12 (Bookworm):**

```bash
apt-get update && apt-get install -y curl build-essential dkms linux-headers-$(uname -r)
mkdir -p /etc/apt/keyrings
curl -fsSL "https://keyserver.ubuntu.com/pks/lookup?op=get&search=0x75C9DD72C799870E310542E24166F2C257290828" -o /etc/apt/keyrings/amnezia.asc
echo "deb [signed-by=/etc/apt/keyrings/amnezia.asc] https://ppa.launchpadcontent.net/amnezia/ppa/ubuntu jammy main" > /etc/apt/sources.list.d/amnezia.list
apt-get update && apt-get install -y amneziawg-dkms amneziawg-tools
modprobe amneziawg

```

**Debian 13 (Trixie):**

```bash
apt-get update && apt-get install -y curl build-essential dkms linux-headers-$(uname -r)
mkdir -p /etc/apt/keyrings
curl -fsSL "https://keyserver.ubuntu.com/pks/lookup?op=get&search=0x75C9DD72C799870E310542E24166F2C257290828" -o /etc/apt/keyrings/amnezia.asc
echo "deb [signed-by=/etc/apt/keyrings/amnezia.asc] https://ppa.launchpadcontent.net/amnezia/ppa/ubuntu noble main" > /etc/apt/sources.list.d/amnezia.list
apt-get update && apt-get install -y amneziawg-dkms amneziawg-tools
modprobe amneziawg

```

**Ubuntu (22.04 / 24.04 LTS):**

```bash
add-apt-repository -y ppa:amnezia/ppa
apt-get update && apt-get install -y amneziawg-dkms amneziawg-tools
modprobe amneziawg

```

### 6. Check AmneziaWG tools

```bash
awg --version

```

### 5. DNS resolution error when using awg-quick manually

If `awg-quick up awg0` fails with `resolvconf: command not found` on Debian:

```bash
apt-get install -y openresolv

```

- - - - - -

## Getting Help

- **Documentation**: [https://puqvpncp.com/doc/](https://puqvpncp.com/doc/)
- **Community**: [https://community.puqcloud.com](https://community.puqcloud.com)
- **Support**: [https://puqcloud.com/submitticket.php](https://puqcloud.com/submitticket.php)# 21. Diagnostics

## Overview

The **Diagnostics** section provides real-time monitoring, log viewing, and system integrity checking across all VPN protocols, traffic control, monitoring services, and the panel itself.

Navigate to **Diagnostics** in the main menu to access the following pages:

![Diagnostics menu](https://doc.puq.info/uploads/images/gallery/2026-09/embedded-image-jqmo5tia.png)*Diagnostics dropdown menu*

<table id="bkmrk-page-description-wir"><thead><tr><th>Page</th><th>Description</th></tr></thead><tbody><tr><td>**WireGuard**</td><td>WireGuard service status, `wg show` output, kernel logs</td></tr><tr><td>**AmneziaWG**</td><td>AmneziaWG service status, `awg show` output, kernel logs</td></tr><tr><td>**OpenVPN**</td><td>OpenVPN service status, certificates, instances, connection events, auth log, server logs</td></tr><tr><td>**IKEv2**</td><td>strongSwan service status, certificates, `ipsec statusall` output, IKEv2 logs</td></tr><tr><td>**Traffic Control**</td><td>Overview of TC classes, per-interface bandwidth statistics with live throughput</td></tr><tr><td>**Telegraf**</td><td>Telegraf service status, InfluxDB output config, inputs, Telegraf logs</td></tr><tr><td>**System**</td><td>Server uptime, memory, disk usage, network interfaces, system logs</td></tr><tr><td>**Panel**</td><td>PUQVPNCP application log viewer (`puqvpncp.log`)</td></tr><tr><td>**Integrity Check**</td><td>Full system integrity audit — verifies firewall rules, ipset, routing, TC classes, interfaces</td></tr></tbody></table>

> **Permission:** All diagnostics pages require the `diagnostics:read` permission. Integrity Check requires `firewall:read` (audit) and `firewall:write` (fix).

All log viewers feature:

- **Auto-refresh** every 3 seconds
- **Pause / Resume** button to stop auto-refresh
- **Line count selector** (50, 100, 200, 500 lines)
- **Color-coded** log entries (errors in red, warnings in yellow, connections in green)

- - - - - -

## WireGuard

![Diagnostics: WireGuard](https://doc.puq.info/uploads/images/gallery/2026-09/embedded-image-w6bgqqcw.png)*Diagnostics: WireGuard — service status, wg show, kernel logs*

### Service Status

<table id="bkmrk-field-description-wi"><thead><tr><th>Field</th><th>Description</th></tr></thead><tbody><tr><td>**WireGuard**</td><td>Installed WireGuard kernel module version</td></tr><tr><td>**WireGuard Tools**</td><td>Installed `wireguard-tools` package version</td></tr><tr><td>**Networks**</td><td>Number of WireGuard-enabled networks</td></tr><tr><td>**Clients**</td><td>Total number of WireGuard clients</td></tr><tr><td>**Online**</td><td>Number of currently connected WireGuard peers</td></tr></tbody></table>

If WireGuard or WireGuard Tools are not installed, or no networks are configured, a warning alert is displayed with instructions.

### wg show

Displays the raw output of the `wg show` command — the standard WireGuard status tool. Shows all active WireGuard interfaces with their public keys, listening ports, and connected peers with handshake times and transfer statistics.

This section is collapsible. Click the header to expand/collapse.

### WireGuard Kernel Logs

Displays WireGuard-related kernel messages from `journalctl`. These logs show low-level WireGuard events such as interface creation, peer handshake failures, and kernel module messages.

- - - - - -

## AmneziaWG

![Diagnostics: AmneziaWG](https://doc.puq.info/uploads/images/gallery/2026-09/embedded-image-qjv52on8.png)*Diagnostics: AmneziaWG — service status, awg show, and kernel logs*

### Service Status

<table id="bkmrk-field-description-am"><thead><tr><th>Field</th><th>Description</th></tr></thead><tbody><tr><td>**AmneziaWG**</td><td>Installed AmneziaWG kernel module (DKMS) version</td></tr><tr><td>**AmneziaWG Tools**</td><td>Installed `amneziawg-tools` package CLI version (`awg`)</td></tr><tr><td>**Networks**</td><td>Number of AmneziaWG-enabled networks</td></tr><tr><td>**Clients**</td><td>Total number of AmneziaWG clients</td></tr><tr><td>**Online**</td><td>Number of currently connected AmneziaWG peers</td></tr></tbody></table>

If AmneziaWG or AmneziaWG Tools are not installed, or no networks are configured, an informative warning alert is displayed with repository and package installation instructions for Debian 12 (using Ubuntu 22.04 `jammy` for glibc compatibility with `.asc` keyring), Debian 13 (using `noble`), and Ubuntu (`add-apt-repository -y ppa:amnezia/ppa`).

### awg show

Displays the raw output of the `awg show` command — the standard AmneziaWG status tool. Shows all active AmneziaWG interfaces with obfuscation parameters (`Jc`, `Jmin`, `Jmax`, `S1`, `S2`, `H1`, `H2`, `H3`, `H4`), public keys, listening ports, and connected peers with handshake times and transfer statistics.

This section is collapsible. Click the header to expand/collapse.

### AmneziaWG Kernel Logs

Displays AmneziaWG-related kernel messages from `journalctl`. These logs show low-level AmneziaWG events such as interface creation, handshake negotiations, and kernel module messages.

- - - - - -

## OpenVPN

### Service Status and Certificates

![Diagnostics: OpenVPN — status](https://doc.puq.info/uploads/images/gallery/2026-09/embedded-image-ddwzvjwn.png)*Diagnostics: OpenVPN — service status, certificates, instances*

The page displays two cards side by side:

**Service Status:**

<table id="bkmrk-field-description-op"><thead><tr><th>Field</th><th>Description</th></tr></thead><tbody><tr><td>**OpenVPN**</td><td>Installed OpenVPN package version</td></tr><tr><td>**easy-rsa**</td><td>Installed easy-rsa package version</td></tr><tr><td>**Global Status**</td><td>Whether OpenVPN is globally enabled or disabled</td></tr><tr><td>**Networks**</td><td>Number of OpenVPN-enabled networks</td></tr><tr><td>**Online**</td><td>Number of currently connected OpenVPN clients</td></tr></tbody></table>

**Certificates:**

<table id="bkmrk-field-description-ca"><thead><tr><th>Field</th><th>Description</th></tr></thead><tbody><tr><td>**CA Certificate**</td><td>Root CA certificate status (Valid / Not generated / Invalid)</td></tr><tr><td>**Server Certificate**</td><td>Server TLS certificate status</td></tr><tr><td>**DH Parameters**</td><td>Diffie-Hellman parameters status</td></tr><tr><td>**TLS Auth Key**</td><td>HMAC authentication key status</td></tr></tbody></table>

### Instances

Shows a table of all OpenVPN network instances:

<table id="bkmrk-column-description-n"><thead><tr><th>Column</th><th>Description</th></tr></thead><tbody><tr><td>**Network**</td><td>Network name (link to network edit page)</td></tr><tr><td>**Port**</td><td>UDP/TCP port for this instance</td></tr><tr><td>**Status**</td><td>Running (green) or Stopped (red)</td></tr><tr><td>**PID**</td><td>Process ID (if running)</td></tr></tbody></table>

Each OpenVPN-enabled network runs as a separate `openvpn` process with its own PID file.

### Connection Events

![Diagnostics: OpenVPN — logs](https://doc.puq.info/uploads/images/gallery/2026-09/embedded-image-dayopvvw.png)*Diagnostics: OpenVPN — connection events and authentication log*

Displays the OpenVPN connection log (`/etc/openvpn/puqvpncp/logs/connections.log`). Shows client connect and disconnect events with color coding:

- **Green** — `CONNECT` events
- **Yellow** — `DISCONNECT` events

### Authentication Log

Displays the OpenVPN authentication log (`/etc/openvpn/puqvpncp/logs/auth.log`). Shows authentication attempts with color coding:

- **Green** — `AUTH OK` events
- **Red** — `AUTH FAILED` or `AUTH ERROR` events

### Server Logs

![Diagnostics: OpenVPN — server logs](https://doc.puq.info/uploads/images/gallery/2026-09/embedded-image-6jjqkf3d.png)*Diagnostics: OpenVPN — server logs from all network instances*

Displays combined server logs from all OpenVPN network instances (`/etc/openvpn/puqvpncp/logs/*.log`). Each log line is prefixed with the network name in square brackets (e.g., `[net1] ...`).

- - - - - -

## IKEv2

### Service Status and Certificates

![Diagnostics: IKEv2](https://doc.puq.info/uploads/images/gallery/2026-09/embedded-image-bovdnfts.png)*Diagnostics: IKEv2 — service status, certificates, ipsec statusall*

The page displays two cards side by side:

**Service Status:**

<table id="bkmrk-field-description-st"><thead><tr><th>Field</th><th>Description</th></tr></thead><tbody><tr><td>**strongSwan**</td><td>Installed strongSwan version</td></tr><tr><td>**Starter PID**</td><td>PID of the strongSwan starter process</td></tr><tr><td>**Charon PID**</td><td>PID of the IKE daemon (charon)</td></tr><tr><td>**Global Status**</td><td>Whether IKEv2 is globally enabled or disabled</td></tr><tr><td>**Server Domain**</td><td>Domain configured for IKEv2 server certificates</td></tr><tr><td>**Online**</td><td>Number of currently connected IKEv2 clients</td></tr></tbody></table>

**Certificates:**

<table id="bkmrk-field-description-ca-0"><thead><tr><th>Field</th><th>Description</th></tr></thead><tbody><tr><td>**CA Certificate**</td><td>Root CA certificate status (Valid / Not generated / Invalid)</td></tr><tr><td>**Server Certificate**</td><td>Server certificate status</td></tr></tbody></table>

### ipsec statusall

Displays the raw output of the `ipsec statusall` command — the standard strongSwan status tool. Shows detailed information about:

- IKE charon daemon status (version, uptime, memory, threads, plugins)
- Virtual IP pools with size/online/offline counters
- Active security associations (SAs)
- Connection definitions

This section is collapsible.

### IKEv2 / strongSwan Logs

![Diagnostics: IKEv2 — logs](https://doc.puq.info/uploads/images/gallery/2026-09/embedded-image-hhxehoug.png)*Diagnostics: IKEv2 — strongSwan logs*

Displays strongSwan logs from `journalctl`. Shows IKE negotiation events, connection establishments, certificate validations, and authentication messages. The system tries `strongswan` unit first, then falls back to `charon` syslog tag.

- - - - - -

## Traffic Control

![Diagnostics: Traffic Control](https://doc.puq.info/uploads/images/gallery/2026-09/embedded-image-br3kr4mn.png)*Diagnostics: Traffic Control — overview and per-interface TC classes*

### Overview

<table id="bkmrk-field-description-ma"><thead><tr><th>Field</th><th>Description</th></tr></thead><tbody><tr><td>**Managed Interfaces**</td><td>Total number of network interfaces with TC rules</td></tr><tr><td>**Total TC Classes**</td><td>Total number of HTB traffic control classes across all interfaces</td></tr><tr><td>**Total Bytes Processed**</td><td>Sum of all bytes processed by TC classes</td></tr><tr><td>**Total Drops**</td><td>Sum of all dropped packets (highlighted in red if &gt; 0)</td></tr></tbody></table>

The overview auto-refreshes every 2 seconds.

### Per-Interface Tables

Below the overview, each managed interface is displayed as a separate card showing all its TC classes:

<table id="bkmrk-column-description-h"><thead><tr><th>Column</th><th>Description</th></tr></thead><tbody><tr><td>**Handle**</td><td>TC class handle (e.g., `1:806e`)</td></tr><tr><td>**Type**</td><td>Class type — `root` for the root class, or direction + protocol (e.g., `DL IPv4 #110`, `UL IPv6 #119`)</td></tr><tr><td>**Rate**</td><td>Configured bandwidth rate</td></tr><tr><td>**Bytes**</td><td>Total bytes processed by this class</td></tr><tr><td>**Packets**</td><td>Total packets processed</td></tr><tr><td>**Drops**</td><td>Dropped packets (highlighted in red if &gt; 0)</td></tr><tr><td>**Overlimits**</td><td>Overlimit events (highlighted in yellow if &gt; 0)</td></tr><tr><td>**Throughput**</td><td>Real-time throughput calculated from byte deltas between refreshes</td></tr></tbody></table>

Interfaces include:

- **Gateway interfaces** (e.g., `ens18`) — main server network interfaces
- **WireGuard interfaces** (e.g., `wg51824`) — per-network WireGuard tunnel interfaces
- **OpenVPN interfaces** (e.g., `ovpn1197`) — per-network OpenVPN tunnel interfaces
- **Upstream interfaces** (e.g., `wgup1`) — upstream WireGuard tunnel interfaces

- - - - - -

## Telegraf

![Diagnostics: Telegraf](https://doc.puq.info/uploads/images/gallery/2026-09/embedded-image-dgbia5ng.png)*Diagnostics: Telegraf — service status, InfluxDB config, inputs, logs*

### Service Info

Three cards are displayed:

**Telegraf Service:**

<table id="bkmrk-field-description-ve"><thead><tr><th>Field</th><th>Description</th></tr></thead><tbody><tr><td>**Version**</td><td>Installed Telegraf version</td></tr><tr><td>**Status**</td><td>Running (with PID) or Stopped</td></tr></tbody></table>

**InfluxDB Output:**

<table id="bkmrk-field-description-en"><thead><tr><th>Field</th><th>Description</th></tr></thead><tbody><tr><td>**Enabled**</td><td>Whether InfluxDB output is enabled</td></tr><tr><td>**URL**</td><td>InfluxDB server URL</td></tr><tr><td>**Bucket**</td><td>InfluxDB bucket name</td></tr><tr><td>**Organization**</td><td>InfluxDB organization</td></tr></tbody></table>

**Inputs:**

<table id="bkmrk-field-description-so"><thead><tr><th>Field</th><th>Description</th></tr></thead><tbody><tr><td>**Socket Listener**</td><td>Whether the Unix socket input is active (receives metrics from PUQVPNCP)</td></tr><tr><td>**HTTP Metrics**</td><td>Whether the HTTP metrics endpoint is active</td></tr></tbody></table>

### Telegraf Logs

Displays Telegraf service logs from `journalctl` with color coding:

- **Red** — Error messages (`E!`)
- **Yellow** — Warning messages (`W!`)
- **Gray** — Debug messages (`D!`)

- - - - - -

## System

![Diagnostics: System](https://doc.puq.info/uploads/images/gallery/2026-09/embedded-image-g66addey.png)*Diagnostics: System — uptime, memory, disk usage, interfaces*

### System Info Cards

Four cards are displayed:

**Uptime** — output of the `uptime` command showing server uptime, number of users, and load averages.

**Memory** — output of `free -h` showing total, used, free, shared, buffers/cache, and available memory for both RAM and swap.

**Disk Usage** — output of `df -h` showing mounted filesystem, size, used space, available space, and usage percentage for the root partition.

**Interfaces** — output of `ip -br addr` showing all network interfaces with their status (UP/DOWN) and assigned IP addresses. Includes physical interfaces, WireGuard interfaces, OpenVPN tunnel interfaces, and upstream tunnels.

### System Logs (puqvpncp)

![Diagnostics: System — logs](https://doc.puq.info/uploads/images/gallery/2026-09/embedded-image-od8yv7cz.png)*Diagnostics: System — PUQVPNCP system logs*

Displays PUQVPNCP service logs from `journalctl` (syslog tag `puqvpncp`). Shows application events such as API requests, system operations, network changes, and service lifecycle events.

- - - - - -

## Panel Log

![Diagnostics: Panel Log](https://doc.puq.info/uploads/images/gallery/2026-09/embedded-image-ddjbdd9e.png)*Diagnostics: Panel Log — puqvpncp.log viewer*

Displays the PUQVPNCP application log file (`puqvpncp.log` in the configured `LogDir` directory, default `/var/log/puqvpncp/`).

This is the application's own log file (separate from journalctl system logs). Log entries are color-coded by level:

- **Red** — `ERROR:` messages
- **Yellow** — `WARN:` messages
- **Gray** — `DEBUG:` messages
- **Normal** — `INFO:` messages

The log format is: `timestamp LEVEL: message` (e.g., `2026-03-11T17:18:00.000Z INFO: ReloadNetworks: setting iptables`).

- - - - - -

## Integrity Check

![Integrity Check](https://doc.puq.info/uploads/images/gallery/2026-09/embedded-image-22fcknkw.png)*Integrity Check — summary, log table, and last run info*

The Integrity Check performs a comprehensive audit of the entire PUQVPNCP system configuration. It verifies that all firewall rules, routing tables, ipset entries, traffic control classes, and network interfaces are correctly configured and match the expected state.

### Running a Check

Two buttons are available in the page header:

<table id="bkmrk-button-description-a"><thead><tr><th>Button</th><th>Description</th></tr></thead><tbody><tr><td>**Audit** (magnifying glass)</td><td>Run a read-only audit — checks all rules and reports issues without making changes</td></tr><tr><td>**Audit &amp; Fix** (wrench)</td><td>Run an audit and automatically fix any issues found</td></tr></tbody></table>

The check runs in the background. Results stream in real-time via Server-Sent Events (SSE), with automatic polling fallback if SSE disconnects.

### Summary

The summary card shows counters for each check result:

<table id="bkmrk-counter-color-descri"><thead><tr><th>Counter</th><th>Color</th><th>Description</th></tr></thead><tbody><tr><td>**Total**</td><td>—</td><td>Total number of checks performed</td></tr><tr><td>**OK**</td><td>Green</td><td>Checks that passed</td></tr><tr><td>**Failed**</td><td>Red</td><td>Checks that failed (in audit mode, these need fixing)</td></tr><tr><td>**Fixed**</td><td>Yellow</td><td>Checks that were failed but successfully repaired (fix mode only)</td></tr><tr><td>**Errors**</td><td>Blue</td><td>Checks where the fix was applied but still failing</td></tr><tr><td>**Skipped**</td><td>Gray</td><td>Checks that were skipped (e.g., ipset not installed, mangle overflow)</td></tr></tbody></table>

A progress bar shows the proportion of each result type.

### Filter Buttons

Filter the log table by status:

- **All** — show all entries
- **Failed** — show failed, fixed, error, and skipped entries (default)
- **Fixed** — show only fixed entries
- **OK** — show only passed entries
- **Skipped** — show only skipped entries

### Log Table

<table id="bkmrk-column-description-t"><thead><tr><th>Column</th><th>Description</th></tr></thead><tbody><tr><td>**Time**</td><td>Timestamp of the check</td></tr><tr><td>**Status**</td><td>Result badge (OK / FAILED / FIXED / ERROR / SKIPPED)</td></tr><tr><td>**Category**</td><td>Check category (see below)</td></tr><tr><td>**Network**</td><td>Network and/or client name (if applicable)</td></tr><tr><td>**Description**</td><td>What was checked</td></tr><tr><td>**Detail**</td><td>Additional information (e.g., "Fixed", error message)</td></tr></tbody></table>

### Check Categories

The integrity check performs 9 phases, covering all aspects of the system:

<table id="bkmrk-category-phase-what-"><thead><tr><th>Category</th><th>Phase</th><th>What is Checked</th></tr></thead><tbody><tr><td>**System**</td><td>1</td><td>IPv4 forwarding enabled, INPUT/FORWARD/OUTPUT chain policies, system\_PUQVPNCP rule</td></tr><tr><td>**Global Rules**</td><td>2</td><td>Pre-filter rules, peering ACCEPT rules (A→B, B→A), intra-network ACCEPT, isolation DROP (ipset), post-filter rules</td></tr><tr><td>**ipset**</td><td>3</td><td>`puq_vpn_nets` ipset exists, each network subnet is a member</td></tr><tr><td>**Chains**</td><td>4</td><td>Per-network chains exist in filter (`PQ_`), nat SNAT (`PQN_`), nat DNAT (`PQD_`), mangle (`PQM_`) — plus jump rules from built-in chains</td></tr><tr><td>**NAT**</td><td>5</td><td>SNAT rules for each network's upstream IP</td></tr><tr><td>**Mangle**</td><td>5</td><td>Per-client mangle marks for download (dst) and upload (src) traffic</td></tr><tr><td>**Network Rules**</td><td>5</td><td>Route ACCEPT rules for custom routes</td></tr><tr><td>**Policy Routing**</td><td>6</td><td>Upstream WG tunnel `ip rule` / `ip route table`, WG/OpenVPN fwmark-based policy routing</td></tr><tr><td>**CONNMARK**</td><td>7</td><td>WG and OpenVPN CONNMARK rules in PREROUTING (mangle)</td></tr><tr><td>**Traffic Control**</td><td>8</td><td>Root HTB qdisc on gateway, VPN, and upstream interfaces; per-client TC classes</td></tr><tr><td>**Interfaces**</td><td>9</td><td>WireGuard interfaces are UP, upstream WG tunnel interfaces are UP</td></tr></tbody></table>

### Last Run

The **Last Run** card shows information about the most recent integrity check:

<table id="bkmrk-field-description-mo"><thead><tr><th>Field</th><th>Description</th></tr></thead><tbody><tr><td>**Mode**</td><td>`audit` or `fix`</td></tr><tr><td>**Started**</td><td>When the check started</td></tr><tr><td>**Duration**</td><td>How long the check took</td></tr><tr><td>**Result**</td><td>Summary of OK, failed, fixed, errors, and skipped counts</td></tr></tbody></table>

- - - - - -# 22. AmneziaWG (Anti-Censorship)

## Overview

**AmneziaWG** is a specialized fork of WireGuard designed to evade Deep Packet Inspection (DPI) and strict internet censorship systems. While standard WireGuard has easily detectable packet signatures, AmneziaWG obfuscates traffic while retaining WireGuard's speed and performance.

### Key Capabilities

- **Header Obfuscation** — randomizes message headers (H1, H2, H3, H4) so DPI firewalls cannot detect WireGuard handshakes or data packets
- **Junk Packet Injection** — sends random junk packets (Jc count, within Jmin–Jmax byte size) before connection initiation to confuse DPI pattern analyzers
- **Variable Junk Packet Sizes** — custom sizes for initiation junk (S1) and response junk (S2)
- **High Performance** — runs with kernel module speed (`amneziawg`), offering WireGuard throughput with anti-censorship resistance
- **Cross-Platform Clients** — supported on Windows, macOS, Linux, Android, and iOS via Amnezia VPN client applications

> **Requirement:** `amneziawg` (kernel module or DKMS) and `amneziawg-tools` packages must be installed on the host. Check via **Settings &gt; Environment**.

### Installation

AmneziaWG requires the kernel module (`amneziawg-dkms`) and CLI tools (`amneziawg-tools`). Choose the instructions corresponding to your operating system:

#### Debian 12 (Bookworm)

> **Important for Debian 12:** Debian 12 uses `glibc 2.36`. The Ubuntu 24.04 (`noble`) package requires `libc6 >= 2.38`, so attempting to use `noble` will result in broken package dependencies. You **must** use the Ubuntu 22.04 (`jammy`) PPA.
> 
> The keyring is saved directly in `.asc` format, so no `gpg` or `gnupg` package is required:

```bash
# 1. Install build tools, DKMS, and current kernel headers
apt-get update && apt-get install -y curl build-essential dkms linux-headers-$(uname -r)

# 2. Add the official Amnezia PPA repository keyring (ASCII format)
mkdir -p /etc/apt/keyrings
curl -fsSL "https://keyserver.ubuntu.com/pks/lookup?op=get&search=0x75C9DD72C799870E310542E24166F2C257290828" -o /etc/apt/keyrings/amnezia.asc

# 3. Add Launchpad PPA source (jammy for Debian 12)
echo "deb [signed-by=/etc/apt/keyrings/amnezia.asc] https://ppa.launchpadcontent.net/amnezia/ppa/ubuntu jammy main" > /etc/apt/sources.list.d/amnezia.list

# 4. Install the DKMS module and tools
apt-get update && apt-get install -y amneziawg-dkms amneziawg-tools

# 5. Load the kernel module
modprobe amneziawg

```

#### Debian 13 (Trixie)

> On **Debian 13**, glibc is 2.40+, so the Ubuntu 24.04 (`noble`) PPA is used:

```bash
# 1. Install build tools, DKMS, and current kernel headers
apt-get update && apt-get install -y curl build-essential dkms linux-headers-$(uname -r)

# 2. Add the official Amnezia PPA repository keyring (ASCII format)
mkdir -p /etc/apt/keyrings
curl -fsSL "https://keyserver.ubuntu.com/pks/lookup?op=get&search=0x75C9DD72C799870E310542E24166F2C257290828" -o /etc/apt/keyrings/amnezia.asc

# 3. Add Launchpad PPA source (noble for Debian 13)
echo "deb [signed-by=/etc/apt/keyrings/amnezia.asc] https://ppa.launchpadcontent.net/amnezia/ppa/ubuntu noble main" > /etc/apt/sources.list.d/amnezia.list

# 4. Install the DKMS module and tools
apt-get update && apt-get install -y amneziawg-dkms amneziawg-tools

# 5. Load the kernel module
modprobe amneziawg

```

#### Ubuntu (22.04 / 24.04 LTS)

**Option 1: Using `add-apt-repository` (standard):**

```bash
add-apt-repository -y ppa:amnezia/ppa
apt-get update && apt-get install -y amneziawg-dkms amneziawg-tools
modprobe amneziawg

```

**Option 2: Using direct keyring (minimal systems):**

```bash
mkdir -p /etc/apt/keyrings
curl -fsSL "https://keyserver.ubuntu.com/pks/lookup?op=get&search=0x75C9DD72C799870E310542E24166F2C257290828" -o /etc/apt/keyrings/amnezia.asc
echo "deb [signed-by=/etc/apt/keyrings/amnezia.asc] https://ppa.launchpadcontent.net/amnezia/ppa/ubuntu $(. /etc/os-release && echo $VERSION_CODENAME) main" > /etc/apt/sources.list.d/amnezia.list
apt-get update && apt-get install -y amneziawg-dkms amneziawg-tools
modprobe amneziawg

```

#### Verification

Verify that the module has been compiled and loaded into the kernel:

```bash
# Check DKMS compilation status (should show 'installed')
dkms status

# Check that the kernel module is active
lsmod | grep amneziawg

# Check that the awg CLI utility is available
awg --version

```

#### Troubleshooting DKMS Compilation &amp; Kernel Updates

If `dkms status` shows `added` or `error`, or if you upgrade the system kernel:

```bash
apt-get install -y build-essential dkms linux-headers-$(uname -r)
dpkg-reconfigure amneziawg-dkms
modprobe amneziawg

```

> **Note on DNS / resolvconf:** If you run `awg-quick` manually and receive `/usr/bin/awg-quick: resolvconf: command not found`, install `openresolv`:
> 
> ```bash
> apt-get install -y openresolv
> 
> ```

Navigate to **VPN Servers &gt; AmneziaWG** to access AmneziaWG management. The page provides 5 tabs: Overview, Networks, Settings, Online, and Client Profiles.

- - - - - -

## Obfuscation Parameters Explained

<table id="bkmrk-parameter-default-de"><thead><tr><th>Parameter</th><th>Default</th><th>Description</th></tr></thead><tbody><tr><td>**H1**</td><td>Random</td><td>Header type for handshake initiation packets</td></tr><tr><td>**H2**</td><td>Random</td><td>Header type for handshake response packets</td></tr><tr><td>**H3**</td><td>Random</td><td>Header type for cookie reply packets</td></tr><tr><td>**H4**</td><td>Random</td><td>Header type for data transport packets</td></tr><tr><td>**Jc**</td><td>4</td><td>Number of junk packets injected before handshake (1–128)</td></tr><tr><td>**Jmin**</td><td>40</td><td>Minimum byte size of junk packets</td></tr><tr><td>**Jmax**</td><td>70</td><td>Maximum byte size of junk packets</td></tr><tr><td>**S1**</td><td>15</td><td>Initiation packet junk size in bytes</td></tr><tr><td>**S2**</td><td>20</td><td>Response packet junk size in bytes</td></tr></tbody></table>

Each network can inherit the global defaults or define custom obfuscation values to match specific ISP bypass requirements.

- - - - - -

## Overview Tab

![AmneziaWG Overview](https://doc.puq.info/uploads/images/gallery/2026-09/embedded-image-cd5ggy01.png)

The Overview tab displays:

<table id="bkmrk-card-description-ser"><thead><tr><th>Card</th><th>Description</th></tr></thead><tbody><tr><td>**Service Status**</td><td>Installed `amneziawg` kernel module and `amneziawg-tools` package versions</td></tr><tr><td>**Summary**</td><td>Total number of AmneziaWG networks and clients configured</td></tr><tr><td>**Online Connections**</td><td>Real-time count of connected AmneziaWG peers with live bandwidth stats</td></tr></tbody></table>

- - - - - -

## Networks Tab

![AmneziaWG Networks](https://doc.puq.info/uploads/images/gallery/2026-09/embedded-image-vxb0byhh.png)

Lists all networks that have AmneziaWG enabled:

<table id="bkmrk-column-description-n"><thead><tr><th>Column</th><th>Description</th></tr></thead><tbody><tr><td>**Name**</td><td>Network name (link to network edit page)</td></tr><tr><td>**Clients**</td><td>Number of AmneziaWG clients in this network</td></tr><tr><td>**Interface**</td><td>Interface name (e.g., `awg51821`)</td></tr><tr><td>**Network**</td><td>Subnet assigned to this network</td></tr><tr><td>**Endpoint**</td><td>Server IP and UDP port for AmneziaWG client connections</td></tr><tr><td>**Bandwidth**</td><td>Upload / download bandwidth limits</td></tr></tbody></table>

- - - - - -

## Settings Tab

![AmneziaWG Settings](https://doc.puq.info/uploads/images/gallery/2026-09/embedded-image-l0onmib1.png)

Global defaults for AmneziaWG client profiles:

- **Default MTU** — interface MTU (recommended: 1420 or 1280 for mobile networks)
- **Persistent Keepalive** — interval in seconds to keep NAT sessions active (default: 25s)
- **AllowedIPs** — default route pushed to clients (default: `0.0.0.0/0, ::/0`)
- **Global Junk Settings** — default Jc, Jmin, Jmax, S1, S2 values

- - - - - -

## Online Peers Tab

![AmneziaWG Online Peers](https://doc.puq.info/uploads/images/gallery/2026-09/embedded-image-rwvagliq.png)

Shows real-time connected peers with active session data:

- **Client Name &amp; Username** — client identity
- **IP Address &amp; Endpoint** — assigned tunnel IP and client remote IP:port
- **Latest Handshake** — timestamp of most recent successful handshake
- **Transfer RX/TX** — live byte counters
- **Bandwidth** — configured bandwidth limit for the client

- - - - - -

## Client Profiles Tab

![AmneziaWG Client Profiles](https://doc.puq.info/uploads/images/gallery/2026-09/embedded-image-ajnashi8.png)

Lists all configured AmneziaWG client profiles across networks, indicating network membership, activation status, and cryptographic key status.

- - - - - -

## Network Configuration

![Network Edit — AmneziaWG](https://doc.puq.info/uploads/images/gallery/2026-09/embedded-image-tevlfj2l.png)

When configuring AmneziaWG inside a network:

- **Listen Port** — UDP port on which AmneziaWG listens
- **Allowed IPs** — IP ranges routed through the tunnel
- **MTU &amp; Persistent Keepalive** — per-network overrides
- **Obfuscation Parameters** — custom H1–H4 headers and Jc/Jmin/Jmax/S1/S2 values

- - - - - -

## Client Configuration &amp; QR Codes

![Client Edit — AmneziaWG](https://doc.puq.info/uploads/images/gallery/2026-09/embedded-image-rqxhjkhq.png)

In the client management page, enabling AmneziaWG automatically generates:

1. Standard cryptographic keys adapted for AmneziaWG
2. Obfuscation parameters embedded into client `.conf`
3. QR code for instant mobile setup via AmneziaWG apps on iOS and Android

- - - - - -

## One-Time Links (OTL) for AmneziaWG

![OTL AmneziaWG Configuration](https://doc.puq.info/uploads/images/gallery/2026-09/embedded-image-wykippxq.png)

Administrators can configure the AmneziaWG download page on One-Time Links, setting custom button labels and download links for all supported platforms (Android, iOS, Windows, macOS).

![OTL AmneziaWG Client View](https://doc.puq.info/uploads/images/gallery/2026-09/embedded-image-j5eayrfe.png)

The end-user sees a clean, self-service page with QR code, configuration preview, config file download button, and direct app store links to the official AmneziaWG clients.