# Mikrotik IKEv2 client configuration
##### [Order now](https://puqcloud.com/puqvpncp.php) | [Download](https://download.puqcloud.com/cp/puqvpncp/) | [FAQ](https://faq.puqcloud.com)
## Configuring Mikrotik as an IKEv2 Client.
##### Make sure you have an up to date routerOS system.
Version must be at least: 6.49.7
```shell
[admin@VPN-CLIENT] > system package print
Flags: X - disabled
# NAME VERSION SCHEDULED
0 ntp 6.49.7
1 ppp 6.49.7
2 dhcp 6.49.7
3 mpls 6.49.7
4 security 6.49.7
5 advanced-tools 6.49.7
6 system 6.49.7
7 openflow 6.49.7
8 multicast 6.49.7
9 routing 6.49.7
```
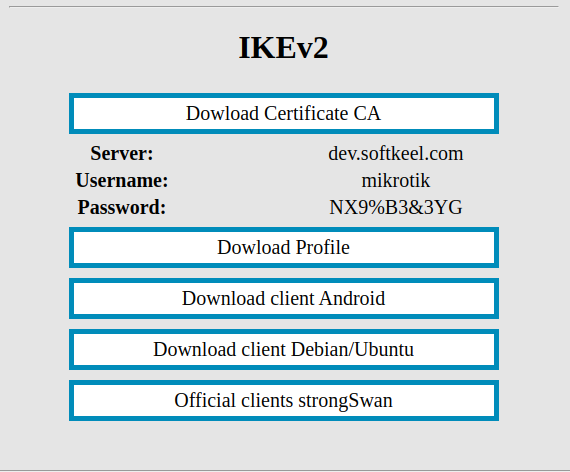
##### Open a one-time link to obtain authorization data and a root certificate.
[](https://doc.puq.info/uploads/images/gallery/2022-12/image-1671037736670.png)
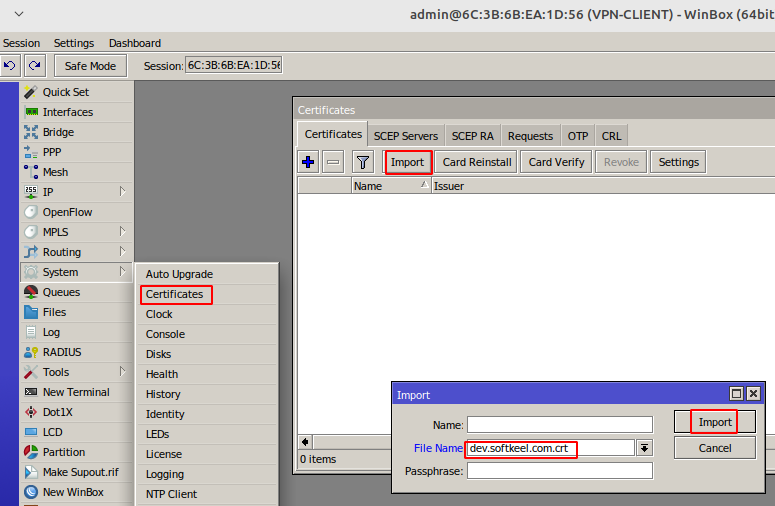
Download the certificate and place it on the Mikrotik router using the Winbox program
[](https://doc.puq.info/uploads/images/gallery/2022-12/image-1671037851417.png)
Import the certificate into the system
[](https://doc.puq.info/uploads/images/gallery/2022-12/image-1671038008488.png)
[](https://doc.puq.info/uploads/images/gallery/2022-12/image-1671038098059.png)
To create an IKEv2 connection, we will use the console
Open a terminal and enter the following commands
Replace the authorization data with the data that is in the one-time link
the example contains the following data. You need to replace them with your own.
| **Server:** | **dev.softkeel.com** | address=**dev.softkeel.com** |
| **Username:** | **mikrotik** | my-id=user-fqdn:**mikrotik** AND username=**mikrotik** |
| **Password:** | **NX9%B3&3YG** | password=**NX9%B3&3YG** |
| **certificate** | **dev.softkeel.com.crt\_0** | certificate=**dev.softkeel.com.crt\_0** |
- - - - - -
It is a strong recommendation to use only the terminal command line in setup.
We encountered cases when, during the configuration of Mikrotik through *winbox*, some parameters were not correctly entered into the configuration. Commands entered through the terminal are always correctly processed.
```
/ip ipsec settings
set accounting=no
/ip ipsec mode-config
add name=MY_VPN responder=no
/ip ipsec policy group
add name=MY_VPN
/ip ipsec profile
add dh-group=modp1024 enc-algorithm=aes-256 name=MY_VPN
/ip ipsec peer
add address=dev.softkeel.com exchange-mode=ike2 name=MY_VPN profile=MY_VPN
/ip ipsec proposal
add name=MY_VPN pfs-group=none
/ip ipsec policy
add dst-address=0.0.0.0/0 group=MY_VPN proposal=MY_VPN src-address=0.0.0.0/0 template=yes
/ip ipsec identity
add auth-method=eap \
eap-methods=eap-mschapv2 generate-policy=port-strict \
mode-config=MY_VPN \
peer=MY_VPN policy-template-group=MY_VPN \
certificate=dev.softkeel.com.crt_0 \
my-id=user-fqdn:mikrotik \
username=mikrotik \
password=NX9%B3&3YG
```
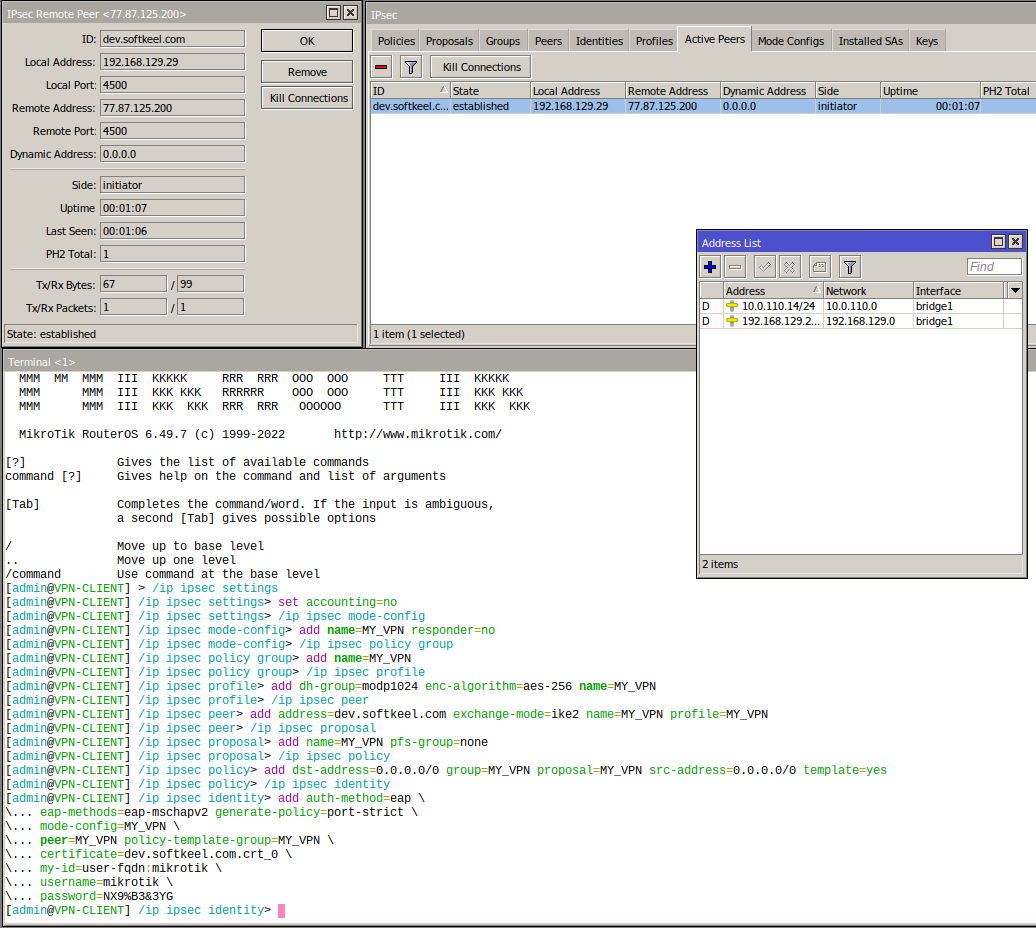
##### After the work done, you can see the connection status in the IP->IPsec configuration
[](https://doc.puq.info/uploads/images/gallery/2022-12/image-1671039196036.png)
You also need to configure the traffic routes you need at your discretion.