Installation and configuration guide
- WHMCS setup(install/update)
- PUQVPNCP installation and configuration
- Add server (PUQVPNCP) in WHMCS
- Product Configuration
- Localization change Сonfiguration
- Email Template (puqWireGuard Custom welcome email template)
- Email Template (puqWireGuard Custom change package Email template)
- Important Information About Generating a Unique Open Link for QR Code Delivery in an Email Template
WHMCS setup(install/update)
WireGuard VPN module WHMCS
Order now | Download | FAQ
System requirements
The module is encoded with ionCube.
Requirements:
-
PHP 8.2 or higher
-
WHMCS 9.x or higher
-
ionCube Loader v13 or newer (v14, v15)
Older module versions for WHMCS 8
Older versions of the module are stored by PHP version in separate directories:
PHP 7.4
https://download.puqcloud.com/WHMCS/servers/PUQ_WHMCS-WireGuard-VPN/php74/
PHP 8.1
https://download.puqcloud.com/WHMCS/servers/PUQ_WHMCS-WireGuard-VPN/php81/
To install and update a module, you must perform one and the same action.
1. Download the latest version of the module.
PHP 8.2
wget http://download.puqcloud.com/WHMCS/servers/PUQ_WHMCS-WireGuard-VPN/php82/PUQ_WHMCS-WireGuard-VPN-latest.zipAll versions are available: https://download.puqcloud.com/WHMCS/servers/PUQ_WHMCS-WireGuard-VPN/
2. Unzip the archive with the module.
unzip PUQ_WHMCS-WireGuard-VPN-latest.zip3. Copy and Replace "puqWireGuardVPN" from "PUQ_WHMCS-WireGuard-VPN" to "WHMCS_WEB_DIR/modules/servers/"
PUQVPNCP installation and configuration
WireGuard VPN module WHMCS
Order now | Download | FAQ
Official documentation:
PUQVPNCP Documentation
PUQVPNCP Download
PUQVPNCP Order now
1. Install the required packages
apt-get update
apt-get install wireguard wireguard-dkms wireguard-tools -y
apt-get install iproute2 iptables -y
apt-get install bind9 -y
2. Download the latest version of the package
https://download.puqcloud.com/cp/puqvpncp/
3. Install the puqvpncp package
wget https://download.puqcloud.com/cp/puqvpncp/puqvpncp_1.1-2_amd64.deb
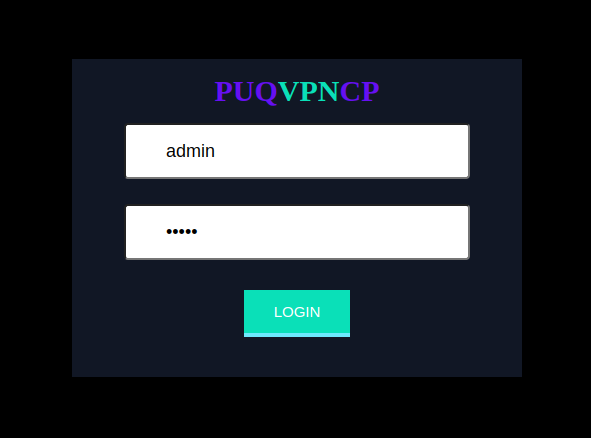
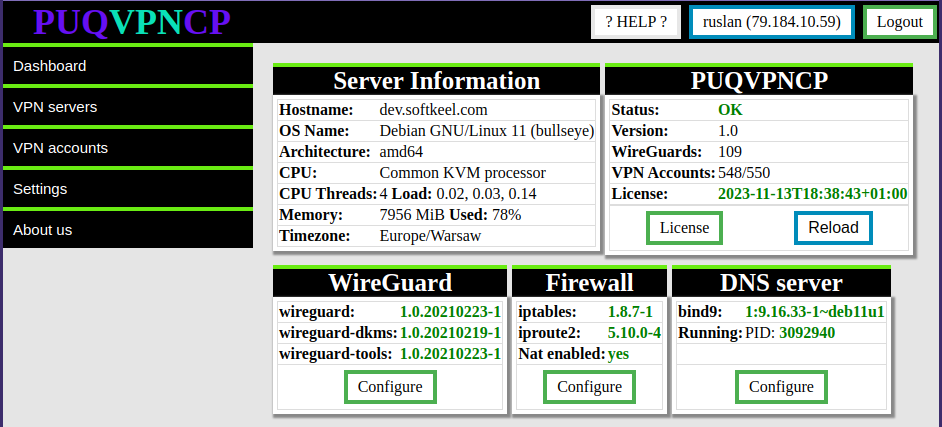
dpkg -i puqvpncp_1.1-2_amd64.deb4. After installation, connect to your server via a web browser.
http://SERVER_IP:8098
Username: admin
Password: admin
5. Enable SSL Let’s Encrypt
Requirements
- The active domain name that resolves the server's IP address
- Port 80 and 443 are always open, and not busy with another process
In order for the system to start the procedure for obtaining an SSL certificate from Let's Encrypt, it is necessary.
In the configuration file, enable the use of SSL and enter the domain name.
nano /etc/puqvpncp/puqvpncp.conf LetsEncrypSSL=yes
Domain=XXXXXX.XXXRestart the PUQVPNCP service
service puqvpncp restartAfter these steps, the first time you connect to the server via the https protocol, the system will request an SSL certificate and automatically renew it if necessary.
ATTENTION. After activating SSL, the system will only work in the https protocol on port 443.
A redirect is also set from port 80 to port 443.
To connect to the server via the https protocol, use only the domain that was set in the configuration file.
Otherwise, you will get an error that SSL is not working correctly.
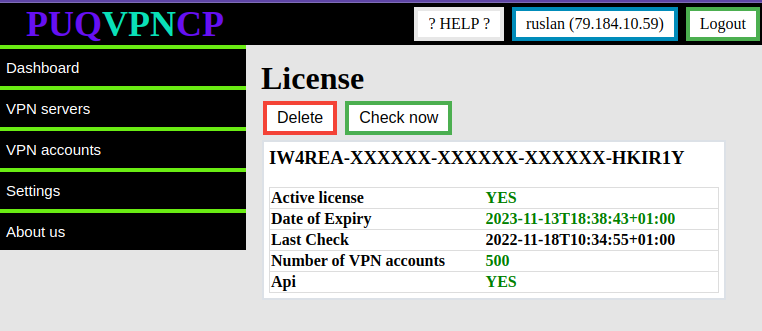
6. License configuration is available in the menu item Settings->License
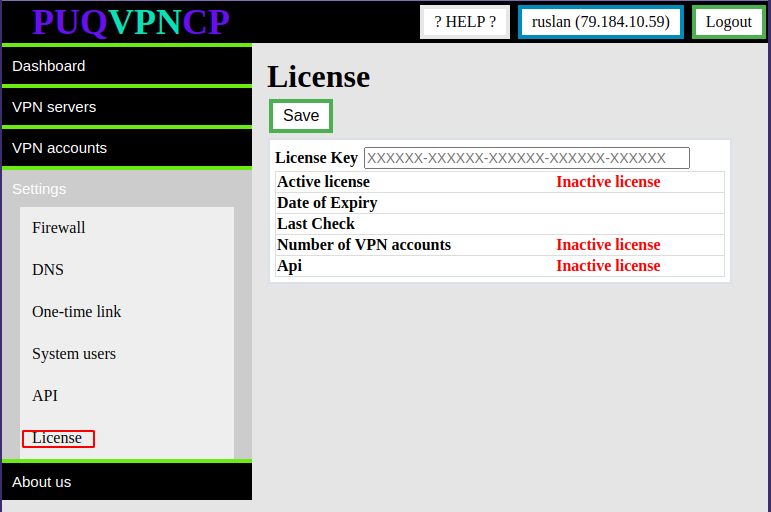
By default, the system limit is 50 users and the API is disabled.
In order to activate the license key, the key must be entered in the "License Key" field and click on the "Save" button
7.Creation of access API
To manage API Access Hashs, go to the section Settings->API
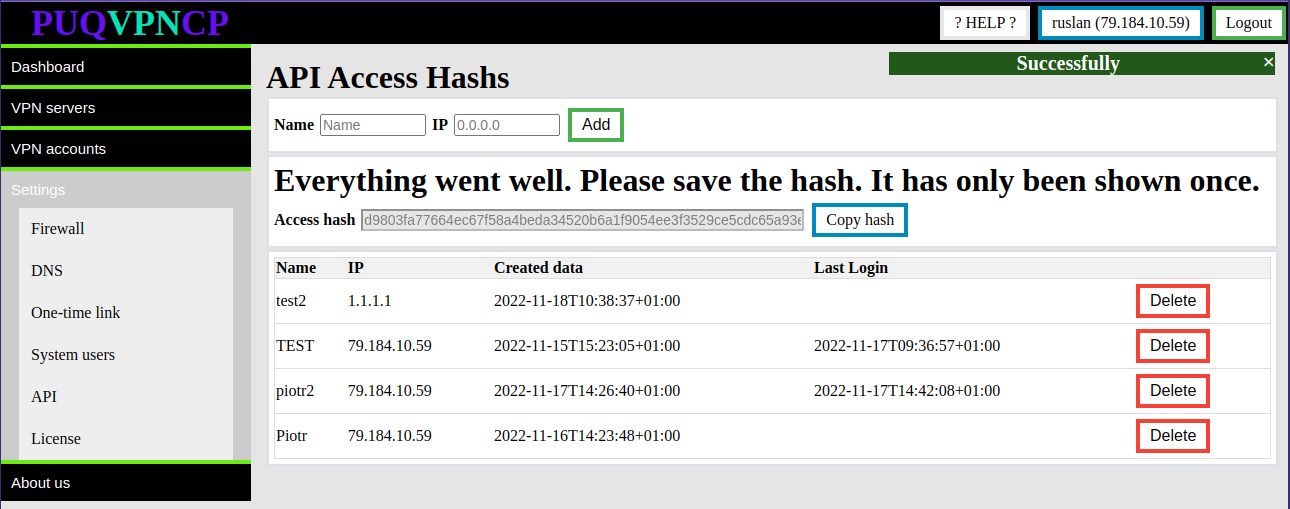
Enter the name and IP address of the WHMCS server and click the ADD button
Attention.
The generated Access hash will only be shown once. Copy it, it will be needed during configuration of the product server in the WHMCS system.
Accept the fact that once the Access Hashs API is created, it will only be shown once.
Each API Access Hash only works from a specific IP address.
8. Creation of access API
Add new WireGuard is available in the menu item VPN servers->WireGuard->Click Create
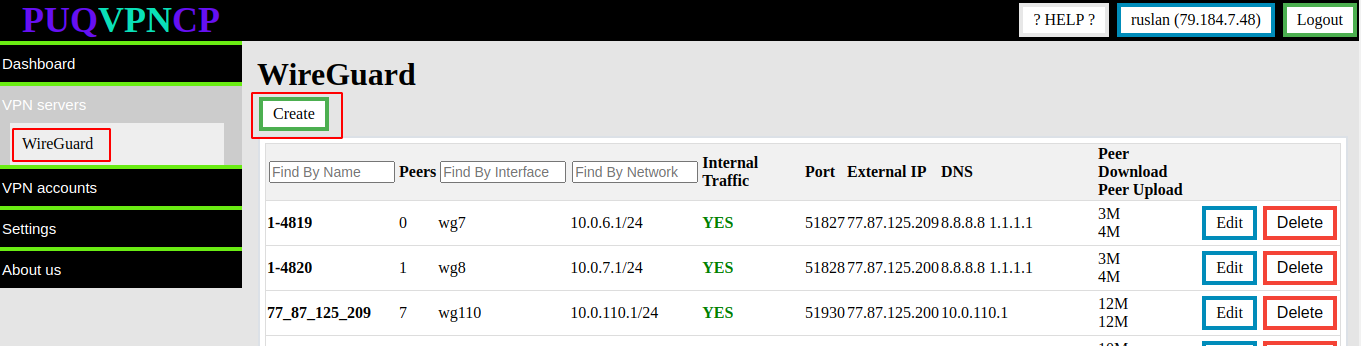
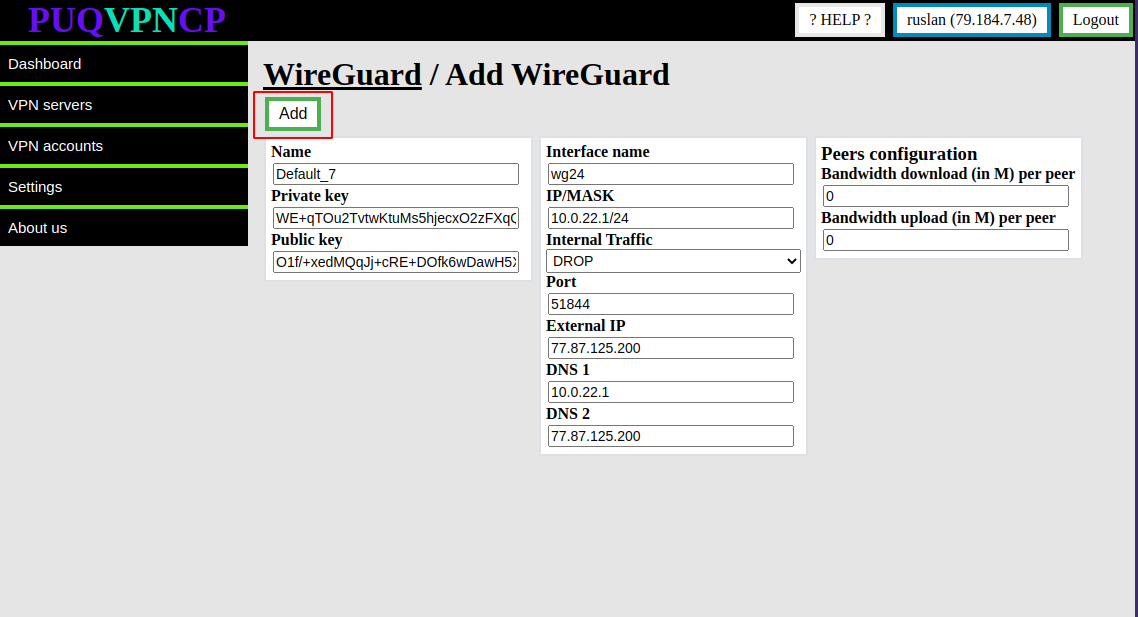
Enter or edit the parameters of the new server/interface and click the ADD button
Add server (PUQVPNCP) in WHMCS
WireGuard VPN module WHMCS
Order now | Download | FAQ
Add a new server to the system WHMCS.
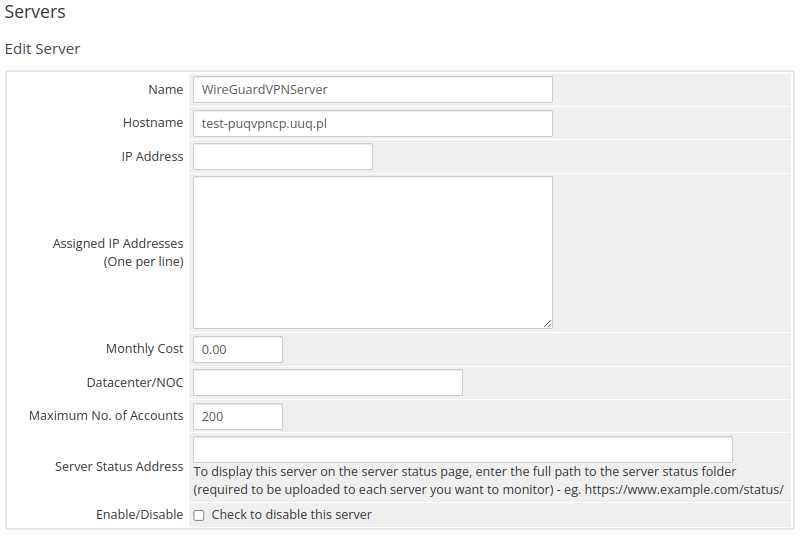
Login to Your WHMCS panel and create new server in WHMCS (System Settings->Products/Services->Servers)

System Settings->Servers->Add New Server- Enter the correct Name and Hostname
Name is just for Your convenience and You can put there anything You like ie: Mygreat PUQVPNCP routr
You can choose whatever hostname You want. Valid entries look similar to: vpn.mydomain.com, ourgreatvpn.mydomain.net. You can also dedicate whole domain ie: myVPNservices.com if You like. The important thing is to resolve the choosen IP address of the PUQVPNCP in DNS server for Your domain.
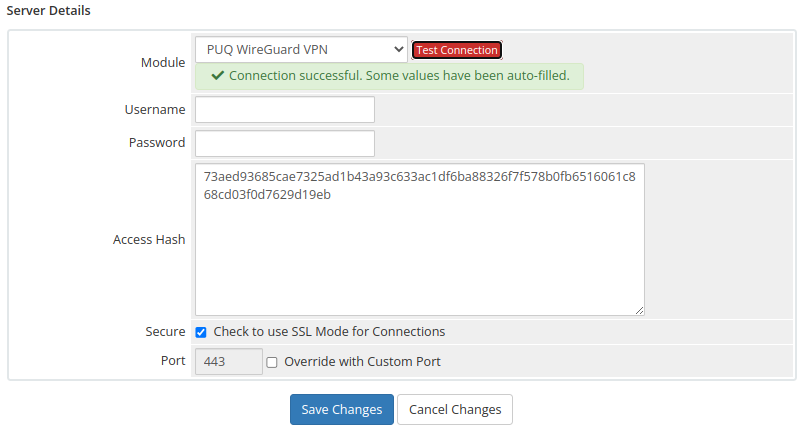
Enter the correct data in the Access Hash field
- In the Server Details section, select the "PUQ WireGuard VPN" module and enter the correct API Access Hash.
- To check, click the "Test connection" button
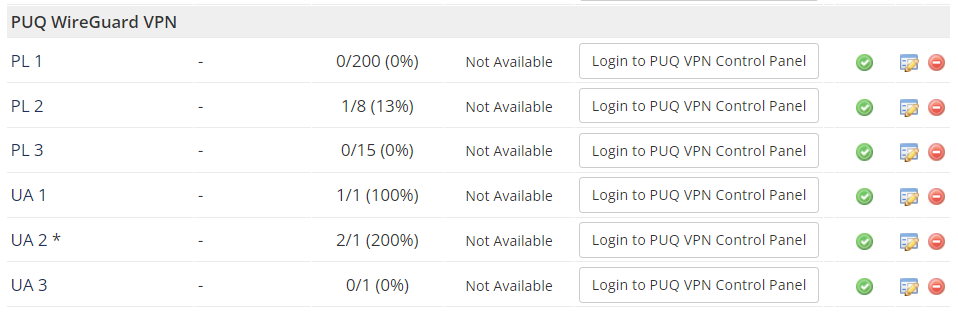
If you save the correct login and password for PUQVPNCP in the server settings, then the Login to PUQ VPN Control Panel button will open for you without entering a login and password.
Product Configuration
WireGuard VPN module WHMCS
Order now | Download | FAQ
Add new product to WHMCS
System Settings->Products/Services->Create a New ProductIn the Module settings section, select the "PUQ WireGuard VPN" module
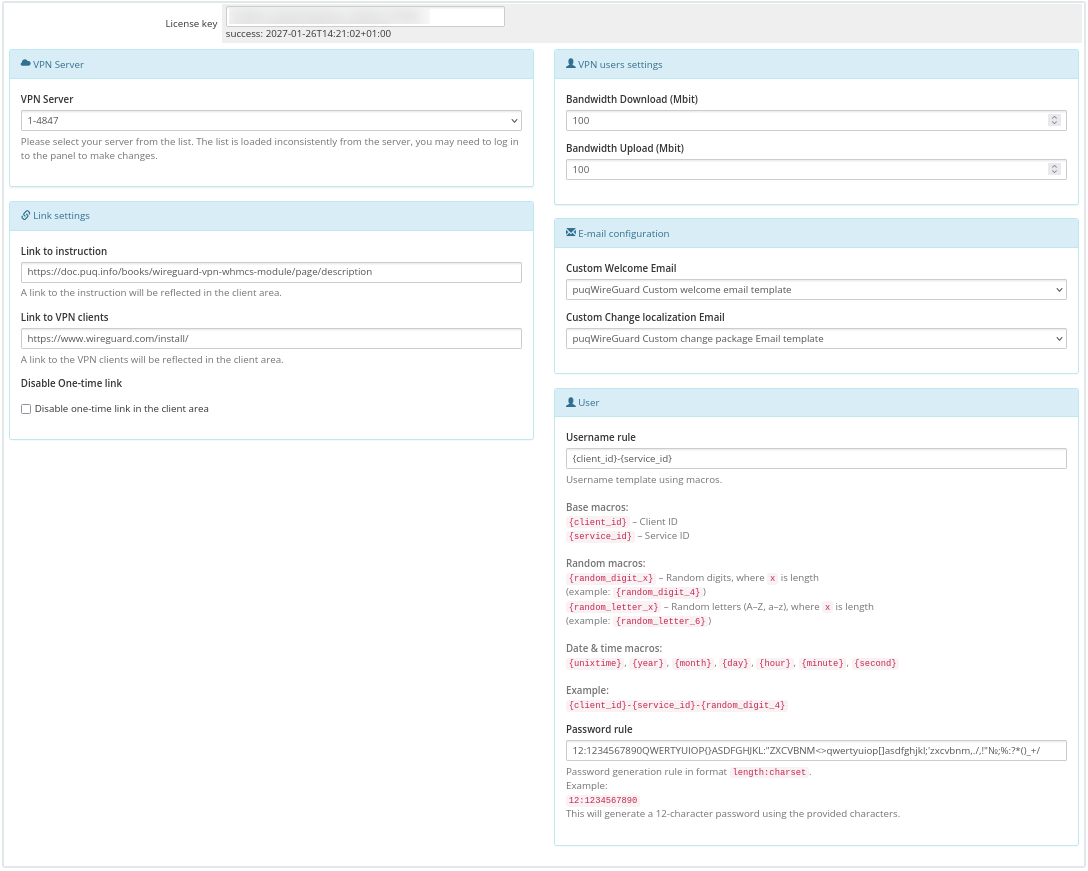
- License key: A pre-purchased license key for the "PUQ WireGuard VPN" module. For the module to work correctly, the key must be active
VPN Server
- Please select your server from the list. The list is loaded inconsistently from the server PUQVPNCP, you may need to log in to the panel to make changes.
Link settings
- Link to instruction - If you have prepared instructions for your customers on how to use the service, then a link to the instructions is provided here (If filled, it will be shown in the client area)
- Link to VPN clients - Link to download the VPN client. For example https://www.wireguard.com/install/ (If filled, it will be shown in the client area)
- Disable One-time link - When this option is enabled, a one-time link to the VPN clients will be disabled in the client area, preventing the customer from using a single-use link for downloading the VPN clients.
E-mail configuration
- Custom Welcome Email - Drop-down list of available e-mail templates for the action of creating a new client account. Please note that it is necessary to disable the standard welcome email in order to avoid double notification
- Custom Change localization Email - Drop-down list of available e-mail templates for the localization change action (package change) for the client account. Please note that you need to disable the standard package change email to avoid double notification.
VPN users settings
- Bandwidth Download - Bandwidth Download of VPN accounts (package change)
- Bandwidth Upload - BandwidthUpload of VPN accounts (package change)
Metric Billing
-
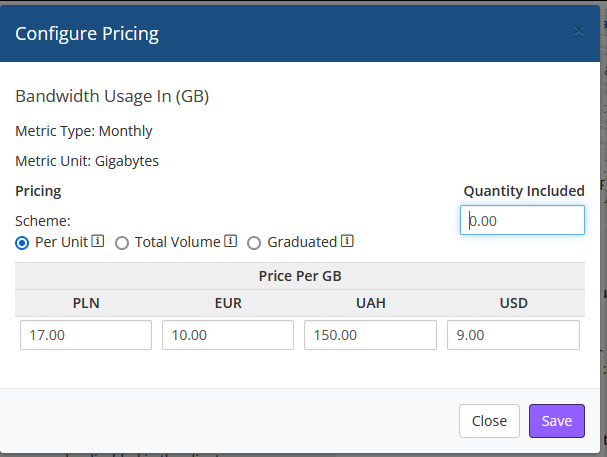
Bandwidth Usage In (GB):
- Metric Type: Monthly
- Metric Unit: Gigabytes (GB)
- Pricing Scheme:
- Per Unit: Billing for each gigabyte of traffic.
- Total Volume: Billing for the total volume of traffic.
- Graduated: Billing on a graduated scale.
- Quantity Included: Allows you to set how many gigabytes are included in the plan.
- Price Per GB: Allows you to specify the cost per gigabyte of traffic in various currencies.
-
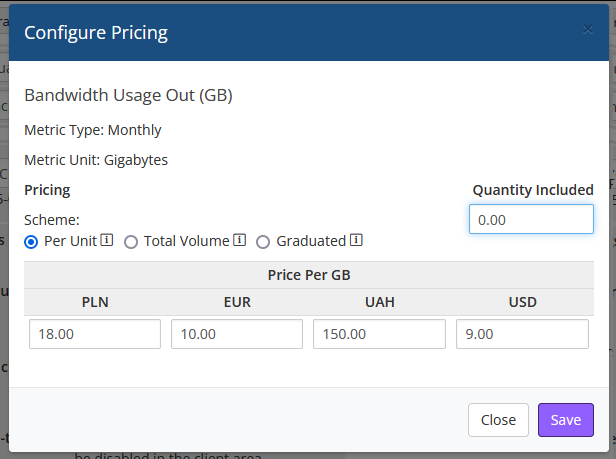
Bandwidth Usage Out (GB):
- Metric Type: Monthly
- Metric Unit: Gigabytes (GB)
- Pricing Scheme:
- Per Unit: Billing for each gigabyte of traffic.
- Total Volume: Billing for the total volume of traffic.
- Graduated: Billing on a graduated scale.
- Quantity Included: Allows you to set how many gigabytes are included in the plan.
- Price Per GB: Allows you to specify the cost per gigabyte of traffic in various currencies.
Overages Billing

- Check to Enable: Enables overage billing.
- Soft Limits:
- Disk Usage: not use.
- Bandwidth: Sets a soft limit for bandwidth usage (units: MB, GB, TB). For example, you can set a soft limit of 1 GB for bandwidth.
- Overage Costs:
- Disk Usage: not use.
- Bandwidth: Specifies the cost per unit over the soft limit for bandwidth usage.
- Price Per Unit Over Above: Sets the pricing for overage units.
Localization change Сonfiguration
WireGuard VPN module WHMCS
Order now | Download | FAQ
To ensure the functionality of changing localization, you need to make some settings. We will give an example of such a configuration with two independent installations where "(UA) PUQ WireGuard VPN" and "(PL) PUQ WireGuard VPN" are two different packages that have two independent groups of servers and have different locations. In our example, we simulate two localizations and the ability to change client packages, which allow changing localization, it is also worth noting that in our configuration example, many servers are used in each of the two groups, where the server is selected according to the least loaded one, which is necessary for correct load distribution between servers.
Attention! For the correct operation of this functionality, available servers are required. If the server is unavailable, changing the package when changing the locale will fail.
1. Add necessary services according to your requirements. (How to add servers)
2. Add your servers to specific server groups.
Add your servers for the first group:
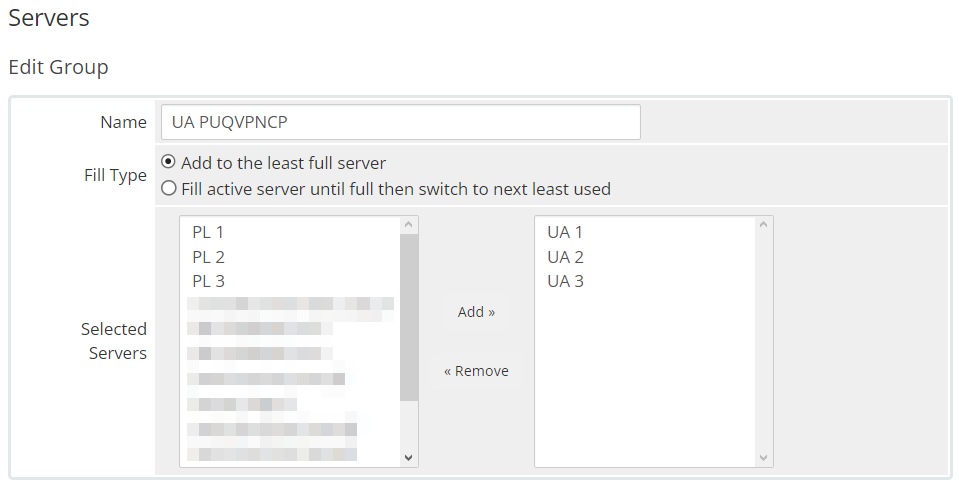
Add your servers for the second group:
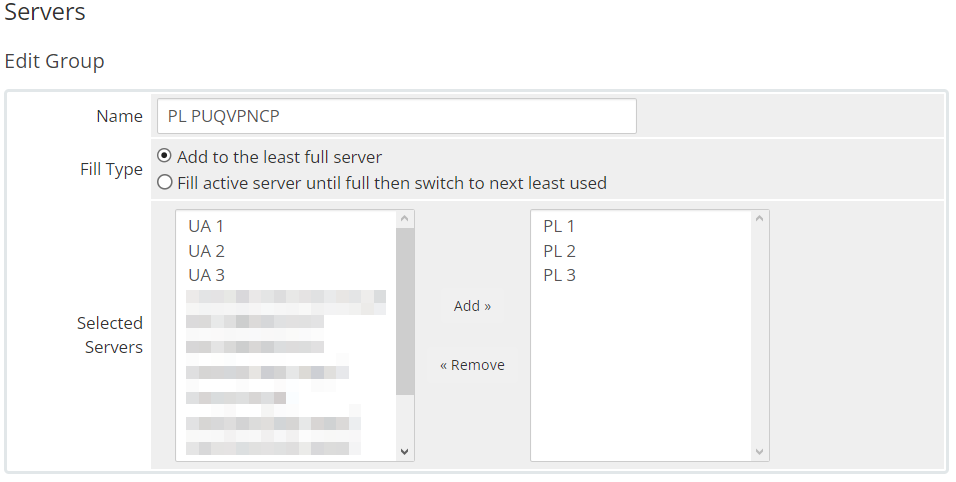
Server groups look like this:
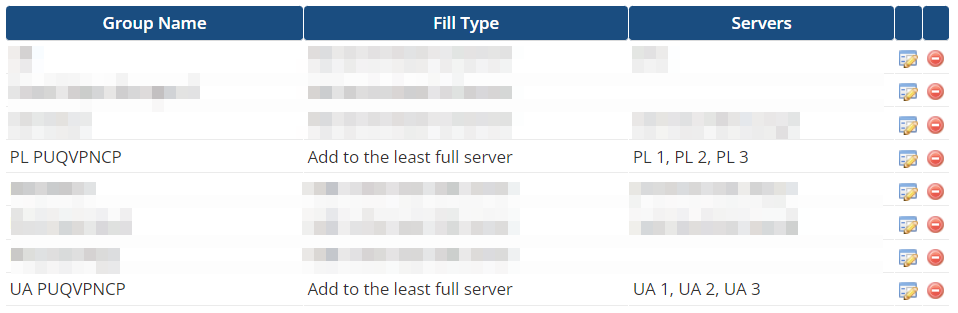
Note. Currently only the "Add to the least full server" scenario is implemented.
3. Select the appropriate server groups in the corresponding product.
Choose your servers group for the first product:
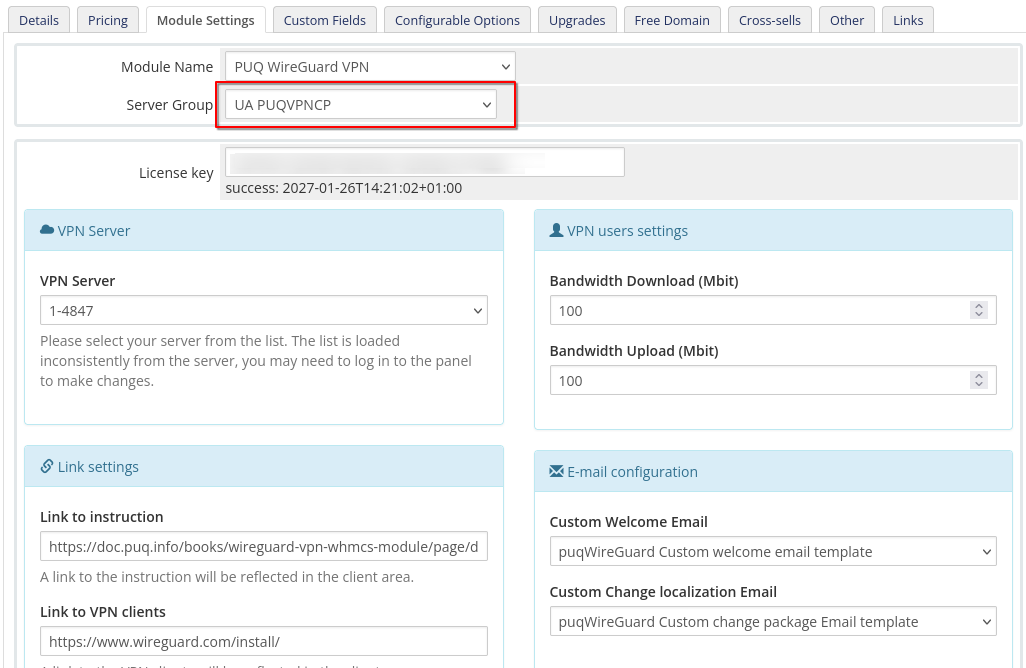
Choose your servers group for the second product:

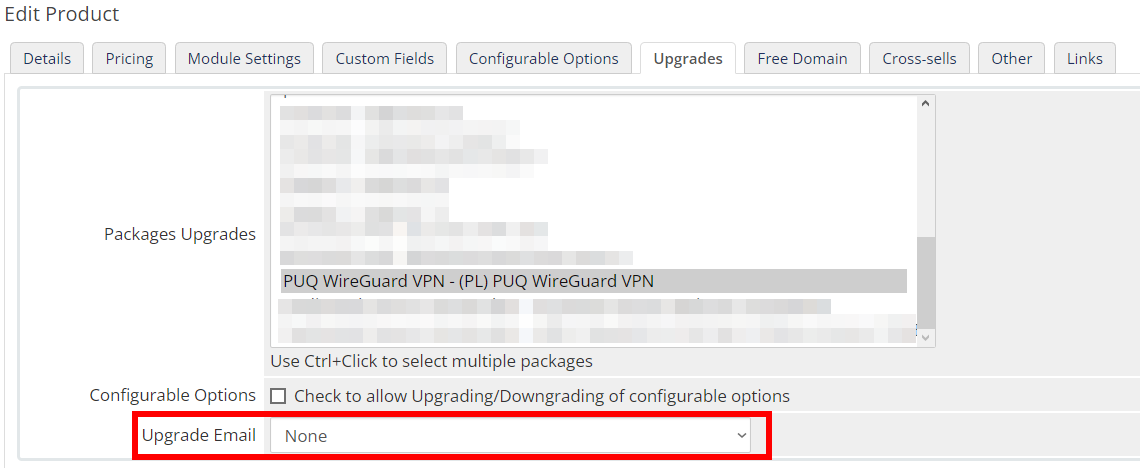
4. Select the appropriate package to update.
Choose your package update for the first product:
Choose your package update for the second product:
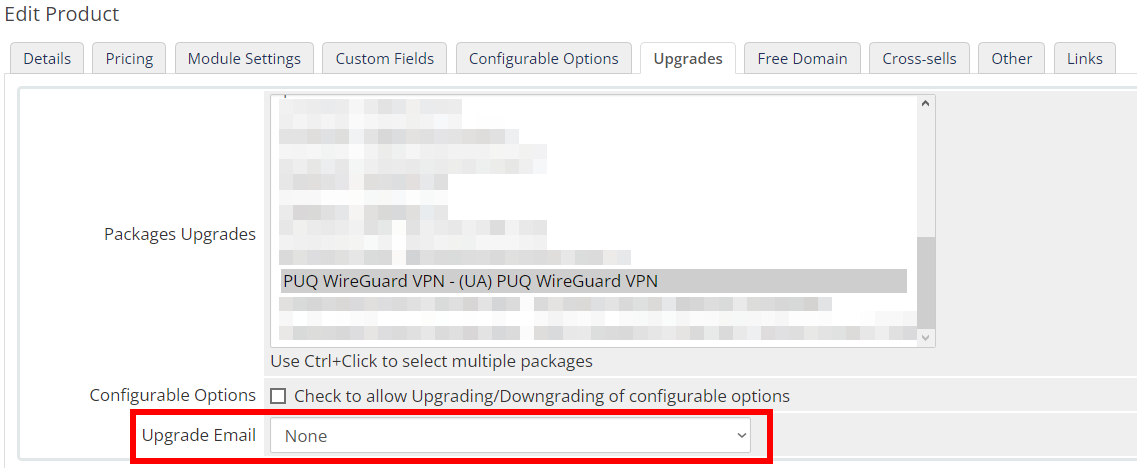
Note. Please note that in order to avoid double notification, notification by means of WHMCS is disabled, because a custom notification will be used.
Email Template (puqWireGuard Custom welcome email template)
WireGuard VPN module WHMCS
Order now | Download | FAQ
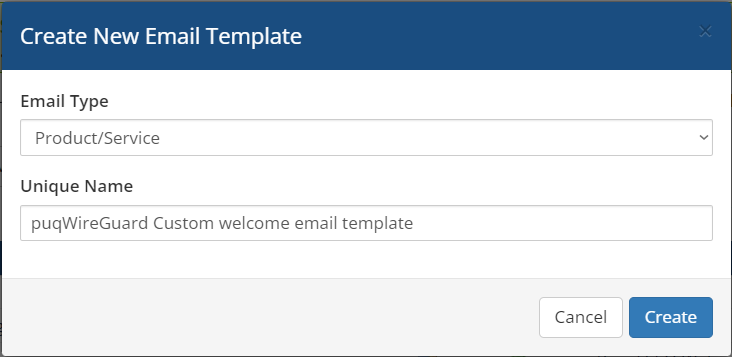
Create an email template for customer notifications.
System Settings->Email Templates->Create New Email Template- Email Type: Product/service
Unique Name: puqWireGuard Custom welcome email template
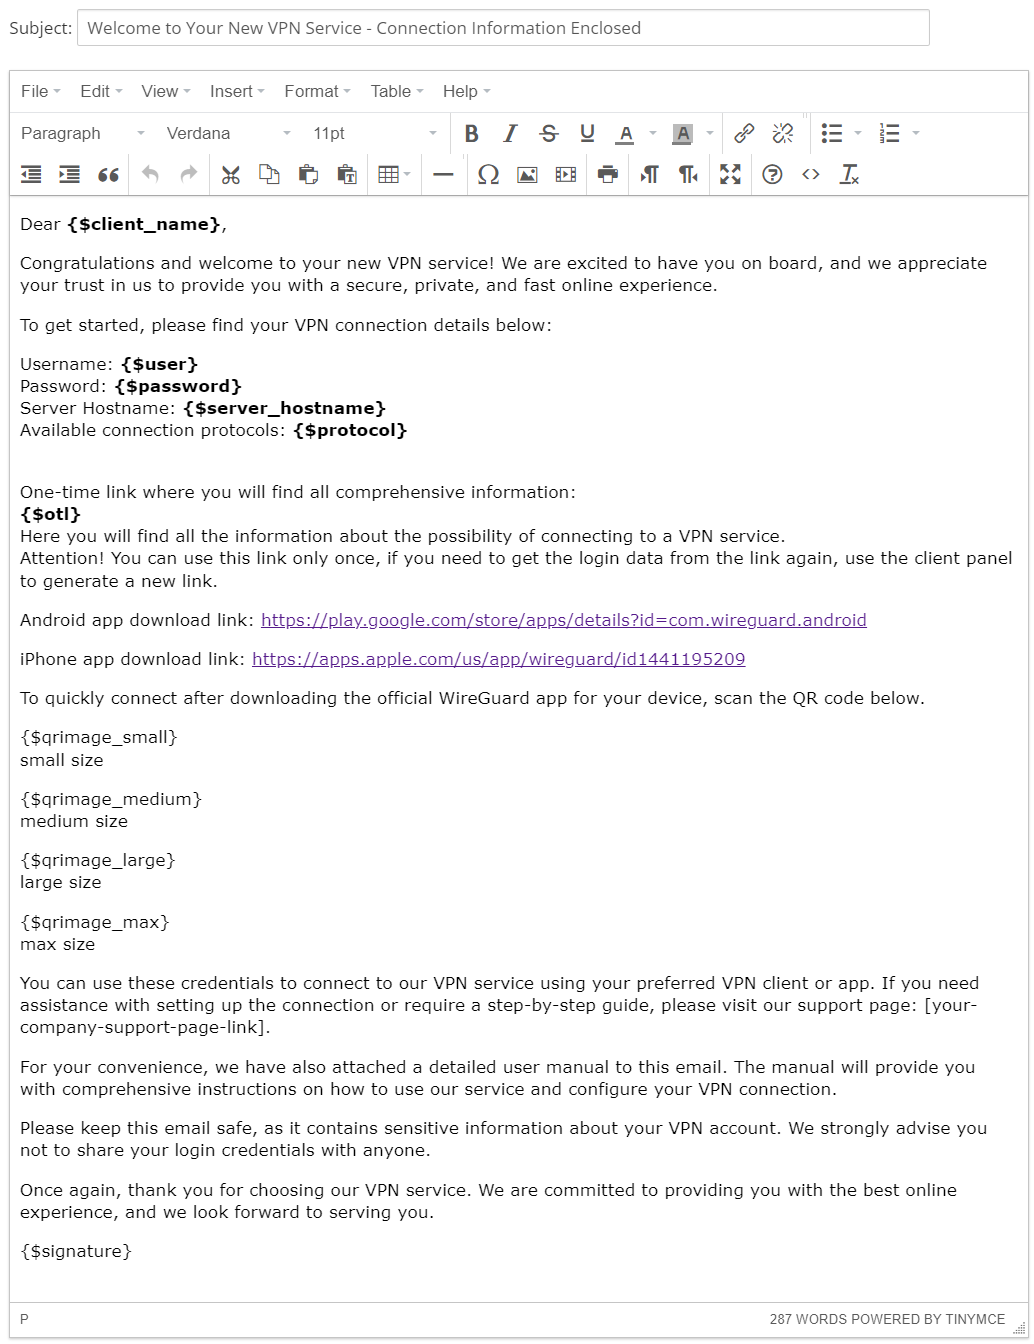
Subject:
Welcome to Your New VPN Service - Connection Information EnclosedBody:
Dear {$client_name},

Congratulations and welcome to your new VPN service! We are excited to have you on board, and we appreciate your trust in us to provide you with a secure, private, and fast online experience.

To get started, please find your VPN connection details below:

Username: {$user}
Password: {$password}
Server Hostname: {$server_hostname}
Available connection protocols: {$protocol}


One-time link where you will find all comprehensive information:
{$otl}
Here you will find all the information about the possibility of connecting to a VPN service.
Attention! You can use this link only once, if you need to get the login data from the link again, use the client panel to generate a new link.

Android app download link: https://play.google.com/store/apps/details?id=com.wireguard.android

iPhone app download link: https://apps.apple.com/us/app/wireguard/id1441195209

To quickly connect after downloading the official WireGuard app for your device, scan the QR code below.

{$qrimage_small}
small size

{$qrimage_medium}
medium size

{$qrimage_large}
large size

{$qrimage_max}
max size

You can use these credentials to connect to our VPN service using your preferred VPN client or app. If you need assistance with setting up the connection or require a step-by-step guide, please visit our support page: [your-company-support-page-link].

For your convenience, we have also attached a detailed user manual to this email. The manual will provide you with comprehensive instructions on how to use our service and configure your VPN connection.

Please keep this email safe, as it contains sensitive information about your VPN account. We strongly advise you not to share your login credentials with anyone.

Once again, thank you for choosing our VPN service. We are committed to providing you with the best online experience, and we look forward to serving you.

{$signature}
Email Template (puqWireGuard Custom change package Email template)
WireGuard VPN module WHMCS
Order now | Download | FAQ
Create an email template for customer notifications.
System Settings->Email Templates->Create New Email Template- Email Type: Product/service
Unique Name: puqWireGuard Custom change package Email template
Subject:
You have changed the location in your VPN service - connection information is attachedBody:
Dear {$client_name},

You received this email because your connection location has changed.

To continue, find your VPN connection information below:

Username: {$user}
Password: {$password}
Server Hostname: {$server_hostname}
Available connection protocols: {$protocol}


One-time link where you will find all comprehensive information:
{$otl}
Here you will find all the information about the possibility of connecting to a VPN service.
Attention! You can use this link only once, if you need to get the login data from the link again, use the client panel to generate a new link.

Android app download link: https://play.google.com/store/apps/details?id=com.wireguard.android

iPhone app download link: https://apps.apple.com/us/app/wireguard/id1441195209

To quickly connect after downloading the official WireGuard app for your device, scan the QR code below.

{$qrimage_small}
small size

{$qrimage_medium}
medium size

{$qrimage_large}
large size

{$qrimage_max}
max size

You can use these credentials to connect to our VPN service using your preferred VPN client or app. If you need assistance with setting up the connection or require a step-by-step guide, please visit our support page: [your-company-support-page-link].

For your convenience, we have also attached a detailed user manual to this email. The manual will provide you with comprehensive instructions on how to use our service and configure your VPN connection.

Please keep this email safe, as it contains sensitive information about your VPN account. We strongly advise you not to share your login credentials with anyone.

Once again, thank you for choosing our VPN service. We are committed to providing you with the best online experience, and we look forward to serving you.

{$signature}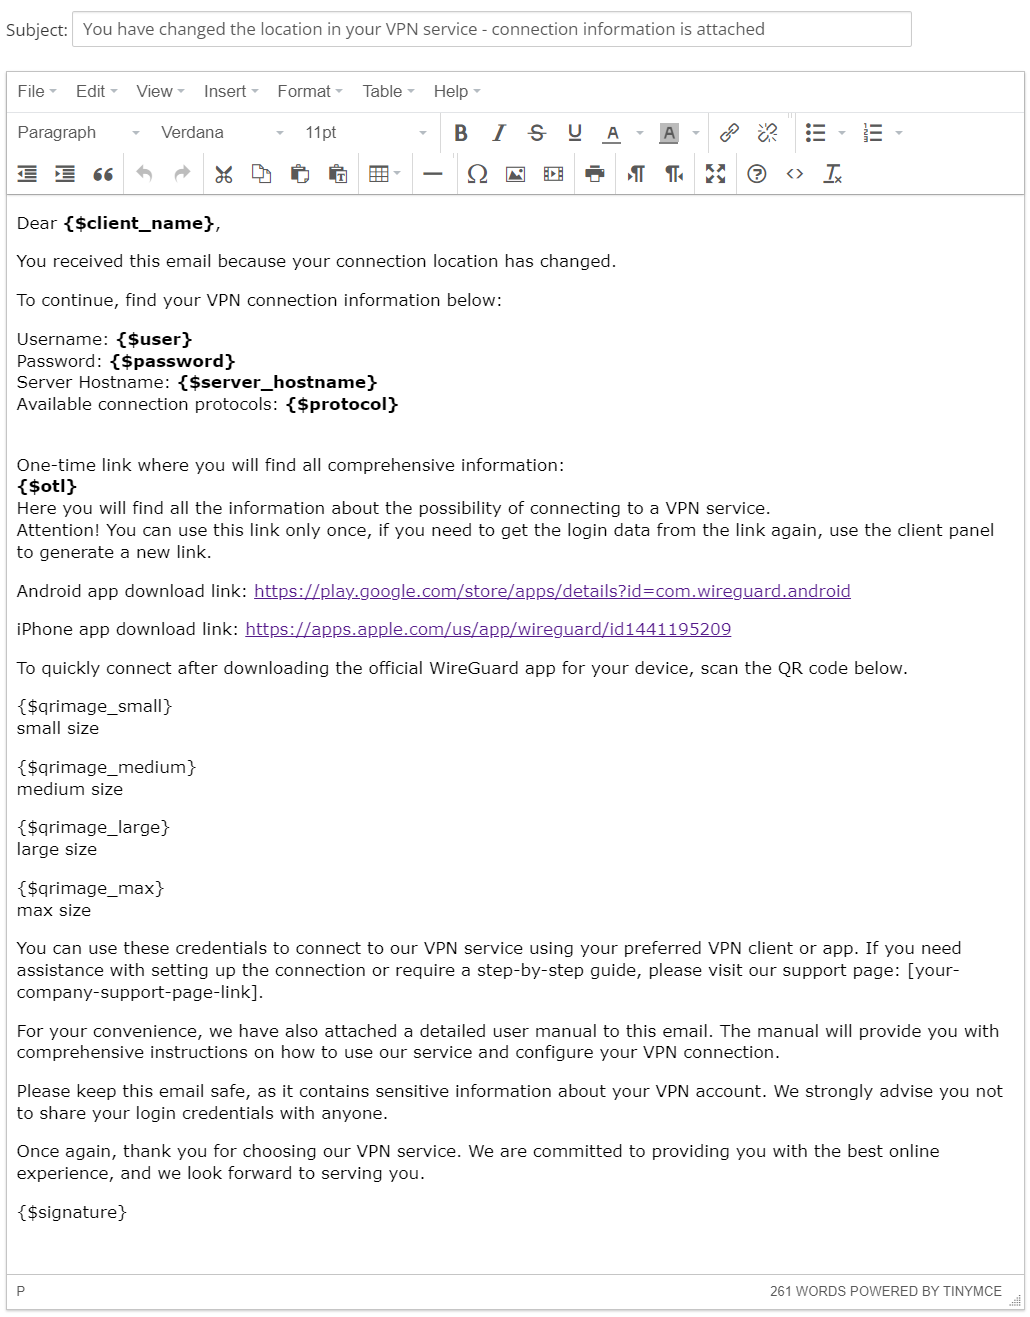
Important Information About Generating a Unique Open Link for QR Code Delivery in an Email Template
WireGuard VPN module WHMCS
Order now | Download | FAQ
Introduction
This process allows for the generation of unique open links for QR codes that can be incorporated into email templates in WHMCS. This is convenient for ensuring secure access to your user's configuration data.
Security Mechanism
The security mechanism built into this process has multiple layers of protection that ensure the safety of the data. Details about the implementation of the protection are not disclosed to maintain maximum security.
Activity Notifications
If there are attempts to unauthorized access to the QR code, the administrator will receive corresponding notifications in the WHMCS activity log. This ensures full control and visibility of any attempts to access the QR code.
Important: It's essential to react to these notifications in the activity log and take appropriate security measures.
Notification Levels
-
High level of danger: Notifications in the form of "Someone is trying to get a QR code, but the verification words are wrong. [additional data follows]". This indicates an attempt to access the QR code using incorrect verification parameters.
-
Low level of danger: Notifications in the form of "It looks like someone is trying to get a QR code. [additional data follows]". This indicates an attempt to access, but without any attempt to use verification parameters.
Reacting to Notifications
It's necessary to take appropriate security measures when receiving high-level danger notifications. Upon receiving low-level danger notifications, pay attention, but it's not critical. In any case, you will always be aware of attempts to access the QR code, and you will have the IP address of the device making such requests.
Conclusion
Using this mechanism ensures the safety and control of access to a user's configuration data via QR code.