Product Configuration
Proxmox KVM module WHMCS
Order now | Download | FAQ
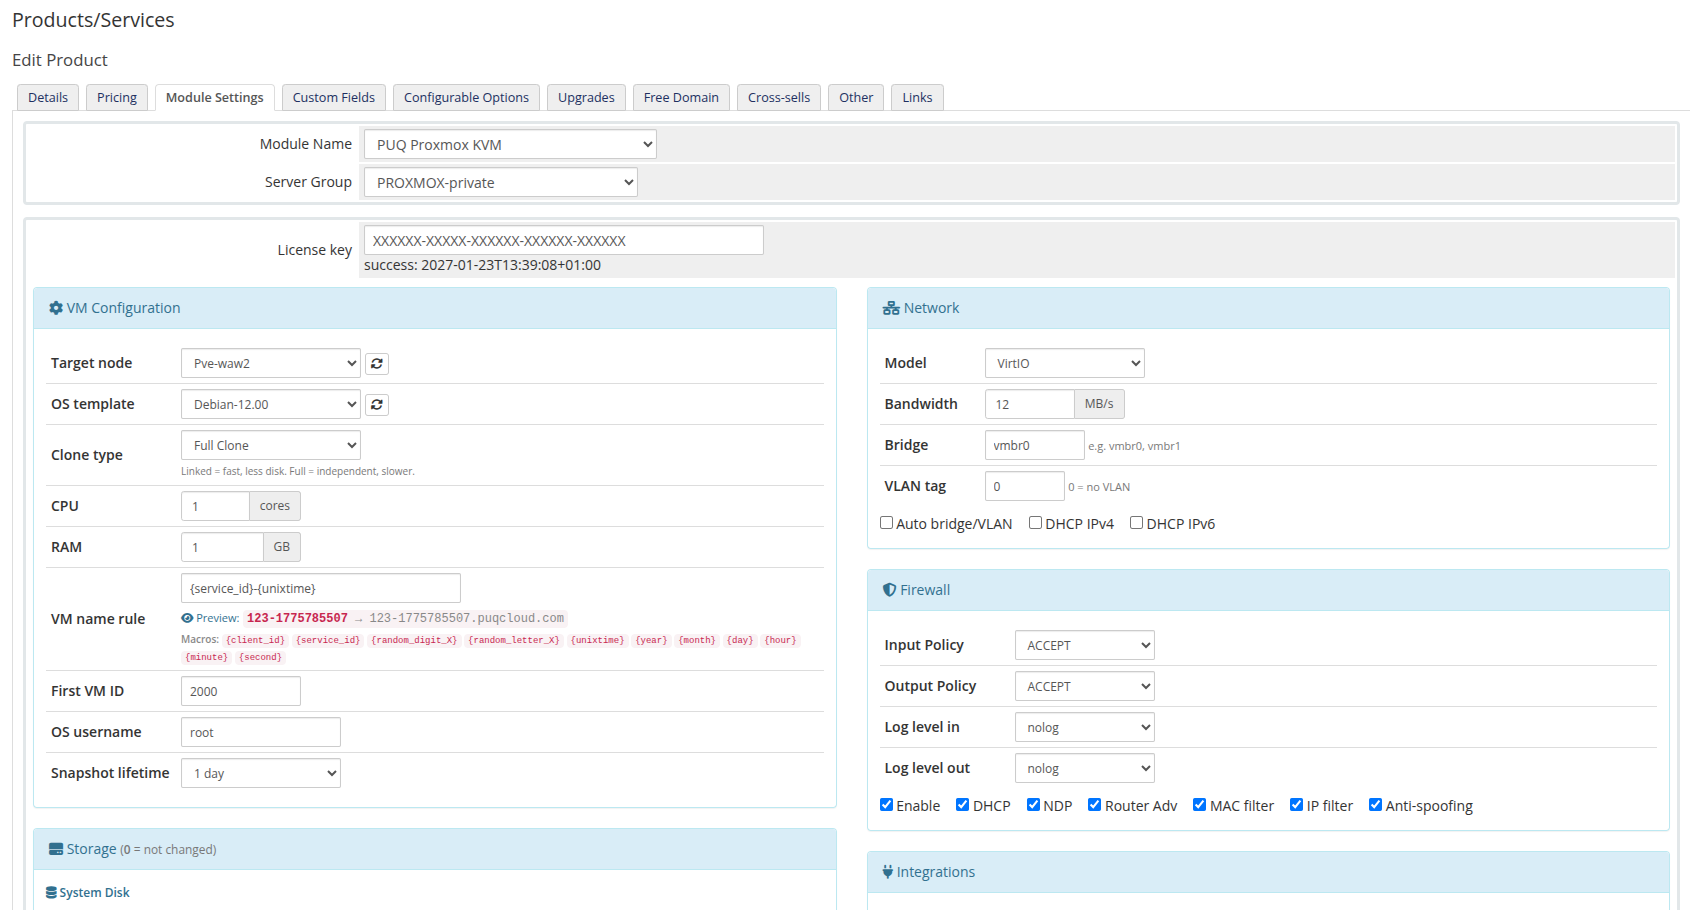
The product configuration page defines all default settings for virtual machines provisioned under a given WHMCS product. These settings are accessible by navigating to Setup > Products/Services > Products/Services, selecting a product, and opening the Module Settings tab with PUQ ProxmoxKVM selected as the module.
The module injects a custom settings panel directly below the standard WHMCS module options. All settings are organized into collapsible sections arranged in a two-column layout.
Changed in v3.0. The product configuration page has been fully rewritten as a custom Bootstrap panel injected into the Module Settings tab. In v1.x–v2.x the same options were stored in the stock WHMCS
configoption1..Nfields and displayed as plain textareas — all existing values are preserved during upgrade and migrated to the new panel automatically. The Firewall section and the Anti-spoofing checkbox, which previously lived inside the Network block, are now a dedicated collapsible section of their own.
License Key
The first field in the standard WHMCS module settings area is the License key. Enter your PUQ ProxmoxKVM license key here. The module validates the license on each page load and displays a verification badge next to the field.
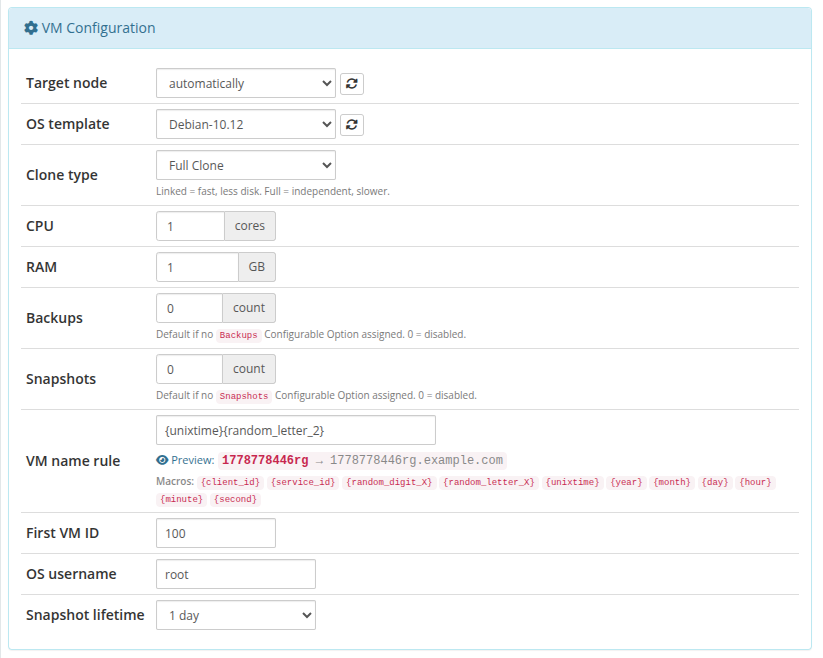
VM Configuration
This section controls the core virtual machine parameters applied during provisioning.
| Setting | Description | Default |
|---|---|---|
| Target node | Proxmox node where VMs will be created. Select a specific node from the dropdown or leave as automatically to let the module choose the node with the most available resources. The dropdown is populated via AJAX from the connected Proxmox server; click the refresh button to reload the list. | automatically |
| OS template | The default operating system template used for cloning new VMs. Templates are loaded from Proxmox via AJAX. Click the refresh button to reload available templates. | (none) |
| Clone type | Determines how the VM is cloned from the template. Linked Clone is faster and uses less disk space by sharing the base disk with the template. Full Clone creates a completely independent copy but is slower and uses more storage. | Linked Clone |
| CPU | Number of virtual CPU cores assigned to the VM. | 1 |
| RAM | Amount of memory in gigabytes assigned to the VM. | 1 |
| Backups (new in v3.3) | Default maximum number of backups for the service. Overridden by the Backups Configurable Option when assigned. 0 = backups disabled. |
0 |
| Snapshots (new in v3.3) | Default maximum number of snapshots for the service. Overridden by the Snapshots Configurable Option when assigned. 0 = snapshots disabled. |
0 |
| VM name rule | A naming pattern for the VM hostname. Supports macros that are expanded at provisioning time. Leave empty to use the default pattern. A live preview is shown below the field. | {client_id}-{service_id} |
| First VM ID | The starting VM ID number. The module assigns VM IDs sequentially from this value, skipping any IDs already in use on the Proxmox cluster. | 100 |
| OS username | The default operating system username set via cloud-init. Leave empty to generate a random username. | (empty = random) |
| Snapshot lifetime | Automatic cleanup period for client-created snapshots. The cron job removes snapshots older than the selected duration. Set to Don't remove to keep snapshots indefinitely. | Don't remove |
VM Name Rule Macros
The following macros can be used in the VM name rule field:
| Macro | Description | Example |
|---|---|---|
{client_id} |
WHMCS client ID | 142 |
{service_id} |
WHMCS service/hosting ID | 387 |
{random_digit_X} |
Random digits (X = count) | {random_digit_4} = 7291 |
{random_letter_X} |
Random lowercase letters (X = count) | {random_letter_3} = kqz |
{unixtime} |
Current Unix timestamp | 1712678400 |
{year} |
Current 4-digit year | 2026 |
{month} |
Current 2-digit month | 04 |
{day} |
Current 2-digit day | 09 |
{hour} |
Current 2-digit hour | 14 |
{minute} |
Current 2-digit minute | 35 |
{second} |
Current 2-digit second | 07 |
Snapshot Lifetime Options
| Value | Duration |
|---|---|
| Don't remove | Snapshots kept indefinitely |
| 1 day | 86,400 seconds |
| 2 days | 172,800 seconds |
| 3 days | 259,200 seconds |
| 4 days | 345,600 seconds |
| 5 days | 432,000 seconds |
| 6 days | 518,400 seconds |
| 7 days | 604,800 seconds |
| 8 days | 691,200 seconds |
| 9 days | 777,600 seconds |
| 10 days | 864,000 seconds |
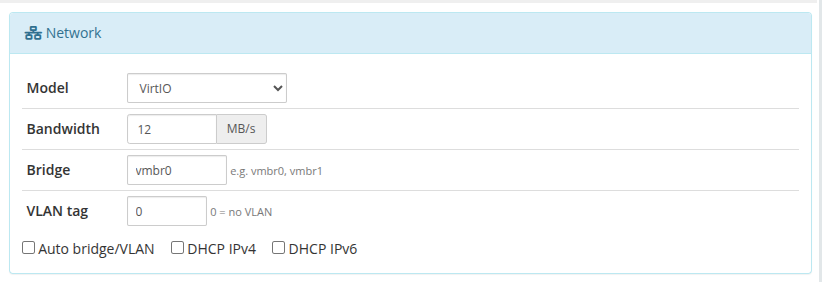
Network
This section configures the virtual network adapter and IP addressing behavior for provisioned VMs.
| Setting | Description | Default |
|---|---|---|
| Model | The virtual network adapter model. As in template preserves the model defined in the Proxmox template. Other options: VirtIO (recommended for Linux), Intel E1000, Realtek RTL8139, VMware vmxnet3. | As in template |
| Bandwidth | Maximum network bandwidth limit in MB/s. Set to 0 for unlimited bandwidth. Overridden by the Network Bandwidth Configurable Option when assigned. |
0 (unlimited) |
| Bridge | The Proxmox network bridge to attach the VM's network adapter to (e.g., vmbr0, vmbr1). |
vmbr0 |
| VLAN tag | VLAN tag for the network adapter. Set to 0 for no VLAN tagging. Valid range: 0-4096. | 0 |
| IPv4 count (new in v3.3) | Default number of IPv4 addresses to allocate from the pool. Overridden by the IPv4 Addresses Configurable Option when assigned. |
1 |
| IPv6 count (new in v3.3) | Default number of IPv6 addresses to allocate from the pool. Overridden by the IPv6 Addresses Configurable Option when assigned. 0 = no IPv6. |
0 |
| Auto bridge/VLAN | When enabled, the bridge and VLAN are automatically determined from the IP Pool configuration in the addon module, overriding the manual Bridge and VLAN settings above. | on |
| DHCP IPv4 | Enable DHCP for IPv4 addressing in cloud-init configuration. | on |
| DHCP IPv6 | Enable DHCP for IPv6 addressing in cloud-init configuration. | on |
Note: When Auto bridge/VLAN is enabled and the addon module's IP Pools are configured, the pool's bridge and VLAN values take precedence over the manually entered Bridge and VLAN fields.
DHCP caveat. When either DHCP IPv4 or DHCP IPv6 is enabled, the module does not know the VM's final IP address at provisioning time. In that case no firewall rules and no anti-spoofing IPSet are applied to the VM's interface (they would be meaningless without a known IP). If you want the firewall feature, either use static IPs with the IP pool, or configure the rules manually after the DHCP lease has been issued.
Firewall
This section defines the default Proxmox firewall configuration applied to each provisioned VM's network interface.
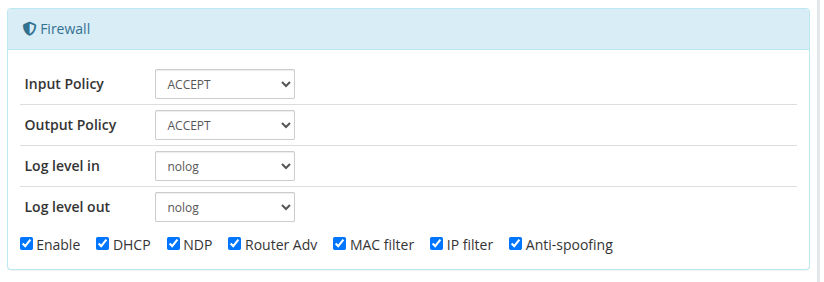
Policy and Logging
| Setting | Description | Default |
|---|---|---|
| Input Policy | Default policy for incoming traffic. Options: ACCEPT, DROP, REJECT. | ACCEPT |
| Output Policy | Default policy for outgoing traffic. Options: ACCEPT, DROP, REJECT. | ACCEPT |
| Log level in | Logging level for incoming traffic. Options: nolog, info, notice, warning. | nolog |
| Log level out | Logging level for outgoing traffic. Options: nolog, info, notice, warning. | nolog |
Firewall Toggles
| Setting | Description | Default |
|---|---|---|
| Enable | Enable the Proxmox firewall on the VM's network interface. | on |
| DHCP | Allow DHCP traffic through the firewall. | on |
| NDP | Allow Neighbor Discovery Protocol (IPv6) traffic. | on |
| Router Adv | Allow Router Advertisement packets. Typically disabled for client VMs. | off |
| MAC filter | Enable MAC address filtering on the network interface. | on |
| IP filter | Enable IP address filtering, restricting traffic to assigned IPs only. | off |
| Anti-spoofing | Enable anti-spoofing rules to prevent the VM from sending traffic with forged source addresses. | on |
Anti-spoofing requires a deny-by-default policy on the cluster. For the anti-spoofing IPSet (
ipfilter-net0) to actually protect against spoofed traffic, the cluster / node firewall policy must be DENY/DENY — the module then only adds permissive rules matching the VM's own IP addresses. Without a DENY baseline, the permissive rules change nothing and the feature has no effect. The filter was renamed from the legacywm-VMIDtoipfilter-net0in v2.3; v3.0 uses the same naming.
Storage
This section configures the system (boot) disk and optional additional (secondary) disk for provisioned VMs. A value of 0 means "not changed" — the template's default is preserved.
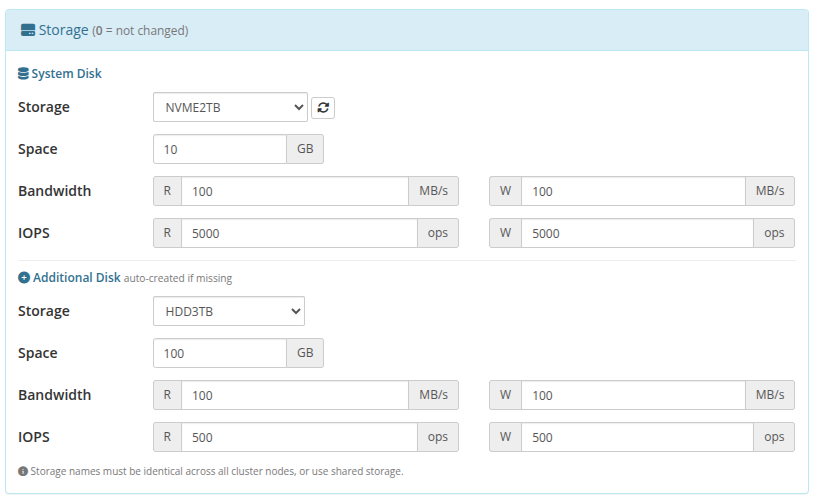
System Disk
| Setting | Description | Default |
|---|---|---|
| Storage | Proxmox storage pool for the system disk. Select a specific storage or leave as auto (from template) to use the same storage as the template. The dropdown is populated via AJAX from the connected Proxmox server. | auto (from template) |
| Space | System disk size in GB. Set to 0 to keep the template's disk size. | 0 |
| Bandwidth Read | Maximum read throughput in MB/s. Set to 0 for unlimited. | 0 |
| Bandwidth Write | Maximum write throughput in MB/s. Set to 0 for unlimited. | 0 |
| IOPS Read | Maximum read I/O operations per second. Set to 0 for unlimited. | 0 |
| IOPS Write | Maximum write I/O operations per second. Set to 0 for unlimited. | 0 |
Additional Disk
The additional disk is automatically created during provisioning if the space is set to a value greater than 0.
| Setting | Description | Default |
|---|---|---|
| Storage | Proxmox storage pool for the additional disk. Leave as same as system disk to use the system disk's storage. | same as system disk |
| Space | Additional disk size in GB. Set to 0 to skip additional disk creation. | 0 |
| Bandwidth Read | Maximum read throughput in MB/s. Set to 0 for unlimited. | 0 |
| Bandwidth Write | Maximum write throughput in MB/s. Set to 0 for unlimited. | 0 |
| IOPS Read | Maximum read I/O operations per second. Set to 0 for unlimited. | 0 |
| IOPS Write | Maximum write I/O operations per second. Set to 0 for unlimited. | 0 |
Important: Storage names must be identical across all cluster nodes, or use shared storage. If the VM may be migrated between nodes, ensure the target storage exists on all nodes.
Integrations
This section configures external integrations: backup/ISO storage locations, noVNC console proxy, domain naming, reverse DNS ticket creation, and email notification templates.
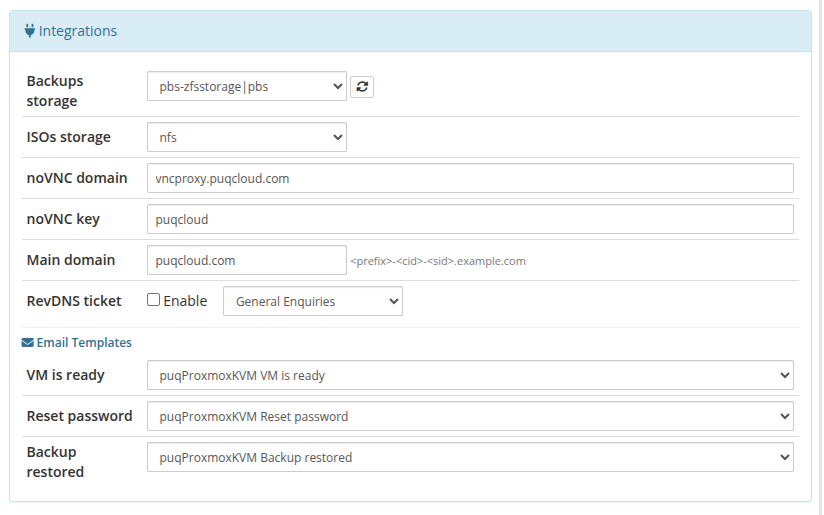
Storage and Console
| Setting | Description | Default |
|---|---|---|
| Backups storage | Proxmox storage pool for VM backups. The dropdown lists all storages with backup content type. The value includes the storage name and plugin type (e.g., local|dir). |
(none) |
| ISOs storage | Proxmox storage pool where ISO images are stored for client ISO mount functionality. | (none) |
| noVNC domain | Domain name of the noVNC proxy server used for browser-based console access. | vncproxy.puqcloud.com |
| noVNC key | Authentication key for the noVNC proxy server. | puqcloud |
Domain and DNS
| Setting | Description | Default |
|---|---|---|
| Main domain | The base domain suffix used for VM hostname generation. The full hostname is constructed as <prefix>-<client_id>-<service_id><main_domain>. |
.example.com |
| RevDNS ticket | When enabled, a support ticket is automatically created when a client requests a reverse DNS change (if no DNS zone automation is configured). Select the support department for these tickets from the dropdown. | on |
Email Templates
These dropdowns list all WHMCS product-type email templates. Select the template to be sent for each event, or choose None to disable the notification.
| Setting | Description | Default Template |
|---|---|---|
| VM is ready | Sent when VM provisioning completes successfully. Contains VM credentials and connection details. | puqProxmoxKVM VM is ready |
| Reset password | Sent when a client resets the VM's OS password. Contains the new credentials. | puqProxmoxKVM Reset password |
| Backup restored | Sent when a backup restore operation completes. | puqProxmoxKVM Backup restored |
Client Area Permissions
This section controls which features are visible and accessible to clients in their service management area. Each toggle enables or disables a specific client area function.

| Permission | Description | Default |
|---|---|---|
| Start | Allow clients to power on their VM. | on |
| Stop | Allow clients to power off their VM. | on |
| noVNC | Allow clients to open a browser-based console session. | on |
| Charts | Allow clients to view CPU, RAM, disk, and network performance charts. | on |
| Reinstall | Allow clients to reinstall the VM's operating system (destructive). | on |
| Reset password | Allow clients to reset the VM's OS password via cloud-init. | on |
| RevDNS | Allow clients to configure reverse DNS records for their IP addresses. | on |
| ISO mount | Allow clients to mount and unmount ISO images on their VM. | on |
| Firewall | Allow clients to manage their VM's Proxmox firewall rules. | on |
Metric Billing
The module includes a built-in WHMCS Usage Billing (Metric) Provider that reports monthly bandwidth consumption per service. This integrates with WHMCS's standard metric billing system.

Available Metrics
| Metric | Description | Unit | Period |
|---|---|---|---|
| Bandwidth Usage In | Total inbound network traffic | GB | Monthly |
| Bandwidth Usage Out | Total outbound network traffic | GB | Monthly |
To enable metric billing:
The module's cron job collects bandwidth statistics from Proxmox and stores them in the puqProxmoxKVM_statistics table. The metric provider aggregates this data for WHMCS's billing calculations.